sport mode AUDI Q3 2020 Owners Manual
[x] Cancel search | Manufacturer: AUDI, Model Year: 2020, Model line: Q3, Model: AUDI Q3 2020Pages: 278, PDF Size: 72.66 MB
Page 69 of 278

83A012721BB
Sitting correctly and safely
the rear seats. If special circumstances re-
quire the use of a child safety seat on the
front passenger's seat, always make sure
that PASSENGER AIR BAG OFF 3; re-
mains on while driving. If
PASSENGER AIR BAG OFF #¥; does not
turn on, remove the child safety seat and in-
stall it again according to the child safety
seat manufacturer instructions. If
PASSENGER AIR BAG OFF &%; still does
not turn on, the front passenger's seat must
not be used. Drive to an authorized Audi
dealer or authorized Audi Service Facility
and have the airbag system inspected.
— Fluids, electronic devices, or mechanical
damage on the front passenger's seat may
cause the front passenger seat occupant de-
tection to malfunction. The system may
then incorrectly detect if the front passeng-
er's seat is occupied. As a result, it could de-
ploy the front passenger’s airbag incorrectly
or fail to deploy it, which increases the risk
of serious or fatal injury. Make sure that no
wet objects (such as a wet hand towel) and
no fluids come into contact with the front
passenger's seat cushion. If the front pas-
senger's seat becomes wet, dry it immedi-
ately. Make sure no electronic devices (such
as a laptop or a retrofitted seat heater) are
on the front passenger's seat. Do not trans-
port any objects on or under the front pas-
senger's seat.
— Seat covers or protective covers may prevent
the advanced airbag system from correctly
detecting child safety seats or passengers in
the front passenger's seat. You must not use
seat covers or protective covers on the front
passenger's seat that are not specifically ap-
proved for use on Audi seats with an ad-
vanced airbag system.
manufacturer instructions for the child safety
seat.
You can also obtain useful and current informa-
tion from the following sources:
U.S. National Highway Traffic Safety Adminis-
tration
http://www.nhtsa.gov
http://www.safercar.gov
National SAFE KIDS Campaign
http://www.safekids.org
SafetyBeltSafe U.S.A.
http://www.carseat.org
Transport Canada Information Centre
http://www.tc.gc.ca/roadsafety
Audi Customer Experience Center
https://www.audiusa.com/help/contact-us
https://www.audi.ca/ca/web/en/models/layer/
contact.html
Child safety seats
General information
When installing and using child safety seats, fol-
low the information in this Owner's Manual, the
applicable state and federal regulations, and the
ZA\ WARNING
To reduce the risk of serious or fatal injuries,
children must always be secured in the vehicle
with a child safety seat that is appropriate for
their body size, weight, and age.
— Children ages 12 and under must be trans-
ported using the appropriate child safety
seat. Note differences in regulations be-
tween states and countries.
— Child safety seats secured incorrectly in the
vehicle may cause serious or fatal injuries in
the event of an accident. Always secure the
child safety seat according to the manufac-
turer instructions.
— Children or babies must not under any cir-
cumstances be held on the lap of the driver
or other passengers while driving.
— Do not secure more than one child in a child
safety seat.
— Never allow a child to sit in a child safety
seat unsupervised.
— Never allow children to ride unsecured in the
vehicle or to stand or kneel on the seats
while driving. In the event of an accident, a
child could be propelled through the vehicle.
67
Page 87 of 278

83A012721BB
Driving
several seconds. At that time, you can start driv-
ing without the vehicle rolling backward.
Requirement: the driver's door must be closed,
the engine must be on, and the vehicle must be
traveling uphill.
> To activate hill hold assist, press and hold the
brake pedal for several seconds while the vehi-
cle is stationary.
ZA WARNING
— If you do not begin driving immediately af-
ter releasing the brake pedal, your vehicle
may begin to roll backward. Press the brake
pedal
or set the parking brake immediately.
— The hill hold assist cannot hold the vehicle
on inclines in every scenario (for example,
on slippery or icy ground).
Messages
B Hill hold assist: unavailable
The hill hold assist is temporarily unavailable.
Press the brake pedal to secure the vehicle from
rolling away unintentionally.
Take over!
The vehicle cannot be held in place automatically.
If necessary, press the brake pedal to secure the
vehicle so that it does not roll, or press the accel-
erator pedal to begin driving.
Gears and driving programs
RAZ-0405,
SEeEer
. D/S
a
Fig. 80 Center console: selector lever
The automatic transmission shifts automatically
depending on the selected gear and the current
driving style. When driving with a moderate driv-
ing style, upshifting early and downshifting late
will help to improve fuel economy. When driving
with a sporty driving style, the transmission per-
mits higher RPMs.
The gears are displayed next to the selector lever.
— P (Park)
— R (Reverse)
—N (Neutral)
— D (Drive)
Selecting a gear
Requirement: the ignition must be switched on.
— Bring the vehicle to a full stop and press the
brake pedal.
— Press the release button (4) on the selector lev-
er.
—To select a gear, move the selector lever into
the corresponding position.
— The label next to the selector lever for the se-
lected gear will light up.
“N” (Neutral) gear
In the “N” gear, power is not transmitted to the
driving wheels. Use the “N” gear in a car wash
(with conveyor belts), for example.
If you unintentionally select “N” while driving
(faster than 1 mph (2 km/h)), you can also shift
back to “D” without pressing the brake pedal.
For safety reasons, the vehicle cannot be locked
when the transmission is in the "N” gear.
“Pp” (Park) gear
The vehicle is secured from rolling away by the
parking lock when in the “P” gear.
If you cannot shift out of “P”, for example be-
cause the vehicle has no power, you may need to
use the emergency release for the parking lock
=> page 87.
Selecting a driving program
Various driving programs can be selected when in
the “D” gear. The programs influence when the
transmission shifts and how the accelerator ped-
al responds.
8s
>
Page 88 of 278

Driving
The selected driving program is displayed in the
instrument cluster.
—D (Drive): normal driving mode
—S (Sport): sporty driving mode
If you select the Dynamic mode in Audi drive se-
lect*, the “S” driving program will be activated.
When the ignition is switched off, the driving pro-
gram may be reset to “D”.
To switch between the current driving program
and “S”, push the selector lever toward the rear.
Z\ WARNING
— Before starting to drive, check if the desired
gear is displayed next to the selector lever.
— Always secure your vehicle from rolling
away. Press the brake pedal or shift to “P”.
When leaving the vehicle, also set the park-
ing brake.
— Power is still transmitted to the wheels
when the engine is running at idle. To pre-
vent the vehicle from “creeping”, you must
keep your foot on the brake in all selector
lever positions (except "P" and "N") when
the engine is running.
—To reduce the risk of an accident, do not
press the accelerator pedal when changing
gears if the vehicle is stationary and the en-
gine is running.
— Never select the “R" or "P” gears while driv-
ing. Doing so could cause an accident.
— The vehicle can roll even if the ignition is
switched off.
@ Tips
If you shift between “D” and “R” within one
second, you do not need to press the brake
pedal. This makes it possible to “rock” if it is
stuck, for example.
86
Manual shifting
RAZ-0406
Fig. 81 Center console: shifting manually with the selector
lever
RAZ-0003
—
Fig. 82 Steering wheel: shift paddles*
You can shift the gears manually when in “D”
mode. The transmission must be in tiptronic
mode.
Shifting with the selector lever
You can shift into manual shifting mode while the
vehicle is stationary or while driving.
> To switch to manual shifting mode, tilt the se-
lector lever toward the front passenger's side
> fig. 81. “M” will be displayed in the instru-
ment cluster.
> Upshifting: push the selector lever forward (@).
> Downshifting: push the selector lever toward
the rear ©).
> To switch back to automatic mode, tilt the se-
lector lever toward the driver's side.
Shifting with the shift paddles
Applies to: vehicles with shift paddles
> Upshifting: press the @) shift paddle > fig. 82.
> Downshifting: press the ©) shift paddle.
> To switch back to automatic mode, press and
hold the () shift paddle or push the selector
lever toward the rear.
Page 99 of 278

83A012721BB
Driving dynamic
Driving dynamic
Audi drive select
Introduction
Applies to: vehicles with Audi drive select
Drive select makes it possible to experience dif-
ferent types of vehicle characteristics in one vehi-
cle. With different driving modes, the driver can
switch the setting, for example from sporty to
comfortable. This allows you to adjust the set-
tings to your personal preferences. This makes it
possible to combine settings such as a sporty
drivetrain setting with comfortable steering.
Selecting an Audi drive select mode
Applies to: vehicles with Audi drive select
The ssise button is located above the selector lever
in the center console.
> Press the sis@ button repeatedly until the de-
sired mode appears in the instrument cluster or
center display, or:
> Select on the home screen: VEHICLE > Audi
drive select.
You can change the driving mode when the vehi-
cle is stationary or while driving. If traffic per-
mits, briefly remove your foot from the accelera-
tor pedal after changing modes so that the mode
you have selected will be activated for the drive
system.
The following modes are available depending on
the equipment:
offroad - Provides assistance when driving off-
road. The vehicle will exit this mode after the ig-
nition is switched off.
comfort - Provides a comfort-oriented vehicle
setup and is suited for long drives on highways.
auto - Provides an overall comfortable yet dy-
namic driving feel and is suited for everyday use.
dynamic - Gives the driver a sporty driving feel
and is suited to a sporty driving style. The “S”
driving program is selected on vehicles with an
automatic transmission
individual - Provides the option for personalized
vehicle settings. Press % to configure the mode
= page 97, Individual settings.
G) Tips
When the ignition is being switched on, indi-
vidual systems, such as the drive system, will
be reset to a balanced setting. Select the cur-
rent mode again to attain its full configura-
tion.
Individual settings
Applies to: vehicles with Audi drive select
The equipment in your vehicle will determine
which settings you can adjust.
Drive
The drive system will react to accelerator pedal
moves more quickly or in a more balanced man-
ner. The shift points are located in higher or low-
er engine speed ranges on vehicles with automat-
ic transmissions.
Depending on the equipment, certain driver as-
sistance systems can also become more sporty or
efficient.
Steering
The power steering will adapt. Light steering is
suitable for long trips on highways or smooth
driving around curves, for example.
Suspension
The suspension adjusts to be tighter or more
comfort-oriented when it comes to compensat-
ing for uneven spots on the road.
Engine sound
The engine sound adapts and can be subtle to
sporty.
Suspension
Adaptive dampers
Applies to: vehicles with suspension control
The adaptive dampers are an electronically-con-
trolled damping system. The firmness of the sus-
pension will adapt to the driving conditions and >
97
Page 104 of 278

Trailer towing
Trailer towing
Driving with a trailer
ere eleurl lela)
Your vehicle is primarily intended for transport-
ing people and luggage. However, if you drive
with a trailer, follow the technical requirements,
the operation and driving tips, and the legal reg-
ulations.
Driving with a trailer affects the vehicle's energy
usage, performance, and wear. It also requires
higher concentration from the driver.
ZA WARNING
Do not transport any people in a trailer due to
the risk of fatal injury.
Technical requirements
Trailer hitch
Only use a trailer hitch with a removable ball
hitch mount and ball hitch. The trailer hitch must
be permitted for the vehicle, the trailer and the
permitted total weight of the trailer being
pulled. Above all, it must be securely and safely
attached to the vehicle trailer.
Never mount a trailer hitch on the bumper. The
trailer hitch must be mounted in a way that does
not impair the function of the bumper. Do not
make any changes to the exhaust system and the
brake system.
Check regularly if the trailer hitch is securely
mounted. Always follow the instructions given by
the trailer hitch manufacturer.
Trailer brakes
If the trailer has its own brake system, then fol-
low the manufacturer specifications. However,
the brake system on the trailer must never be
connected to the vehicle brake system.
Engine cooling system
Driving with a trailer means a higher load on the
engine and the cooling system. The cooling sys-
tem must be designed for additional load and
contain enough coolant >@®.
102
Z\ WARNING
— Never mount a "weight-distributing" or
"load-balancing" trailer coupler as the trailer
hitch. The vehicle was not designed for
these types of trailer hitches. The trailer
hitch can malfunction and the trailer can
break off from the vehicle.
— If the trailer is equipped with electronic
brakes, these brakes cannot be activated by
a factory-installed control system, which in-
creases the risk of an accident.
—To reduce the risk of injury, always remove
the ball hitch mount if no trailer is mount-
ed
@) Note
Longer inclines cannot be driven without a
suitable cooling system, especially if the out-
side temperatures are high. Otherwise, this
increases the risk of engine damage.
ey Teale met ada)
Towing capacity
Never exceed the maximum permitted weights
=> page 262.
In some scenarios, the load in trailer mode can
be reduced due to the permitted towing weight.
You can drive up larger inclines if you are not us-
ing the maximum towing capacity.
The specified towing weights only apply at eleva-
tions up to 3,200 ft (1,000 m) above sea level. As
the elevation increases, the motor power de-
creases due to the decreasing air pressure. This
reduces the hill climbing ability and towing ca-
pacity. For every additional 3,200 ft (1,000 m),
the maximum permitted towing weight must be
reduced by approximately 10%. The permitted
towing weight is the combined weight of the
(loaded) vehicle and the (loaded) trailer.
Tongue weight
The maximum permitted tongue weight of the
trailer drawbar on the trailer hitch ball head must
not be exceeded.
Page 119 of 278

83A012721BB
Driver assistance
Meaning
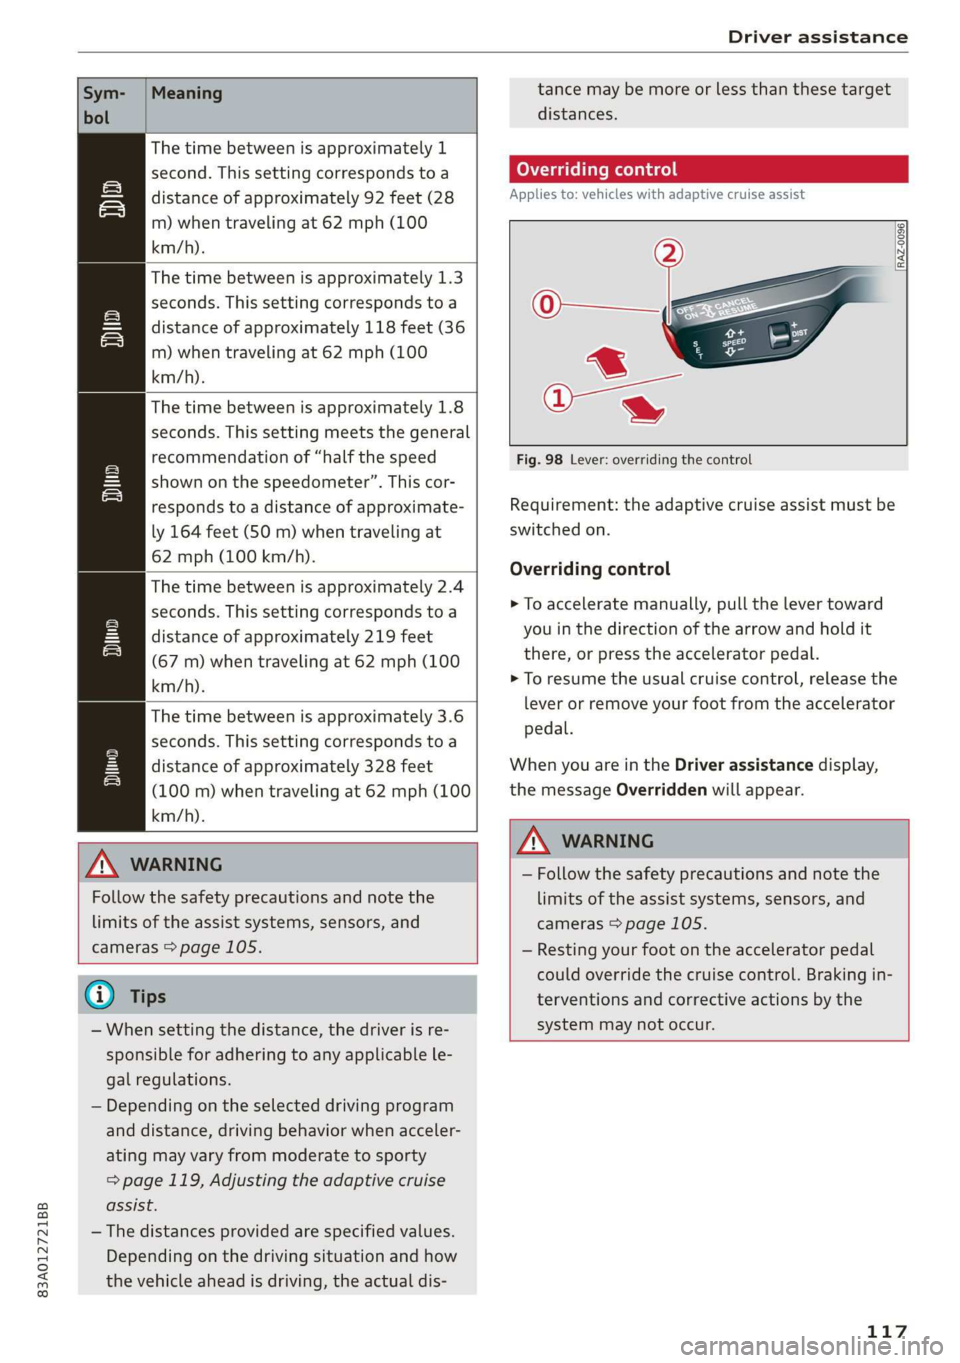
The time between is approximately 1
second. This setting corresponds toa
distance of approximately 92 feet (28
m) when traveling at 62 mph (100
km/h).
The time between is approximately 1.3
seconds. This setting corresponds toa
distance of approximately 118 feet (36
m) when traveling at 62 mph (100
km/h).
My
The time between is approximately 1.8
seconds. This setting meets the general
recommendation of “half the speed
shown on the speedometer”. This cor-
responds to a distance of approximate-
ly 164 feet (SO m) when traveling at
62 mph (100 km/h).
The time between is approximately 2.4
seconds. This setting corresponds toa
distance of approximately 219 feet
(67 m) when traveling at 62 mph (100
km/h).
i)
1)
The time between is approximately 3.6
seconds. This setting corresponds toa
distance of approximately 328 feet
(100 m) when traveling at 62 mph (100
km/h).
D
ZA WARNING
Follow the safety precautions and note the
limits of the assist systems, sensors, and
cameras > page 105.
G@) Tips
— When setting the distance, the driver is re-
sponsible for adhering to any applicable le-
gal regulations.
— Depending on the selected driving program
and distance, driving behavior when acceler-
ating may vary from moderate to sporty
= page 119, Adjusting the adaptive cruise
assist.
— The distances provided are specified values.
Depending on the driving situation and how
the vehicle ahead is driving, the actual dis-
tance may be more or less than these target
distances.
Overriding control
Applies to: vehicles with adaptive cruise assist
[RAZ-0096|
Fig. 98 Lever: overriding the control
Requirement: the adaptive cruise assist must be
switched on.
Overriding control
> To accelerate manually, pull the lever toward
you in the direction of the arrow and hold it
there, or press the accelerator pedal.
> To resume the usual cruise control, release the
lever
or remove your foot from the accelerator
pedal.
When you are in the Driver assistance display,
the message Overridden will appear.
ZA WARNING
— Follow the safety precautions and note the
limits of the assist systems, sensors, and
cameras > page 105.
— Resting your foot on the accelerator pedal
could override the cruise control. Braking in-
terventions and corrective actions by the
system may not occur.
117
Page 121 of 278

83A012721BB
Driver assistance
ZA\ WARNING
Follow the safety precautions and note the
limits of the assist systems, sensors, and
cameras > page 105.
Adjusting the adaptive cruise assist
Applies to: vehicles with adaptive cruise assist
You can adjust the adaptive cruise assist to your
own preferences. The settings depend on the ve-
hicle equipment.
> Applies to: MMI: Select on the home screen:
VEHICLE > Driver assistance > Adaptive cruise
assist.
Possible settings:
Applies to: vehicles without Audi drive select
Driving program - Depending on the selected
driving program and distance, the vehicle han-
dling will be adjusted from Sport to Moderate.
Applies to: vehicles with Audi drive select
Vehicle handling will be adjusted based on the
set distance and the selected Audi drive select
mode > page 97.
Store last distance - The last distance that was
set will be stored after the ignition is switched
off. If the distance is not stored, distance
(time distance of approximately 1.8 seconds) is
automatically preset every time the ignition is
switched on.
Messages
Applies to: vehicles with adaptive cruise assist
If or sq is displayed when there is a malfunc-
tion, the adaptive cruise assist functions may be
unavailable or limited.
A message that indicates the cause and possible
solution may appear with some displays. The
weather conditions may be too poor or a sensor
may be covered. Clean the area in front of the
sensors > page 106, fig. 86 and try to turn on
the systems again later.
If the malfunction remains, drive to an author-
ized Audi dealer or authorized Audi Service Facili-
ty immediately to have the malfunction correct-
ed.
Please take over!
This message appears if the vehicle rolls back
when starting on a slight incline, even though the
systems are active. Press the brake pedal to pre-
vent the vehicle from rolling or starting to move.
The message will also appear, for example, if the
steering power from the system is not sufficient
and adaptive cruise assist is switched off.
Distance warning
Applies to: vehicles with distance warning
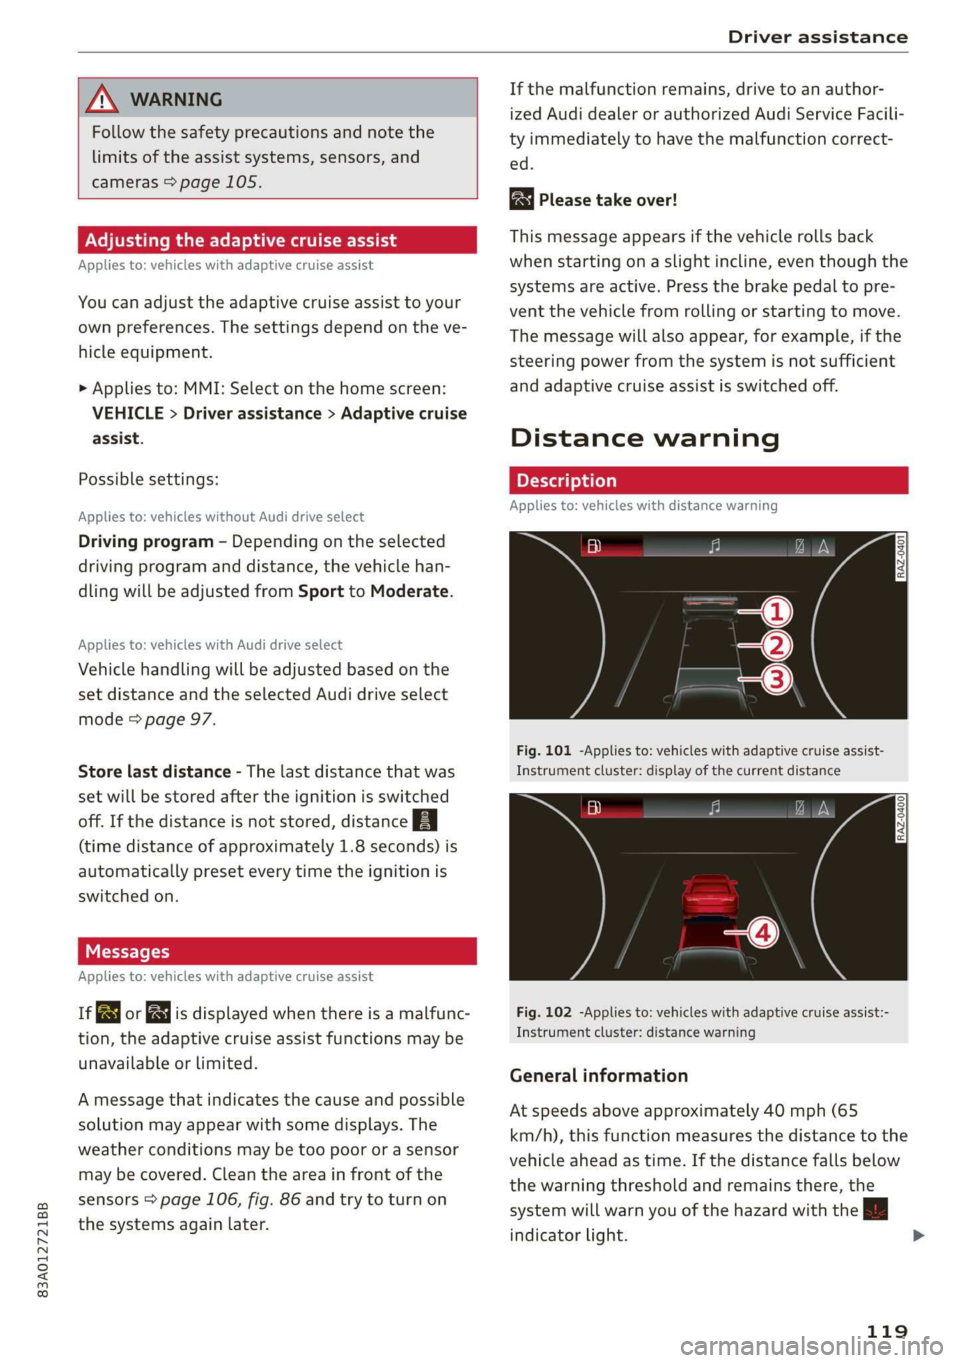
Fig. 101 -Applies to: vehicles with adaptive cruise assist-
Instrument cluster: display of the current distance
[RAZ-0400]
Fig. 102 -Applies to: vehicles with adaptive cruise assist:-
Instrument cluster: distance warning
General information
At speeds above approximately 40 mph (65
km/h), this function measures the distance to the
vehicle ahead as time. If the distance falls below
the warning threshold and remains there, the
system will warn you of the hazard with the |
indicator light.
119
>
Page 126 of 278

Driver assistance
Take-over
If the message Bo Please take over! appears, the
vehicle has been braked to a stop by Audi pre
sense and you must resume control of the vehi-
cle.
ZA WARNING
— Follow the safety precautions and note the
limits of the assist systems, sensors, and
cameras > page 105.
— Audi pre sense front cannot overcome natu-
ral physical laws. It is a system designed to
assist and it cannot prevent a collision in ev-
ery circumstance. The driver must always in-
tervene. The driver is always responsible for
braking at the correct time. Do not let the
increased safety provided tempt you into
taking risks. This could increase your risk of
a collision.
— Among other things, Audi pre sense front
does not react to pedestrians who are sta-
tionary, stopped, oncoming, and crossing at
an angle. It also does not react to cyclists,
groups of people, animals, crossing vehicles,
or oncoming vehicles and objects, such as
posts, guardrails, and railway vehicles.
— Audi pre sense front may be limited or un-
available when driving in curves.
— Loose objects can be thrown around the ve-
hicle interior during sudden driving or brak-
ing maneuvers, which increases the risk of
an accident. Store objects securely while
driving.
— In trailer mode, the braking behavior of the
trailer can be different than usual during au-
tomatic braking.
G) Tips
— If you switch off the ESC, Audi pre sense al-
so switches off automatically.
— Certain Audi pre sense front functions are
unavailable or have limited availability for
approximately 20 seconds after starting the
vehicle (may be longer depending on the
driving situation).
YD In certain countries
124
Adjusting Audi pre sense
Applies to: vehicles with Audi pre sense
You can adjust the Audi pre sense functions to
your preferences. The settings depend on the ve-
hicle equipment.
> Applies to MMI: Select on the home screen: VE-
HICLE > Driver assistance > Audi pre sense.
Possible settings:
The system can be switched off and on.
Prewarning!) - The prewarning can be switched
off or the Audi pre sense warning time can be set
(Early/Medium/Late).
Set the warning time for the early warning to
Early at first. If you feel that the prewarnings ap-
pear too early, then set the warning time to Me-
dium. The Late warning time should only be set
in special circumstances.
G) Tips
— If Audi pre sense is switched off, it switches
on again automatically once the ignition is
switched on again.)
— Switch Audi pre sense off when you are not
using public streets, when loading the vehi-
cle onto a vehicle carrier, train, ship, or oth-
er type of transportation, or when towing
the vehicle. This can help to prevent an un-
desired intervention from the Audi pre
sense system.
Messages
Applies to: vehicles with Audi pre sense
a | or fal is displayed when there is a malfunc-
tion, the Audi pre sense functions may be un-
available or may be limited.
A message that indicates the cause and possible
solution may appear with some displays. The
weather conditions may be too poor or a sensor
may be covered. Clean the area in front of the
sensors > page 106, fig. 86 and try to turn on
the systems again later.