charging AUDI Q5 2013 Owners Manual
[x] Cancel search | Manufacturer: AUDI, Model Year: 2013, Model line: Q5, Model: AUDI Q5 2013Pages: 316, PDF Size: 78.89 MB
Page 100 of 316
98 Hybrid -Do not transport fluids in open contain
ers in the luggage compartment. Spilled
fluids can seep underneath the cargo
floor. This can damage the high voltage
system.
Starting the vehicle
App lies to vehicles: with hybrid drive
The vehicle is started and turned off either
with the ignition key~
page 83 or with the
I START ENGIN E STOP ! button* ~ page 86 in
the same way as a conventional vehicle .
When starting the vehicle, the needles in the instrument cluster move upward briefly .
When the vehicle enters drive ready mode,
the status message
hybrid ready appears
briefly in the instrument cluster display and
the needle in the power meter points to
READY ~ page 98.
Depending on the operation mode of the hy
brid system, there are two possible drive
ready modes after the vehicle has been start
ed:
Power meter overview
Applies to vehicles: with hybrid dr ive
Drive ready mode with combustion engine
If the operating requirements~ page 100 for
electric drive mode are
not met, the combus
tion engine starts the vehicle as usual. You can start driving as usual.
Drive ready mode with the electric motor
If the operating requirements~ page 100 for
the electric drive mode are met, the combus
tion engine remains off after starting the ve
hicle.
(0 Tips
To prevent the 12 volt battery from dis
charging, never leave the vehicle parked in
the drive ready mode. Remove the key
from the ignition or press the
I START ENGINE STOP! button* . When
leaving the vehicle always take the key
with you.
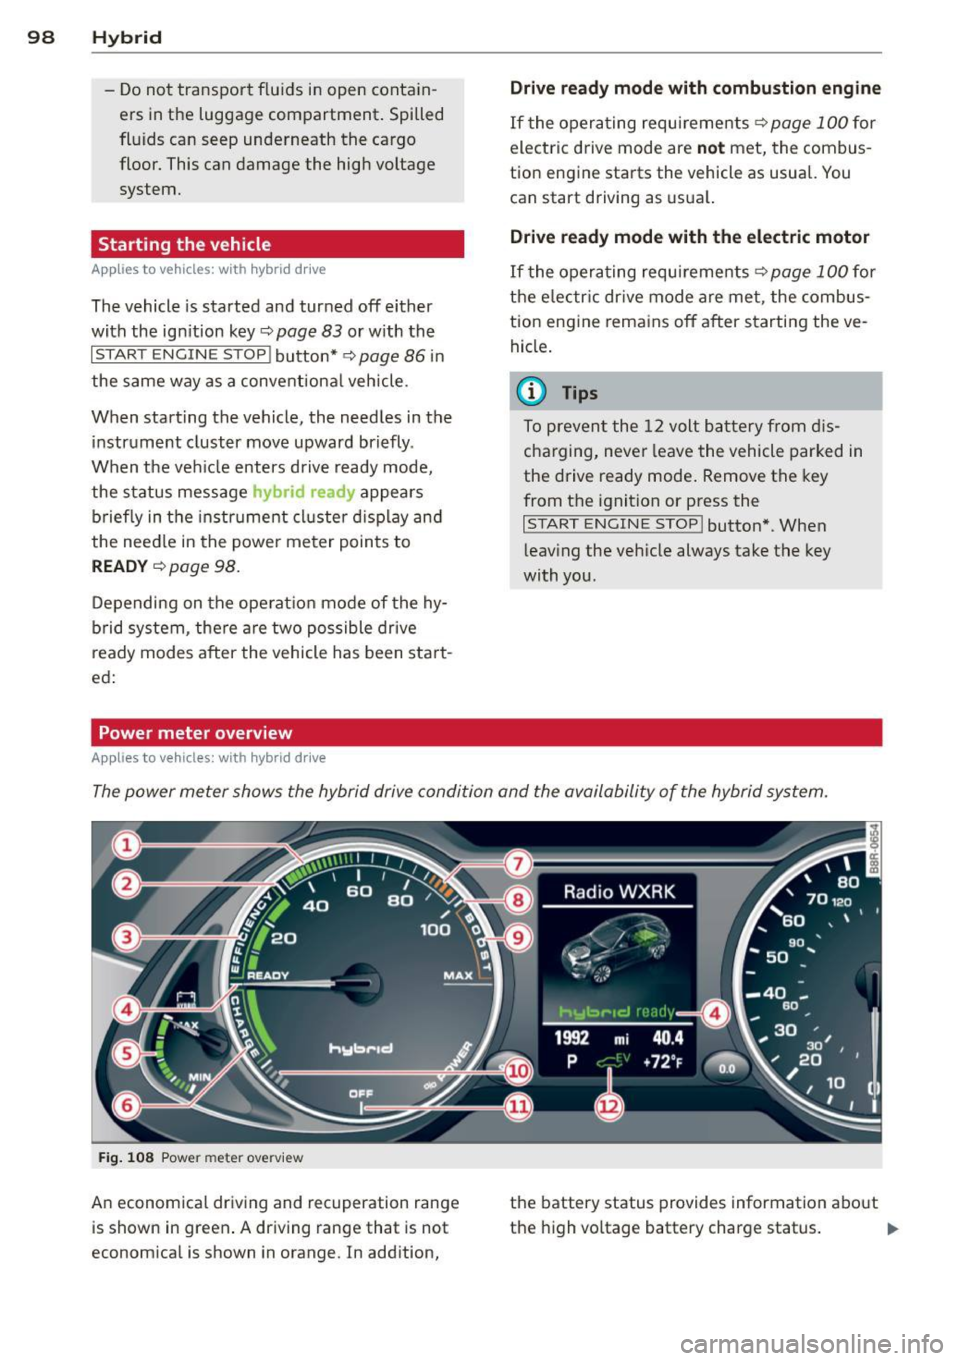
The power meter shows the hybrid drive condition and the availability of the hybrid system.
Fig. 108 Power meter overv iew
An economical driving and recuperation range
is shown in green. A driving range that is not
economical is shown in orange. In addition, the battery status
provides information about
the high voltage battery charge status.
lill-
Page 106 of 316
104 Hybrid
@ High voltage battery green High voltage battery charge level
green (animated High voltage battery is charging
@ Movement arrow in MMI)
gray
green
orange
---.. ,
green-orange
@ Movement arrow g
reen
@ Tips
The Energy flow display will not shown in
the MMI display when the reverse gear is engaged, due to safety reasons .
Consumption display
Applies to vehicles: with hybrid drive
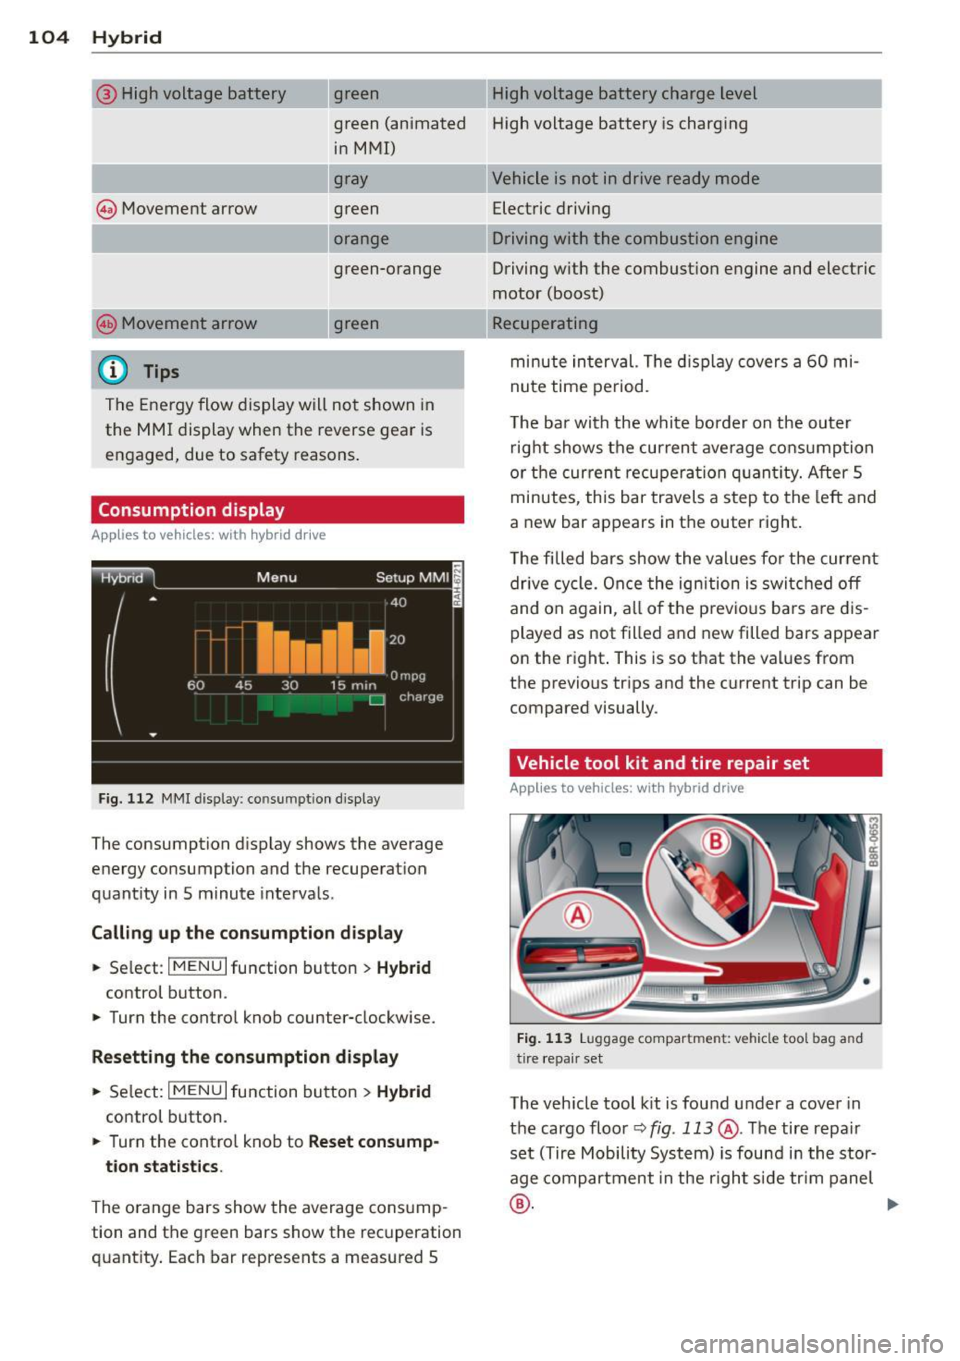
Fig. 1 12 MM! display: consumpt ion disp lay
The consumption display shows the average
energy consumption and the recuperat ion
quantity in S minute interva ls.
Call ing up th e co nsumption displa y
.. Se lect: I MENU I function button > H ybrid
control button .
.. Turn the control knob counter-clockwise.
Res etting the con sumption display
.. Se lect: I MENU I function button> H ybrid
control button.
.. Turn the contro l knob to
Reset consump-
tion stat istics.
The o range bars show the average cons ump
tion and the green bars show the recuperation
quantity . Each bar represents a measured S Vehicle is not in drive ready mode
Electric driving
Driving with the combustion engine
Driving w ith the combust ion engine and electric
motor (boost)
Recuperating
minute interval. The d isplay
covers a 60 mi
nute time period.
The bar with the white border on the outer right shows the current ave rage consumption
or the cur ren t recupera tion quan tity. After 5
minutes, th is bar travels a step to the left and
a new bar appears in the outer right.
T he filled bars show the values fo r the current
drive cycle. Once the ignition is switc hed off
and on again, all o f the p revio us ba rs a re d is
played as not filled and new filled bars appear
on the right . This is so that the values from
the previous tr ips and the current trip can be
compared visually.
Vehicle tool kit and tire repair set
Applies to vehicles: with hybrid drive
Fig. 11 3 Luggage compartment: vehicle tool bag and
tire repair se t
The vehicle tool k it is found under a cove r in
the cargo floo r<=>
fig . 113 @. The tire repair
set (Tire Mobility System) is found in the stor
age compartment in the r ight s ide tr im panel
® · ~
Page 107 of 316
Additional information about the vehicle tool kit may be found under
c::> page 269 and
about the tire repa ir set under
c::> page 2 72 .
(D Tips
The right storage compartment in the lug
gage compartment and its contents must
always be kept in the vehicle. The veh icle
m ust not be operated w ithout the tire re
pa ir set.
Charging the batteries
Applies to vehicles: with hybrid drive
The vehicle is equipped with two 12 volt bat
ter ies and a h igh voltage battery.
If the
12 volt batter ies are dead, they may be
charged with a charger or the vehicle may be
jump started with assistance from another ve
hicle in the same way as a conventional vehi
cle .
The same applies to the high voltage battery
if it is d ischarged . However, in this case, the
charg ing process is accompanied w ith mes
sages in the inst rument cluste r display. The
i gnit ion m ust be switched on and all unneces
sary electric components m ust be turned off.
The connections in the engine compartment
are used for both charging and jump starting
c::> page 245 or c::> page 284.
Vehicle not ready to start. See owner's
manual
This message appears if the high voltage bat
tery charge level is too low. The vehicle can no
l onge r be started with its own power. The
high voltage battery must be charged with a
charger or the vehicle must be jump started
with the aid of another vehicle.
Afte r the connecting the cha rger or jumper ca
b les, the ignition must be turned off for ap
proximately two minutes and then turned on
again. After no more than one m inute, one of
the following indicator lights turns on in the instrument cluster d isp lay. Hybrid 105
II Charging battery. Please wait ...
If
the indicator light turns on and this mes
sage appears, the high voltage battery is
charging or the vehicle is being jump started
with assistance from another vehicle.
If the 12 vo lt batteries are dead, the -
indicator light turns on. The charging proce
dure takes longer in this case because the
12
volt batteries are charged first. The procedure
goes faster with the ignition switched off.
Vehicle ready to start.
This message appears if the charging proce
dure was successfu l. The vehicle may be start
ed again.
Battery could not be charged enough to
start vehicle.
T his message appears if the charging proce
dure was not successful or it was interrupted.
This may happen if the charger or the battery
in the veh icle that is assist ing is too weak.
If
the vehicle cannot be started, see an author
ized repa ir facility for assistance .
(D Tips
- The charger should deliver a current of at
least
30 A. Otherwise charging the high
voltage battery will take considerably longer. A current between
50 A and 70 A
is ideal.
- The ve hicle that is assist ing should be
somewhat within the same vehicle class
when jump starting a vehicle. A smaller
vehicle's battery may be drained.
- After approximately
30 minutes, the
c harging procedure ends because the ig
nition is automatically turned off.
If you
would like to continue to charge the bat
tery, turn the ignition on again.
Page 234 of 316
232 Fuel supply and filling your fuel tank
-Always keep the filler nozzle complete
ly inside the portable container before
and during filling.
- If filling a portable container made of
metal, the filler nozzle must always be
in contact with the container. Th is will
help prevent static electricity from dis
charging and cause a fire .
- Never spill fuel inside the vehicle or
luggage compartment. Fuel vapors are
highly flammable.
-Always observe local and state/provin cial laws regarding the use, storage
and transportation of fuel containers.
- Make certain the fuel container meets
industry standards (ANSI/ ASTM
F 852-86).
(D Note
If any fuel has spilled onto the car, it
should be removed immediately to prevent
damage to the paint .
@ For the sake of the environment
As soon as the correctly operated nozzle sw itches off automatically for the first
time, the tank is full. Do not try to add
more fuel because fuel may spill out. In
addition, the expansion space in the fuel
tank will be filled -causing the fue l to
overflow when it becomes warm and pol
lute the environment.
@ Tips
- Running yo ur engine while refuelling
may cause vapors to escape or even
cause fue l to spill out of the tank . This
would then shut off the fuel nozzle be
fore the tank is full.
- Do not refuel your vehicle with the igni
tion turned on. The fuel gauge may oth
erwise not indicate the correct fuel level
after refuelling.
- The fuel filler flap of your vehicle is not locked when you lock the vehicle from
the inside. Unlocking the fuel filler flap
by hand
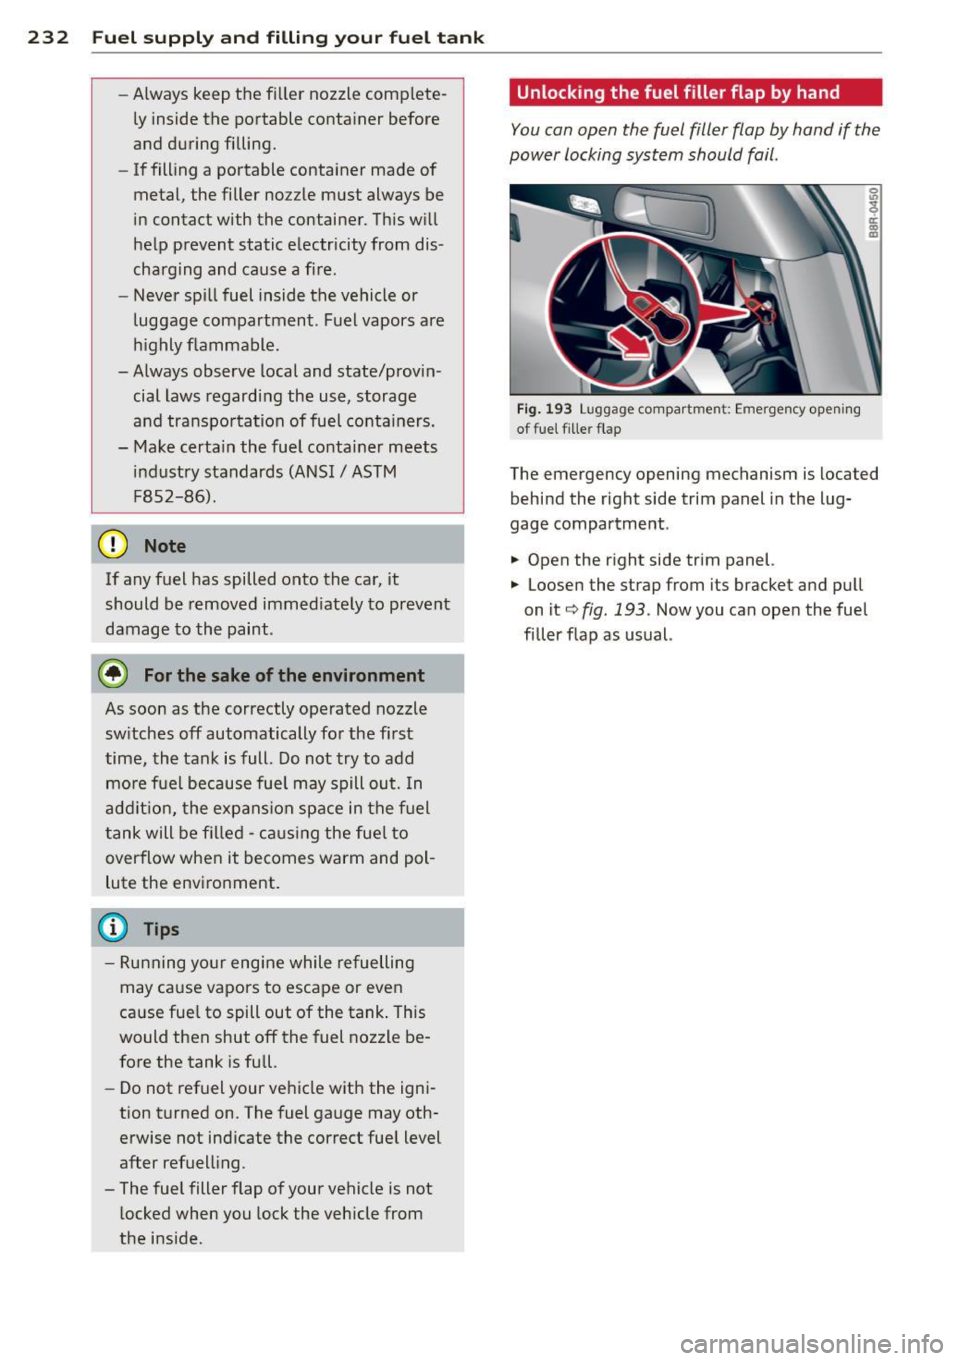
You can open the fuel filler flap by hand if the
power locking system should fail.
Fig. 193 Luggage compartment: Emergency opening
o f fue l fille r flap
0 lD
~ rr co .,
The emergency opening mechanism is located
behind the right side trim panel in the lug
gage compartment .
.... Open the right side trim panel.
.,.. Loosen the strap from its bracket and pull
on it
c;, fig. 193. Now you can open the fuel
filler flap as usual.
Page 247 of 316

-Do not interchange the positive and neg
ative cables .
- When working on the battery , be sure
not to short-circuit the terminals with
tools or other metal objects. This would cause the battery to heat up very quickly,
which could lead to damage or explosion
and personal injury.
- When a battery is charged, it produces
hydrogen gas which is explosive and
could cause personal injury .
- Always keep the battery well out of the
reach of children .
- Before work is done on the electrical sys
tem, disconnect the negative ground ca
ble .
- Before performing any work on the elec
trical system , switch off the engine and
ignition as well as any electrical equip
ment. The negative cable on the battery
must be disconnected. If you are just go
ing to replace a light bulb, then it is
enough to switch off the lights.
- Before disconnecting the battery , switch
off the anti-theft alarm system! Other
wise you will set off the alarm.
- When disconnecting the battery, first
disconnect the negative cable and then
the positive cable.
- Before reconnecting the battery, make
sure all electrical consumers are switch
ed off. Reconnect the positive cable first
and then the negative cable. Never inter
change the cables - this could start a fire!
- Never charge a fro zen or a thawed-out
battery. It could explode! If a battery has
frozen, then it must be replaced. A dis
charged battery can freeze over at 32°F
(OOC) .
-Make sure the vent hose is always attach
ed to the opening on the side of the bat
tery.
- Never use batteries which are damaged.
There is the danger of an explosion! Al
ways replace a damaged battery.
Checking and filling 245
A WARNING
California Proposition 65 Warning:
- Battery posts, terminals and related ac cessories contain lead and lead com
pounds, chemicals known to the State of
California to cause cancer and reproduc
tive problems . Wash hands after han
dling.
Q) Note
- Do not disconnect the vehicle battery
when the ignition is switched on or when
the engine is running, otherwise , you will
damage electronic components in the
electrical system.
- If your vehicle is going to stand for a
long period of time without being driven,
protect the battery from "freezing", oth
erwise it will be damaged and will then
have to be replaced.
Battery charging
Starting the engine requires a well charged
battery.
Fig. 201 Engin e compart ment: Co nn ectors for charger
and j umper cab les
Always read and heed all WARNINGS below
¢ .&. and ¢,&. in Working on the battery on
page 244.
~ Hybrid drive*: read the important informa
tion concerning a dead high voltage battery
under
¢ page 105.
~ Turn off the ignition and all electrical con
sumers.
~ Make sur e the area is well ventilated when
you charge the battery . ..,.
Page 248 of 316
246 Checking and filling
• Open the engine hood ¢ page 233.
• Remov e the cover (!) by pressing on the ar
row ¢
fig. 201.
• Open the cover @on the positive term inal.
• Connect the charger connectors according
to the instruct ions to the
jump start bolts.
(Bolts under the cover = "positive ", Bolts
with hex head= "negative").
• Only now plug the mains lead for the charg
i ng equipment into the wall outlet and turn
iton ¢,&. .
• Make sure the charging rate is not over
30 amps/14.8 Volt.
• When the battery is fully charged: Turn the
charging equ ipment off and remove the
mains lead from the wall outlet.
• Now remove the clamps for the charging
equipment.
• Close the cover @on the positive term inal
and re-install the cover (!).
• Close the hood ¢
page 233.
A discharged battery can freeze at tempera
tures of on ly 32 °F (0 °C). A llow a frozen bat
tery to thaw completely befo re attempt ing to
cha rge it~ &. . H owever, we recommend not
using a thawed battery again because the bat
tery casing can be cracked due to ice forma
tion and can leak battery acid.
Battery charging (Maximum charging rate
of
30 amps/14.8 Volt)
When charging at low voltages (e.g . with a
trickle charger ), the battery cables do not
have to be d isconnected first. The battery
caps should
not be opened when charging a
battery .
It is not necessary to remove the battery from
the luggage compartment.
Fast charging the battery (charging rate
above 14.8 Volts )
For technical reasons do not use a battery
charger that uses voltage greater than 14.8
Volts to charge your vehicle's battery.
.&_ WARNING
Charging a battery can be dangerous. -
Always follow the operating instructions
provided by the battery charger manu
facturer when charging your battery.
- Never charge a frozen battery. It may ex
plode because of gas trapped in the ice.
Allow a frozen battery to thaw out first.
- Do not reuse batteries wh ich were fro
zen. The battery housing may have
cracked and weakened when the battery
froze.
- Charge the battery in a well ventilated
area. Keep away from open flame or elec
tr ica l spark. Do not smoke. Hydrogen gas
generated by the battery is explosive.
- To reduce the danger of explosion, never
connect or disconnect charger cab les
while the charger is ope rat ing.
- Fast charging a battery is dangerous and
should only be attempted by a compe
tent technician with the proper equip
ment.
- Battery acid that may spill dur ing charg
ing should be washed off with a solution
of warm wat er and baking soda to neu
tralize the acid.
(I) Note
Never use a fast charger as a booster to
start the engine. This will seriously dam
age sensitive electronic components, such
as contro l units, re lays, radio, etc., as well
as the battery charger.
Battery replacement
The new battery must have the same specifi
cations and dimensions as the original equip
ment battery.
Intelligent energy management in your vehi
cle is responsible for distributing the electri
ca l energy throughout your vehicle
¢
page 203 . The intelligent energy manage
ment system will keep the engine battery
charged better then vehicles without this sys
tem . To make sure the additional electrical en
ergy is ava ilable once again after you have
changed the battery, we recommend that you ..,.
Page 287 of 316
@ Tips
-The discharged battery must be properly
connected to the vehicle's electrical sys
tem. When jump start ing or charging the
battery, never connect the negative
ground cable to the battery negative
post because the battery manager sys
tem must be able to detect the battery's
state of cha rge . A lways connect the neg
ative g round cab le to the negative
gro und post o f the battery manage r con
trol uni t.
Use of jumper cables
Make sure to connect the jumper cobl e
clomps in exactly the order describ ed b elow!
Fig. 227 Engine co mpartmen t: Con ne ctors fo r jum per
c ables a nd char ger
Fi g. 22 8 Jump s tart in g w ith t he ba ttery of a not her ve
hi cle :@ booster battery, @ disc harged vehicle bat tery
The procedure described below for connecting
jumper cables is intended to provide a jump
start for your veh icle .
Hybr id drive*: read the important information
concerning a dead high voltage bat te ry under
c::;, page 105 .
Emergenc y situ ation s 285
Vehicle with discharged b attery:
.,. Turn off lights and accessor ies, move lever
o f automatic transmiss ion to N (Neutra l) or
P (Pa rk) and set parking brake.
Connect POSITIVE (+) to POSITIVE (+ )
(r ed)
.,. Remove the cover(!) by pressing on the ar
row
¢ fig. 227.
.,. Open the cover @on th e positive terminal.
1. Connect one end of the red pos it ive cable
on the
jump start bolt c::;, fig. 228 (D
(Bolts under cover= "po sit ive") of the ve
hicle to be started @.
2. Connect the othe r end to the pos itive ter-
mi na l@ of the booster battery @.
Connect NEGATIVE (-) to NEGATIVE (- )
(black )
3. Connect one end of the black negative ca
ble to the negative termi na l@ of the
booster battery @.
4 . Co nnect the othe r end o f the black nega
tive cab le to the
jump sta rt b olt © (Bolts
with hex head = "negative") of the vehicle
to be started @.
Starting the engine
.,. Start the engine of the veh icle w ith the
booster ba tte ry @ . Ru n the engine at a
moderate speed .
.,. Start eng ine wit h discha rged vehicle battery
@ in the usual manner .
.,. If the eng ine fails to start: do not keep the
starter crank ing for longer than 10 seconds.
Wait for about 30 seconds and then try
aga in .
.,. With engine running, remove jumper cab les
from both vehicles in the e xact
reverse o r
de r .
.,. Close the cover @on the pos itive termina l
and re -install the cover
(D c::;, fig . 22 7.
T he battery is vented to the outside to preven t
gases from en ter ing the veh icle in ter io r. Ma ke
su re that the jumper clamps are well connect
ed with their
metal parts in full contact with
the battery te rm inals.