display AUDI Q5 2014 8R / 1.G Getting To Know
[x] Cancel search | Manufacturer: AUDI, Model Year: 2014, Model line: Q5, Model: AUDI Q5 2014 8R / 1.GPages: 29, PDF Size: 6.93 MB
Page 4 of 29
Downloaded from www.Manualslib.com manuals search engine MMI
® Controls
Audio & Navigation
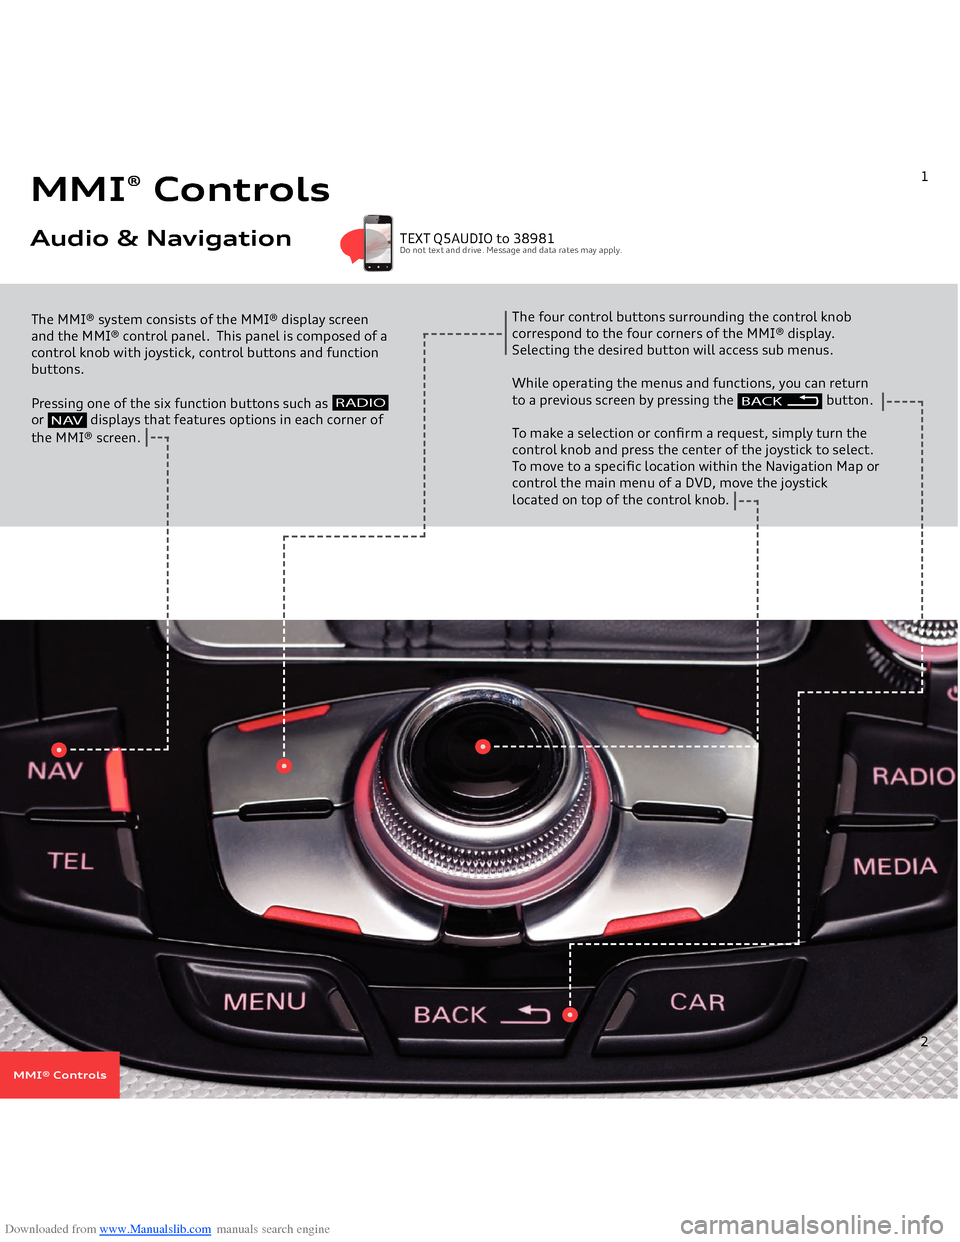
The MMI® system consists of the MMI® display screen and the MMI® control panel. This panel is composed of a control knob with joystick, control buttons and function buttons.Pressing one of the six function buttons such as or displays that features options in each corner of the MMI® screen.
The four control buttons surrounding the control knob
correspond to the four corners of the MMI® display.
Selecting the desired button will access sub menus.While operating the menus and functions, you can return
to a previous screen by pressing the button.To make a selection or confirm a request, simply turn the control knob and press the center of the joystick to select. To move to a specific location within the Navigation Map or control the main menu of a DVD, move the joystick located on top of the control knob.
TEXT Q5AUDIO to 38981Do not text and drive. Message and data rates may apply.
1
N AV
BACK
RADIO
2
MMI® Controls
Page 5 of 29
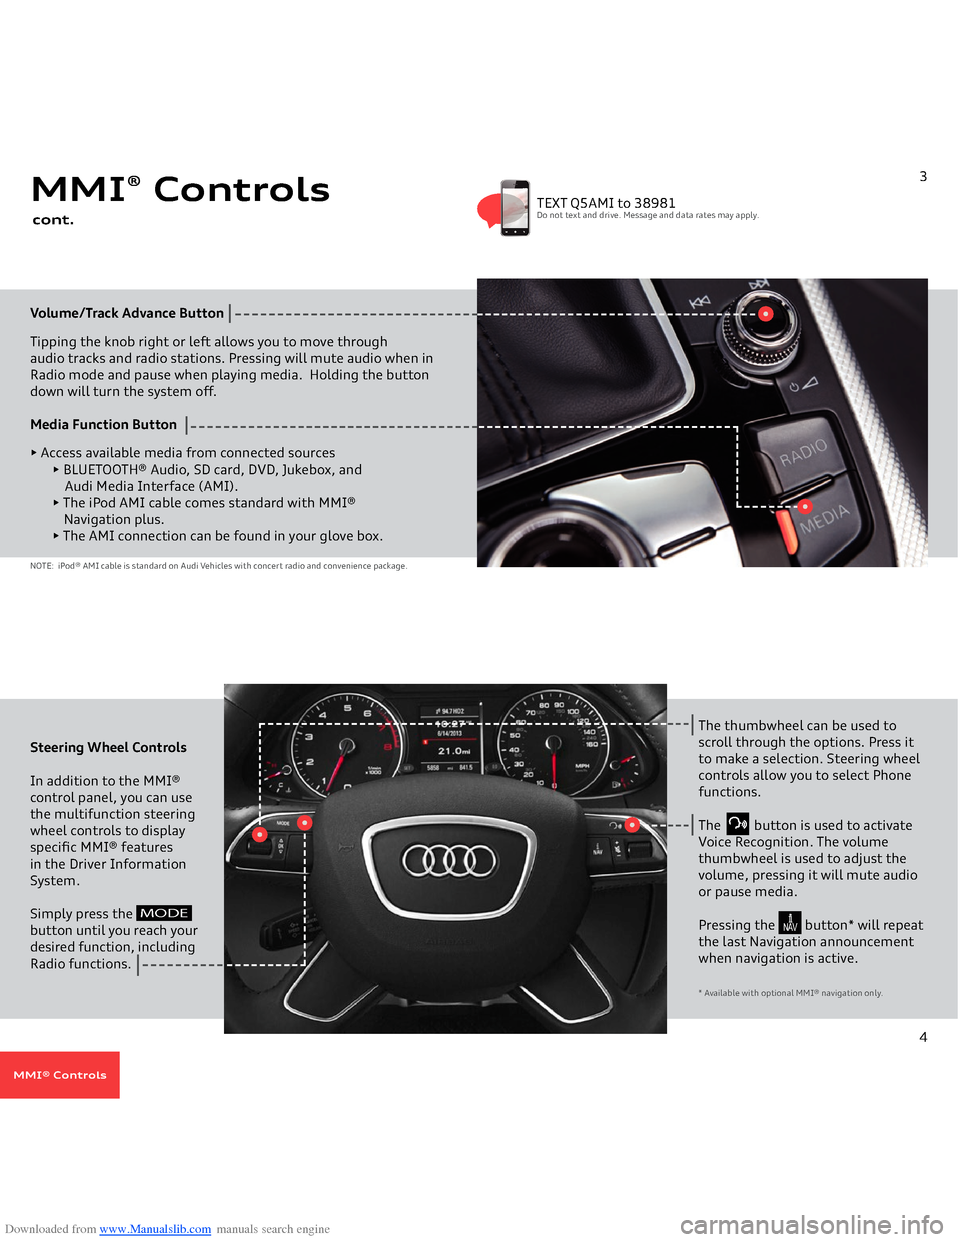
Downloaded from www.Manualslib.com manuals search engine Volume/Track Advance
Button
Tipping the knob right or left allows you to move through
audio tracks and radio stations. Pressing will mute audio when in Radio mode and pause when playing media. Holding the buttondown will turn the system off. Media Function Button
ŌĆó Access available media from connected sources
ŌĆó BLUETOOTH┬« Audio, SD card, DVD, Jukebox, and Audi Media Interface (AMI).ŌĆó The iPod AMI cable comes standard with MMI┬« Navigation plus. ŌĆó The AMI connection can be found in your glove box.
MMI
® Controls
cont.
3
TEXT Q5AMI to 38981Do not text and drive. Message and data rates may apply.
NOTE: iPod® AMI cable is standard on Audi Vehicles with concert radio and convenience package.Steering Wheel Controls In addition to the MMI® control panel, you can use the multifunction steering wheel controls to display specific MMI® features in the Driver Information System. Simply press the
button until you reach your desired function, including Radio functions.
The thumbwheel can be used to scroll through the options. Press it to make a selection. Steering wheel controls allow you to select Phone functions.The button is used to activate Voice Recognition. The volume thumbwheel is used to adjust the volume, pressing it will mute audio or pause media.Pressing the button* will repeat the last Navigation announcement when navigation is active.* Available with optional MMI
® navigation only.
4
MODE
N AV
MMI® Controls
Page 7 of 29
Downloaded from www.Manualslib.com manuals search engine BLUETOOTH
® Pairing: MMI
®
Initial Setup
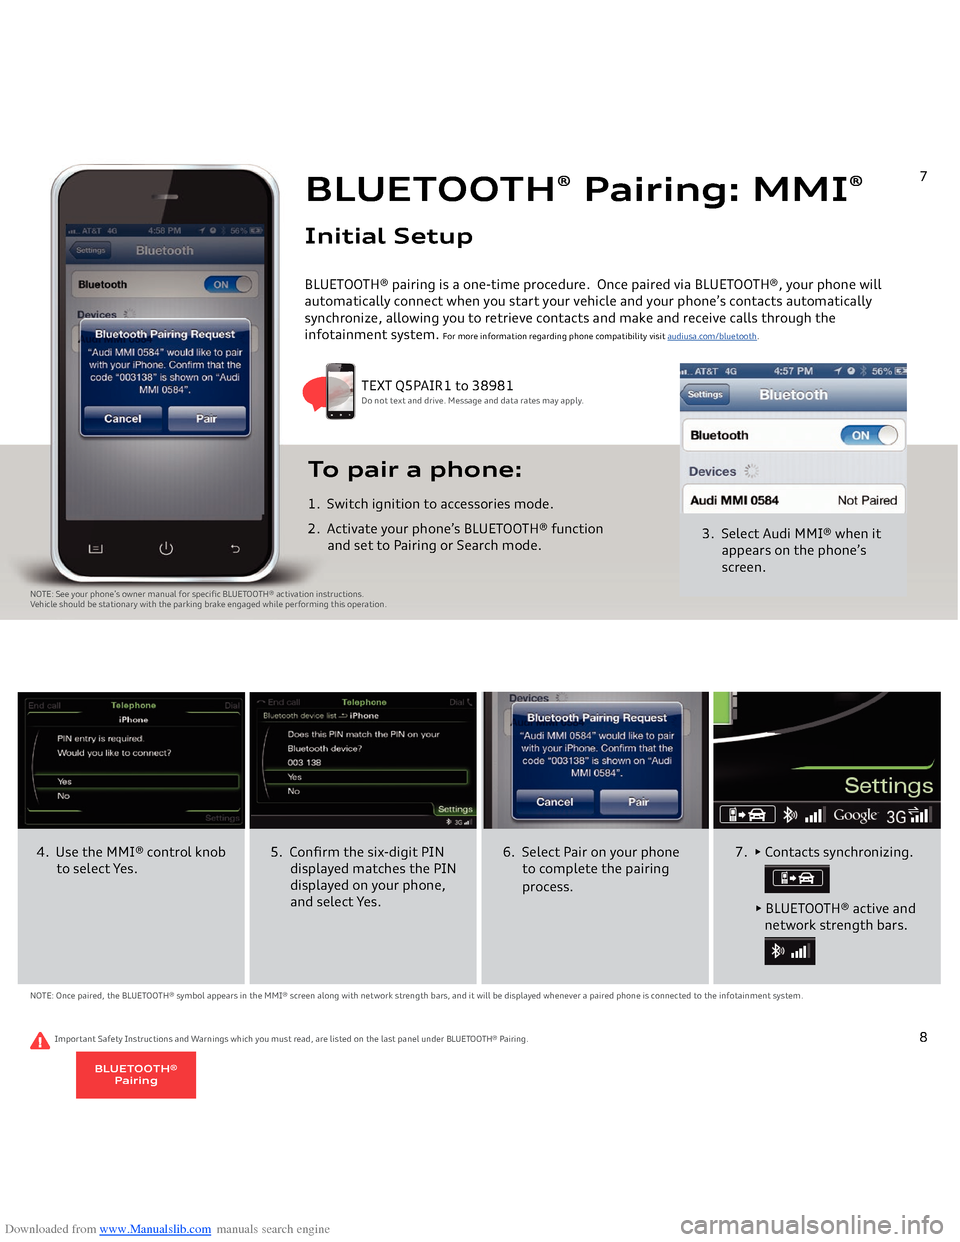
3. Select Audi MMI® when it
appears on the phoneŌĆÖs
screen.
To pair a phone: 1. Switch ignition to accessories mode.2. Activate your phoneŌĆÖs BLUETOOTH┬« function
and set to Pairing or Search mode.
TEXT Q5PAIR1 to 38981Do not text and drive. Message and data rates may apply.
NOTE: See your phoneŌĆÖs owner manual for specific BLUETOOTH┬« activation instructions. Vehicle should be stationary with the parking brake engaged while performing this operation.
BLUETOOTH® pairing is a one-time procedure. Once paired via BLUETOOTH®, your phone will
automatically connect when you start your vehicle and your phoneŌĆÖs contacts automatically
synchronize, allowing you to retrieve contacts and make and receive calls through the
infotainment system.
For more information regarding phone compatibility visit
audiusa.com/bluetooth
.
7
4. Use the MMI® control knob
to select Yes.
5. Confirm the six-digit PIN
displayed matches the PIN
displayed on your phone,
and select Yes.
NOTE: Once paired, the BLUETOOTH® symbol appears in the MMI® screen along with network strength bars, and it will be displayed whenever a paired phone is connected to the infotainment system.
6. Select Pair on your phone
to complete the pairing
process.
7. ŌĆó Contacts synchronizing.
ŌĆó BLUETOOTH┬« active and
network strength bars.
8
Important Safety Instructions and Warnings which you must read, are listed on the last panel under
BLUETOOTH® Pairing
.
BLUETOOTH®
Pairing
Page 14 of 29
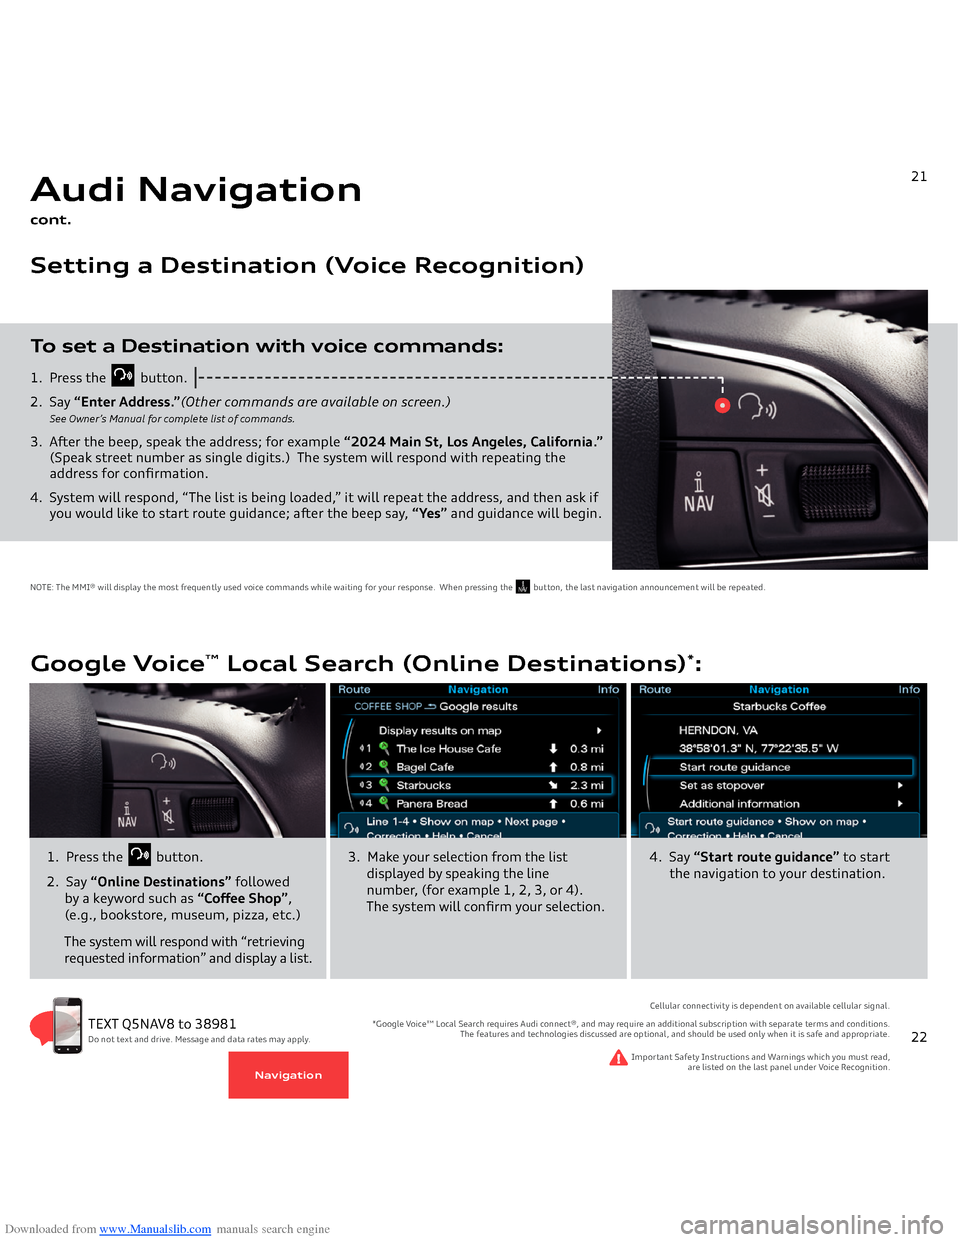
Downloaded from www.Manualslib.com manuals search engine 1. Press the
button.
2. Say
ŌĆ£Enter Address.ŌĆØ
(Other commands are available on screen.)
See OwnerŌĆÖs Manual for complete list of commands.
3. After the beep, speak the address; for example
ŌĆ£2024 Main St, Los Angeles, California.ŌĆØ
(Speak street number as single digits.)
The system will respond with repeating the
address for confirmation.4. System will respond, ŌĆ£The list is being loaded,ŌĆØ it will repeat the address, and then ask if you would like to start route guidance; after the beep say,
ŌĆ£YesŌĆØ
and guidance will begin.
To set a Destination with voice commands:Audi Navigationcont.Setting a Destination (Voice Recognition)
21
NOTE: The MMI® will display the most frequently used voice commands while waiting for your response. When pressing the button, the last navigation announcement will be repeated.
N AV
21
TEXT Q5NAV8 to 38981Do not text and drive. Message and data rates may apply.
Google Voice
Ōäó Local Search (Online Destinations)
*:
1. Press the
button.
2. Say
ŌĆ£Online DestinationsŌĆØ
followed
by a keyword such as
ŌĆ£Coffee ShopŌĆØ
,
(e.g., bookstore, museum, pizza, etc.) The system will respond with ŌĆ£retrieving requested informationŌĆØ and display a list.
3. Make your selection from the list
displayed by speaking the line number, (for example 1, 2, 3, or 4).
The system will confirm your selection.
4. Say
ŌĆ£Start route guidanceŌĆØ
to start
the navigation to your destination.
Important Safety Instructions and Warnings which you must read,
are listed on the last panel under Voice Recognition.
Cellular connectivity is dependent on available cellular signal.
*Google VoiceŌäó Local Search requires Audi connect┬«, and may require an additional subscription with separate terms and conditions.
The features and technologies discussed are optional, and should be used only when it is safe and appropriate.
22
Navigation
Page 16 of 29
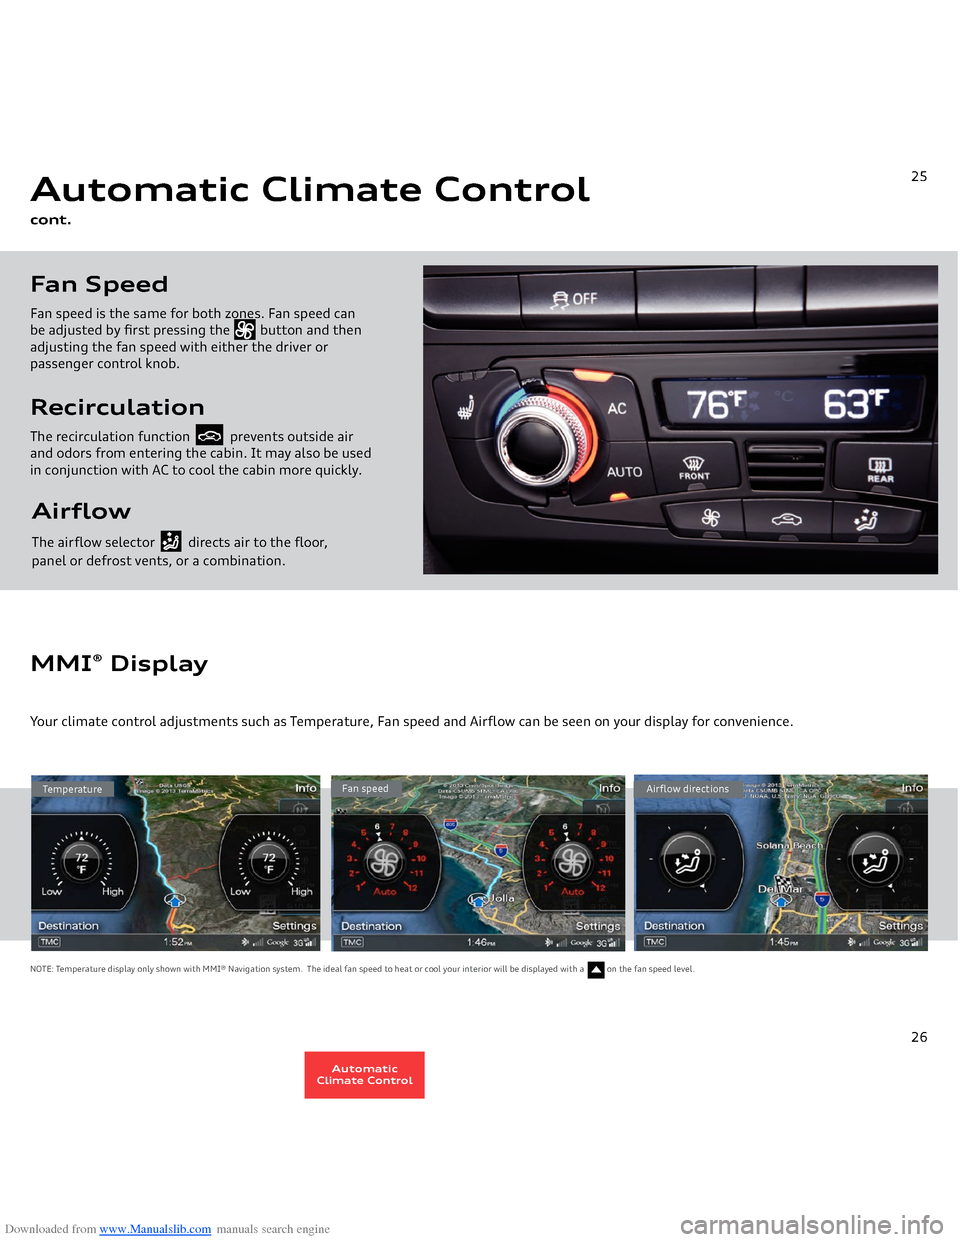
Downloaded from www.Manualslib.com manuals search engine Airflow The airflow selector directs air to the floor, panel or defrost vents, or a combination.RecirculationThe recirculation function prevents outside air and odors from entering the cabin. It may also be used in conjunction with AC to cool the cabin more quickly.Fan SpeedFan speed is the same for both zones. Fan speed can
be adjusted by first pressing the button and then adjusting the fan speed with either the driver or
passenger control knob.Automatic Climate Controlcont.
25
Temperature
Fan speed
Airflow directions
MMI
® Display
Your climate control adjustments such as Temperature, Fan speed and Airflow can be seen on your display for convenience.NOTE: Temperature display only shown with MMI® Navigation system. The ideal fan speed to heat or cool your interior will be displayed with a on the fan speed level.
26
AutomaticClimate Control
Page 19 of 29
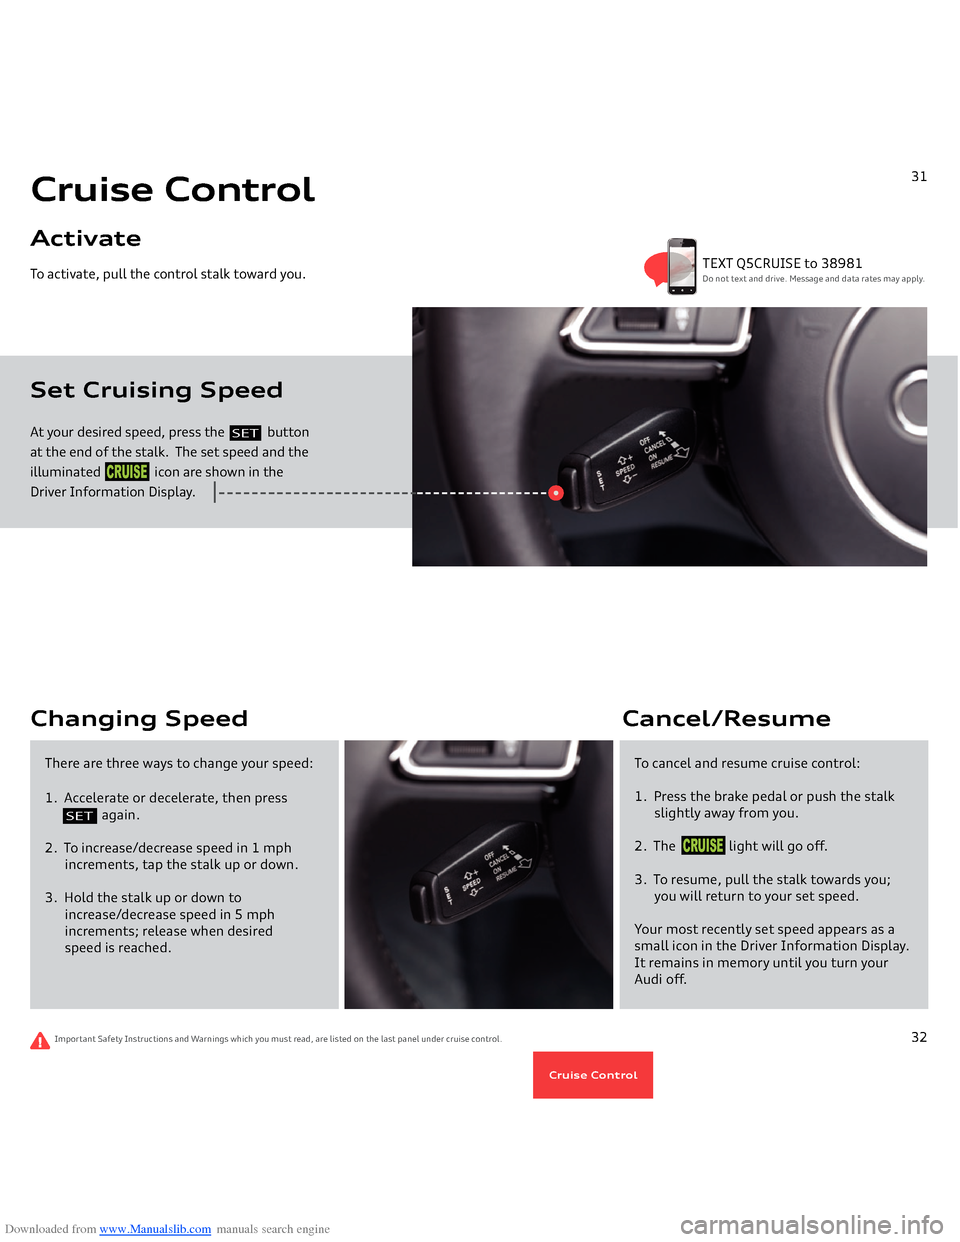
Downloaded from www.Manualslib.com manuals search engine At your desired speed, press the
button
at the end of the stalk. The set speed and the illuminated icon are shown in the Driver Information Display.To activate, pull the control stalk toward you.Set Cruising Speed Cruise ControlActivate
31
SET
CRUISE
TEXT Q5CRUISE to 38981Do not text and drive. Message and data rates may apply.
Important Safety Instructions and Warnings which you must read, are listed on the last panel under cruise control.
Changing Speed
To cancel and resume cruise control:1. Press the brake pedal or push the stalk
slightly away from you.2. The light will go off.3. To resume, pull the stalk towards you;
you will return to your set speed.Your most recently set speed appears as a small icon in the Driver Information Display. It remains in memory until you turn your Audi off.Cancel/Resume
There are three ways to change your speed:1. Accelerate or decelerate, then press
again.
2. To increase/decrease speed in 1 mph
increments, tap the stalk up or down.3. Hold the stalk up or down to
increase/decrease speed in 5 mph
increments; release when desired
speed is reached.
32
SET
CRUISE
Cruise Control
Page 20 of 29
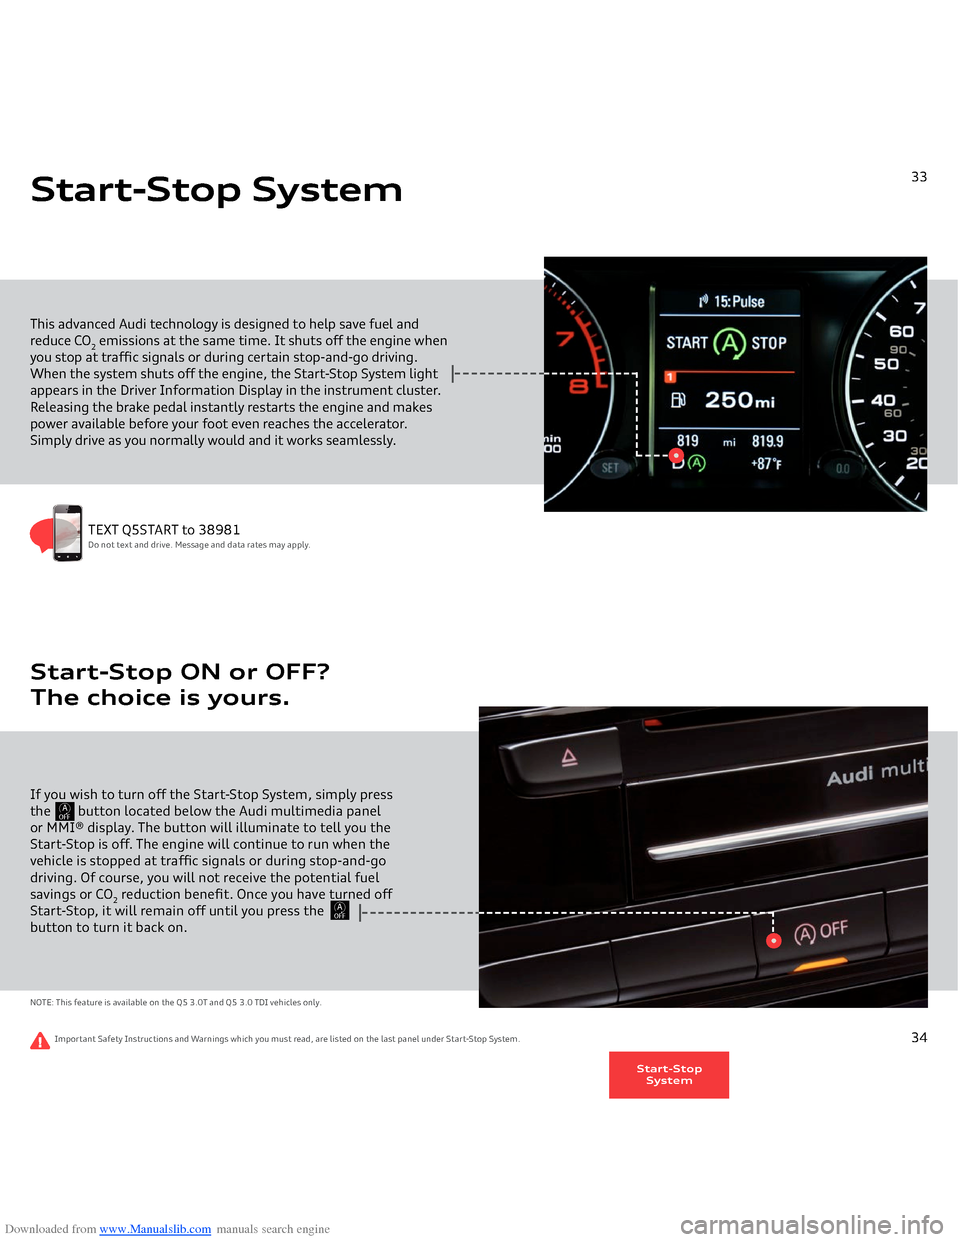
Downloaded from www.Manualslib.com manuals search engine This advanced Audi technology is designed to help save fuel and reduce CO
2 emissions at the same time. It shuts off the engine when
you stop at traffic signals or during certain stop-and-go driving. When the system shuts off the engine, the Start-Stop System light appears in the Driver Information Display in the instrument cluster. Releasing the brake pedal instantly restarts the engine and makes power available before your foot even reaches the accelerator. Simply drive as you normally would and it works seamlessly.Start-Stop System
33
TEXT Q5START to 38981Do not text and drive. Message and data rates may apply.
Important Safety Instructions and Warnings which you must read, are listed on the last panel under Start-Stop System.
If you wish to turn off the Start-Stop System, simply press the
button located below the Audi multimedia panel
or MMI® display. The button will illuminate to tell you the Start-Stop is off. The engine will continue to run when the vehicle is stopped at traffic signals or during stop-and-go driving. Of course, you will not receive the potential fuel savings or CO
2 reduction benefit. Once you have turned off
Start-Stop, it will remain off until you press the button to turn it back on.NOTE: This feature is available on the Q5 3.0T and Q5 3.0 TDI vehicles only.Start-Stop ON or OFF? The choice is yours.
34
AOFF
AOFF
Start-StopSystem
Page 22 of 29
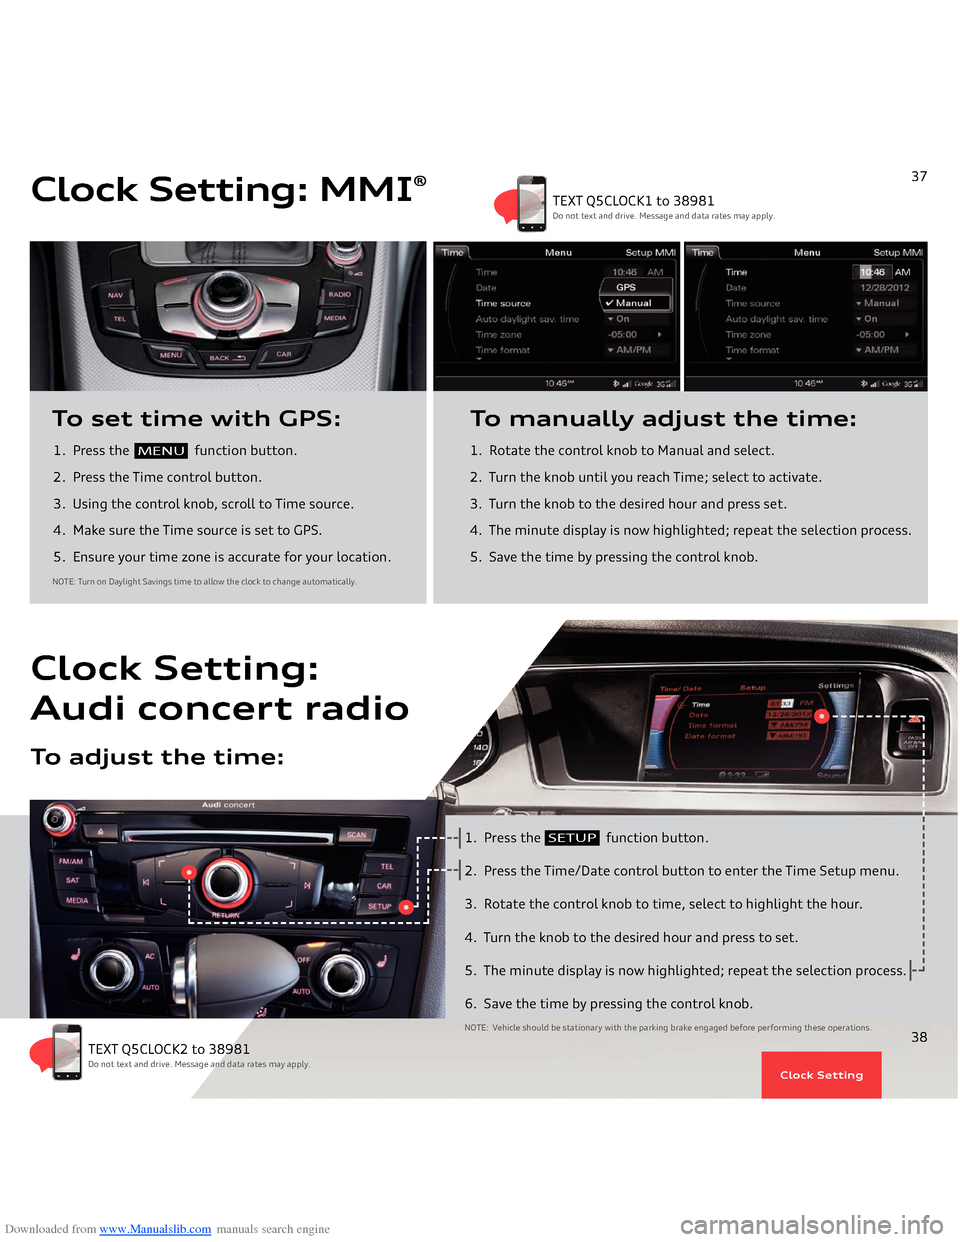
Downloaded from www.Manualslib.com manuals search engine 1. Press the
function button.
2. Press the Time control button.
3. Using the control knob, scroll to Time source. 4. Make sure the Time source is set to GPS.5. Ensure your time zone is accurate for your location.To set time with GPS:
1. Rotate the control knob to Manual and select.
2. Turn the knob until you reach Time; select to activate.3. Turn the knob to the desired hour and press set.4. The minute display is now highlighted; repeat the selection process.5. Save the time by pressing the control knob.To manually adjust the time:
NOTE: Turn on Daylight Savings time to allow the clock to change automatically.
Clock Setting: MMI
®
MENU
37
TEXT Q5CLOCK1 to 38981Do not text and drive. Message and data rates may apply.
Clock Setting
1. Press the
function button.
2. Press the Time/Date control button to enter the Time Setup menu.3. Rotate the control knob to time, select to highlight the hour.4. Turn the knob to the desired hour and press to set.5. The minute display is now highlighted; repeat the selection process.6. Save the time by pressing the control knob.NOTE: Vehicle should be stationary with the parking brake engaged before performing these operations.
Clock Setting:Audi concert radi
o
To adjust the time:
SETUP
38
TEXT Q5CLOCK2 to 38981Do not text and drive. Message and data rates may apply.
Clock Setting