jack points AUDI Q5 2014 Owners Manual
[x] Cancel search | Manufacturer: AUDI, Model Year: 2014, Model line: Q5, Model: AUDI Q5 2014Pages: 316, PDF Size: 78.41 MB
Page 277 of 316

Loosening and tightening the wheel
bolt s
The wheel bolts must be loosened before rais
ing the vehicle.
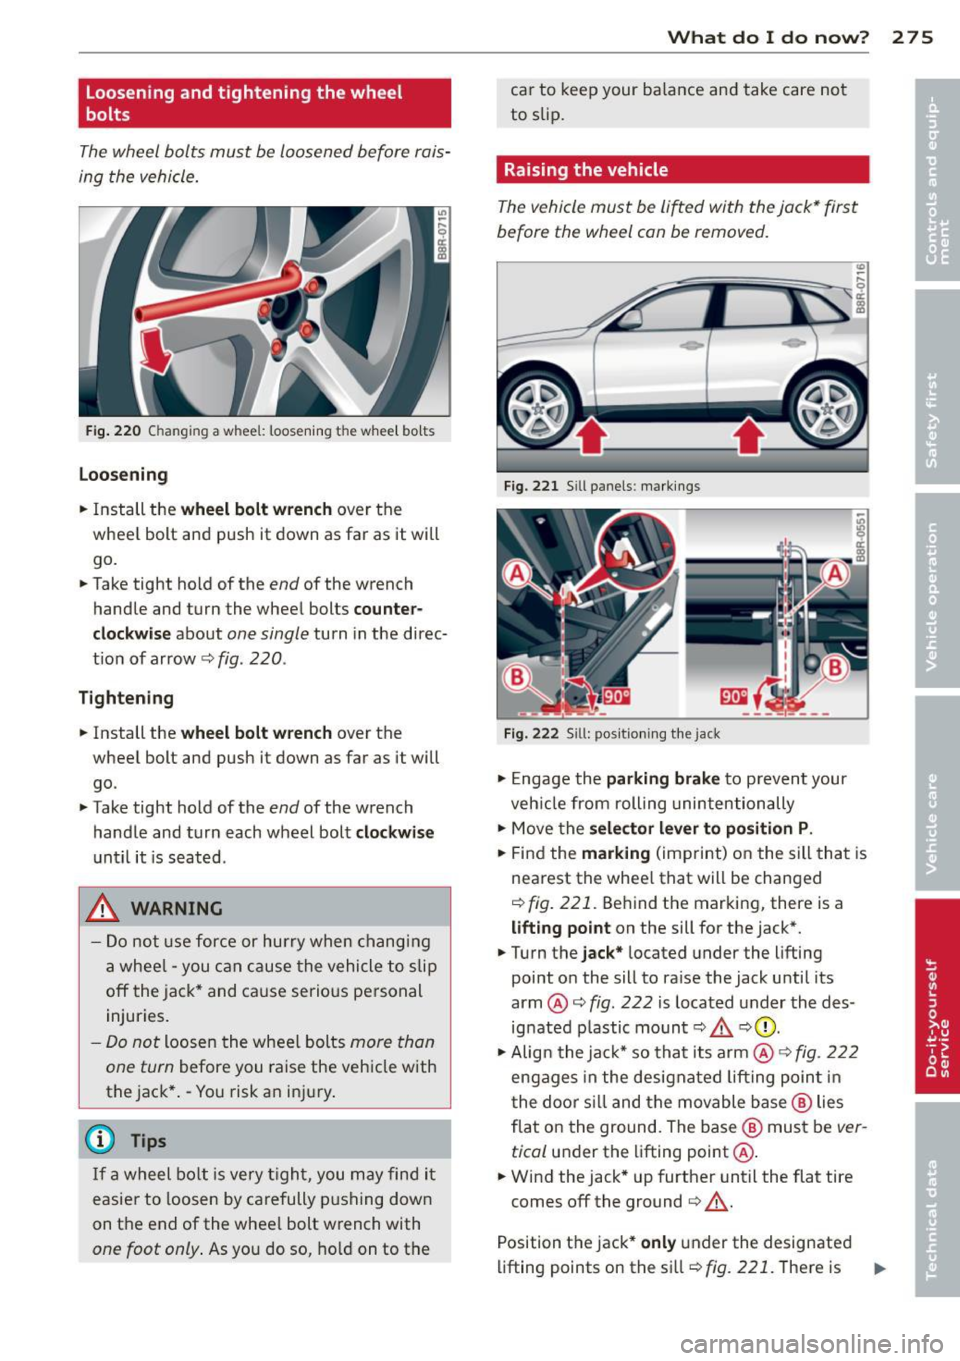
Fig . 220 Changing a wheel: loosening the whee l bo lts
Loosening
.. Install the wheel bolt wrench over the
wheel bolt and push it down as far as it will
go .
.. Take tight hold of the
end of the wrench
handle and turn the wheel bolts
counter
clockwise
about one single turn in the direc
t ion of arrow c::>
fig. 220.
Tightening
.. Install the wheel bolt wrench over the
wheel bolt and push it down as far as it will go.
.. Take tight hold of the
end of the wrench
handle and turn each wheel bolt
clockwise
until it is seated .
.&, WARNING
-Do not use force or hurry when changing
a whee l -you can cause the vehicle to slip
off the jack* and cause serious personal
injuries.
- Do not loosen the wheel bolts more than
one turn
before you raise the veh icle with
the jack*. -You risk an injury .
(D Tips
If a wheel bolt is very tight, you may find it
easier to loosen by carefully pushing down
on the end of the whee l bolt wrench with
one foot only . As you do so, hold on to the
What do I do now? 275
car to keep your ba lance and take care not
to slip.
Raising the vehicle
The vehicle must be lifted with the jock* first
before the wheel con be removed.
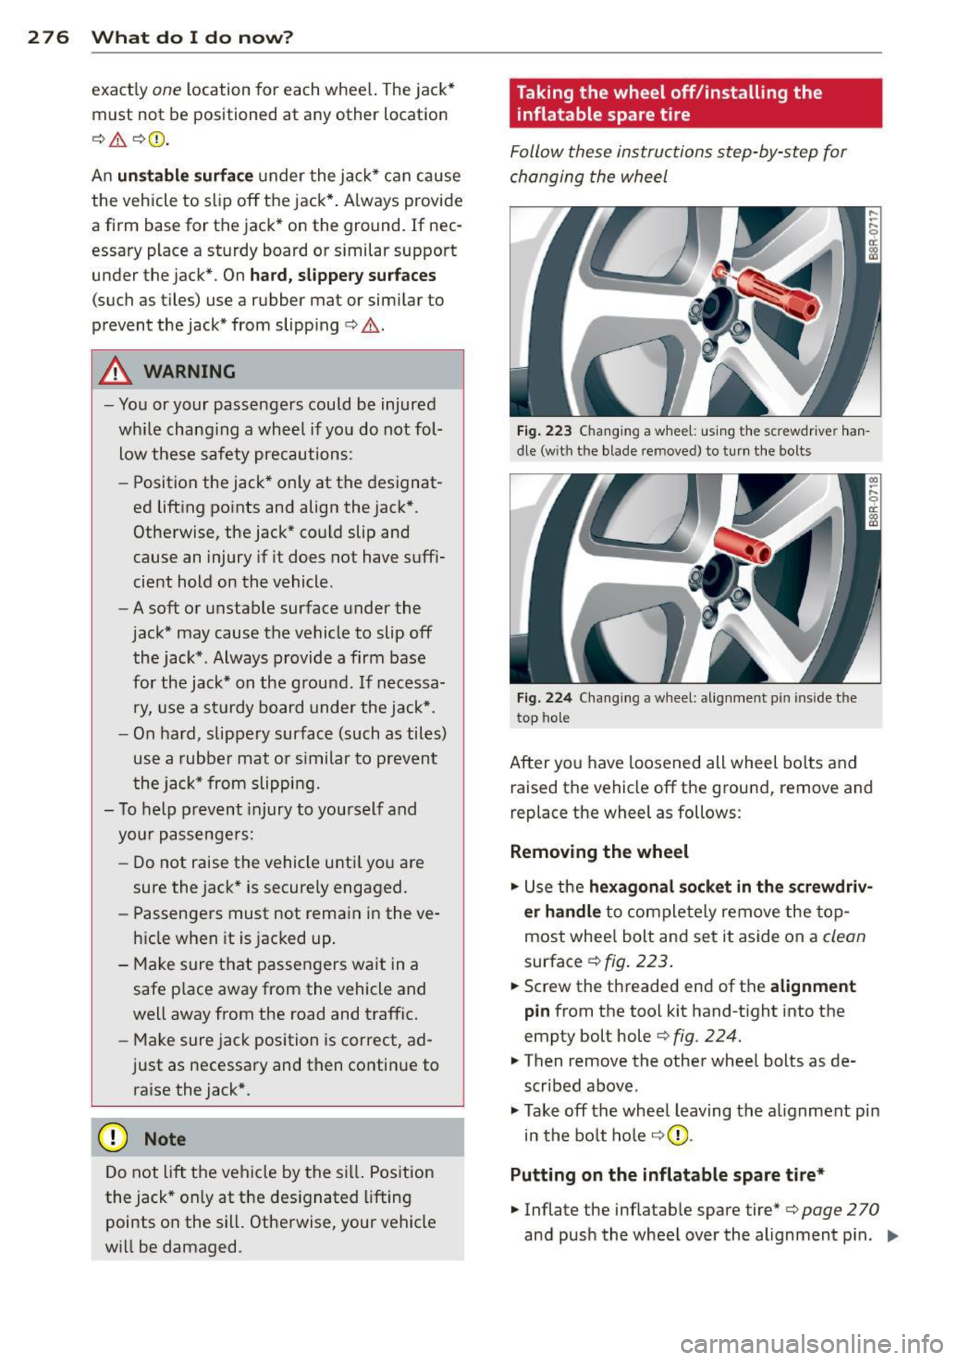
Fig . 221 Sill panels : marking s
Fig. 222 Sill: positio ning the jack
.,. Engage the parking brake to prevent your
vehicle from rolling unintentionally
.. Move the
selector lever to position P .
.. Find the marking (imprint) on the s ill that is
nearest the whee l that will be changed
c::>fig . 221. Behind the marking, there is a
lifting point on the sill for the jack*.
.. Turn the
jack* located under the lifting
point on the sill to raise the jack until its
arm @c::>
fig. 222 is located under the des
ignated p lastic mount c::>
& c::>0.
.,. Align the jack* so that its arm@
c::> fig. 222
engages in the designated lifting point in
the door s ill and the movable base® lies
flat on the ground. The base@ must be
ver
tical
under the lifting point@.
.. Wind the jack* up further until the flat tire
comes off the ground
c::> & .
Position the jack* only under the designated
lifting points on the s ill
c::>fig. 221. There is ll-
Page 278 of 316

276 What do I do n ow ?
exact ly one location for each whee l. The jack*
must not be positioned at any other location
c::> &. c::> CD .
An un sta bl e s urfa ce under the jac k* can cause
the vehicle to slip off the jack* . Always provide
a firm base for the jack* on the ground. If nec
essary place a sturdy board or similar support
under the jack*. On
h ard , s lippe ry surfa ces
(such as tiles) use a rubber mat or sim ilar to
prevent the jack* from slipping
c::> &. .
_&. WARNING
-You or your passengers could be injured
wh ile chang ing a wheel if you do not fol
low these safety precautions:
- Position the jack * only at the designat
ed lifting points and align the jack *.
Otherwise, the jack* could slip and
cause an injury if it does not have suff i
cient hold on the vehicle.
- A soft or unstab le surface under the
jack* may cause the vehicle to slip off the jack*. Always provide a firm base
fo r the jack* on the ground . If necessa
r y, use a st urdy board under the jack*.
- On hard, slippery surface (such as tiles)
use a rubbe r mat o r similar to prevent
the jack* from slipping.
- To help p revent injury to yourself and
yo ur passenge rs:
- Do not raise the vehicle u ntil you are
sure the jack* is securely engaqed.
- Passengers must not remain in the ve
h icle when it is jac ked up .
- Make sure that passengers wait in a
safe p lace away from the vehicle and
well away from the road and traffic.
- Make sure jack position is correct, ad
just as necessary and then continue to
ra ise the jack *.
(D Note
Do not lift the vehi cle by the s ill. Position
the jack* only at the des ignated lifting
points o n the sill. Otherwise, your veh icle
wi ll be damaged.
Taking the wheel off /installing the
inflatable spare tire
Follow these instructions step-by-step for
changing the wheel
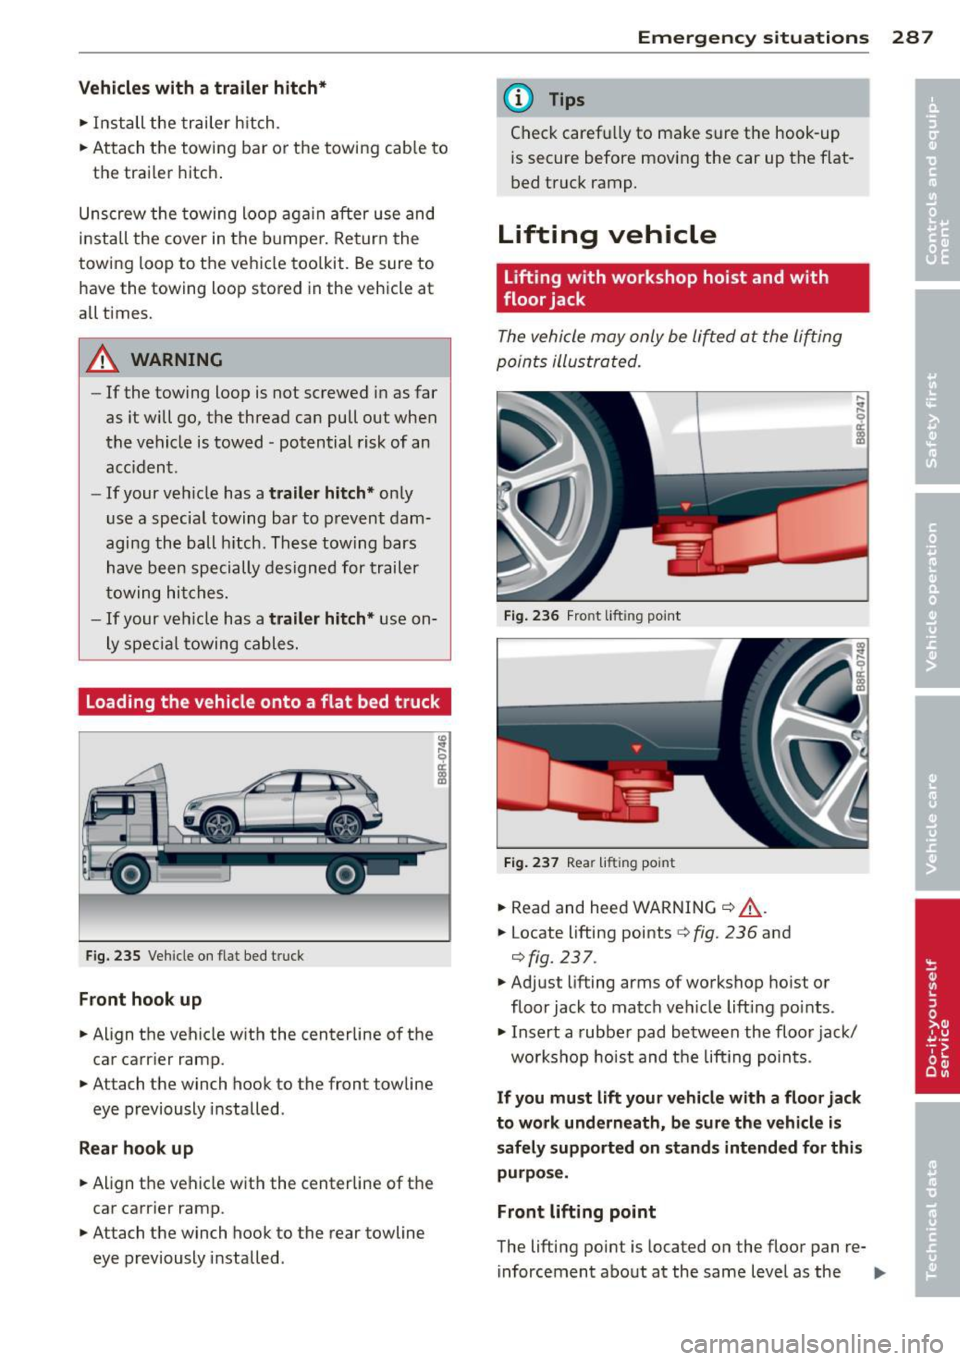
F ig . 2 23 Chang ing a w hee l: using th e screwdr ive r han
dle (w ith the blade removed) to turn th e bolts
Fig . 22 4 Cha ng in g a w hee l: alig nment p in ins ide the
top ho le
After yo u have loosened all wheel bo lts and
raised the vehicle off the ground, remove and
replace the wheel as follows:
Removing the wheel
.,. Use the hexagonal so cket in th e screwdriv
er handle
to complete ly remove the top
most whee l bolt and se t it aside on a
clean
surface c::> fig . 223 .
.,. Screw the threaded end of the alignment
pin
from the tool kit hand-t ight into the
empty bolt hole
c::> fig. 224.
.,. Then remove the other wheel bolts as de
scribed above.
.,. Take off the whee l leaving the a lignment pin
in the bo lt ho le
c::> (D .
Putting on the inflatable spare tire*
.,. Inflate the inflatab le spare tire* c::> page 2 70
and push the wheel over the alignment p in . "'
Page 289 of 316

Vehicles with a trailer hitch *
• Install the trailer h itch .
• Attach the towing bar or the towing cab le to
the trai le r hitch.
Unscrew the towing loop aga in after use and
i nstall the cover in the bumper. Return the
t owing loop to the vehicle too lkit. Be sure to
have the towing Loop stored in the vehicle at
all times.
A WARNING
- If the towing Loop is not screwed in as far
as it will go, the thread can pull out when
the vehicle is towed -potential risk of an
accident.
- If your veh icle has a
trailer h itch * only
use a special towing bar to prevent dam
aging the ball h itch . These towing bars
have been specially designed for trailer
towing hi tches.
- If your veh icle has a
trailer hi tch* use on
ly specia l towing cables.
Loading the vehicle onto a flat bed truck
Fig. 235 Veh icle on fla t bed tru ck
Front hook up
• Align the vehicle w ith the centerline of the
car carr ier ramp.
• Att ach the winch hook to the front towline
eye previously installed .
Rear hook up
• Align the vehicle with the centerline of the
car car rier ramp.
• Attach the winch hook to the rear towline
eye previously installed .
Emergency situ ation s 287
@ Tips
Check caref ully to make sure the hook-up
i s secure before moving the car up the flat
bed truck ramp.
Lifting vehicle
Lift ing w ith workshop hoist and with
floor jack
The vehicle may only be lifted at the lifting
points illustrated.
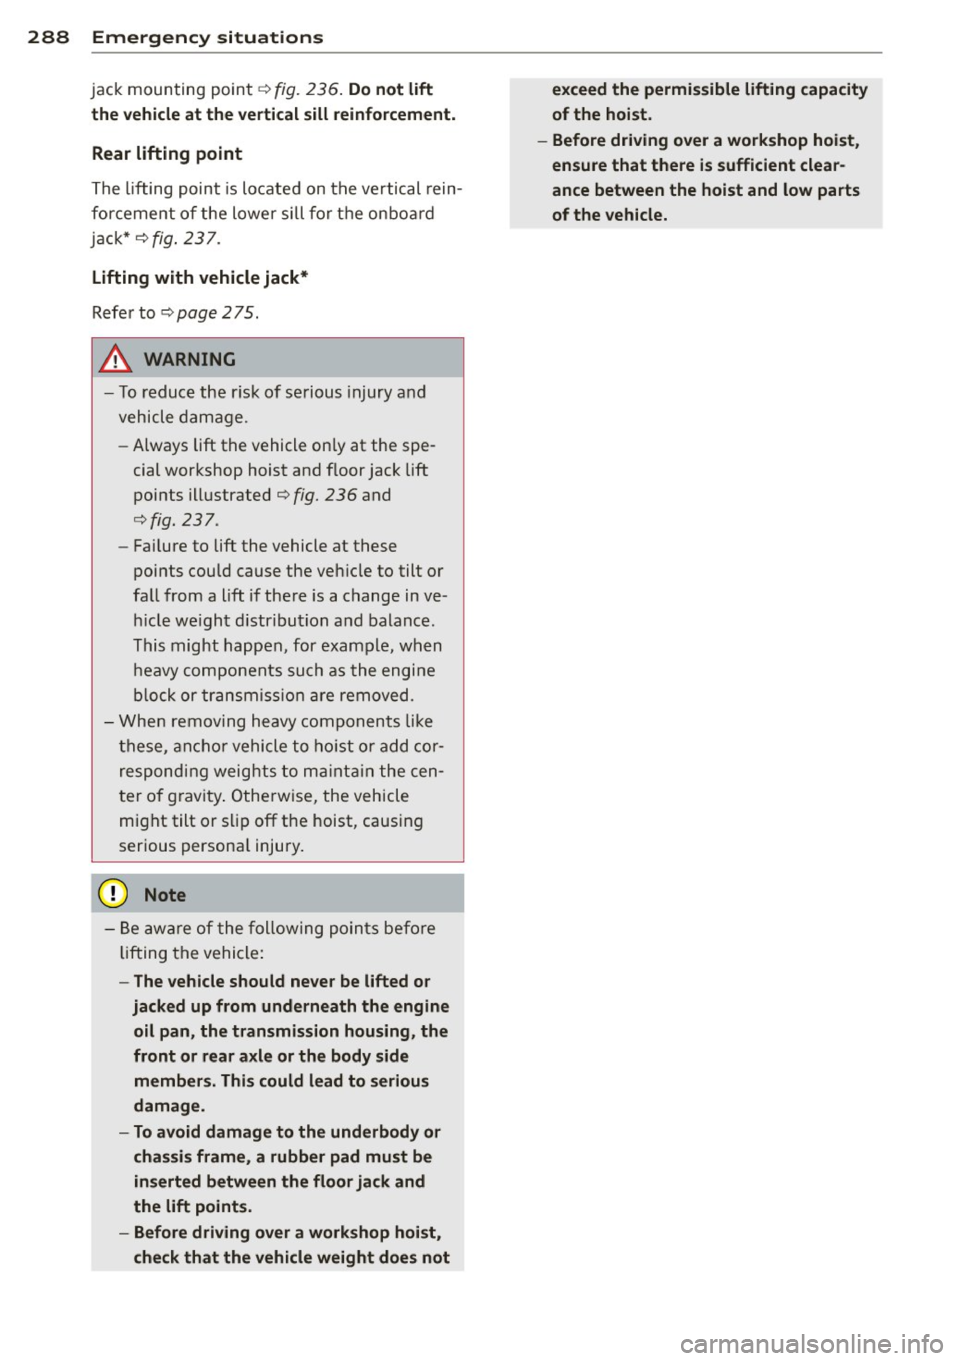
F ig . 236 Fro nt li fting point
F ig . 237
Rea r liftin g po int
• Read and heed WARNING ¢ ,&. .
• Locate lifting points ¢ fig. 236 and
¢fig. 237.
• Adjust li fting arms of workshop ho is t or
floor jack to match veh icle lifting points .
• Insert a rubber pad between the floor jack/
workshop hoist and the lift ing poin ts .
If you must l ift your vehicle with a floor jack
t o work und erneath, b e sure the vehi cle i s
saf ely s upported on stands int ended for thi s
purpo se.
Fron t lifting point
The lifting poin t is located on the floor pan re-
inforcement about at the same level as the
Ill>
Page 290 of 316

288 Emergency situations
jack mounting point¢ fig. 236 . Do not lift
the vehicle at the vertical sill reinforcement.
Rear lifting point
T he lifting point is lo cate d on t he ve rtical rein
fo rceme nt of the lower s ill fo r th e on bo ard
j ack *¢
fig . 23 7.
Lifting with vehicle jack*
Refe r to ¢ page 2 75 .
..&, WARNING
- T o redu ce t he r is k of se rious injury and
vehicle dam ag e.
- Always lift the vehicle on ly at the spe
cial wor kshop h oist and floor jack lift
points illustrated
¢ fig. 236 and
¢ fig. 237 .
-Fa ilure to lift the vehicle at these
points cou ld cause the veh icle to tilt or
fa ll from a lift if the re is a change in ve
h icle we igh t di stribu tion a nd ba lance .
This might happen, for exa mple, w hen
h eavy co mpo ne nts su ch as the engi ne
bl oc k or tra ns mis sion ar e removed .
- W hen re mov ing heavy co mpo nents like
t h ese , a nch or vehicle to hoist or add cor
res pond ing weig hts to maintain t he cen
te r of gravity . Othe rwise, the vehicle
mi gh t tilt o r slip off t he hoist , ca usi ng
serious persona l injury .
CJ) Note
- Be aw ar e of t he fo llow ing poin ts be fo re
lift ing t he vehicle:
- The vehicle should never be lifted or
jacked up from underneath the engine oil pan, the transmission housing, the
front or rear axle or the body side members. Thi s could lead to serious
damage.
- To avoid damage to the underbody or
chassis frame , a rubber pad must be
inserted between the floor jack and
the lift points.
- Before driving over a workshop hoist,
check that the vehicle weight does not
-
exceed the permissible lifting capacity
of the hoist .
- Before driving over a workshop hoist,
ensure that there is sufficient clear
ance between the hoist and low parts
of the vehicle.