rims AUDI Q5 2016 Owners Manual
[x] Cancel search | Manufacturer: AUDI, Model Year: 2016, Model line: Q5, Model: AUDI Q5 2016Pages: 300, PDF Size: 75.02 MB
Page 210 of 300
Care and cleaning
& WARNING
-Only wash the vehicle when the ignition is
off and follow the instructions from the car
wash operator to reduce the risk of acci dents.
- To reduce the risk of cuts, protect yourself from sha rp metal components when wash
ing the underbody or the inside of t he wheel
hous ings.
- After was hing the vehicle, the braking effect
may be delayed due to mo isture on the
bra ke rotors o r ice i n the winte r. The bra kes
mus t be d ried first w ith a few care ful brake
applications .
@ Note
-If you wash the ve hicle in an automa tic car
wash, you m ust fold the exte rior m irrors i n
to reduce the risk of damage to the mirrors.
Power folding exterior m irrors * must on ly
be fo lded in and out using the power folding
funct ion.
- To reduce the risk of damage to the rims
and tires, compare the width between the
whee ls on your ve hicle w ith the distance be
tween the gu ide rails in the car wash. -
To red uce the risk of damage, compare the
heig ht and width of your vehicle with the
heig ht and w idth of the inside of the car
wash.
- To prevent paint damage, do not wash the
vehicle in direct sunlight.
- To reduce the risk of damage to the surface,
do not use insect removing sponges, k itchen
sponges or s imilar items.
- Matte finish painted vehicle components:
- To reduce the r isk of damage to the sur-
face, do not use polish ing agents or hard
wax.
- Never use protective wax. It can destroy
the matte finish effect.
- Do not place any stickers or magnetic signs on vehicle parts pain ted with matte
finish paint. The paint could be damaged
when the stickers or magne ts are re
moved.
@ For the sake of the environment
Only wash the veh icle in facilities spe cially de
signed for that pu rpose. This will reduce the
r isk of dirty wate r contamina ted with o il from
entering the sewer system .
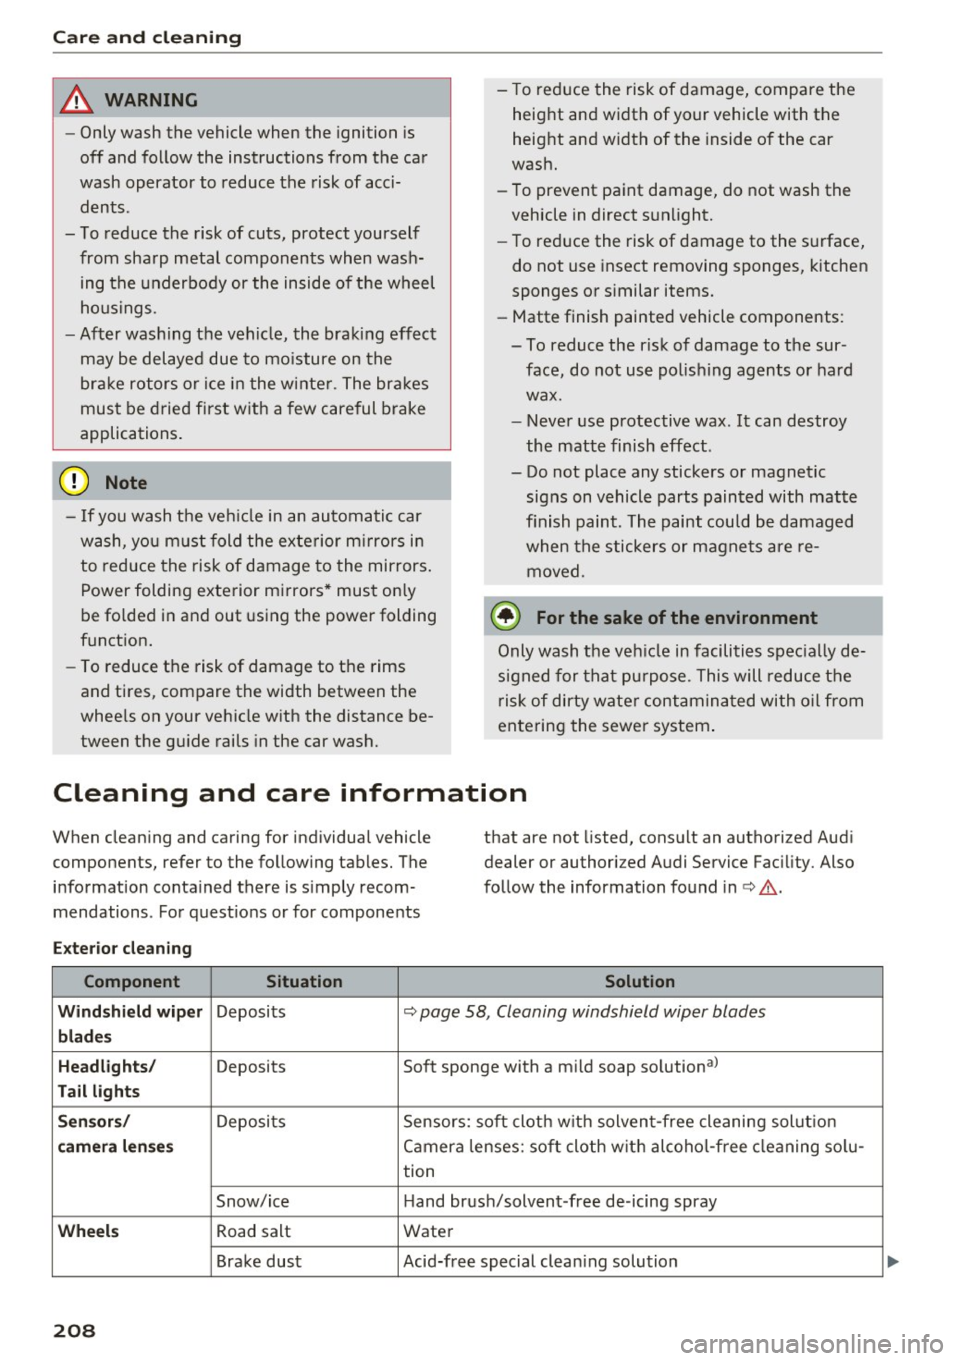
Cleaning and care information
When cleaning and caring for individua l vehicle
components, refer to the following tables. The information conta ined there is s imply recom
mendations . Fo r quest ions or for components that are not
listed, consult an authorized Aud i
dealer or authorized Audi Service Fac ility. Also
fo llow the information found in c::> & .
Ex ter io r cleaning
Component S ituation Solution
Wind shield wiper
Deposits c::> page 58, Cleaning windshield wiper blades
blades
Headlights /
Deposits Soft sponge with a mild soap solution a)
Tail lights
Sen sor s/
Deposits Sensors: soft cloth with solvent-free cleaning sol utio n
camera len ses Camera lenses: soft cloth w ith alcoho l-free cleaning so lu-
tion
Snow/ice Hand brush/solvent -free de -icing spray
Wheels Road salt Water
Brake dust Acid-free special cleaning solution
208
Page 212 of 300
Care and cleaning
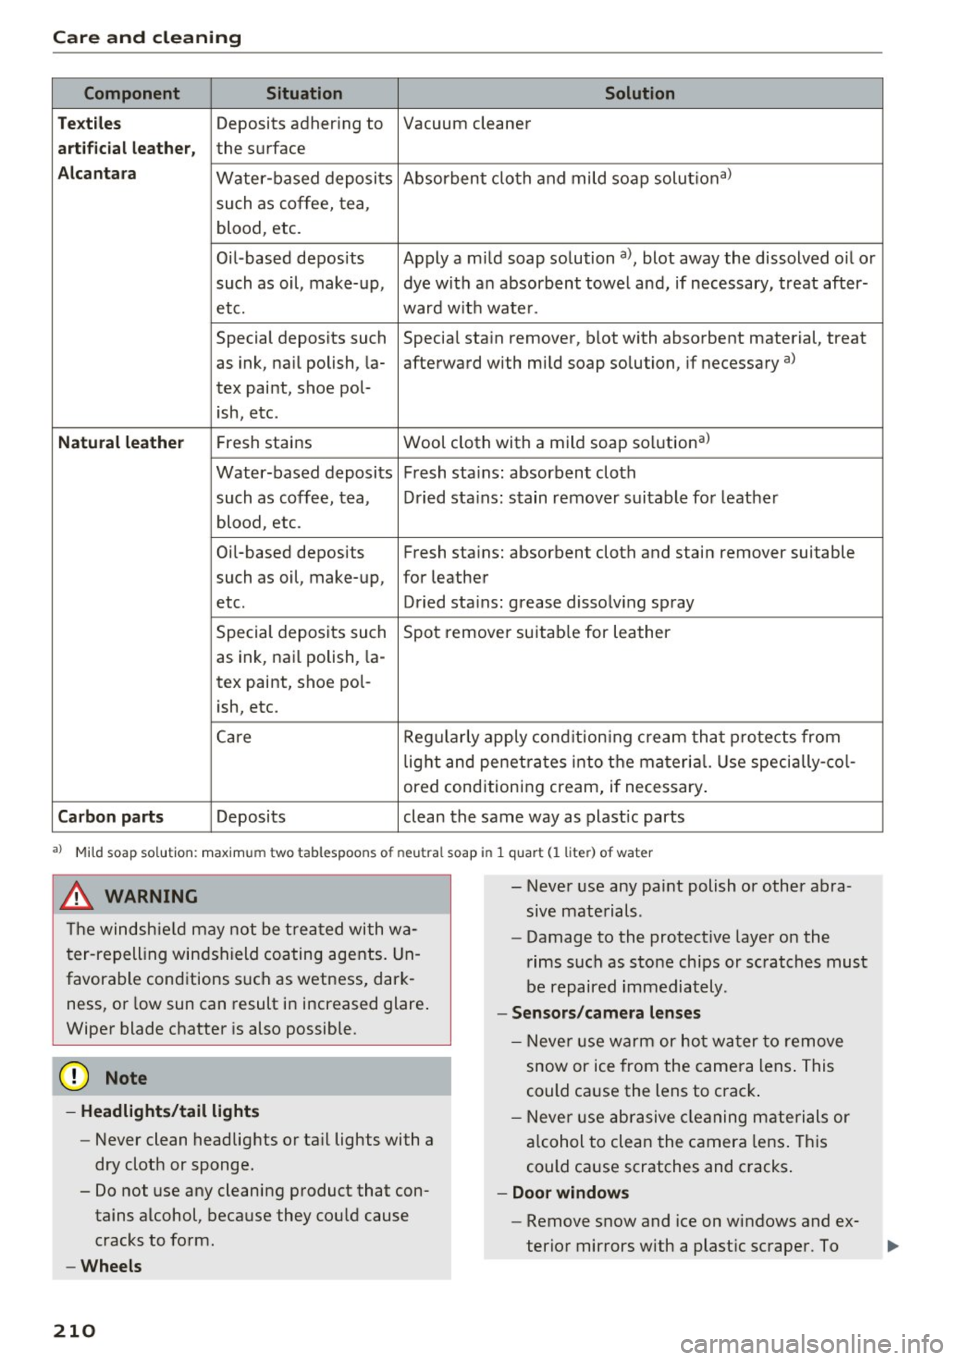
Component Situation Solution
Te xtil es
Deposits adhering to Vacuum cleaner
a rt ifici al le ather , the surface
Alcant ara Water-based deposits Absorben
t cloth and mild soap solutiona>
such as coffee, tea,
blood, etc.
O il-based deposits Apply a m ild soap solution a), blot away the dissolved oil or
such as oil, make-up, dye with an absorbent towel and, if necessary, treat after-
etc. ward wit h water.
Special deposits such Special stain remover, b lot with absorbent material, treat
as ink, na il polish, la- afterward with mild soap solution, if necessary a)
tex paint, shoe pol-
ish, etc.
Natural leather Fresh stains Wool cloth with a mild soap so
lutiona)
Water-based deposits Fresh sta ins : absorbent cloth
such as coffee, tea, Dried sta ins: stain remover suitable fo r leather
blood, etc.
Oil-based deposits Fresh stains: absorbent cloth and stain remover suitable
such as oil, make-up, for leather
etc. Dried sta ins : grease dissolv ing spray
Special deposits such Spot remover suitab le for leather
as ink, nai l polish, la -
tex paint, shoe pol-
ish, etc.
Ca re Regularly apply cond ition ing cream that protects from
light and penet rates into the materia l. Use specia lly-co l-
ored conditioning cream, if necessary.
Carbon parts Deposits clean the same way as plastic parts
a) Mild soap solution: maximum two tablespoons of neutral soap in 1 quart (l liter) of water
_& WARNING
The windshie ld may not be trea ted with wa
ter-repelling windshield coating agents. Un
favorable conditions s uch as wetness, dark
ness, or low sun can result in increased glare .
Wiper blade chatter is also possible.
(D Note
- Headlights/tail light s
-Never clean headlights or tail lights with a
dry cloth or sponge.
- Do not use any cleaning product that con
tains alcohol, because they could cause
cracks to form.
- Wheels
210
-
- Never use any paint polish or other abra
sive materials.
- Damage to the protect ive layer on the
rims such as stone chips or scratches must
be repaired immediately.
- Sensors /camera lenses
- Neve r use wa rm or ho t wa ter to remove
snow or ice from the camera lens . This
could cause the lens to crack .
- N eve r use ab rasive cleaning materials or
a lcohol to clea n the camera lens . This
could cause scratches and cracks .
-Doo r window s
-Remove snow and ice on windows and ex-
terior mirrors with a plast ic scraper. To
Page 236 of 300
Wheels
Wheels
Wheels and Ti res
General information
.,. Check your tires regularly for
damage (punctures, cuts, cracks
and bulges). Remove foreign ob
jects from the tire tread.
.,. If driving over curbs or similar
obstacles, drive slowly and ap proach the curb at an angle.
.,.Have faulty tires or rims re
placed immediately.
.,.Protect your tires from oil,
grease and fuel.
.,.Mark tires before removing
them so that the same running
direction can be maintained if
they are reinstalled .
.,. Lay tires flat when storing and
store them in a cool, dry location
with as little exposure to light as
possible.
(D N ote
-Please note that summer and
winter tires are designed for
the conditions that are typical in those seasons . Audi recom
mends using winter tires dur
ing the winter months . Low
temperatures significantly de crease the elasticity of summ
er tires, which affects traction
23 4
and b raking ability. If summer
tires are used in very cold
temperatures, cracks can form
on the tread bars, resulting in permanent tire damage that
can cause loud driving noise
and unbalanced tires.
-Burnished, polished or chromed rims must not be used in winter driving condi
tions. The surface of the rims
does not have sufficient corro
sion protection for this and
could be permanently dam
aged by road salt or similar
substances.
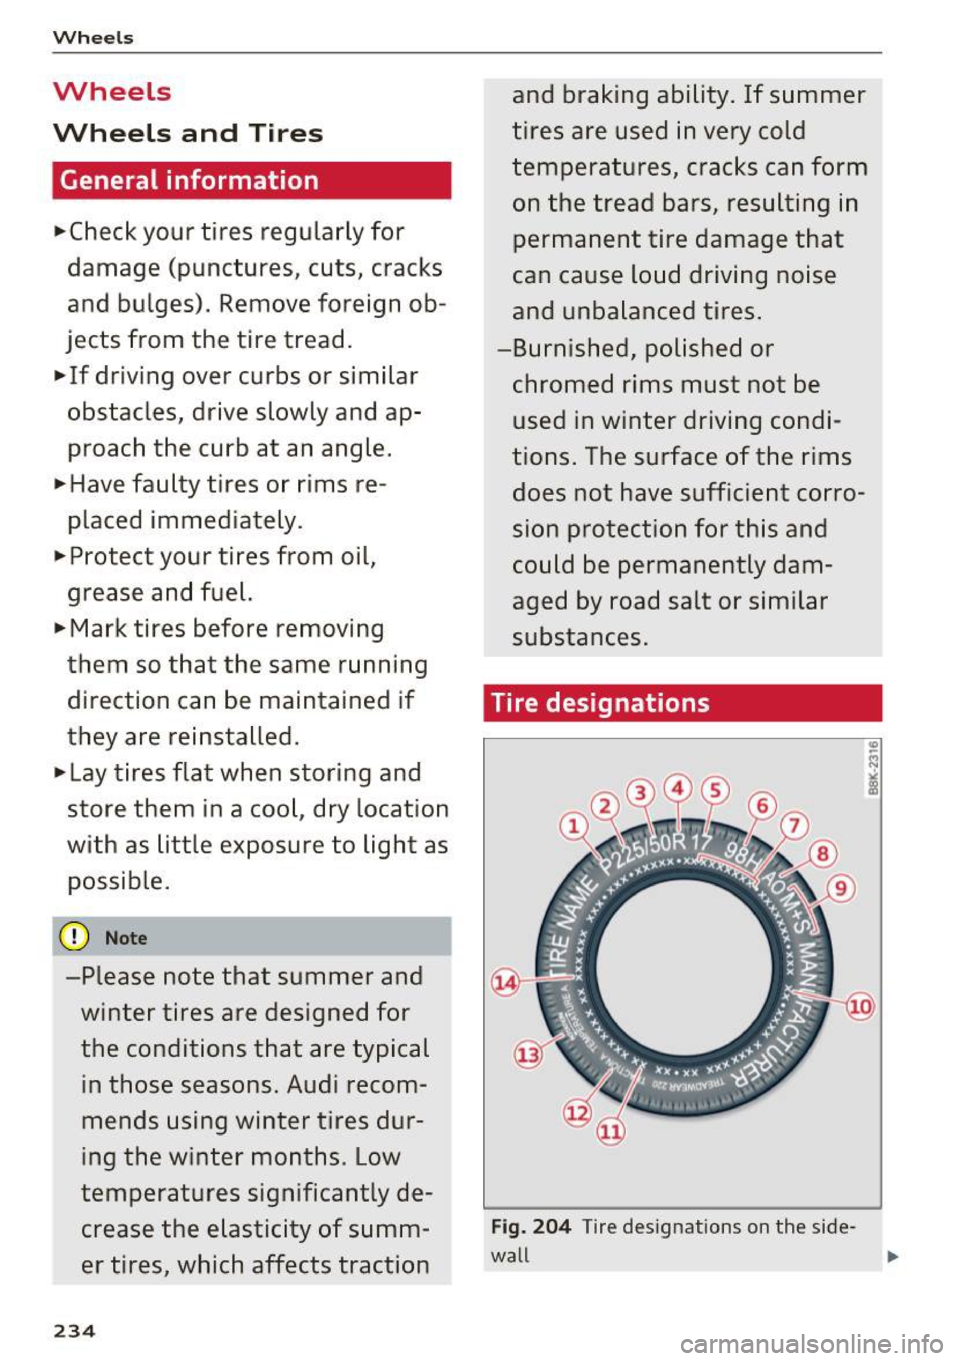
Tire designations
F ig. 20 4 Tire des ignat ions on the side-
wall II>
Page 245 of 300
Wheels
-Have an authorized Audi dealer wear evenly. To rotate wheels, in-
or authorized Audi Service Facili- stall the wheels from the rear
ty check the wheel alignment if axle on the front axle and vice
there is unusual wear. versa. This will allow the tires to
-Have the wheels rebalanced if an have approximately the same
imbalance is causing noticeable length of service life.
vibration in the steering wheel. For unidirectional tires, make
If you do not, the tires and other sure the tires are installed accord-
vehicle components could wear ing to the running direction indi-
more quickly. cated on the tire sidewall
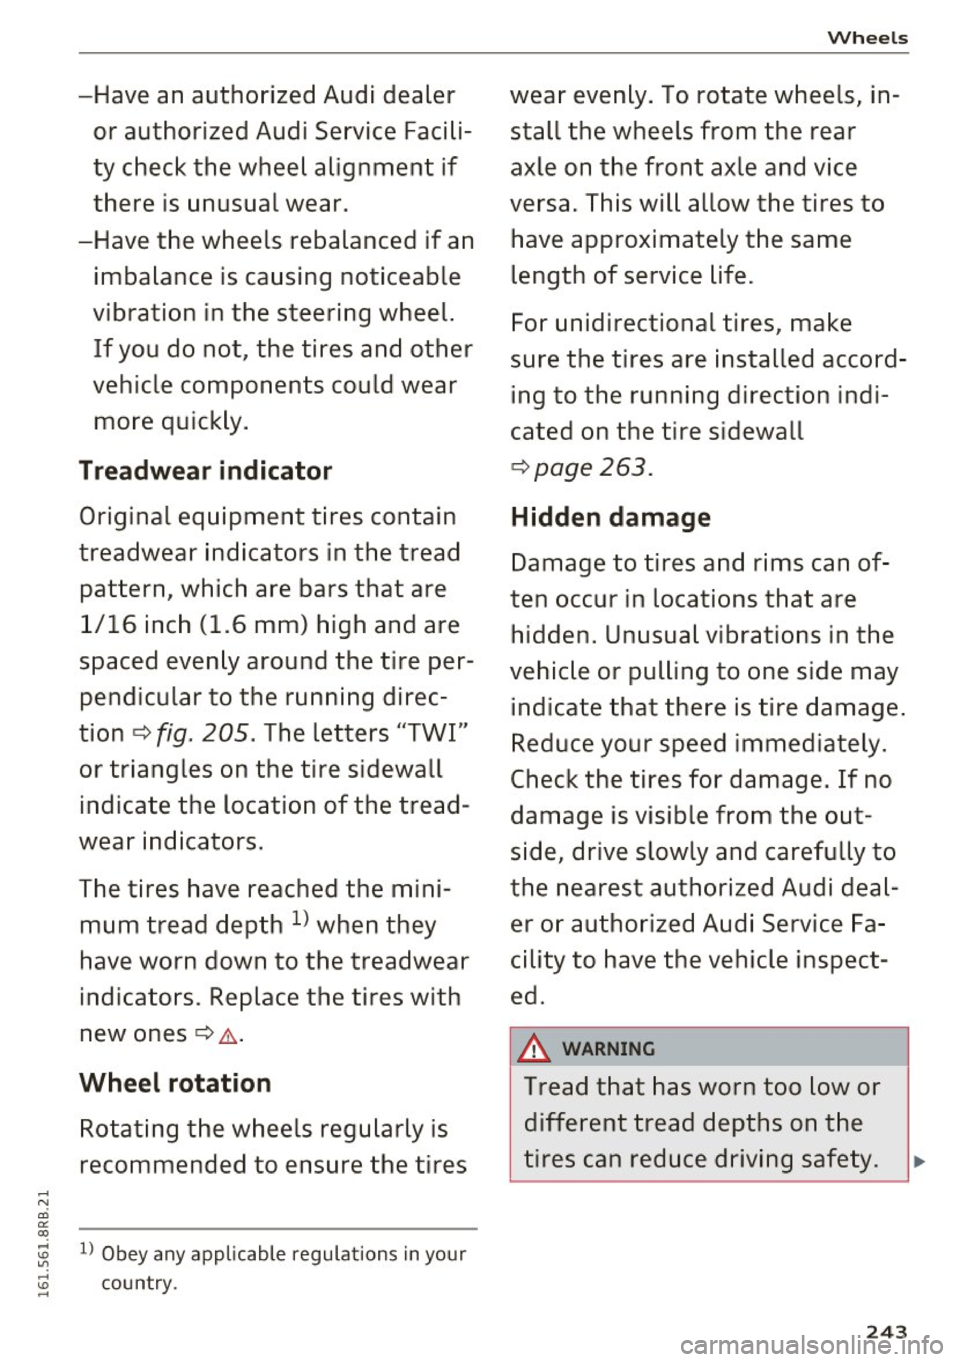
Treadwear indicator ¢page 263.
Original equipment tires contain Hidden damage
treadwear indicators in the tread
Damage to tires and rims can of-
pattern, which are bars that are ten occur in locations that are
1/16 inch (1 .6 mm) high and are
hidden. Unusual vibrations in the
spaced evenly around the tire per- vehicle or pulling to one side
may
pendicular to the running di rec-indicate that there is tire damage.
tion ¢
fig. 205. The letters "TWI"
Reduce your speed immediately .
or triangles on the tire sidewall Check the tires for damage. If no
indicate the location of the tread- damage is visible from the out-
wear indicators. side, drive slowly and carefully to
The tires have reached the mini- the nearest authorized Audi deal-
mum tread depth
l) when they er or authorized Audi Service Fa-
have worn down to the treadwear cility to have the vehicle inspect-
indicators . Replace the tires with ed.
new ones¢ &.
& WARNING
-
Wheel rotation Tread that has worn too low or
Rotating the wheels regularly is different tread depths on the
recommended to ensure the tires tires can reduce driving safety
.
..
.... N a:i er ~ ... l) Obey any applicable regu lat ions in your '° "? .... country . '° ...
243
Page 250 of 300
Wheels
Determining correct load
limit
Use the example below to calcu
late the total weight of the pas
sengers and luggage or other
things that you plan to transport so that you can make sure that
your vehicle will not be overload ed .
Steps for Determining Correct
Load Limit
1 . Locate the statement "THE
COMBINED WEIGHT OF OCCU PANTS AND CARGO SHOULD
NEVER EXCEED XXX KG OR XXX
LBS"on your vehicle 's placard
(tire inflation pre ssure label)
c:::> page 244, fig. 206.
2. Determine the combined
weight of the driver and pas
sengers that will be riding in
your vehicle.
3 . Subtra ct the combined weight
of the driver and passengers
from
"XXX" kilograms or " XXX"
pounds shown on the sticker
c:::> page 244 , fig. 206 .
4. The re sulting figure equals the
available amount of cargo and luggage load capacity. For ex
ample, if the
"XXX" amount
equals 1400 lbs. and there will
248
be five 150 lbs. passengers in
your vehicle, the amount of available cargo and luggage load capacity is 650 lb s.
(1400-750 (5 X 150) = 650
lb s.)
5. Determine the combined weight of luggage and cargo
being loaded on the vehicle.
That weight may not safely ex
ceed the available cargo and luggage load capacity calculat
ed in Step 4 .
6. If your vehicle will be towing a trailer, load from your trailer
will be transferred to your ve
hicle. Con sult this manual to
determine how this reduces
the available cargo and lug gage load capacity of your vehi
cle .
~check the tire sidewall
(¢ page 234, fig. 204) to deter
mine the designated load rating
for a specific tire.
· Wheel bolts and rims
Wheel bolts
W heel bolts mus t be clean and loose n/tighten
eas ily.
Rims
R ims with a bo lted r im ring * or with bo lted wheel
covers" co nsist of mult ip le p ieces . T h ese compo-
n ents were bolted togethe r usin g s pec ial bolts ..,.
Page 251 of 300
,....,
N
co
er::
co
,....,
disassemble them ¢.&. .
A WARNING
Wheel bolts that are tightened or repaired in
correctly can become loose and result in loss
of vehicle control, which increases the risk of
an acc ident. For the correct tightening specifi
cation, refer to ¢
page 260, After changing a
wheel .
- Always keep the wheel bolts and the
threads in the wheel hub clean and free of grease.
- Only use wheel bolts that fit the rim .
- Always have damaged r ims repa ired by an
authorized Audi dealer o r autho rized Aud i
Service Facility . Never repair or d isassemble
rims yourself, because this increases the risk
of an accident.
Winter tires
W inte r ti res s ignificantly improve the vehicle's
h andling when driving in win ter condit ions . Be
cause of the ir constr uction (width, compound,
tread pattern), summer tires provide less trac
tion on ice and snow .
"'U se winter t ires on all fo ur wheels .
.. Only use winter t ires that are approve d for your
v ehicl e.
"' Please note that the maximum permitted
speed may be lower with winter tires¢.&_ . An
authorized Aud i dealer or au thori zed Aud i Serv
ice Fac ility can inform you about the maximum
permitted speed fo r your tires .
"' Check the tire press ure after installing wheels
¢page 244.
The effectiveness of winter tires is reduced great
l y when the tread is worn down to a depth of
0 .1 57 inch (4 mm). The character ist ics of winter
tires a lso de crease great ly as the tire ages, re
ga rdless of the remain ing tread.
WARNING
- Never drive faster than the maxim um per
mitted speed for your t ires. This cou ld cause
the tires to heat up too much. Th is increases
Wh eel s
the risk of an accident because it can cause
the t ire to burst.
- Always adapt your driving to the road and
traffic cond itions . Drive carefully and reduce
your speed on icy or slippery roads . Even
winter t ires can lose tract io n on black ice.
@ For the sake of the environment
Reinsta ll summer tires at the app ropr iate
time, beca use they prov ide better handling
when roads are free of snow and ice. Summer
tires cause less road no ise, tire wear and fue l
consumpt io n.
(D Tips
You can also use all season tires instead of
winter tires. Please note that in some coun
tries where winter tires are required, on ly
winter tires w ith the
& symbo l may be per
mitted .
Snow chains
Snow chains improve traction in the snow.
"'On ly install snow chains on the rear wheels.
"' Check and correct the seating of the snow
chains if necessary after drivi ng a few feet. Fol
low the instructions from the manufacturer .
"' Note the maximum pe rmitted spe ed wh en dr iv
ing w it h snow cha ins. Do not excee d 30 mph
( SO km/h) .
S now c ha ins not o nly improve the
driving in win
te r road condit io ns, but also the
braking.
Use of snow chains is only permitted w ith certa in
r im/tire comb inat ions due to technical reasons .
Check with an author ized Audi dealer or author
ized Audi Service Facility to see if you may use
snow chains.
U se
fine-mesh snow chains . They must not add
more than 0 .53 inch (13 .5 mm) in heig ht, incl ud
ing the cha in lock.
You m ust remove the chai ns when driving on
r oads t hat are
free of snow . When roads are free
of snow, snow chai ns can impa ir han dling and .,.
249
Page 252 of 300
Wheels
damage the ti res, and the chains w ill quickly be
destroyed .
A WARNING
Using incorrect snow chains or insta lling snow
chains incorrectly can result in loss of vehicle
control, which increases the risk of an acc i
dent .
(D Note
Snow chains can damage the rims/wheel cov
ers * if the chains come into d irect contact
w ith them. Remove the wheel covers* first .
Use coated snow chains.
(D Tips
When using snow cha ins, it may be useful to
sw itch the off road mode on
<=> page 191.
Low aspect ratio tires
Your Aud i is factory -equipped with low aspect ra
tio tires. These t ires have been tho roughly tested
a nd been se lected specifically fo r yo ur model fo r
thei r supe rb per fo rman ce , road feel and handling
un der a va riety of d riving conditions . As k yo ur au
thor ized Audi dealer for mo re details .
T he low aspect ratio of these t ires is in dicated by
a nume ral of
55 or less in the tire's size desig na
tion . The numera l rep resents the rat io o f th e
tire's sidewall he ight in relat ion to its tread width
expressed in pe rcentage. Conventional tires have
a height/w idt h rat io o f 60 o r more .
The performance of low-aspect -ra tio tires i s par
ticularly sensitive to improper inflation pres
sure . It is therefore important that low aspect
ratio tires are inflated to the specified pressure
and that the inflation pressure is regularly
checked and maintained . Tire pressures should
be checked at least once a month and always
before a long trip <=>
page 244.
What you can do to avoid tire and rim
damage
Low aspect rat io tires can be damaged more easi
ly by impact with potholes, cu rbs, gullies or
250
ridges on the road, particularly if the tire is un
derinflated.
I n orde r to mi nimize the occur rence o f imp act
dam age to the tires o f yo ur vehicle, we recom
mend that you observe the following preca u
tions:
- Always m aintain reco mmende d in fla tion pres
sures. Check yo ur tir e pressure eve ry 2,0 00
m iles (3,00 0 km) and add air if necessary .
- Dr ive c arefully on ro ads w ith potholes, deep
gu llies o r ridges . The impact from dr iving
through or over such obstacles can damage
your tires. Impact with a curb may a lso ca use
damage to your t ires.
- After any impact, immediate ly inspect you r
tires or have them inspected by the nearest au
thorized Aud i dealer. Replace a damaged tire as
soon as possible.
- Inspect your tires every 2,000 m iles (3,000 km)
for damage and wear . Damage is not always
easy to see . Damage can lead to loss of a ir and
unde rinflation, w hich could event ua lly cause
tire fa ilure . If you believe that a tire may have
be en damaged, replace the tire as soon as pos
sible .
- These tires may wear mo re quickly than o thers .
- Please also remember that, while these tires delive r responsive hand ling, they may ride less
comfortab ly and make mo re noise than o ther
choi ces.
Reduced performance in winter/cold season
conditions
A ll tires are des igned for certain purposes. The
l ow aspect ratio, ultra h igh performance tires
o rigin ally ins talle d on your veh icle are inten ded
for m aximum dry and wet road per forma nce and
handling . They a re not suitable for co ld, snowy or
i cy weather conditions . If you drive under those
c ir cumstances, you should equip yo ur vehicle
with all-season o r winter tires, which offer better
tract ion under t hose conditions. We suggest you
u se the recommended s now or all-season tires
spec ified for your vehicle, o r the ir equiva lent .
Refer to<=>
page 249 for more detailed informa
tion regard ing winter tires.
Page 265 of 300
,....,
N
co
er::
co
,....,
handle to screw in and tighten all whee l bolts
slightly .
~ Remove the alignment pin and insert and tight
en the remaining wheel bolt slightly like the
rest .
~ Turn the jack handle* counter-clockwise to low
er the vehicle until the jack* is fully released .
~ Use the wheel bolt wrench to tighten all wheel
bolts firmly
Q page 260. Tighten them cross
wise,
from one bolt to the (approximately) op
posite one, to keep the wheel centered .
Q) Note
When removing or installing the whee l, the
rim could hit the brake rotor and damage the
rotor. Work carefu lly and have a second per
son help you.
(D Tips
Never use the hexagonal socket in the handle
of the screwdriver to loosen or tighten the
wheel bolts.
- Pull the reversible blade from the screwdriv
er before you use the hexagonal socket in
the handle to turn the wheel bolts.
- When mounting tires w ith
unidirectional
tread design
make sure the tread pattern is
pointed the right way
Q page 263.
- The wheel bolts should be clean and easy to
turn. Check for d irt and corrosion on the
mating surfaces of both the wheel and the
hub. Remove all dirt from these surfaces be
fore remount ing the wheel.
Tires with unidirectional tread design
Tires with unidirectional tread design must be
mounted with their tread pattern pointed in the
right direction .
Using a spare tire with a tread pattern
intended for use in a specific direction
When using a spare t ire with a tread pattern in
tended for use in a specific direction, please note
the following:
- The direct ion of rotat ion is marked by an arrow
on the side of the tire.
Emergency assistance
- If the spare tire has to be installed in the incor
rect direction, use the spare tire on ly tempora
r il y since the tire will not be able to ac hieve its
optimum performance characterist ics with re
gard to aquap lan ing, no ise and wear.
- We recommend that you pay part icu lar atten
tion to th is fact during wet weather and that
you adjust your speed to match road cond i
tions.
- Rep lace the flat tire w ith a new one and have it
installed on your veh icle as soon as possible to
restore the handling advantages of a un id irec
tional tire .
Notes on wheel changing
Please read the information Q page 241, New
tires or wheels
if you are going to use a spare tire
which is different from the tir es on your veh icle.
After you change a tire:
- Check the tire pressure on the spare immedi
ately after installation.
- Have the wheel bolt tightening torque
checked with a torque wrench as soon as pos
sible by your authorized Audi dealer or a
qualified workshop.
- With steel and alloy wheel rims, the wheel
bolts are correctly tightened at a torque of
105
ft lb (140 Nm).
- If you notice that the wheel bolts are corroded
and difficult to turn while changing a tire,
they should be replaced before you check the
tightening torque.
- Replace the flat tire with a new one and have
it installed on your vehicle as soon as possi
ble. Remount the wheel cover.
Until then, drive with extra care and at reduced
speeds.
.&_ WARNING
- If you are going to equip your vehicle with
tires or rims which differ from those which
were fac tory installed, then be sure to read
the information
Q page 241, New tires or
wheels.
-
263
Page 288 of 300
Index
Child restraints
Danger of using chi ld restraints in the front
seat ... .. .. .. .. ... ... .... ... .. .. .. . 152
System anchors . . . . . . . . . . . . . . . . . . . . . 183
Where can I get additional informat ion
about ch ild restrai nts and their use? . . . . 188
Ch ild safety . . . . . . . . . . . . . . . . . . . . . . . . . . 171
Important safety instructions for using child
safety seats . . . . . . . . . . . . . . . . . . . . . . . . 17 4
Installing a child restraint using the LATC H
system . . . . . . . . . . . . . . . . . . . . . . . . . . . . 185
Mounting and releasing the anchorage
hook . . . . . . . . . . . . . . . . . . . . . . . . . . . . . . 18S
Tether anchors . . . . . . . . . . . . . . . . . . . . . . 186
Tether st raps . . . . . . . . . . . . . . . . . . . . . . . 186
Ch ild safety locks
Rear doors . . . . . . . . . . . . . . . . . . . . . . . . . . 45
Ch ild safety seats
Booster seats . . . . . . . . . . . . . . . . . . . . . . . 179
Convertible child seats . . . . . . . . . . . . . . . 177
Da nger of us ing child restraints in the front
seat . . . . . . . . . . . . . . . . . . . . . . . . . . . . . . . 152
H ow do I properly install a child safety seat
. h' l ? in myve 1c e .... .. . .......... .. .. ... 174
I nfa nt seats . . . . . . . . . . . . . . . . . . . . . . . . 176
L A TCH system . . . . . . . . . . . . . . . . . . . . . . 185
L ower anchorages . . . . . . . . . . . . . . . . . . . 184
Safety instructions . . . . . . . . . . . . . . . . . . . 17 4
Unused safety belts on the rear seat . . . . 176
Ch ild seats . . . . . . . . . . . . . . . . . . . . . . . . . . 176
Secur ing . . . . . . . . . . . . . . . . . . . . . . . . . . . 180
Cigarette lighter . . . . . . . . . . . . . . . . . . . . . . . 76
Cleaning . . . . . . . . . . . . . . . . . . . . . . . . . . . . 207
Clea ning/ remov ing ice from windows . . . . . 209
C lean ing Alcantara ............. .... .. . 210
Clean ing artificia l leather ..... ... .. .. ... 210
C lea ning ca rbon parts .... ...... ... 209,210
Clean ing contro ls . . . . . . . . . . . . . . . . . . . . . 209
Clea ning deco rative p arts and trim . . . . . . . 209
Clea ning displays . . . . . . . . . . . . . . . . . . . . . 209
Cleaning exhaust tai l pipes . . . . . . . . . . . . . 209
Clean ing plast ic parts . . . . . . . . . . . . . . . . . . 209
Clean ing textiles . . . . . . . . . . . . . . . . . . . . . . 210
Clean ing the rims
Climate control 208
Ai r vents . . . . . . . . . . . . . . . . . . . . . . . . . . . . 82
Automatic recircu lation . . . . . . . . . . . . . . . . 8 2
286
Operat ion . . . . . . . . . . . . . . . . . . . . . . . . . . . 81
Setup . . . . . . . . . . . . . . . . . . . . . . . . . . . . . . 82
Supplementary . . . . . . . . . . . . . . . . . . . . . . . 83
Sync hroni zing . . . . . . . . . . . . . . . . . . . . . . . . 82
Cli mat e co ntro l system . . . . . . . . . . . . . . . . . 80
Cl imatized cupholder . . . . . . . . . . . . . . . . . . . 75
Clock . . . . . . . . . . . . . . . . . . . . . . . . . . . . . . . . 12
Closi ng
Panorami c slid ing su nroof . . . . . . . . . . . . . . 47
Coat hooks . . . . . . . . . . . . . . . . . . . . . . . . . . . 79
Compass mirror . . . . . . . . . . . . . . . . . . . . . . . 61
Compliance . . . . . . . . . . . . . . . . . . . . . . . . . . 283
Cons umer info rmation . . . . . . . . . . . . . . . . . 280
Cons umer Informa tion . . . . . . . . . . . . . . . . . 141
Contacting NHTSA . . . . . . . . . . . . . . . . . . . . 141
Convenience Closing . . . . . . . . . . . . . . . . . . . . . . . . . . . . . 47
Opening . . . . . . . . . . . . . . . . . . . . . . . . . . . . 47
Convenience key . . . . . . . . . . . . . . . . . . . . . . . 40
Indicator lights . . . . . . . . . . . . . . . . . . . . . . 88
Locking and unloc king vehicle . . . . . . . . . . . 40
Start ing engine (START ENGINE STOP but-
ton) . . . . . . . . . . . . . . . . . . . . . . . . . . . . . . . . 87
Stopp ing the eng ine (START ENGINE STOP
button) . . . . . . . . . . . . . . . . . . . . . . . . . . . . . 88
Switc hing on ignit io n . . . . . . . . . . . . . . . . . . 87
Convertible child safety seats . . . . . . . . . . . 177
C onvertib le locking ret racto r
Activating . . . . . . . . . . . . . . . . . . . . . . . . . . 182
Deact ivating . . . . . . . . . . . . . . . . . . . . . . . . 183
U sing to secure a child safety seat . . . . . . 182
Coo la nt system . . . . . . . . . . . . . . . . . . . . . . . 226
Coo led cupholder . . . . . . . . . . . . . . . . . . . . . . 75
Cooling box in glove compartmen t . . . . . . . . 78
Cooling mode (climate cont rol) . . . . . . . . . . . 81
Cooling System Expansion tank . . . . . . . . . . . . . . . . . . . . . . 226
Co rne ring light . . . . . . . . . . . . . . . . . . . . . . . . 54
C ruise cont rol
Changi ng speed . . . . . . . . . . . . . . . . . . . . . . 96
Preselec t speed . . . . . . . . . . . . . . . . . . . . . . 96
Swi tc hin g off . . . . . . . . . . . . . . . . . . . . . . . . 96
Switc hing on . . . . . . . . . . . . . . . . . . . . . . . . . 95
Warn ing/indicator lights . . . . . . . . . . . . . . . 17
C ruisi ng range . . . . . . . . . . . . . . . . . . . . . . . . . 22
Page 295 of 300
,....,
N
co
er::
co
,....,
40
Remote rear lid release . . . . . . . . . . . . . . . . . 43
Repair manuals . . . . . . . . . . . . . . . . . . . . . . . 280
Repairs
Airbag system
164
Replacing
Light bulbs . . . . . . . . . . . . . . . . . . . . . . . . .
268
Replacing wiper blades . . . . . . . . . . . . . . . . . 58
Reporting Safety Defects . . . . . . . . . . . 141, 142
Reset button . . . . . . . . . . . . . . . . . . . . . . . . . . 13
Retractor . . . . . . . . . . . . . . . . . . . . . . . . . . . . 146
Right hand drive . . . . . . . . . . . . . . . . . . . . . . . 54
Rims ...... ... ................ .... .. 248
Roof rack . . . . . . . . . . . . . . . . . . . . . . . . . . . . . 72
Attachment points . . . . . . . . . . . . . . . . . . . . 72
Installing the attachments . . . . . . . . . . . . . 73
Installing the roof rack . . . . . . . . . . . . . . . . 73
Roof load . . . . . . . . . . . . . . . . . . . . . . . . . . . 7 4
Rule of behavior offroad . . . . . . . . . . . . . . .
201
s
Safe driving hab its
Safety 134
Airbag system . . . . . . . . . . . . . . . . . . . . . . 151
Belts . . . . . . . . . . . . . . . . . . . . . . . . . . . . . . 143
Cargo . . . . . . . . . . . . . . . . . . . . . . . . . . . . . 139
Correct seating position . . . . . . . . . . . . . . 13 5
Pedal area . . . . . . . . . . . . . . . . . . . . . . . . . .
138
Safety belt position . . . . . . . . . . . . . . . . . . . 147
Safety belt height adjustment . . . . . . . . . 148
Safety belts worn by pregnant women . . . 148
Safety belt pretensioner
Service and disposal . . . . . . . . . . . . . . . . . .
150
Safety belts . . . . . . . . . . . . . . . . . . . . . . 143, 146
Cleaning . . . . . . . . . . . . . . . . . . . . . . . . . . . 209
Danger to passengers who do not wear a
safety belt . . . . . . . . . . . . . . . . . . . . . . . . .
144
Fastening . . . . . . . . . . . . . . . . . . . . . . . . . . 146
Height adjustment . . . . . . . . . . . . . . . . . . . 148
Improperly worn . . . . . . . . . . . . . . . . . . . . 149
Not worn . . . . . . . . . . . . . . . . . . . . . . . . . . 144
Safety belt position . . . . . . . . . . . . . . . . . . 147
Safety instructions . . . . . . . . . . . . . . . . . . . 145
Securing child safety seats . . . . . . . . . . . . 180
Index
Special considerations for pregnant wom-
en . . . . . . . . . . . . . . . . . . . . . . . . . . . . . . . .
148
Unfastening . . . . . . . . . . . . . . . . . . . . . . . . 148
Warning/indicator light ........... 17,143
Worn properly . . . . . . . . . . . . . . . . . . . . . . 145
Safety compliance sticker . . . . . . . . . . . . . . 276
Safety equipment . . . . . . . . . . . . . . . . . . . . . 134
Safety features for occupant restraint and
protection . . . . . . . . . . . . . . . . . . . . . . . . . . .
134
Safety guidelines
Seat adjustment . . . . . . . . . . . . . . . . . . . . .
63
Safety instructions
Engine compartment . . . . . . . . . . . . . . . . .
220
for side curtain airbags . . . . . . . . . . . . . . . 170
for using child safety seats . . . . . . . . . . . . 17 4
for using safety belts . . . . . . . . . . . . . . . . .
145
Monitoring the Advanced Airbag System . 163
Safety systems
Warning/indicator lights . . . . . . . . . . . . . . .
16
Seat
Heating . . . . . . . . . . . . . . . . . . . . . . . . . . . . .
82
Number of seats . . . . . . . . . . . . . . . . . . . . 143
Ventilat ion . . . . . . . . . . . . . . . . . . . . . . . . . . 82
Seat adjustment . . . . . . . . . . . . . . . . . . . . . . . 64
Driver's seat . . . . . . . . . . . . . . . . . . . . . . . . .
63
Front passenger's seat . . . . . . . . . . . . . . . . . 64
Head restraints . . . . . . . . . . . . . . . . . . . . . 13 7
Safety gu idelines . . . . . . . . . . . . . . . . . . . . .
63
Seat belts
refer to Safety belts . . . . . . . . . . . . . . . . . . 143
Seating capacity
Seating position 143
Driver . . . . . . . . . . . . . . . . . . . . . . . . . . . . . 135
Front passenger . . . . . . . . . . . . . . . . . . . . . 136
How to adjust the front seats . . . . . . . . . . 136
Incorrect seat position . . . . . . . . . . . . . . . 138
Occupants. . . . . . . . . . . . . . . . . . . . . . . . . . 135
Rear passengers . . . . . . . . . . . . . . . . . . . . . 137
Sea transport
Seats 105
Cleaning . . . . . . . . . . . . . . . . . . . . . . . . . . . 210
Correct seating position . . . . . . . . . . . . . . 135
Selective cata lytic reduction
refertoAdBlue . .... .................
217
Se lective unlock feature . . . . . . . . . . . . . . . . . 39
Selective wheel torque control (all-wheel
drive) . . . . . . . . . . . . . . . . . . . . . . . . . . . . . . .
190
293