start stop button AUDI Q5 2018 User Guide
[x] Cancel search | Manufacturer: AUDI, Model Year: 2018, Model line: Q5, Model: AUDI Q5 2018Pages: 392, PDF Size: 60.56 MB
Page 89 of 392
u co ..... N r--N ..... 0 <( 0 00
~ Release the brake pedal and press the acce lera-
tor pedal
~ ,&. .
Various conven ien ce fun ctions are ava ilable for
s tarting on hills
~page 82.
Stopping temporarily
~ Press the brake pedal to stop the vehicle, for
example at a t raff ic light . Do not press the ac
ce le rato r peda l w hen do ing th is.
~ T o p revent the vehicle from rolling when yo u
sta rt d riving, se t the pa rk ing brake when stop
ping on steep
hi lls¢ ,&..
~ The parking bra ke wi ll re lease automatically
and yo ur vehicle will begin to move when the
doors a re closed, the driver's safety belt is fas
tened, and you accelerate as usual.
Stopping /parking
If the se lector lever is not in the "P" position
when yo u ope n the driver's door, the ve hicle
could rol l.
~ Press and hold the b rake pedal ¢,&. .
~ Set the parking brake.
~ To se lect the "P" selector leve r position, press
the "P" button
@ on the selector lever
¢page 85, fig. 90.
Under certain conditions, such as driving in the
mo unta ins or when towing a trailer, it may be
he lpful to switch to manual mode temporarily
and sh ift
manually to adapt to the driving condi
tions
¢ page 88.
On hills, set the parking brake first and then s hift
into the "P" position
¢ page 80. This prevents too
much stress from being placed on the locking
mechanism .
A WARNING
- The veh icle can roll even when the engine is
switched off .
- Unintended veh icle movement can lead to
serious injur ies .
- To reduce the risk of an accident, do not
press the acce lera to r pedal when changing
the se lector lever posi tion while the vehi cle
is sta tionary an d the engine is running.
Driving
- To reduce the r is k of an accident, neve r se
lect the "R" or "P" pos itions wh ile d riving.
- Do not inadvertently press the accelerator
pedal when the vehicle is stationa ry. Other
wise the r is k of an accident increases be
cause the vehicle will start to move immedi
ately, even if the parking brake is set .
Hill descent control
The hill descent control system assists the driver
when driving down hills.
Hi ll d escent cont rol activates when the t ransmis
s ion is in the "D" or "S" pos ition and you press the
brake pedal. The transmission automatica lly se
lects a gear that is s uitable for the hill. Hill de
scent cont rol tr ies to maintain the speed ach
ieved a t the t ime of b raking, w it hi n physical a nd
tec hnical lim itations . If may still be necessary to
adjus t the speed w it h t he bra ke pedal.
Hill descent con trol switches off once the hill lev
els out or you press the accelerator pedal.
When operat ing the cru ise cont rol system*
¢ page 95, hill descent contro l is a lso activated
whe n the speed is set .
A WARNING
-
Hill descent cont rol cannot ove rcome physical
li mitat ions, so it may not be able to ma intain
a consta nt s pee d un der all conditions. A lways
b e ready to app ly the bra kes.
87
Page 91 of 392
u co ..... N ,..._
N ..... 0 <( 0 00
Launch control program
App lies to: ve hicles with S tro nic tra nsm issio n
The launch control program provides the best
possible acceleration when starting from a stop.
Requirement: the eng ine must be at operating
temperature and the steer ing whee l must not be
turned .
~ Deactivate the Start/Stop system* c:> page 80.
The LED in the 10~ ·1 button turns on.
~ With the engine runn ing, press the ~
l fl - O~FF =I but
ton briefly
c> page 141 . The Ill indicator light
tu rns o n and the message
Stabil ization control
( ESC ): offroad . Warning! Reduc ed stabilit y
ap
pears in the inst rumen t cluste r display.
~ Pull the selector lever back o ut of t he "D/S" po
s it ion briefly to select the "S " position or se lect
the
D ynamic driving mode in drive se -
lect* ¢ page 12 7.
~ Press the brake pedal firmly with your left foot
and hold it all the way down for at least one
second.
~ At the same t ime, press the gas pedal all the
way dow n with your right foot unt il the engi ne
reaches and stays at a h igh RPM level.
~ Remove yo ur foot from t he b rake pedal within
five seconds
c:> ,&. .
A WARNING
-Always adapt yo ur driving to the traffic flow.
- O nly use the La unch contro l prog ram when
road and traffic conditions allow it and ot h
er drivers wi ll not be endangered or both
ered by your driving and the vehicle's accel
eration.
- Please note that the drive whee ls can spin
and the vehicle can break away when off
road mode is switched on, espec ia lly when
the road is slippery.
- Once the vehicle has started moving, press the
I~ OF F! button briefly to turn the offroad
mode off .
(D Tips
-The transmiss ion temperature may increase
s ignificantly after using the launc h control
program. If that happens, the program may
Driving
not be ava ilab le for a few minutes. It will be
avai lab le agai n after a coo l-down period.
- Whe n accelerati ng usi ng the launch cont ro l
program, all vehicle parts are s ubject to
heavy loads. This can lead to increased
wear.
Transmission malfunction
• Tran smiss ion: too hot. Please stop vehicle
Do not continue driving. Se lect the "P" selector
l ever posit ion and contact an authorized A udi
dealer or authorized Audi Service Fac ility for as
s istance.
• Tran smiss ion: malfunction! Plea se stop ve
hicle and shift to P
Do not continue dr iv ing . Se lect t he "P" selec to r
l ever posit ion and contact an authori zed A udi
dealer or authorized Audi Service Facility for as
s istance.
[O] Selector lever : malfunction ! You can con tin
ue d riving. Please contact Se rvice
The re is a system malfu nction in t he transmis
s io n. Dr ive to an a uth orized Aud i de aler o r au
tho rized Aud i Serv ice Facili ty immedia tely to have
the mal function corrected.
[i'J P button : malfun ction! Auto P when engine
off . Pl ea se conta ct Servi ce
T here is a malfunct ion in the "P" button on the
selector lever . The transm ission automatically
engages "P " when you sw itch off t he engine.
D rive to an author ized A udi dealer or autho riz ed
Audi Se rvice Faci lity immed iate ly to have the
malfunction corrected.
[i'J Select or lever : malfun ction! Gear change on
l y pos sibl e using both paddl e le ver s. Plea se con
ta ct Service
T here is a system malfunction in the transmis
s io n. You can con tinue dr iv ing with restr icted
funct ion. The se lector lever is not wo rk ing . Gea rs
can on ly be selected by tapping bo th shift pad
dles at the same time when the vehicle is station
ary
c> page 88 , fig . 92 . Pay attention to these-
l ected transmission position in the instrument
.,.
89
Page 97 of 392
u co ..... N r-N .....
~ 0 co
Assistance systems Speed warning system
Description
App lies to: vehicles with speed warning system
The speed warning system helps you to stay be
low a specified maximum speed that can be set,
changed or deleted in the Infotainment system .
The speed warning system warns you if you are
exceeding the maximum speed that you have set .
A warning tone will sound as soon as your speed
exceeds the stored value slightly. The
(Ol (USA
models)/
(01 (Canada models) indicato r light
and a message appear i n the ins trumen t cluster
d isplay at the same time. The
(Sl / (Ol indicator
light and the message turn
off if the speed falls
back below the stored maximum speed .
Sett ing a threshold is recommended if you would
like to be reminded when yo u reach a certa in
maximum speed . Situations where you may want
to do so include driving in a country with a gener
al speed limit or if there is a specified maximum
speed for winter tires.
Setting the warning threshold
Select in the I nfotai nment system: IMENU I but
ton
> Ve hicle > le ft control button > Dri ver a ssis
tan ce
> Speed warning > Manual.
@ Tips
Regard less of the speed warning system, you
should always monitor your speed using the
speedometer and make sure you are following
the legal speed limit.
A ssi st a nce systems
Cruise control system
Switching on
Applies to: vehicles with cruise control system
The cruise control system makes it possible to
drive at a constant speed starting at 15 mph
(20 km/h).
0
f
~
0
Fig . 94 Operat ing leve r: cru ise control system
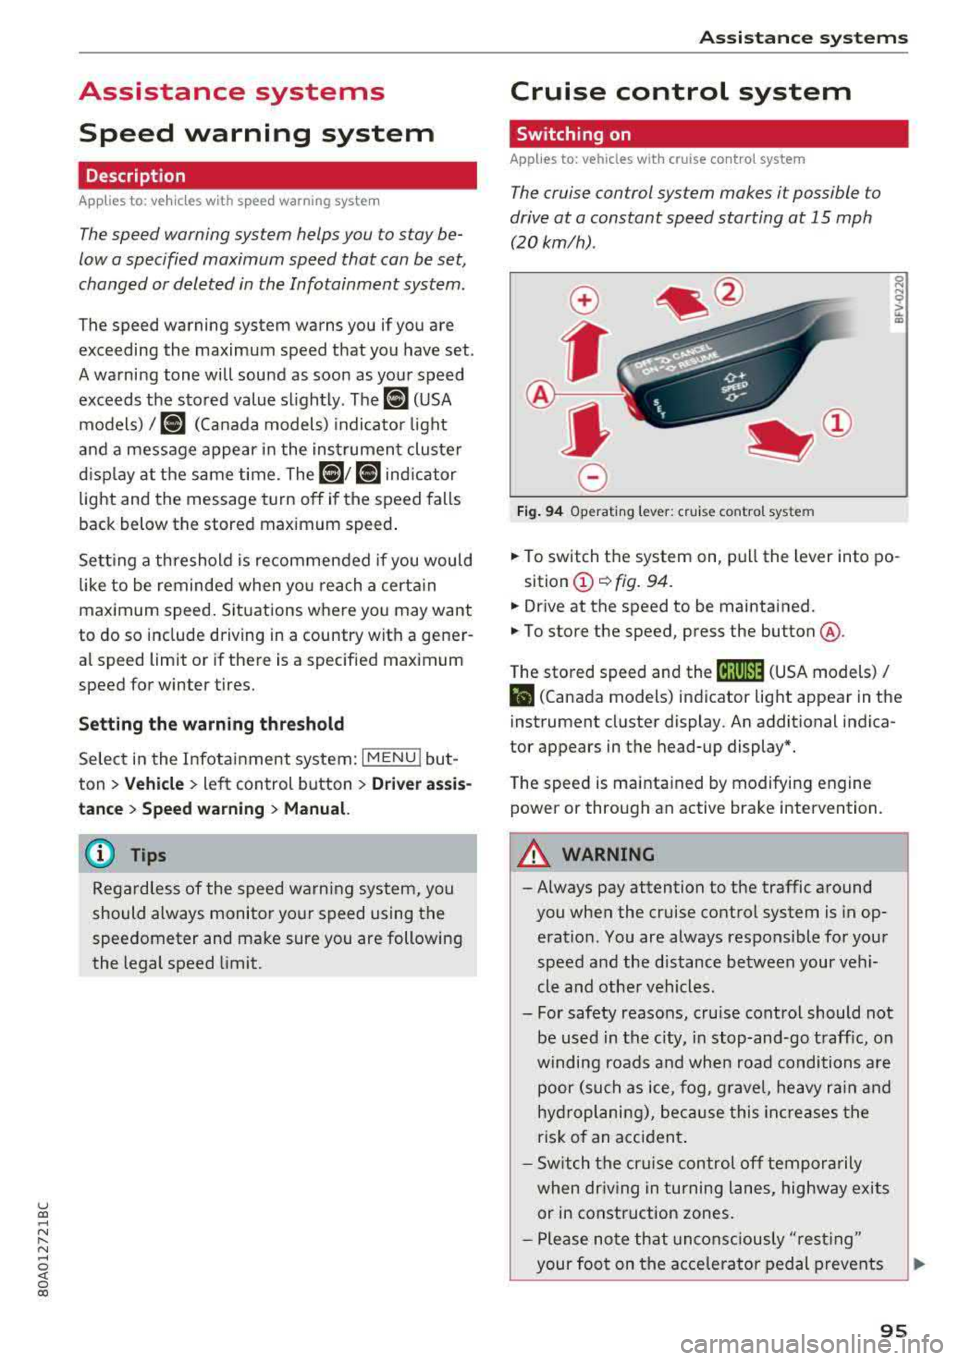
.,. To switch t he system on, pull the lever into po-
sition
(D ¢ fig. 94.
.,. Drive at the speed to be maintained.
.,. To store the speed, press the button @.
T he stored speed and the
@jltJ~i, (USA models) /
l'I (Canada models) ind icator lig ht appear in the
instrument cluster display. An additional indica
tor appears in the head-up display*.
T he speed is mainta ined by modifyi ng engine
power or through an active brake intervention.
A WARNING
-Always pay attention to the traffic around
you when the cruise control system is in op
eration. You are always responsible for you r
speed and the distance between your vehi
cle and othe r vehicles .
- For safety reasons, cru ise control should not
be used in the city, in stop -and-go t raff ic, on
winding roads a nd when road conditions a re
poor (such as ice, fog, g rave l, heavy ra in and
hy droplani ng), bec ause this in cr eases the
risk of an acciden t.
- S witch the cr uise con trol
off tempor arily
when dr iv ing in turning lanes, highway exits
or in construction zones.
- P lease no te th at unconsc iously
"rest ing"
your foot on the accelerator ped al prevents
95
Page 101 of 392
u co .... N ,..._
N ..... 0 <( 0 00
Operating the lap timer
.,. On the mult if u nct ion s teer ing whee l, tur n the
l e ft thumbw hee l
0 ~ page 12 unt il t he desired
menu item is displayed in the instrument cl us
ter .
.,. Press the left thumbwhee l to confirm the selec
t ion.
A WARNING
Your focus should always be on driving your
veh icle safely . As the dr ive r, yo u have com
plete responsib ility for safety in traffic. Only
use t he f unctions s uch as the lap time r in s uch
a way tha t you alw ays ma int ain com plete con
tr ol ove r your vehicle in all tra ffic s itu ations.
(D Tips
You ca n ret rieve information from the t rip
computer while t he lap t ime r stopwatch i s
r u nning.
Lap times and timing
Applies to: vehicles with lap timer
Requirement: the lap t imer must be o pen
~ page 98 .
Timing laps
.,. To start tim ing manually, se lect Start lap 1 in
the menu .
-
.,. To start tim ing a utomat ica lly as soon as you
begin to drive, select
Drive off to start lap 1 or
Start by driving off in the men u .
.,. To measure the lap t ime, select New lap in the
menu. T his starts timing the next lap at the
same t ime.
After completing a lap, the difference between
the last lap and the previous best lap time w ill be
ind icated with
a" -" or" +".
Pausing timing and displaying a split time
.,. To insert a pa use m , se lect Pau se in t he menu.
.,. T o resume timing, se lect Re sume in the men u .
.,. To display a split time, se lect Split time in the
men u. The split t ime
[fw] appears for approxi
mately 10 seconds in the instrument cluste r.
The timing of the current lap continues.
A ss istance systems
Resetting timing
.,. Using the mul tifun cti on steer ing whee l, sele ct
Re set time s in the menu.
(D Tips
- A m axim um of 99 lap t imes can be meas
ure d.
- If tim ing is pa used, you can continue i t later
even if yo u swi tc h t he ign ition o ff.
- Saved lap ti mes ca nnot be indiv id ua lly de
le ted from the tot al results.
- Th e saved lap t ime r va lues w ill remain after
sw itching the ign ition off.
Lap statistics
Applies to: vehicles with lap timer
Displaying lap statistics
You can display the numbe r of laps dr iven, the
fas test lap" +", the slowes t lap" -", and the aver
age t ime
"0" in t he instr ument cluster .
.,. On the multifunc tion steering w heel, select the
left contro l bu tton
> Lap stati stic s o r Sta tis
tics .
.,. Turn the thumbwheel down o r up to display the
individual lap times .
.,. To return to t he lap timing that was begun,
press the left thumbwheel.
Resetting lap statistics
.,. On the mul tif unc tion stee ring w heel, selec t:
the right control button
> Reset statistics.
(D Tips
The lap st atis tic s lis t the lap t imes fo r th e l ast
3 0 l aps . The fastest and slowes t lap time o ut
of up to 99 meas ured laps are a lso d isplayed.
Predictive efficiency
assist
Introduction
T he predict ive e fficiency assist he lps the driver to
drive with anticipation and therefore helps to
save fuel. The system accesses p redictive t rip da -
ta (including speed limits, inclines and the radius
Iii"
99
Page 129 of 392
u co ..... N r--N ..... 0 <( 0 00
(D Tips
The "S" selector lever position automatically
engages when the
Dynamic mode is se lected .
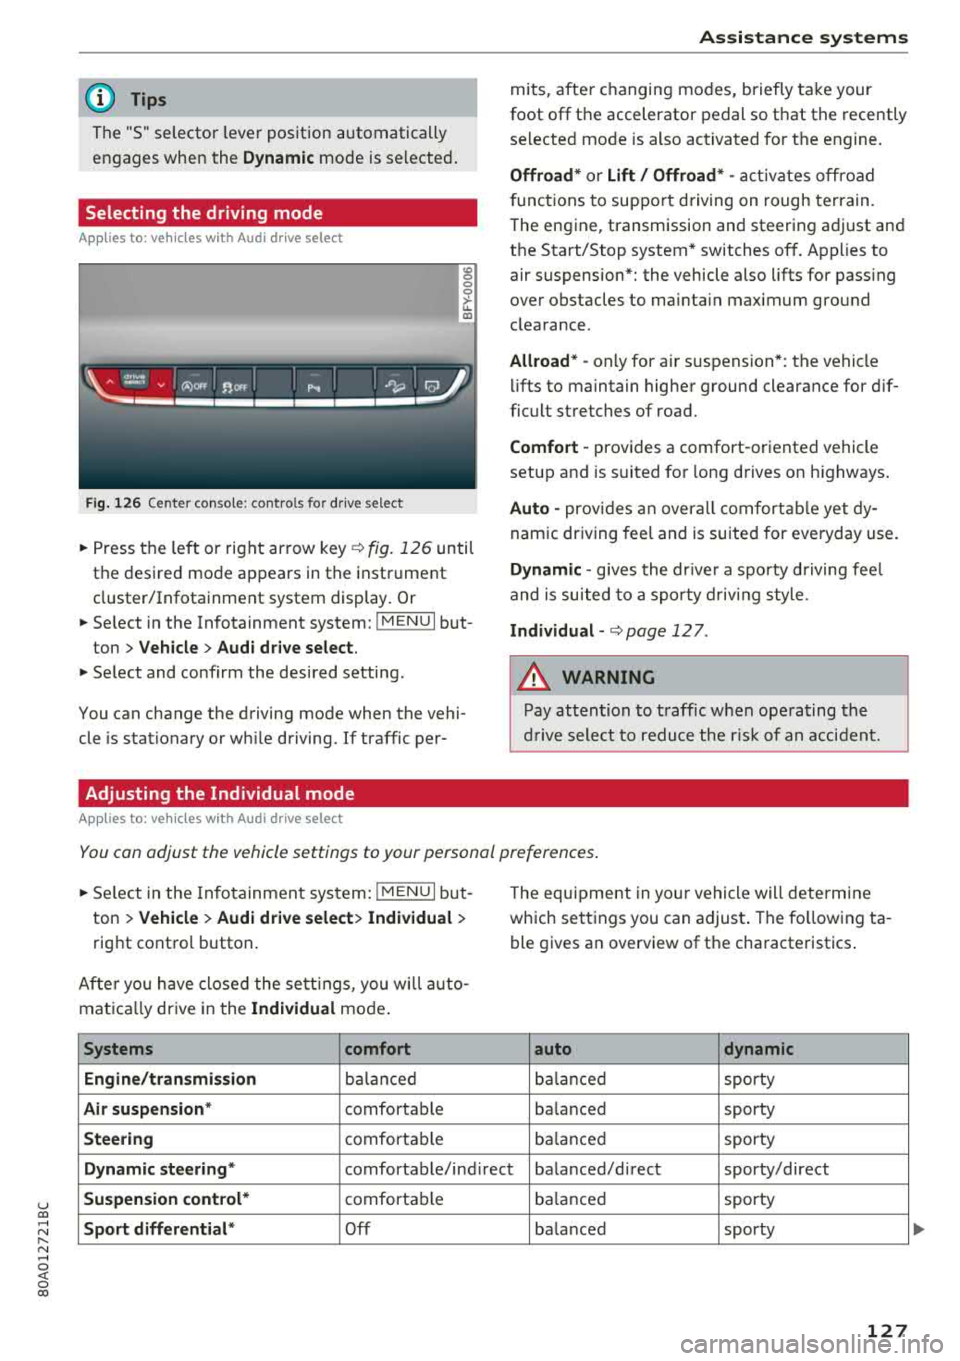
Selecting the driving mode
Applies to: ve hicles with Audi drive select
Fig. 126 Center conso le: controls for drive select
0 >'-LL ID
~ Press the left o r right arrow key¢ fig. 126 until
the desired mode appears in the instrument
cluster/Infotainment system display . Or
~ Se lect in the Infotainment system: !MENUI but-
ton
> Vehicle > Audi drive select.
~ Select and confirm the desired setting.
You can change the driving mode when the vehi
cle is stationary or wh ile driving. If traffic per-
Adjusting the Individual mode
Applies to: ve hicles with Audi drive select
Assistance systems
mits, after changing modes, briefly take your
foot
off the accelerator pedal so that the recently
selected mode is also activated for the engine.
Offroad* or Lift/ Offroad* -activates off road
f unct ions to support driving on rough terrain.
T he engine, transmission and steering adjust and
the Start/Stop system* switches
off. Applies to
air suspension*: the vehicle also lifts for pass ing
over obstacles to mainta in maximum ground
clearance.
Allroad * -only for ai r suspension *: the vehicle
lifts to maintain higher ground clearance for dif
ficult stretches of road.
Comfort -provides a comfort -oriented vehicle
setup and is suited fo r long d rives on h ighways .
Auto -provides an overall comfortable yet dy
namic driving feel and is suited for everyday use.
Dynamic -gives the drive r a sporty driving feel
and is suited to a sporty driving style .
Individual -¢ page 12 7.
A WARNING
-
Pay attention to traffic when operating the
drive select to reduce the risk of an accident.
You can adjust the vehicle settings to your personal preferences .
~ Select in the Infotainment system: !MENUI but
ton
> Vehicle > Audi drive select> Individual >
right contro l button.
Afte r you have closed the settings, you will auto
mat ica lly dr ive in the
Individual mode.
Systems comfort
Engine/transmission
balanced
Air suspension * comfortable
Steering comfortable Th
e equipment in yo ur vehicle will determine
which settings you can adjust . The fo llowing ta
ble gives an overview of the characteristics .
auto dynamic
balanced
sporty
ba lanced sporty
balanced sporty
Dynamic
steering* comfortable/ind irect ba lanced/direct sporty/direct
Suspension control* comfortab le balanced sporty
Sport differential* Off balanced sporty
127
...
Page 207 of 392
u co ..... N r--N ..... 0 <( 0 00
Or: search for a country/state using the input
field.
- Ent ering a d estination u sin g th e Ci ty/ ZIP
c o de :
select and confirm Cit y/ZIP code . Enter a
city or a ZIP code .
Or: select and confirm a city
from the list.
- Se lect and confirm additional detai ls about the
destination such as
Street , House number or
Dow nto wn.
- Destination ent ry using a st reet inter se ction* :
Requirement: you must enter a street. Se lect
and confirm
Inte rsection . Select and confirm a
street d irectly from the list.
Or : search for a
street using the input field .
- Se lect and confirm
Start ro ut e guidance .
Selecting a destination on the map
A pp lies to: ve hicles with navigation system and MMI touch
A point on the map can be used as the destina
tion.
- Adju sting th e scale : turn the contro l knob to
the left or rig ht.
- Acti vating c rosshairs : press the control knob.
T he crosshairs are shown on the map .
-Mov ing the c rosshairs: move the crosshairs to
the destination using the MM I touch contro l
pad*
¢ page 152.
- Setting as desti nation : press the control knob
when the crosshairs are s hown. If necessary,
select and confirm
Add as stopo ve r and then
Start route guidance .
- Hiding the cro sshai rs:
press the I BACK I button.
Additional information about th e loc ation of
the cro sshai rs:
when you select map con tent us
ing the crosshairs, a display of avai lable informa
tion appears (such as street name , address or
points of
interest) @c>page 213, fig. 193.
Na vigation
Setting a home address/favorite as the
destination
App lies to : vehicles wi th navigat io n syste m
You can quickly and easily start route guidance
to your home address using the home address
function. Favorites allow easier ac cess to fre
quently used destinations.
"' Press the INAV/MAPI button repeatedly u nti l
t he
En ter d estination men u is displayed
c>
page 203, fig . 185 .
Setting a home address as the destination
Requirement: a home address must be stored
c>page 210.
Your Home address is shown directly in the Ente r
d estination
menu @c>page 203 , fig . 185 .
-Select: Home address > Sta rt route g uidance .
Setting a favorit e as the destination
Requirement: a favo rite must be s tored as a des
tination
c> page211.
- Enter at least the fi rst three letters of the de
sired favo rite in the free text sea rch inpu t field.
The favo rites fo und a re shown in the Infotain
ment system
disp lay @ ¢ page 203, fig. 185 .
-Select and co nfirm the des ired entry.
- Select and confirm
St art route guidance.
(D Tips
- Add itiona l settings for the home address
can be fo und
under ¢page210 .
-Add itiona l setti ngs for the favorites can be
found unde r
¢page 211 .
205
Page 208 of 392
Navigat ion
Transferring a destination from the
directory
A pp lies to: ve hicles w ith naviga tion system
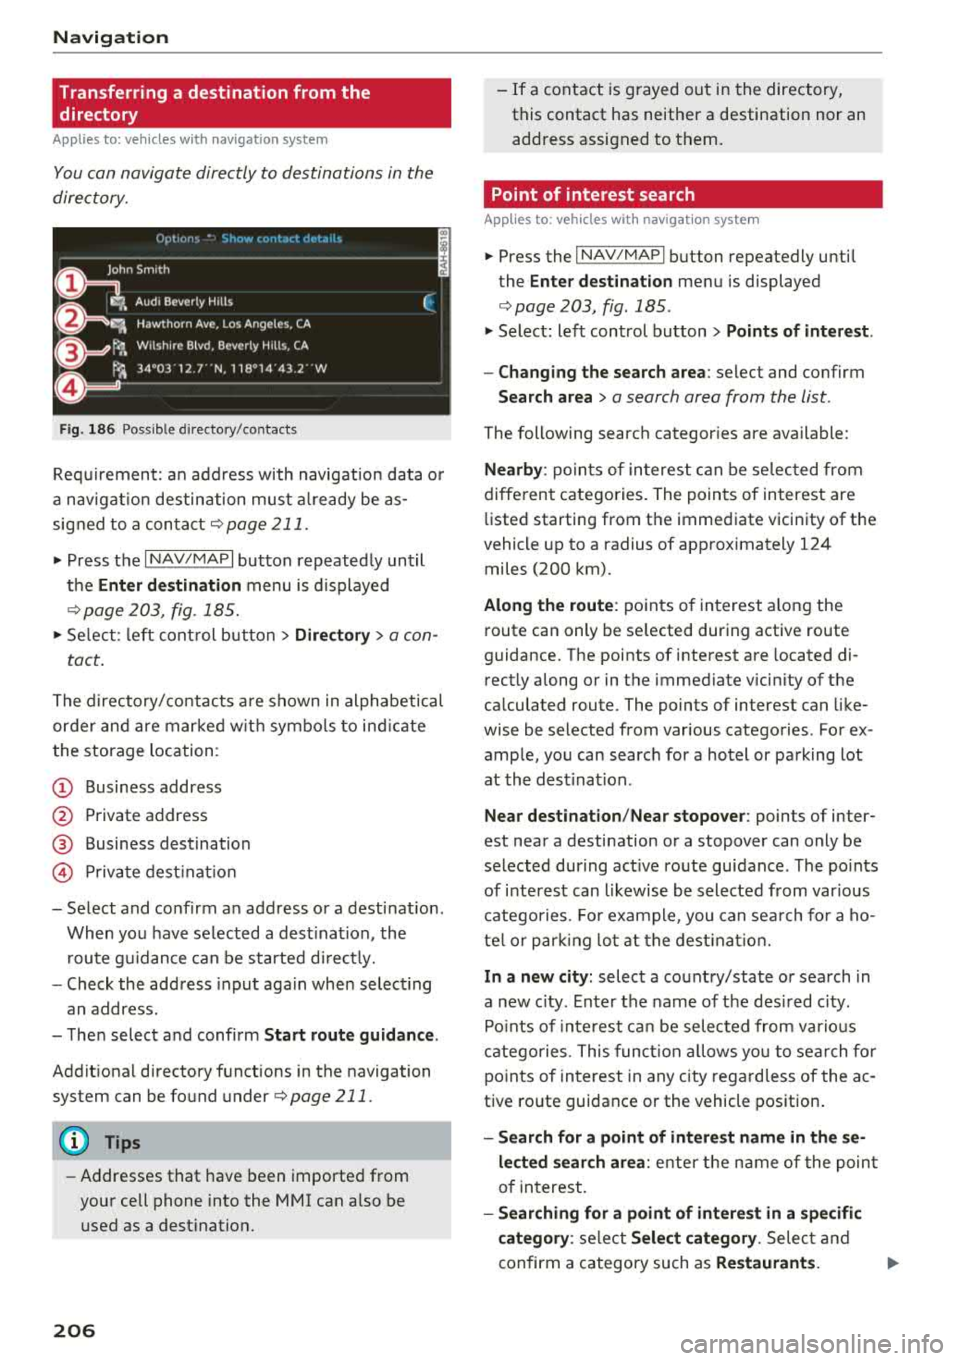
You can navigat e directly to d estinations in th e
directory.
Option•, • ~.,how co11t.Ht dl't.1il•,
0
, ;== Jo;i hn Smith
~ :-Audi Beverly Hills
~ ,. Hawthorn Ave, Los Angeles, CA
&=9t<;'l, Wilshire B lvd, Beverly Hills, CA
t
9, ~
Fig . 186 Possible directory/contacts
(,
~
~
Requirement: an address with navigat ion data o r
a nav igat io n destination must a lready be as
signed to a conta ct
¢ page 211 .
i. Press the I NAV/MAPI button repeatedly until
t h e
Enter de stination menu is displayed
¢ page 203, fig . 185.
i. Se lect: left con trol button > Director y > a con-
tact.
The d irectory/contacts a re shown in alphabetical
order and are marked w it h symbo ls to ind ic a te
the storage location:
(D Business address
@ Private address
@ Business dest ination
© Pr ivate dest inat io n
-Select and confirm a n address or a destination.
When you have se lected a dest inat ion, the
r oute g uidance can be started d irect ly.
-Check the address input aga in whe n select ing
an address.
-The n select and confirm Start rout e guid ance .
Addit iona l directory functions in the navigation
system can be found
under¢ page 211.
(D Tips
-Addresses that have been imported from
your cell phone into the MMI can a lso be
used as a dest ination.
206
-If a contact is g rayed out in the directory,
this contact has neither a destination nor an address assigned to them.
Point of interest search
App lies to : vehicles wit h navigat ion syste m
i. Press the I NAV/MAPI button repeatedly until
the
Enter des tinat ion me nu is displayed
¢page 203, fig . 185 .
.. Select: left control button > Points of intere st.
-Changing the search area : select and confirm
Search area > a search area from the list .
The following search categor ies are available:
Nearby : poin ts of in teres t can be se lec ted from
diffe rent categories. The points of interest are
li sted starting from the immediate vicinity of the
vehicle up to a radius of approximately 124
miles (200 km).
Along the route : points o f interest a long the
route can only be se lected during active route
guidance. The points of interest are located di
rectly a long or in the immediate vicin ity of the
ca lculated route. The points of interest can like
wise be selected from various categories . For ex
ample, you can searc h for a hotel or parking lot
at the dest inat ion .
Near destination /Near stopo ver : points of inter
est near a destination or a stopover can only be
selected dur ing act ive route guidance. The po ints
of i nterest can likewise be selected from var ious
catego ries. Fo r example, you can sea rch fo r a ho
te l o r par king lo t a t the dest inat io n .
In a new city: select a co untry/state or sea rch in
a new c ity. Enter the name of the des ired c ity .
Po ints o f inte rest ca n be selected from va rio us
c a tego ries. This funct ion a llows yo u to se arch fo r
po ints of in terest in any city rega rd less of the a c
tive ro ute guidance or the vehicle position.
-Search for a point of intere st name in the se
l ec ted search ar ea :
ente r the name of the poin t
o f in terest.
-Searching for a point of interest in a specific
c ategory :
select Sel ect category . Select and
confirm a category such as
Re staurant s. .,.
Page 210 of 392
Navigation
.,. Select: left control button > Geographical coor
dinates .
-Select Latitude /Longitude.
- Press the control knob to set t he in dividua l val-
u es.
- T urn the cont rol knob to the left/r ight to
c h ange the selected value .
- Select and confirm
Start route guidance .
Adding a stopover
Applies to: vehicles with navigation system
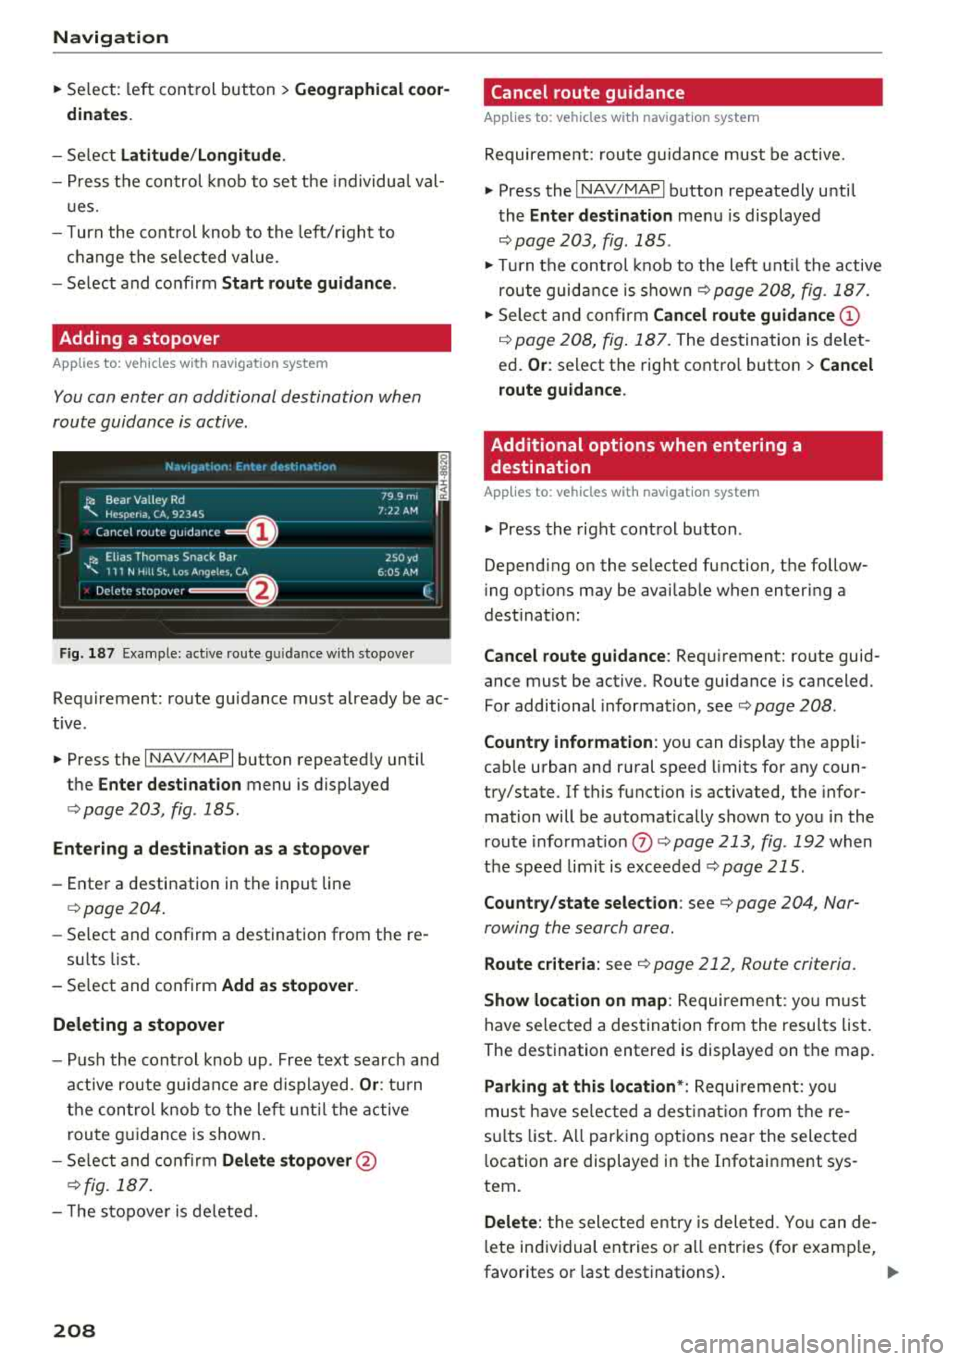
You can enter an additional destination when
route guidance is active .
_________ N_a_ v_ ,_g _a _t _,o _n_ . _F _n _t _e _, _ d _e_ ,_1 _, n_ a _
t, _o _n ________ ~~
jl1 Bear Va lley Rd 79 9 m;
' HC'spcria. CA, 92345 1:22 AM
J Cancel route g~1dance ::0 -·-·-·
.JI' Elias Thomas Snack Bar
' 111 N Hill St, Los Angeles, CA
Delete stopover ====~ lfJ
250yd
6:05 AM
Fig . 187 Example: active route g uida nce w ith stopover
Requirement: route guidance must already be ac
tive .
.,. Press the I NAV/MAPI button repeatedly until
the
Enter destination menu is displayed
¢ page 203, fig . 185 .
Entering a destination as a stopover
-Enter a destination in the input line
¢page 204.
-Se lect and confirm a destination from the re -
s ul ts list .
- Select and confirm
Add as stopover.
Deleting a stopover
- Push the cont rol knob up . Free text search and
active route guidance are displayed.
Or: turn
the control knob to the left until the active
route guidance is shown.
- Select and confirm
Delete stopover @
¢fig. 187.
- T he stopove r is deleted.
208
Cancel route guidance
Applies to: vehicles with navigation system
Requirement: route guidance must be active.
.,. Press the I NAV/MAPI button repeatedly until
the
Enter destination menu is displayed
¢ page 203, fig. 185 .
.,. Turn the control knob to the left until the active
route guidance is
shown¢ page 208, fig. 187 .
.,. Select and confirm Cancel route guidance (D
¢ page 208, fig. 187. The destination is de let
ed.
Or : select the right contro l button > Cancel
route guidance .
Additional options when entering a
destination
Applies to: vehicles with navigation system
.,. Press the right control button .
Depend ing on the selected function, the follow
i ng opt ions may be avai lable when entering a
dest ination:
Cancel route guidance: Requirement: route guid
ance must be active. Route guidance is canceled.
For additional information, see ¢ page 208 .
Country information : you can display the app li
cab le urban and rural speed limits for any coun
try/state. If this function is activated, the infor
mation will be automatically shown to you in the
route informat ion
(J) ¢ page 213 , fig . 192 when
the speed limit is exceeded
¢page 215.
Country/state selection: see¢ page 204, Nar
rowing the search area .
Route criteria: see¢ page 212, Route criteria .
Show location on map: Requirement: you m ust
have selected a destination from the results list.
The destination entered is displayed on the map .
Parking at this location*: Requirement: you
must have se lected a destination from the re
su lts list . A ll parking options near the selected
l ocation are displayed in the Infotainment sys
tem.
Delete: t he selected entry is deleted. You can de
l ete individual entries or a ll entries (for examp le,
favorites or last destinations) .
...
Page 211 of 392
u co ..... N r-N .....
~ 0 co
Audi connect at this location *: Requirement: you
must have selected a destination from the re
sults list . Allows yo u to search for items in the vi
cinity of the selected location, such as
Travel in
formation.
Online traffic data* :
the on line traffic informa
tion
r::;, page 219 can be switched on or off .
Add destination to contact : see r::;, page 211.
Store as favorite : see r::;, page 211.
Voice guidance : see r::;,page 212.
Navigation settings: seer::;, page 211.
(D Tips
Information on online traffic data* can also
be found online at www.audiusa.com.
Personal route
assistance
Applies to: vehicles with navigation system and personal
route assistance
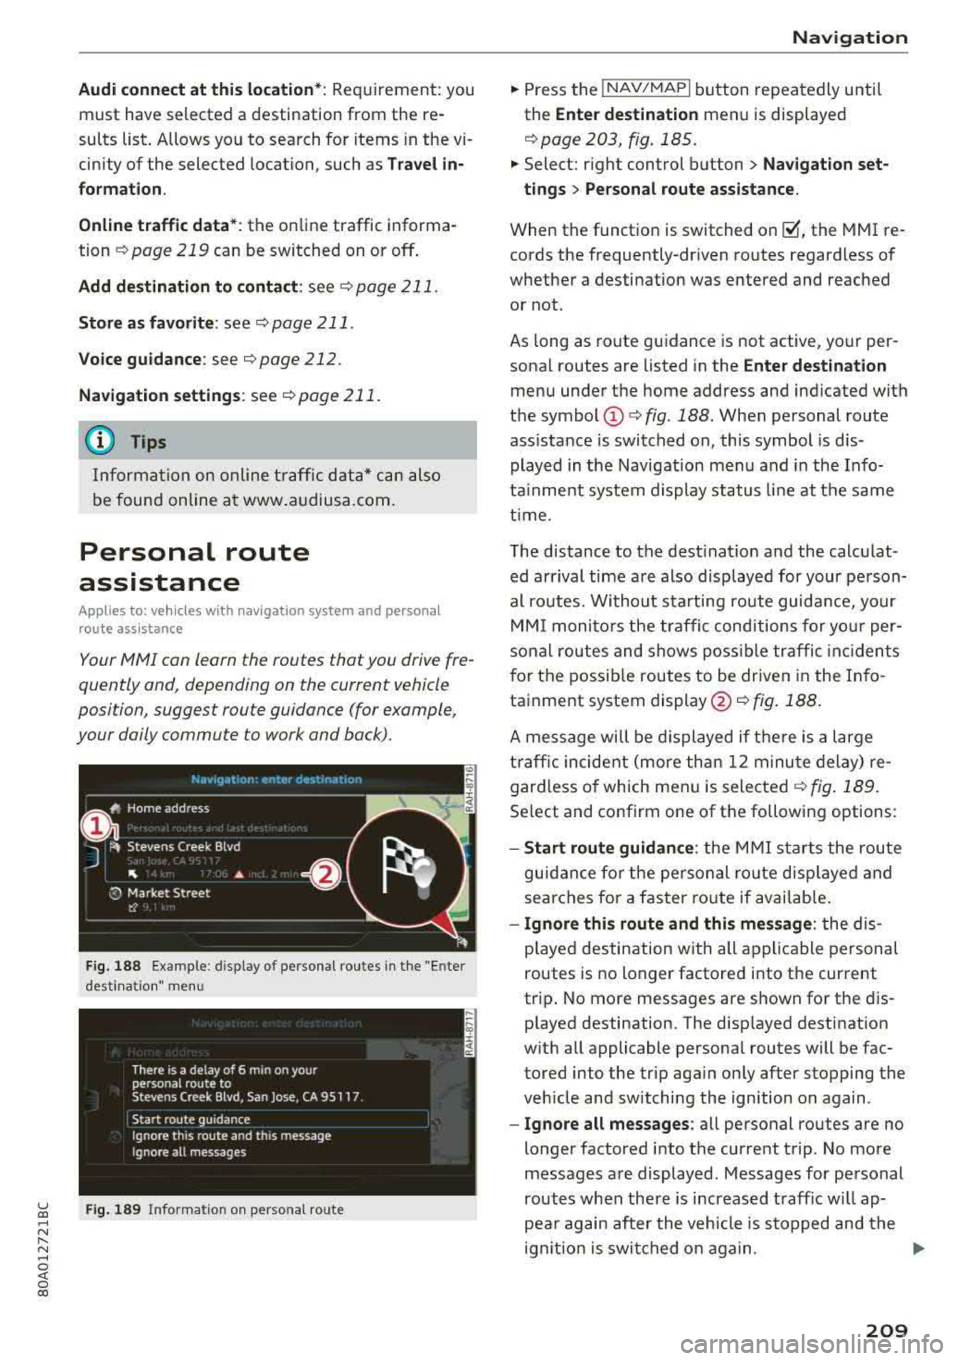
Your MMI con learn the routes thotyou drive fre
quently and, depending on the current vehicle
position, suggest route guidance (for example,
your doily commute to work and back).
Fig. 188 Example : d isplay of personal routes in the "Enter
desti natio n" me nu
F ig. 189 Info rmation on perso nal route
Navigation
"Press the !NAV/MAPI button repeatedly until
the
Enter destination menu is displayed
r::;, page 203, fig . 185.
" Select: right control button > Navigation set-
tings > Personal route assistance.
When the function is switched on~. the MMI re
cords the frequently-driven routes regardless of
whether a destination was entered and reached
or not.
As long as route guidance is not active, your per
sonal routes are listed in the
Enter destination
menu under the home address and indicated with
the symbol
(D r::;, fig. 188. When personal route
ass istance is switched on, this symbol is dis
played in the Navigation menu and in the Info
tainment system display status line at the same
time .
The distance to the destination and the calculat
ed arrival time are also displayed for your person
al routes. Without starting route guidance, your
MMI monitors the traffic conditions for your per
sonal routes and shows possible traffic incidents
for the possible routes to be driven in the Info
tainment system
display @r::;, fig. 188.
A message will be displayed if there is a large
traffic incident (more than 12 minute delay) re
gardless of which men u is selected
r::;, fig . 189.
Select and confirm one of the following options:
-Start route guidance : the MMI starts the route
guidance for the personal ro ut e displayed and
searches for a faster route if available.
- Ignore this route and this message : the dis
played destination w ith all applicable personal
routes is no longer factored into the cur rent
trip . No more messages are shown for the dis
played destination. The disp layed destination
with all applicable personal routes will be fac
tored into the trip aga in only after stopping the
veh icle and switching the ign ition on again .
-Ignore all messages : all personal routes are no
longer factored into the current trip. No more
messages are displayed. Messages for personal
routes when there is increased traff ic w ill ap
pea r again after the vehicle is stopped and the
ign ition is switched on again .
.,.
209
Page 219 of 392
u co ..... N r-N .....
~ 0 co
A selection with the available update packages
appears in the Infotainment system disp lay
¢ fig . 196.
Selecting th e onlin e map upda te
- Se lect an update package from the list(~) @
<=>fig. 196.
-Confirm you r se lection with the I BACK I button
and go back to the selection.
- The number and amount of data fo r th e select
ed update package are now disp layed in the I n
fotainment system.
Starting the download
- Se lect and confirm Start downlo ad .
- Confirm the secur ity prompt by selecting S tart
download
again .
The update packages begin to down load and the
status of the download progress is shown in the
Infotainment system display.
In stall ation of onlin e map update s
The downloaded map mater ia l installs after you
stop your vehicle . The new update packages in
stall only after you switch off the ignition . After
restarting the MMI , the Infota inment system dis
play ind icates if the updates installed successful
ly .
- Confirm the successful update with
OK .
The new map materia l can now be used for navi
gation.
(D Tips
- Always read the chap ter ~ page 18 7.
- The amou nt of available on line map up-
dates in the vehicle is lim ited. To update
more regions, use the map update via SD
card at www .audiusa.com/myaudi.
- Always read the chap ter
¢ page 194, Audi
connect (Infotainment) general informa
tion . Na
viga tion
Traffic information
Introduction
Applies to: veh icles w ith navigation system
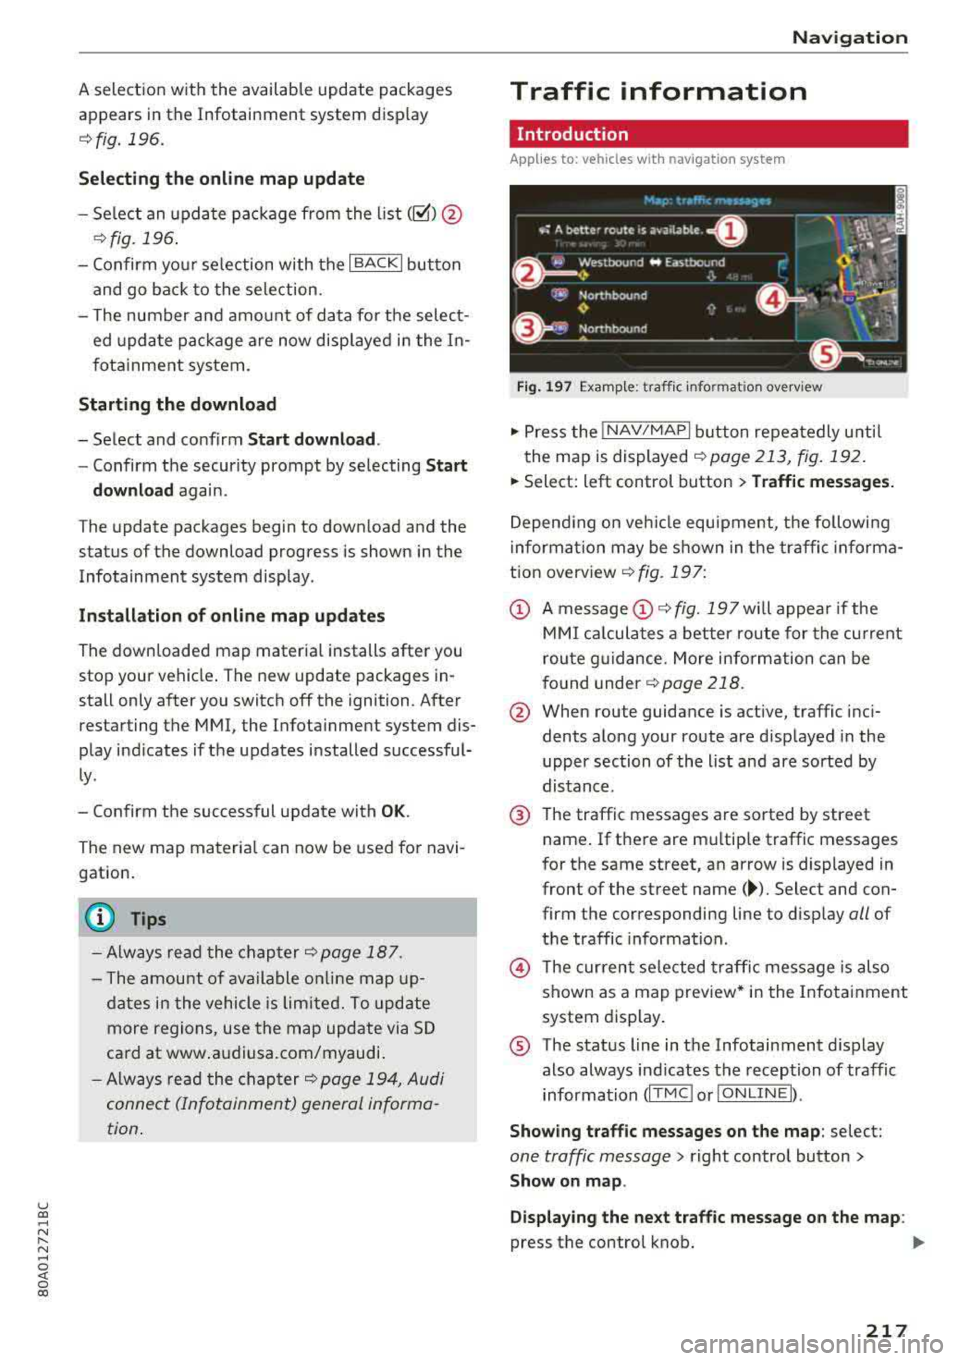
Fig . 1 97 Example: traffic informat ion overv iew
.,. Press the INAV/MAPI button repea tedly u nti l
the map is displayed
~ page 213, fig. 192.
.,. Select: left control button > Traffic mes sage s.
Depending on veh icle equipment, the following
i nforma tion may be shown in the traffic informa
tion
overview ¢ fig. 197:
CD A message CD ¢fig. 197wi ll appea r if the
MM I ca lculates a better route for the cu rrent
rou te g uidance. More information can be
f o und under
¢ page 218.
@ When route guidance is active, traffic inci
dents along your route are d isplayed in the
upper section of the list and are sorted by
distance.
@ T he traffic messages are sorted by street
name . If there are mu ltip le traffic messages
for the same street, an arrow is displayed in
front of the st reet name
(~ ). Select and con
firm the corresponding line to disp lay
all of
t h e traffic information .
@ The cur rent se lected traffi c message is also
shown as a map preview* i n the Infotainment
system display .
® The status line in t he Infotainment d isplay
also always ind icates the reception of traffic
information
( IT MC !orlO NLINEI).
Show ing tra ffic messages on the map : select:
one traffic message > right control button >
Show on map .
Di splaying the ne xt t raffi c message o n the map :
press the control knob. ..,.
217