coolant AUDI Q5 2018 Owners Manual
[x] Cancel search | Manufacturer: AUDI, Model Year: 2018, Model line: Q5, Model: AUDI Q5 2018Pages: 392, PDF Size: 60.56 MB
Page 12 of 392
Cockpit overview
Instrument cluster
Instrument cluster overview
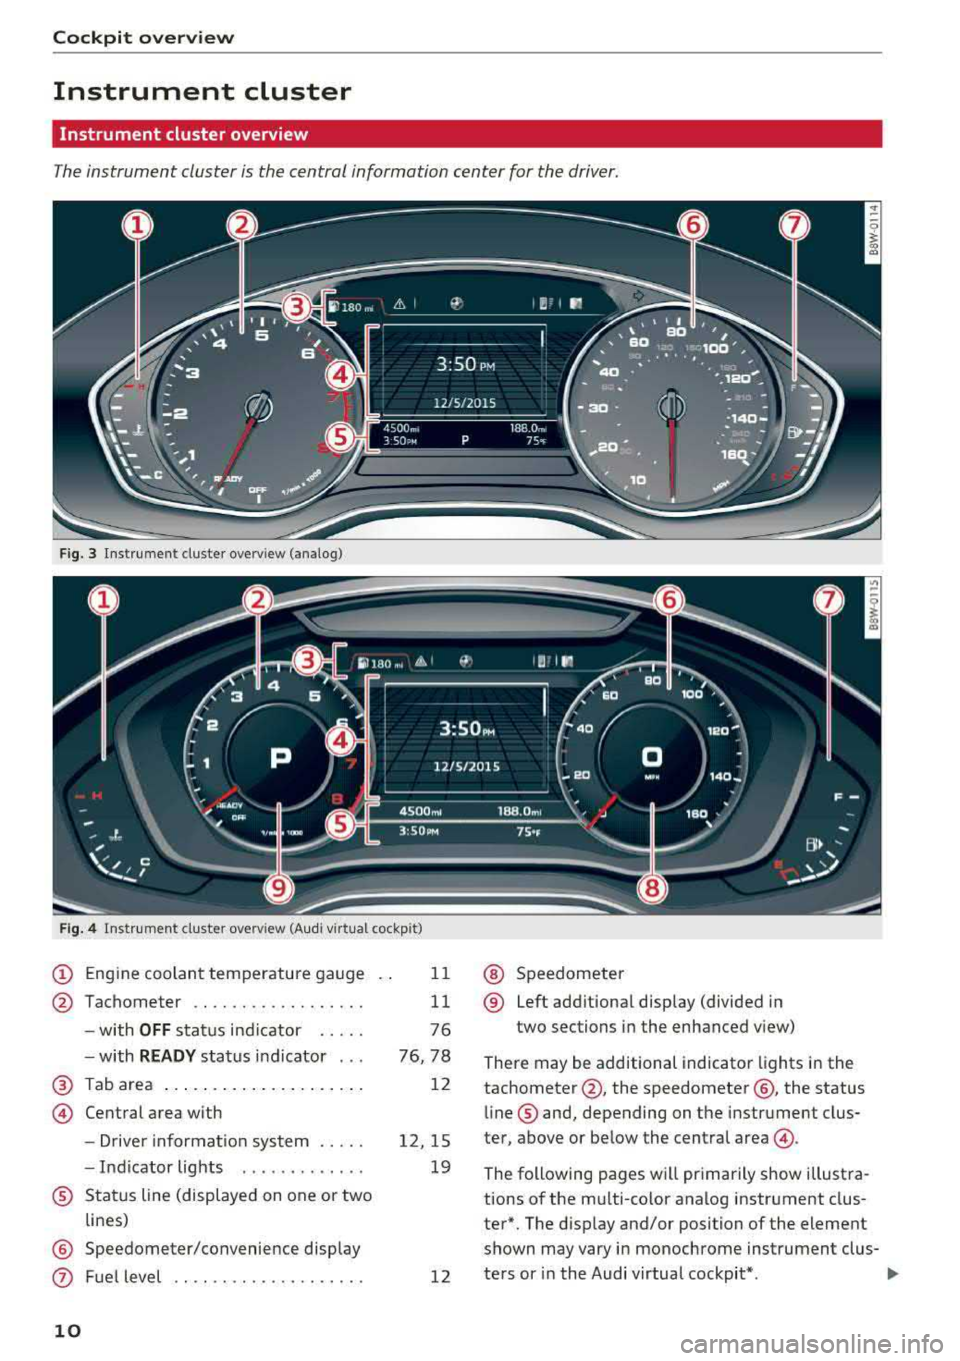
The instrument cluster is the central information center for the driver.
Fig. 3 Instrument cl uster overv iew (analog)
F ig . 4 Instrument cluster overv iew (Audi virtual cockpit )
(D Engine coolant temperature gauge
@ Tachometer ................. .
- with
OFF status indicator .... .
- with
READY status indicator .. .
@ Tab area .... ... ... ....... ... .
@ Central area with
- Driver informat ion system .. .. .
- Indicator lights ........... . .
® Status line (displayed on one or two
lines)
@ Speedometer/convenience display
0 Fuel level
10
11
11
76
76, 78
12
12 , 15
19
12
@ Speedometer
® Left additional display (divided in
two sections in the enhanced view)
There may be additional indicator lights in the
tachometer @, the speedometer @, the status
line ® and, depending on the instrument clus
ter, above or below the central
area @.
The following pages will primarily show illustra
tions of the multi-color analog instrument clus
ter*. The display and/or position of the element
shown may vary in monochrome instrument clus-
ters or in the Audi virtual cockpit* .
lllJ,,
Page 13 of 392
u co ..... N ,..._
N ..... 0 <( 0 00
Certain instrument cluster content can also be
displayed in the head-up display*
¢ page 18.
A WARNING
Do not assume the roads are free of ice based
on the outside temperature display . Be aware
that there may be ice on roads even when the
outside temperature is around 41 °F (+5 °C)
and that ice can increase the risk of accidents .
(D Tips
-Depending on vehicle equipment, the in
strument illumination (needles and gauges) may turn on when the lights are off and the
ignition is switched on . The illumination for
the gauges reduces automatically and even
tually turns off as brightness outside in
creases. This function reminds the driver to
turn the low beams on at the appropriate
time.
- You can select the units used for tempera
ture, speed and other measurements in the
Infotainment
system ¢ page 245.
-If your vehicle is stationary or if you are driv
ing at very low speeds, the temperature dis
played may be slightly higher than the ac
tual temperature outside due to the heat ra
diating from the engine.
- At temperatures below 41 °F (+5 °C), a
snowflake symbol appears in front of the
temperature
display ¢,&. .
Coolant temperature indicator
The coolant temperature display @¢ page 10,
fig . 3
or ¢ page 10, fig . 4 only functions when
the ignition is switched on. To prevent engine
damage, please observe the following notes
about the temperature ranges.
Cold range
If only the LEDs at the bottom of the gauge turn
on, the engine has not reached operating tem perature yet . Avoid high engine speeds, full ac
celeration and heavy engine loads.
Cockpit overview
Normal range
The engine has reached its operating tempera
ture once the LEDs up to the center of the gauge
turn on. If
the. indicator light in the instru
ment cluster display turns on, the coolant tem
perature is too
high ¢ page 23.
@ Note
-Auxiliary headlights and other accessories in
front of the cooling-air intake impair the
cooling effect of the coolant. This increases
the risk of the engine overheating during
high outside temperatures and heavy en
gine load .
- The front spoiler also helps to distribute
cooling air correctly while driving. If the
spoiler is damaged, the cooling effect will
be impaired and the risk of the engine over
heating will increase. See an authorized
Audi dealer or authorized Audi Service Fa
cility for assistance.
Tachometer
The tachometer displays the engine speed in rev
olutions per minute (RPM).
The beginning of the red zone in the tachometer
indicates the maximum permissible engine speed
for all gears once the engine has been broken in
and when it is warmed up to operating tempera
ture. Before reaching this zone, you should shift
into the next highest gear, select the "D/S" selec
tor lever position, or remove your foot from the
acce lerato r pedal.
@ Note
The needle in the tachometer @¢ page 10,
fig. 3
or ¢ page 10, fig. 4 may only be in the
red area of the gauge for a short time or there
is a risk of engine damage . The location where
the red zone begins varies depending on the
engine.
@) For the sake of the environment
Upshifting early helps you to save fuel and re
duces operating noise.
11
Page 25 of 392

u co ..... N ,..._
N ..... 0 <( 0 00
increases the risk that the vehicle will slide.
Do not continue driving. See an a uthorized
Audi dealer or author ized Audi Service Fac ili
ty for assistance .
PARK/{®)/ ~ Electromechanical parking
brake
I f t he -(USA models) / . (Canada models)
in dic ator light turns on , the pa rk ing br ake was
set.
I f the
-(USA models)/ . (Canada models) in
d icator light blinks, the bra king fo rce is no t buil d
in g up enough or no t bui lding up at all. Selec t the
"P" selec to r l eve r posit ion to he lp secure the vehi
cle. Make s ure t he indicato r light is off before yo u
start driving.
@ Parking brake : malfunction! Plea se contact
Service
There is a malfunction in the park ing brake . Dr ive
to an author ized Audi dealer or author ized A udi
Serv ice Fac ility immedia tely to have t he malfunc
tion
co rrected.
II (USA models )/ ffc,) (Canada model s) Parking
brake : warning! Vehicle parked too steep
There is not enoug h braking force to hold the ve
hi cle in place . The brakes have overhea ted . The
ve hicle could ro ll away even on a small incli ne .
II (USA models )/ l(C,)J (Canada models ) Parking
brake: applied
If t his message appears, press the brake pedal
fi rst and the n release the parking brake if neces
sary.
II ( USA models)/ ¢c,) (Canada model s) Parking
brake: emergency braking
The eme rgency bra king funct ion was tr iggere d.
Please release parking brake
Release the park ing bra ke if this message ap
pears .
Please press the brake pedal to release the park
ing brake
Coc kpit o ver view
To release the parking brake, press t he brake
peda l and press
the ~ button at the same time,
o r start driving w ith hill start assist ¢
page 82,
Starting to drive .
(D Tips
Fo r additional informat io n on the parking
b ra ke,
see ¢ page 80 .
-L Cooling system
• Turn off engine and check coolant level. See
owner's manual
T he coo lant level is too low.
D o no t con tinue dr iv ing and switch t he e ngine
off. Chec k the coolant leve l¢
page 319.
- I f the coo lant level is too low, add coolant
¢
page 320 . Only continue dr iving on ce the in
d icator ligh t turns off.
• Coolant temperature: too high . Let engine
run with vehicle stationary
Let the engine ru n at idle for a few mi nutes to
cool off , until the indicator light turns off .
-If the ind icator light does not t urn off, do not
cont inue driv ing the ve hicle. See an authori zed
Aud i dea ler or aut horized Audi Service Facility
for assistance .
A WARNING
-
-Never open the hood if you can see or hea r
s tea m or coo la nt escaping from t he e ngine
com partment. This increases t he r isk of
bu rns. Wait until yo u no lo nger see o r hear
s team or coo lant es caping .
- T he e ngine comp artment in a ny ve hicle c an
be a dange rous area . Stop the engine an d
a llow i t to cool be fore wor king in the eng ine
compartment. Always follow the informa
tion fo und in
c;, page 314, Working in the
engine compartment.
@ Note
D o not con tinue dr iv ing if the . indica to r
li ght tur ns on as this increases t he risk of en
g ine damage.
23
Page 71 of 392
u co ..... N r--N ..... 0 <( 0 00
Warm and cold Climate control system
Description
The climate control system warms , cools and re
moves humidity from the air in the vehicle inte ri
or. It is the most effective when the w indows and
sunroof* are closed . If there is a bu ild -up of heat
inside the ve hicle, ventilation can he lp to speed
up the cooling process.
I n all he ating mode f unct ions except for
defrost ,
the blower on ly switches to a higher speed once
the engine coolant has reached a sufficient tem
perature .
Pollutant filter
The pollutant filte r removes pollutants such as
d ust and pollen from the a ir.
Key recognition
The climate control settings are automatically
sto red and assig ned to the remote control key
that is i n use .
Warm and c old
@ For the sake of the environment
If you wo uld like to reduce fue l consumption,
switch the air conditioning off. T his w ill also
r educe em issions.
(D Tips
- To prevent interference with the heating
and cooling output and to prevent the win
dows from fogging over, the a ir intake in
fro nt of the w indshie ld must be free of ice,
snow o r leaves .
- Condensation from the coo ling system can
dr ip and form a pudd le of water under the
veh icle . Th is is norma l and does not mean
t here is a lea k.
- The e nergy management system may tem
pora rily switch off certa in functions, s uch as
the seat heati ng* o r rear window defogger .
Th ese sys tems are av ailable aga in as soon
as t he e nergy supply has been restore d.
69
Page 74 of 392
Warm and cold
SYNC Syn chr oniz ation
Use t he rocker sw itc h® to select the f unct ion.
When synchronization is switched on, the set
tings for the driver's side are applied to the front
passenger's side and the rear (except for seat
heating/venti lation*). When the settings on the
front passenger's side or in the rear are changed,
the synchron izat ion is automatically switched off
and
3 -z one appears in the display .
SET REAR function
Use the rocker switch ® to select the function .
When the function is switched on, you can adjust
all settings for the rear us ing the climate control
system controls in the cockpit . The rear climate
control system controls cannot be operated at
the same time . T his function switches off auto
mat ica lly after a ce rtain per iod of t ime or after
leav ing the menu.
Vents
You can open or close the center and rear vents in
the cockpit and the vents in the rear center con
sole us ing the r idged thumbwhee ls . T he levers
adjust the d irection of the airflow from the vents.
Re sidu al he at
You can activate the residual heat function when
the ignition is switched off by pressing the knob
(!) . The res idual heat from the coolant is used to
heat the vehicle interior. The residual heat func
tion switches off automatically afte r about 15
m inutes.
A WARNING
- Yo u should not use the re circulation mode
for an extended period of time, because no
fres h air is drawn in and the windows can
fog when cooling mode is sw itched off. This
increases the risk of an accident.
- Individuals with reduced sensitivity to pain
or temperature cou ld deve lop burns when
using the seat heating* funct ion. To reduce
the risk of injury, these ind iv iduals should
not use seat heati ng*.
72
@ Note
To avoid damaging the seat heating* ele
ments, do not knee l on the seats or p lace
heavy pressure on one area of the seat.
Setup
The climate control system basic settings ore ac
cessed in the Infotainment system .
.. Select in the Infotainment system : IMENU! but
ton
> Veh icle > left control button > Air condi
t ioning
Auto recirculation
When sw itched on, a utomat ic rec ircu lat ion con
tro ls the recircu lation mode automatically . If the
windows fog up, press
the® MAX button .
Automatic au xiliary heater *
The auxiliary heater he lps to wa rm the vehicle in
te rior more qu ic kl y.
Steering wheel heating
Applies to: vehicles with steering wheel heating
The steering wheel rim con be heated .
.. Press the lg\~ page 14, fig . 11 button on the
mu ltifu nction stee ring wheel to switch the
steer ing whee l heating on and off . The mes
sage
S teering wheel h eating : on /Ste ering
wheel heating: off
appears in the instrument
cluster display.
The tempe ra ture is ma inta ined at a constant lev
el when steering wheel heating is switc hed on .
The steer ing whee l heating sett ings are stored
automat ica lly and assigned to the remote control
k ey tha t is in use .
Page 79 of 392
u co ..... N r--N ..... 0 <( 0 00
@ Note
Avoid high engine speed, full throttle, and heavy engine load if the engine has not
reached operating temperature yet. You could
damage the engine.
@) For the sake of the environment
Do not let the engine run while parked to
warm up. Begin driving immediately. This re duces unnecessary emissions.
(D Tips
- Some noise after starting the engine is nor
mal and is no cause for concern.
- If you leave the vehicle with the ignition
switched on, the ignition will switch off af
ter a certain amount of time. Make sure that electrical equipment such as the exterior
lights are switched off.
Starting the engine
"'Bring the vehicle to a full stop.
"'Press the I START ENGI NE STO PI button
C? page 76, fig. 86.
Emergency off function*
If it is absolutely necessary, the engine can also
be turned off while driving at speeds starting at
4 mph (7 km/h). To switch the engine off, press
the
! START ENGINE STOPI button twice in a row
briefly or press and hold for longer than two sec
onds.
A WARNING
- Never turn off the engine before the vehicle
has come to a complete stop. The full func
tionality of the brake booster and the power steering is not guaranteed. You must use
more force to steer and brake the vehicle.
The fact that you cannot steer and brake as
usual can increase the risk of accidents and
serious injuries.
-If you leave the vehicle, switch the ignition
off and take the vehicle key with you .
If you
do not, the engine could be started and
electrical equipment such as the power win-
Driving
dows could be activated. This can lead to se
rious injuries.
- For safety reasons, always park the vehicle
with the selector lever in the "P" position.
Otherwise, there is the risk that the vehicle
could roll unintentionally.
@ Note
If the engine has been under heavy load for
an extended period of time, heat builds up in
the engine compartment after the engine is
switched off and there is a risk of damaging
the engine . For this reason, let the engine run
at idle for approximately two minutes before
shutting it off.
(D Tips
For up to 10 minutes after stopping the en
gine, the radiator fan may turn on again auto
matically or it may continue to run (even if
the ignition is switched off) for the following
reasons :
- The coolant temperature is increasing due
to
trapped heat.
- If the engine is warm and the engine com
partment also heats up from strong sun
light.
Messages
Engine running. Warning! Turn off ignition be
fore leaving vehicle
This message appears and a warning tone sounds
if you open the driver's door when the engine is
running.
Please press the brake pedal
This message appears if you do not press the brake pedal when starting the engine .
Ill Remote control key: key not detected. Is the
key still in the vehicle?
This indicator light turns on and this message ap
pears if the ignition key was removed from the
vehicle when the engine was running. If the igni
tion key is no longer in the vehicle, you cannot
switch on the ignition or start the engine once
..,.
77
Page 94 of 392
Trail er to wing
Trailer towing
Driving with a trailer
General information
Your veh icle is primari ly intended for transport
ing peop le and luggage. Howeve r, if you dr ive
with a tra iler , follow the techn ica l requirements ,
the operation and driving tips, and the lega l reg
ulations.
Dr iving w ith a trailer affects the vehicle 's fuel
consumpt ion, performance and wear. It a lso re
quires higher concentration from the driver .
A WARNING
Do not transport any people in a trailer due to
the risk of fatal injury .
Technical requirements
Certain requirements must be met when towing
a trailer.
Trailer hitch
Only use a trailer hitch with a removab le ball
h itch mount and ball h itch. The tra ile r hitc h must
be pe rm it t ed for the vehicle, the tra iler and the
permitted tota l weight of the trailer being
pu lled . Above all, it must be secure ly and safe ly
attached to the vehicle trailer.
Never mo unt a t rai ler hitch on the bumper. The
trai ler hitc h must be mounted in a way that does
not impair the function of the bumper. Do not
make any changes to the exhaust system and the
brake system.
Check regu larly if the trai ler hitc h is securely
mounted . A lways follow the instructions given by
the trai ler hitch manufacturer .
Trailer brakes
If t he tra ile r has its own bra ke system, then fol
low the manufacturer specifica tions. Howeve r,
the brake system on the trai ler must never be
connected to the vehicle brake system.
92
Engine cooling system
D riving w ith a tra ile r means a higher load on t he
engine and the cooling sys tem. The coo ling sys
tem must be designed for additiona l load and
contain enoug h
coolant ~@ .
A WARNING -
- Never mount a "weight -distributing" or
"load-balancing" trailer coupler as the trail
er hitch. The ve hicle was not des igned for
these types of tra iler h itches. The tra iler
h itch can malfunction and t he tra ile r can
b reak off from the vehicle.
- If t he tra ile r i s equ ipped w ith elect ronic
brakes, these brakes can not be activated by
a facto ry-installed control system, whi ch in
creases the r isk of an accide nt.
- To red uce the r is k of injury, always remove
the ball hitch mount if no tra ile r is mo unt
ed.
@ Note
L onge r incl ines cannot be dr iven without a
su itab le cooli ng system, especially if the out
s ide temperatu res a re high. ot herwise, this
i nc reases the risk of eng ine da mage.
Operating instructions
Several things must be noted when towing a
trailer.
Towing capacity
The permitted towing capacity must not be ex
ceeded under any
circumstances ~ page 370.
You can dr ive up larger inclines if you are not us
i ng the maximum towing capacity.
The towing capacities given only apply to e leva
tions up to 3,200 ft (1,000 m) above sea level. As
the e levation increases, the engine power de
creases due to the decreasing air pressures. T his
reduces the hill climb ing ability and towing ca
pac ity . For every additional 3,200
ft (1,000 m),
t h e maximum permitted tow ing weight must be
r educed by app roximately 10% . T he pe rm itted
tow ing weight is t he comb ined we igh t of the
( loaded) vehicle and the (loaded) trailer .
Page 96 of 392
Trail er to wing
- Set the a ir suspension to the standard vehi
cle height, otherwise the applicab le tongue
weight no longer applies to your vehicle.
(D Tips
- Use chocks when parking on incl ines if the
trailer is loaded .
- We recommend also having the vehicle in
spected between the inspection intervals if
you are towing a trai ler frequent ly .
- Avo id driving with a trailer d uring the vehi
cle break-in period .
Driving with a trailer
Driving with a trailer requires extra caution .
Speed
Adhere to the legal speed limits. Follow the legal
regulat ions spec ific to the country.
As the speed increases, the driving stability of
the trailer decreases . Therefore you should not
exceed the maximum legal speed l imit whe n
there a re unfavorabl e road, weathe r and/or wind
conditions. This especially appl ies when dr iv ing
downhill.
You must always reduce you r speed as soon as
you not ice even the s lightest sw inging motion of
the t railer. Neve r try to "straighte n ou t" the t rail
e r by accelera ting.
The weight distribution is very poor if t he veh icle
is empty and the t railer is loaded . H oweve r if you
m ust dr ive under these c ircumstances, t hen d rive
espec ially slowly.
Brakes
Brake in a t imely manner . Downshift before driv
i n g downhill so that the engine can assist w ith
b raking
¢ ,&. .
When us ing a tra iler with overrun brakes, first
brake gently then qu ickly . This reduces the risk of
je rk ing w hile brak ing if the tra ile r w heels lock up .
Engine coolant temperature
Pay attention specif ica lly to the coolant tempera
ture display when there are h igh outside tempe r
atures, and when dr iv ing o n long inclines
94
¢ page 11. Shift to a higher gear in a timely man
ner .
A WARNING
Constant braking causes the brakes to over
heat and substantially reduces braking per
formance, increases braking distance or caus
es complete failure of the brake system.
-
Page 316 of 392
Check ing and F illing
On -Board Diagnostic S yst em
Eng ine data can be read out at the On-Board D i
agnostic System connection po rt using a special
testing device
¢ fig. 257 .
Indicator light
Ift hP ¢..ifi indicato r light b lin ks o r tu rns o n, there
is a malfunction that is caus ing poor emiss ions
qua lity and that could damage the catalytic con
verter.
Dr ive s low ly to an author ized Audi dealer or au
thor ized Audi Se rvice Fac il ity to have the ma l
f u nction co rrected.
The indicator l ight can also turn on if the fuel fi ll
er cap is not closed correct ly
9 page 311.
_& WARNING
Incorrect use of the connection po rt fo r th e
On-Board Diagnostic Sys tem can ca use mal
functions, which can then result in accidents
and serious injuries.
- Only allow an authorized Audi dealer or au
thorized Audi Service Facility to read out the
engine data .
Engine compartment
Working in the engine compartment
Special care is required if you are working in the
engine compartment
-
Fo r w ork in th e engi ne comp artm ent su ch as
c heck ing and filli ng flu id s, the re is a risk of in
jur y, scalding , ac cident s, and b urns . Fo r this
r easo n, follow all th e warning s and g enera l
sa fe ty preca ution s pro vided in the foll owin g in
f o rm ation . Th e e ng ine comp artmen t is a d an
ger ous ar ea .
9 &, .
_& WARNING
- T urn the eng ine off.
- Switch the ig nition off.
- Set the parking brake .
- Select the "P" selector lever pos it io n.
- let the engine coo l down.
314
- Never open the hood when there is steam or
coo lant escaping from the engine compart
ment, because there is a risk that you could
be burned . Wait unt il no steam or coolant is
escaping.
- Keep children away from the eng ine com
partment .
- Never sp ill fluids on a hot engine . These flu
ids (such as the anti-freezing agent con
tained in the coolant) can ignite .
- Avoid short c ircuits in the electrical system.
- When working in the engine compartment, remember that the radiator fan can switch
on even if the ignition is switched off, wh ich
increases the r isk of injury .
- Never open the cap on the coolant expan
sion tank when the engine is warm . The
cool ing system is under pressure .
- To protect your face, hands, and arms from
hot steam or coolant, cover the cap w ith a
large cloth when open ing.
- Do not remove the engine cover under any
circumstances . This increases the risk of
burns .
- If tests need to be performed with the en
gine runni ng, there is add itiona l danger due
to mov ing components (such as the r ibbed
be lt, alte rnato r and rad iato r fan) and from
the hig h-voltage ignition system.
- Do not unde r any ci rcumstances activate the
throttle inadvertent ly (for example, by hand
from the engine compartment) if the veh i
cle is stationary but the engine is running
and a gear is engaged. Otherwise, the vehi
cle will start to move immediate ly and this
could result in an acc ident.
- Pay attention to the following warnings
when work on the fue l system is required:
- Do not smoke.
- Never work near open flames .
- Always have a working fire extinguisher
nearby.
- All work on the battery or electrical system in your vehicle can result in injuries, chemi
cal burns, acc idents or burns . Because of
this, all work must be performed
only by an
author ized Audi dealer or author ized Audi
Serv ice Faci lity.
Page 318 of 392
Checking and Filling
Cl osing the ho od
~ Push the hood down until you overr ide the
force of t he struts .
~ Let the hood fall light ly into the latch. Do not
press it in.
c::> &_ .
A WARNING
-Never open the hood when there is steam or
coolant escaping from the engine compart
ment, because there is a risk that you could
be burned. Wait until no steam or coolant is
escaping.
Engine compartment overview
The most important check points .
-For safety reasons, the hood must always be
latched securely while dr iving. Because of
this, always check the hood after closing it
to make sure it is latched correctly . The
hood is latched if the front corners cannot
be lifted .
-If you notice that the hood is not latched
while you are driving, stop immed iate ly and
close it, because d riving when the hood is
not latched increases the r is k of an accident.
-If the hood is not latched comp letely, it
could f ly up wh ile you are driving and ob
s t ruc t your vis ion.
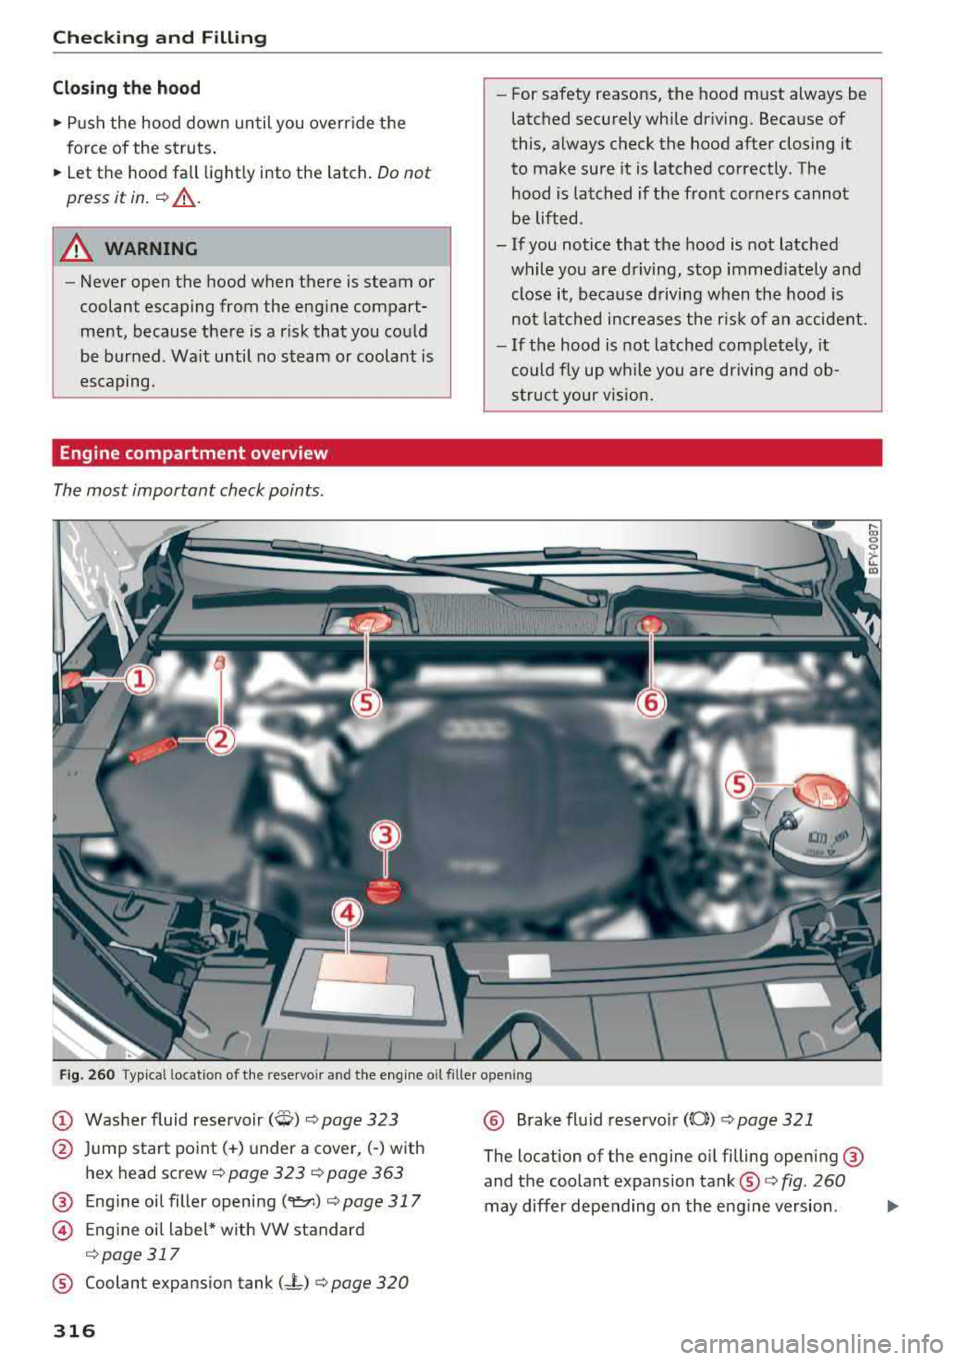
F ig . 260 Typical location of the rese rvoir and the engine o il fil le r open ing
@ Washer fluid rese rvoir (W) c::> page 323
@ J ump start po int(+) under a cover,(-) w ith
hex head screw
c::> page 323 c::> page 363
® Eng ine oi l filler openi ng (9:=r.) c::> page 317
@ Eng ine oi l label * w ith VW st andard
c;, page 317
® Coolant expans ion tank (-L) c::> page 320
316
@ B rake fl uid reservo ir (Oi) c::>pag e 321
The location of the eng ine o il filling open ing ®
and the coolant expansion tank ®
c::> fig. 260
may differ depending on the eng ine version .
Iii>