console AUDI Q5 2021 Owner´s Manual
[x] Cancel search | Manufacturer: AUDI, Model Year: 2021, Model line: Q5, Model: AUDI Q5 2021Pages: 332, PDF Size: 118.86 MB
Page 113 of 332
80B012721BA
Driving
soon as possible to have the malfunction correct-
ed.
Brake booster: limited functionality. You can
continue driving. Please contact Service
There is a brake booster malfunction. The brake
booster is available, but its effectiveness is re-
duced. The braking performance may be different
compared to the usual performance. Drive to an
authorized Audi dealer or authorized Audi Service
Facility immediately to have the malfunction cor-
rected.
Brake booster: deactivated. See owner's manual
The brake booster remains active for a brief peri-
od of time after switching off the ignition. Secure
the vehicle against rolling > page 98.
Other indicator lights
When you switch the ignition on, the EMM / ®
indicator light turns on briefly to check the func-
tion. If the indicator light does not turn on, there
is a system malfunction.
1f NG / @ stays on, there is a malfunction in
the brake system.
w@- A high load was placed on the brakes from
driving downhill for a long period of time. Follow
the instructions in the message to utilize the en-
gine braking effect and to relieve the brakes.
ZA WARNING
If a malfunction occurs in the ABS, ESC, and
braking distribution, interventions that stabi-
lize the vehicle will no longer be available.
This could cause the vehicle to swerve, which
increases the risk that the vehicle will slide.
Do not continue driving. See an authorized
Audi dealer or authorized Audi Service Facility
for assistance.
Electromechanical
parking brake
Operating the parking brake
The electromechanical parking brake is used to
secure the vehicle from rolling away unintention-
ally.
The @) switch is located under the selector lever
in the center console. It turns on when the park-
ing brake is set. You can release the parking brake
manually or automatically when you start to
drive.
Setting and releasing the parking brake
> Setting: pull the © switch.
> 1* / oa appears, the parking brake is hold-
ing the vehicle. You can remove your foot from
the brake pedal.
>» Releasing: when the ignition is switched on,
press and hold the brake pedal and press the
button.
If the red indicator light flashes, the braking
force has not built up enough or it has decreased.
You can also secure the vehicle by selecting the
“P” gear or pressing the brake pedal. Make sure
the indicator light is off before you start driving.
Automatically releasing the parking brake
when starting to drive
Requirement: the driver's door must be closed
and the driver’s safety belt must be fastened.
> Press the accelerator pedal to start to drive.
ZA\ WARNING
—To reduce the risk of an accident, always
make sure the vehicle is situated safely
while stationary.
— If the parking brake is set, it can release au-
tomatically when the accelerator pedal is
pressed. To reduce the risk of an accident,
do not inadvertently press the accelerator
pedal and always shift into “P” when the ve-
hicle is stopped.
— If the power supply fails, you cannot set the
parking brake once it is released, or release
it if it is set. Secure the vehicle against roll-
ing before exiting the vehicle > page 98. See
an authorized Audi dealer or authorized
Audi Service Facility for assistance.
111
Page 116 of 332
Driving
@) Tips
Clean your vehicle after driving offroad. Dirt
and stones falling off your vehicle can affect
other road users.
PUN Male Ruel e le
If you must drive through water, follow these in-
structions:
— Check the stability of the ground, the current,
and the water depth. If the ground is unstable,
there is a strong current, or there are waves,
the water must only reach up to the lower edge
of the body at the most.
— Deactivate the Start/Stop system*.
— Drive carefully and no faster than at walking
speeds to prevent the front of the vehicle from
creating waves, because they could splash
above the lower edge of the body. Oncoming
vehicles could also create waves.
— Do not stop the vehicle while in the water.
— Drive in reverse.
— Do not turn the engine off.
ZA\ WARNING
After driving through water, press the brake
pedal carefully to dry the brakes so that the
full braking effect will be restored.
@) Note
Vehicle components such as the motor, drive
system, suspension, or electrical system can
be severely damaged by driving through wa-
t
er.
Tips
If possible, avoid driving through salt water
because it increases the risk of corrosion. Use
fresh water to clean any vehicle components
that come into contact with salt water.
Hill descent assist
Applies to: vehicles with hill hold assist
The “@ button is located above the selector lever
in the center console. It lights up when the sys-
tem is turned on.
114
Hill descent assist can assist you when driving
down hills by maintaining a constant vehicle
speed by automatically braking all four wheels.
You can adjust the speed using the accelerator
and brake pedals. The regulation depends on the
hill and the vehicle speed.
> Switching on: press “2.
> Switching off: press “2 again.
Active regulation
Regulation begins shortly after you start driving
and is possible at speeds up to approximately 19
mph (30 km/h) and on hills that have an approxi-
mately 6-60% grade. If these conditions are met,
regulation will be activated and the BJ indicator
light will turn on.
Ready mode
If one of the requirements for active regulation is
not met, the system will be in ready mode. The
indicator
light will turn on. Once the require-
ments are met again, the system will be able to
provide active regulation again.
Z\ WARNING
— Be ready to apply the brakes at all times
when using the hill hold assist.
— Always adjust the speed to the visibility,
weather, road, and traffic conditions. The
system cannot replace the driver's atten-
tion.
— The system cannot maintain a constant vehi-
cle speed in all situations, for example when
on smooth or slippery ground. This can in-
crease the risk of an accident.
G) Tips
If you select the Audi drive select* Offroad
mode, hill descent assist will switch on.
Page 117 of 332
80B012721BA
Driving dynamic
Driving dynamic
Audi drive select
Introduction
Applies to: vehicles with Audi drive select
Drive select makes it possible to experience dif-
ferent types of vehicle characteristics in one vehi-
cle. With different driving modes, the driver can
switch the setting, for example from sporty to
comfortable. This allows you to adjust the set-
tings to your personal preferences. This makes it
possible to combine settings such as a sporty
drivetrain setting with comfortable steering.
Selecting an Audi drive select mode
Applies to: vehicles with Audi drive select
The size button is located above the selector lever
in the center console.
> Press the left or right arrow key until the de-
sired mode appears in the MMI. Or:
> Applies to MMI: Select on the home screen: VE-
HICLE > Audi drive select.
You can change the driving mode when the vehi-
cle is stationary or while driving. If traffic per-
mits, briefly remove your foot from the accelera-
tor pedal after changing modes so that the mode
you have selected will be activated for the drive
system.
The following modes may be available depending
on the equipment:
Offroad - Provides assistance when driving off-
road. The vehicle will be raised to the second-
highest level using the air suspension*. The ESC
will be restricted and the hill descent assist* will
be activated. The vehicle will exit this mode after
the ignition is switched off.
allroad - Provides balanced vehicle handling. The
vehicle will be raised to the second-highest level
using the air suspension*.
Comfort - Provides a comfort-oriented vehicle
setup and is suited for long drives on highways.
Auto - Provides an overall comfortable yet dy-
namic driving feel and is suited for everyday use.
Dynamic - Gives the driver a sporty driving feel
and is suited to a sporty driving style. The “S”
driving program is selected.
Individual - Provides the option for personalized
vehicle settings. Press ¥ to configure the mode
=> page 115, Individual settings.
G) Tips
When the ignition is being switched on, indi-
vidual systems, such as the drive system, will
be reset to a balanced setting. Select the cur-
rent mode again to attain its full configura-
tion.
Individual settings
Applies to: vehicles with Audi drive select
The equipment in your vehicle will determine
which settings you can adjust.
Drive
The drive system will react to accelerator pedal
moves more quickly or in a more balanced man-
ner. The shift points are located in higher or low-
er engine speed ranges on vehicles with automat-
ic transmissions.
Depending on the setting, the drive power at the
rear axle will be distributed with the sport differ-
ential* to be more sporty or moderate
=> page 118.
Steering
The power steering will adapt. Light steering is
suitable for long trips on highways or smooth
driving around curves, for example.
Suspension
The suspension adjusts to be tighter or more
comfort-oriented when it comes to compensat-
ing for uneven spots on the road.
The vehicle ground clearance is adjusted by the
air suspension* based on the setting.
Engine sound
The engine sound adapts and can be subtle to
sporty. In the automatic setting, the engine
sound depends on the selected driving program.
115
Page 122 of 332
Driving dynamic
these control systems are installed and this
can affect driving stability and increase the
risk of a collision.
— As the vehicle load increases, especially the
roof load, the vehicle's center of gravity also
increases along with the risk of the vehicle
tipping. To reduce the risk of an accident, al-
ways adapt your driving style to the current
conditions and avoid sudden driving maneu-
vers.
G) Tips
The ABS and ASR only function correctly when
all four wheels have a similar wear condition.
Different tire sizes can lead to a reduction in
motor power.
The So* button (or #, depending on the model)
for controlling the ESC is located in the center
console, in front of the selector lever. The ESC is
automatically switched on when the ignition is
switched on.
Limiting ESC
It may make sense in some situations to limit the
ESC stabilization functions so that the wheels can
spin:
— Rocking the vehicle to free it when it is stuck
— Driving in deep snow, on unpaved ground, or
with snow chains
— Driving downhill while braking on loose ground
— Driving with axle articulation
The ESC can be limited in order to allow the
wheels to spin.
—To limit the ESC, press the So button briefly.
The B indicator light will turn on.
—To completely reactivate the ESC stabilization
function, press the button again. The indicator
light turns off.
If you select the Offroad Audi drive select mode,
the Offroad ESC mode will be automatically
used. This mode is suited for driving offroad and
is designed for uneven terrain or loose ground.
120
Switching off ESC
For a more active control of the vehicle where the
stabilizing functions of the ESC cannot intervene,
the ESC can be switched off.
— To switch off the ESC, press and hold the Sor
button for more than three seconds. The B
and aa indicator lights turn on.
—To completely reactivate the ESC stabilization
function, press the button again. The indicator
lights turn off.
ZA\ WARNING
— When the ESC is switched off or limited,
there will be no vehicle stabilization or it will
be limited. The driving wheels could spin
and the vehicle could swerve, especially on
slick or slippery road surfaces. When there is
a heavy vehicle load and sudden driving ma-
neuvers, it may not be possible to prevent
the vehicle from tipping under certain cir-
cumstances, which increases the risk of an
accident.
— Because of the increased risk of an accident,
only drive with the ESC switched off or Limit-
ed when it is necessary. Reactivate the ESC
as soon as possible.
G) Tips
— If you select the Audi drive select* Offroad
mode, hill descent assist will switch on.
— If the ESC is limited, switched off, or mal-
functioning, systems with an automatic
braking intervention function may not be
fully available.
— If malfunctions occur in other systems or
certain driver assist systems are active, the
ESC must be switched on by the system. The
ESC
may switch on automatically and can-
not be operated with the button.
B fs / B © Stabilization control (ESC/
ABS): malfunction! See owner's manual
There is a malfunction in the ABS or EDL. This al-
so causes the ESC to malfunction. The brakes still >
Page 176 of 332
Parking and maneuvering
Parking and
maneuvering
Introduction
Depending on the vehicle equipment, various
parking aids will help you when parking and ma-
neuvering.
Parking aid
The parking aid plus assists you while parking
using audio and visual signals to warn you about
objects detected in front of, behind, and next to*
the vehicle > page 174.
The rearview camera shows the area behind the
vehicle in the center display. The lines in the rear-
view camera image help you to park and maneu-
ver > page 176.
The peripheral cameras are an addition to the
rearview camera and help you to see various
areas around the vehicle while parking and ma-
neuvering > page 176.
The rear cross-traffic assist can warn you of ap-
proaching cross traffic when driving in reverse or
exiting a parking space > page 180.
Assisted parking
Park assist helps you to locate suitable parking
spaces and to park in them and exit them. Park
assist controls the steering movements when
parking in free parking spaces. The driver is still
responsible for accelerating, braking, and shift-
ing gears. The driver must always monitor the
area around the vehicle and supervise the parking
procedure > page 181.
Settings options
You can adjust parking aid functions individually.
The adjustment options depend on the vehicle
equipment.
— Automatic activation > page 174
— Front and rear volume > page 175
— Entertainment fader > page 175.
— Clean rearview camera > page 177
— Trailer view > page 178
— View > page 179
— Rear cross-traffic assist > page 180
174
ZA WARNING
Observe the safety precautions and note the
limits of the assist systems, sensors, and
cameras > page 141.
@ Tips
Practicing parking in a traffic-free location or
parking lot to become familiar with the sys-
tems is recommended. Practice parking in
good light and weather conditions.
Parking aid plus
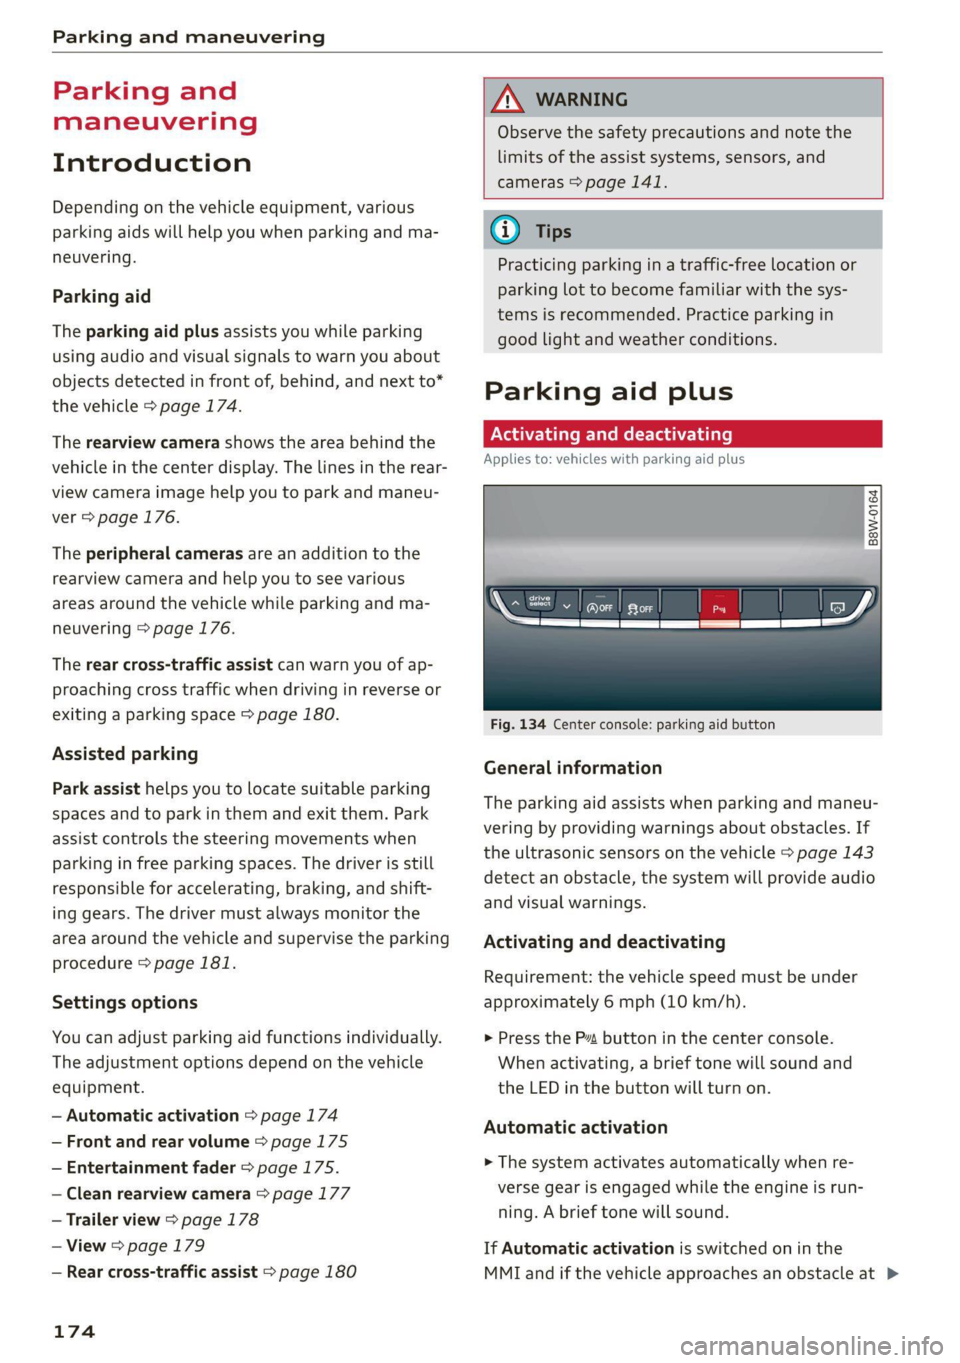
Ne ELS EUR
Applies to: vehicles with parking aid plus
B8W-0164
Fig. 134 Center console: parking aid button
General information
The parking aid assists when parking and maneu-
vering by providing warnings about obstacles. If
the ultrasonic sensors on the vehicle > page 143
detect an obstacle, the system will provide audio
and visual warnings.
Activating and deactivating
Requirement: the vehicle speed must be under
approximately 6 mph (10 km/h).
> Press the P” button in the center console.
When activating, a brief tone will sound and
the LED in the button will turn on.
Automatic activation
> The system activates automatically when re-
verse gear is engaged while the engine is run-
ning. A brief tone will sound.
If Automatic activation is switched on in the
MMI and if the vehicle approaches an obstacle at >
Page 179 of 332
80B012721BA
Parking and maneuvering
The rearview camera helps you to park or maneu-
ver using the orientation lines.
The peripheral cameras expand the vehicle over-
view to include various views around the vehicle
that can be selected.
Z\ WARNING
Observe the safety precautions and note the
limits of the assist systems, sensors, and
cameras > page 141.
Activating and deactivating
Applies to: vehicles with rearview camera/peripheral cameras
B8W-0164
Fig. 137 Center console: parking aid button
Activating and deactivating
> Press the Pa button in the center console.
When activating, a brief tone will sound and
the LED in the button will turn on. Or
> Press bin the center display if the visual dis-
tance indicator is shown > page 175, fig. 135.
The system can be activated at low speeds, such
when maneuvering.
Automatic activation
The system activates automatically when reverse
gear is engaged while the engine is running. A
brief tone will sound.
Automatic deactivation
The system will deactivate automatically once
the vehicle exceeds a certain speed while driving
forward.
ZX WARNING
Observe the safety precautions and note the
limits of the assist systems, sensors, and
cameras > page 141.
(eT Tada Len)
Applies to: vehicles with rearview camera/peripheral cameras
You can manually start the cleaning of the rear-
view camera.
> Move the window wiper lever S7 into the posi-
tion for cleaning the rear window © > page 57.
Z\ WARNING
Observe the safety precautions and note the
limits of the assist systems, sensors, and
cameras > page 141.
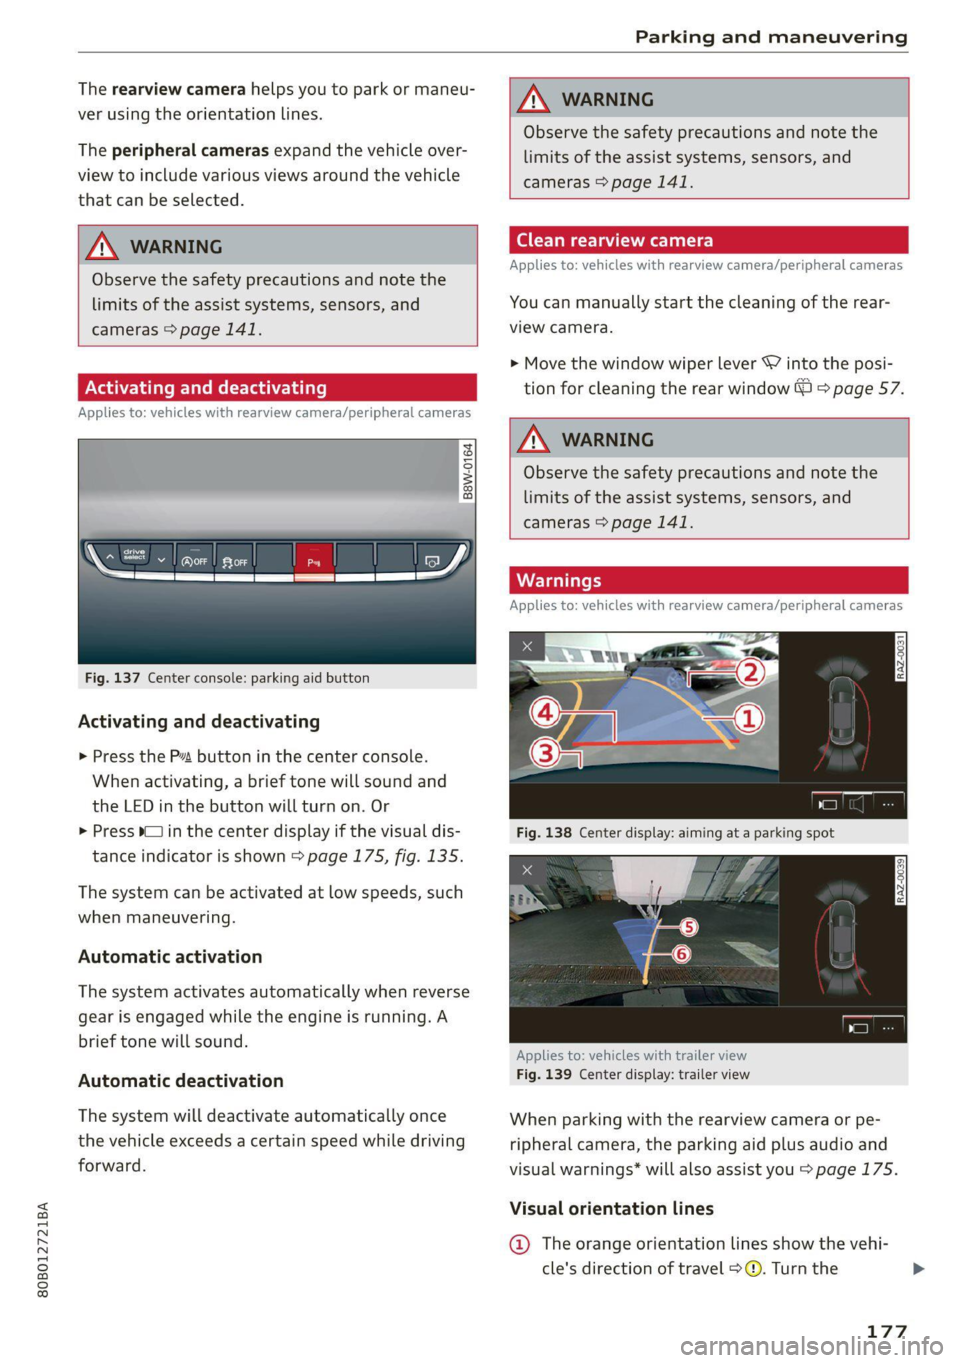
Warnings
Applies to: vehicles with rearview camera/peripheral cameras
Applies to: vehicles with trailer view
Fig. 139 Center display: trailer view
When parking with the rearview camera or pe-
ripheral camera, the parking aid plus audio and
visual warnings* will also assist you > page 175.
Visual orientation lines
@ The orange orientation lines show the vehi-
cle's direction of travel > @. Turn the
177
Page 184 of 332

Parking and maneuvering
Fig. 143 Parking options overview
Parking options
@ Backing into parallel parking spaces
Backing into perpendicular parking spaces
Driving forward into perpendicular parking
spaces that you have already driven past
Driving forward into perpendicular parking
spaces if you have already driven to the space
yourself
and the front of the vehicle is al-
ready in the space
Options for exiting parking spaces
Exiting parallel parking spaces
@ Tips
You can also drive into a perpendicular park-
ing space yourself and then activate the sys-
tem. If this is the case, the front of the vehi-
cle should already be in the space @) so that
the sensors can measure the space.
182
a
Ss
g
= & a
Fig. 144 Center console: park assist button
RAZ-0339
an
(1 Y
4
Fig. 145 Center display: activated parking space search
Activating the parking space search
> To activate the parking space search, press the
Pe button in the center console, or
> To activate the parking space search when the
parking aid is switched on, select Pe in the cen-
ter display.
The LED in the button will turn on and the display
for finding a parking space will appear in the cen-
ter display > fig. 145.
Searching for parking spaces
> Drive forward to the row of parking spaces at a
low speed. For the best parking results, the ve-
hicle should be approximately 3 feet (1 m) from
the row of parking spaces.
> The parking space search is first done on the
side of your lane. To switch the side for the
parking space search, activate the turn signal
for that side. Depending on vehicle equipment,
you may also be able to press on the side next
to your vehicle in the center display.
Selecting the parking space
If the system finds a parking space that could be
suitable for the vehicle length and width, it will >
Page 186 of 332

Parking and maneuvering
ZA\ WARNING
— Observe the safety precautions and note the
limits of the assist systems, sensors, and
cameras > page 141.
— The driver is always responsible when enter-
ing or exiting a parking space and during
similar maneuvers.
— Do not use this function if the vehicle cannot
move freely, for example when on a vehicle
jack.
— Sensors and cameras have spots in which
the surrounding area cannot be detected.
Objects, animals, and people may only be
detected with limitations may not be detect-
ed at all. Always monitor the traffic and the
vehicle's surroundings directly and do not
become distracted.
@) Note
— Do not use the park assist systems when
transporting cargo that extends out of the
vehicle, when snow chains are mounted, or
when the parking space is on a hill or in-
cline.
— Park assist guides the vehicle either away
from curbs or onto them if other vehicles
are parked on the curb. Make sure that your
vehicle's tires and rims are not damaged.
Resume control of the vehicle in time or
stop the parking process if needed to pre-
vent damage.
G) Tips
Follow the legal regulations in the country
where you are located when using Park assist.
dem Re eee
Applies to: vehicles with park assist
Requirement: a suitable parking space must be
found and selected > page 181. The vehicle must
initially be stationary.
In the center display, arrows and symbols on the
vehicle roof @) > page 182, fig. 145 indicate
what action is needed, such as applying the
brakes or changing the direction. Park assist au-
184
tomatically steers the vehicle into the parking
space while the driver presses the pedals.
> After stopping the vehicle briefly, make sure
the actual direction the vehicle is traveling
matches the direction indicated by the park as-
sist.
> Remove your hands from the steering wheel.
>» Pay attention to the path of the vehicle. If the
traffic situation permits, accelerate carefully
> AX. The maximum parking speed is approxi-
mately 4 mph (7 km/h).
> Follow the visual instructions in the center dis-
play and the warning tones until the parking
process
has ended.
Z\ WARNING
— Observe the safety precautions and note the
limits of the assist systems, sensors, and
cameras > page 141.
— The park assist is an assist system. The driv-
er is still responsible for monitoring the ve-
hicle's surroundings and preventing colli-
sions when using the system.
— When using park assist to drive into or out
of a parking space, the steering wheel turns
quickly on its own. Reaching into the steer-
ing wheel spokes while this is happening can
result in injury.
G) Tips
You can also cancel the driving direction set
by the system by shifting between a forward
gear and reverse gear. Based on the position
of the vehicle, the system then calculates the
additional steering and driving directions for
maneuvering.
ten Lei ek ace
Applies to: vehicles with park assist
If you parked the vehicle in a parallel parking
space, park assist can help you drive out of it.
Park assist automatically steers the vehicle out of
the parking space while the driver presses the
pedals.
» Start the engine.
> Press the Pe button in the center console.
Page 190 of 332
Telephone
Disconnecting a mobile device
Applies to: vehicles with telephone
> To disconnect a Bluetooth device from the MMI,
use the Connected devices menu > page 238.
Using the Audi phone
box
ere Ly
Applies to: vehicles with Audi phone box
RAZ-1089) {
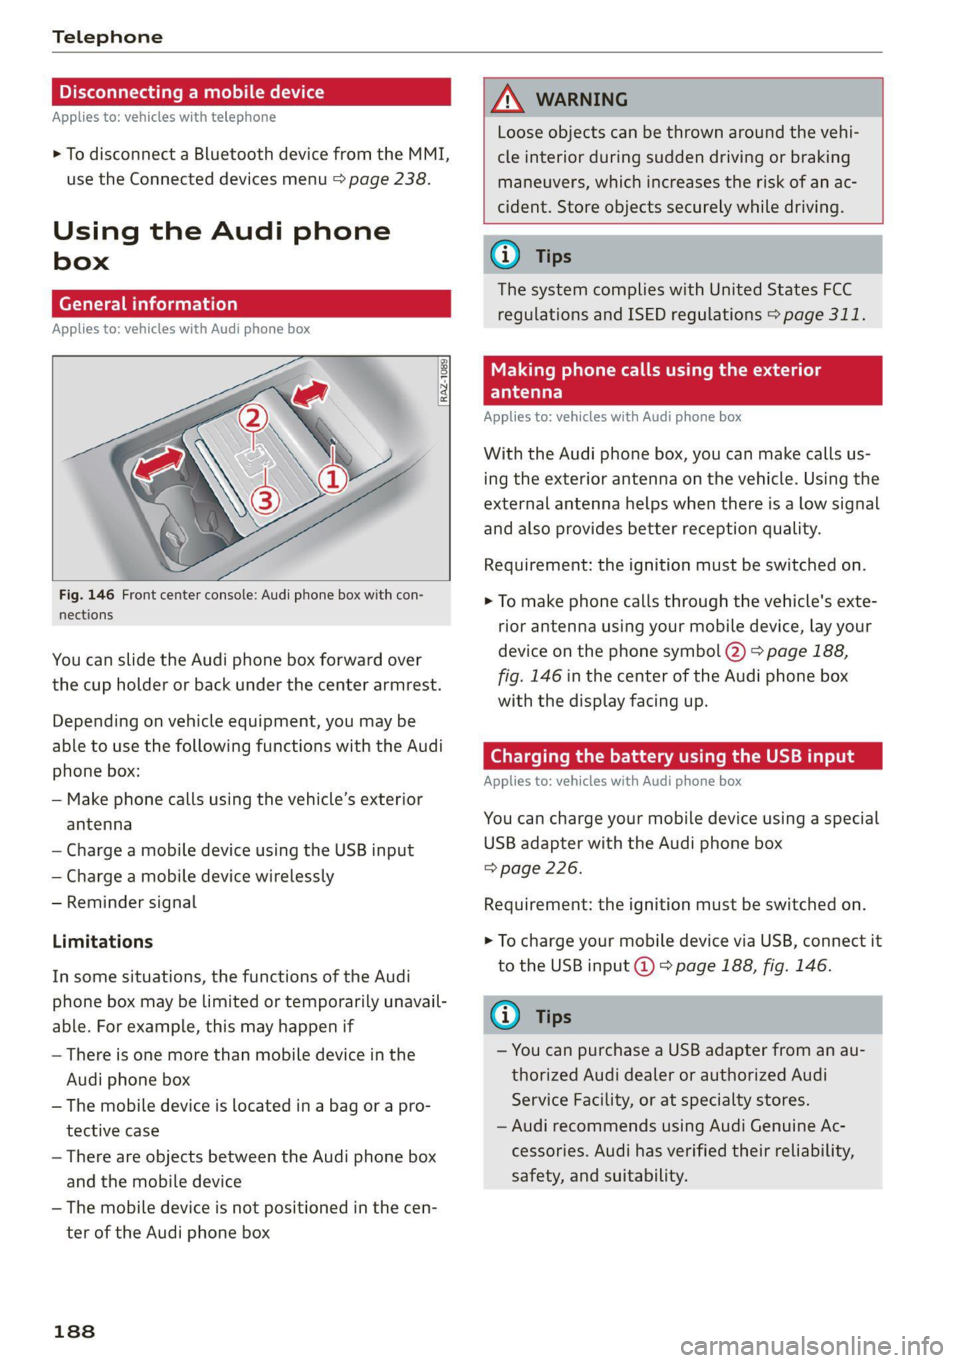
Fig. 146 Front center console: Audi phone box with con-
nections
You can slide the Audi phone box forward over
the cup holder or back under the center armrest.
Depending on vehicle equipment, you may be
able to use the following functions with the Audi
phone box:
— Make phone calls using the vehicle’s exterior
antenna
— Charge a mobile device using the USB input
— Charge a mobile device wirelessly
— Reminder signal
Limitations
In some situations, the functions of the Audi
phone box may be limited or temporarily unavail-
able. For example, this may happen if
— There is one more than mobile device in the
Audi phone box
— The mobile device is located in a bag or a pro-
tective case
— There are objects between the Audi phone box
and the mobile device
— The mobile device is not positioned in the cen-
ter of the Audi phone box
188
AN WARNING
Loose objects can be thrown around the vehi-
cle interior during sudden driving or braking
maneuvers, which increases the risk of an ac-
cident. Store objects securely while driving.
G) Tips
The system complies with United States FCC
regulations and ISED regulations > page 311.
Making phone calls using the exterior
Yaar)
Applies to: vehicles with Audi phone box
With the Audi phone box, you can make calls us-
ing the exterior antenna on the vehicle. Using the
external antenna helps when there is a low signal
and also provides better reception quality.
Requirement: the ignition must be switched on.
> To make phone calls through the vehicle's exte-
rior antenna using your mobile device, lay your
device on the phone symbol @) > page 188,
fig. 146 in the center of the Audi phone box
with the display facing up.
(Geel w eae ae ma Meh) se ialeltie
Applies to: vehicles with Audi phone box
You can charge your mobile device using a special
USB adapter with the Audi phone box
=> page 226.
Requirement: the ignition must be switched on.
> To charge your mobile device via USB, connect it
to the USB input @ ° page 188, fig. 146.
G) Tips
— You can purchase a USB adapter from an au-
thorized Audi dealer or authorized Audi
Service Facility, or at specialty stores.
— Audi recommends using Audi Genuine Ac-
cessories. Audi has verified their reliability,
safety, and suitability.
Page 228 of 332
Media
— Note the volume setting on your Bluetooth
device. Audi recommends setting your mo-
bile device to the maximum volume when
using it as a Bluetooth audio player.
—Aselection of supported Bluetooth devices
can be found in the database for tested mo-
bile devices at www.audi.com/bluetooth.
Amazon Alexa
Applies to: vehicles with Amazon Alexa Integration
You can play various Amazon Alexa content using
the MMI. The voice recognition system is used to
operate it.
Requirement: Amazon Alexa must be activated
=> page 28.
> Start Amazon Alexa using the voice recognition
system.
» Applies to: MMI: Select on the home screen:
MEDIA > Source > Amazon Alexa.
@) Note
Read the information about Audi connect, and
be sure to note the connectivity costs section
=> page 197.
Multimedia connections
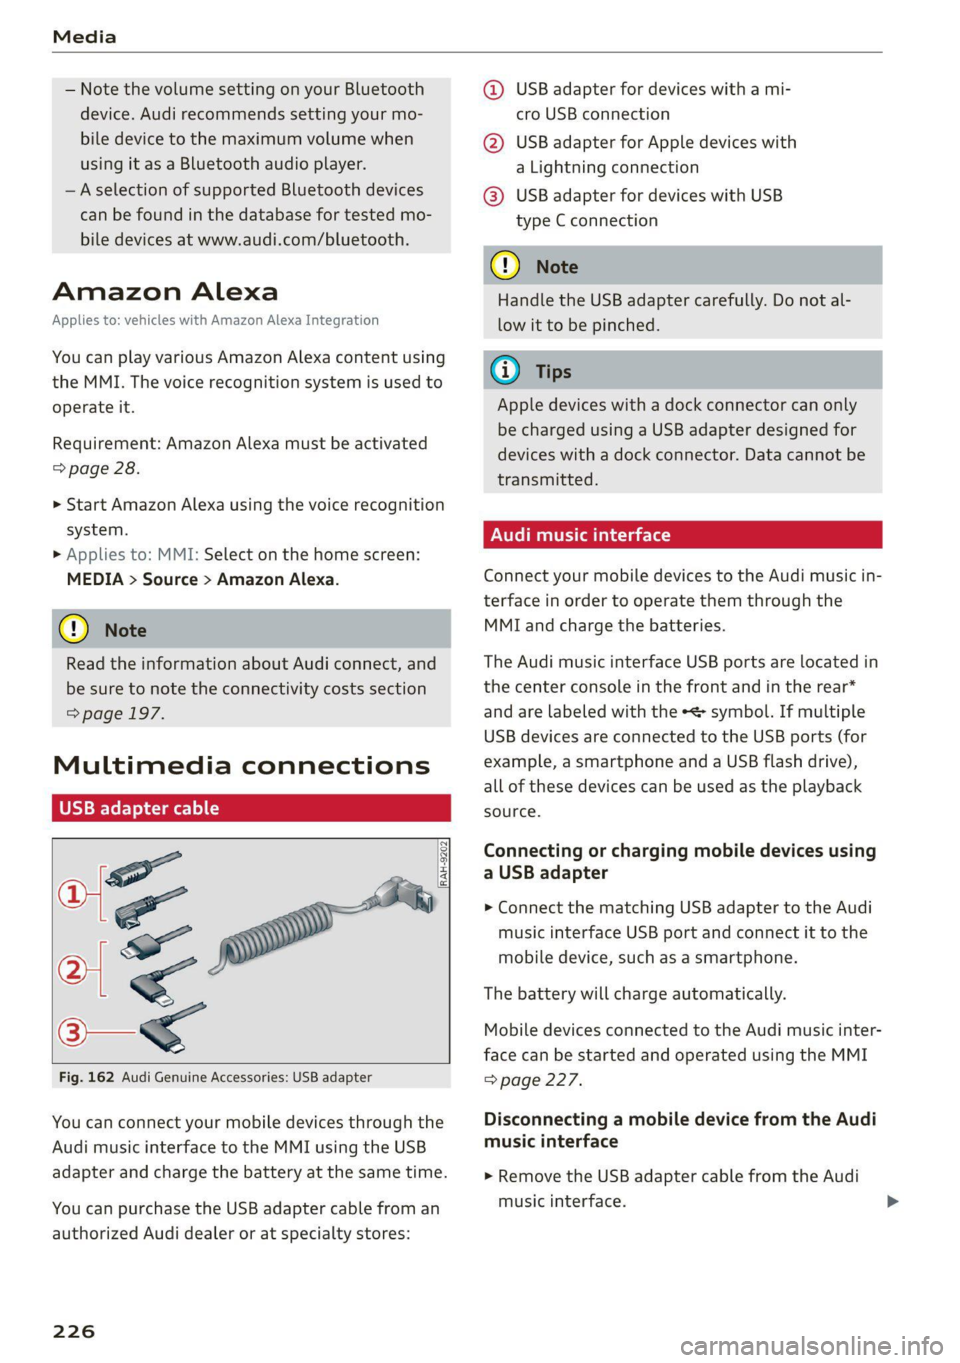
USB adapter cable
[RAH-9202
Fig. 162 Audi Genuine Accessories: USB adapter
You can connect your mobile devices through the
Audi music interface to the MMI using the USB
adapter and charge the battery at the same time.
You can purchase the USB adapter cable from an
authorized Audi dealer or at specialty stores:
226
@ USB adapter for devices with a mi-
cro USB connection
@ USB adapter for Apple devices with
a Lightning connection
@ USB adapter for devices with USB
type C connection
() Note
Handle the USB adapter carefully. Do not al-
low it to be pinched.
@ Tips
Apple devices with a dock connector can only
be charged using a USB adapter designed for
devices with a dock connector. Data cannot be
transmitted.
Audi music interface
Connect your mobile devices to the Audi music in-
terface in order to operate them through the
MMI and charge the batteries.
The Audi music interface USB ports are located in
the center console in the front and in the rear*
and are labeled with the «> symbol. If multiple
USB devices are connected to the USB ports (for
example, a smartphone and a USB flash drive),
all of these devices can be used as the playback
source.
Connecting or charging mobile devices using
a USB adapter
> Connect the matching USB adapter to the Audi
music interface USB port and connect it to the
mobile device, such as a smartphone.
The battery will charge automatically.
Mobile devices connected to the Audi music inter-
face can be started and operated using the MMI
=> page 227.
Disconnecting a mobile device from the Audi
music interface
> Remove the USB adapter cable from the Audi
music interface.