sensor AUDI Q5 2021 Owner´s Manual
[x] Cancel search | Manufacturer: AUDI, Model Year: 2021, Model line: Q5, Model: AUDI Q5 2021Pages: 332, PDF Size: 118.86 MB
Page 48 of 332
Opening and closing
G) Tips
— You can still open and close the windows for
several minutes after turning the ignition
off. The power window switch is not disa-
bled until the driver's door or front passeng-
er's door is opened.
— The power windows are equipped with pinch
protection. The automatic window may stop
closing and will open all the way again even
if no obstacle is detected. Pull the power
window switch up until the window is com-
pletely raised.
Convenience opening and closing
Applies to: vehicles with convenience key
Convenience opening and closing the
windows and roof*
You can set in the MMI if all windows or the roof*
should open or close all at once > page 35, Set-
ting the central locking system.
> Press and hold the (@ or @ button on the vehicle
key until all windows and the roof* have
reached the desired position > A\.
> Touch the sensor* on the door handle until all
of the windows and the roof* are closed. Do not
place your hand in the door handle when doing
this.
When all of the windows and the roof* are
closed, the turn signals will flash once.
ZA WARNING
— Never close the windows or the roof* care-
lessly or in an uncontrolled manner, because
this increases the risk of injury.
— For security reasons, the windows and the
roof* can only be opened and closed with
the vehicle key at a maximum distance of
approximately 6.5 feet (2 m) away from the
vehicle. Always pay attention when using
the & button to close the windows and the
roof* so that no one is pinched. The closing
process will stop immediately when the f}
button is released.
46
G) Tips
Applies to: vehicles with panoramic glass
roof: If the sunshade is closed, it will auto-
matically open partially or halfway when the
roof is tilted or opened.
Panoramic glass roof
emu aCe em ele lir)
sunshade
Applies to: vehicles with panoramic glass roof and roof sun-
shade
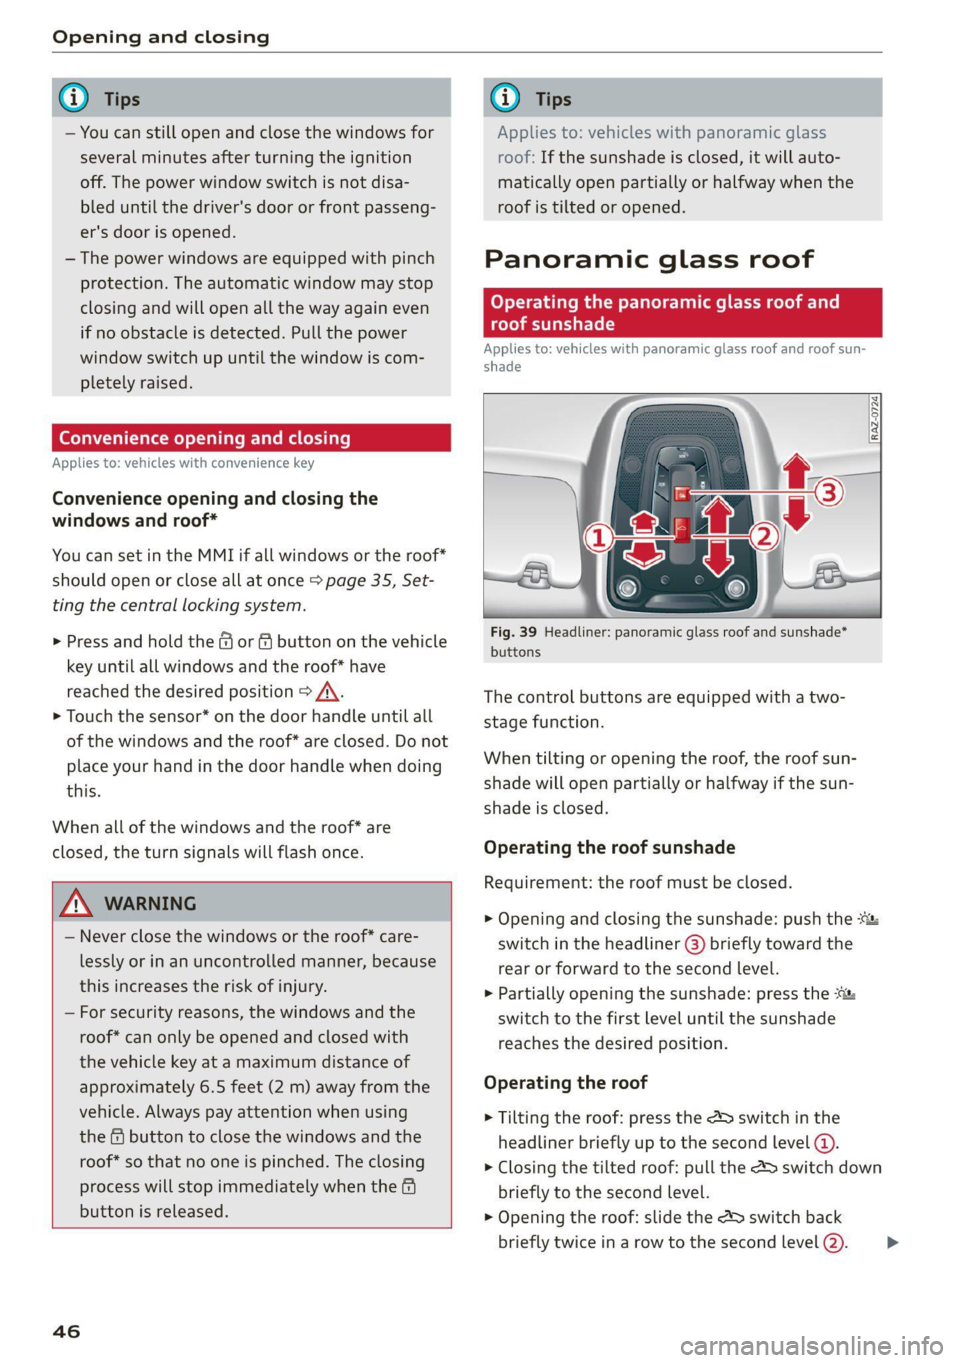
Fig. 39 Headliner: panoramic glass roof and sunshade*
buttons
The control buttons are equipped with a two-
stage function.
When tilting or opening the roof, the roof sun-
shade will open partially or halfway if the sun-
shade is closed.
Operating the roof sunshade
Requirement: the roof must be closed.
> Opening and closing the sunshade: push the -&&
switch in the headliner @) briefly toward the
rear or forward to the second level.
> Partially opening the sunshade: press the
switch to the first level until the sunshade
reaches the desired position.
Operating the roof
> Tilting the roof: press the 4S switch in the
headliner briefly up to the second level @.
> Closing the tilted roof: pull the > switch down
briefly to the second level.
> Opening the roof: slide the 2> switch back
briefly twice in a row to the second level @).
>
Page 52 of 332
Lights and Vision
Lights and Vision
Exterior lighting
Switching the lights on and off
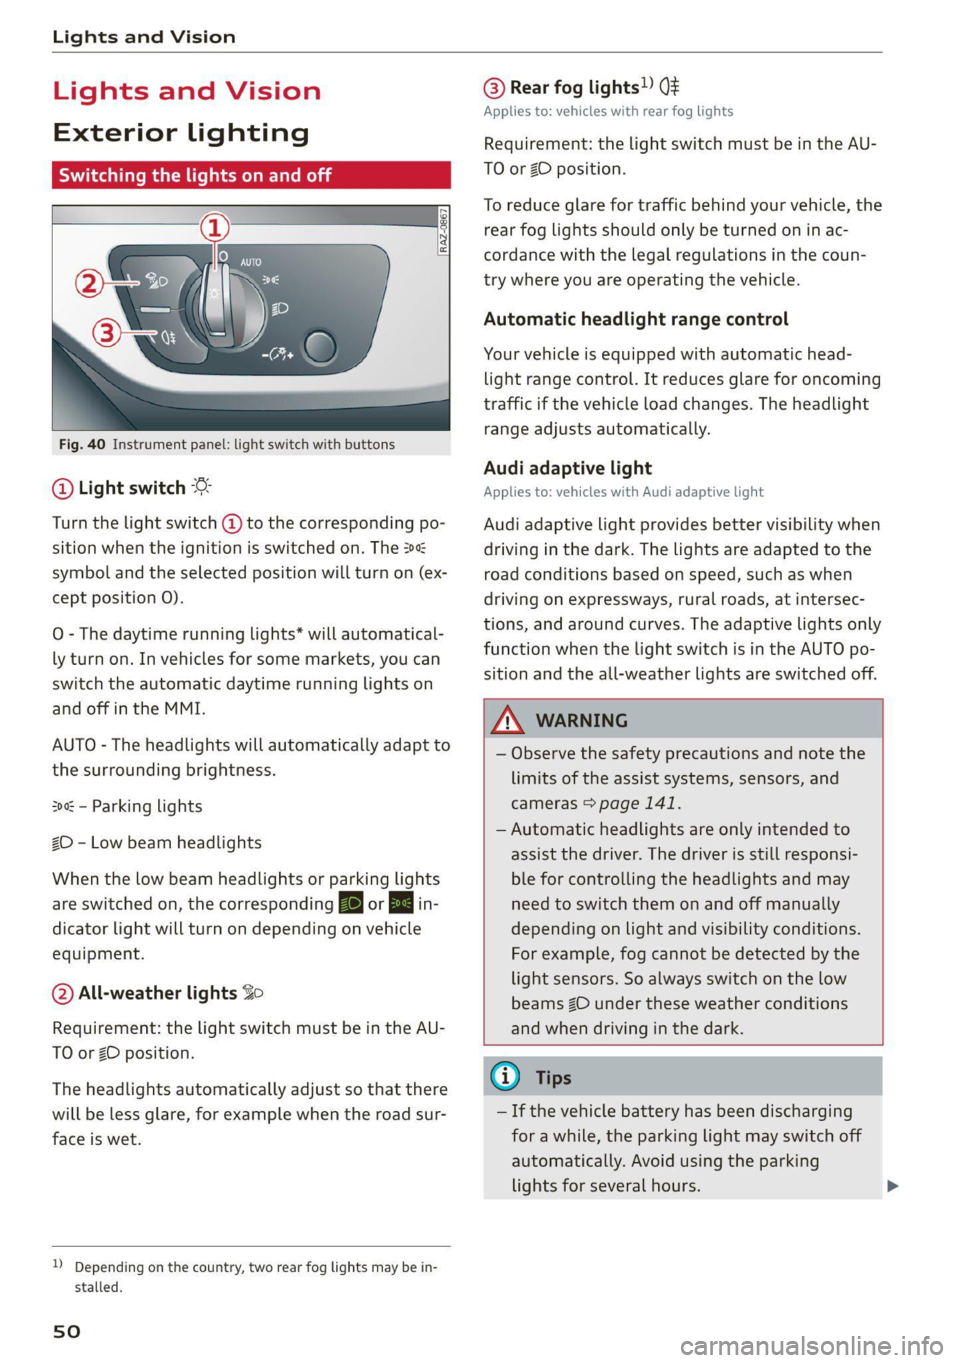
Fig. 40 Instrument panel: light switch with buttons
@ Light switch &
Turn the light switch @ to the corresponding po-
sition when the ignition is switched on. The 2
symbol and the selected position will turn on (ex-
cept position 0).
O - The daytime running lights* will automatical-
ly turn on. In vehicles for some markets, you can
switch the automatic daytime running lights on
and off in the MMI.
AUTO - The headlights will automatically adapt to
the surrounding brightness.
300: — Parking lights
2D - Low beam headlights
When the low beam headlights or parking lights
are switched on, the corresponding BB or 200 in-
dicator light will turn on depending on vehicle
equipment.
@ All-weather lights Zo
Requirement: the light switch must be in the AU-
TO or ZO position.
The headlights automatically adjust so that there
will be less glare, for example when the road sur-
face is wet.
D_ Depending on the country, two rear fog lights may be in-
stalled.
sO
@ Rear fog lights!) Qt
Applies to: vehicles with rear fog lights
Requirement: the light switch must be in the AU-
TO or ZO position.
To reduce glare for traffic behind your vehicle, the
rear fog lights should only be turned on in ac-
cordance with the legal regulations in the coun-
try where you are operating the vehicle.
Automatic headlight range control
Your vehicle is equipped with automatic head-
light range control. It reduces glare for oncoming
traffic if the vehicle load changes. The headlight
range adjusts automatically.
Audi adaptive light
Applies to: vehicles with Audi adaptive light
Audi adaptive light provides better visibility when
driving in the dark. The lights are adapted to the
road conditions based on speed, such as when
driving on expressways, rural roads, at intersec-
tions, and around curves. The adaptive lights only
function when the light switch is in the AUTO po-
sition and the all-weather lights are switched off.
A WARNING
— Observe the safety precautions and note the
limits of the assist systems, sensors, and
cameras > page 141.
— Automatic headlights are only intended to
assist the driver. The driver is still responsi-
ble for controlling the headlights and may
need to switch them on and off manually
depending on light and visibility conditions.
For example, fog cannot be detected by the
light sensors. So always switch on the low
beams ZO under these weather conditions
and when driving in the dark.
@ Tips
— If the vehicle battery has been discharging
for a while, the parking light may switch off
automatically. Avoid using the parking
lights for several hours.
Page 54 of 332
Lights and Vision
> To activate the high beams manually, tap the
lever forward @) > page 51, fig. 41. The =0} in-
dicator light will turn on.
> To deactivate the high beams manually, pull
the lever back @) > page 51, fig. 41. The high
beam assistant is deactivated.
Operating the headlight flasher
> To operate the headlight flashers, pull the lever
back @ © page 51, fig. 41. If the high beam
headlights are not switched on, the high beam
assistant will remain activated.
ZA WARNING
— Observe the safety precautions and note the
limits of the assist systems, sensors, and
cameras > page 141.
— High beam assistant is only intended to as-
sist the driver. The driver is responsible for
controlling the high beam headlights and
adjusting them to match the lighting and
visibility conditions.
— High beams can cause glare for other driv-
ers, which increases the risk of an accident.
For this reason, only use the high beams or
the headlight flasher when they will not cre-
ate glare for other drivers.
@) Tips
Adhere to any local applicable regulations
when using the lighting equipment, for exam-
ple in regard to reducing glare for other driv-
ers. The driver is always responsible for adher-
ing to the regulations applicable in the coun-
try where the vehicle is being operated.
Adjusting the exterior lighting
You can adjust the exterior lighting separately.
The settings depend on the vehicle equipment.
> Applies to: MMI: Select on the home screen:
VEHICLE > Light & Visibility > Exterior light-
ing.
Automatic headlights
You can adjust the following settings in the Auto-
matic
headlights menu:
52
Activation time - You can adjust if the headlights
switch on Early, Medium, or Late based on the
sensitivity of the light sensor.
High beam assistant - You can switch the high
beam assistant on and off.
Entry/exit lighting
The Entry/exit lighting illuminates the area
around the vehicle when the vehicle is unlocked
or when the driver’s door is opened while the ig-
nition is off. The entry/exit lighting works when it
is dark and the light switch is in the AUTO posi-
tion. The front and rear daytime running lights*
switch on automatically each time the vehicle is
unlocked regardless of how bright it is outside
the vehicle.
Daytime running lights
USA models: The daytime running lights can be
switched on and off.
Canada models: This function cannot be switched
off. They activate automatically each time the ig-
nition is switched on.
Emergency flashers
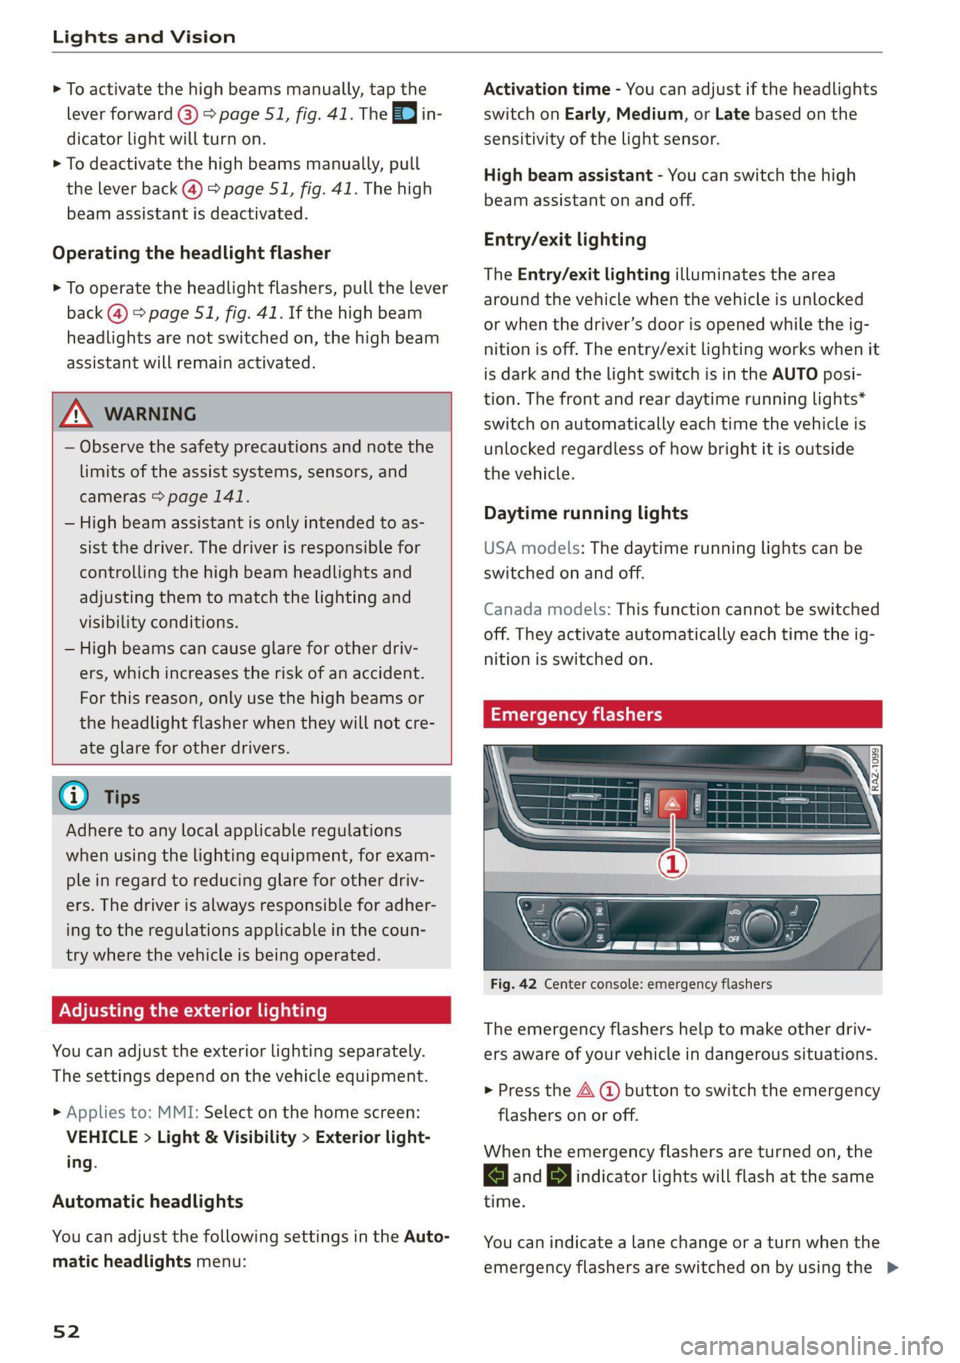
Fig. 42 Center console: emergency flashers
The emergency flashers help to make other driv-
ers aware of your vehicle in dangerous situations.
> Press the A @ button to switch the emergency
flashers on or off.
When the emergency flashers are turned on, the
and BJ indicator lights will flash at the same
time.
You can indicate a lane change or a turn when the
emergency flashers are switched on by using the >
Page 55 of 332
80B012721BA
Lights and Vision
turn signal lever. The emergency flashers stop
temporarily.
The emergency flashers also work when the igni-
tion is turned off.
G) Tips
You should switch the emergency flashers on
if
—
you are the last car in a traffic jam so that
all other vehicles approaching from behind
can see your vehicle
— your vehicle has broken down or you are
having an emergency
— your vehicle is being towed or if you are tow-
ing another vehicle
If the Ea indicator light turns on, a bulb has
failed. The displayed message indicates the cause
and possible solutions. If one of the messages re-
mains on, drive immediately to an authorized
Audi dealer or authorized Audi Service Facility to
have the malfunction repaired.
By Audi adaptive light: malfunction! See own-
er's manual
Adaptive light* is not working. The headlights
still function. Drive immediately to an authorized
Audi dealer or authorized Audi Service Facility to
have the malfunction repaired.
By Headlight range control: malfunction! See
owner's manual
There is a malfunction in the headlight range
control system, which may cause glare for other
drivers. Drive to an authorized Audi dealer or au-
thorized Audi Service Facility immediately to have
the malfunction corrected.
High beam assistant: malfunction! See own-
er's manual
You can still switch the high beams on or off
manually. Drive immediately to an authorized
Audi dealer or authorized Audi Service Facility to
have the malfunction repaired.
High beam assistant: currently unavailable.
Camera view limited due to environmental con-
ditions
This message appears if the camera's visual field
is blocked. The system will switch itself off. Try
switching the systems on later.
a Automatic headlights: malfunction! See
owner's manual
The light/rain sensor is malfunctioning. In the
AUTO light switch position, the low beams re-
main switched on at all times for safety reasons.
Drive immediately to an authorized Audi dealer
or authorized Audi Service Facility to have the
malfunction repaired.
Interior lighting
Front interior lighting
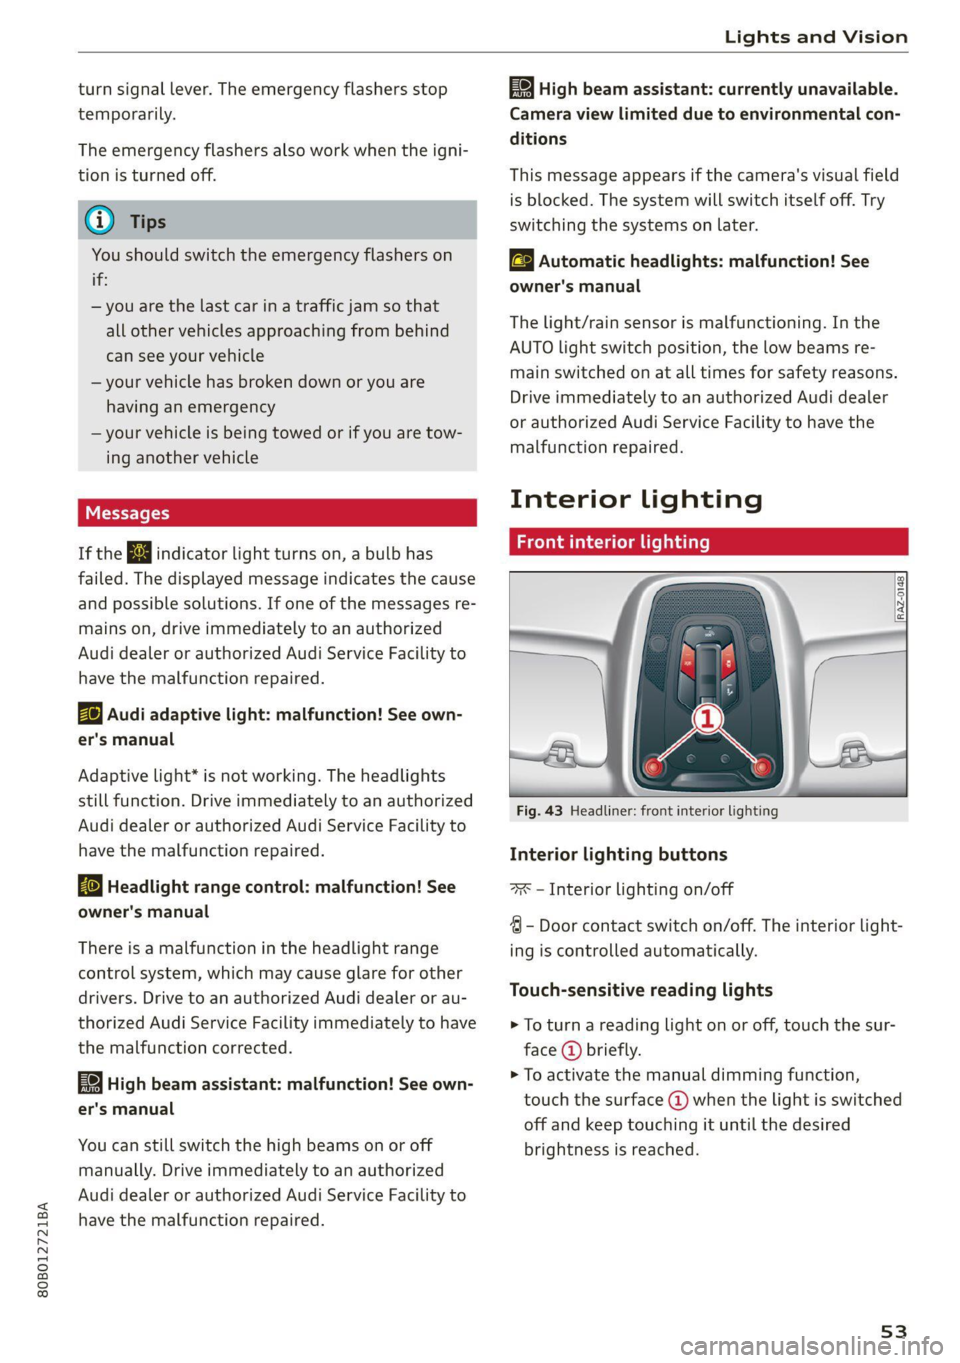
Fig. 43 Headliner: front interior lighting
Interior lighting buttons
=x — Interior lighting on/off
4 - Door contact switch on/off. The interior light-
ing is controlled automatically.
Touch-sensitive reading lights
> To turn a reading light on or off, touch the sur-
face @ briefly.
> To activate the manual dimming function,
touch the surface @) when the light is switched
off and keep touching it until the desired
brightness is reached.
53
Page 59 of 332
80B012721BA
Lights and Vision
Sun visor
The sun visors can be moved out of their brackets
and turned toward the doors @).
They can also be moved back and forth length-
wise in this position.
Vanity mirror
The mirror light switches on when the cover over
the
vanity mirror @) opens.
Applies to: vehicles with sunshade
<=
Q 6
gS
= z a
Fig. 49 Rear door: sunshade
Rear door sunshade
> Pull the sunshade out and attach it to the re-
tainer on the upper door frame > fig. 49.
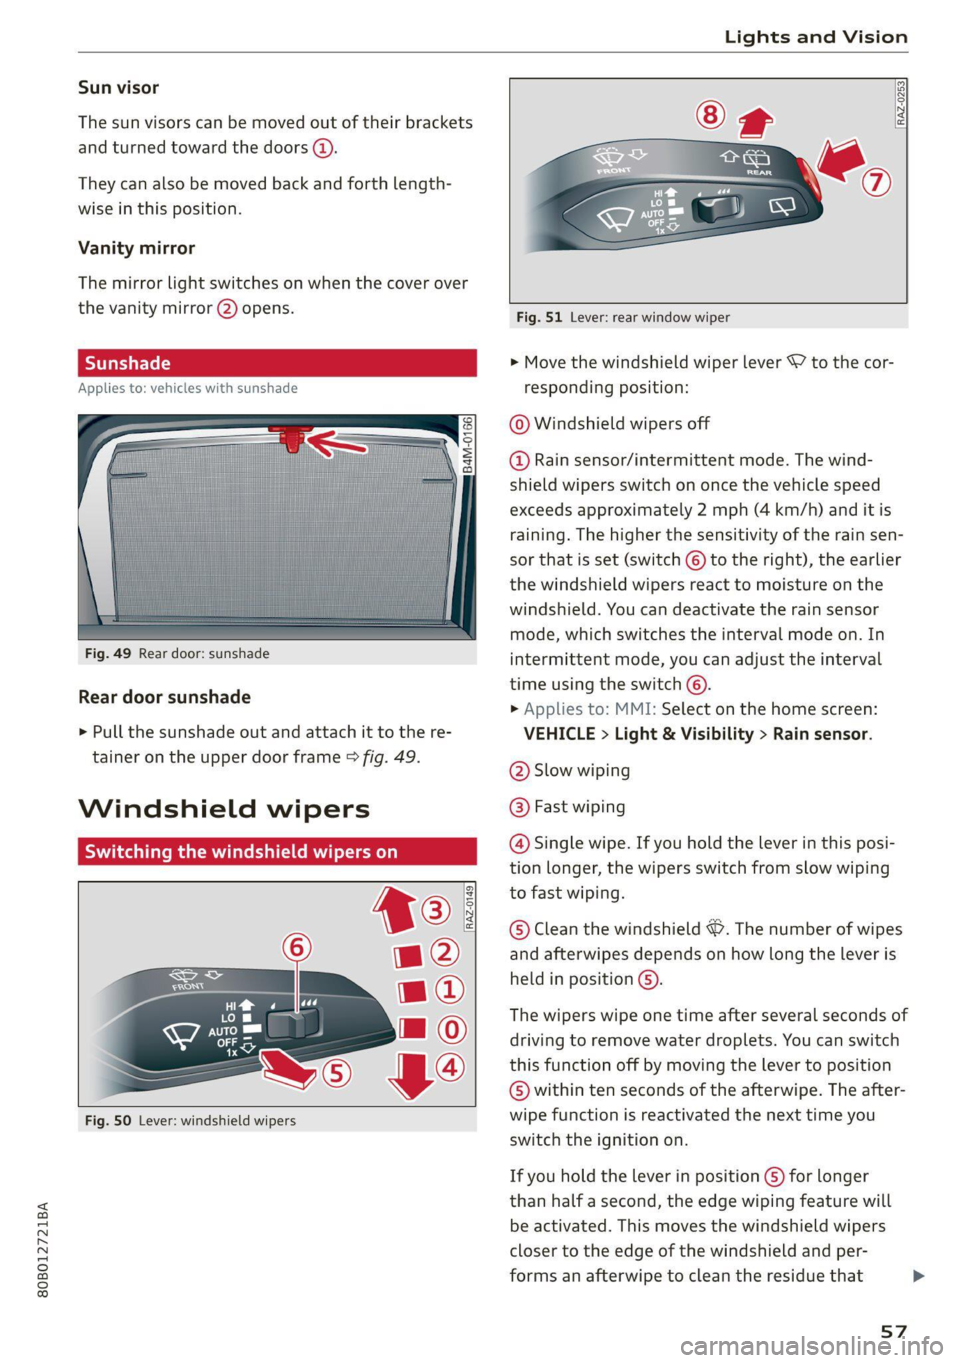
Windshield wipers
Switching the windshield wipers on
Fig. 50 Lever: windshield wipers
RAZ-0253
Fig. 51 Lever: rear window wiper
> Move the windshield wiper lever \7 to the cor-
responding position:
@ Windshield wipers off
@ Rain sensor/intermittent mode. The wind-
shield wipers switch on once the vehicle speed
exceeds approximately 2 mph (4 km/h) and it is
raining. The higher the sensitivity of the rain sen-
sor that is set (switch © to the right), the earlier
the windshield wipers react to moisture on the
windshield. You can deactivate the rain sensor
mode, which switches the interval mode on. In
intermittent mode, you can adjust the interval
time using the switch ©.
> Applies to: MMI: Select on the home screen:
VEHICLE > Light & Visibility > Rain sensor.
@ Slow wiping
@ Fast wiping
@ Single wipe. If you hold the lever in this posi-
tion longer, the wipers switch from slow wiping
to fast wiping.
© Clean the windshield &. The number of wipes
and afterwipes depends on how long the lever is
held in position ©).
The wipers wipe one time after several seconds of
driving to remove water droplets. You can switch
this function off by moving the lever to position
© within ten seconds of the afterwipe. The after-
wipe function is reactivated the next time you
switch the ignition on.
If you hold the lever in position ©) for longer
than half a second, the edge wiping feature will
be activated. This moves the windshield wipers
closer to the edge of the windshield and per-
forms an afterwipe to clean the residue that
57
>
Page 60 of 332
Lights and Vision
results from the wiping process from the edge of
the windshield. The function is available when
driving at speeds up to 75 mph (120 km/h).
The headlight washer system” operates only
when the low beam headlights are on. If you
move the lever into position ©, the headlights
will be cleaned at fixed intervals.
@ Wipe the rear window W. The number of
wipes depends on the windshield wiper move-
ment.
The rear wiper automatically switches on when
the reverse gear is selected and the front wind-
shield wipers are on and running.
Clean the rear window @. The number of
wipes depends on how long the lever is held in
position (@).
This may also clean the rearview camera, depend-
ing on the vehicle equipment.
ZA\ WARNING
— The rain sensor is only intended to assist the
driver. The driver may still be responsible for
manually switching the wipers on based on
visibility
conditions.
— The windshield must not be treated with
water-repelling windshield coating agents.
Under unfavorable conditions, such as wet-
ness, darkness, and when the sun is low,
these coatings can cause increased glare,
which increases the risk of an accident. They
can also cause wiper blade chatter.
— Properly functioning windshield wiper
blades are required for a clear view and safe
driving > page 58, Cleaning/changing wip-
er blades.
@) Note
— If there is frost, make sure the windshield
wiper blades are not frozen to the wind-
shield. Switching on the windshield wipers
when the blades are frozen to the wind-
shield can damage the wiper blades.
— Prior to using a car wash, the windshield
wiper system must be switched off (lever in
position @). This prevents the wipers from
58
switching on unintentionally and causing
damage to the windshield wiper system.
G) Tips
— The windshield wipers switch off when the
ignition is switched off. You can activate the
windshield wipers after the ignition is
switched on again by moving the windshield
wiper lever to any position. The single wipe
function (lever in position @) also functions
when the ignition is switched off.
— Worn or dirty windshield wiper blades result
in streaking. This can affect the rain sensor
function. Check your windshield wiper
blades regularly.
— The washer fluid nozzles for the windshield
washer system are heated when the ignition
is on if the outside temperature is low.
— When stopping temporarily, such as at a
traffic light, the speed of the windshield
wipers automatically reduces by one level.
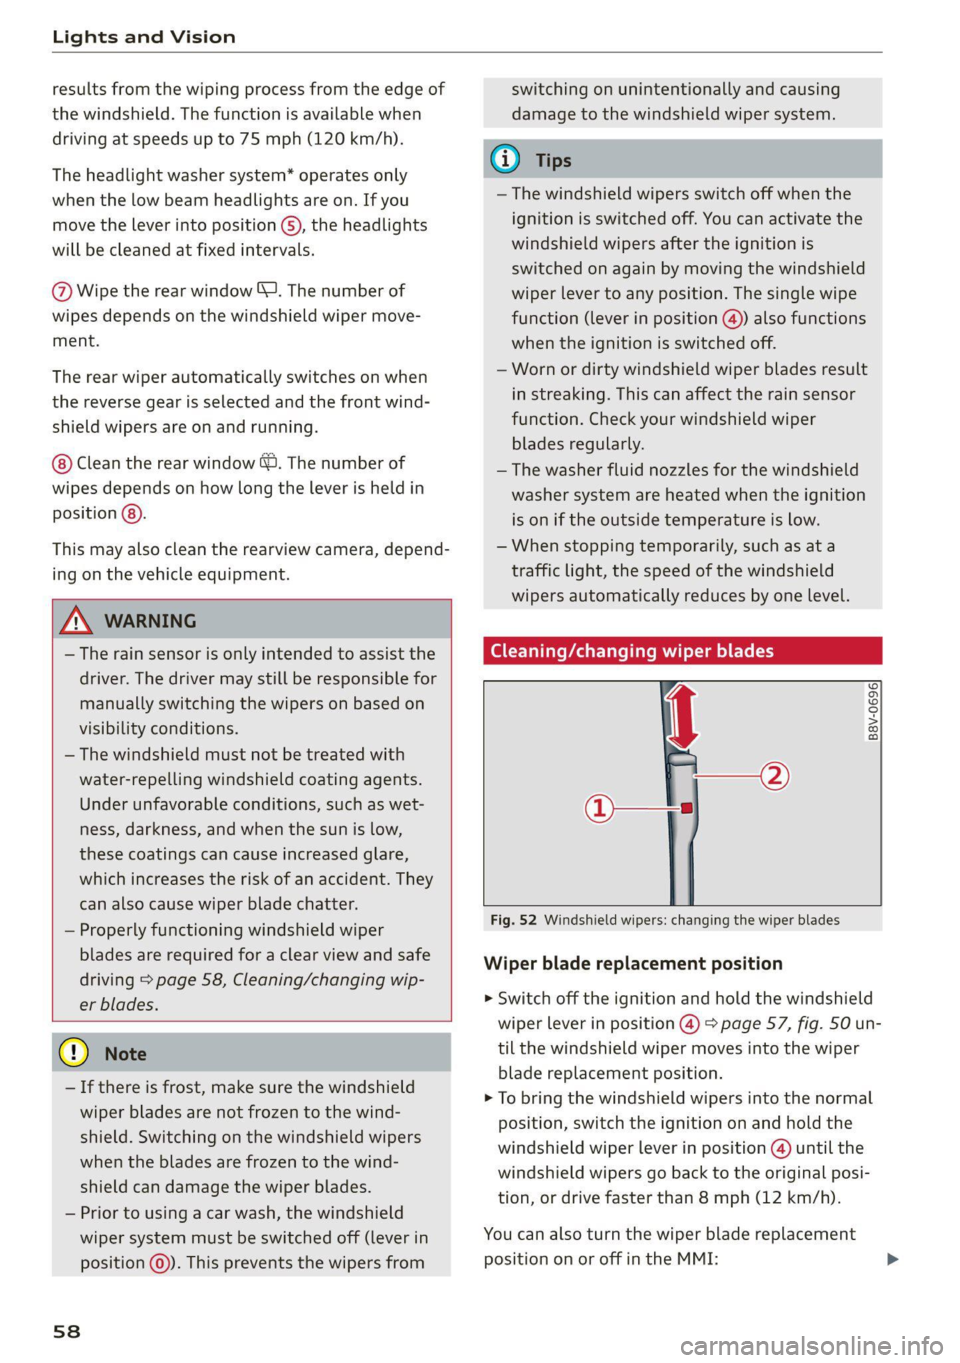
(eG cue a Re ct wiper blades
Fig. 52 Windshield wipers: changing the wiper blades
B8V-0696)
Wiper blade replacement position
>» Switch off the ignition and hold the windshield
wiper lever in position @) > page 57, fig. 50 un-
til the windshield wiper moves into the wiper
blade replacement position.
> To bring the windshield wipers into the normal
position, switch the ignition on and hold the
windshield wiper lever in position @ until the
windshield wipers go back to the original posi-
tion, or drive faster than 8 mph (12 km/h).
You can also turn the wiper blade replacement
position on or off in the MMI:
Page 62 of 332
Lights and Vision
dealer or authorized Audi Service Facility to have
the malfunction repaired.
SB Automatic wipers: malfunction! See owner's
manual
The light/rain sensor is malfunctioning. You can
still control all functions that are not controlled
by the rain sensor using the windshield wiper lev-
er. Drive immediately to an authorized Audi deal-
er or authorized Audi Service Facility to have the
malfunction repaired.
Digital compass
Scare meee lu Rei Rela
Applies to: vehicles with digital compass
BFV-0288
3
Fig. 54 Rearview mirror: digital compass is switched on
60
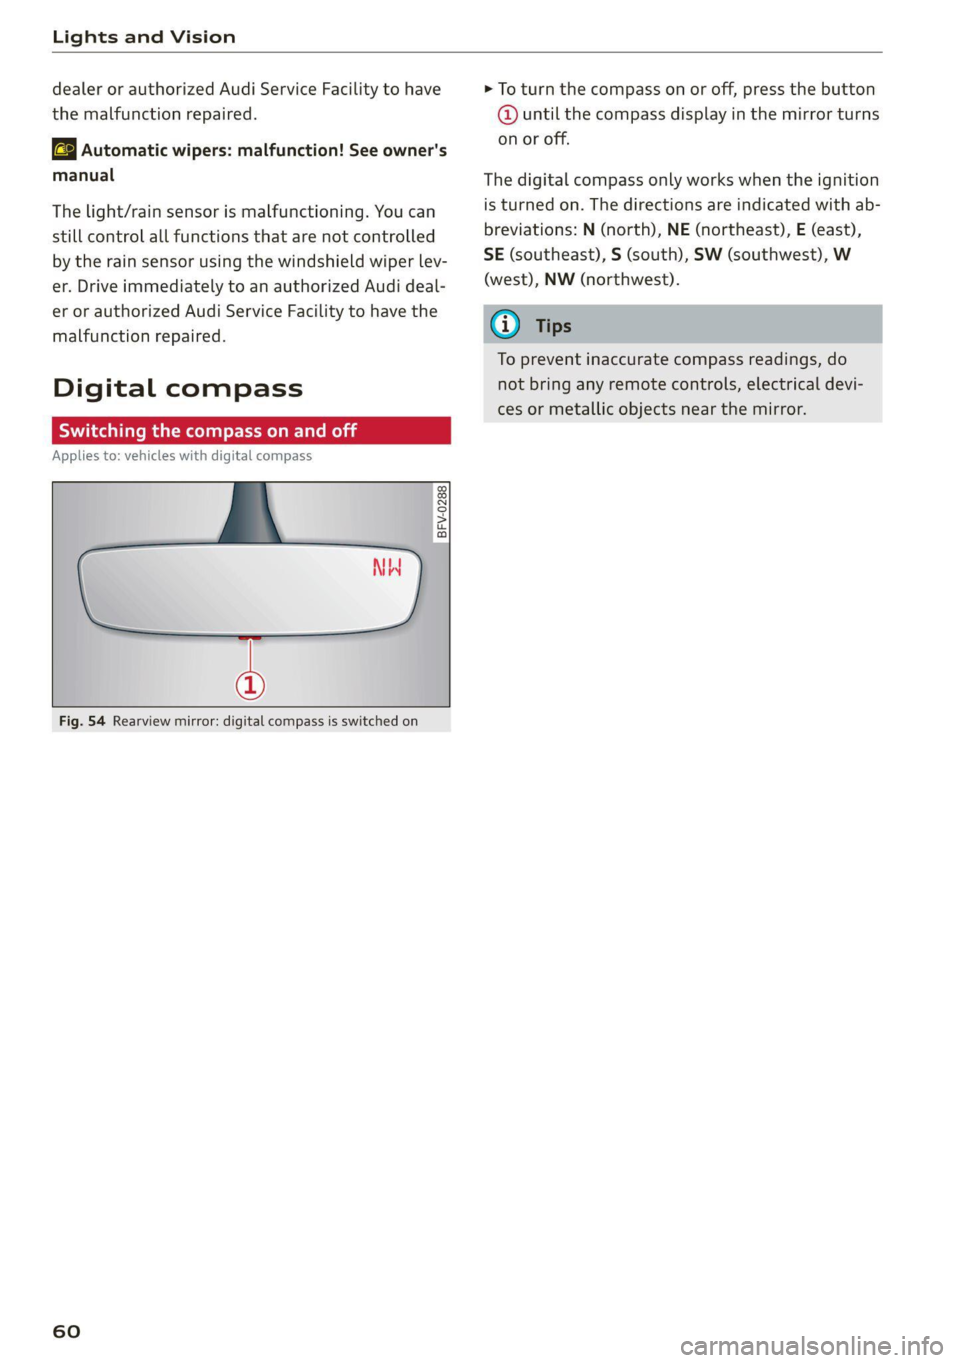
> To turn the compass on or off, press the button
@ until the compass display in the mirror turns
on or off.
The digital compass only works when the ignition
is turned on. The directions are indicated with ab-
breviations: N (north), NE (northeast), E (east),
SE (southeast), S (south), SW (southwest), W
(west), NW (northwest).
G) Tips
To prevent inaccurate compass readings, do
not bring any remote controls, electrical devi-
ces or metallic objects near the mirror.
Page 74 of 332

Sitting correctly and safely
— You must not use seat or protective covers particularly for individuals who have or have
that are not specifically approved for use on had asthma or other health issues that af-
Audi seats with side airbags. Since the side fect breathing. Exit the vehicle or open the
airbags deploy from the seat backrest, such windows or doors to get access to fresh air.
covers could impair the protective function
of the side airbags. G@) Tips
— Damage to the original seat covers in the
side airbag deployment area must always be
repaired by an authorized Audi dealer or au-
thorized Audi Service Facility.
— Airbag system components are installed at Ss
. . . ; Se melee]
various locations in your vehicle. Incorrect
If you are transporting children in the vehicle,
read the information and follow the safety
precautions > page 76.
work or repairs on the vehicle could damage The B@ indicator light in the instrument cluster
the airbag system components or impair monitors the safety systems such as the airbags
their functionality. This may prevent the air- (including the control modules, sensor, and wir-
bags from deploying or cause them to de- ing) and the belt tensioners. It turns on when you
ploy incorrectly in the event of an accident, switch the ignition on and
turns off after several
which increases the risk of serious or fatal seconds.
injuries. Only have an authorized Audi dealer
or authorized Audi Service Facility make re-
pairs or modifications to a vehicle.
If the indicator light does not turn on when the
ignition is switched on, does not turn off after
several seconds, or turns on or flashes while driv-
ing, there may be a malfunction in one of the
safety systems. Drive to an authorized Audi deal-
er or authorized Audi Service Facility immediately
to have the malfunction corrected.
— The airbag system can only provide protec-
tion during one collision. If there is another
collision, the airbag system will not deploy
again. If the airbag system has deployed,
have it replaced immediately by an author-
ized Audi dealer or authorized Audi Service A WARNING
Facility.
— Fine dust may appear if the airbags deploy.
This is completely normal and does not indi-
cate a fire in the vehicle. The fine dust can ir-
ritate the skin and mucous membranes in
the eyes and can cause difficulty breathing,
Have the malfunction in the safety systems in-
spected immediately. Otherwise, there is a
risk that the systems may not activate during
an accident, which increases the risk of seri-
ous or fatal injury.
72
Page 75 of 332
80B012721BA
Sitting correctly and safely
Description
RAZ-0785)
Fig. 70 Airbag overview image (enlarged section: deployed airbags)
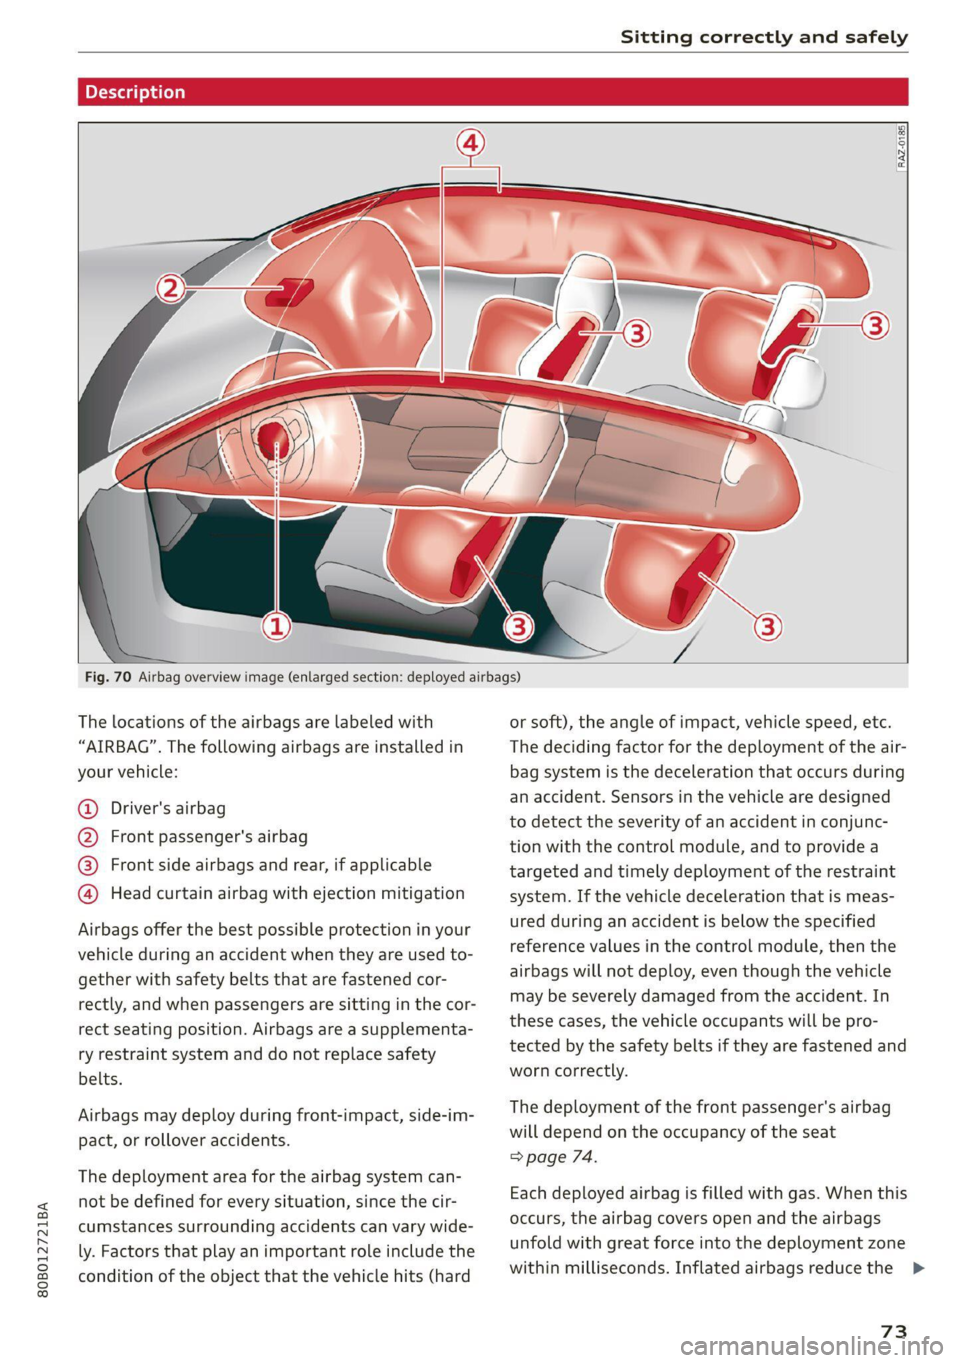
The locations of the airbags are labeled with
“AIRBAG”. The following airbags are installed in
your vehicle:
@ Driver's airbag
@ Front passenger's airbag
@®) Front side airbags and rear, if applicable
@ Head curtain airbag with ejection mitigation
Airbags offer the best possible protection in your
vehicle during an accident when they are used to-
gether with safety belts that are fastened cor-
rectly, and when passengers are sitting in the cor-
rect seating position. Airbags are a supplementa-
ry restraint system and do not replace safety
belts.
Airbags may deploy during front-impact, side-im-
pact, or rollover accidents.
The deployment area for the airbag system can-
not be defined for every situation, since the cir-
cumstances surrounding accidents can vary wide-
ly. Factors that play an important role include the
condition of the object that the vehicle hits (hard
or soft), the angle of impact, vehicle speed, etc.
The deciding factor for the deployment of the air-
bag system is the deceleration that occurs during
an accident. Sensors in the vehicle are designed
to detect the severity of an accident in conjunc-
tion with the control module, and to provide a
targeted and timely deployment of the restraint
system. If the vehicle deceleration that is meas-
ured during an accident is below the specified
reference values in the control module, then the
airbags will not deploy, even though the vehicle
may be severely damaged from the accident. In
these cases, the vehicle occupants will be pro-
tected by the safety belts if they are fastened and
worn correctly.
The deployment of the front passenger's airbag
will depend on the occupancy of the seat
=> page 74.
Each deployed airbag is filled with gas. When this
occurs, the airbag covers open and the airbags
unfold with great force into the deployment zone
within milliseconds. Inflated airbags reduce the >
73
Page 76 of 332
Sitting correctly and safely
movement of passengers wearing safety belts in
the direction of the impact and thus help to re-
duce the risk of injury. They can help to protect
the head, upper body, and lap, for example. How-
ever, there is the possibility that airbag deploy-
ment can cause injuries.
The airbag system only works when the ignition
is turned on.
If you or other vehicle passengers have physical
limitations that prevent sitting in a correct posi-
tion, modifications to the vehicle may be neces-
sary. For more information, contact an author-
ized Audi dealer or authorized Audi Service Facili-
ty, or call Audi customer support at
1-800-822-2834.
@ Tips
The side curtain airbags in your vehicle have
ejection mitigation functions. This reduces
the risk of being ejected from the vehicle inte-
rior during an accident, especially in the event
of a vehicle rollover.
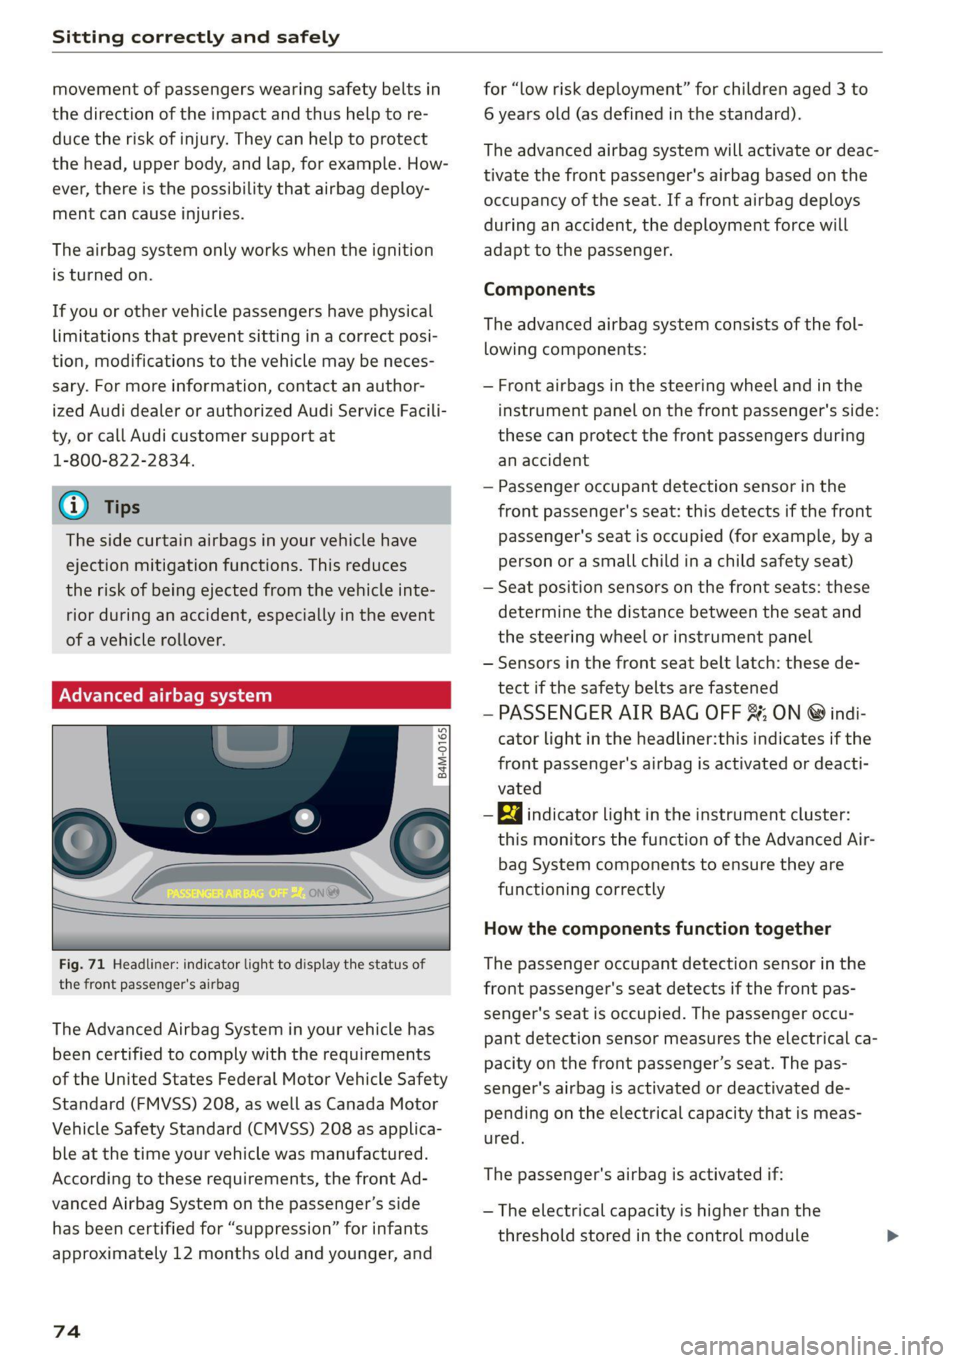
Advanced airbag system
Fig. 71 Headliner: indicator light to display the status of
the front passenger's airbag
The Advanced Airbag System in your vehicle has
been certified to comply with the requirements
of the United States Federal Motor Vehicle Safety
Standard (FMVSS) 208, as well as Canada Motor
Vehicle Safety Standard (CMVSS) 208 as applica-
ble at the time your vehicle was manufactured.
According to these requirements, the front Ad-
vanced Airbag System on the passenger’s side
has been certified for “suppression” for infants
approximately 12 months old and younger, and
74
for “low risk deployment” for children aged 3 to
6 years old (as defined in the standard).
The advanced airbag system will activate or deac-
tivate the front passenger's airbag based on the
occupancy of the seat. If a front airbag deploys
during an accident, the deployment force will
adapt to the passenger.
Components
The advanced airbag system consists of the fol-
lowing components:
— Front airbags in the steering wheel and in the
instrument panel on the front passenger's side:
these can protect the front passengers during
an accident
— Passenger occupant detection sensor in the
front passenger's seat: this detects if the front
passenger's seat is occupied (for example, by a
person or asmall child in a child safety seat)
— Seat position sensors on the front seats: these
determine the distance between the seat and
the steering wheel or instrument panel
— Sensors in the front seat belt latch: these de-
tect if the safety belts are fastened
— PASSENGER AIR BAG OFF ; ON ® indi-
cator light in the headliner:this indicates if the
front passenger's airbag is activated or deacti-
vated
- ka indicator light in the instrument cluster:
this monitors the function of the Advanced Air-
bag System components to ensure they are
functioning correctly
How the components function together
The passenger occupant detection sensor in the
front passenger's seat detects if the front pas-
senger's seat is occupied. The passenger occu-
pant detection sensor measures the electrical ca-
pacity on the front passenger’s seat. The pas-
senger's airbag is activated or deactivated de-
pending on the electrical capacity that is meas-
ured.
The passenger's airbag is activated if:
— The electrical capacity is higher than the
threshold stored in the control module