climate control AUDI Q5 2021 Owner´s Manual
[x] Cancel search | Manufacturer: AUDI, Model Year: 2021, Model line: Q5, Model: AUDI Q5 2021Pages: 332, PDF Size: 118.86 MB
Page 4 of 332
Table of contents
About this Owner's Manual......
SUMIMAry: < = exe : eens: Seen cs sens
QutckeaeCe ssh: «i esis se ois a eaves @
Cockpit. ...... 0... eee eee eee eee
Indicator lights overview...........4..
Display and operation...........
Instrument cluster...............
Instrument cluster overview...........
Operating. ecccuse w+ were oo wens oo ayes 9 ¥
Adjusting the display.................
Coolant temperature display...........
Tachometer’ series i ewe so snes ¥ & ome
Power meter...............0 00000005
QUOOMEtEr as + 2 ame < gas = papas s ¥ HERS &
Outside temperature display...........
Engine oil temperature indicator.......
Boost indicator’: 2 2c« «= sesa ¢ x sews «x 2x8
Vehicle functions « seis ss emis ee mes ee
Touch display.....................
General touch display operation........
Multi Media Interface................
Head-up display..................
DeSeriptioni: << sone so sisi © » axsinne oo sxe
Voice recognition system........
General information.................
Description ...... 0... ccc eee ee eee
External voice operation..............
Global functions.................
Additional function buttons...........
Starting and driving.............
Personalization..................
Luggage compartment lid.............
Child'safety lock ses < « se0% cs eee se oes
Power windows: ss sew. «sass as eaves a
Panoramic glass roof.................
Garage door opener..........--..00-5
NOD
OO
12 12 12
13
13
14 14
15
15
16
16
16
16
18 18
20
26
26
27 27 27 28 30 30
31 3h 31
34
34
38
41
44
45
46
Lights and Vision.................
Exterior lighting...............0000ee
Windshield wipers................05-
Digital compass’ « < sces ss sees sz wees ae
Sitting correctly and safely......
Correct passenger seating position......
Frontis@ats's « sais « ¢ sine « » saree yo eae a
ReAarSeats verse a coecns oo area oo semen nw aie
Steering wheel.............2.200005.
Head restraintsts: « » gare x 2 oawa ys qe a 5
Safety belts..............00..00000.
Memory function............2..00 eee
Airbag
syst@m aces ss cece se ees ee ees
Child safety seats cic «4 wessn « women © vane
Storage and convenience........
POWer SOURCES sisson «+ women « ¥ oes 3 6 eos
Cup holders........ 00... e cece eee
Climatized cup holders...............
Storage and compartments............
Luggage compartment...............
ROOF PACK: « « ewws 4s ewes 4s nees ¥ e reese gs
WV erence Chl ieee. & socsese 5 & newer 3 0 we
Climate control system............00.
3-zone deluxe automatic climate control .
Steering wheel heating...............
Auxiliary climate control..............
Fluids in the A/C system..............
Driving........... 0... cece eee
Starting the vehicle..................
Whe nid rivitngnes ss sons 6 x tana © 8 cuere a 6
Drive systeM.... 2... eee eee eee
Start/Stop system..........2--00000-
Electromechanical parking brake.......
Special driving situations..............
Driving dynamic..................
Audi drive select..........0.-..000005
SUSPENSION is: + & eas » s eews 6 y Gews Fo HEE
SEONG « csevaiss 5 + sevens = anecome © u enecans + © ox
All wheel drive (quattro) ..............
Electronic Stabilization Control.........
62
62
62
65 65
66 67
71 71
76
82
82
82
83
83
84
88
91
91
92
94
94
96
Page 8 of 332
Quick access
Quick access
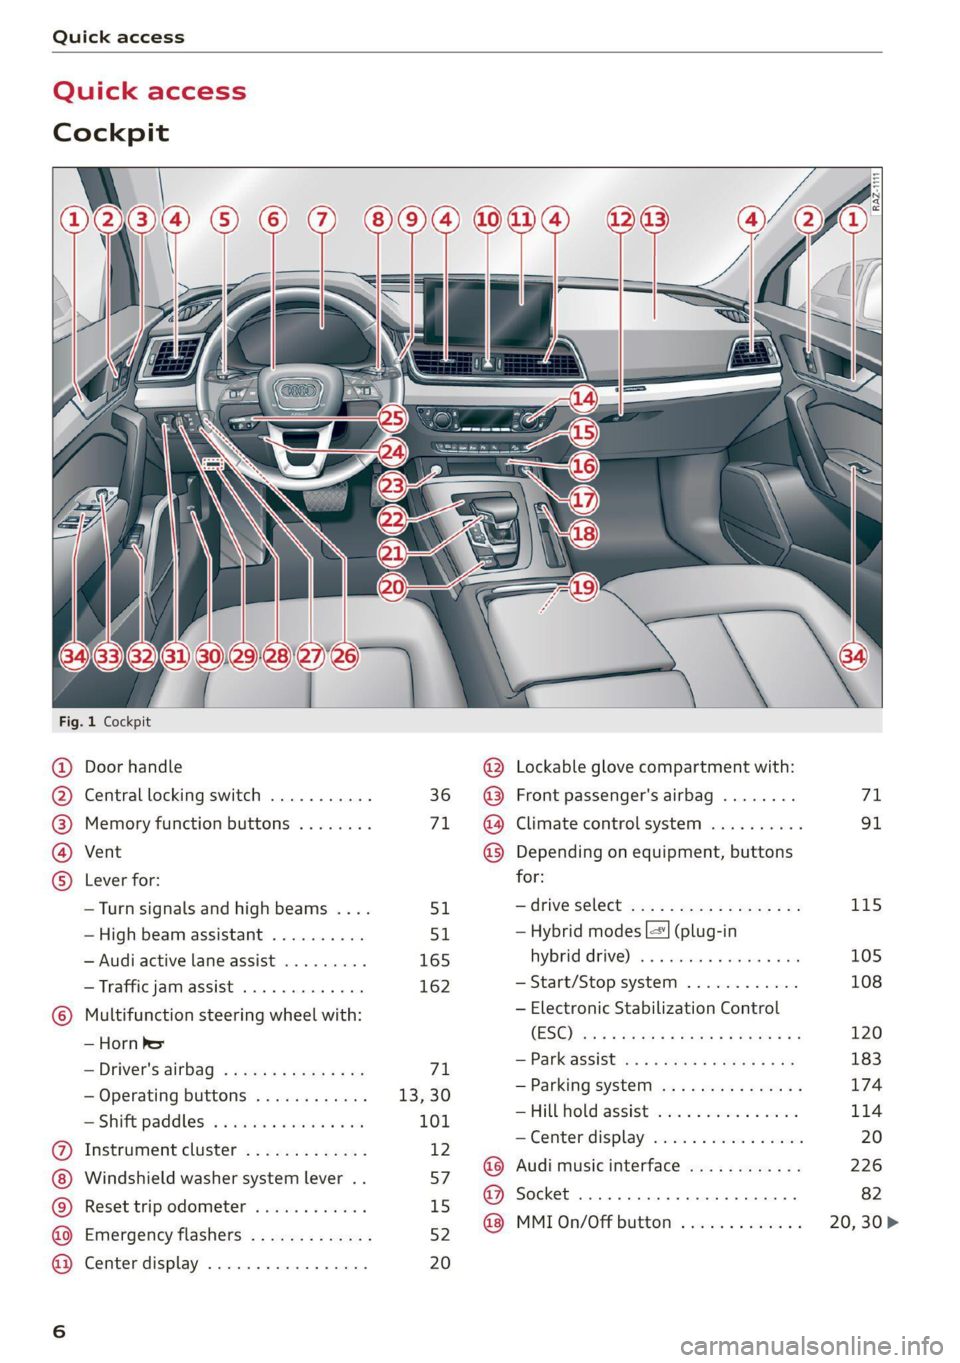
Cockpit
Fig. 1 Cockpit
@ @ @ @ ©
©
OOOO
Door handle
Central locking switch ...........
Memory function buttons ........
Vent
Lever for:
—Turn signals and high beams ....
—High beam assistant ..........
— Audi active lane assist .........
— Traffic jam assist .............
Multifunction steering wheel with:
— Horn be
— Driver's airbag ...............
— Operating buttons ............
= Shift paddles: « « coi e ewes sv ove
Instrument cluster .............
Windshield washer system lever ..
Reset trip odometer ............
Emergency flashers .............
Center display .................
51
165 162
71
13,30
101
12
57
15
52
20
@ Lockable glove compartment with:
@ Front passenger's airbag ........
@ Climate control system ..........
@ Depending on equipment, buttons
for:
—drive select ...............0..
— Hybrid modes |=] (plug-in
hybrid drive) ss i scsi ov sven 6 oa
— Start/Stop system ............
— Electronic Stabilization Control
(ESO) ca ss wuss 5 4 Hema a i eos a ee
— Parkeassist ws 3 ¢ avo » x eeay a y me
— Parking system ...............
Hill Hold assist ves: es sseose. 2 animes
—Center display .............00.
@ Audi music interface ............
@ Socket ......... 0... c eee eee
@ MMI On/Off button .............
115 105 108 120
183
174
114
Page 47 of 332
80B012721BA
Opening and closing
Vehicles with & button
Applies to: vehicles with manual child safety lock
> To activate or deactivate the child safety lock
for the power window switch in the rear doors,
press the button in the driver's door (2)
> fig. 36. The indicator light in the button turns
on/blinks.
> To activate or deactivate the manual child safe-
ty lock for the rear door handle, open the re-
spective rear door and turn the key switch with
the mechanical key in the direction of the arrow
or opposite the direction of the arrow 9 fig. 37.
This will disable the function of the rear door
handle.
> Make sure the child safety lock is working by
checking the function on the rear power win-
dow switch and door handle.
Applies to: vehicles with power child safety locks:
It is not possible to operate the rear climate con-
trol system* when the child safety lock is activat-
ed. The SET REAR function allows you to adjust
all settings in the rear using the climate control
system controls in the cockpit.
Message in the instrument cluster display
@/8 Child safety lock: malfunction! Please
contact Service
There is a malfunction in the child safety lock.
Press the @/ & button again.
If the message stays on, drive immediately to an
authorized Audi dealer or authorized Audi Service
Facility to have the malfunction repaired.
Z\ WARNING
— Observe the safety precautions > page 34.
—A malfunction in the child safety lock could
allow the rear doors to be opened from the
inside, which increases the risk of an acci-
dent.
Power windows
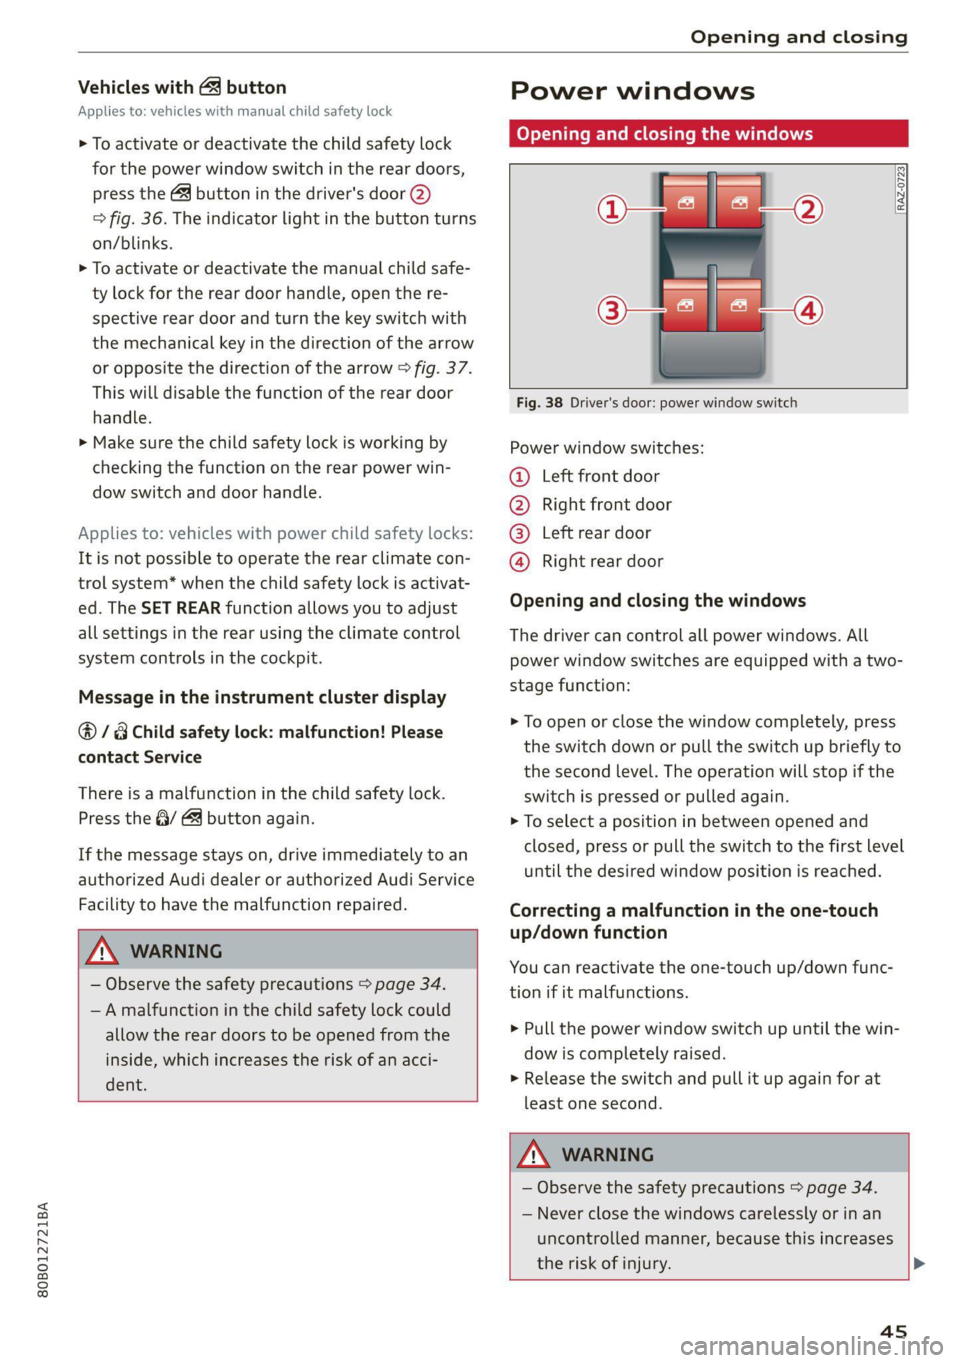
Opening and closing the windows
[RAZ-0723
Fig. 38 Driver's door: power window switch
Power window switches:
@ Left front door
® Right front door
@® Left rear door
@ Right rear door
Opening and closing the windows
The driver can control all power windows. All
power window switches are equipped with a two-
stage function:
> To open or close the window completely, press
the switch down or pull the switch up briefly to
the second level. The operation will stop if the
switch is pressed or pulled again.
> To select a position in between opened and
closed, press or pull the switch to the first level
until the desired window position is reached.
Correcting a malfunction in the one-touch
up/down function
You can reactivate the one-touch up/down func-
tion if it malfunctions.
> Pull the power window switch up until the win-
dow is completely raised.
> Release the switch and pull it up again for at
least one second.
ZA WARNING
— Observe the safety precautions > page 34.
— Never close the windows carelessly or in an
uncontrolled manner, because this increases
the risk of injury.
4s
Page 93 of 332
80B012721BA
Warm and cold
Warm and cold
Climate control system
Your vehicle has a deluxe automatic climate con-
trol system with 3 zones where the temperature,
air distribution, and air supply can be set sepa-
rately on the left front side, the right front side,
and in the rear.
The climate control system warms, cools, dehu-
midifies, and filters the air in the vehicle interior.
It is the most effective when the windows and
panoramic glass roof* are closed. If there is a
build-up of heat inside the vehicle, ventilation
can help to speed up the cooling process.
The automatic climate control system automati-
cally maintains a temperature once it has been
set. In all heating mode functions except defrost,
the blower only switches to a higher speed once
the coolant has reached a certain temperature.
Pollutant filter
The pollutant filter removes pollutants such as
dust and pollen from the air.
ZA\ WARNING
— You should not use the recirculation mode
for an extended period of time, because no
fresh air is drawn in and the windows can
fog when cooling mode is switched off. This
increases the risk of an accident.
— Individuals with reduced sensitivity to pain
or temperature could develop burns when
using the seat heating* function. To reduce
the risk of injury, these individuals should
not use seat heating*.
Q) Note
To reduce the risk of damage to the seat heat-
ing* elements, do not kneel on the seats or
place heavy pressure on one area of the seat.
@) For the sake of the environment
Energy can be saved by switching off the A/C
mode.
@) Tips
—To prevent interference with the heating or
cooling output and to prevent the windows
from fogging over, the air intake in front of
the windshield must be free of ice, snow,
and leaves.
— Condensation from the cooling system can
drip and form a puddle of water under the
vehicle. This is normal and does not mean
there is a leak.
— The energy management system may tem-
porarily switch off certain functions, such as
the seat heating” or rear window defogger.
These systems are available again as soon as
the energy supply has been restored.
— If the front passenger's seat heating* is
turned on, it will not turn on again automat-
ically if more than 10 minutes have passed
between switching the ignition off and on
again.
91
Page 94 of 332
Warm and cold
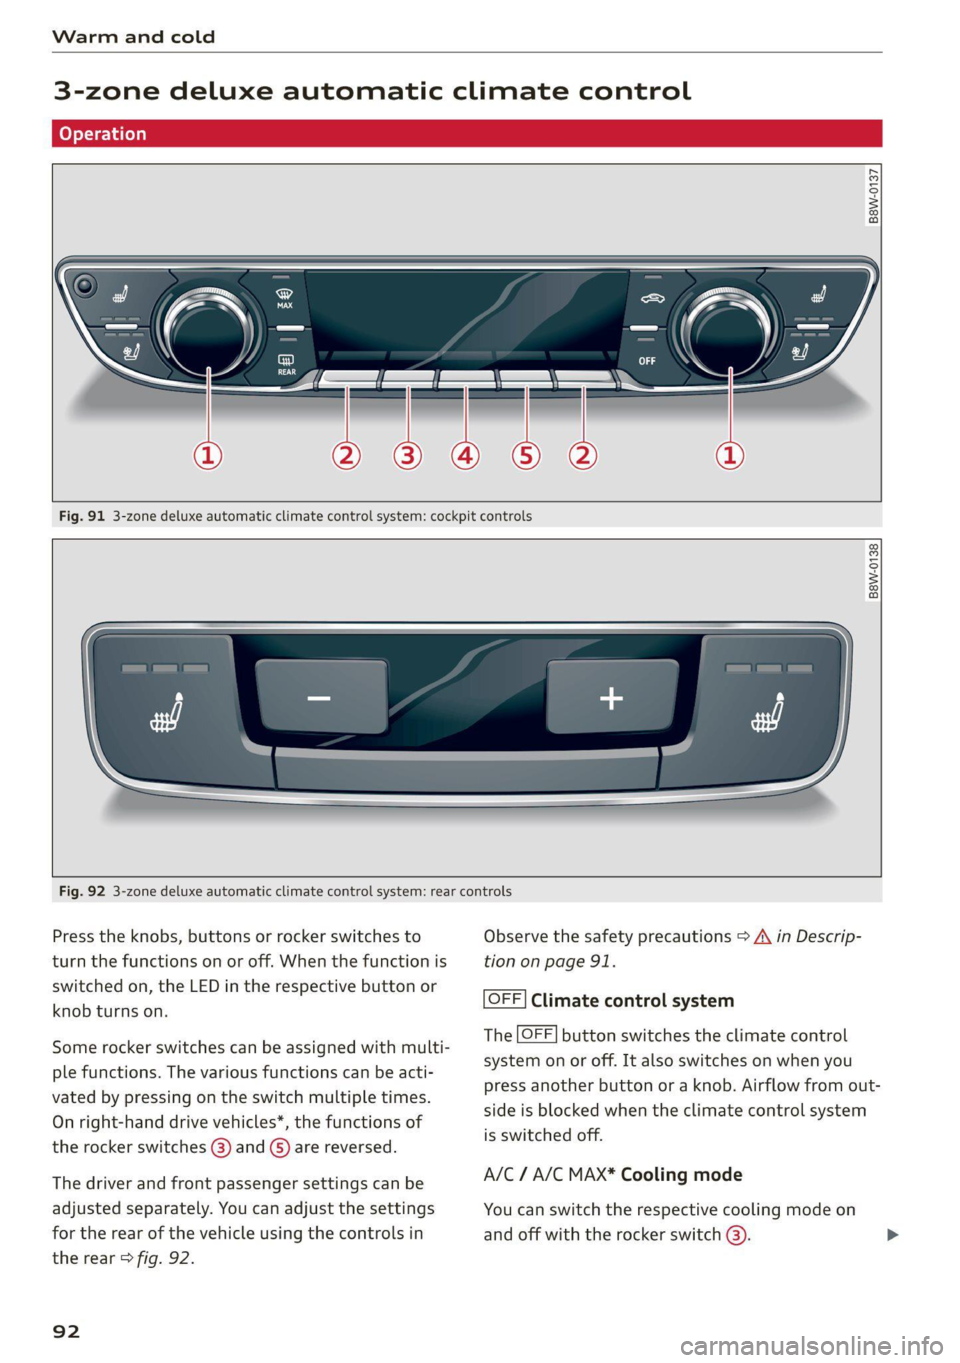
3-zone deluxe automatic climate control
B8W-0137
Fig. 91 3-zone deluxe automatic climate control system: cockpit controls
B8W-0138
Fig. 92 3-zone deluxe automatic climate control system: rear controls
Press the knobs, buttons or rocker switches to Observe the safety precautions > A\ in Descrip-
turn the functions on or off. When the function is tion on page 91.
switched on, the LED in the respective button or
knob turns on.
OFF] Climate control system
The [OFF] button switches the climate control
system on or off. It also switches on when you
press another button or a knob. Airflow from out-
side is blocked when the climate control system
is switched off.
Some rocker switches can be assigned with multi-
ple functions. The various functions can be acti-
vated by pressing on the switch multiple times.
On right-hand drive vehicles*, the functions of
the rocker switches (8) and ©) are reversed.
The driver and front passenger settings can be A/C / A/C MAX* Cooling mode
adjusted separately. You can adjust the settings You can switch the respective cooling mode on
for the rear of the vehicle using the controls in and off with the rocker switch @).
the rear > fig. 92.
92
Page 95 of 332
80B012721BA
Warm and cold
The cooling mode only functions with the blower
turned on. The air is not cooled and humidity is
not reduced when cooling mode is switched off.
This can cause fog on the windows. The cooling
mode switches off automatically at low outside
temperatures.
If you activate A/C ON, the cooling mode will be
automatically regulated. A/C OFF switches cool-
ing mode off.
If you activate A/C MAX*, the cooling mode will
operate with maximum output. To reduce unnec-
essary energy usage, only use this function brief-
ly.
= Recirculation mode
In recirculation mode, the air inside the vehicle is
circulated and filtered. This prevents the unfil-
tered air outside the vehicle from entering the
vehicle interior A\ in Description on page 91.
Pressing the <> button switches recirculation
mode on or off manually. You can also switch the
recirculation mode off by pressing the knob (@ or
the §& button.
AUTO Automatic mode
Automatic mode maintains a constant tempera-
ture inside the vehicle. Air temperature, airflow
and air distribution are controlled automatically.
You can switch automatic mode on or off by
pressing the knob (@).
Temperature
You can adjust the temperature between 60°F
(+16°C) and 84°F (+28°C) by turning the knob
©. If outside of this range, LO or HI will appear
in the climate control system display. In both set-
tings, the climate control runs constantly at the
maximum cooling or heating level. The tempera-
ture is not regulated.
The temperature can be adjusted in the rear us-
ing
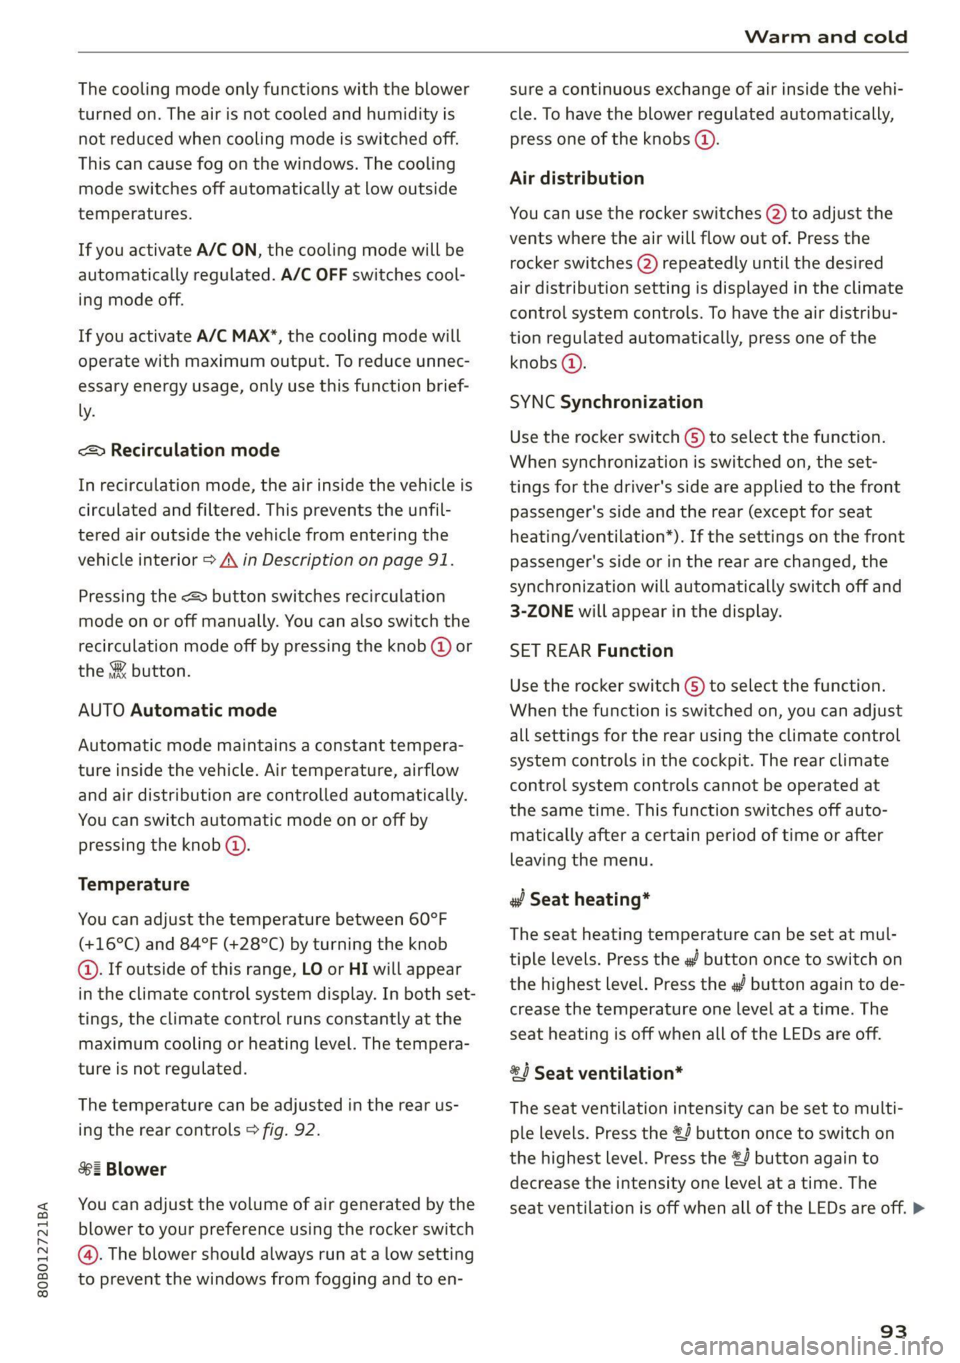
the rear controls > fig. 92.
=z Blower
You can adjust the volume of air generated by the
blower to your preference using the rocker switch
@. The blower should always run at a low setting
to prevent the windows from fogging and to en-
sure a continuous exchange of air inside the vehi-
cle. To have the blower regulated automatically,
press one of the knobs ().
Air distribution
You can use the rocker switches @) to adjust the
vents where the air will flow out of. Press the
rocker switches (2) repeatedly until the desired
air distribution setting is displayed in the climate
control system controls. To have the air distribu-
tion regulated automatically, press one of the
knobs (a).
SYNC Synchronization
Use the rocker switch (5) to select the function.
When synchronization is switched on, the set-
tings for the driver's side are applied to the front
passenger's side and the rear (except for seat
heating/ventilation*). If the settings on the front
passenger's side or in the rear are changed, the
synchronization will automatically switch off and
3-ZONE will appear in the display.
SET REAR Function
Use the rocker switch (5) to select the function.
When the function is switched on, you can adjust
all settings for the rear using the climate control
system controls in the cockpit. The rear climate
control system controls cannot be operated at
the same time. This function switches off auto-
matically after a certain period of time or after
leaving the menu.
a Seat heating*
The seat heating temperature can be set at mul-
tiple levels. Press the w button once to switch on
the highest level. Press the #/ button again to de-
crease the temperature one level at a time. The
seat heating is off when all of the LEDs are off.
#4 Seat ventilation*
The seat ventilation intensity can be set to multi-
ple levels. Press the &J button once to switch on
the highest level. Press the £4 button again to
decrease the intensity one level at a time. The
seat ventilation is off when all of the LEDs are off. >
93
Page 96 of 332
Warm and cold
& Defrosting
The windshield and side windows are defrosted
or cleared of condensation as quickly as possible.
Align the outer air vents with the side windows.
The maximum amount of air flows mainly from
the vents below the windshield. Recirculation
mode switches off. The temperature should be
set at 72 °F (+22 °C) or higher. The temperature
is controlled automatically.
You can switch the defroster on or off using the
& button. You can switch the function off by
pressing a knob @).
@ Rear window defogger
The rear window defogger only operates when
the engine is running. It switches off automati-
cally after 10 to 20 minutes, depending on the
outside temperature.
To prevent the rear window defogger from
switching off automatically, press and hold the
® button for more than three seconds. This is
stored until the ignition is switched off.
Vents
You can open or close the center and rear vents in
the cockpit and the vents in the rear center con-
sole using the ridged thumbwheels. The levers
adjust the direction of the airflow from the vents.
Residual heat
You can activate the residual heat function when
the ignition is switched off by pressing the knob
@ (left side). The residual heat from the coolant
is used to heat the vehicle interior. The residual
heat function switches off automatically after
about 15 minutes.
ONC eeiaeiile hy
You can adjust additional settings.
» Applies to MMI: Select on the home screen: VE-
HICLE > Air conditioning.
Auto recirculation
When switched on, automatic recirculation con-
trols the recirculation mode automatically. You
94
must press the §& button if fog forms on the win-
dows.
Steering wheel heating
Sica Le molal
Applies to: vehicles with steering wheel heating
> Press the @ button on the multifunction steer-
ing wheel to switch the steering wheel heating
on and off.
Messages
Applies to: vehicles with steering wheel heating
@& Steering wheel heating: on / Steering wheel
heating: off
This message appears if you switched the steer-
ing wheel heating on or off by pressing the but-
ton on the multifunction steering wheel.
Steering wheel heating: malfunction! See own:
er's manual
If this message appears, there is a malfunction.
Drive immediately to an authorized Audi dealer
or authorized Audi Service Facility to have the
malfunction repaired.
Auxiliary climate control
Applies to: vehicles with auxiliary climate control
The auxiliary climate control system warms or
cools the vehicle interior. The vehicle will turn on
the auxiliary climate control system if needed,
depending on the last temperature that was set
with the climate control system controls. This
function can be used when the drive system is
switched off.
You can turn the auxiliary climate control system
on and off immediately in the MMI or set a timer.
Requirement: the charge level of the high-volt-
age battery must be sufficient.
Page 97 of 332
80B012721BA
Warm and cold
@) Tips
— Using the auxiliary climate control while
charging can also reduce the charge level of
the high-voltage battery.
— Starting or stopping the vehicle will not
switch off the auxiliary climate control auto-
matically.
— The auxiliary climate control system will not
turn on automatically or will turn off earlier
if the high-voltage battery charge level is
too low, even if the vehicle is being charged
at the time.
Applies to: vehicles with auxiliary climate control
Applies to: MMI: Select on the home screen: VE-
HICLE > Air conditioning > Auxiliary air condi-
tioning.
Immediate start
You can immediately switch the auxiliary climate
control on and off using the f button. When this
function is switched on, a colored bar lights up
over the button and the remaining time is dis-
played.
The auxiliary climate control will run for a maxi-
mum of 30 minutes after the immediate start.
Timer programming
You can set up and activate up to two timers for
the departure time.
> Select a timer using >.
> Set the date and press Next.
> Set the time (departure time) and press OK.
The timer will be activated automatically once
itis set.
>» Set the second timer, if necessary.
By setting the departure time, you determine
when your vehicle should reach the desired tem-
perature. The departure time can be a maximum
of six days in the future. The auxiliary climate
control will continue to run approximately ten
minutes after the departure time is reached.
After switching off the ignition
Information about the active timer will appear in
the display after switching off the ignition. You
can start the set climate control settings imme-
diately with the f button, or go to the auxiliary
climate control menu with the > button.
(i) Tips
— Make sure the time and date match in the
system settings so that the timer can func-
tion correctly > page 236.
— The auxiliary climate control can also be
switched on and off immediately when a
timer is set.
— You can operate the climate control in the
vehicle interior when the high-voltage bat-
tery is charging using the charging timer
=> page 123. The climate control output de-
pends on the power supply capacity.
Additional settings
Applies to: vehicles with auxiliary climate control
>» Applies to: MMI: Select on the home screen:
VEHICLE > Air conditioning > Auxiliary air con-
ditioning > ©.
Start A/C after unlocking
If this function is activated, the climate control
will continue to run for five minutes after the ve-
hicle has been unlocked.
Comfort aux. A/C
Applies to: vehicles with comfort auxiliary climate control
You can set if the steering wheel heating* and
seat heating* or seat ventilation* should also be
automatically activated with auxiliary climate
control. You can select the respective zones.
Window and mirror heating*
Applies to: vehicles with comfort auxiliary climate control
You can set if the rear window and mirrors should
also be heated during auxiliary climate control.
Messages
Applies to: vehicles with auxiliary climate control
2— There is a malfunction in the auxiliary air
conditioning.
95
Page 125 of 332
80B012721BA
High-voltage system
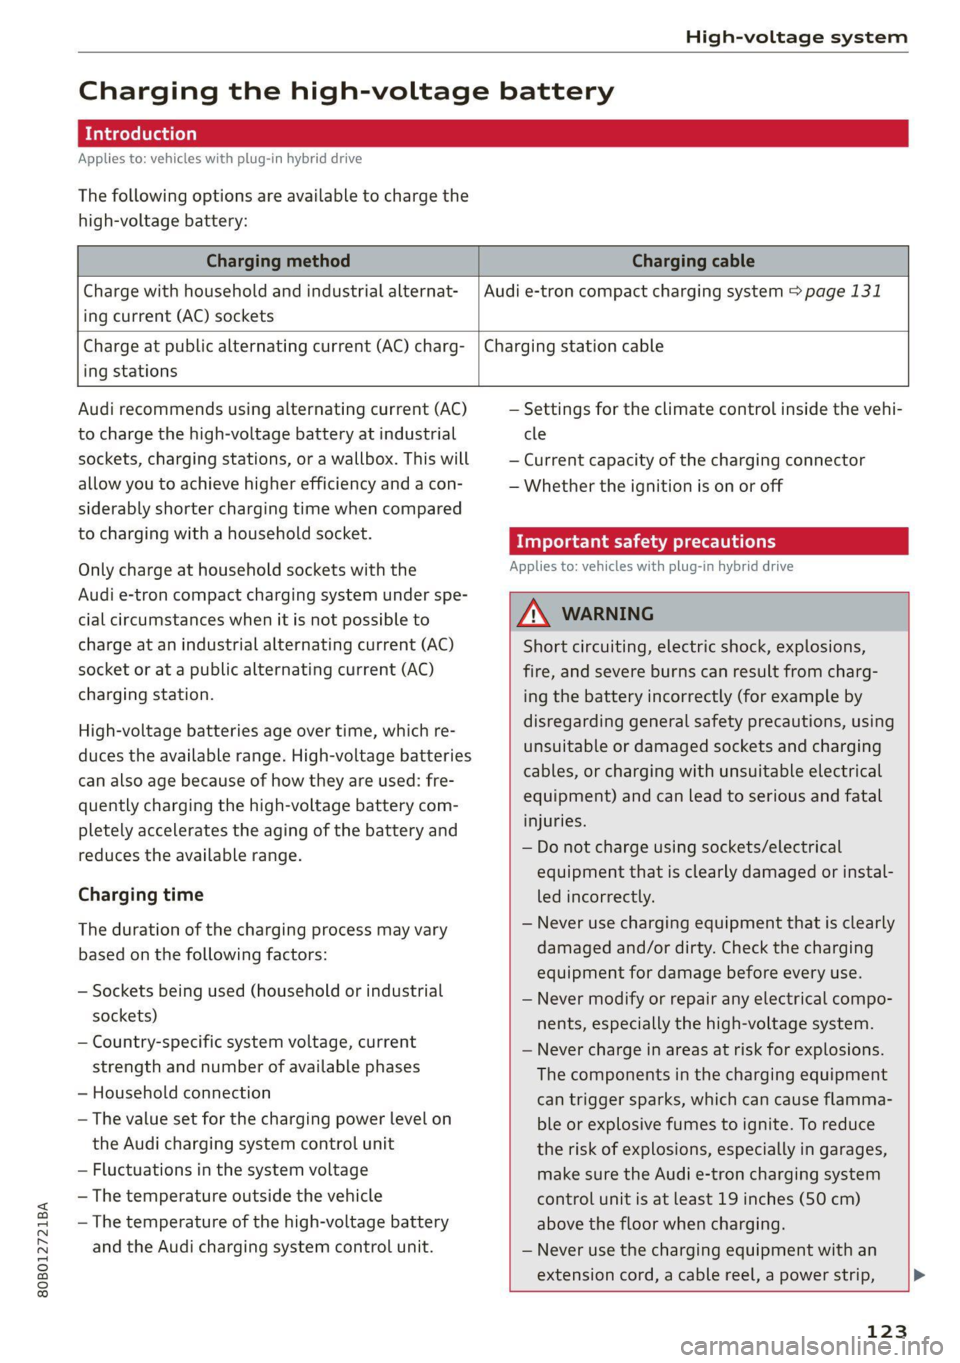
Charging the high-voltage battery
Introduction
Applies to: vehicles with plug-in hybrid drive
The following options are available to charge the
high-voltage battery:
Charging method Charging cable
Charge with household and industrial alternat-
ing current (AC) sockets
Audi e-tron compact charging system > page 131
Charge at public alternating current (AC) charg-
ing stations
Charging station cable
Audi recommends using alternating current (AC)
to charge the high-voltage battery at industrial
sockets, charging stations, or a wallbox. This will
allow you to achieve higher efficiency and a con-
siderably shorter charging time when compared
to charging with a household socket.
Only charge at household sockets with the
Audi e-tron compact charging system under spe-
cial circumstances when it is not possible to
charge at an industrial alternating current (AC)
socket or at a public alternating current (AC)
charging station.
High-voltage batteries age over time, which re-
duces the available range. High-voltage batteries
can also age because of how they are used: fre-
quently charging the high-voltage battery com-
pletely accelerates the aging of the battery and
reduces the available range.
Charging time
The duration of the charging process may vary
based on the following factors:
— Sockets being used (household or industrial
sockets)
— Country-specific system voltage, current
strength and number of available phases
— Household connection
—The value set for the charging power level on
the Audi charging system control unit
— Fluctuations in the system voltage
— The temperature outside the vehicle
— The temperature of the high-voltage battery
and the Audi charging system control unit.
— Settings for the climate control inside the vehi-
cle
— Current capacity of the charging connector
— Whether the ignition is on or off
Important safety precautions
Applies to: vehicles with plug-in hybrid drive
Z\ WARNING
Short circuiting, electric shock, explosions,
fire, and severe burns can result from charg-
ing the battery incorrectly (for example by
disregarding general safety precautions, using
unsuitable or damaged sockets and charging
cables, or charging with unsuitable electrical
equipment) and can lead to serious and fatal
injuries.
— Do not charge using sockets/electrical
equipment that is clearly damaged or instal-
led incorrectly.
— Never use charging equipment that is clearly
damaged and/or dirty. Check the charging
equipment for damage before every use.
— Never modify or repair any electrical compo-
nents, especially the high-voltage system.
— Never charge in areas at risk for explosions.
The components in the charging equipment
can trigger sparks, which can cause flamma-
ble or explosive fumes to ignite. To reduce
the risk of explosions, especially in garages,
make sure the Audi e-tron charging system
control unit is at least 19 inches (50 cm)
above the floor when charging.
— Never use the charging equipment with an
extension cord, a cable reel, a power strip,
123
Page 129 of 332
80B012721BA
High-voltage system
Charging display
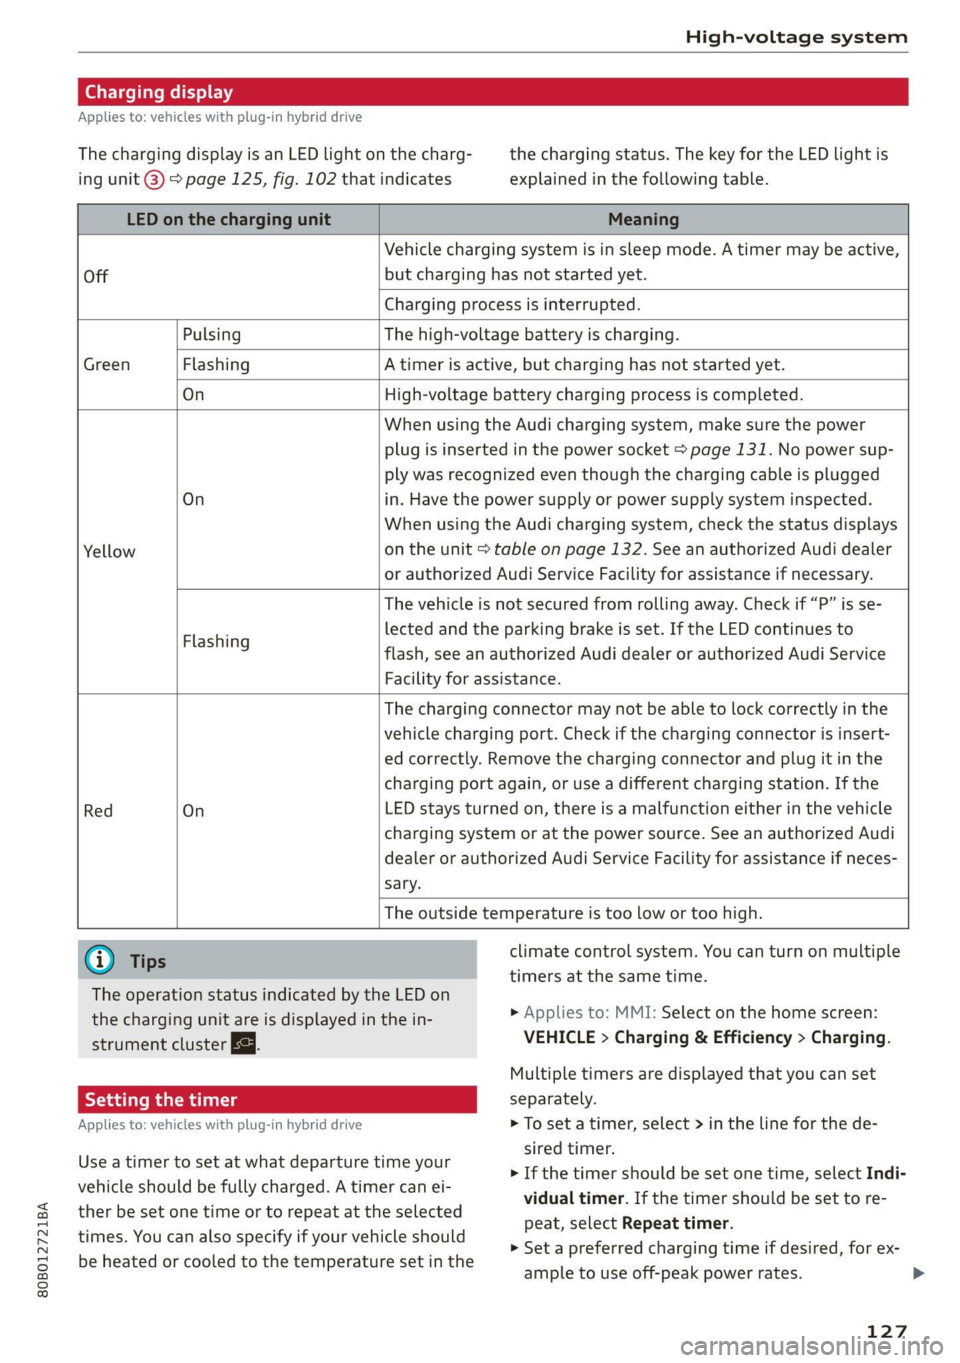
Applies to: vehicles with plug-in hybrid drive
The charging display is an LED light on the charg- the charging status. The key for the LED light is
ing unit @) page 125, fig. 102 that indicates explained in the following table.
LED on the charging unit Meaning
Vehicle charging system is in sleep mode. A timer may be active,
Off but charging has not started yet.
Charging process is interrupted.
Pulsing The high-voltage battery is charging.
Green Flashing A timer is active, but charging has not started yet.
On High-voltage battery charging process is completed.
When using the Audi charging system, make sure the power
plug is inserted in the power socket > page 131. No power sup-
ply was recognized even though the charging cable is plugged
On in. Have the power supply or power supply system inspected.
When using the Audi charging system, check the status displays
Yellow on the unit > table on page 132. See an authorized Audi dealer
or authorized Audi Service Facility for assistance if necessary.
The vehicle is not secured from rolling away. Check if “P” is se-
lected and the parking brake is set. If the LED continues to
flash, see an authorized Audi dealer or authorized Audi Service
Facility for assistance.
Flashing
The charging connector may not be able to lock correctly in the
vehicle charging port. Check if the charging connector is insert-
ed correctly. Remove the charging connector and plug it in the
charging port again, or use a different charging station. If the
Red On LED stays turned on, there is a malfunction either in the vehicle
charging system or at the power source. See an authorized Audi
dealer or authorized Audi Service Facility for assistance if neces-
sary.
The outside temperature is too low or too high.
@ Tips climate control system. You can turn on multiple
timers at the same time.
The operation status indicated by the LED on
the charging unit are is displayed in the in-
strument cluster Eg.
> Applies to: MMI: Select on the home screen:
VEHICLE > Charging & Efficiency > Charging.
Multiple timers are displayed that you can set
Applies to: vehicles with plug-in hybrid drive > To set a timer, select > in the line for the de-
sired timer.
> If the timer should be set one time, select Indi-
vidual timer. If the timer should be set to re-
peat, select Repeat timer.
> Set a preferred charging time if desired, for ex-
ample to use off-peak power rates. >
Use a timer to set at what departure time your
vehicle should be fully charged. A timer can ei-
ther be set one time or to repeat at the selected
times. You can also specify if your vehicle should
be heated or cooled to the temperature set in the
127