jump start AUDI Q5 2021 Owner´s Manual
[x] Cancel search | Manufacturer: AUDI, Model Year: 2021, Model line: Q5, Model: AUDI Q5 2021Pages: 332, PDF Size: 118.86 MB
Page 232 of 332
Media
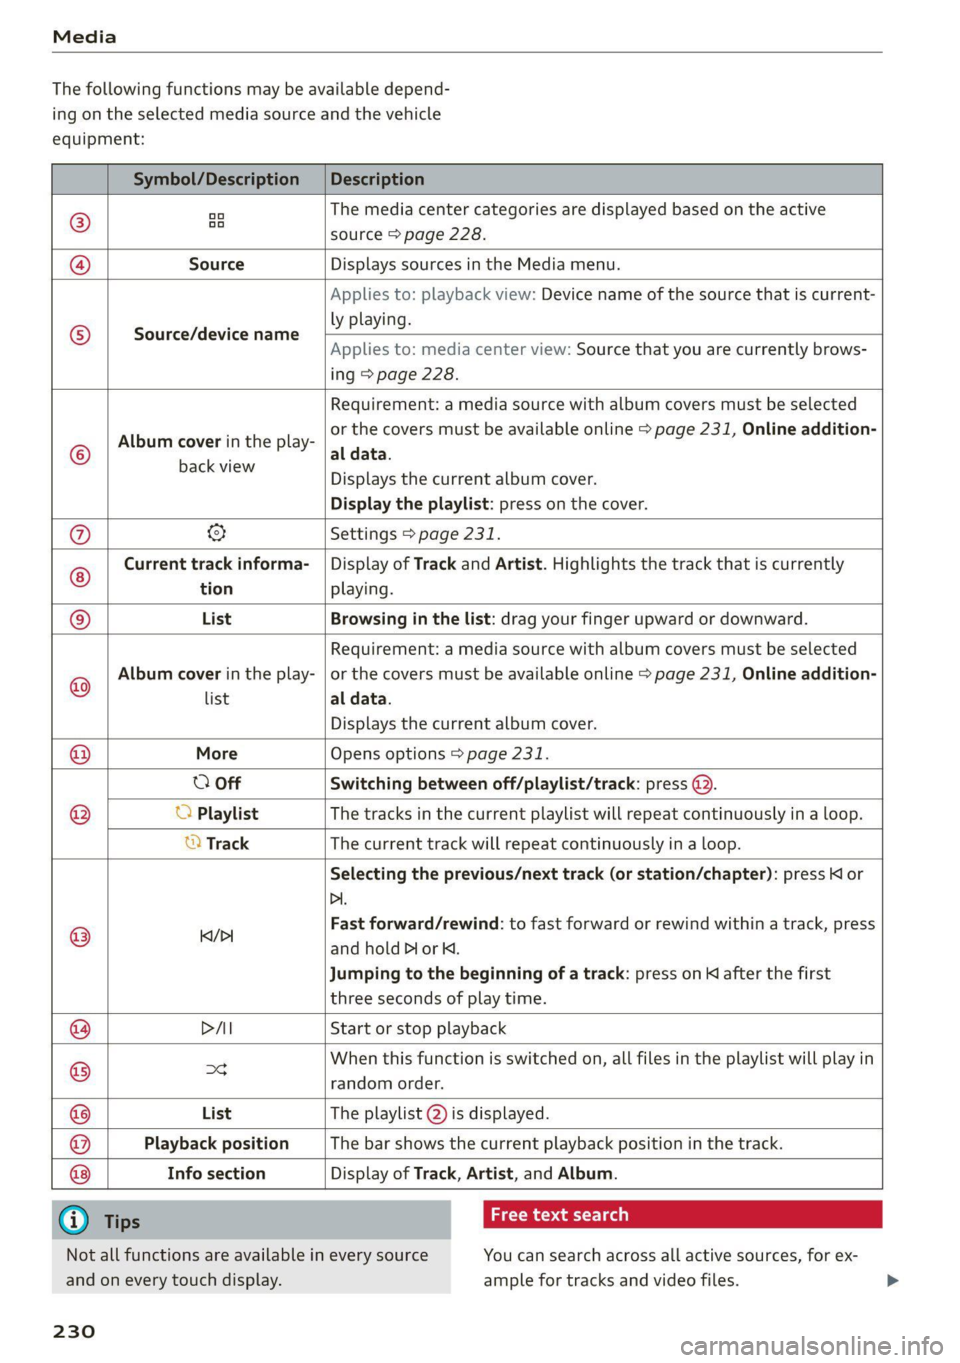
The following functions may be available depend-
ing on the selected media source and the vehicle
equipment:
Symbol/Description Description
©)
oo oo The media center categories are displayed based on the active
source > page 228.
@ Source Displays sources in the Media menu.
Source/device name
Applies to: playback view: Device name of the source that is current-
ly playing.
Applies to: media center view: Source that you are currently brows-
ing > page 228.
©
Album cover in the play-
Requirement: a media source with album covers must be selected
or the covers must be available online > page 231, Online addition-
al data.
Sanaa Displays the current album cover.
Display the playlist: press on the cover.
@ & Settings > page 231.
Current track informa- | Display of Track and Artist. Highlights the track that is currently
tion playing.
List Browsing in the list: drag your finger upward or downward.
Album cover in the play-
Requirement: a media source with album covers must be selected
or the covers must be available online > page 231, Online addition-
Playback position The bar shows the current playback position in the track.
©
© list al data.
Displays the current album cover.
@ More Opens options > page 231.
O Off Switching between off/playlist/track: press @.
® O Playlist The tracks in the current playlist will repeat continuously in a loop.
© Track The current track will repeat continuously in a loop.
Selecting the previous/next track (or station/chapter): press Kl or
Dl.
@ lea/D Fast forward/rewind: to fast forward or rewind within a track, press
and hold PI or K.
Jumping to the beginning of a track: press on K after the first
three seconds of play time.
@ DAI Start or stop playback
@ =d When this function is switched on, all files in the playlist will play in
random order.
@ List The playlist @) is displayed.
@
@ Info section
Display of Track, Artist, and Album.
G) Tips
Not all functions are available in every source
and on every touch display.
230
aay aay laa)
You can search across all active sources, for ex-
ample for tracks and video files.
Page 251 of 332
80B012721BA
Checking and Filling
Col kel mel nator Tadnat-lal ae) lav (7
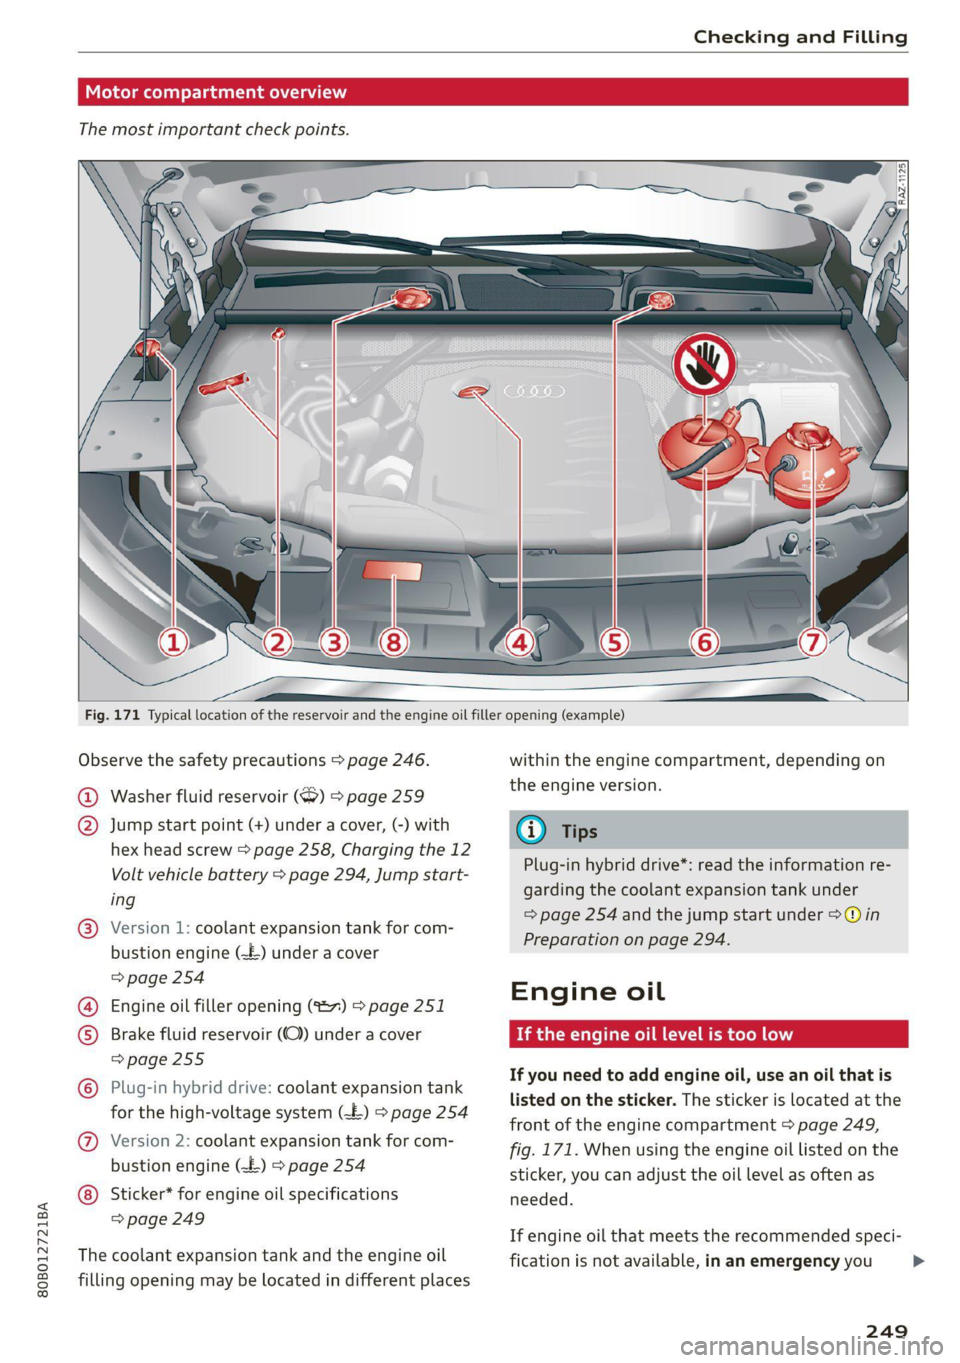
The most important check points.
Fig. 171 Typical location of the reservoir and the engine oil filler opening (example)
Observe the safety precautions > page 246.
@ Washer fluid reservoir (S) > page 259
@ Jump start point (+) under a cover, (-) with
hex head screw > page 258, Charging the 12
Volt vehicle battery > page 294, Jump start-
ing
Version 1: coolant expansion tank for com-
bustion engine (-£) under a cover
=> page 254
Engine oil filler opening (%2~) > page 251
©
Brake fluid reservoir (OC) under a cover
=> page 255
Plug-in hybrid drive: coolant expansion tank
for the high-voltage system (-E£) > page 254
Ge
©
©®
Version 2: coolant expansion tank for com-
bustion engine (-£) > page 254
© Sticker* for engine oil specifications
=> page 249
The coolant expansion tank and the engine oil
filling opening may be located in different places
within the engine compartment, depending on
the engine version.
iG Tips
Plug-in hybrid drive*: read the information re-
garding the coolant expansion tank under
=> page 254 and the jump start under >@ in
Preparation on page 294.
Engine oil
If the engine oil level is too low
If you need to add engine oil, use an oil that is
listed on the sticker. The sticker is located at the
front of the engine compartment > page 249,
fig. 171. When using the engine oil listed on the
sticker, you can adjust the oil level as often as
needed.
If engine oil that meets the recommended speci-
fication is not available, in an emergency you >
249
Page 259 of 332
80B012721BA
Checking and Filling
Multiple batteries with different technologies
may be installed in your vehicle:
— Vehicle battery (for example, for starting the
engine, basic power supply) > page 257, 12
Volt vehicle battery or > page 258, Other bat-
tery types
— Auxiliary battery (for example, for recuperation
or optional equipment) > page 258, Other bat-
tery types
— Plug-in hybrid drive: High-voltage battery (for
example, for electric driving) > page 122, In-
troduction.
Not running the vehicle for long periods of
time
The battery will gradually drain if the vehicle
does not run for long periods of time. To ensure
that the vehicle can still be started, the electrical
equipment will be limited or switched off. Some
convenience functions, such as interior lighting
or power seat adjustment, may not be available
under certain circumstances. The convenience
functions will be available again when you start
the
engine.
Even when electrical equipment is switched off,
the equipment can still drain the battery if the
vehicle is not driven for long periods of time.
Deep draining results in a chemical reaction that
destroys the inside of the battery. The battery
must be charged every month to prevent this
= page 258. Contact an authorized Audi dealer or
authorized Audi Service Facility for more infor-
mation.
Winter operation
Cold weather places an especially high load on
the 12 Volt vehicle battery. Have the battery
checked by an authorized Audi dealer or author-
ized Audi Service Facility before cold weather be-
gins.
authorized Audi dealer or authorized Audi
Service Facility.
— Never connect a charging cable or jump
start cable directly to the 12 Volt vehicle
battery. Only use the connections in the en-
gine compartment > page 258.
Z\ WARNING
California Proposition 65 Warning:
— Battery posts, terminals and related acces-
sories contain lead and lead compounds,
chemicals known to the State of California
to cause cancer and reproductive harms.
Wash hands after handling.
@) Note
— If the vehicle will be parked for long periods
of time, protect the battery against the cold
so that it will not be destroyed by “freezing”
=> page 258, Charging the 12 Volt vehicle
battery.
— There are electrical components under the
cargo floor behind a trim panel that warm
up during operation. To reduce the risk of
the components overheating, do not store
objects such as blankets under the cargo
floor. If the components overheat, they will
switch off temporarily. This will be indicated
by a message that will be displayed in the
instrument cluster until the temperature re-
turns to normal.
12 Volt vehicle battery
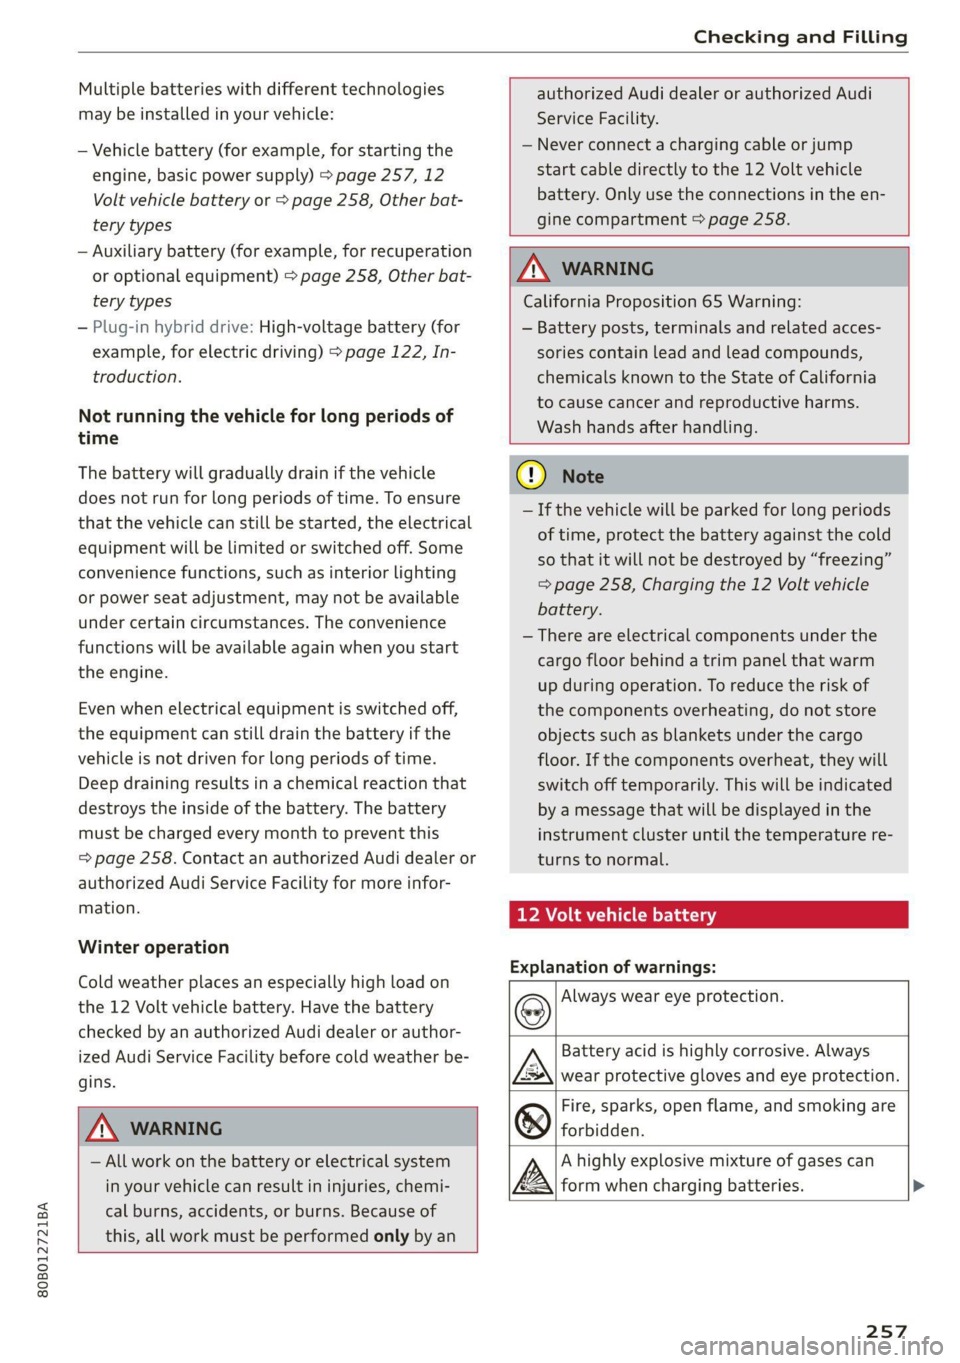
Explanation of warnings:
Always wear eye protection.
ZA\ WARNING
— All work on the battery or electrical system
in your vehicle can result in injuries, chemi-
cal burns, accidents, or burns. Because of
this, all work must be performed only by an
Fire, sparks, open flame, and smoking are
forbidden.
Battery acid is highly corrosive. Always
wear protective gloves and eye protection.
A highly explosive mixture of gases can
form when charging batteries. >
257
Page 260 of 332
Checking and Filling
Always keep children away from battery
acid and the battery. @
@/
oo
Always follow the instructions in the oper-
ating manual.
@ For the sake of the environment
2 ¥ Lead-acid batteries must be disposed of
using methods that will not harm the environ-
ment. Do not dispose of them in household
trash. They contain harmful substances, such
as sulfuric acid and lead, and also recyclable
raw materials. Contact an authorized Audi
dealer or authorized Audi Service Facility for
more information.
Other battery types
Explanation of warnings:
® ®
@/
oo
Fire, sparks, open flame, and smoking are
forbidden.
Always keep children away from battery
acid and the battery.
Always follow the instructions in the oper-
ating manual.
ZA WARNING
All work on the batteries must only be per-
formed by an authorized Audi dealer or au-
thorized Audi Service Facility.
— Gases that escape from these different bat-
tery types can be poisonous or flammable.
— The contents of these battery types can be
corrosive. If any battery contents come into
contact with the skin, flush the affected
area for at least 15 minutes with clean wa-
ter. Then wash the affected area with soap.
Have the affected area examined by a medi-
cal professional.
©) Note
Components must not be connected to the
battery terminals and wires on these battery
types because this increases the risk of dam-
age, for example due to overvoltage.
258
@) For the sake of the environment
OE These types of batteries must be dis-
posed of using methods that will not harm
the environment. Do not dispose of them in
household trash. They contain harmful sub-
stances and recyclable raw materials. Contact
an authorized Audi dealer or authorized Audi
Service Facility for more information.
rging the 12 Volt vehicle battery
a N S >
a a
ao
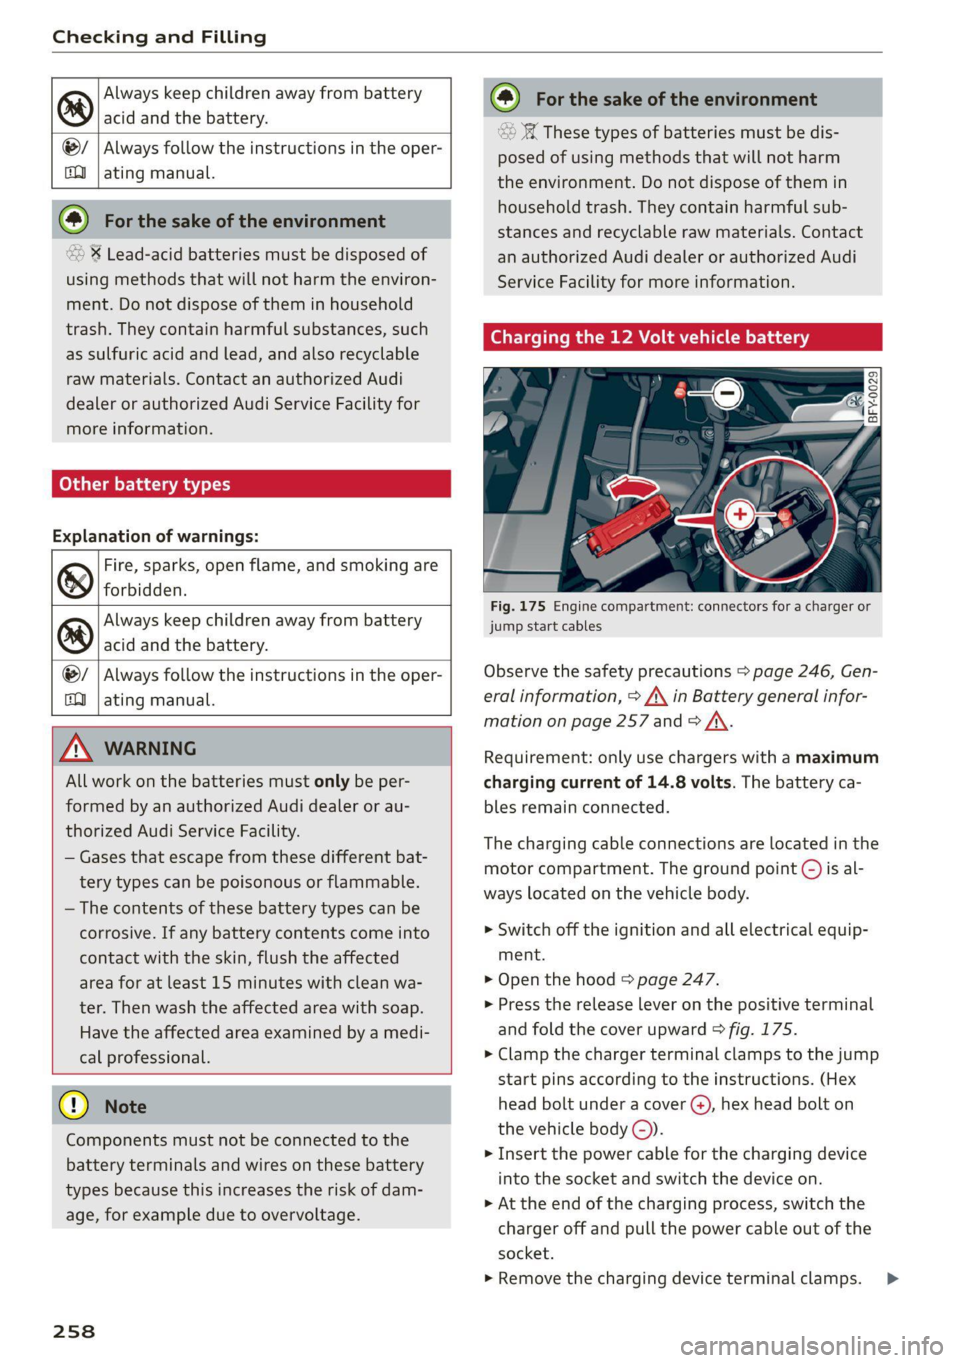
Fig. 175 Engine compartment: connectors for a charger or
jump start cables
Observe the safety precautions > page 246, Gen-
eral information, > A\ in Battery general infor-
mation on page 257 and > A\.
Requirement: only use chargers with a maximum
charging current of 14.8 volts. The battery ca-
bles remain connected.
The charging cable connections are located in the
motor compartment. The ground point ©) is al-
ways located on the vehicle body.
> Switch off the ignition and all electrical equip-
ment.
> Open the hood > page 247.
» Press the release lever on the positive terminal
and fold the cover upward > fig. 175.
> Clamp the charger terminal clamps to the jump
start pins according to the instructions. (Hex
head bolt under a cover @), hex head bolt on
the vehicle body ©).
> Insert the power cable for the charging device
into the socket and switch the device on.
> At the end of the charging process, switch the
charger off and pull the power cable out of the
socket.
» Remove the charging device terminal clamps. >
Page 261 of 332
80B012721BA
Checking and Filling
> Close the cover on the positive terminal.
> Close the hood > page 247.
ZA WARNING
— Never connect a charging cable or jump
start cable directly to the 12 Volt vehicle
battery. Only use the connections in the en-
gine compartment > page 258.
— A highly explosive mixture of gases can form
when charging batteries. Only charge the
battery in well-ventilated areas.
— A drained battery can freeze at tempera-
tures around 32 °F (0 °C). Do not charge or
use a frozen or thawed battery. If ice forms,
the battery housing can crack and battery
electrolyte can leak out, which increases the
risk of an explosion and chemical burns.
Contact an authorized Audi dealer or author-
ized Audi Service Facility for more informa-
tion.
— Do not connect or disconnect the charging
cable while charging because this increases
the risk of an explosion.
@) Tips
Read all of the manufacturer's instructions
for the charger before charging the battery.
Windshield washer
system
B4M-0135)
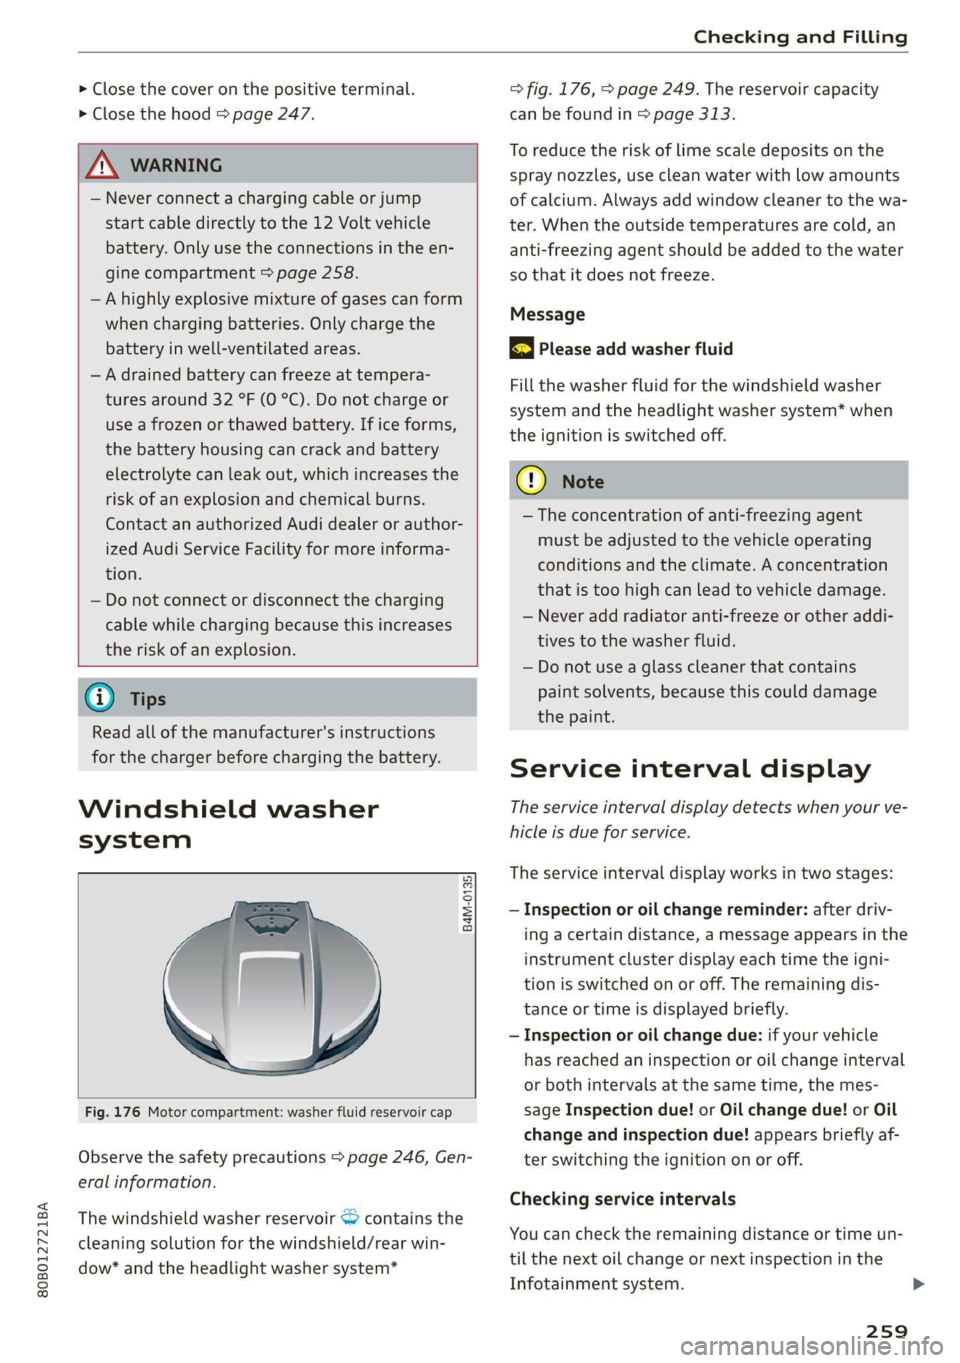
Fig. 176 Motor compartment: washer fluid reservoir cap
Observe the safety precautions > page 246, Gen-
eral information.
The windshield washer reservoir <> contains the
cleaning solution for the windshield/rear win-
dow* and the headlight washer system*
=> fig. 176, > page 249. The reservoir capacity
can be found in > page 313.
To reduce the risk of lime scale deposits on the
spray nozzles, use clean water with low amounts
of calcium. Always add window cleaner to the wa-
ter. When the outside temperatures are cold, an
anti-freezing agent should be added to the water
so that it does not freeze.
Message
BS Please add washer fluid
Fill the washer fluid for the windshield washer
system and the headlight washer system* when
the ignition is switched off.
CG) Note
—The concentration of anti-freezing agent
must be adjusted to the vehicle operating
conditions and the climate. A concentration
that is too high can lead to vehicle damage.
— Never add radiator anti-freeze or other addi-
tives to the washer fluid.
— Do not use a glass cleaner that contains
paint solvents, because this could damage
the paint.
Service interval display
The service interval display detects when your ve-
hicle is due for service.
The service interval display works in two stages:
— Inspection or oil change reminder: after driv-
ing a certain distance, a message appears in the
instrument cluster display each time the igni-
tion is switched on or off. The remaining dis-
tance or time is displayed briefly.
— Inspection or oil change due: if your vehicle
has reached an inspection or oil change interval
or both intervals at the same time, the mes-
sage Inspection due! or Oil change due! or Oil
change and inspection due! appears briefly af-
ter switching the ignition on or off.
Checking service intervals
You can check the remaining distance or time un-
til the next oil change or next inspection in the
Infotainment system.
259
Page 296 of 332
Emergency assistance
Snow chains
Using snow chains on the collapsible spare tire is
not permitted for technical reasons.
If you need to drive with snow chains and your
vehicle has a flat tire, install the collapsible spare
tire on the axle where snow chains are not per-
mitted > page 277. Install the snow chains on
the tire that you removed, and install that in
place of the flat tire.
ZA WARNING
— Only use the collapsible spare tire in emer-
gencies and drive very carefully, especially if
it is
more than six years old.
— The compressor and the hose can become
very hot during operation which increases
the risk of burn injuries.
— After installing a collapsible spare tire, the
tire pressure must be checked as quickly as
possible to reduce the risk of an accident.
— Do not drive faster than 50 mph (80 km/h)
with the collapsible spare tire. Driving faster
than that increases the risk of an accident.
—To reduce the risk of an accident, avoid hard
acceleration or braking and driving fast
around curves with the collapsible spare
tire.
— Never drive using more than one collapsible
spare tire, because this increases the risk of
an accident.
— Normal tires or winter tires must not be
mounted on the collapsible spare tire rim.
@ Note
The compressor must be switched off after six
minutes at the most to reduce the risk of
overheating. Let the compressor cool down
for several minutes before using it again.
294
Jump starting
You should only perform the steps that follow if
you have the necessary tools and technical ex-
pertise.
If the engine does not start because the vehicle
battery is drained, you can jump start your vehi-
cle using another vehicle. Jump start cables are
needed to do this.
Both vehicle batteries must have 12 V nominal
voltage. The voltage capacity (Ah) of the vehicle
battery that is giving power must not be less
than the capacity of the drained vehicle battery.
Jump start cable
Only use a jump start cable with a large enough
diameter. Note the manufacturer's specifica-
tions.
Only use a jump start cable with insulated termi-
nal clamps.
Positive cable - usually red.
Negative cable - usually black.
ZA WARNING
— A drained battery can freeze at tempera-
tures around 32 °F (0 °C). If the vehicle bat-
tery is frozen, it must be thawed before con-
necting the jump start cables. If it is not,
the risk of an explosion and chemical burns
increases. After jump starting the vehicle,
drive to an authorized Audi dealer or author-
ized Audi Service Facility immediately to
have the vehicle battery checked.
— Read the warnings when working in the en-
gine compartment > page 246.
— Handling the jump start cables incorrectly
may cause the vehicle battery to explode
and lead to serious injuries.
() Note
— Jump start cables can cause considerable
damage to the vehicle electrical system if
they are connected incorrectly.
Page 297 of 332
80B012721BA
Emergency assistance
— Plug-in hybrid drive: You must not give a
jump start with your vehicle. This could
cause significant damage to the electrical
system in your vehicle.
@) Tips
— There must be no contact between the
vehicles, or else voltage could flow when
connecting the positive terminal and drain
the vehicle battery of the vehicle providing
the jump start.
— The drained vehicle battery must be con-
nected correctly to the electrical system.
— Switch off electrical equipment that is not
needed.
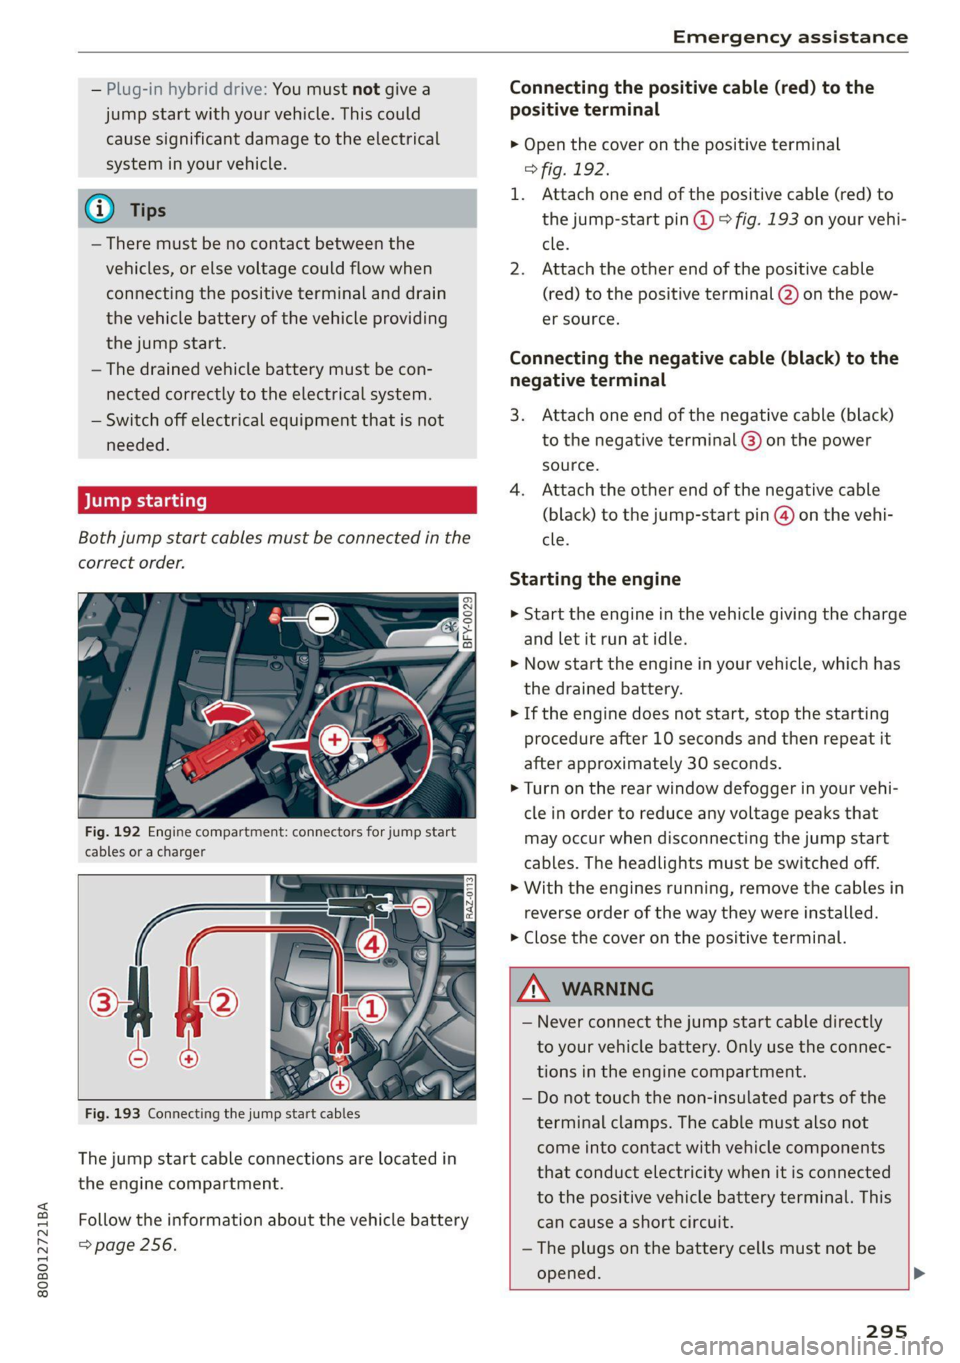
Both jump start cables must be connected in the
correct order.
a nN 3
aS = a o
Fig. 192 Engine compartment: connectors for jump start
cables or a charger
The jump start cable connections are located in
the engine compartment.
Follow the information about the vehicle battery
=> page 256.
Connecting the positive cable (red) to the
positive terminal
> Open the cover on the positive terminal
> fig. 192.
1. Attach one end of the positive cable (red) to
the jump-start pin @ © fig. 193 on your vehi-
cle.
2. Attach the other end of the positive cable
(red) to the positive terminal @) on the pow-
er source.
Connecting the negative cable (black) to the
negative terminal
3. Attach one end of the negative cable (black)
to the negative terminal @) on the power
source.
4. Attach the other end of the negative cable
(black) to the jump-start pin @) on the vehi-
cle.
Starting the engine
> Start the engine in the vehicle giving the charge
and let it run at idle.
> Now start the engine in your vehicle, which has
the drained battery.
> If the engine does not start, stop the starting
procedure after 10 seconds and then repeat it
after approximately 30 seconds.
> Turn on the rear window defogger in your vehi-
cle in order to reduce any voltage peaks that
may occur when disconnecting the jump start
cables. The headlights must be switched off.
> With the engines running, remove the cables in
reverse order of the way they were installed.
> Close the cover on the positive terminal.
Z\ WARNING
— Never connect the jump start cable directly
to your vehicle battery. Only use the connec-
tions in the engine compartment.
— Do not touch the non-insulated parts of the
terminal clamps. The cable must also not
come into contact with vehicle components
that conduct electricity when it is connected
to the positive vehicle battery terminal. This
can cause a short circuit.
— The plugs on the battery cells must not be
opened. >
295
Page 298 of 332
Emergency assistance
— Keep ignition sources (such as open flames,
burning cigarettes, etc.) away from the vehi-
cle batteries to reduce the risk of an explo-
sion.
— Route the jump start cables so they cannot
get caught in the moving parts in the other
vehicle's engine compartment.
©) Note
Please note that the connecting process previ-
ously described for the jump start cables is in-
tended for when your vehicle is being jump
started.
G) Tips
Make sure that the connected jump start ca-
bles have sufficient contact with metal.
Towing
ere eeeurisela)
You should only perform the steps that follow if
you have the necessary tools and technical ex-
pertise.
Towing requires a certain amount of practice.
Audi recommends contacting a towing company
to have the vehicle transported.
You should only have your vehicle towed by an-
other vehicle when disabled in exceptional cir-
cumstances. Inexperienced drivers should not
tow.
Notes on towing
When the engine is stopped, the transmission
will not be sufficiently lubricated if traveling at
high speeds and long distances:
— The maximum permitted towing speed is 30
mph (50 km/h).
— The maximum permitted towing distance is 30
miles (50 km).
Additional information on towing with a tow
truck
The vehicle may only be towed with the front axle
raised. Do not wrap any chains or cables around
the brake lines.
296
Tow bar and towing cable
The vehicle can be towed with a tow bar or tow-
ing cable. Both drivers should be familiar with
the special considerations when towing, especial-
ly when using a towing cable.
Always make sure the traction force does not ex-
ceed the permitted level and there are no shock
loading conditions. There is always the risk of the
coupling becoming overloaded when driving off-
road.
For the most safety and security, drive with a tow
bar. You should use a towing cable only if a tow
bar is not available. Use a towing cable made of
synthetic elastic cable similar elastic material.
ZA WARNING
— Towing highly increases the risk of an acci-
dent, for example from colliding with the
towing vehicle.
— To reduce the risk of an accident, do not al-
low anyone to remain inside the vehicle
when it is being transported by a tow truck
or a special transporter.
@) Note
— If normal towing is not possible, for exam-
ple if the transmission is faulty or if the
towing distance is greater than 30 miles
(50 km), then transport the vehicle on a
special carrier.
— If the vehicle is towed by a tow truck at the
axle that is not permitted, this can cause se-
vere damage to the transmission.
— The vehicle must not be tow started for
technical reasons.
G) Tips
— If the power supply is interrupted, then it
will not be possible to move the selector
lever out of the "P" position. The parking
lock must be released using the emergency
release before towing the vehicle
=> page 103.
— Switch Audi pre sense* off > page 170 when
loading the vehicle onto a vehicle carrier,
train, ship,
or other type of transportation, >
Page 320 of 332
Index
Diteetor yess 6 s cscaves ws sacewes v6 aneims v © sxeams 6 0 191
Business card... 6... eee eee eee 192
SCttinGSanww + wuwn x 3 mee ee ReUeE SE eee & 194
Display
Cleaning’s « «sew 2s seas © 2 eww vo ene woe 285
Displaying tooltips..................0.. 20
DispoSaliv: ss seus s ¢ sees av wees vv teen swe 308
DIStaHCO sas = » saeas + ¢ sacee @ 2 Sacee 7 a Hae Ya: 17
Distance warning............0.see ee eee 164
Doors
Child safety lock 22s ¢ 2 eee es geen ss eees 44
Doorcontactiswiteh « « sisi ss wes «6 mewn 2 6 53
Mechanically unlocking and locking....... 37
Driver information system................ 13
Drives
refer to Media................-4- 225,227
Drive select
refer to Audi drive select............... 115
Drive systeM... 0... cee eee eee 104
(Audi drive’select s coac 2 ¢ cawe ¢ s gence so ae LIS
Drive system (message)...............-. 109
Driving down hills............0.--00 ee 112
Driving program... .. 6... cee ee eee eee eee 161
Driving through water................5. 114
DGiVIMNG BIER. « » exesene « 0 ssinsocie © of emetinze © ovation» « 17
Driving tips
Driving through water.............00-- 114
Efficient driving » sxc. x» see: ss eee se eee 107
GFRrOAGNARIVING 2 cxcwie & wromenow » aresum « ¥ anaie 113)
Uphill and downhill................... 112
Drivinguphills................0...005. 112
Dust filter
refer to Pollutant filter..............00. 91
Dynamic steering...............0..000. 117
=
E-mail
Message Options: « < seas 5 = was 5 v ween s 195
SettinQSwasiess + wen ee aaron so meena & @ eae 8 195
EDL
refer to Electronic Differential Lock...... 119
EDR
refer to Event Data Recorder (EDR)...... 304
Efficiency assist... 0... eee ee 152
Electrical system. .........-.0 02 e ee eee 256
Electromechanical parking brake......... 111
318
Electronic Differential Lock.............. 119
Electronic immobilizer cvs. 6. ow sa sia ves 39
Electronic Stabilization Control........... 119
Embedded SIM: card « « secu + 2 gaye 4 2 ese « ¢ 198
Emergency assistance..............-.-. 288
Emergency braking function............. 112
Emergency call..............000.. 193, 202
Emergency flashers.............--..00-- 52
Emergency mode.............--.000005 103
Emergency operation
Doors... 2. eee eee B7
FUG TINLERAGOr ss « 2 wows x o yawn a a wows 4 ee 245
Luggage compartment lid............... 44
Panoramic glass roof...............000. 47
Emissions control system.............05 245
ENergy CONSUMENS i 6 6 ess © reseeee e eiee e o 8 17
Energy flowdisplay’s seas: o 6 cscs 2 6 eevee s vv 106
Energy management............--.00ee 107
Energy TECOVErYcews 5 s eave + o ewig + 5 ewe & 104
Engine
Breakingiinis « csv. + 2 ewe 2 6 wwe a 6 aes a 104
Coolant............... 00. cece 253
Emergency Stop ss « s ee.8 se ees s sees es we 97
JUMP Starting « = sce 5 x secre © 2 seweEe vo sore 294
Start/Stop system ........ eee eee ee eee 108
Starting/stopping.................0 ae 97
Engine braking effect
refer to Recuperation................. 104
Engine oil
AGING « seswies «vere © & oxaners a o Sensis ve oTIEENs 249
Changing.............. eee ee eee eee 252
Checking GILlEVEl: x = sase ys sae a 3 Beam 3 249
CONSUMPTION & & swe « 0 ors = 5 semen wo ome 249
Indicator light... 2... cece eee eee eee 250
Replacement interval................. 259
Temperature display................... 16
Engine sound
Audi driverselecti, «sisi s+ iusiest a a samen a LI5
Engine Start/Stop mode
refer to Start/Stop system............. 108
Engine Start:syStei vceca « cose o 6 econ @ x anon 98
Engine stop
refer to Start/Stop system............. 108
Entry/exit lighting................-.000- 52
EMtry ASSiStamGes. « « sesess 6 « samme © a samme oo mace 64
also refer to Exit assistance............. 64
Page 322 of 332
Index
Headlight range control................0. 50
Headlights: « scincs xo snes oe mms 2 o ones ow a0 50
Cleaning......... 0... e eee eee eee 283
Headlight range control................ 50
Washer'system « = ses09 + see ey eeru ee es 57
Washer system (filling washer fluid) ..... 259
Headsrestraints cies m + eassen wo iecwne © o aiemne so 3 67
Heated rear window.............0000 sees 94
Heated steering wheel................0.. 94
HOAtinG cer x = seas & s Kame Fe em ee ew ee 91
HFP
refer to Hands Free Profile............. 186
High:voltagebattery’s « ssw 4s asww s enews « 122
Audi e-tron compact charging system.... 131
Charging.............c eee eee eee 123,125
Charging display on the vehicle......... 127
Charging equipment.................. 129
Charging methods.................04. 123
Charging ports on the vehicle........... 123
Charging time iin: . aici ev eye 3 vere s vs 123
Connecting the charging cable.......... 125
Messages while driving................ 129
Not running for long periods of time..... 124
Opening the charging port door......... 125
Quick charginGiss « ¢ eas sv eee sy eee 2 we 123
Setting the timers. + circ a cane a a sane a ao 127
Transporting charging equipment....... 130
High-voltage system..............0000e 122
High beams
High beam assistant................... 51
Highway lights........ 0.0... eee eee ee eee 50
Hill descentiassist's ccciose oo scarce eo sonsee a a en 114
Hill descenticomtrol. « swssiwe sa ssaiia sv amen 112
Hill hold assist «cco so sewn 6 wane wv wea a oo 99
Home
refer to Home address................ 211
Hometaddnesss, « ws 4s isvawese i « onaseme ow ates 211
HomeLink
refer to Garage door opener............. 47
HOME:SEFEON:. 5 5 worn so cewtei « w veosen « wratess a oo 19
HORM w & ssccase oo asessie wo cecoans © or aoawne © stan B Bees 6
Hotspot
refer to Wi-Fi........ 0... cece eee eee 200
320
I
Idle
TOPE CO'GESISs ween x 3 wean a x woen se weeG ae 99
Ignition
Switching on and off................... 97
Imbalance (wheels) ...........00..00005 270
Immobilizer
refer to Electronic immobilizer........... 38
Tni¢linfometetios. « s eon so wenn vo womens oo nae L13
Indicator lights’; « ese. 5 ¢ eewe ee see se eee 7
Inspection interval..................00. 259
Instrument cluster.............0seeeeuee 12
Adjusting the layout................... 13
Cleaning... ... 2... ee eee eee eee eee ee 285
Failure... 0... eee eee eee eee 12,
MOtorcOdehis « sive « s wena o 2 wee a 2 wane 239
On-board computer............-..00-0- 17
Operating............... 0. cece ee eee 13
Service interval display................ 259
Software information.............0005 239
Switching
tabs......... 0... eee eee eee 13
Switching the VieWir. s + eses « eee xe exw» 13
Vehicle fUNGtIONS). 6 wiicaue as asiere sa uae ao ac 16
Version information.................. 239
Instruments
Adjusting illumination.............00005 55
Integrated Toll Module................. 149
Intelligent search
NaVigatiOticns + ney = yawe so mame x ¢ Hee 206
Interference-Causing Equipment Standard
CIGES) 5 0 mces so sami oe came oo somes 2 x one 312
Interior lighting... e.:3 secs s eee eee 53,54
INteriOr MONICOFING® ss ese « = eoee y 2 wees ae 37
Intermittent mode (windshield wipers) ..... 57
International travel.................5-5 201
Internet
refer to CONNECts « = secs es eeen ee eee ee: 197
Internet radio
refer to Online radio.............. 221, 222
iPhone
refer to Audi music interface........... 226
J
JUMpIStarting, ssw 6 vans a 6 aman w 6 sews ww ae 294