window AUDI Q7 2015 Owner´s Manual
[x] Cancel search | Manufacturer: AUDI, Model Year: 2015, Model line: Q7, Model: AUDI Q7 2015Pages: 350, PDF Size: 86 MB
Page 56 of 350
54 Opening and closing
Reactivating the system after battery
disconnection
If the vehicle battery is disconnected and then
reconnected, the a utomatic closing and open
ing function wilt not work until it is reactivat
ed. To reactivate this feature, perform the fol
lowing steps:
Reactivating close /open feature
., Pull and hold the power window switch until
the window is completely closed .
., Re lease the switch .
., Pull the switch again for one second. The au
tomatic closing/opening is now reactivated.
Panoramic sliding
sunroof
Description
Applies to vehicles: with Panoramic sliding sunroof
The Panoramic sliding sunroof is comprised of
two individual glass roof segments, which can be adjusted electrically independently of each
other.
The front segment can be tilted and slid open.
The rear segment can be tilted, but it cannot be slid open .
T he Panoramic s liding sunroof is operated by
the driver or passenger when the ignition is on
with a rotary switch (for the front roof seg
ment) and a rocker switch (rear roof seg
ment) .
After the ignit ion has been switched off , the
Panoramic sliding sunroof can st ill be opened
or closed for about 10 m inutes . However, as
soon as the dr iver's or passenger's door is
opened, the sw itches for the Pano ramic s lid
ing sunroof are inoperat ive.
0 Note
You should always close the Panoramic
sliding sunroof when you leave you r vehi
cle. Sudden rain can drench the interior
equ ipment and damage the electronic con
venience feat ures in your vehicle .
(D Tips
If you park your vehicle in the sun, we rec
ommend that you close both sun blinds
c>page56.
Tilting/sliding open Panoramic sliding
sunroof
Applies to veh icles: w ith Panoramic sliding sunroof
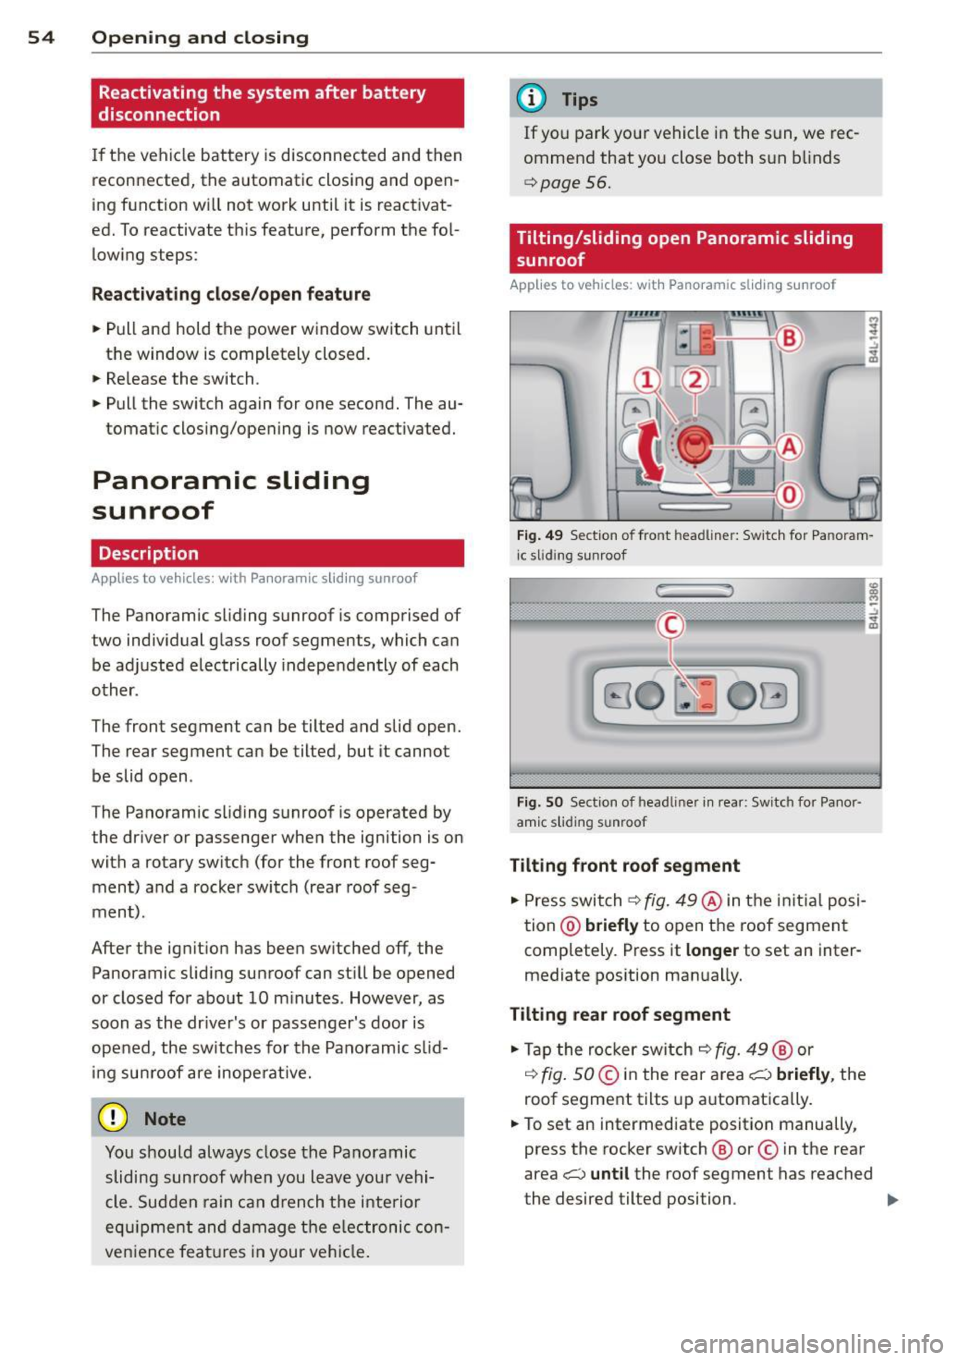
Fig. 49 Se ction o f fro nt headline r: Sw itch for Pa noram
i c slid ing sunroof
Fi g. SO Sect ion of head liner in rear : Switc h for Panor
amic s lidin g sunroof
Tilting front roof segment
., Press switch c> fig. 49@in the initial posi
tion @)
briefly to open the roof segment
completely . Press it
longer to set an inter
mediate pos ition manually.
Tilting rear roof segment
., Tap the rocker switch c> fig. 49@ or
,:¢, fig. SO @in the rear area i;:::) briefly, the
roof segment tilts up automatica lly.
., To set an intermediate position manually ,
press the rocker switch @ or© in the rear
area
i;:::) until the roof segment has reached
the desired tilted position . ..,.
Page 67 of 350
M
"' 0 ..J
"". rl I.O
"' rl
"' rl
Ambience lighting
App lies to v ehicles: with a mbience ligh tin g
The ambience lighting can be adjusted in the
MMI.
... Select: I CARI funct ion button > Sy stems *
control button > Ambience l igh ting . Or
.,. Select:
ICARI funct ion button> C ar sys te m s*
control button > Vehicl e settings > In teri or
lighting .
When the ve hicle is unlocked, the standard
lighting turns on automatically and dims after
approx . 2 minutes, and when the ignition is
turned o n it switches off immediately.
The following interio r lighting is
controlled:
- Front footwe ll
- Rear footwell
- Front door panel
- Rear door panel
Vision
Sun visors
Using the sun visors makes driving safer.
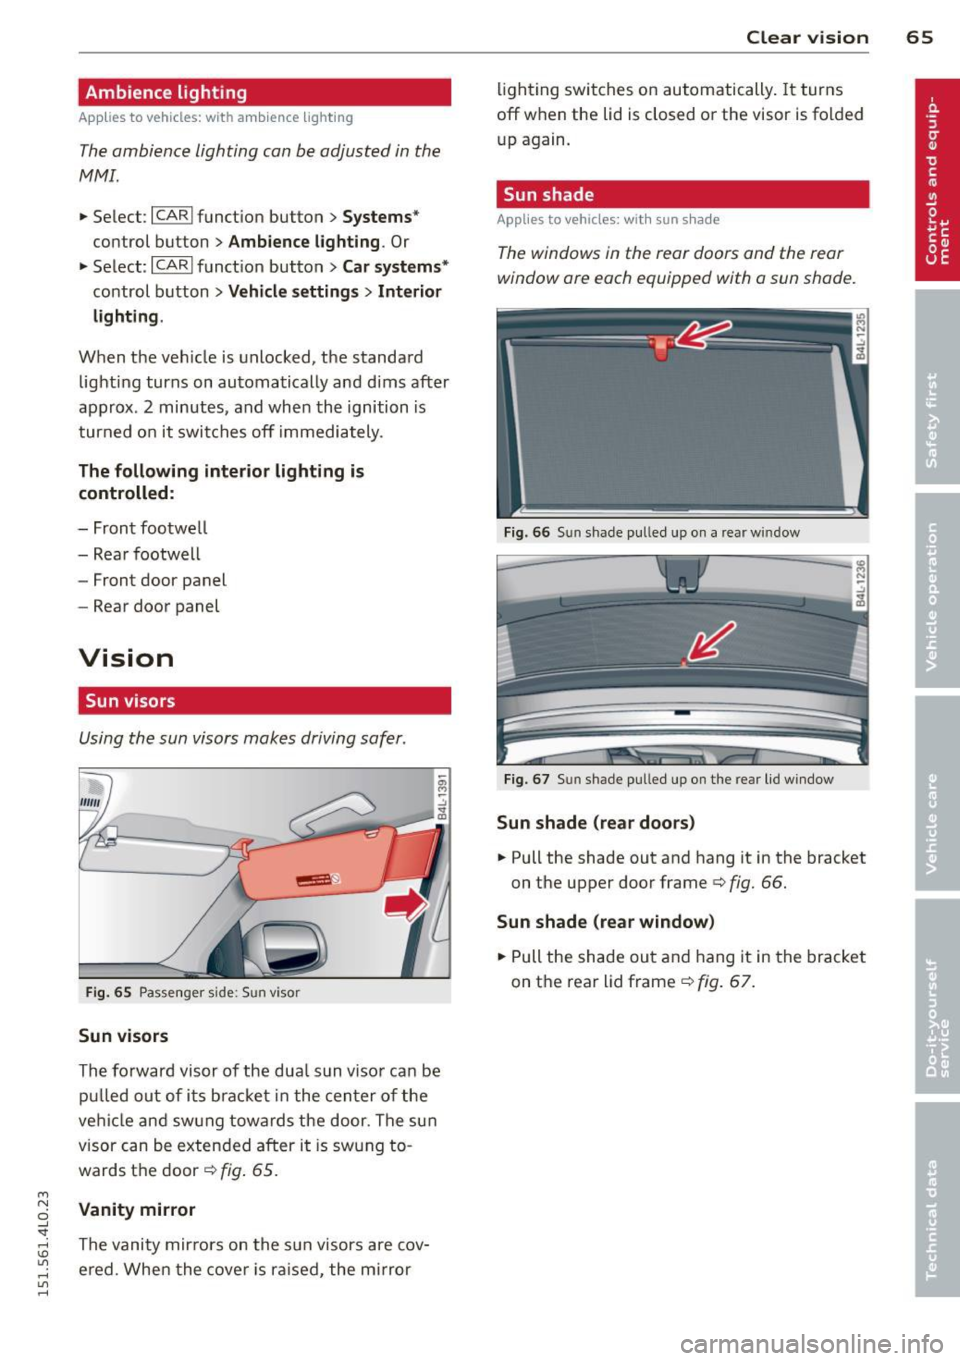
Fig. 65 Passenger side: Sun visor
Sun vis ors
The forward visor of the dua l sun visor can be
pu lled out of i ts bracket in the cen ter of the
veh icle and swung towards the door. The sun
visor can be extended after it is swung to
wards t he door ¢
fig. 65.
Vanit y mirror
The vanity mir rors on the sun visors are cov
ered. When the cove r is ra ised, the mi rror
Clear vi sion 65
lighting switches on automatically. It turns
off when the lid is closed or the visor is folded
up again.
Sun shade
App lies to vehicles : wit h sun s hade
The windows in the rear doors and the rear
window are each equipped with a sun shade.
Fig. 66 Sun shade p ull ed up on a rear window
Fig. 67 Sun shade pulled up on the rear lid window
Sun shade (rear door s)
... Pull the shade out and hang it in the bracket
on the upper door frame¢
fig. 66.
Sun shad e (rear window )
... Pull the shade out and hang it in the bracket
on the rear l id frame¢
fig. 67.
Page 69 of 350

M
"' 0 ..J
"". rl I.O
"' rl
"' rl
the rain sensor is not activated until vehicle
speed is above 4 mph (6 km/h).
To reduce the sensitivity of the rain sensor,
the switch@ must be moved down. To in
crease the sensitivity of the rain sensor, the
switch must be moved up.
The higher the sensitivity setting, the sooner
the windshield wipers react to moisture on
the windshield . Increased sensitivity is sig
naled by the windshield w ipers making a sin
gle pass over the windshield.
The rain sensor wiper intervals depend on the
sensitivity setting as well as vehicle speed .
During brief stops, wiper motion will adjust in
relation to the amount of rain on the wind
shield.
A WARNING
- Wiper blades are crucial for safe driving!
Only when they are in good condition are
they able to clear the windows properly
to provide uncompromised visibility .
Worn or damaged wiper blades are a
safety hazard
i:::> page 69, Replacing
windshield wiper blades!
- The rain sensor is only designed to assist
and support the driver.
It remains entire
ly the driver's responsibility to monitor
outside weather conditions and to man
ually activate the wipers as soon as rain
or drizzle reduces visibility through the
windshield .
(D Note
In freezing or near freezing conditions:
- Always check that the wiper blades are
not frozen to the glass before you turn
the wipers on. Loosen a wiper blade
which is frozen in place before operating
the wipers to prevent damage to the
wiper blade or the wiper motor .
- Do not use the wipers to clear a frosted
window . Using the wipers as a conven
ient ice scraper will destroy the wiper
blades .
Clear vision 67
-Prior to using a car wash, the w indshield
wiper system must be switched off (lever
in position 0). This helps to prevent unin
tentional switching on and damage to
the windshield wiper system.
(1} Tips
- The windshield wipers are switched off
when the ignition is turned off. Activate
the windshield wipers after the ignition
is switched back on by moving the wind
shield wiper lever to any position .
- Worn or dirty windshield wiper blades
cause smearing which can affect the op
eration of the rain sensor . Check the con
dition of your windshield w iper blades
regularly.
- The rain sensor is part of the interval
wiping system. Turning off the ignition
will also deactivate the rain sensor. To re activate the sensor, switch off the inter
val wiping function, then switch it back
on again.
- Make sure the washer fluid reservoir in
the engine compartment is topped off
before going on a long trip. Look up
i:::> page 2 70 for checking and filling the
washer container.
Rear window wiper
T he wip er lever is also used to operate the
rear window wiper and the automa tic wiper/
washer func tion.
Fig. 69 Wipe r leve r: activat ing the re ar w indow wiper
and was her
The rear w indow wiper and the automatic wip
er/washer functions a re activated as follows : ..,.
Page 70 of 350
68 Clear vis ion
Int ermittent w iping
.. Push the w iper lever forward to the first po
sition @~
fig. 69. The rear window wiper
will wipe the window approx. every four sec onds .
Automatic wiper /washer function
.. Push the w iper lever fo rward to the second
stop,
posi tion (!), and hold it there for as
l ong as you want the rear wiper/washer to
operate.
.. Re lease the lever aga in . the wiper wi ll keep
runn ing for approx. four seconds.
Switching interm ittent wip er action off
.. Pull the lever all the way back to the or iginal
position .
As soon as the reverse gea r is engaged and
the front wipe rs are turned on and operat ing
at the same time, the rear wipe r also turns on
automatically.
A WARNING
Wipe r blades are crucial for safe d riving!
On ly in good condition are they able to
clear the windows properly to provide un
restricted visibility. Worn or frayed wipe r
blades are a safety hazard! ¢
page 69,
Replacing windshield wiper blades
CD Note
In freezing or near freezing condit ions:
- Always check that the wiper blades are
not frozen to the glass before you turn
the wiper on. Loosen a wiper blade which i s frozen in p lace before operating the
wipe r to prevent damage to the wiper
blade o r the wiper motor .
- Do not use the wiper to clear a frosted
window . U si ng the w ipers as a conven
i ent ice sc raper will destroy the wiper
blades.
-
Headlight washer system
App lies to vehicles : wi th headlight washe r system
The headlight washer system cleans the
headlights.
.. Operate the w indshield wiper/washer sys
tem ¢
page 66, fig. 68 ® with the head
lights turned on by ho lding the lever for lon
ger than one second .
The washer jets extend forward out of the
front bumper driven by water pressu re to
spray the fro nt headlights w ith water .
You should inspect the headlights regu larly
(for example whe n refueling) and clean off
any solid di rt or i nsects from the le nses .
To ensure the system wor ks proper ly in w inter,
keep the washer jets free of snow and remove
any ice using a de-icing spray.
Service position
The wiper blades can only be changed in the
service position .
.. If the wiper blades are not frozen to the
windshie ld, bring the windshie ld wiper lever
to the basic pos ition @¢
page 66, fig. 68.
.. Select: !CAR I function button> Systems *
control button> Windshield wipers > Serv
ic e po sition .
Or
.. Select:
!CARI function button> Car sy stems*
cont ro l butto n > Servicing & checks > Wip er
s ervi ce po sition .
-On -changing the windshield wipe r blades
can o nly be done if you b ring the wiper arms
t o the servi ce position. Yo u will a lso avoid
pa int damage to the hood when wor king on
t he wipe rs in this position .
-Off -the w indshie ld w ipers are moved to
t heir initia l posi tion again .
CD Note
Never ma ne uver you r vehicle with the
front windshie ld w iper arms raised s ince
t hey will automatically be moved bac k t o
Page 74 of 350
7 2 Clear vision
-Repeated or prolonged exposure to elec
trolyte can cause irritation to the respira tory system, especially among people
with asthma or other respiratory condi
tions . Get fresh air immediately by leav
ing the vehicle or, if that is not possible,
open windows and doors all the way.
- If electrolyte gets into the eyes, flush
them thoroughly with large amounts of
clean water for at least 15 minutes;
medical attention is recommended.
- If electrolyte contacts skin, flush affect
ed area with clean water for at least 15
minutes and then wash affected area
with soap and water; medical attention
is recommended . Thoroughly wash af
fected clothing and shoes before reuse.
- If swallowed and person is conscious,
rinse mouth with water for at least 15
minutes. Do not induce vomiting unless
instructed to do so by medical professio
nal. Get medical attention immediately.
(D Note
Liquid electrolyte leaking from broken mir
ror glass will damage any plastic surfaces
it comes in contact with. Clean up spilled
electrolyte immediately with clean water
and a sponge.
@ Tips
- Switching off the dimming function of
the inside rear view mirror also deacti
vates the automatic dimming function of
the exterior mirrors*.
- The automatic dimming mirrors do not
dim when the interior lighting is turned
on or the reverse gear is selected.
-Automatic dimming for the mirror only operates properly if the sun shade* for
the rear window is not in use or the light
striking the inside mirror is not hindered
by other objects.
Digital compass
Activating or deactivating the compass
Applies to veh icles: w ith dig ital compass
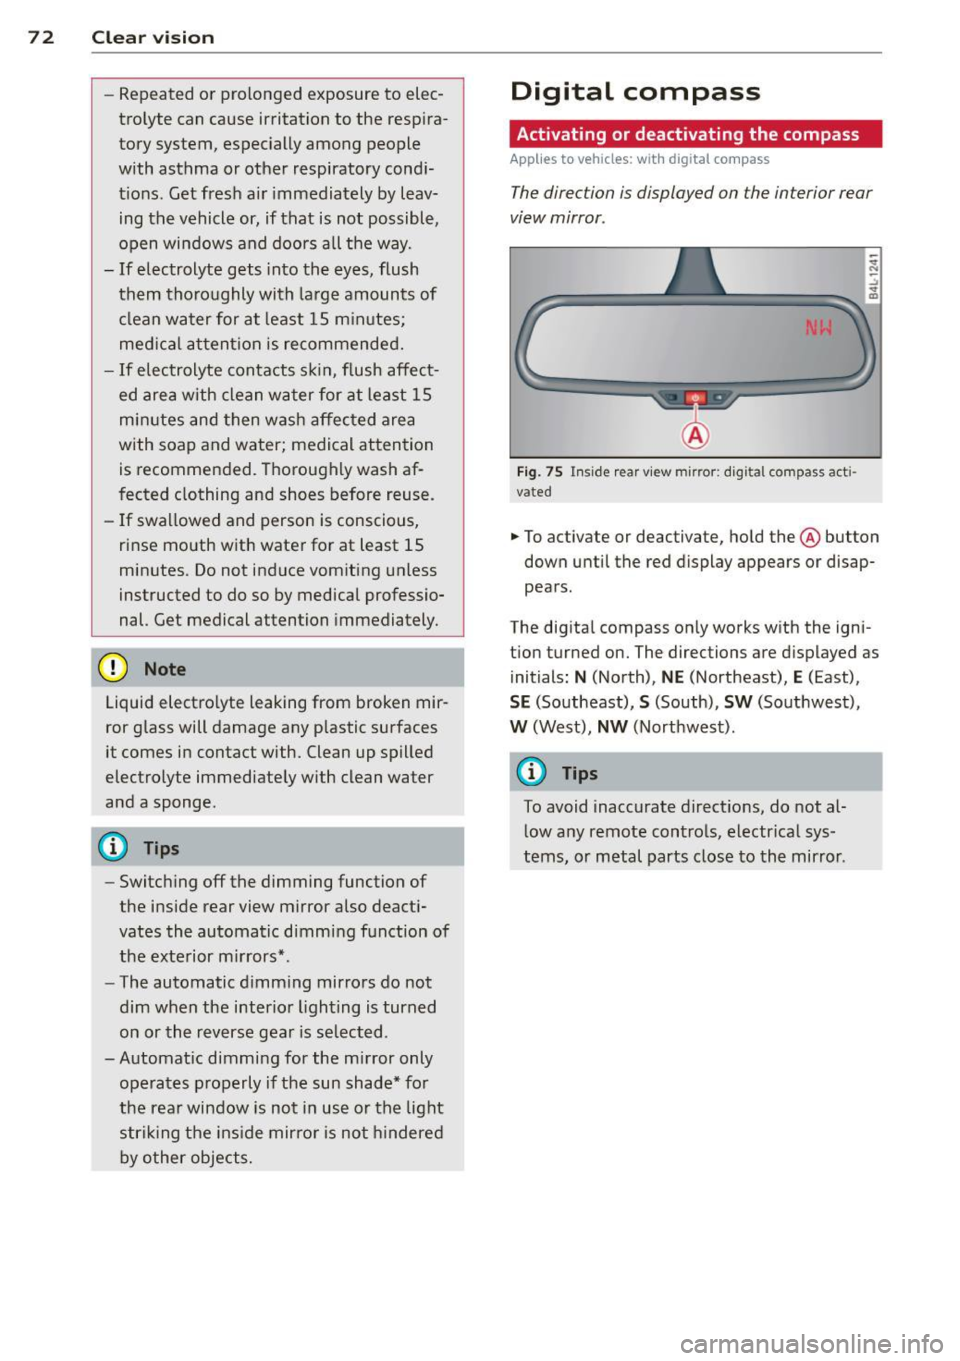
The direction is displayed on the interior rear
view mirror .
Fig. 75 Inside rear view mirror: digital compass acti
vated
.. To activate or deactivate, hold the @ button
down until the red display appears or disap
pears.
The digital compass only works with the igni
t ion turned on. The directions are displayed as
initials:
N (North), NE (Northeast), E (East),
SE (Southeast), S (South), SW (Southwest),
W (West), NW (Northwest).
@ Tips
To avoid inaccurate directions, do not al
low any remote controls, electrical sys
tems, or metal parts close to the mirror .
Page 84 of 350
82 Seats and st o rage
Luggage compartment
Expanding luggage compartment
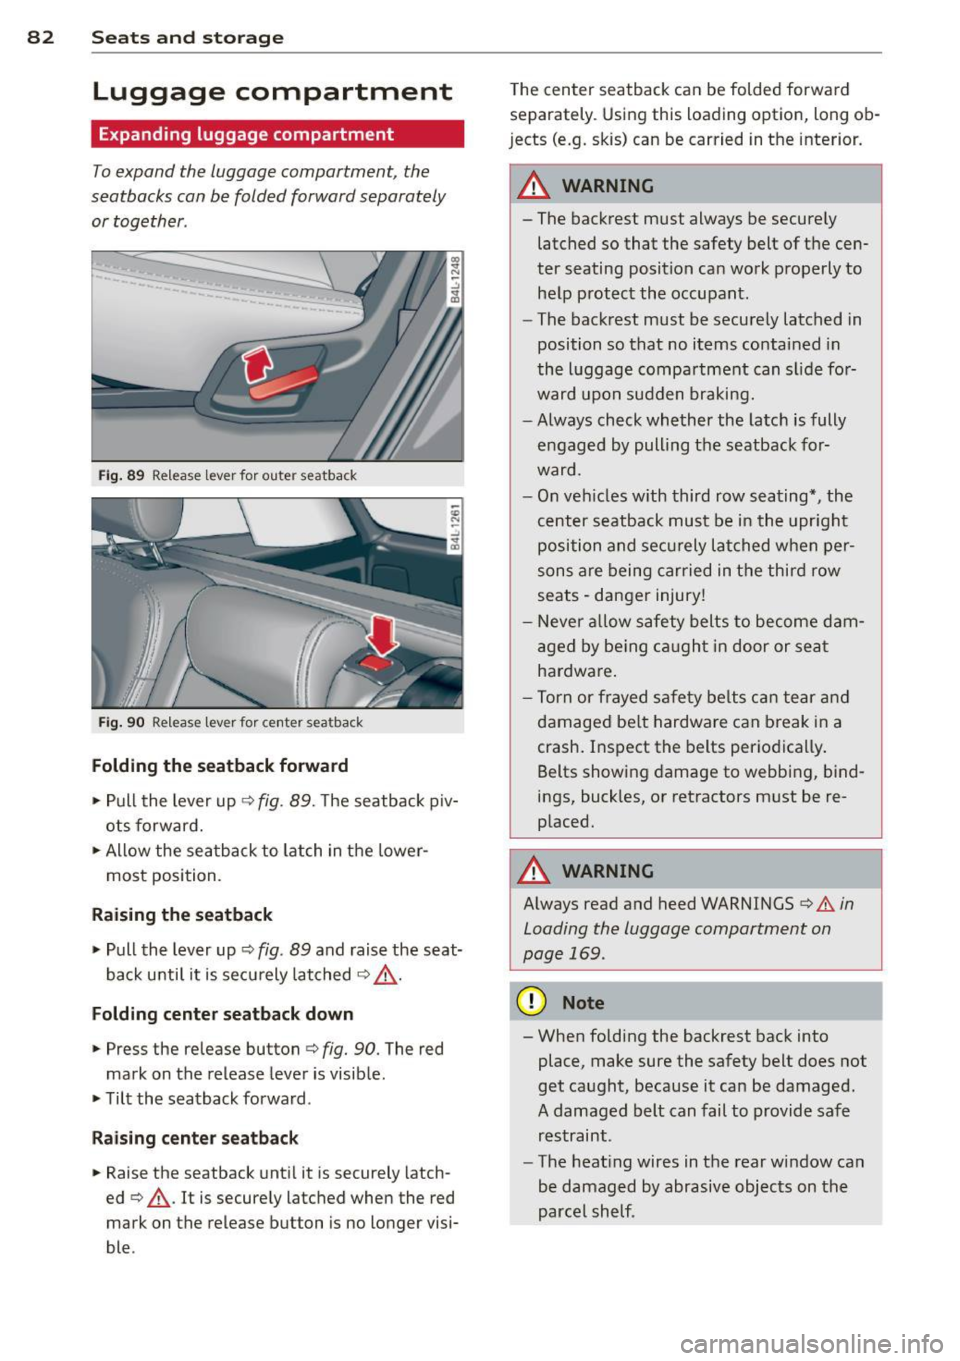
To expand the luggage compartment, the
seatbacks can be folded forward separately or together .
Fig. 89 Release lever for outer seatback
Fig. 90 Release lever for center seatback
Folding the seatback forward
,. Pull the lever up c:> fig. 89. The seatback piv
ots forward.
,. Allow the sea tback to latch in the lower·
most position.
Raising the seatback
,. Pull the lever up c:> fig. 89 and raise the seat
back u ntil it is securely latched
c:> & -
Folding cente r seatba ck d own
,. Press the release button c:> fig. 90. The red
mark on the release lever is visible.
,. Tilt the seatback forward .
Rais ing cen te r s eatba ck
,. Raise the seatback until it is securely latch ·
ed
c:> & . It is securely latched when the red
mark on the release button is no longer visi·
ble . T
he center seatback can be folded forwa rd
separately. Using this loading option, long ob·
j ects (e.g. skis) can be carried in the interior.
A WARNING
--
- The backrest must always be secure ly
latched so that the safety belt of the cen·
ter seating position can wo rk properly to
help protect the occupant.
- The backrest must be securely latched in
position so that no items contained in
the luggage compartment can s lide for·
ward upon sudden braking.
- Always check whether the latch is fully engaged by pulling the seatback for
ward.
- On vehicles w ith third row seating*, the
center seatback must be in the upr ight
position and secu rely latched when per
sons are being carried in the third row
seats -danger injury!
- Never allow safety belts to become dam· aged by be ing ca ugh t in door or seat
hardware .
- Torn or frayed safety belts can tear and
damaged be lt hardware can break in a
crash. Inspect the belts periodica lly .
Belts showing damage to webbing, bind
ings, buckles, or retractors must be re·
placed.
A WARNING
-
A lways read and heed WARNINGS c:> .&. in
Loading the luggage compartment on
page
169.
(D Note
- When folding the backrest back into
place, make sure the safety belt does not
get caught, because it can be damaged.
A damaged belt can fail to provide safe
restraint .
- The heat ing wires in the rear window can
be damaged by abrasive objects on the
parcel shelf .
Page 96 of 350
94 Warm and cold
Warm and cold Climate control
Description
The air conditioner is fully automatic and is
designed to maintain a comfortable and uni
form climate inside the vehicle .
We recommend the following settings :
.. Set the temperature to 72 °F (+22 °C).
.. Press the
!AUTO ! button.
With this setting, you attain maximum com
fort in the least amount of time. Change this
setting, as desired, to meet your personal
needs.
The climate controls are a combination of
heating, ventilation and cooling systems,
which automatica lly reduce humidity and cool
the air inside your vehicle.
The air temperature, air flow and air distribu
tion are automatica lly regu lated to achieve
and maintain the desired passenger compart
ment temperature as quick ly as possib le.
The system automatically compensates for
changes in outside temperature and for the
intensity of the sunlight entering the vehicle.
We recommend you use the
Automatic mode
¢ page 97 for year-round comfort.
Please note the following:
Turn on the air conditioner to reduce humidity
in the vehicle . Thi s also prevents the windows
from fogging up.
When the outside temperature is high and the
a ir i s very humid,
condensation from the
evaporator may drip under the vehicle. This is
norma l and does not indicate a leak.
If the outside temperature is low, the fan nor
mally only switches to a h igher speed once
the eng ine coolant has warmed up sufficient
l y.
The air conditioner temporarily switches off
when you drive off from a standstill using full
thrott le to save eng ine power. The
compressor a lso switches off if the coo l
ant temperature is too high , so that the en
gine can be adequately cooled under extreme
loads.
Air pollutants filter
The air pollutants filt er (a comb ined particle
filter and activated charcoa l filter) reduces or
prevents outside air pollution (dust, or pollen)
from enter ing the vehicle. The air is also fil
tered in air recirculation mode .
The air pollutants filt er must be changed at
the interva ls specified in your Warranty
&
Maintenance booklet, so that the a ir condi
tioner can properly work.
If you drive your vehicle in an area with high
air pollution, the filter may need to be
changed more frequently than specified in
your Audi Warranty
& Maintenance booklet. If
in doubt, ask your authorized Audi Service Ad
visor for advice .
Key coded settings
The air conditioner settings selected are auto
matically stored and assigned to the key be ing
used. When the vehicle is started, the air con
ditioner automa tically selects the settings as
s igned to that key. This way every driver will
maintain h is/her own personal settings and
does not have to reset them manually .
If a different dr iver uses your key and changes
the a ir cond itioner settings, the latest adjust
ments will e rase and replace the settings you
have stored.
Energy management
To prevent the battery from being discharged
and to restore the balance of energy, compo
nents which require large amounts of energy
are temporarily cut back or switched off
¢ page 228. Heating systems in pa rticular re
quire a great deal of energy.
If yo u notice , fo r
example, that the seat* or rear window heat
ing is not heating, they have been temporarily
cut back or switched off by
energy manage
ment.
These systems are availab le aga in as
soon as the energy balance has been restored . .,.
Page 97 of 350
M
"' 0 _,
"". rl I.O
"' rl
"' rl
,&_ WARNING
Reduced visibility is dangerous and can
cause accidents.
-
-For safe driving it is very important that
all windows be free of ice, snow and con
densation.
- Completely familiarize yourself with the proper use and function of the heating
and ventilation system and especially
how to defog and defrost the windows.
- Never use the windshield wiper/washer
system in freezing weather until you
have warmed the windshield first, using
the heating and ventilation system. The
washer solution may freeze on the wind
shield and reduce visibility.
(D Note
- If you suspect that the climate control
system has been damaged, switch the
system off to avoid further damages,
and have it inspected by a qualified deal
ership.
Controls
Warm and cold 95
-Repairs to the Audi air conditioner re
quire special technical knowledge and
special tools. Contact an authorized Audi
dealer for assistance.
@ Tips
- Keep the air intake slots (in front of the
windshield) free from ice, snow and de
bris in order to maintain the proper func
tion of the climate control system.
- Air inside the vehicle escapes through air
vents located in the side trim panels be
neath the rear side windows. Make sure
that the outlet slots are not covered by
clothing, etc.
- Climate control works most effectively if
the windows and the Panoramic sliding
sunroof* are closed. However, if the inte
rior of a parked vehicle is extremely hot
from the sun's rays, briefly opening the
windows can speed up the cooling proc
ess.
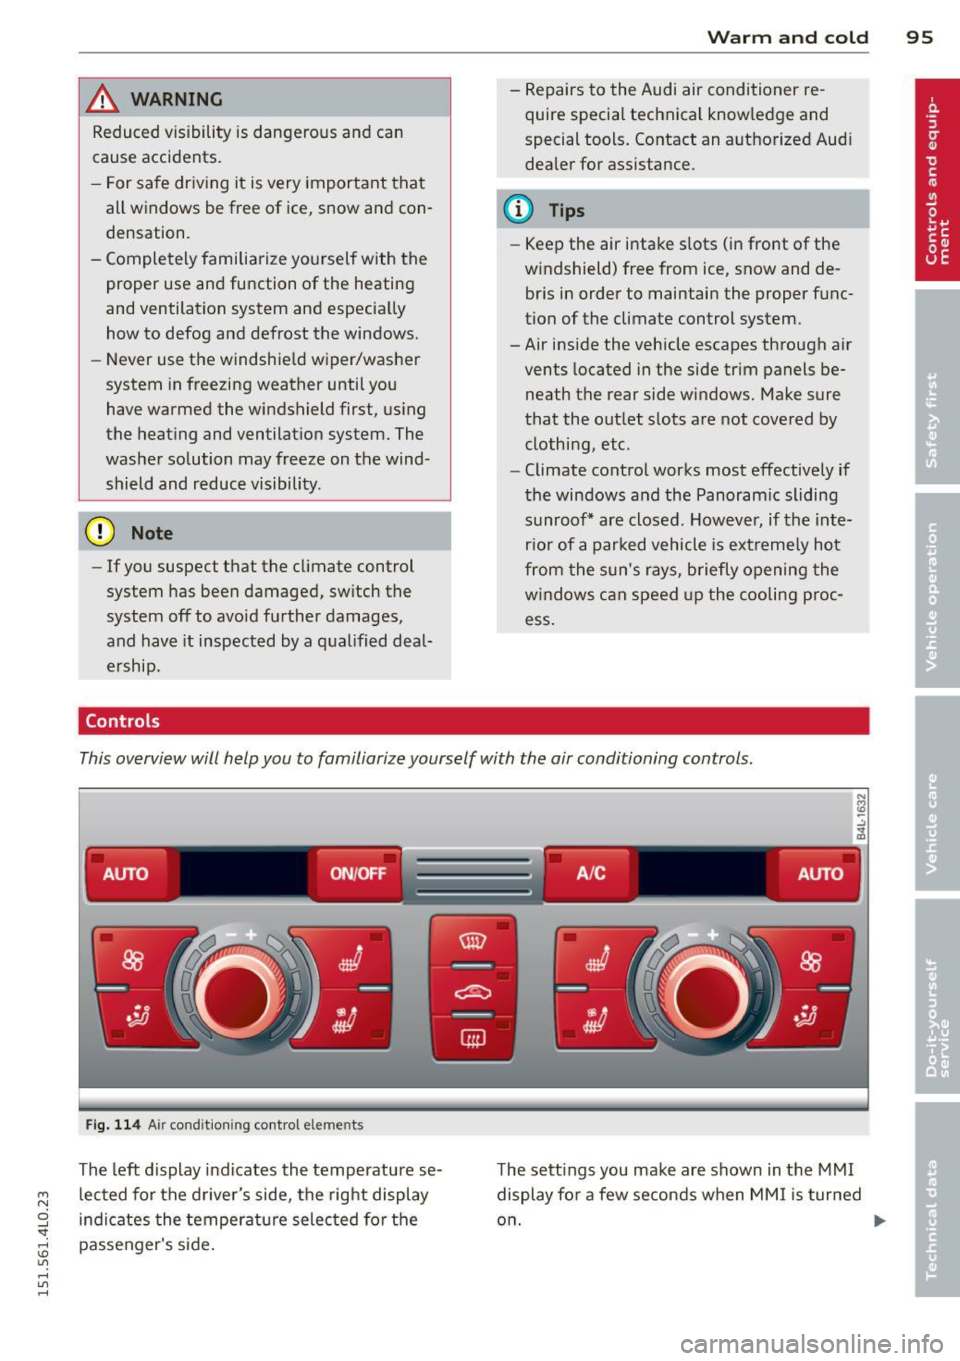
This overview will help you to familiarize yourself with the air conditioning controls.
-------. .- .--. -
AUTO ON/OFF A /C AUTO
;;__,
Fig. 114 Air condit ioning control elements
The left display indicates the temperature se
lected for the driver's side, the right display
indicates the temperature selected for the
passenger's side. The
settings you make are shown in the MMI
display for a few seconds when MMI is turned
on. .,.
Page 98 of 350

96 Warm and cold
Each function is turned on or off by briefly
pressing the corresponding button . The indi
cator light in the button illum inates when the
function is active.
Button(s ) Function
ION/OFFI Climate control on/off
c> page96
IA/Cl Air conditioner on/off
c>page96
IAU TO I Automatic mode
¢page 97
Regulatora) G Temperature selection
c>page 97
[tl Seat heating*
¢page 103
~
Seat ventilation*
i=>page 103
~ Fan
¢ page 97
Qi] Air distr ibut ion
c> page 97
~ Defrost
i=>page 97
~ Manua l recircu lation
c>page98
~ Heated rear window
i=>page 98
al The re gula tor is also used to set th e fan speed, air dis
t ribution, seat heating and seat vent ilat ion.
Synchroniz ing clim ate control
By pressing and holding the regu lator on the
d river's s ide, the temperature setting on the
driver's side can be switched to the passeng
e r's side, and vice versa. The new temperature
is shown in the display.
Synchronizing four-zone automatic
comfort air conditi oning*
By pressing and holding the regu lator on the
driver's side, the temperature setting on the
driver's side can be switched to the passeng
er's side and to the outer rear seats. The new
temperature is shown in the disp lay. By sim
ultaneously pressing and holding the
regulators o n the driver's side and front pas
senger's s ide, the temperature setting on the
driver's side can be switched to the front pas
senger's side . The new temperature is shown
i n the disp lay .
(D Tips
The gr ille on the controls m ust rema in un
obstr ucted and m ust not be taped over.
Measur ing sensors are located behind it.
Turning on and off~
Turning the climate control on
.,. Press the ION/O FF! button, or
.,. Press the
IAUTO I button.
Turning the climate control off
.,. Press the ION/O FFj button to sw itch the cli
mate contro l off and to block the air supply
from the outside.
The air conditioner turns bac k on when you
press the
temperature regulator or one of the
buttons.
(D Tips
With the ign ition t urned off, you can acti
vate the residua l heat funct ion by pressing
the
ION/O FF I button. The res idual heat
from the coolant can be used to heat the
vehicle interior .
Air Conditioner On/Off~
Switching off the air conditioner saves fuel.
.,. Press the IAIC I button to switch the air con-
ditioner on or off.
When the air conditioner is switched on, the
indicator lamp in the button will illum inate
and the heat ing/venti lation system is control
led automatically.
P lease keep in mind that with the air condi
tione r switched off, the interior tempe rat ure ..,_
Page 99 of 350
M N
0 ...J
'SI: ...... \!) 1.1'1
...... 1.1'1 ......
cannot be lower than the outside tempera
ture. The air wi ll not be cooled or
dehumid ified. The windows can fog up.
Automat ic mode ~
The automatic mode is the standard setting
for all seasons.
.,. Se lect temperature between 60 °F ( + 16 °()
and 84 °F (+ 28 °C) .
.. Press the !AUTO ! button.
Automatic opera tion ens ures constant tem
peratures in the interior and dehumidifies the
air inside the vehicle . Air temperature, vol ume
and distribution are controlled automatically
to reach or maintain the desired interior tem perature as quickly as possible. Fluctuations
in exterior temperature and the effects of
temperature from the pos ition of the sun are
compensated for automat ically.
This operat ing mode works only in the adjust
ab le temperature range, from 60
°F ( + 16 °C)
to 84 °F (+28 °C) . If a temperature be low 60
°F ( + 16 °C) is selected, L O appears in the d is
p lay. At tempe rat ures above
84 °F (+ 28 °C),
HI is d isplayed. At both extreme settings, cl i
mate con trol r uns con tinuously at maximum
coo ling or heat ing power . There is no temper
ature reg ulation.
Setting the temperature
Separate temperatures con be selected for
the driver's and front passenger's side.
.,. Rotate the reg ulator to the left to reduce
the temperature, or to the right to increase
the temperature.
The se lected temperatu re appea rs on the cli
mate con trol d isp lay. The tempe rature sett ing
will also appear for a few seconds in the MMI
d isp lay .
Warm and c old 97
Fan~
The automatically preset fan speed con be re
duced or increased .
.. Press the [!] button .
.. Rotate the regulator to the des ired fan
speed.
The climate control system automatically reg ulates fan speed depending on inter ior tem
perature. You ca n adjust the volume of air pro
duced by the fan to your own requirements .
The fan speed setting will appear for a few
seconds in the MMI display.
(D Tips
It is possible that the fan speed may
change automatically. This occurs to en
sure that the des ired temperature sett ing
i s reached as quickly as possible .
Air distribution ~
The automatically controlled air distribution
con be changed manually.
.. Press the G!J button.
.. Rotate the regulator to the des ired setting.
You can adjust the air distribut ion so that air
flows from specific vents. In position
:,0 air
flows on ly to the windows, in posit ion
;J, it
flows to the driver or passenger, and in pos i
tion
!J it flows to the footwell. There are ad
ditional comb inat ions availab le to adjust air
distribution as needed .
To regulate air d istribution automatically,
switch to
IAUTOI.
The air distribution setting will appear for a
few seconds in the MMI display.
Defrosting ~
The windshield and side windows ore rapidly
defrosted or defogged.
.,. Press the~ button to turn on the defroster .
.. Press the~ button again, or press the
!AUTO ! button to turn it off . ..,.