ESP AUDI Q7 2017 Owner´s Manual
[x] Cancel search | Manufacturer: AUDI, Model Year: 2017, Model line: Q7, Model: AUDI Q7 2017Pages: 402, PDF Size: 100.39 MB
Page 8 of 402
About this Owner's Manual
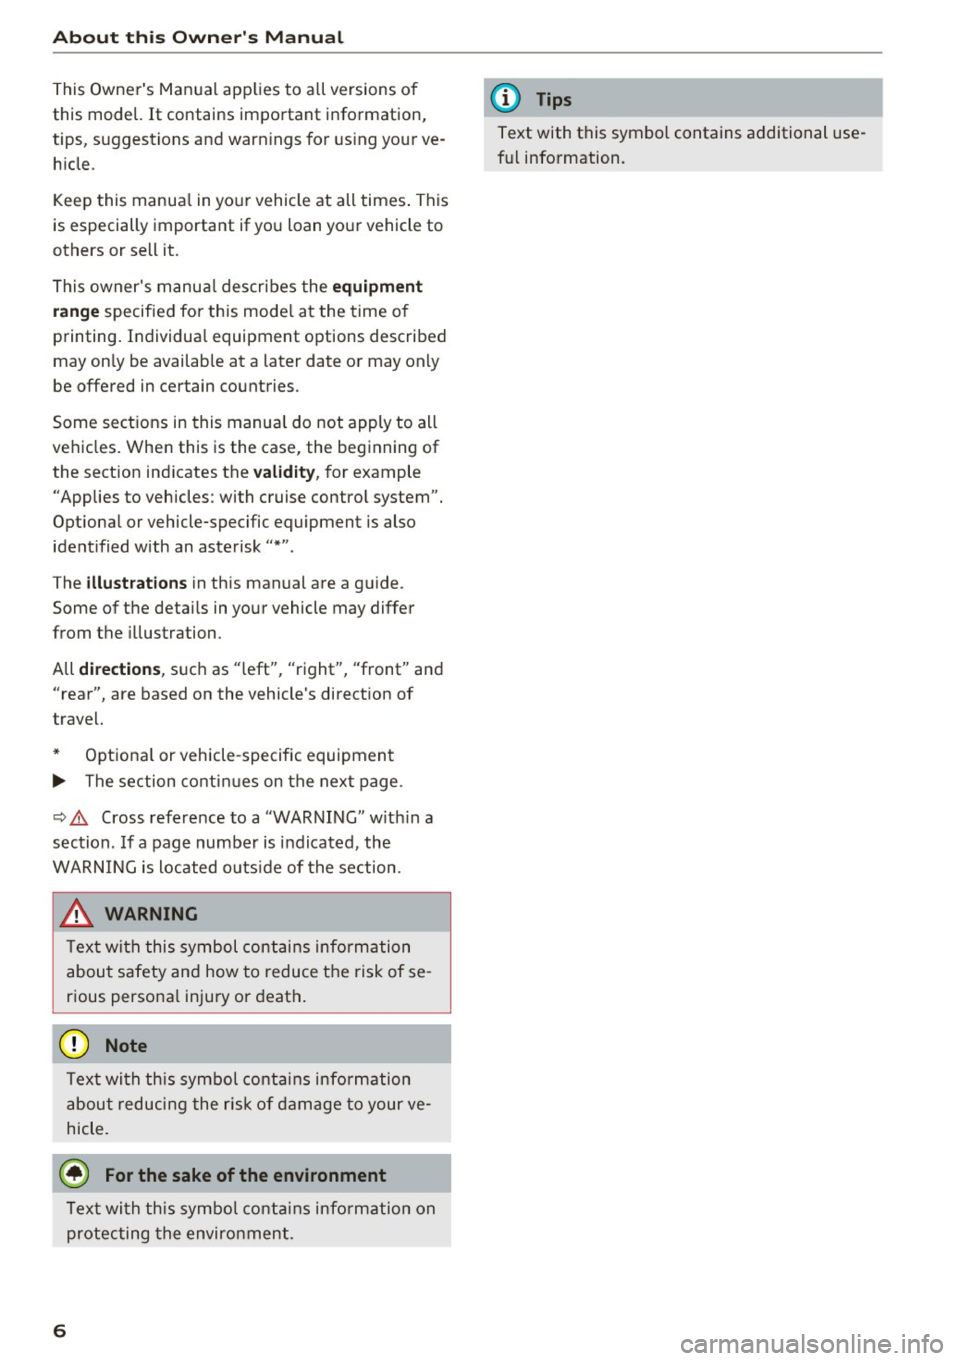
This Owne r's Man ual applies to a ll versions of
this mode l.
It contains important information,
tips, suggestions and warn ings for using your ve
h icle.
Keep this manual in your vehicle at all times . This
is especially important if you loan your vehicle to
others or sell it.
This owner's manua l describes the
equipment
range
specified for this mode l at the time of
printing. Individual equipment options described
may on ly be available at a later date or may only
be offered in certain countries .
Some sections in this manual do not apply to all
vehicles. When this is the case, the beginning of
the sect ion ind icates the
validity, for example
"Applies to vehicles : with cruise contro l system".
Optional or vehicle-specific equipment is also
ident ified with an asterisk
"*" .
The illustrations in this manual are a guide.
Some of the detai ls in your vehicle may differ
from the illustration.
All
directions , such as "left", "right", "front" and
"rear", are based on the vehicle's direct ion of
travel.
* Optional or vehicle
-specific equipment
.,._ The section continues on the next page.
c::> & Cross reference to a "WARNING" with in a
section. If a page number is indicated, the
WARNING is located outs ide of the section.
&, WARNING
Text with this symbol contains information
about safety and how to reduce the risk of se
rious personal injury or death.
(D Note
Text with this symbol contains informat ion
about reducing the risk of damage to your ve
hicle.
@ For the sake of the environment
Text with this symbol contains informat ion on
protecting the environment.
6
-
(D Tips
Text with this symbol contains additional use
fu l information.
Page 15 of 402
u (0
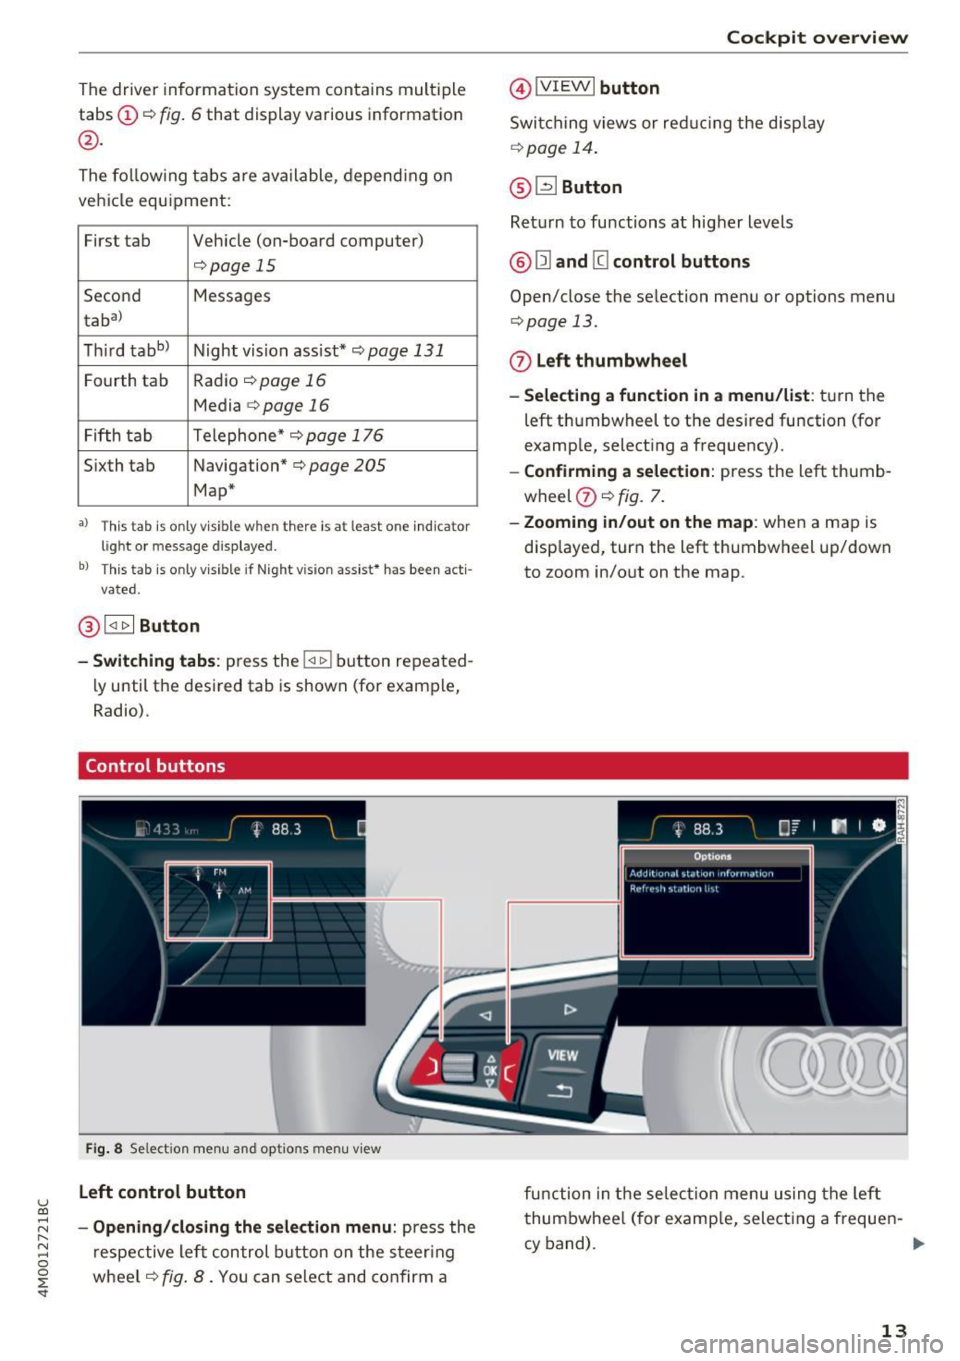
The driver informa tion system contains mult iple
tabs ©
c:;, fig. 6 that display various information
@.
The fo llow ing tab s are ava ilable, depend ing o n
ve hicl e equ ipment:
First tab Veh icle (on-board computer)
<=>page 15
Se co nd Messages
tabal
Thir d tabb)
Night vis ion ass ist*
c:;, page 131
F o urth tab Radio <=>page 16
Media c:;, page 16
Fifth tab Telephone
* c:;, page 1 76
S ixth tab Navigation" c:;, page 205
Map*
•> Thi s tab is only visible when there is at least one indicato r
light or m essage displayed.
bl T hi s tab is only v isible if Night vision ass ist * h as been acti
vated.
@ l<11> I Button
-Switching tabs: press the !<1 t> I bu tton re pea ted
l y until t he des ired tab is shown (for example,
Radio).
Control buttons
Fi g. 8 Se lect ion menu and opt ions menu view
Left control button
;::j -Opening/closing the selection menu : press the r--.
~ respe ctive le ft control button on the s teer ing 0
~ wheel c:;, fig . 8. You can sele ct and co nfi rm a
@IV IEWI button
Swi tc h ing views or red ucing the disp lay
¢ page 14 .
@ ~Button
Ret urn to fu nctions a t higher levels
@ Ill and @ control buttons
Open/close the se lecti on men u or options menu
<=> page 13.
0 Left thumbwheel
-Selecting a function in a menu/list : tur n the
left thumbwheel to the des ired function (fo r
examp le, select ing a frequency).
- Confirming a selection : press the left thumb
wheel
(J) c:;, fig. 7.
- Zooming in/out on the map : when a map is
disp layed, turn the left thumbw heel up/down
to zoom in/out on the map .
fu nction in t he se lec tion m enu us ing t he left
t hum bwhee l (for examp le, select ing a freque n-
cy band). ..,.
13
Page 16 of 402
Cockpit overview
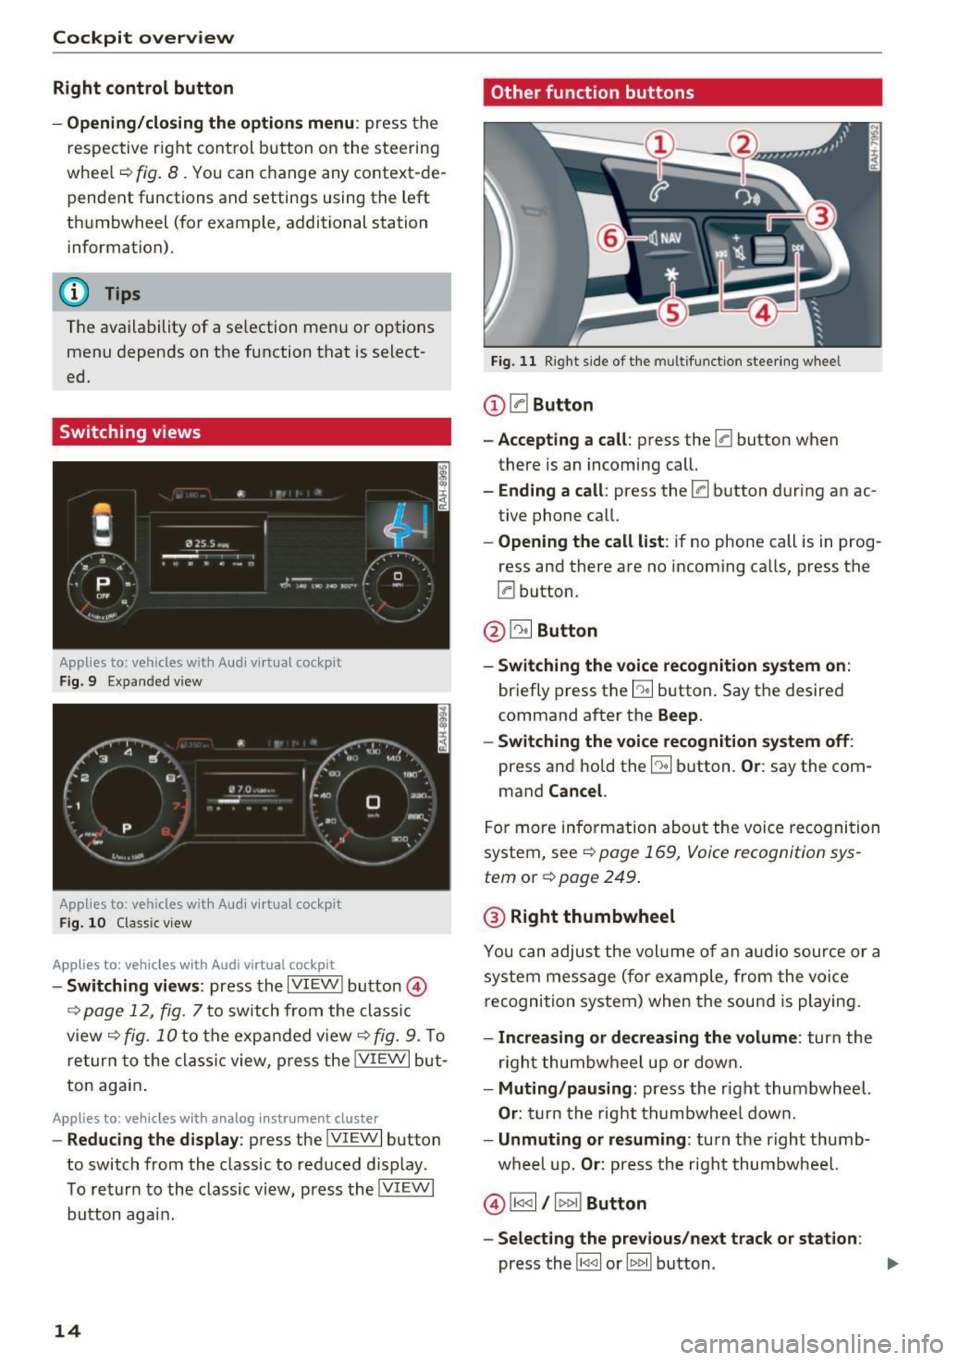
Right control button
- Opening/closing the options menu :
press the
respective right control button on the steering
whee l~
fig. 8 . You can change any context-de
pendent functions and settings using the left
thumbwheel (for example, additional station information).
(D Tips
The availability of a se lection menu or options
menu depends on the function that is select
ed.
Switching views
Applies to: vehicles with Audi virtual cockpit
F ig. 9 Expanded v iew
Applies to: vehicles with Audi virtual cockpit
Fig. 10 Classic view
Applies to: vehicles with Audi virtual cockpit
- Switching views : press the IVIEW ! button @)
~ page 12, fig. 7 to sw itch from the classic
view ~
fig. 10 to the expanded view~ fig. 9. To
return to the classic view, press the IVIEW I but
ton again .
Applies to: vehicles with analog instrument cluster
-Reducing the display : press the IVIEW I button
to switch from the classic to reduced d isplay .
To return to the class ic view, press the !VIEWI
button aga in.
14
Other function buttons
Fig. 11 Right side of the multifunction steering wheel
(D 0Button
- Accepting a call:
press the 0 button when
there is an incoming call.
-Ending a call: press the 0 button during an ac
tive phone call.
- Opening the call list: if no phone call is in prog
ress and there are no incoming calls, press the
0 button.
@ ~ Button
- Switching the voice recognition system on:
briefly press the E:9 button. Say the desired
command after the
Beep.
- Switching the voice recognition system off:
press and hold the [:9 button. Or: say the com
mand
Cancel.
For more information about the voice recognition
system, see
~ page 169, Voice recognition sys
tem
or Q page 249.
@ Right thumbwheel
You can adjust the volume of an audio source or a
system message (f or example, from the voice
recognition system) when the sound is playing.
-Increasing or decreasing the volume: turn the
r ig ht thumbwheel up or down.
-Muting/pausing : press the right thumbwheel.
Or: turn the right thumbwheel down.
-Unmuting or resuming : turn the right thumb
wheel up.
Or: press the right thumbwheel.
© !1441 / l t>t>I! Button
- Selecting the previous/next track or station :
press the l1<1 <1I or lt>t> II button . .,,.
Page 17 of 402
u co ...... N r-... N ...... 0
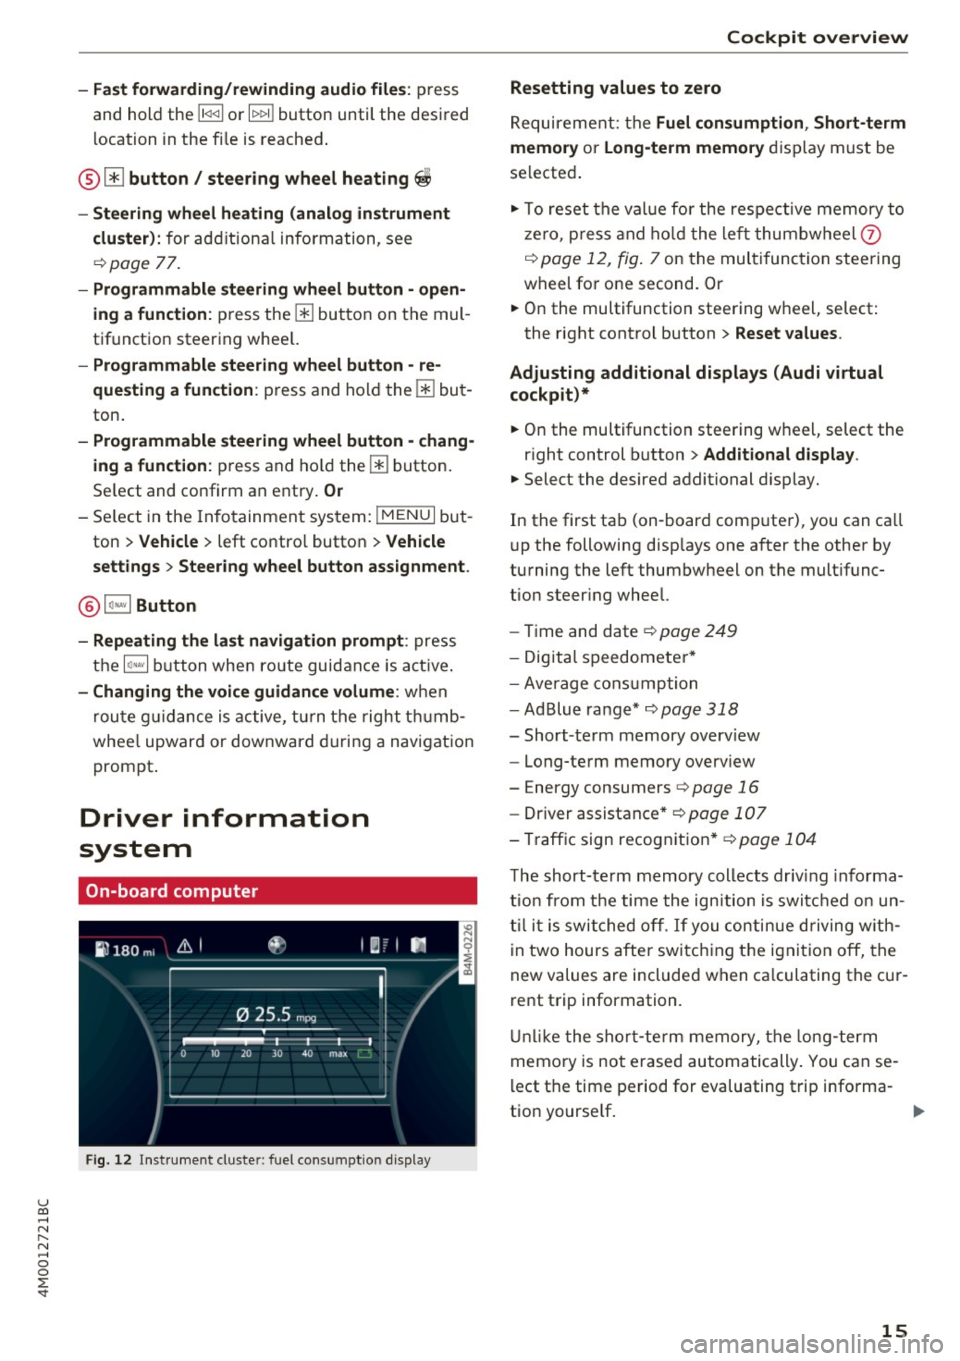
0
:E: '
and hold the
l 1
l ocation in the fi le is reached.
®0 button I steering wheel heating ~
- Steering wheel heating (analog instrument
cluster) :
for additional information, see
¢page 77.
-Programmable steering wheel button -open
ing a function :
press them button on the mul
tifunction steering whee l.
-Programmable steering wheel button -re
questing a function :
press and hold the m but
ton .
-Programmable steering wheel button -chang·
ing a function :
press and hold the m button.
Se lect and confirm an entry.
Or
- Se lect in the Infotainment system: !MENUI but
ton >
Vehicle > left contro l button > Vehicle
settings
> Steering wheel button assignment .
® I q .. vl Button
- Repeating the last navigation prompt :
press
the
l a,w l button when route guidance is act ive .
-Changing the voice guidance volume: when
route guidance is active, tur n the right t humb
whee l upward or downward during a navigation
prompt.
Driver information
system
On-board computer
Fig. 12 Instrument cluster: fuel consumption disp lay
Cockpit overview
Resetting values to zero
Requirement: the Fuel consumption , Short-term
memory or Long-term memory
display must be
selected.
"' To reset the val ue for the respect ive memory to
zero, press and hold the left thumbwheel
0
¢ page 12, fig. 7 on the multi function steering
wheel for one second. Or
"' On the multifunction steering wheel, select:
the right control button>
Reset values .
Adjusting additional displays (Audi virtual
cockpit)*
"' On the multifunction steering wheel, select the
right control button >
Additional display .
"'Select the desired additional display.
In the first tab (on -board comp uter), you can ca ll
u p the following disp lays one after the other by
turning the left thumbwheel on the mult ifunc
tion steer ing wheel.
- Time and date¢
page 249
-Digita l speedomete r*
- Average consum ption
- AdBlue range*
¢page 318
-Short-term memory overview
- Long-term memory overview
- Energy consumers ¢
page 16
-Driver assistance * ¢page 107
-Tra ffic sign recognition* ¢page 104
The short-te rm memory collects driv ing informa
tion from the time the ignition is switched on un
til it is switched off.
If you continue driving with
in two hours after switching the ignition
off, the
new values are included when ca lculating the cur
rent trip information.
Unlike the short-term memory, the long-term
memo ry is not erased automatically. You can se
lect the time period for evaluating trip informa-
t ion yourse lf . ..,.
15
Page 36 of 402
Opening and closing
Opening and closing
Central locking
Description
You can lock and unlock the vehicle centrally . You
have the following options:
- Remote control key <=>
page 3 7,
- Sensors in the door handles" <=>
page 37,
-Lock cylinder on the driver's door <=> page 39,
or
- Interior central locking switch <=>
page 38.
Turn signals
The turn s ignals flash tw ice when you unlock the
vehicle and flash once when you lock the vehicle.
If they do not flash, then one of the doors , the
rear lid or the hood is not closed.
Automatic locking (Auto Lock)
The Auto Lock funct ion locks all doors and the
luggage compartment lid once the speed has ex
ceeded approximately 9 mph (15 km/h).
The vehicle can be unlocked if the opening func
tion in the centra l locking system sw itch is used
or one of the door handles is pulled.
In the event of a crash with a irbag deployment,
the doors will a lso automat ica lly unlock to allow
access to the veh icle.
Selective door unlocking
The doors and luggage compartment lid will lock
when they close . You can set in the Infotainment
system whether
only the dr iver's door or the en
tire vehicle should be unlocked when unlocking
<=>page 39.
Unintentionally locking yourself out
Only lock your vehicle when all of the doors and
the luggage compartment l id are closed and the
remote control key is not in the vehicle . This
he lps to prevent you from locking yourse lf out
accidentally .
The follow ing cond itions prevent you from lock
ing your remote control key in the vehicle :
34
-If the driver's door is open, the vehicle cannot
be locked by pressing the
!'.rl button on the re
mote contro l key or by touching the locking
sensor* on a door .
- If the most recently used convenience key* is
detected in the luggage compartment, the lug
gage compartment lid automatica lly unlocks
again after closing it.
- If the convenience key* that was last used is de
tected ins ide the vehicle, then the vehicle will
not be able to lock from the outside .
Closing aid on the door s*
The vehicle doors are equipped with closing aids.
When closing a door, yo u only have to let it fall
lightly into the latch. It then closes automatically
<=> &. .
A WARNING
-
-When you lock your vehicle from outs ide,
nobody - especially children -sho uld rema in
inside the vehicle. Remember, when you
loc k the vehicle from the outside the win
dows cannot be opened from the inside.
- When you leave the vehicle, always take the
ign it ion key with yo u. This will prevent pas
sengers (ch ildren, for examp le) from acci
dentally being locked in the vehicle shou ld
they accidentally press the power locking
switch in the doors.
- Do not leave children inside the vehicle un
supervised. In an emergency it would be im
possible to open the doors from the outside
w ithout the key.
- Applies to vehicles with power side door
closer*:
- When closing a door, make sure nothing
can interfere with the door. Th is could
cause serious personal inj ury.
- You can stop the door from closing at any
time by pulling on the inside or outside
door handle.
(D Tips
-Do not leave valuables unattended in the ve
hicle. A locked vehicle is not a safe!
Page 39 of 402
u (0 ...... N r--. N ...... 0
0
:E
@J For the sake of the environment
Discharged batteries must be disposed of us
ing methods that will not harm the environ
ment . Do not dispose of them in household
trash .
(D Tips
The replacement battery must meet the same
specifications as the original battery in the re
mote control key.
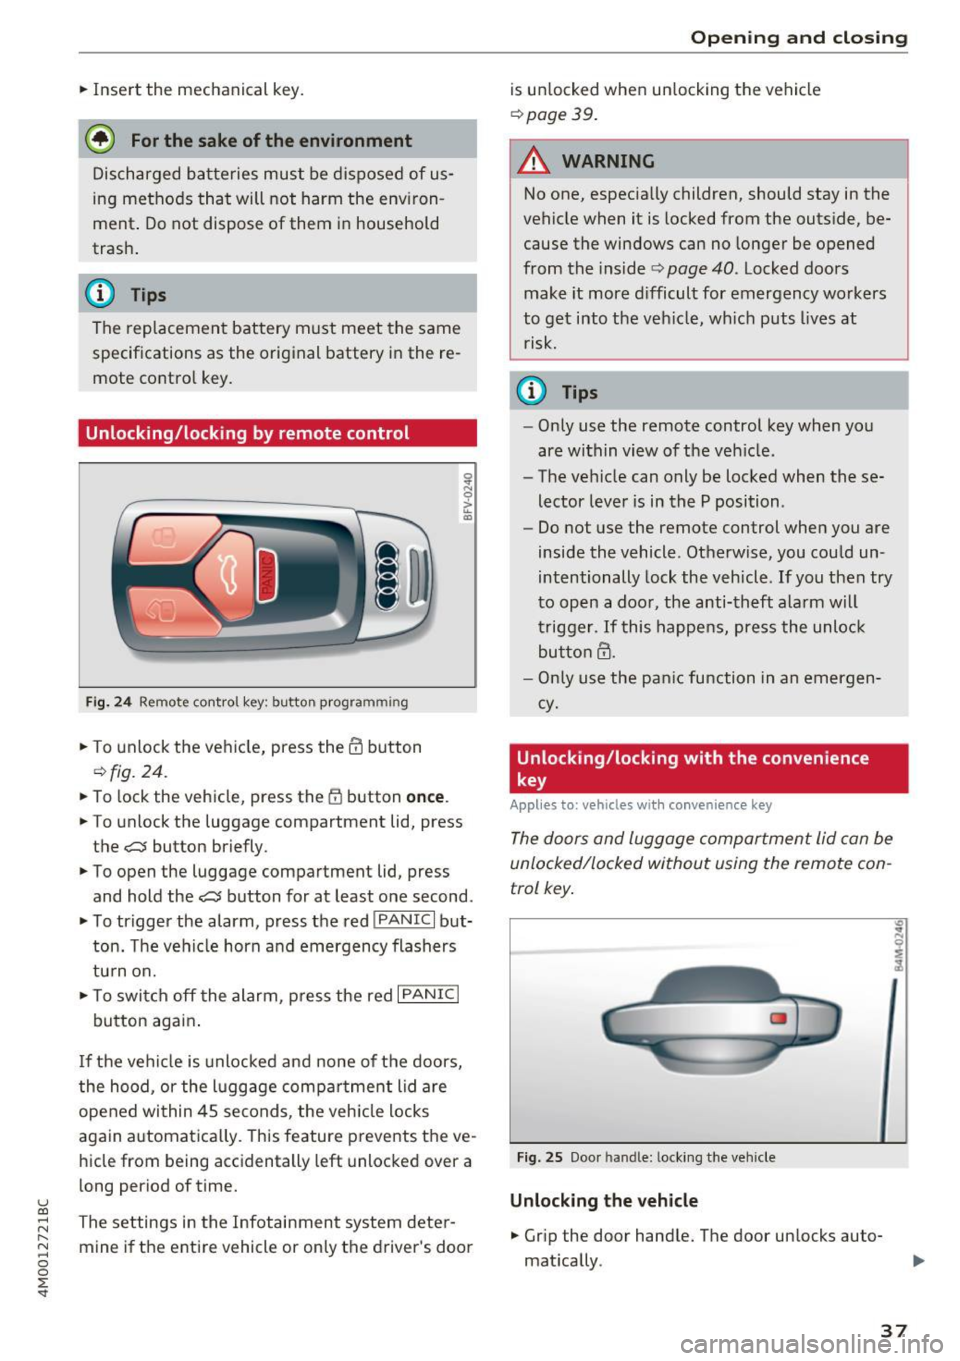
Unlocking/locking by remote control
Fig . 24 Remote control key : button programm ing
.. To unlock the vehicle, press the@ button
¢fig. 24.
.. To lock the vehicle, press the {fJ button once.
.. To unlo ck the luggage compartment lid, press
the
c::::J button briefly .
.. To open the luggage compartment lid, press
and hold the
C:$ button for at least one second .
.. To trigger the alarm, press the red
I PANIC I but
ton. The vehicle horn and emergency flashers
turn on .
.. To switch off the alarm, press the red
I PANIC I
button again .
If the vehicle is unlocked and none of the doors,
the hood, or the luggage compa rtment lid are
opened within 45 seconds, the veh icle locks
again automatically. This feature prevents the ve
hicle from being accidentally left unlocked over a
long period of time.
The settings in the Infotainment system deter
mine if the entire vehicle or only the driver's door
Open ing and closing
is un locked when unlocking the vehicle
¢ page 39.
.&_ WARNING
-No one, especially children, should stay in the
vehicle when it is locked from the outside, be
cause the windows can no longer be opened
from the inside ¢
page 40. Locked doors
make it more difficult for emergency workers
to get into the veh icle, wh ich puts lives at
r isk.
@ Tips
- Only use the remote control key when you
are within view of the veh icle.
- The vehicle can only be locked when these
lector lever is in the P position .
- Do not use the remote control when you are
inside the vehicle . Otherwise, you could un
intentionally lock the vehicle . If you then try
to open a door, the anti-theft alarm will
trigger. If this happens, press the unloc k
button@.
- Only use the panic function in an emergen
cy .
Unlocking/locking with the convenience
key
App lies to: vehicles with convenience key
The doors and luggage compartment lid can be
unlocked/locked without using the remote con
trol key .
Fig. 25 Door handle: locking the vehicle
Unlocking the vehicle
.. Gr ip the door hand le. The door un locks auto
mat ically .
37
Page 40 of 402
Opening and clo sin g
• Pullon the door handle to open the door.
Locking the v ehic le
• Se lect the P posit ion, because the vehicle can
not be locked otherwise .
• To lock the veh icle, close the door and touch
the sensor in the door handle
o nce ¢ fig. 25 . Do
not hold the door handle while doing this .
You can un lock/lock the vehicle at every door.
The remote control key cannot be more than ap
p roximate ly 4 feet (1. 5 m) away from the door
handle. It makes no difference whether the mas
ter key is in your jacket pocket or in your brief case, for example .
If you hold the door handle while locking, this
can impair the locking function.
The door cannot be opened for a br ief period di
rectly af ter lock ing it. This way you have the op
portun ity to check if the doors locked correctly.
The settings in the Infotainment system deter
mine if the ent ire ve hicle or only one of the doors
is unlocked when unlocki ng the vehicle
¢ page 39 .
A WARNING
Read and following a ll WARNINGS ¢&. in De
scription on page 34 .
@ Tips
If your vehicle is le ft standing fo r a long peri
od of time, note the following:
- T he energy management system grad uall y
turns off unnecessa ry cohvenience functions
to prevent the vehicle batte ry from draining
and to ma intain the vehicle's ab ility to start
for as long as possib le. You may not be able
to unlock your vehicle using the convenie nce
key.
38
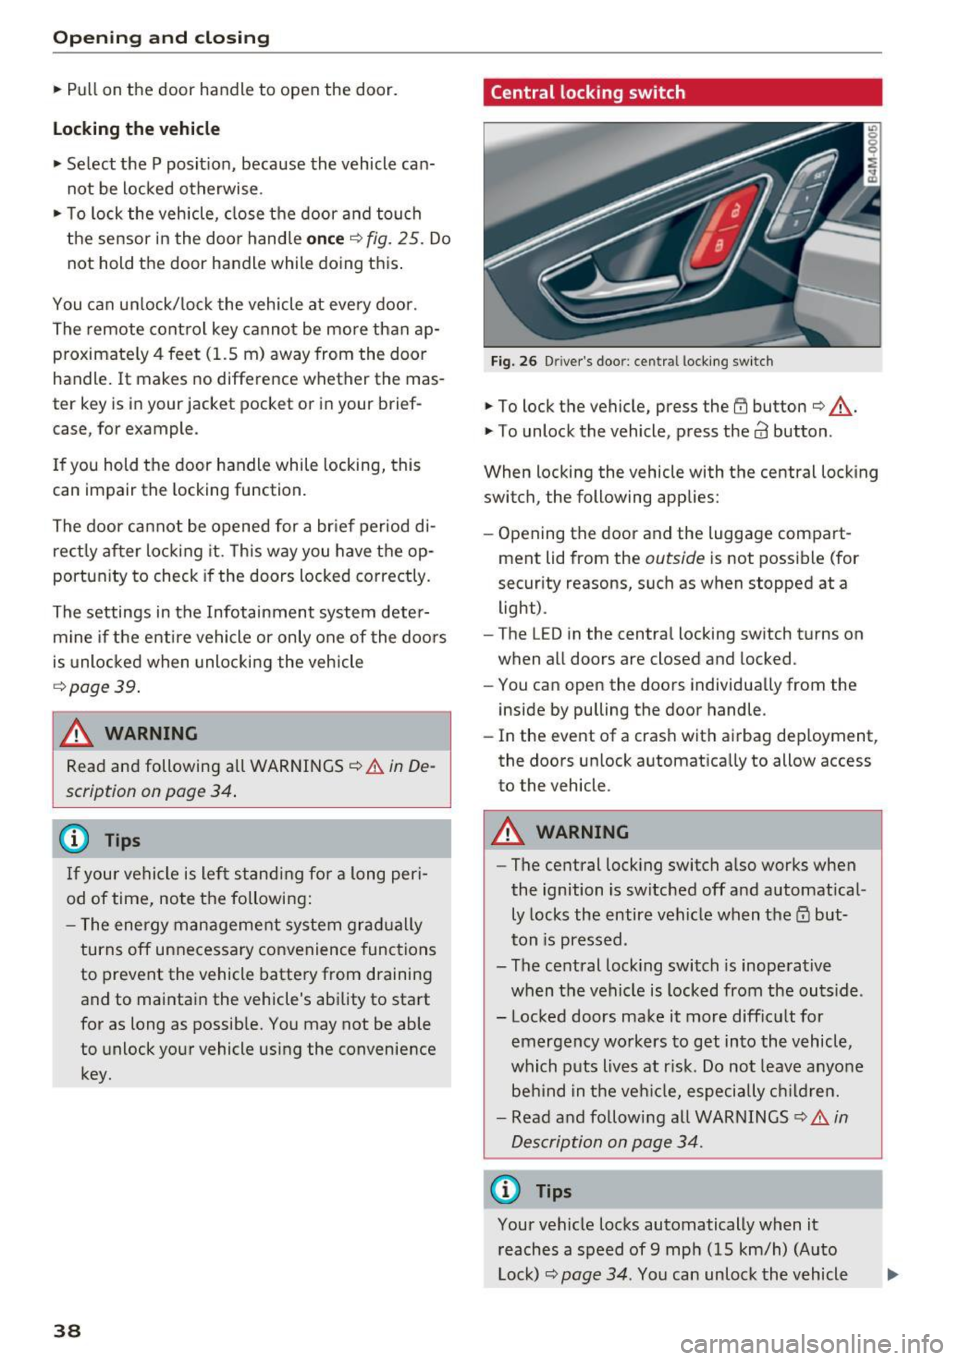
Central locking switch
Fig. 26 D river 's doo r: cen tra l lo cking sw it c h
• To lock the vehicle, press the @ button ¢&. -
• To unlock the vehicle, press the
63 button.
When locking the vehicle with the central locking
switch , the following applies:
- Opening the door and the luggage compart
ment lid from the
outside is not possib le (for
security reasons, such as when stopped at a light) .
- The L ED in the centra l locking switch turns on
when all doors are closed and locked .
- You can open the doors ind iv idually from the
inside by pulling the door handle .
- In the event of a crash with airbag dep loyment,
the doors unlock a utomatica lly to allow access
to the vehicle .
A WARNING
-The central lock ing switch a lso works when
the ignition is switched off and automatical
ly locks the entire vehicle when the
ID but
ton is pressed .
- The central lock ing switch is inoperative
when the vehicle is locked from the outs ide .
- Locked doors ma ke it more diffic ult for
emergency workers to get into the vehicle,
which puts lives at r isk . Do not leave anyone
behind in the ve hicle, especially c hild ren.
- Read and following a ll WARNINGS ¢&.
in
Description on page 34.
{D Tips
Your vehicle locks automatically when it reaches a speed of 9 mph (15 km/h) (Auto
Lock)¢
page 34. You can unloc k the vehicle
Page 45 of 402
u (0 ...... N r--. N ...... 0
0
:E
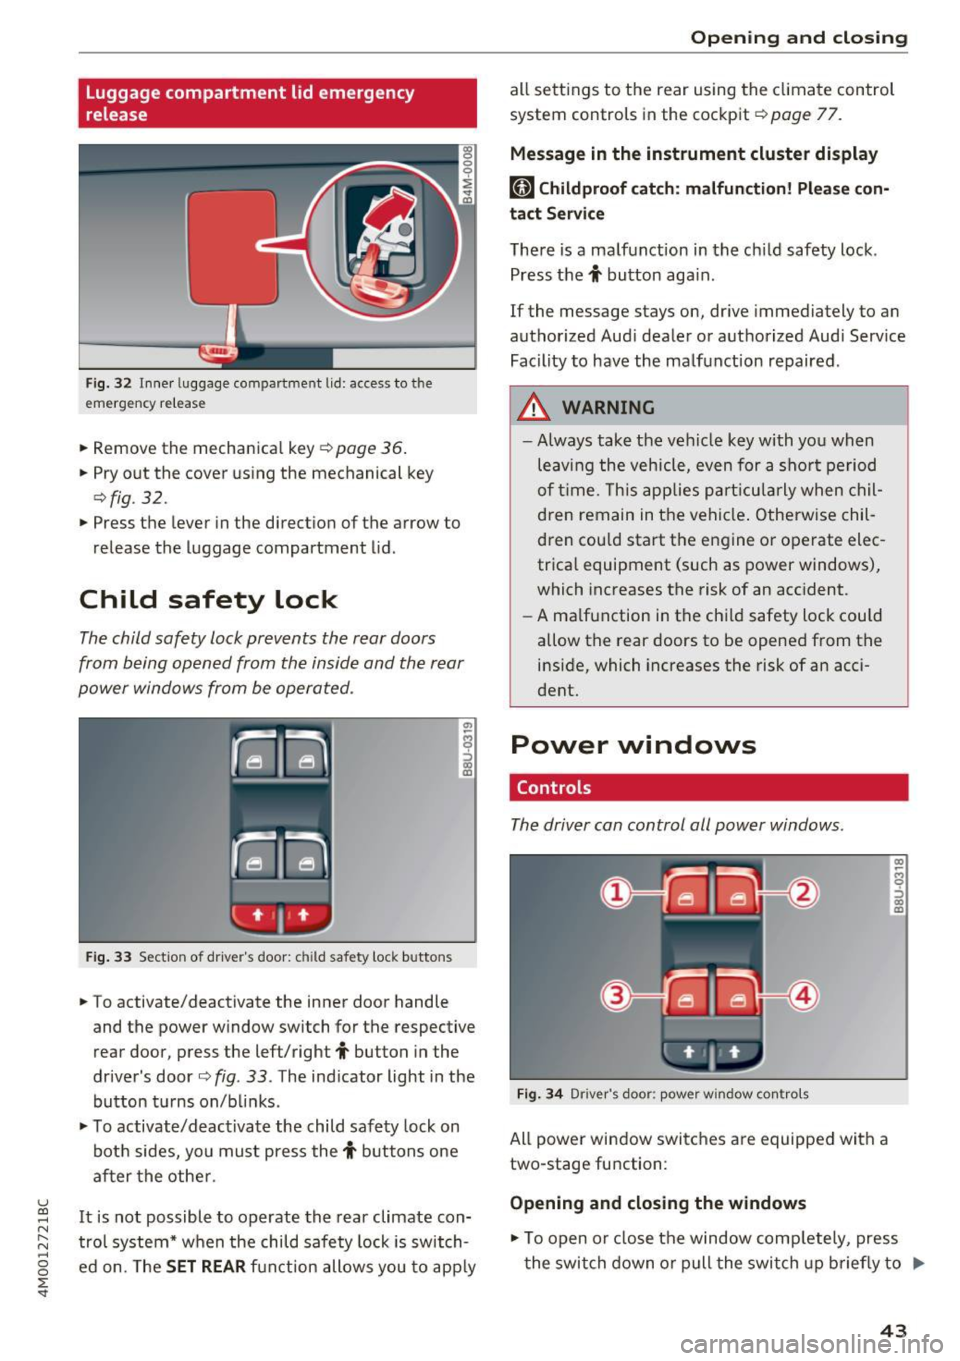
release
Fig . 32 Inner luggage co mpartme nt lid : access to the
emerge ncy re le ase
• Remove the mechanica l key ~ page 36 .
• Pry o ut the cover us ing the mechanical key
¢ fig . 32 .
• Press the lever in the direct io n of the arrow to
release the luggage compartment lid .
Child safety lock
The child safety lock prevents the rear doors
from being opened from the inside and the rear
power windows from be operated .
Fig. 33 Sect io n of dr ive r's door : chil d sa fety lock b utto ns
• To activate/deactivate the inner door handle
and the power w indow switch for the respective
rear door , press the left/right
t button in the
driver 's door ¢
fig. 33 . The ind icator light in the
bu tton turns on/b links .
• To activate/d eact ivate the child safety lock on
bot h sides, yo u must press the
t buttons one
a fter the othe r.
It is not possible to operate the rear climate con
tro l system* w hen the child safe ty lock is switch
e d on. The
SET REAR fu nction allows y ou to app ly
Open ing and closing
all sett ing s to the rear using the cl imate control
system controls in the cockpit ¢
page 77.
Message in the instrument cluster display
[81 Childproof catch : malfun ction! Please con·
tact Service
The re is a ma lfunction in the ch ild safety lock .
Press the
t button aga in .
If the message stays on, dr ive immediately to an
authorized Aud i dealer o r a uthorized Aud i Serv ice
Facility to have the ma lf u nction repaired .
A WARNING
=
-Always take the ve hicl e key with yo u when
leav ing the vehicle, even for a s hort pe riod
o f ti me. This applie s pa rtic ula rly w hen chil
dren remain in t he vehi cle. O therwise chil
d ren cou ld sta rt the en gine or operate elec
trica l equipment (such as power windows),
which increases the risk of an acc ident.
- A ma lf u nction in the ch ild safety loc k could
allow the rear doors to be opened from t he
inside, which increases the risk of an acci
dent.
Power windows
Controls
The driver can control all power windows.
F ig . 34 Dr iver 's doo r: pow er w indow co ntro ls
All power win dow switc hes are equipped wit h a
two-stage fu nction :
Opening and closing the windows
-
CX) ~ M 0
::'> CX) (D
• To open o r close the window comp letely, press
t he swi tch down or pull the swi tch up briefly to
IJi,,-
43
Page 50 of 402
Lights and Vision
Lights and Vision
Exterior lighting
Switching the lights on and off
M
::== === =----======= ~!
:,
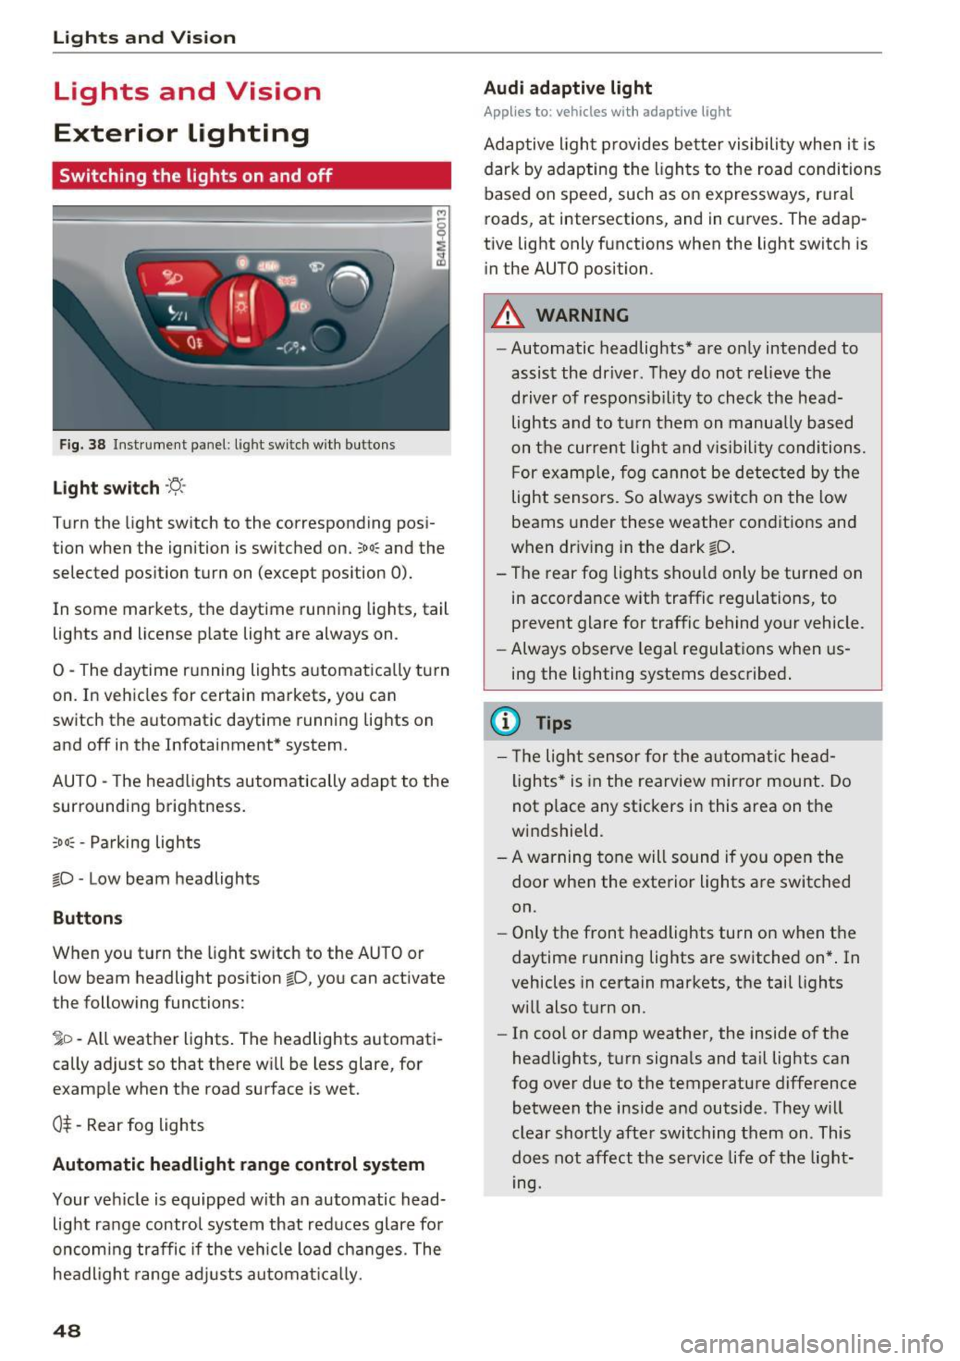
Fig. 38 Instrument panel : lig ht sw it c h w ith buttons
Li ght switch ·ti:
Turn the light switch to the corresponding posi
tion when the ignition is switched on.
;oo: and the
selected pos ition turn on (except pos ition 0).
In some markets, the daytime running lights, tail lights and license p late light are always on .
0 -The daytime r unning lights a utomatica lly turn
on. In veh icles for certain markets, you can
sw itch the automatic daytime runn ing lights on
and off in the Infotainment* system.
AUTO - The headlights automatically adap t to the
surrounding brightness.
;o o: -Pa rking lights
tD -Low beam headlights
Buttons
When you t urn the light sw itch to the AUTO or
low beam headlight position
tD , yo u can activate
the following functions:
jD -All weather lights . The headlights automati
cally ad just so that there w ill be less glare, for
example when the road surface is wet.
0$ -Rear fog lights
Automatic headlight range control system
Your vehicle is equipped with a n automatic head
light range contro l system that red uces glare for
oncom ing traffic if the veh icle load changes. The
headligh t range ad justs a utoma tically .
48
Audi adaptive light
App lies to: vehicles with adaptive light
Adaptive ligh t provides be tter visibility when i t is
dark by adapting the ligh ts to the roa d conditions
based on speed, such as on expressways, r ura l
roads, at intersections, and in curves. The adap
tive light only functions when the light switch is
i n the AUTO position .
A WARNING
-Automatic headlig hts* are on ly intended to
assist the driver . They do not relieve the
driver of responsib il ity to check the head
lights and to t urn them on manua lly b ased
on t he curre nt ligh t and v is ibility conditions.
F or exa mple, fog cannot be detec ted by the
light sensors. So always switch on the low
beams under these weather condit ions and
when dr iv ing in the dark
tD .
- T he rear fog lights shou ld only be turned on
in acco rdance w ith traffic regulations, to
prevent glare for traffic behind your vehicle.
- Always observe le g al regulat ions when us
ing the lighting systems desc ribe d.
{l) Tips
- Th e light sensor for the a utomat ic he ad
ligh ts * is in the rearview mir ror mount. Do
not p lace any stickers in this area on the
w indshield .
- A warning tone will sound if yo u ope n the
door when the exte rior Lights a re switched
on.
- Only the front headlights turn on when t he
daytime running lights are switched on* . In
vehicles in certain markets, t he tail lights
w ill also t urn on .
- In cool or damp weather, the inside of t he
head lights, t urn signa ls and ta il lig hts can
fog over due to the temperature difference
between the inside and outside . They w ill
clear shortly afte r swi tching them on . This
does not affect the service life of t he light
mg.
Page 51 of 402
u (0 ...... N r--. N ...... 0
0
:E
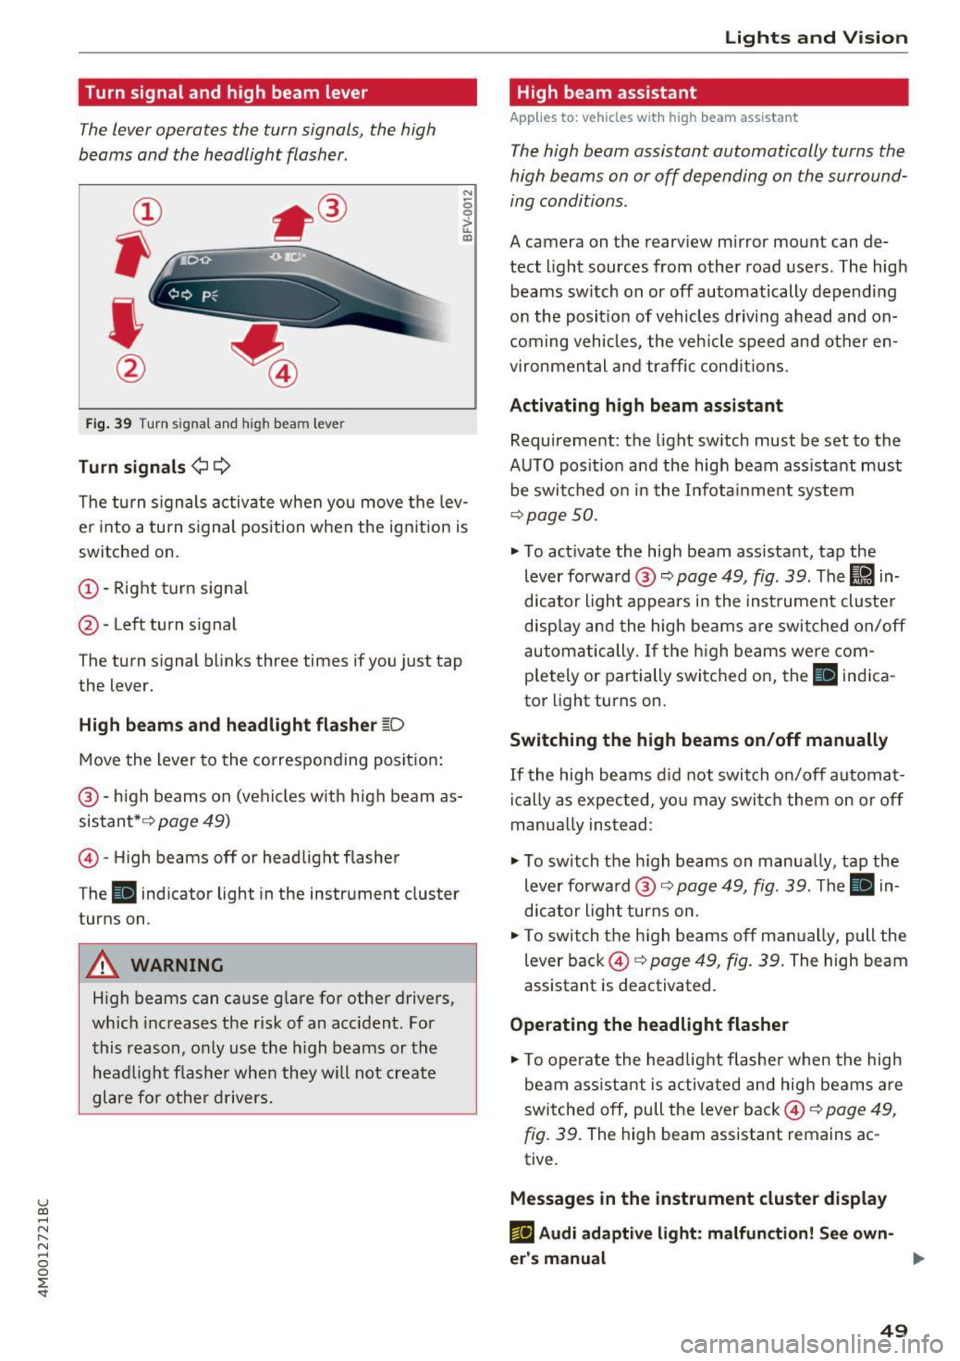
The lever operates the turn signals, the high
beams and the headlight flasher .
Fig. 39 Turn signal and high beam lever
Turn signals ¢¢
N
0 0
> u. C0
The turn signals activate when you move the lev
e r i nto a turn s ignal position when the ign ition is
switched on.
(D -Right turn signa l
@-Left turn signal
The turn s ignal blinks three times if you just tap
the lever.
High beams and headlight flasher ~D
Move the lever to the corresponding position:
@ -high beams on (vehicles w ith high beam as
sistant* ¢
page 49)
© -High beams off or headlight flasher
The
II ind icator light in the instrument cluster
turns on.
A WARNING
H igh beams can cause glare for other drivers,
which increases the risk of an acc ident. For
this reason, only use the h igh beams or the
head light flasher when they w ill not create
glare for other drivers.
Lights and V ision
High beam assistant
App lies to : vehicles wi th high beam assistant
The high beam assistant automatically turns the
high beams on or off depending on the surround
ing conditions .
A camera on the rearview mirror mount can de
tect light sources from other road users . The high
beams sw itch on or off automatically depending
on the posit io n of vehicles driving ahead and on
coming vehicles, the vehicle speed and other en
vironmental and traffic conditions.
Activating high beam assistant
Requirement: the light sw itch must be set to the
AUTO posit ion and the high beam ass istant must
be switched on in the Infota inment system
¢p age 50.
.,. To act ivate the high beam ass istant, tap the
lever forward @¢
page 49, fig . 39 . The lj!a in
d icator light appears in the instrument cluster
disp lay and the high beams a re switched on/off
automatically. If the high beams were com
p letely or partially switched on, the
II indica
to r light turns on.
Switching the high beams on/off manually
If the high beams did not switch on/off automat
ically as expected, yo u may swi tch them on or off
man ua lly ins tead:
.,. To switch the h igh beams on manua lly, tap the
lever forwa rd @ ¢
page 49, fig. 39. The II in
dicator light turns on.
.,. To switch the high beams off manually, pull the
lever back@¢
page 49, fig. 39. The high beam
assistant is deactivated .
Operating the headlight flasher
.,. To operate the headlight flasher when the high
beam ass istant is activated and high beams are
sw itched off, pull the lever back©¢
page 49,
fig. 39.
The high beam assistant remains ac
tive .
Messages in the instrument cluster display
ml Audi adaptive light: malfun ction! See own-
er's manual ..,.
49