tyre pressure AUDI R8 2007 User Guide
[x] Cancel search | Manufacturer: AUDI, Model Year: 2007, Model line: R8, Model: AUDI R8 2007Pages: 210, PDF Size: 8.1 MB
Page 175 of 210
Wheels and tyres173
Controls
Safety
Driving tips
General maintenance
Self-help
Technical data
Note
•
Responsibility for ensuring that the tyres are correctly inflated
remains with the driver; the system can only provide assistance.
•
Only adjust the inflation pressure of the tyres when they are at
approximately ambient temperature.
•
The sensors and valves do not have to be detached or changed
round when fitting new tyres. Only the valve core needs to be
replaced, and if necessary the valve and the electronic components
in the wheel.
•
After using the Tyre Mobility System* the tyre pressure moni-
toring system may malfunction. The sensor for the tyre pressure
monitoring system must therefore be renewed by a qualified
workshop.
Applies to vehicles: with tyre pressure monitoring systemMalfunctionsIf the tyre pressure monitoring system is inoperative, the tyre
symbol or “TPMS” will appear on the display. This can have various
causes:•
One of the wheel sensors or other related components may not
be working.
•
Snow chains can interfere with the signals emitted by the
sensors so that the system cannot function properly.
•
The tyre pressure monitoring system may be inoperative due to
radio interference.
•
Radio systems operating on the same frequency, such as radio
headphones or two-way radios inside the vehicle, produce strong
electromagnetic fields which can cause temporary interference.
•
If the fault persists, take the vehicle to a qualified workshop.
document_0900452a816e6cc9.book Seite 173 Mittwoch, 21. Februar 2007 1:32 13
Page 181 of 210
Self-help179
Controls
Safety
Driving tips
General maintenance
Self-help
Technical data Your vehicle is equipped with a tyre repair kit: the Tyre Mobility
System (TMS).
In the event of a puncture you will find the TMS, which consists of a
sealing compound and an electric compressor, located under the
floor panel in the luggage compartment.
The TMS will reliably seal tyres damaged by foreign bodies,
provided that the cuts or punctures are no larger than approx. 4 mm
in diameter.
It is not necessary to remove the foreign body from the tyre.
The sealing compound must not be used:
•
on cuts and punctures larger than 4 mm ⇒page 178, fig. 124
•
if the wheel rim has been damaged
•
if you have been driving with very low pressure or a completely
flat tyre .
How to use the TMS is described in the section Repairing a tyre
⇒page 180.
The TMS can be used at outside temperatures down to – 20 °C.
WARNING
After repairing a tyre please note the following points:•
Do not drive faster than 80 km/h.
•
Avoid heavy acceleration, hard braking and fast cornering.
•
Vehicle handling could be impaired.
•
Tyres which have been sealed using the TMS are only suitable
for temporary use. Damaged tyres must be renewed. Therefore,
please drive carefully to the next available qualified workshop.
•
The TMS must NOT be used,
−on cuts and punctures larger than 4 mm
−if the wheel rim has been damaged
−if you have been driving with very low pressure or a
completely flat tyre
•
Seek professional assistance if the repair of a tyre puncture is
not possible with the sealing compound.
•
Do not allow the sealant to come into contact with your eyes,
skin or clothing.
•
If you do come into contact with the sealant immediately rinse
the eyes or skin affected with clean water.
•
Change clothing immediately if it becomes soiled with the tyre
sealant.
•
Make sure you do not breathe in the fumes!
•
If any of the tyre sealant is accidentally ingested, immediately
rinse the mouth thoroughly and drink lots of water.
−Do not induce vomiting. Immediately contact a doctor!
•
If any allergic reactions should occur get medical help immedi-
ately.
•
Keep the sealant away from children.For the sake of the environment
Used sealing compound cans should be disposed of at a proper
facility.
Note
•
If sealant should leak out, leave it to dry. When it has dried, you
can pull it off like a piece of foil.
•
Observe the expiry date stated on the sealing compound can.
Have the sealing compound exchanged by a qualified workshop.
A1
A2
A3
WARNING (continued)
document_0900452a816e6cc9.book Seite 179 Mittwoch, 21. Februar 2007 1:32 13
Page 182 of 210
Self-help 180Preparations
Certain steps must be taken before repairing a tyre.– If you have a flat tyre, stop the car well away from moving
traffic.
– Apply the handbrake firmly.
– Engage a gear.
– Check whether a repair is possible using the Tyre
Mobility System ⇒page 178.
– Ensure that all passengers leave the vehicle and move
away from the danger area ⇒.
– Take the tyre sealant can and the electric compressor out
of the holder under the floor panel ⇒page 178, fig. 123.
– Peel the sticker “max. 80 km/h” off the tyre sealant can
and fix it onto the instrument cluster where the driver will
see it.
WARNING
•
If you have a puncture in moving traffic, switch on the hazard
warning lights and place the warning triangle in a visible location.
This is for your own safety and also warns other road users.
•
Make sure your passengers wait in a safe place (for instance
behind the roadside crash barrier).Caution
Take special care if you have to repair a tyre on a gradient.
Note
Please observe the relevant regulations.
Repairing a tyre
The following sections describe the procedures for
repairing a tyre.Setting up the Tyre Mobility System
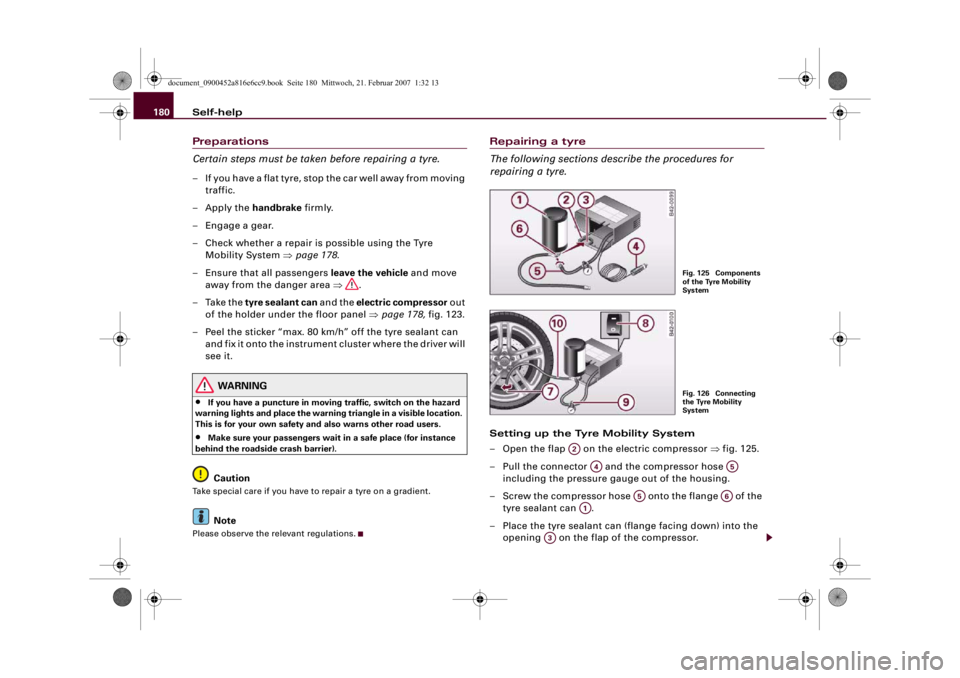
– Open the flap on the electric compressor ⇒fig. 125.
– Pull the connector and the compressor hose
including the pressure gauge out of the housing.
– Screw the compressor hose onto the flange of the
tyre sealant can .
– Place the tyre sealant can (flange facing down) into the
opening on the flap of the compressor.
Fig. 125 Components
of the Tyre Mobility
SystemFig. 126 Connecting
the Tyre Mobility
System
A2
A4
A5
A5
A6
A1
A3
document_0900452a816e6cc9.book Seite 180 Mittwoch, 21. Februar 2007 1:32 13
Page 183 of 210
Self-help181
Controls
Safety
Driving tips
General maintenance
Self-help
Technical data
– Unscrew the dust cap from the valve of the damaged
tyre.
– Screw the filler hose onto the valve ⇒page 180,
fig. 126.
– Insert the connector ⇒page 180, fig. 125 into the
cigarette lighter socket.
Inflating the tyre
–Move the switch ⇒page 180, fig. 126 on the
compressor
4) to position I. After 5 minutes tyre pressure
should be at least 1.8 bar.
– Switch off the compressor by moving switch to
position0. If the necessary tyre pressure of at least 1.8
bar is not reached please follow the instructions given in
the section Re-inflating the tyre.
Re-inflating the tyre
– Remove the filler hose from the valve and pull the
connector out of the socket.
– Slowly move the vehicle forwards and backwards about
10 metres. This enables the sealant to be distributed
more evenly.
– Remove the empty tyre sealant can and screw the
compressor hose ⇒page 180, fig. 125 directly onto
the valve.
– Insert the connector into the cigarette lighter socket.– Move the switch ⇒page 180, fig. 126 on the
compressor to position I. After 5 minutes tyre pressure
should be at least 1.8 bar.
– Switch off the compressor by moving switch to
position0. If the necessary tyre pressure of at least 1.8
bar is not reached this means that the tyre cannot be
repaired using the tyre sealant. You should obtain profes-
sional assistance.
Dismantling the Tyre Mobility System
– Remove the filler hose from the valve and pull the
connector out of the socket.
– Screw the dust cap onto the valve.
– Put the empty tyre sealant can back into its original pack-
aging and then secure it in the holder under the floor
panel in such a way that it will not leak.
– Then drive away immediately so that the tyre sealant can
spread evenly in the tyre.
WARNING
•
Please observe the manufacturers' safety notes on the stickers
on the compressor and the tyre sealant can.
•
If it was not possible to build up a tyre pressure of 1.8 bar
within 5 minutes this means that the tyre is too badly damaged.
Do not drive on.
•
Seek professional assistance if the repair of a tyre puncture is
not possible with the sealing compound.
4)The compressor should never be used for longer than 8 minutes.
A10
A7
A4
A8A5A4
A8
document_0900452a816e6cc9.book Seite 181 Mittwoch, 21. Februar 2007 1:32 13
Page 184 of 210
Self-help 182
Note•
Do not use the compressor for longer than 8 minutes at a time,
as it could overheat. When the compressor has cooled down, you
can use it again.
•
If tyre sealant should leak out, leave it to dry and then pull it off
like foil.
Final checkAfter covering a short distance it is necessary to check the
tyre pressure
– After about 10 minutes stop to check the tyre pressure.
– If tyre pressure is still at least 1.3 bar, pump the tyre up
to the pressure specified (see driver's door pillar) and
drive to the nearest workshop to have the tyre and the
tyre sealant can replaced.
– If tyre pressure is less than 1.3 bar, the tyre is too badly
damaged. Do not drive on. You should obtain profes-
sional assistance.
WARNING
If tyre pressure is less than 1.3 bar after driving about 10 minutes,
the tyre is too badly damaged. Do not drive on. You should obtain
professional assistance.
Note
After carrying out repairs to a tyre, have the tyre sealant can
replaced by a qualified dealer. This will ensure that the Tyre Mobility
System is operative again.
Changing a wheelTyres with directional tread pattern
Tyres with directional tread pattern must be mounted so
that they rotate in the correct direction.A directional tread pattern is identified by arrows on the sidewall
pointing in the forward running direction. Always note the direction
of rotation indicated when mounting the wheel. This is important so
that these tyres can give maximum grip and avoid excessive noise,
tread wear and aquaplaning.Applies to vehicles: with anti-theft wheel boltsAnti-theft wheel bolts
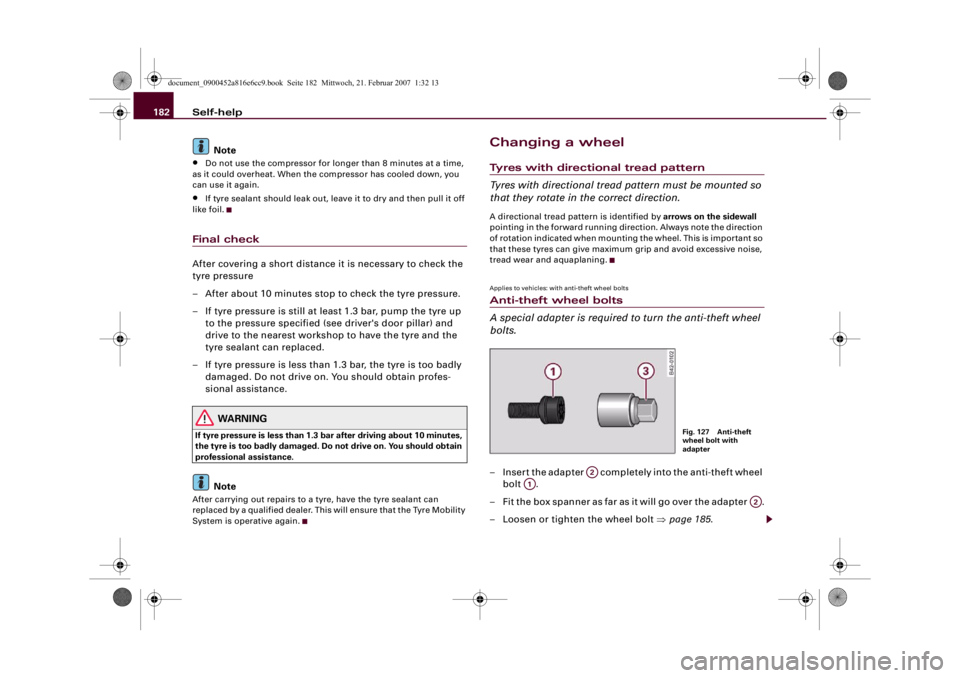
A special adapter is required to turn the anti-theft wheel
bolts.– Insert the adapter completely into the anti-theft wheel
bolt .
– F i t t h e b o x s p a n n e r as fa r as i t w i l l g o o v e r t h e a d a p t e r .
– Loosen or tighten the wheel bolt ⇒page 185.
Fig. 127 Anti-theft
wheel bolt with
adapter
A2
A1
A2
document_0900452a816e6cc9.book Seite 182 Mittwoch, 21. Februar 2007 1:32 13
Page 193 of 210
Fuses and bulbs191
Controls
Safety
Driving tips
General maintenance
Self-help
Technical data
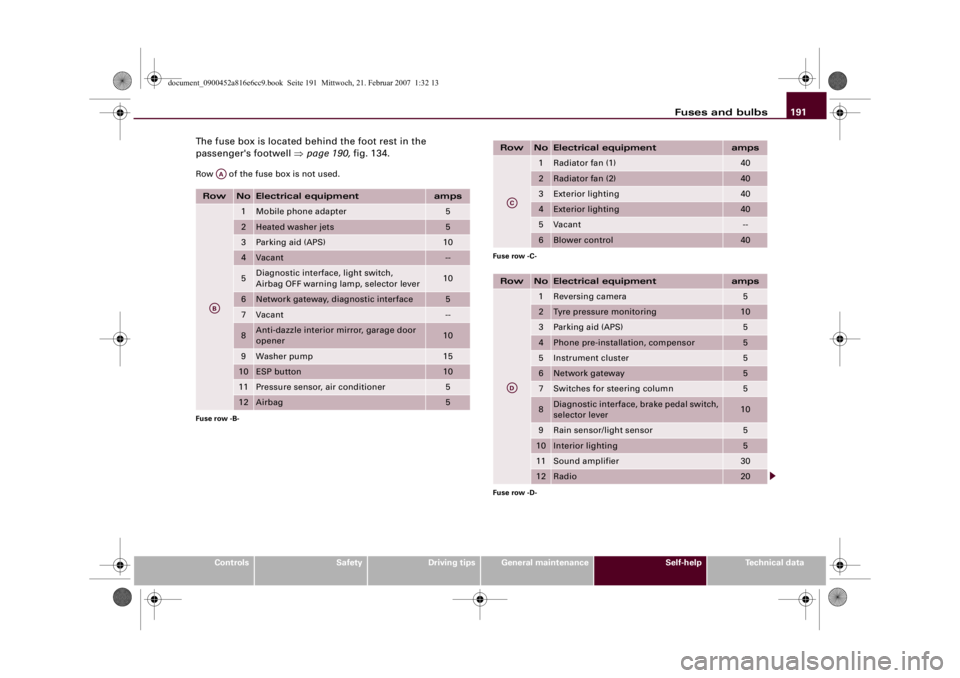
The fuse box is located behind the foot rest in the
passenger's footwell ⇒page 190, fig. 134.Row of the fuse box is not used.Row
No
Electrical equipment
amps
1
Mobile phone adapter
5
2
Heated washer jets
5
3
Parking aid (APS)
10
4
Vacant
--
5
Diagnostic interface, light switch,
Airbag OFF warning lamp, selector lever
10
6
Network gateway, diagnostic interface
5
7
Vacant
--
8
Anti-dazzle interior mirror, garage door
opener
10
9
Washer pump
15
10
ESP button
10
11
Pressure sensor, air conditioner
5
12
Airbag
5
Fuse row -B-
AAAB
Row
No
Electrical equipment
amps
1
Radiator fan (1)
40
2
Radiator fan (2)
40
3
Exterior lighting
40
4
Exterior lighting
40
5
Vacant
--
6
Blower control
40
Fuse row -C-Row
No
Electrical equipment
amps
1
Reversing camera
5
2
Tyre pressure monitoring
10
3
Parking aid (APS)
5
4
Phone pre-installation, compensor
5
5
Instrument cluster
5
6
Network gateway
5
7
Switches for steering column
5
8
Diagnostic interface, brake pedal switch,
selector lever
10
9
Rain sensor/light sensor
5
10
Interior lighting
5
11
Sound amplifier
30
12
Radio
20
Fuse row -D-
ACAD
document_0900452a816e6cc9.book Seite 191 Mittwoch, 21. Februar 2007 1:32 13
Page 207 of 210
Index205
Controls
Safety
Driving tips
General maintenance
Self-help
Technical data
GGarage door opener . . . . . . . . . . . . . . . . . . 95
Gearbox (R tronic) . . . . . . . . . . . . . . . . . . . . 90
Glove box . . . . . . . . . . . . . . . . . . . . . . . . . . . 73HHandbrake . . . . . . . . . . . . . . . . . . . . . . . . . . 83
Handbrake warning lamp . . . . . . . . . . . . . . 35
Hazard warning lights . . . . . . . . . . . . . . . . 56
Indicator lamp . . . . . . . . . . . . . . . . . . . . 17
Head restraints . . . . . . . . . . . . . . . . . . . . . . 71
Headlight flasher . . . . . . . . . . . . . . . . . . . . . 57
Headlight range control
Malfunction . . . . . . . . . . . . . . . . . . . . . . 37
Headlight switch (automatic) . . . . . . . . . . . 53
Headlights
Changing dip settings . . . . . . . . . . . . . 138
Washer system . . . . . . . . . . . . . . . . . . . . 60
Heated
Exterior mirrors . . . . . . . . . . . . . . . . . . . 64
Washer jets . . . . . . . . . . . . . . . . . . . . . . . 59
Heating . . . . . . . . . . . . . . . . . . . . . . . . . . . . . 75
Front seats (air conditioner) . . . . . . . . . 80
Rear window . . . . . . . . . . . . . . . . . . . . . 79
Seats . . . . . . . . . . . . . . . . . . . . . . . . . . . . 80
hill hold assist
Driving away on a slope . . . . . . . . . . . . 84
HomeLink . . . . . . . . . . . . . . . . . . . . . . . . . . . 95
Horn . . . . . . . . . . . . . . . . . . . . . . . . . . . . . . . . 9
IIgnition lock . . . . . . . . . . . . . . . . . . . . . . . . . 81
Immobiliser . . . . . . . . . . . . . . . . . . . . . . . . . 42
Indicator lamps . . . . . . . . . . . . . . . . . . . . . . 15
Cruise control system . . . . . . . . . . . . . . 17
Main beam headlights . . . . . . . . . . . . . 17
Turn signals . . . . . . . . . . . . . . . . . . . . . . 17
Inflation pressures (tyres) . . . . . . . . 167, 172
Inspection intervals . . . . . . . . . . . . . . . . . . . 21
Instrument cluster . . . . . . . . . . . . . . . . . . . . 10
Instrument lighting . . . . . . . . . . . . . . . . . . . 55
Interior lights . . . . . . . . . . . . . . . . . . . . . . . . 57
Engine compartment . . . . . . . . . . . . . . . 58
Luggage compartment . . . . . . . . . . . . . 58
Interior mirrors
SeeMirrors . . . . . . . . . . . . . . . . . . . . . . . 63
Interior monitor . . . . . . . . . . . . . . . . . . . . . . 49
Intermittent wipe . . . . . . . . . . . . . . . . . . . . . 59
ISOFIX . . . . . . . . . . . . . . . . . . . . . . . . . . . . . 128JJack . . . . . . . . . . . . . . . . . . . . . . . . . . . . . . . 183
Jacking points . . . . . . . . . . . . . . . . . . . . . . 183
Journey distances . . . . . . . . . . . . . . . . . . . . 13
Jump-starting . . . . . . . . . . . . . . . . . . . . . . 185KKey-operated switch for front passenger's
airbag . . . . . . . . . . . . . . . . . . . . . . . . . 120Keys . . . . . . . . . . . . . . . . . . . . . . . . . . . . . . . . 40
Remote control key . . . . . . . . . . . . . . . . 40
Replacement keys . . . . . . . . . . . . . . . . . 40
Replacing the battery . . . . . . . . . . . . . . 41
Spare key . . . . . . . . . . . . . . . . . . . . . . . . 40
Kick-down feature
R tronic . . . . . . . . . . . . . . . . . . . . . . . . . . 92
LLap timer
Calling up . . . . . . . . . . . . . . . . . . . . . . . . 28
Clearing overall results . . . . . . . . . . . . . 30
Displaying split times . . . . . . . . . . . . . . 29
Evaluating lap times . . . . . . . . . . . . . . . 30
Finishing the session . . . . . . . . . . . . . . . 30
Interrupting . . . . . . . . . . . . . . . . . . . . . . 29
Introduction . . . . . . . . . . . . . . . . . . . . . . 27
Resuming the session . . . . . . . . . . . . . . 31
Starting . . . . . . . . . . . . . . . . . . . . . . . . . . 28
Switching to on-board computer . . . . . 30
Launch control programme
R tronic . . . . . . . . . . . . . . . . . . . . . . . . . . 93
Leather care
Alcantara . . . . . . . . . . . . . . . . . . . . . . . . 150
Natural leather . . . . . . . . . . . . . . . . . . . 149
Leaving home function . . . . . . . . . . . . . . . . 54
Light . . . . . . . . . . . . . . . . . . . . . . . . . . . . . . . 58
Light sensor/rain sensor
Automatic headlights . . . . . . . . . . . . . . 63
Defective . . . . . . . . . . . . . . . . . . . . . . . . . 38
Headlight switch (automatic) . . . . . . . . 53
Windscreen wipers (intermittent wipe) . .
59
document_0900452a816e6cc9.book Seite 205 Mittwoch, 21. Februar 2007 1:32 13
Page 208 of 210
Index 206Lights . . . . . . . . . . . . . . . . . . . . . . . . . . . . . . 52
Switching on and off . . . . . . . . . . . . . . 52
Locking . . . . . . . . . . . . . . . . . . . . . . . . . . . . 43
Central locking system . . . . . . . . . . . . . 44
Locking and unlocking the vehicle from in-
side
Central locking system . . . . . . . . . . . . . 45
Locking passenger's door manually . . . . . 46
Long periods of non-use
Battery . . . . . . . . . . . . . . . . . . . . . . . . . 162
LongLife Service . . . . . . . . . . . . . . . . . . . . 157
Luggage compartment . . . . . . . . . . . . . . . 58
Light . . . . . . . . . . . . . . . . . . . . . . . . . . . . 58
Luggage lid
Central locking system . . . . . . . . . . . . . 47
Manual release . . . . . . . . . . . . . . . . . . . 48MMain beam headlights . . . . . . . . . . . . . 52, 56
Make-up mirrors . . . . . . . . . . . . . . . . . . . . . 58
Manual operation
Fuel tank flap . . . . . . . . . . . . . . . . . . . . 154
Luggage lid . . . . . . . . . . . . . . . . . . . . . . 48
Maximum speed
SeePerformance, weights and
dimensions . . . . . . . . . . . . . . . . . . . . 198
Menu button . . . . . . . . . . . . . . . . . . . . . . . . 25
Menu display . . . . . . . . . . . . . . . . . . . . . . . 24
Menu, changing settings . . . . . . . . . . . . . . 26
Mileage recorder . . . . . . . . . . . . . . . . . . . . 13Mirrors
Anti-dazzle setting . . . . . . . . . . . . . . . . 63
Automatic anti-dazzle exterior mirrors 64
Automatic anti-dazzle interior mirror . 63
Exterior mirrors . . . . . . . . . . . . . . . . . . . 64
Interior mirror . . . . . . . . . . . . . . . . . . . . 63
Make-up mirrors . . . . . . . . . . . . . . . . . . 58
Mobile phones . . . . . . . . . . . . . . . . . . . . . 175
Modifications . . . . . . . . . . . . . . . . . . . . . . 174
NNatural leather . . . . . . . . . . . . . . . . . . . . . 148
No R gear . . . . . . . . . . . . . . . . . . . . . . . . . . . 38OOctane rating . . . . . . . . . . . . . . . . . . . . . . 152
Oil
SeeEngine oil . . . . . . . . . . . . . . . . . . . 157
Oil consumption . . . . . . . . . . . . . . . . . . . . 157
Oil dipstick . . . . . . . . . . . . . . . . . . . . . . . . . 157
Oil level . . . . . . . . . . . . . . . . . . . . . . . . . . . . 37
On-board computer . . . . . . . . . . . . . . . . . . 22
Opening
Engine lid . . . . . . . . . . . . . . . . . . . . . . . 155
Outside temperature display . . . . . . . . . . . 20
Overview . . . . . . . . . . . . . . . . . . . . . . . . . . . . 9PPaint damage . . . . . . . . . . . . . . . . . . . . . . 146
Paint No. . . . . . . . . . . . . . . . . . . . . . . . . . . 196Parking
R tronic . . . . . . . . . . . . . . . . . . . . . . . . . . 91
Parking aid . . . . . . . . . . . . . . . . . . . . . . . . . . 85
Parking lights . . . . . . . . . . . . . . . . . . . . . . . 57
Parking the car . . . . . . . . . . . . . . . . . . . . . . 84
Pedals . . . . . . . . . . . . . . . . . . . . . . . . . . . . . 107
Performance figures
SeePerformance, weights and
dimensions . . . . . . . . . . . . . . . . . . . . 198
Performance, weights and dimensions . 198
Personalised remote control key . . . . . . . 41
Petrol . . . . . . . . . . . . . . . . . . . . . . . . . . . . . 152
Polishing . . . . . . . . . . . . . . . . . . . . . . . . . . 144
Pollen filter . . . . . . . . . . . . . . . . . . . . . . . . . 76
Pollution filter . . . . . . . . . . . . . . . . . . . . . . . 76
Power steering . . . . . . . . . . . . . . . . . . . . . 136
Pressure (tyres) . . . . . . . . . . . . . . . . . . . . . 172
QQuartz clock . . . . . . . . . . . . . . . . . . . . . . . . . 12
quattro
SeeFour-wheel drive . . . . . . . . . . . . . . 136RR tronic . . . . . . . . . . . . . . . . . . . . . . . . . . . . . 90
Backup programme . . . . . . . . . . . . . . . . 94
Description . . . . . . . . . . . . . . . . . . . . . . . 90
Kick-down feature . . . . . . . . . . . . . . . . . 92
Launch control programme . . . . . . . . . 93
Manual mode . . . . . . . . . . . . . . . . . . . . . 91
Steering wheel with paddle levers . . . 93
document_0900452a816e6cc9.book Seite 206 Mittwoch, 21. Februar 2007 1:32 13
Page 210 of 210
Index 208Tyre pressure . . . . . . . . . . . . . . . . . . 167, 172
Tyre pressure monitoring system . . . . . 172
Warning lamp . . . . . . . . . . . . . . . . . 16, 36
Tyre repair kit . . . . . . . . . . . . . . . . . . . . . . 178
Tyres
Inflation pressures . . . . . . . . . . . 167, 172
Tread wear indicators . . . . . . . . . . . . . 168
Tyre pressure monitoring system . . . 172
Tyre service life . . . . . . . . . . . . . . . . . . 167UUniversal transmitter . . . . . . . . . . . . . . . . . 95
Unleaded fuel . . . . . . . . . . . . . . . . . . . . . . 152
Unlocking . . . . . . . . . . . . . . . . . . . . . . . . . . 43
Central locking system . . . . . . . . . . . . . 44VVehicle battery
SeeBattery . . . . . . . . . . . . . . . . . . . . . . 162
Vehicle data sticker . . . . . . . . . . . . . . . . . 196
Vehicle identification data . . . . . . . . . . . . 196
Vehicle identification number . . . . . . . . . 196
Vehicles with automatic gearshift
SeeR tronic . . . . . . . . . . . . . . . . . . . . . . 90
Ventilation . . . . . . . . . . . . . . . . . . . . . . . . . . 75
Voltmeter display . . . . . . . . . . . . . . . . . . . . 14
WWarning lamps . . . . . . . . . . . . . . . . . . . . . . 15
Airbag . . . . . . . . . . . . . . . . . . . . . . . . . . . 17
Alternator . . . . . . . . . . . . . . . . . . . . . . . . 18
Anti-lock brake system . . . . . . . . . . . . . 19
Audi magnetic ride . . . . . . . . . . . . . . . . 16
Brake system . . . . . . . . . . . . . . . . . . . . . 18
Clutch overheating . . . . . . . . . . . . . . . . 38
Electronic differential lock . . . . . . . . . . 19
Electronic stabilisation program . . . . . 16
Emission control system . . . . . . . . . . . 17
Engine management (EPC) . . . . . . . . . . 16
No R gear . . . . . . . . . . . . . . . . . . . . . . . . 38
Rear spoiler . . . . . . . . . . . . . . . . . . . . . . 17
Red symbols in central display . . . . . . 33
Seat belt . . . . . . . . . . . . . . . . . . . . . . . . . 18
Selector lever defective . . . . . . . . . . . . 38
Tyre pressure monitoring system . 16, 36
Yellow symbols in central display . . . . 33
Warning triangle . . . . . . . . . . . . . . . . . . . . 178
Washer fluid level low . . . . . . . . . . . . . . . . 37
Washing . . . . . . . . . . . . . . . . . . . . . . . . . . . 144
Waxing . . . . . . . . . . . . . . . . . . . . . . . . . . . . 144
Weights
SeePerformance, weights and
dimensions . . . . . . . . . . . . . . . . . . . . 198
Wheel bolts . . . . . . . . . . . . . . . . . . . . . . . . 170
Wheel imbalance . . . . . . . . . . . . . . . . . . . 167
Wheels . . . . . . . . . . . . . . . . . . . . . . . . 147, 166
Rims . . . . . . . . . . . . . . . . . . . . . . . . . . . 166Windows
Cleaning . . . . . . . . . . . . . . . . . . . . . . . . 146
Defrosting . . . . . . . . . . . . . . . . . . . . . . . 78
De-icing . . . . . . . . . . . . . . . . . . . . . . . . 146
Windows (electric)
SeeElectric windows . . . . . . . . . . . . . . 50
Windscreen washer fluid . . . . . . . . . . . . . 164
Windscreen wipers . . . . . . . . . . . . . . . . . . . 59
Changing blades . . . . . . . . . . . . . . . . . . 62
Service position . . . . . . . . . . . . . . . . . . . 61
Winter conditions
Battery . . . . . . . . . . . . . . . . . . . . . . . . . 162
Care of vehicle . . . . . . . . . . . . . . . . . . . 144
Cooling system . . . . . . . . . . . . . . . . . . 159
Defrost function . . . . . . . . . . . . . . . . . . 78
De-icing windows . . . . . . . . . . . . . . . . 146
Snow chains . . . . . . . . . . . . . . . . . . . . . 171
Tyres . . . . . . . . . . . . . . . . . . . . . . . . . . . 170
Windscreen washer . . . . . . . . . . . . . . . 164
Winter operation
Seat heating (air conditioner) . . . . . . . 80
Winter tyres . . . . . . . . . . . . . . . . . . . . . . . . 170
Wiper and washer system . . . . . . . . . . . . . 59
Wiper blades
SeeWindscreen wipers . . . . . . . . . . . . . 62
document_0900452a816e6cc9.book Seite 208 Mittwoch, 21. Februar 2007 1:32 13