height AUDI R8 2007 Owners Manual
[x] Cancel search | Manufacturer: AUDI, Model Year: 2007, Model line: R8, Model: AUDI R8 2007Pages: 210, PDF Size: 8.1 MB
Page 69 of 210
Seats and storage67
Controls
Safety
Driving tips
General maintenance
Self-help
Technical data
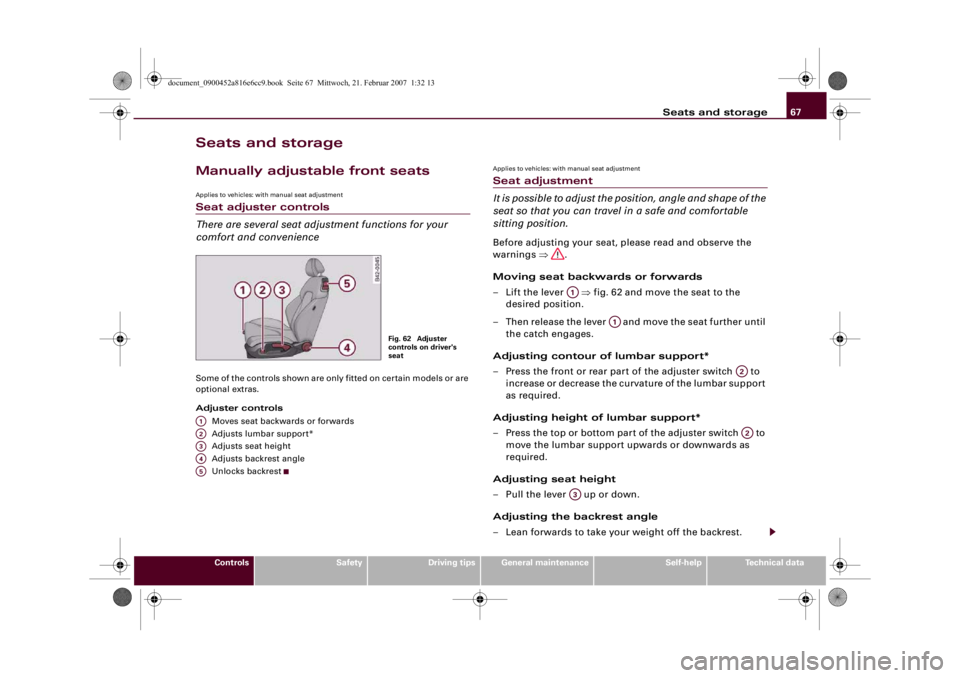
Seats and storageManually adjustable front seatsApplies to vehicles: with manual seat adjustmentSeat adjuster controls
There are several seat adjustment functions for your
comfort and convenienceSome of the controls shown are only fitted on certain models or are
optional extras.
Adjuster controls
Moves seat backwards or forwards
Adjusts lumbar support*
Adjusts seat height
Adjusts backrest angle
Unlocks backrest
Applies to vehicles: with manual seat adjustmentSeat adjustment
It is possible to adjust the position, angle and shape of the
seat so that you can travel in a safe and comfortable
sitting position.Before adjusting your seat, please read and observe the
warnings ⇒.
Moving seat backwards or forwards
– Lift the lever ⇒fig. 62 and move the seat to the
desired position.
– Then release the lever and move the seat further until
the catch engages.
Adjusting contour of lumbar support*
– Press the front or rear part of the adjuster switch to
increase or decrease the curvature of the lumbar support
as required.
Adjusting height of lumbar support*
– Press the top or bottom part of the adjuster switch to
move the lumbar support upwards or downwards as
required.
Adjusting seat height
– Pull the lever up or down.
Adjusting the backrest angle
– Lean forwards to take your weight off the backrest.
Fig. 62 Adjuster
controls on driver's
seat
A1A2A3A4A5
A1
A1
A2A2
A3
document_0900452a816e6cc9.book Seite 67 Mittwoch, 21. Februar 2007 1:32 13
Page 70 of 210
Seats and storage 68
– Turn the adjuster wheel to set the angle of the back-
rest as required.
Unlocking backrest
– Push the handle upwards.
– Fold the backrest forwards
WARNING
•
Never adjust the driver's seat when the vehicle is moving - this
could lead to an accident.
•
Be careful when adjusting the seat angle. Careless or uncon-
trolled use of the seat adjustment can cause injuries.
•
Do not drive with the backrests of the front seats reclined too
far as otherwise the seat belt and airbag could fail to restrain the
wearer properly in an accident, possibly leading to injury.
•
For safety reasons the front seat backrests must be locked
while driving.
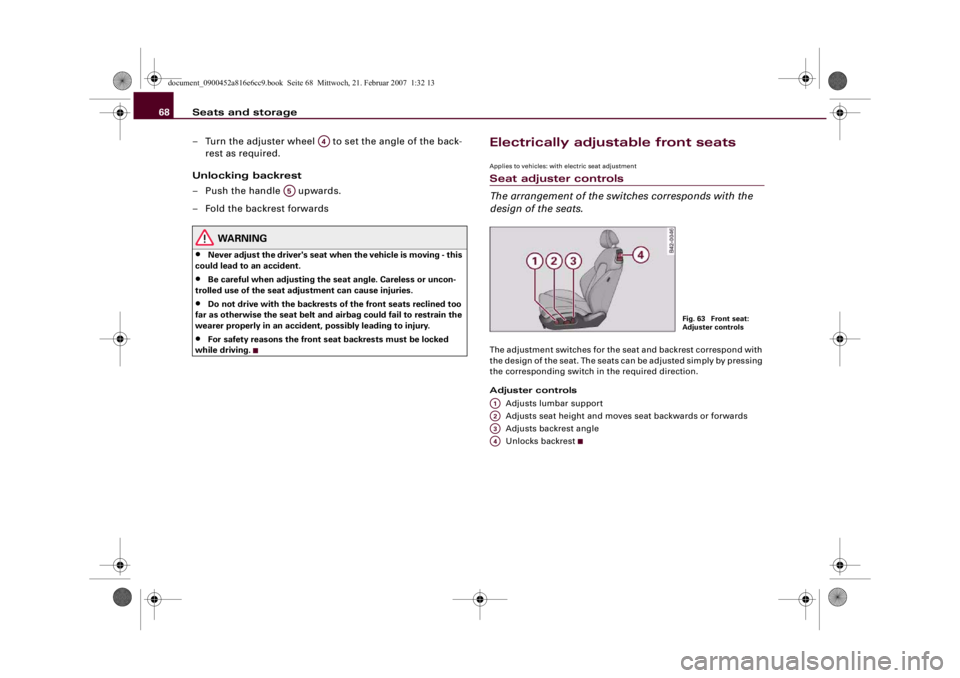
Electrically adjustable front seatsApplies to vehicles: with electric seat adjustmentSeat adjuster controls
The arrangement of the switches corresponds with the
design of the seats.The adjustment switches for the seat and backrest correspond with
the design of the seat. The seats can be adjusted simply by pressing
the corresponding switch in the required direction.
Adjuster controls
Adjusts lumbar support
Adjusts seat height and moves seat backwards or forwards
Adjusts backrest angle
Unlocks backrest
A4
A5
Fig. 63 Front seat:
Adjuster controls
A1A2A3A4
document_0900452a816e6cc9.book Seite 68 Mittwoch, 21. Februar 2007 1:32 13
Page 71 of 210
Seats and storage69
Controls
Safety
Driving tips
General maintenance
Self-help
Technical data
Applies to vehicles: with electric seat adjustmentSeat adjustment
You can use the electrical adjustment to set the position,
angle and shape of the seat so that you can travel in a
safe and comfortable sitting position.Before adjusting your seat, please read and observe the
warnings ⇒.
Adjusting contour of lumbar support*
– Press the front or rear part of the adjuster switch
⇒page 68, fig. 63 to increase or decrease the curvature
of the lumbar support as required.
Adjusting height of lumbar support*
– Press the top or bottom part of the adjuster switch to
move the lumbar support upwards or downwards as
required.
Moving seat backwards or forwards
– Press the switch forwards or backwards.
Adjusting seat height
– Press the switch up or down.
Raising/lowering seat at front
– Press the front of switch up or down.
Raising/lowering seat at rear
– Press the rear of switch up or down.
Adjusting the backrest angle
– Press the switch forwards or backwards.Unlocking backrest
– Push the handle upwards.
– Fold the backrest forwards
WARNING
•
Never adjust the driver's seat when the vehicle is moving - this
could lead to an accident.
•
The electrical seat adjustment also works when the ignition is
off and when the key is not in the ignition. To avoid accidental inju-
ries, never leave children unattended in the vehicle.
•
Be careful when adjusting the seat height. Careless or uncon-
trolled use of the height adjustment can cause injuries.
•
Do not drive with the backrests of the front seats reclined too
far as otherwise the seat belt and airbag could fail to restrain the
wearer properly in an accident, possibly leading to injury.
•
For safety reasons the front seat backrests must be locked
while driving.
A1A1
A2A2
A2A2
A3
A4
document_0900452a816e6cc9.book Seite 69 Mittwoch, 21. Februar 2007 1:32 13
Page 72 of 210
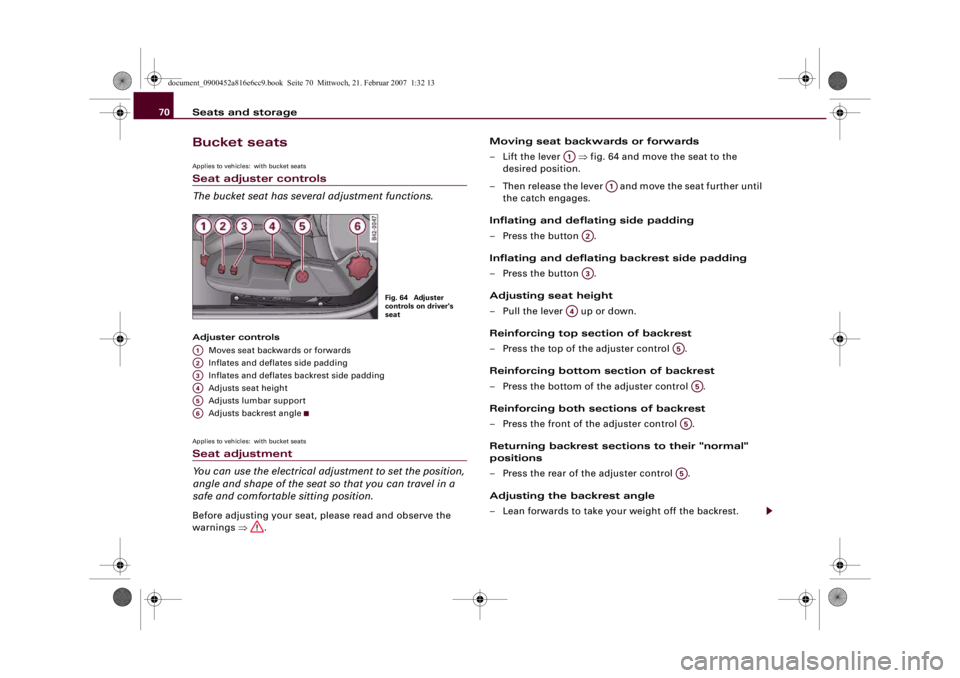
Seats and storage 70Bucket seatsApplies to vehicles: with bucket seatsSeat adjuster controls
The bucket seat has several adjustment functions.Adjuster controls
Moves seat backwards or forwards
Inflates and deflates side padding
Inflates and deflates backrest side padding
Adjusts seat height
Adjusts lumbar support
Adjusts backrest angleApplies to vehicles: with bucket seatsSeat adjustment
You can use the electrical adjustment to set the position,
angle and shape of the seat so that you can travel in a
safe and comfortable sitting position.Before adjusting your seat, please read and observe the
warnings ⇒.Moving seat backwards or forwards
– Lift the lever ⇒fig. 64 and move the seat to the
desired position.
– Then release the lever and move the seat further until
the catch engages.
Inflating and deflating side padding
– Press the button .
Inflating and deflating backrest side padding
– Press the button .
Adjusting seat height
– Pull the lever up or down.
Reinforcing top section of backrest
– Press the top of the adjuster control .
Reinforcing bottom section of backrest
– Press the bottom of the adjuster control .
Reinforcing both sections of backrest
– Press the front of the adjuster control .
Returning backrest sections to their "normal"
positions
– Press the rear of the adjuster control .
Adjusting the backrest angle
– Lean forwards to take your weight off the backrest.
Fig. 64 Adjuster
controls on driver's
seat
A1A2A3A4A5A6
A1
A1
A2A3
A4
A5
A5
A5A5
document_0900452a816e6cc9.book Seite 70 Mittwoch, 21. Februar 2007 1:32 13
Page 73 of 210
Seats and storage71
Controls
Safety
Driving tips
General maintenance
Self-help
Technical data
– Turn the adjuster wheel to set the angle of the back-
rest as required.
Unlocking backrest
– Press one of the two levers ⇒page 68, fig. 63
upwards and fold down the backrest.
WARNING
•
Never adjust the driver's seat when the vehicle is moving - this
could lead to an accident.
•
The electrical seat adjustment also works when the ignition is
off and when the key is not in the ignition. To avoid accidental inju-
ries, never leave children unattended in the vehicle.
•
Be careful when adjusting the seat height. Careless or uncon-
trolled use of the seat adjustment can cause injuries.
•
Do not drive with the backrests of the front seats reclined too
far as otherwise the seat belt and airbag could fail to restrain the
wearer properly in an accident, possibly leading to injury.
•
For safety reasons the front seat backrests must be locked
while driving.
Head restraintsFront head restraints
In combination with properly worn seat belts, the head
restraints offer effective protection. However, they must
always be properly adjusted to suit the height of the occu-
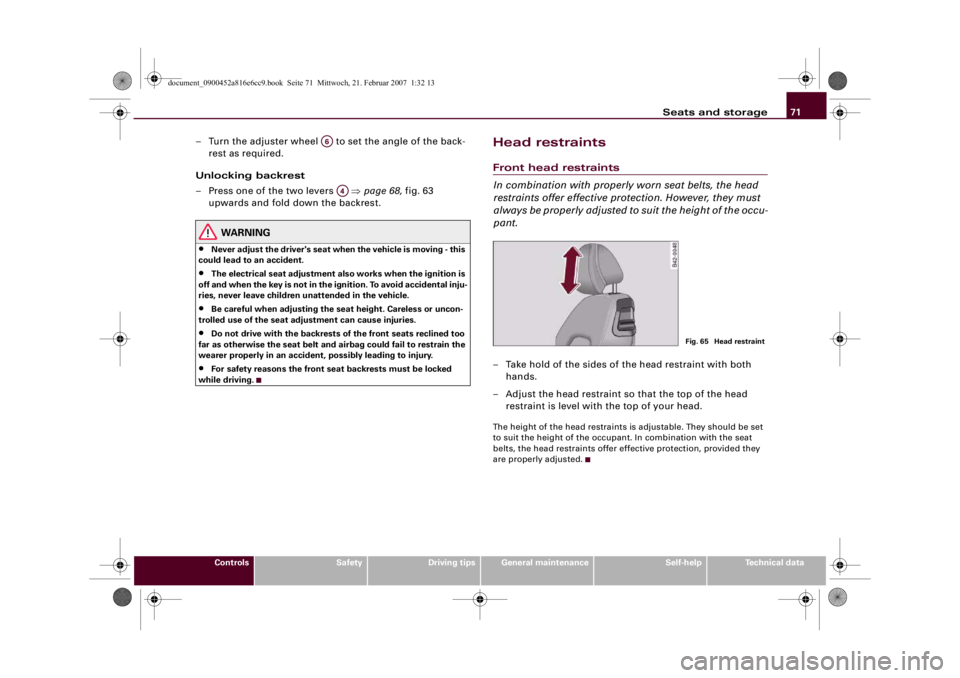
pant.– Take hold of the sides of the head restraint with both
hands.
– Adjust the head restraint so that the top of the head
restraint is level with the top of your head.The height of the head restraints is adjustable. They should be set
to suit the height of the occupant. In combination with the seat
belts, the head restraints offer effective protection, provided they
are properly adjusted.
A6
A4
Fig. 65 Head restraint
document_0900452a816e6cc9.book Seite 71 Mittwoch, 21. Februar 2007 1:32 13
Page 83 of 210
Driving81
Controls
Safety
Driving tips
General maintenance
Self-help
Technical data
DrivingSteeringAdjusting the steering wheel position
The height and reach of the steering wheel can be
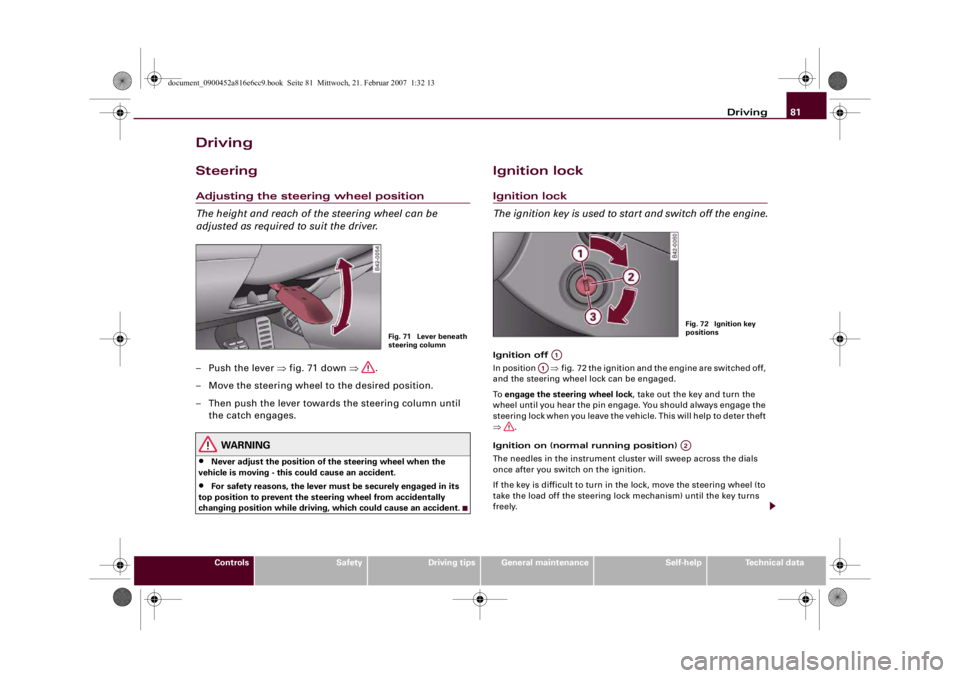
adjusted as required to suit the driver.–Push the lever ⇒fig. 71 down ⇒.
– Move the steering wheel to the desired position.
– Then push the lever towards the steering column until
the catch engages.
WARNING
•
Never adjust the position of the steering wheel when the
vehicle is moving - this could cause an accident.
•
For safety reasons, the lever must be securely engaged in its
top position to prevent the steering wheel from accidentally
changing position while driving, which could cause an accident.
Ignition lockIgnition lock
The ignition key is used to start and switch off the engine.Ignition off
In position ⇒fig. 72 the ignition and the engine are switched off,
and the steering wheel lock can be engaged.
To engage the steering wheel lock, take out the key and turn the
wheel until you hear the pin engage. You should always engage the
steering lock when you leave the vehicle. This will help to deter theft
⇒.
Ignition on (normal running position)
The needles in the instrument cluster will sweep across the dials
once after you switch on the ignition.
If the key is difficult to turn in the lock, move the steering wheel (to
take the load off the steering lock mechanism) until the key turns
freely.
Fig. 71 Lever beneath
steering column
Fig. 72 Ignition key
positions
A1
A1
A2
document_0900452a816e6cc9.book Seite 81 Mittwoch, 21. Februar 2007 1:32 13
Page 104 of 210
Safe driving 102Safe drivingGeneral notesSafety is the first priority
Your safety is our first priority.This chapter contains important information, tips, sugges-
tions and warnings that you should read and observe for
your own safety and the safety of your passengers.
WARNING
•
The information in this chapter is important for the driver of
the vehicle and all passengers. The other chapters in this manual
(and, where applicable, in the other literature supplied with the
vehicle) contain further important notes which you should read
and observe for your own safety and that of your passengers.
•
Ensure that the complete vehicle wallet is always in the vehicle.
This is especially important when you lend or sell the vehicle to
others.
Safety features
The safety features listed here are part of the vehicle's
occupant restraint system. They work together to help
reduce the risk of injury in a wide variety of accident situ-
ations.Your safety and the safety of your passengers should not be left to
chance. In the event of an accident, the safety features incorporated
in your vehicle are capable of reducing the risk of injury. These are
just a few of the safety features in your Audi:•
Three-point seat belts for all seats,
•
Belt force limiters for the front seats,
•
Belt pre-tensioners for the front seats,
•
Front airbags,
•
Head/thorax airbags in the backrests,
•
“ISOFIX” mountings* for “ISOFIX” child safety seats on the front
passenger's seat,
•
Height-adjustable head restraints in the backrests,
•
Adjustable steering column.
These individual safety features are harmonised to provide you and
your passengers with the best possible protection in accident situ-
ations. However, they can only be effective if you and your passen-
gers sit in the correct position and adjust and use the safety equip-
ment properly.
For these reasons, this chapter explains why these safety features
are so important, how they can protect you, what you need to
remember when using them, and how you and your passengers can
gain the most benefit from them. There are also a number of impor-
tant safety warnings which you and your passengers should always
observe in order to minimise the risk of injury.
Safety is everyone's responsibility!
Before every trip
The driver is responsible for the safety of the passengers
and the safe operation of the vehicle at all times.For your own safety and the safety of your passengers,
always note the following points before every trip:
– Make sure that all lights and turn signals are working
properly.
document_0900452a816e6cc9.book Seite 102 Mittwoch, 21. Februar 2007 1:32 13
Page 114 of 210
Seat belts 112How to wear seat belts properlyPutting on the three-point seat belts
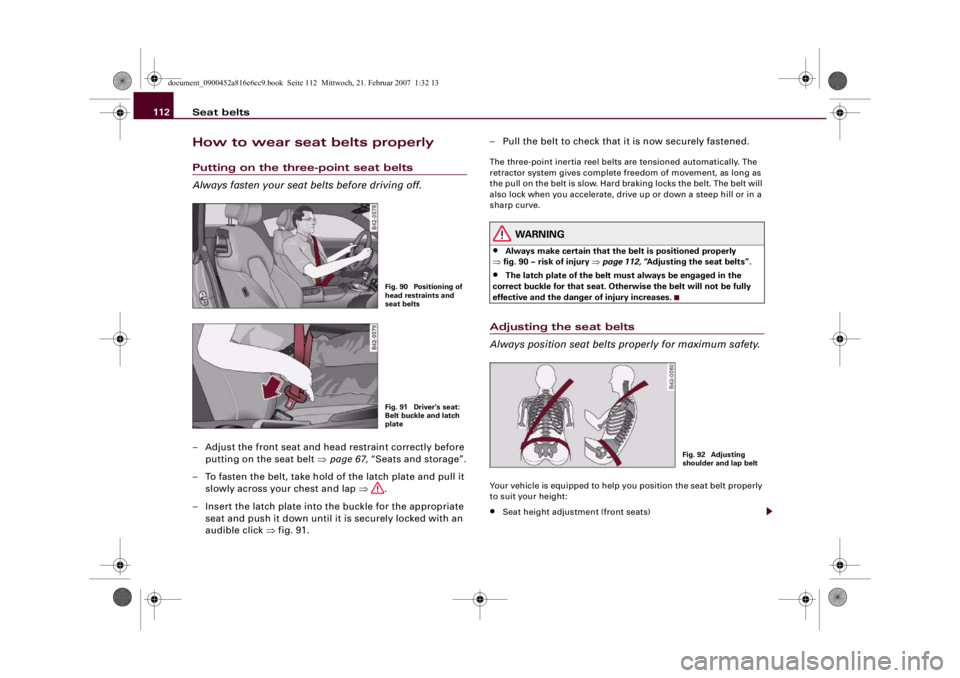
Always fasten your seat belts before driving off.– Adjust the front seat and head restraint correctly before
putting on the seat belt ⇒page 67, “Seats and storage”.
– To fasten the belt, take hold of the latch plate and pull it
slowly across your chest and lap ⇒.
– Insert the latch plate into the buckle for the appropriate
seat and push it down until it is securely locked with an
audible click ⇒fig. 91.– Pull the belt to check that it is now securely fastened.
The three-point inertia reel belts are tensioned automatically. The
retractor system gives complete freedom of movement, as long as
the pull on the belt is slow. Hard braking locks the belt. The belt will
also lock when you accelerate, drive up or down a steep hill or in a
sharp curve.
WARNING
•
Always make certain that the belt is positioned properly
⇒fig. 90 – risk of injury ⇒page 112, “Adjusting the seat belts”.
•
The latch plate of the belt must always be engaged in the
correct buckle for that seat. Otherwise the belt will not be fully
effective and the danger of injury increases.
Adjusting the seat belts
Always position seat belts properly for maximum safety.Your vehicle is equipped to help you position the seat belt properly
to suit your height:•
Seat height adjustment (front seats)
Fig. 90 Positioning of
head restraints and
seat beltsFig. 91 Driver's seat:
Belt buckle and latch
plate
Fig. 92 Adjusting
shoulder and lap belt
document_0900452a816e6cc9.book Seite 112 Mittwoch, 21. Februar 2007 1:32 13
Page 120 of 210
Airbag system 118
WARNING
•
It is important for the driver and front passenger to maintain a
distance of at least 25 cm from the steering wheel or dashboard
⇒page 117, fig. 98. The airbag system will not be able to give the
required protection if you sit too close to the steering wheel or
dashboard. There is also a risk of injury if the airbags are inflated.
The front seats and head restraints must always be positioned
correctly for the height of the occupant.
•
If you do not wear a seat belt, if you lean forward or to the side,
or are not seated correctly while the vehicle is in motion, you are
at greater risk of injury. Should the airbag system be triggered in
an accident there is an even greater risk of injury.
•
Never let a child travel on the front seat without an appropriate
restraint system. If the airbag is triggered in an accident, the child
could sustain serious or fatal injuries ⇒page 122, “Child safety”.
•
Never install a rearward-facing child safety seat on the front
passenger's seat unless the front passenger's airbag has been
deactivated. However, if you have no alternative but to use a rear-
ward-facing child seat on the front passenger's seat, the front
passenger's airbag must be deactivated beforehand by means of
the key-operated switch ⇒page 120, “Deactivating the airbags”.
Failure to observe this precaution could result in serious or poten-
tially fatal injury.
•
Occupants sitting in the front of the car must never carry any
objects or pets in the space between them and the airbags, or
allow children or other passengers to travel in this position.
•
Do not cover or stick anything on the steering wheel hub or the
soft plastic surface of the airbag unit on the passenger's side of
the dashboard, and do not obstruct or modify them in any way.
These parts should only be cleaned with a dry cloth (or with a
cloth moistened with plain water). It is also important not to
attach any objects such as cup holders or telephone mountings to
the surfaces covering the airbag units.
•
Any work on the airbag system or removal and installation of
the airbag components for other repairs (such as repairs to the
steering wheel) should be performed by a qualified workshop.Note
If necessary, you can deactivate the front passenger's airbag by
means of the key-operated switch ⇒page 120, “Deactivating the
airbags”.Side airbagsDescription of side airbags
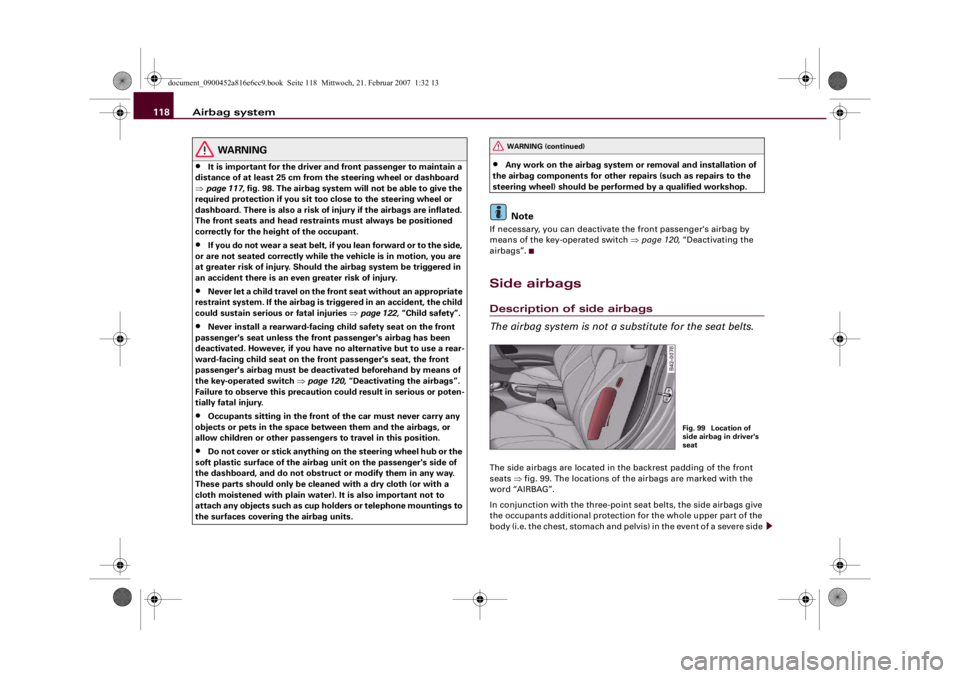
The airbag system is not a substitute for the seat belts.The side airbags are located in the backrest padding of the front
seats ⇒fig. 99. The locations of the airbags are marked with the
word “AIRBAG”.
In conjunction with the three-point seat belts, the side airbags give
the occupants additional protection for the whole upper part of the
body (i.e. the chest, stomach and pelvis) in the event of a severe side
WARNING (continued)
Fig. 99 Location of
side airbag in driver's
seat
document_0900452a816e6cc9.book Seite 118 Mittwoch, 21. Februar 2007 1:32 13
Page 129 of 210
Child safety127
Controls
Safety
Driving tips
General maintenance
Self-help
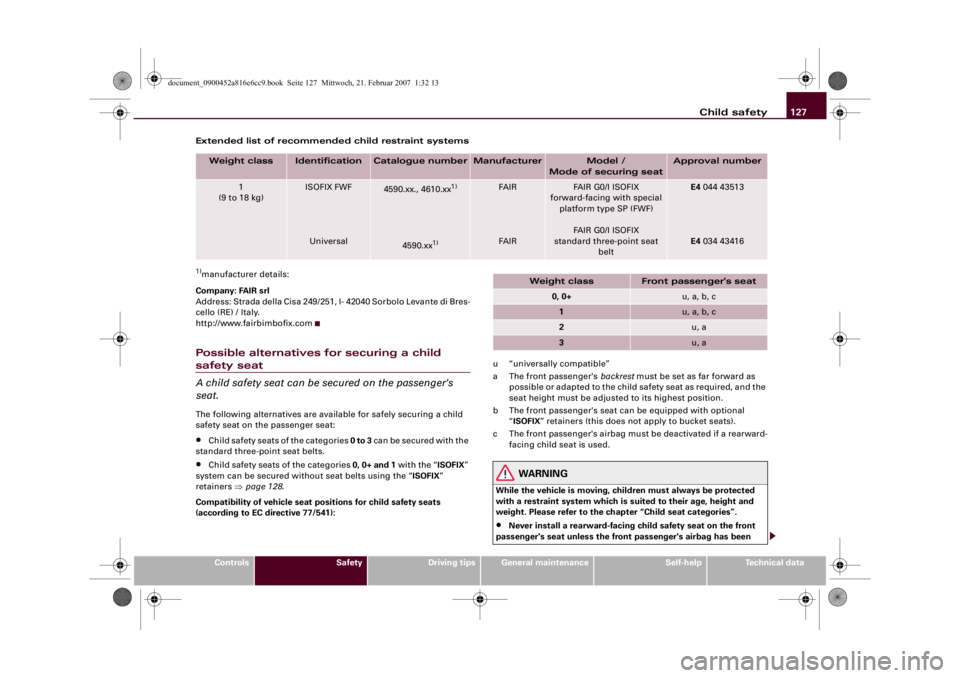
Technical data Extended list of recommended child restraint systems
1)manufacturer details:
Company: FAIR srl
Address: Strada della Cisa 249/251, I- 42040 Sorbolo Levante di Bres-
cello (RE) / Italy.
http://www.fairbimbofix.comPossible alternatives for securing a child safety seat
A child safety seat can be secured on the passenger's
seat.The following alternatives are available for safely securing a child
safety seat on the passenger seat:•
Child safety seats of the categories 0 to 3 can be secured with the
standard three-point seat belts.
•
Child safety seats of the categories 0, 0+ and 1 with the “ISOFIX”
system can be secured without seat belts using the “ISOFIX”
retainers ⇒page 128.
Compatibility of vehicle seat positions for child safety seats
(according to EC directive 77/541):u “universally compatible”
a The front passenger's backrest must be set as far forward as
possible or adapted to the child safety seat as required, and the
seat height must be adjusted to its highest position.
b The front passenger's seat can be equipped with optional
“ISOFIX” retainers (this does not apply to bucket seats).
c The front passenger's airbag must be deactivated if a rearward-
facing child seat is used.
WARNING
While the vehicle is moving, children must always be protected
with a restraint system which is suited to their age, height and
weight. Please refer to the chapter “Child seat categories”.•
Never install a rearward-facing child safety seat on the front
passenger's seat unless the front passenger's airbag has been
Weight class
Identification
Catalogue number
Manufacturer
Model /
Mode of securing seat
Approval number
1
(9 to 18 kg)
ISOFIX FWF
Universal
4590.xx., 4610.xx
1)
4590.xx
1)
FAIR
FAIR
FAIR G0/I ISOFIX
forward-facing with special
platform type SP (FWF)
FAIR G0/I ISOFIX
standard three-point seat
belt
E4 044 43513
E4 034 43416
Weight class
Front passenger's seat
0, 0+
u, a, b, c
1
u, a, b, c
2
u, a
3
u, a
document_0900452a816e6cc9.book Seite 127 Mittwoch, 21. Februar 2007 1:32 13