change wheel AUDI R8 COUPE 2020 Owners Manual
[x] Cancel search | Manufacturer: AUDI, Model Year: 2020, Model line: R8 COUPE, Model: AUDI R8 COUPE 2020Pages: 308, PDF Size: 82.41 MB
Page 80 of 308

Assist systems
Audi drive select (drive
settings)
Drive select makes it possible to experience dif-
ferent types of vehicle characteristics in one vehi-
cle. The driver can select from four modes: Com-
fort, Auto, Dynamic and Individual using the
ssa button on the steering wheel or through the
Infotainment system to switch between a sporty
and a comfortable driving mode, for example. In
the Individual mode, the settings can be adjust-
ed to your personal preferences. This makes it
possible to combine settings such as a sporty en-
gine setting with light steering.
Z\ WARNING
Using Audi drive select incorrectly can lead to
collisions, other accidents and serious inju-
ries.
The vehicle setup in each mode depends on the
vehicle's features.
Engine and automatic transmission
Depending on the mode, the engine and auto-
matic transmission respond more quickly or in a
more balanced manner to accelerator pedal
movements.
Suspension control (Audi magnetic ride)*
The suspension control uses sensors to record in-
formation regarding steering movements, brak-
ing and acceleration operations by the driver, as
well as information about the road surface, driv-
ing speed, and load. With drive select, you can
adjust the suspension control to sporty (dynam-
ic), comfortable (comfort) or balanced (auto).
Steering
The power steering adapts. Indirect steering that
moves easily as in comfort mode is especially
suited to long drives on a highway. The dynamic
mode provides sporty, direct steering.
78
Torque distribution*
The all wheel drive distributes the drive power to
the rear axle based on the situation. The distribu-
tion of power varies depending on the selected
mode from moderate (Comfort) to sporty (Dy-
namic). The goal is a high level of agility and abil-
ity to accelerate on curves. The vehicle is very re-
sponsive to steering.
Engine sound
The engine sound adapts to the current mode
and can be subtle to sporty.
@ Tips
In some models, the maximum vehicle speed
can only be reached in the auto and dynamic
modes.
Selecting the driving mode
You can choose between comfort, auto, dynamic
and individual.
io
):
Fig. 82 Steering wheel: drive select button and perform-
ance mode*
> Press the button > fig. 82 @ or
> Select in the Infotainment system: [MENU] but-
ton > Vehicle > left control button > Audi drive
select.
> Select and confirm the desired setting.
You can change the driving mode when the vehi-
cle is stationary or while driving. If traffic per-
mits, after changing modes, briefly remove your
foot from the accelerator pedal so that the re-
cently selected mode is also activated for the en-
gine.
Comfort - Results in a comfort-oriented vehicle
calibration
Page 81 of 308
4S1012721BA
Assist systems
Auto - Provides an overall comfortable yet dy-
namic driving feel and is suited for everyday use.
Dynamic - Gives the driver a sporty driving feel
and is suited to a sporty driving style.
Individual - > page 79.
Setting the driving program
Depending on the driving mode selected, you can
select additional driving programs with the selec-
tor lever.
D/M - Driving forward
When the transmission is in the D/M position, it
can be operated either in the D normal mode or
in the M manual mode. To engage the M manual
mode, move the selector lever into the tiptronic
gate
or use the shift paddles. You can only select
the M selector lever position when D is engaged.
To engage D from the M selector lever position,
move the selector lever out of the tiptronic gate
to D/S or tap it once toward the rear > A\ in Se-
lecting a selector lever position on page 68. To
shift from N to D when traveling at speeds below
2 mph (2 km/h), press the brake pedal and shift
into the D position > A\ in Selecting a selector
lever position on page 68.
S/MS - Driving forward
When the transmission is in the S/MS position, it
can be operated either in the S sport mode or in
the MS manual mode. To engage the MS manual
mode, move the selector lever into the tiptronic
gate
or use the shift paddles. You can only select
the MS selector lever position when S is engaged.
To engage S from the MS selector lever position,
move the selector lever out of the tiptronic gate
to D/S or tap it once toward the rear > A\ in Se-
lecting a selector lever position on page 68. To
shift from N to S when traveling at speeds below
2 mph (2 km/h), press the brake pedal and shift
into the S position > A in Selecting a selector
lever position on page 68.
M Performance - Driving forward
The transmission can be operated in the MS
mode when the selector Lever is in the M posi-
tion. To engage the manual “MS” performance
mode, press the performance mode button on
the steering wheel.
Performance mode
Applies to: vehicles with performance mode
The vehicle is configured in performance mode
for sporty driving.
The suspension setting, engine and transmission
characteristics change when driving in perform-
ance mode. It is switched on or off with the per-
formance mode button on the steering wheel.
Road conditions
Using the knob > page 78, fig. 82 2), you can op-
timize the vehicle settings for the current road
conditions (such as wet roads).
ZA WARNING
Please note that the stabilization functions
provided by the ESC and the ASR are limited
when performance mode is switched on. To
reduce the risk of sliding, only switch per-
formance mode on when your driving abilities
and the traffic situation permit.
Adjusting the Individual mode
You can adjust the vehicle settings to your personal preferences.
> Press the sist button > Individual > right con-
trol button, or
> Select in the Infotainment system: [MENU] but-
ton > Vehicle > left control button>Audi drive
select
> Individual > right control button
After you have closed the settings, you will auto-
matically drive in the Individual* mode.
The equipment in your vehicle will determine
which settings you can adjust. The following ta-
ble gives an overview of the characteristics.
79
>
Page 83 of 308
4S1012721BA
Parking aid
Parking aid
Introduction
Depending on the vehicle equipment, various
parking aids will help you when parking and ma-
neuvering.
The parking system plus assists you while park-
ing by audibly and visually warning you of objects
detected in front of and behind the vehicle
=> page 81.
The rearview camera shows the area behind the
vehicle in the Infotainment system display. The
lines in the rearview camera image help you to
park or maneuver > page 83.
ZA WARNING
— Always look for traffic and check the area
around your vehicle by looking at it directly
as well. The parking system cannot replace
the driver's attention. The driver is always
responsible when entering or exiting a park-
ing space and during similar maneuvers.
— Please note that some surfaces, such as
clothing, are not detected by the system.
— Sensors and cameras have blind spots in
which people and objects cannot be detect-
ed. Be especially cautious of small children
and animals.
— The sensors can be displaced by impacts or
damage to the radiator grille, bumper,
wheel housing and the underbody. The park-
ing system may be impaired as a result.
Have an authorized Audi dealer or author-
ized Audi Service Facility check their func-
tion.
— Make sure the sensors are not obstructed by
stickers, deposits or other materials. If they
are, the sensor function could be impaired.
For additional information on cleaning, see
=> page 265.
@) Note
— Some objects are not detected or displayed
by the system under certain circumstances:
— objects such as barrier chains, trailer draw
bars, vertical poles or fences
— objects above the sensors such as wall ex-
tensions
— objects with certain surfaces or structures
such as chain link fences or powder snow
— If you continue driving closer to a low ob-
ject, it may disappear from the sensor
range. Note that you will no Longer be
warned about this obstacle.
— Maintain enough distance from the curb to
reduce the risk of damage to the rims.
@ Tips
— The system may provide a warning even
though there are no obstacles in the cover-
age area in some situations, such as:
— certain road surfaces or when there is tall
grass
— external ultrasonic sources such as from
cleaning vehicles
— in heavy rain, snow, or thick vehicle ex-
haust
— We recommend that you practice parking in
a traffic-free location or parking lot to be-
come familiar with the system. Practice
parking in good light and weather condi-
tions.
— You can change the volume of the signals.
— What appears in the display is slightly de-
layed.
— The sensors must be kept clean and free of
snow and ice for the parking aid to operate.
Parking system plus
Description
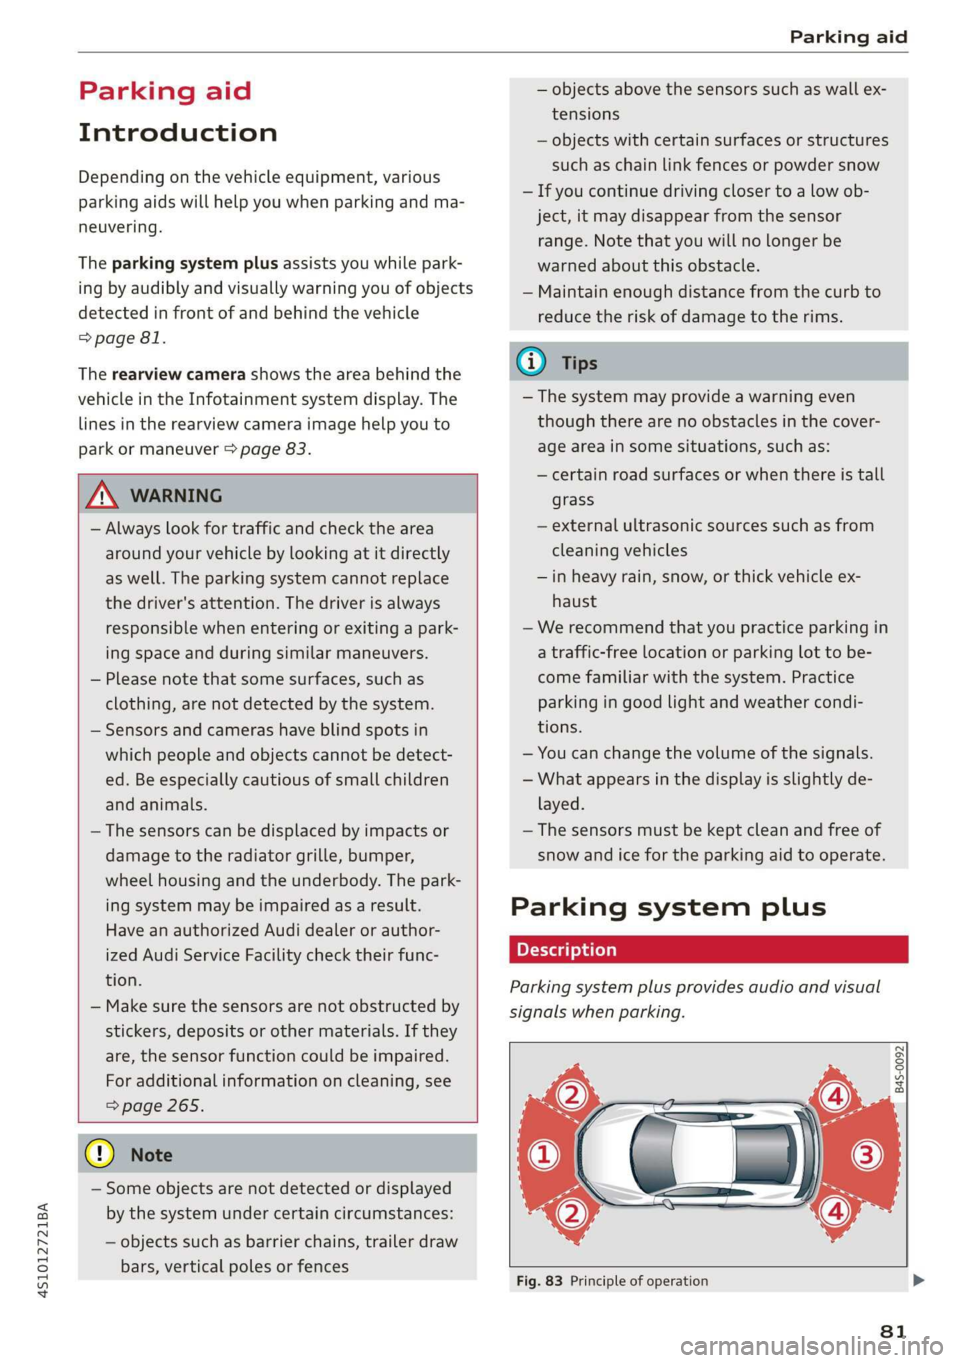
Parking system plus provides audio and visual
signals when parking.
B4S-0092
Fig. 83 Principle of operation
81
Page 85 of 308

4S1012721BA
Parking aid
Rearview camera
Introduction
Applies to: vehicles with rearview camera
B8V-0629
Fig. 86 Diagram: lines to aid in parking
The rearview camera helps you to park or maneu-
ver using the orientation lines.
General information
Applies to: vehicles with rearview camera
B4s-0090
Fig. 87 Principle of operation: Area covered (@) and area
not covered (2) by the rearview camera.
Fig. 88 Vehicle rear: rearview camera component location
The rearview camera is located above the rear li-
cense plate bracket. Make sure that the lens for
the parking system > fig. 88 is not covered by de-
posits or any other obstructions because this can
impair the function of the parking system. For in-
formation on cleaning, see > page 265.
The rearview camera coverage area includes (4)
> fig. 87. Only this area is shown in the Infotain-
ment display. Objects that are in area @), which is
not covered, are not displayed.
ZA WARNING
— Always read and follow the applicable warn-
ings > A in Introduction on page 81.
— If the position and the installation angle of
the rearview camera was changed, for exam-
ple after a collision, do not continue to use
the system for safety reasons. Have it
checked by an authorized Audi dealer or au-
thorized Audi Service Facility.
— Only use the rearview camera to assist you if
it shows a good, clear picture. For example,
the image may be affected by the sun shin-
ing into the lens, dirt on the lens, or if there
is a malfunction.
— Use the rearview camera only if the engine
compartment lid is completely closed. Make
sure any objects you may have mounted on
the luggage compartment lid do not block
the rearview camera.
— The camera lens enlarges and distorts the
field of vision. The object appears both al-
tered and inaccurate on the screen.
—Incertain situations, people or objects in
the display appear closer or farther away:
— For objects that do not touch the ground,
such as the bumper of a parked vehicle, a
trailer hitch or the rear of a truck. Do not
use the orientation lines in this case.
— If driven from a level surface onto an in-
cline, or a downward slope.
— If driven toward protruding objects.
— If the vehicle is carrying too much load in
the rear.
@) Note
— Always read and follow the applicable warn-
ings >@ in Introduction on page 81.
— The orange-colored orientation lines in the
Infotainment display show the vehicle path
based on the steering wheel angle. The
83
>
Page 86 of 308
Parking aid
front of the vehicle swings out more than
the rear of the vehicle. Maintain plenty of
distance so that an exterior mirror or a cor-
ner of the vehicle does not collide with any
obstacles.
Scare Rie meal
Applies to: vehicles with rearview camera
Switching on
> Shift into reverse, or
> Press the Pt button in the center console
=> page 82, fig. 84. A short confirmation tone
sounds and the LED in the button turns on.
Switching off
> Drive faster than 6 mph (10 km/h), or
> Press the Pa button, or
> Switch the ignition off.
G) Tips
— The visual display in the left part of the dis-
play should help you detect the critical vehi-
cle areas.
— You can change the volume of the signals
and the display > page 84.
Perpendicular parking
Applies to: vehicles with rearview camera
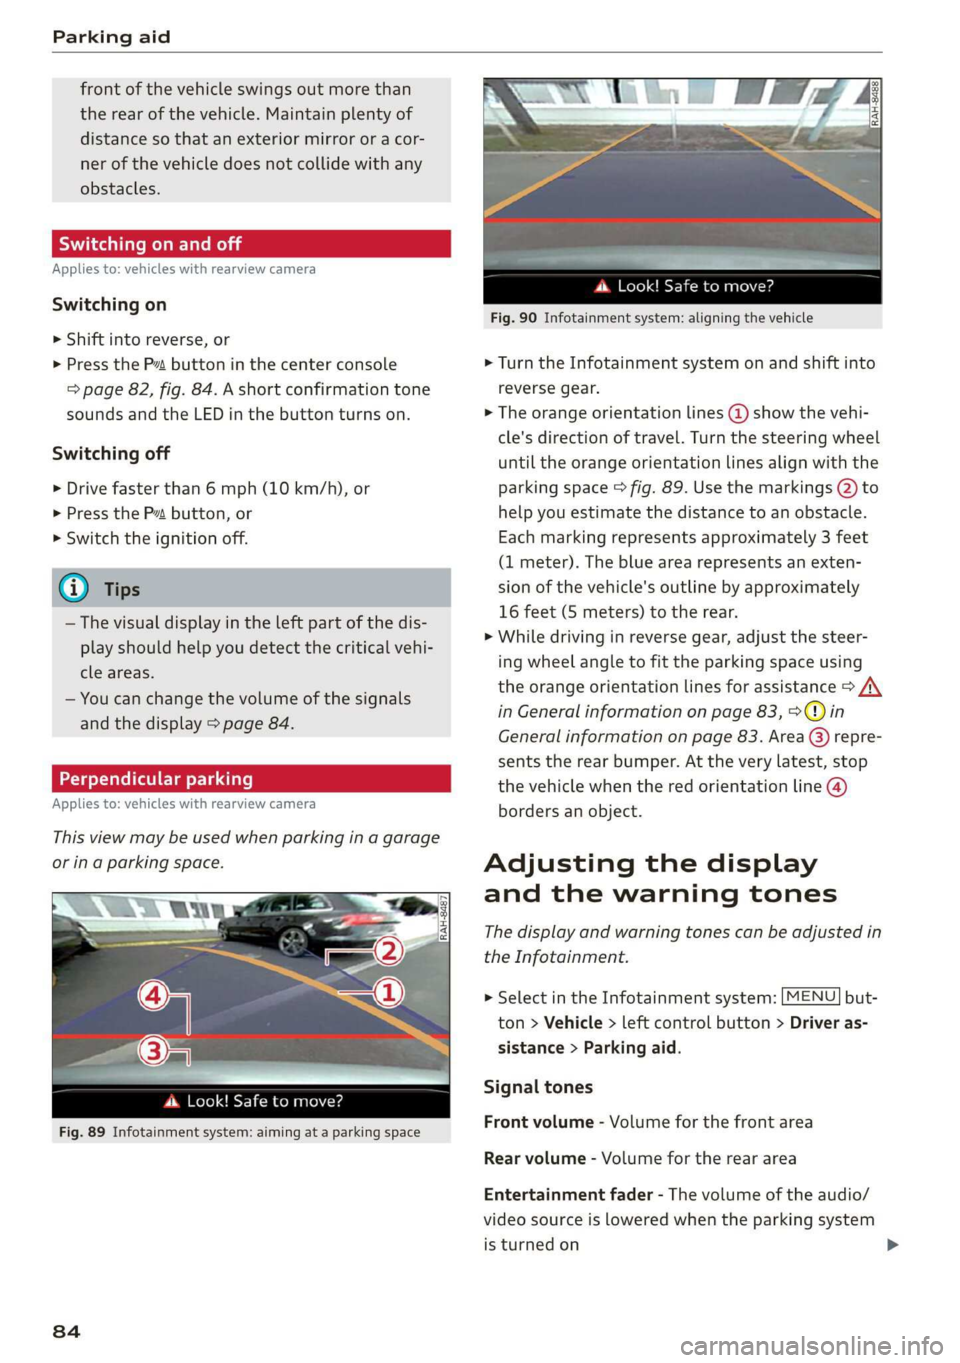
This view may be used when parking in a garage
or ina parking space.
(3)
4. Look! Safe to move?
Fig. 89 Infotainment system: aiming at a parking space
84
ds. Look! Safe to move?
Fig. 90 Infotainment system: aligning the vehicle
> Turn the Infotainment system on and shift into
reverse gear.
> The orange orientation lines @ show the vehi-
cle's direction of travel. Turn the steering wheel
until the orange orientation lines align with the
parking space > fig. 89. Use the markings @ to
help you estimate the distance to an obstacle.
Each marking represents approximately 3 feet
(1 meter). The blue area represents an exten-
sion of the vehicle's outline by approximately
16 feet (5 meters) to the rear.
> While driving in reverse gear, adjust the steer-
ing wheel angle to fit the parking space using
the orange orientation lines for assistance > A\
in General information on page 83, >@) in
General information on page 83. Area () repre-
sents the rear bumper. At the very latest, stop
the vehicle when the red orientation line @
borders an object.
Adjusting the display
and the warning tones
The display and warning tones can be adjusted in
the Infotainment.
> Select in the Infotainment system: [MENU] but-
ton > Vehicle > left control button > Driver as-
sistance > Parking aid.
Signal tones
Front volume - Volume for the front area
Rear volume - Volume for the rear area
Entertainment fader - The volume of the audio/
video source is lowered when the parking system
is turned on
Page 92 of 308
Intelligent Technology
snow and ice. Always read and follow safety pre-
cautions > A\.
Winter tires
By using all wheel drive, your vehicle has good
forward motion with standard tires in winter con-
ditions. However, in winter we recommend using
winter or all season tires on all four wheels, be-
cause this will improve the braking effect.
Snow chains
If there are snow chain laws, snow chains must
also be used on vehicles with all wheel drive
= page 259, Snow chains.
ZA WARNING
— Also, in vehicles with all wheel drive, adapt
your driving style to the current road and
traffic conditions. Do not let the increased
safety provided tempt you into taking risks,
because this increases the risk of an acci-
dent.
— The braking ability of your vehicle is limited
to the traction of the wheels. In this way, it
is not different from a two wheel drive vehi-
cle. Do not be tempted to accelerate toa
high speed when the road is slippery, be-
cause this increases the risk of an accident.
— Note that on wet streets, the front wheels
can “hydroplane” if driving at speeds that
are too high. Unlike front wheel drive vehi-
cles, the engine RPM does not increase sud-
denly when the vehicle begins hydroplaning.
For this reason, adapt your speed to the
road conditions to reduce the risk of an acci-
dent.
90
Rear spoiler
Applies to: vehicles with retractable rear spoiler
The extendable rear spoiler increases driving sta-
bility.
5 =
S $
db + a
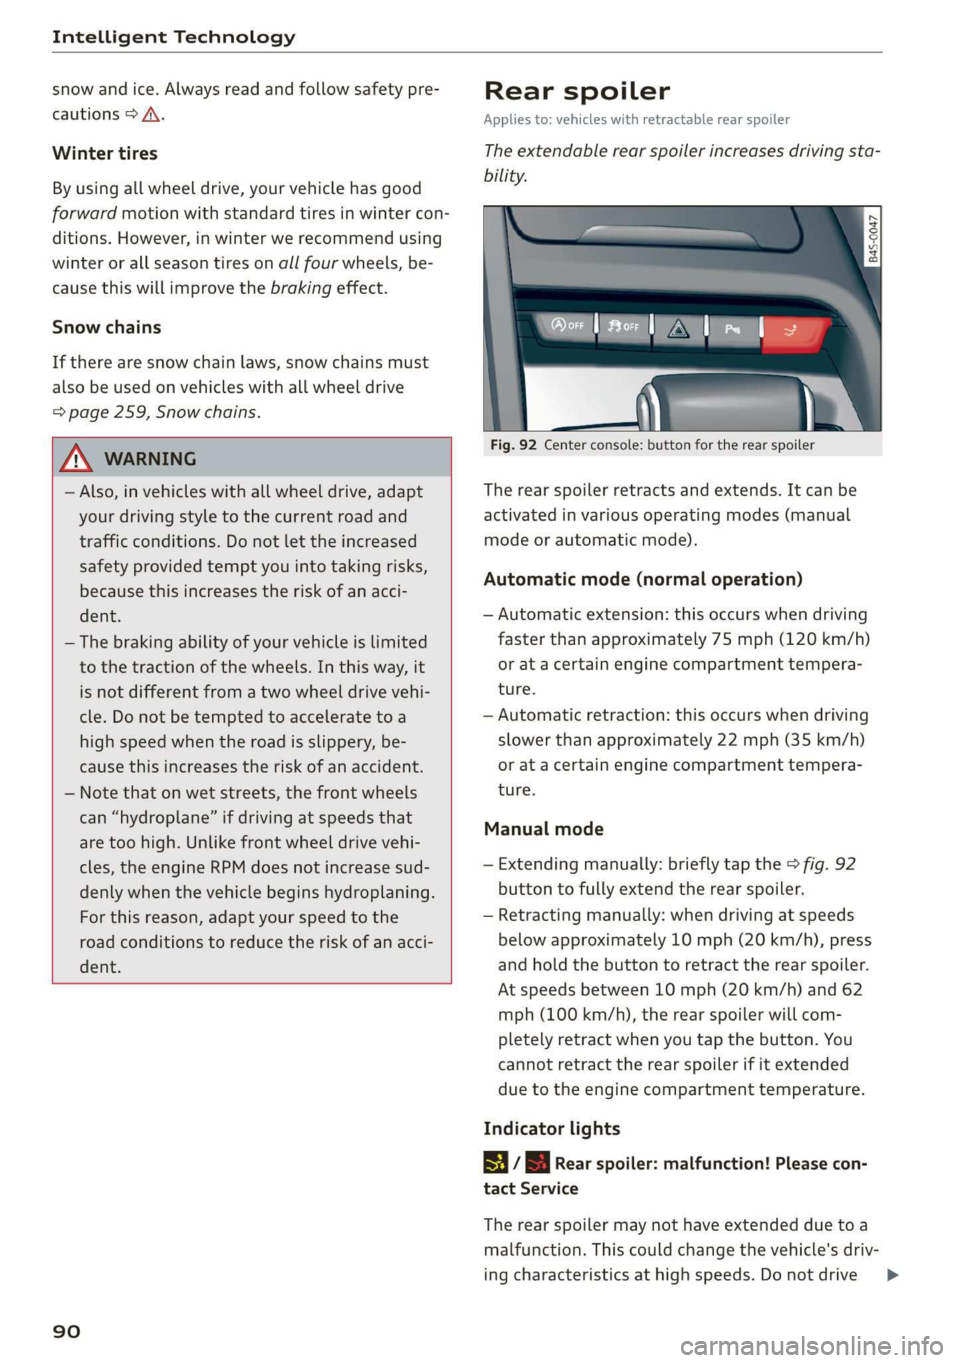
Fig. 92 Center console: button for the rear spoiler
The rear spoiler retracts and extends. It can be
activated in various operating modes (manual
mode or automatic mode).
Automatic mode (normal operation)
— Automatic extension: this occurs when driving
faster than approximately 75 mph (120 km/h)
or at a certain engine compartment tempera-
ture.
— Automatic retraction: this occurs when driving
slower than approximately 22 mph (35 km/h)
or at a certain engine compartment tempera-
ture.
Manual mode
— Extending manually: briefly tap the > fig. 92
button to fully extend the rear spoiler.
— Retracting manually: when driving at speeds
below approximately 10 mph (20 km/h), press
and hold the button to retract the rear spoiler.
At speeds between 10 mph (20 km/h) and 62
mph (100 km/h), the rear spoiler will com-
pletely retract when you tap the button. You
cannot retract the rear spoiler if it extended
due to the engine compartment temperature.
Indicator lights
| / S Rear spoiler: malfunction! Please con-
tact Service
The rear spoiler may not have extended due toa
malfunction. This could change the vehicle's driv-
ing characteristics at high speeds. Do not drive >
Page 106 of 308
Voice recognition system
Voice recognition system
Operating
You can operate many Infotainment functions
conveniently by speaking.
Requirement: the ignition and the MMI must be
switched on. A system language supported by
the voice recognition system must be set. There
must be no phone calls in progress and the park-
ing aid must not be active.
> Switching on: briefly press the [2] button @)
=> page 14, fig. 10 on the multifunction steer-
ing wheel and say the desired command after
the Beep.
> Switching off: press and hold the |] button, or
say the command Cancel.
> Pausing: say the command Pause. To resume,
press the |] button.
> Correcting: say the command Correction.
Input assistance
The system guides you through the input with
visual and audio feedback.
— Visual input assistance: after switching on
voice recognition, a display with a selection of
possible commands appears. The command
display can be switched on/off under [MENU] >
Settings > left control button > MMI settings >
Speech dialog system.
— Audio input assistance: to have the possible
commands read, press the [2] button on the
multifunction steering wheel briefly and say
Help.
For the system to understand you:
— Speak clearly and distinctly at a normal volume.
Speak louder when driving faster.
— Emphasize the words in the commands evenly
and do not leave long pauses.
— Do not speak a command when the voice recog-
nition system is making an announcement.
— Close the doors, the windows, and the sunroof*
to reduce background noise. Make sure that
passengers are not speaking when you are giv-
ing a voice command.
104
— Do not direct the vents toward the handsfree
microphone, which is near the front interior
lights on the roof headliner or on the driver's
safety belt*. For additional information on the
safety belt microphone, see > page 122.
— Only use the system from the driver's seat be-
cause the hands-free microphone is directed to-
ward that seat.
Additional settings
See > page 172, Voice recognition system.
ZA\ WARNING
— Direct your full attention to driving. As the
driver, you have complete responsibility for
safety in traffic. Only use the functions in
such a way that you always maintain com-
plete control over your vehicle in all traffic
situations.
— Do not use the voice recognition system in
emergencies because your voice may change
in stressful situations. The system may take
longer to dial the number or may not be
able to dial it at all. Dial the emergency
number manually.
Gi) Tips
— The dialog pauses when there is an incom-
ing phone call and will continue if you ig-
nore the call. The dialog ends if you answer
the call.
— There are no voice guidance prompts when a
dialog is active.
— You can select an item in the list using ei-
ther the voice recognition system or the
control knob.
Command overview
information
The following overviews describe the commands
that can be used to operate the MMI using the
voice recognition system.
Alternative commands are separated using a “/”,
for example say: Telephone / (or) Navigation /
(or) Radio.
Page 203 of 308
4S1012721BA
Airbag system
authorized Audi dealer. It is possible that
the airbag will inflate when it is not sup-
posed to, or will not inflate when it should.
ZA WARNING
If the front airbag inflates, a child without a
child restraint, or in a rearward-facing child
safety seat, or in a forward-facing child re-
straint that has not been properly installed
will be seriously injured and can be killed.
— If you must install a rearward-facing child
seat on the front passenger seat because of
exceptional circumstances and the PASSEN-
GER AIR BAG OFF #%; light does not appear
and stay on, have the airbag system inspect-
ed by your Audi dealer.
— If, in exceptional circumstances, you must
install a forward-facing child restraint on
the front passenger seat, always move the
seat into its rearmost position in the seat's
fore and aft adjustment range, as far away
from the airbag as possible. The backrest
must be adjusted to an upright position.
Make sure that the PASSENGER AIR BAG
OFF %; light comes on and stays on all the
time whenever the ignition is switched on.
Z\ WARNING
If the PASSENGER AIR BAG OFF %; light does
not go out when an adult is sitting on the
front passenger seat after taking the steps
described above, have the airbag system in-
spected by your Audi dealer before transport-
ing anyone on the front passenger seat.
@) Tips
If the capacitive passenger detection system
determines that the front passenger seat is
empty, the frontal airbag on the passenger
side will be turned off, and the PASSENGER
AIR BAG OFF 3%; light will stay on.
Repair, care and disposal of the airbags
Parts of the airbag system are installed at many
different places on your Audi. Installing, remov-
ing, servicing or repairing a part in an area of the
vehicle can damage a part of an airbag system
and prevent that system from working properly
in acollision.
There are some important things you have to
know to make sure that the effectiveness of the
system will not be impaired and that discarded
components do not cause injury or pollute the
environment.
Z\ WARNING
Improper care, servicing and repair proce-
dures can increase the risk of personal injury
and death by preventing an airbag from de-
ploying when needed or deploying an airbag
unexpectedly:
— Never cover, obstruct, or change the steer-
ing wheel horn pad or airbag cover or the in-
strument panel or modify them in any way.
— Never attach any objects such as cup holders
or telephone mountings to the surfaces cov-
ering the airbag units.
— For cleaning the horn pad or instrument
panel, use only a soft, dry cloth or one mois-
tened with plain water. Solvents or cleaners
could damage the airbag cover or change
the stiffness or strength of the material so
that the airbag cannot deploy and protect
properly.
— Never repair, adjust, or change any parts of
the airbag system.
— All work on the steering wheel, instrument
panel, front seats or electrical system (in-
cluding the installation of audio equipment,
cellular telephones and CB radios, etc.)
must be performed by a qualified technician
who has the training and special equipment
necessary.
— For any work on the airbag system, we
strongly recommend that you see your au-
thorized Audi dealer or qualified workshop.
— Never modify the front bumper or parts of
the vehicle body.
— Always make sure that the side airbag can
inflate without interference:
— Never install seat covers or replacement
upholstery over the front seatbacks that
201
Page 204 of 308
Airbag system
have not been specifically approved by Au-
di.
— Never use additional seat cushions that
cover the areas where the side airbags in-
flate.
— Damage to the original seat covers or to
the seam in the area of the side airbag
module must always be repaired immedi-
ately by an authorized Audi dealer.
— The airbag system can deploy only once. Af-
ter
an airbag has been deployed, it must be
replaced with new replacement parts de-
signed and approved especially for your Audi
model version. Replacement of complete
airbag systems or airbag components must
be performed by qualified workshops only.
Make sure that any airbag service action is
entered in your Audi Warranty & Mainte-
nance booklet under AIRBAG REPLACEMENT
RECORD.
— For safety reasons in severe accidents, the
alternator and starter are separated from
the vehicle battery with a pyrotechnic circuit
interrupter.
— Work on the pyrotechnic circuit interrupter
must only be performed by a qualified
technicians who have the experience, in-
formation and special tools necessary to
perform the work safely.
— If the vehicle or the circuit interrupter is
scrapped, all applicable safety precautions
must be followed.
Orme Mar eel e ce)
Airbag performance
Changing the vehicle's suspension system can
change the way that the Advanced Airbag System
performs in a crash. For example, using tire-rim
combinations not approved by Audi, lowering the
vehicle, changing the stiffness of the suspension,
including the springs, suspension struts, shock
absorbers etc. can change the forces that are
measured by the airbag sensors and sent to the
electronic control unit. Some suspension changes
can, for example, increase the force levels meas-
ured by the sensors and make the airbag system
deploy in crashes in which it would not deploy if
202
the changes had not been made. Other kinds of
changes may reduce the force levels measured by
the sensors and prevent the airbag from deploy-
ing when it should.
Z\ WARNING
Changing the vehicle's suspension including
use of unapproved tire-rim combinations can
change Advanced Airbag performance and in-
crease the risk of serious personal injury in a
crash.
— Never install suspension components that
do not have the same performance charac-
teristics as the components originally instal-
led on your vehicle.
— Never use tire-rim combinations that have
not been approved by Audi.
Knee airbags
Description of knee airbags
The knee airbag system can provide supplemen-
tal protection to properly restrained front seat
occupants.
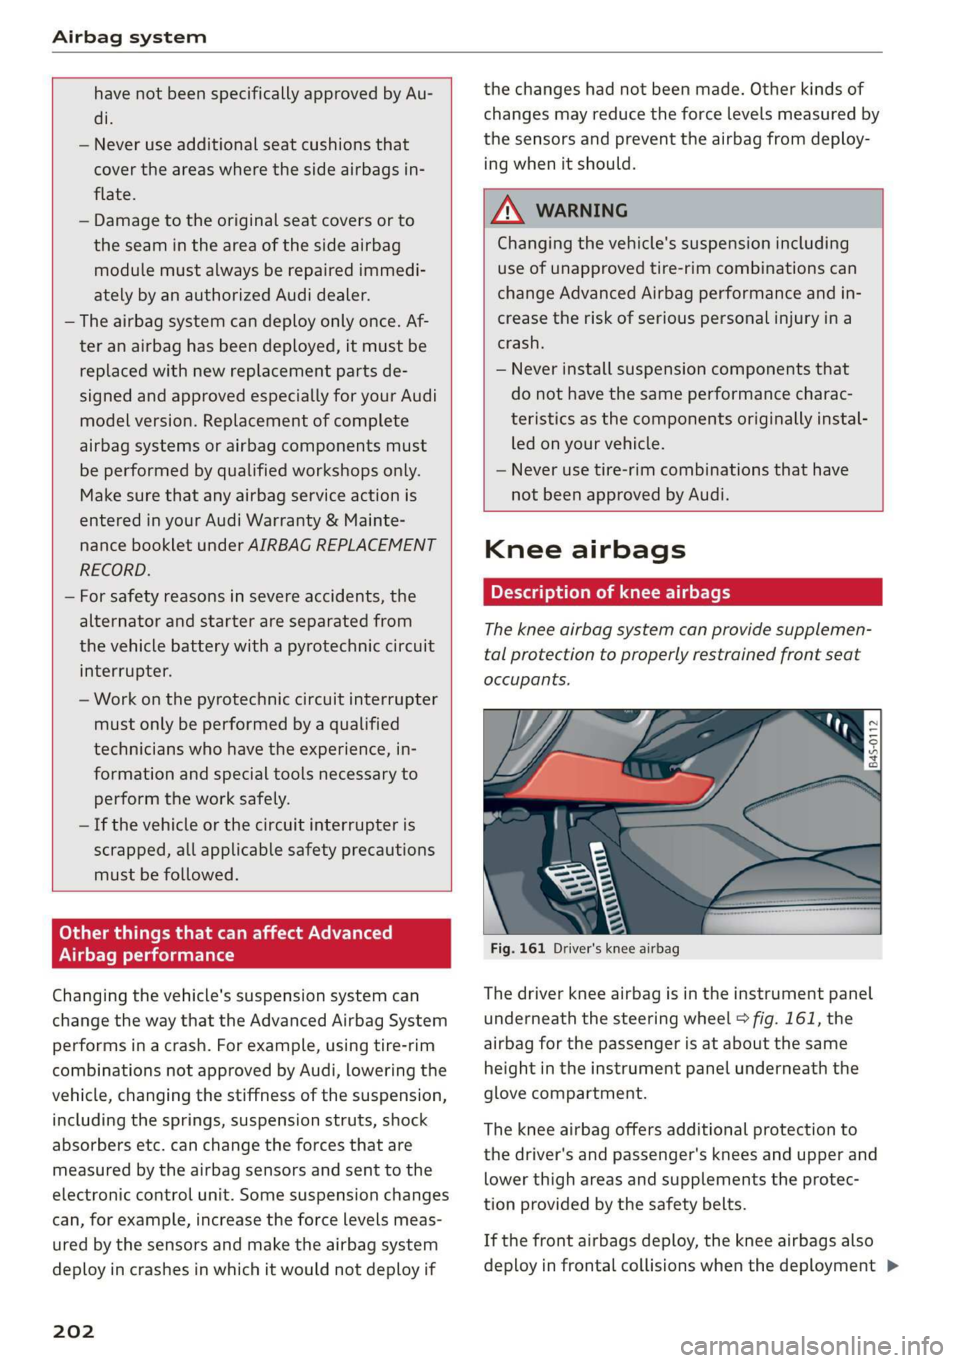
Fig. 161 Driver's knee airbag
The driver knee airbag is in the instrument panel
underneath the steering wheel > fig. 161, the
airbag for the passenger is at about the same
height in the instrument panel underneath the
glove compartment.
The knee airbag offers additional protection to
the driver's and passenger's knees and upper and
lower thigh areas and supplements the protec-
tion provided by the safety belts.
If the front airbags deploy, the knee airbags also
deploy in frontal collisions when the deployment >
Page 215 of 308
4S1012721BA
Child safety
NeW icelai eel ias-le meee Maal Cele)
Your vehicle is equipped with a front “Advanced
Airbag System” in compliance with United States
Federal Motor Vehicle Safety Standard (FMVSS)
208, as well as Canada Motor Vehicle Safety
Standard (CMVSS) 208 as applicable at the time
your vehicle was manufactured.
The Advanced Airbag system in your vehicle has
been certified to meet the “low-risk” require-
ments for 3- and 6-year old children on the pas-
senger side and small adults on the driver side.
The low risk deployment criteria are intended to
reduce the risk of injury through interaction with
the airbag that can occur, for example, by being
too close to the steering wheel and instrument
panel when the airbag inflates. In addition, the
system has been certified to comply with the
“suppression” requirements of the Safety Stand-
ard, to turn off the front airbag for infants up to
12 months who are restrained on the front pas-
senger seat in child restraints that are listed in
the Standard.
Even though your vehicle is equipped with an Ad-
vanced Airbag system, a child should always ride
in the seat properly restrained for its age and
size. The airbag on the passenger side makes the
front seat a potentially dangerous place for a
child to ride. The front seat is not the safest place
for a child in a forward-facing child safety seat. It
can be a very dangerous place for an infant or a
larger child in a rearward-facing seat.
The vehicle's Advanced Airbag System has a ca-
pacitive passenger detection system in the front
passenger seat cushion that can detect the pres-
ence of a baby or a child ina child restraint sys-
tem on this seat.
The capacitive passenger detection system regis-
ters the changes that result in an electrical field
when a child, a child restraint, and a baby blanket
are on the front passenger seat. The change in
the measured capacitance due to the presence of
a child, a child restraint, and a baby blanket on
the front passenger seat is related to the child re-
straint system resting on the seat. The measured
capacitance of a child restraint system varies de-
pending on the type of system and specific make
and model.
The electrical capacitance of the various types,
makes, and models of child restraints specified
by the U.S. National Highway Traffic Safety Ad-
ministration (NHTSA) in the relevant safety
standard are stored in the Advanced Airbag Sys-
tem control unit together with the capacitances
typical of infants and a 1-year old child. When a
child restraint is used on the front passenger seat
with a typical 1 year-old infant, the Advanced Air-
bag System compares the capacitance measured
by the capacitive passenger detection system
with the data stored in the electronic control
unit.
Ce CMe ee aha acl a Tig ey- le)
system
Regardless of the child restraint that you use,
make sure that it has been certified to meet Safe-
ty Standards and has been certified by its manu-
facturer for use with an airbag. If in exceptional
circumstances you must use it on the front pas-
senger seat, carefully read all of the information
on child safety and Advanced Airbags and heed
all of the applicable WARNINGS. Make certain
that the child and child restraint are correctly rec-
ognized by the capacitive passenger detection
system in the front passenger seat, that the front
passenger airbag is turned off, and that the air-
bag status is always correctly signaled by the
PASSENGER AIR BAG OFF #; light.
Many types and models of child restraints have
been available over the years, new models are in-
troduced regularly incorporating new and im-
proved designs and older models are taken out of
production. Child restraints are not standardized.
Child restraints of the same type typically have
different
weights and sizes and different “foot-
prints”, the size and shape of the bottom of the
child restraint that sits on the seat, when they
are installed on a vehicle seat. These differences
make it virtually impossible to certify compliance
with the requirements for advanced airbags with
each and every child restraint that has ever been
sold in the past or will be sold over the course of
the useful life of your vehicle.
213