tire pressure AUDI R8 COUPE 2020 Owners Manual
[x] Cancel search | Manufacturer: AUDI, Model Year: 2020, Model line: R8 COUPE, Model: AUDI R8 COUPE 2020Pages: 308, PDF Size: 82.41 MB
Page 10 of 308
Quick access
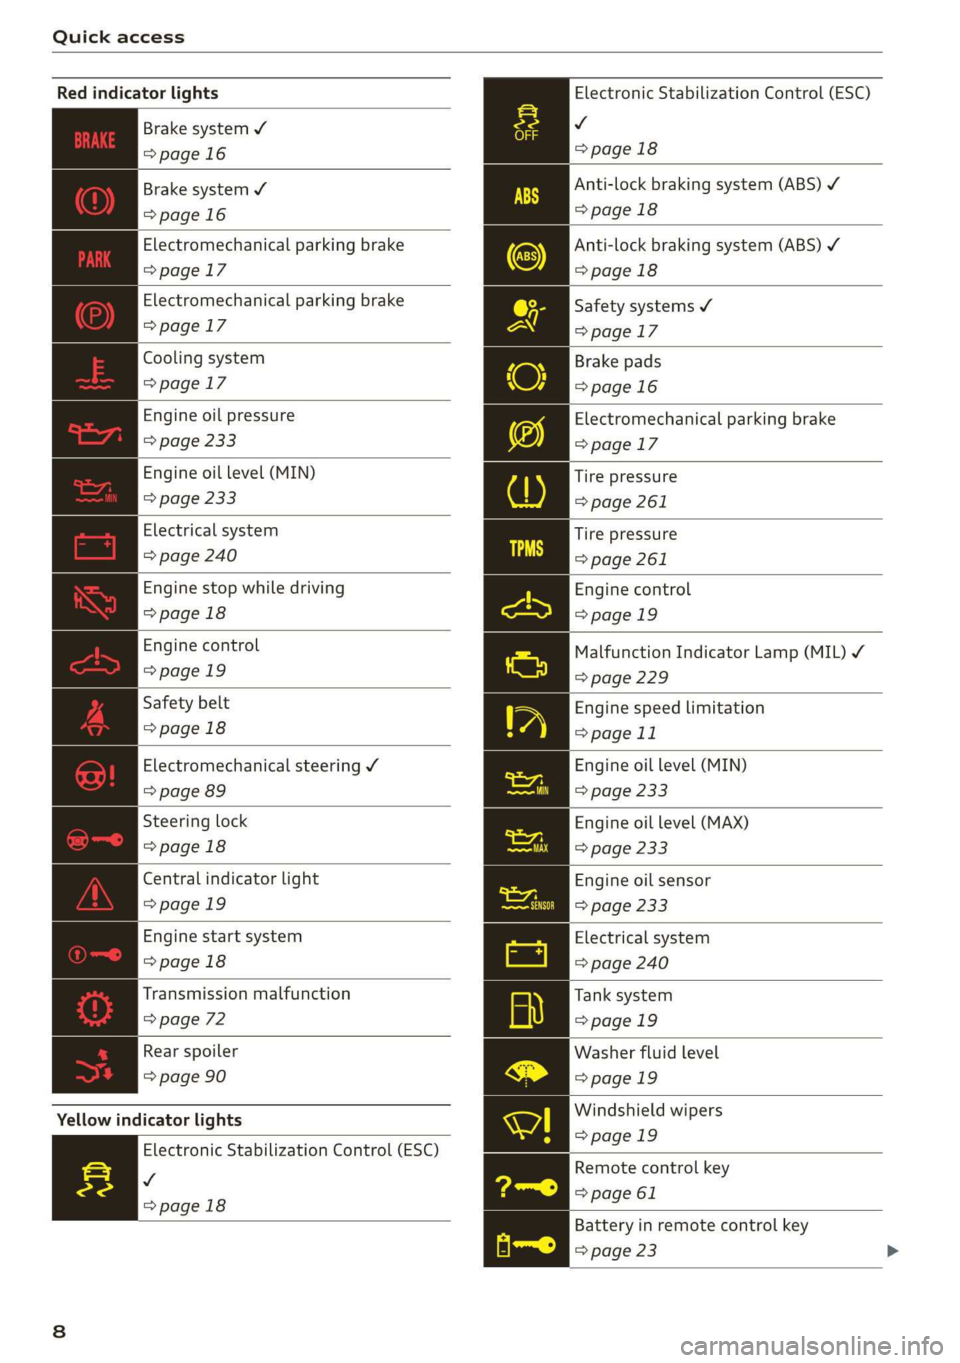
Electronic Stabilization Control (ESC)
v
=>page 18
Red indicator lights
Brake system ¥
=>page 16
Anti-lock braking system (ABS) ¥
>page 18
Anti-lock braking system (ABS) ¥
>page 18
Safety systems ¥
Brake system 4
=>page 16
Electromechanical parking brake
=>page 17
Electromechanical parking brake
=> page 17 =>page 17
Cooling system Brake pads
=>page 17 = page 16
Engine oil pressure
=> page 233
Engine oil level (MIN)
=> page 233
Electrical system
=> page 240
Engine stop while driving
>page 18
Engine control
>page 19
Safety belt
>page 18
Electromechanical parking brake
>page 17
Tire pressure
> page 261
Tire pressure
> page 261
Engine control
>page 19
Malfunction Indicator Lamp (MIL) ¥
=> page 229
Engine speed limitation
> page 11
ra Electromechanical steering V Engine oil level (MIN)
=> page 89 => page 233
eS Steering lock Engine oil level (MAX)
=>page 18 => page 233
Central indicator light Engine oil sensor
=>page 19 => page 233
Engine start system Electrical system
=>page 18 => page 240
Transmission malfunction Tank system
=> page 72 =>page 19
Rear spoiler Washer fluid level
=> page 90 =>page 19
Windshield wipers
Yellow indicator lights
>page 19
Electronic Stabilization Control (ESC)
v
=>page 18
Remote control key
=> page 61
Battery in remote control key
=> page 23
Page 17 of 308
4S1012721BA
Instrument cluster
— Long-term memory overview
— Energy consumers > page 15
— Driver assistance
— Traffic sign recognition
The short-term memory collects driving informa-
tion from the time the ignition is switched on un-
til it is switched off. If you continue driving within
two hours after switching the ignition off, the
new values are included when calculating the cur-
rent trip information.
Unlike the short-term memory, the long-term
memory is not erased automatically. You can se-
lect the time period for evaluating trip informa-
tion yourself.
Energy consumers*
The Energy consumers view lists other equip-
ment that is currently affecting fuel consump-
tion. The display shows up to three equipment
items. The equipment using the most power is
listed first. If more than three items using power
are switched on, the equipment that is currently
using the most power is displayed. A chart also
shows you the current total of all other consum-
ers.
Fuel consumption
The current fuel consumption can be shown using
a bar graph. The average consumption stored in
the short-term memory is also displayed. If the
bar is green, your vehicle is saving fuel through
one of the following functions:
— Recuperation: electrical energy can be stored in
the battery when the vehicle is coasting or driv-
ing downhill. The bar will move toward (1.
Engine oil and transmission temperature
itera 1 els
Applies to: Engine oil and transmission temperature indicator
The engine oil and transmission temperature in-
dicator are only shown in the enhanced view or in
the sport view > page 13.
Engine oil temperature indicator =
The engine has reached its operating tempera-
ture when the engine oil temperature is between
176 °F (80 °C) and 248 °F (120 °C) under normal
driving conditions. The engine oil temperature
may be higher if there is heavy engine load and
high temperatures outside. This is not a cause for
concern as long as the E => page 233 or =
=> page 233 indicator lights do not turn on.
Transmission temperature indicator
The current transmission temperature is indicat-
ed by a bar.
Shift light indicator
Applies to: vehicles with shift light indicator
The shift light indicator informs the driver when
the rpm limit is reached.
Accessing the shift light indicator
Requirement: tiptronic mode must be activated
=> page 71.
> Select the sport view > page 13. The shift light
indicator is displayed with green, yellow and
red ranges in the upper areas of the tachome-
ter.
The shift light indicator will blink red when ap-
proaching the engine speed limit. Shift to the
next highest gear at the right time.
Sy Team e NE
Applies to: vehicles with sport displays
Depending on the vehicle equipment, the sport
displays may include the G-meter, the engine da-
ta and the tire pressure monitoring system. You
can access the sport displays in the central area
or in the additional display in the driver informa-
tion system.
Accessing the sport displays in the central
area
> Open the first Vehicle tab (trip computer) using
the|<>] button on the multifunction steering
wheel.
> Select on the multifunction steering wheel: left
control button > Sport displays.
> Turn the left thumbwheel on the multifunction
steering wheel until the desired sport display
appears in the instrument cluster.
15
Page 18 of 308

Instrument cluster
Accessing the sport displays in the additional
display
> Select on the multifunction steering wheel:
right control button > Additional display.
> Select the desired additional display.
G meter*
The G meter displays the longitudinal and lateral
acceleration. The maximum values that are
reached are stored and displayed when the vehi-
cle is stationary.
> To reset the stored values, select on the multi-
function steering wheel: right control button >
Reset values.
Engine data*
The engine data displays the current power and
torque.
Tire pressure monitoring system*
The tire pressure monitoring system displays the
current tire pressures and temperature. Also see
= page 261, Tire pressure monitoring system.
Messages
BRAKE/@)/‘C} Brake system
If this indicator light turns on, there is a malfunc-
tion in the brake system.
GG @ Brakes: stop vehicle and check brake
fluid level
Stop the vehicle and check the brake fluid level.
See an authorized Audi dealer or authorized Audi
Service Facility for assistance.
Ga / @ Warning! No brake booster function
If the brake booster is not working, you have to
use much more force when braking the vehicle.
See an authorized Audi dealer or authorized Audi
Service Facility for assistance.
BRE / ) Brakes: malfunction! Safely stop ve-
hicle
If the indicator light turns on and this message
appears, there is a malfunction in the brake sys-
tem.
16
1f BES / Gana B also turn on, there is a mal-
function in the ABS, ESC, and braking distribu-
tion.
Do not continue driving. See an authorized Audi
dealer or authorized Audi Service Facility for as-
sistance > A\.
GG /o Parking brake: malfunction! Safely
stop vehicle. See owner's manual
— If the indicator light and the message appear
when the vehicle is stationary or after switch-
ing the ignition on, check if you can release the
parking brake. If you cannot release the parking
brake, see an authorized Audi dealer or author-
ized Audi Service Facility. If you can release the
parking brake and the message still appears,
see an authorized Audi dealer or authorized Au-
di Service Facility immediately to have the mal-
function corrected.
— If the indicator light and message appear while
driving, the hill start assist or emergency brak-
ing function may be malfunctioning. It may not
be possible to set the parking brake or release
it once it has been set. Do not park your vehicle
on hills. See an authorized Audi dealer or au-
thorized Audi Service Facility for assistance.
The fe) indicator light turns on when the brake
pads are worn. Drive to an authorized Audi dealer
or authorized Audi Service Facility immediately to
have the brake pads checked.
Applies to: USA models: The fe} indicator light
turns on together with the IBRAKE| indicator light.
ZA WARNING
— If the brake fluid level is below the MIN
marking, it can impair the braking effect and
driving safety, which increase the risk of an
accident. Do not continue driving. See an au-
thorized Audi dealer or authorized Audi
Service Facility for assistance.
— If the brake system indicator light turns on
together with the ABS and ESC indicator
lights, the ABS/ESC regulating function may
be malfunctioning. Functions that stabilize
the vehicle are no longer available. This
could cause the rear of the vehicle to
swerve, which increases the risk that the >
Page 57 of 308

451012721BA
Stowing and using
—The tire pressure must be adapted to the
load > page 254.
— You can purchase straps at specialty stores.
55
Page 61 of 308
4S1012721BA
Driving
Driving
General information
A new vehicle must be broken in within the first
1,000 miles (1,500 km) so that all moving parts
work smoothly together, which helps to increase
the service life of the engine.
Do not drive higher than two-thirds of the maxi-
mum permitted engine RPM during the first 600
miles (1,000 km) and do not use full accelera-
tion. The engine can be increased RPM gradually
during the next 300 miles (500 km).
Reducing the risk of vehicle damage
@ Note
When driving on poor roads, over curbs, and
on steep ramps, make sure that components
that hang below the vehicle, such as the spoil-
er and exhaust system, are not struck because
they could be damaged. This especially ap-
plies to vehicles with low ground clearance
and vehicles that are heavily loaded.
Driving through water on roads
Note the following to reduce the risk of vehicle
damage when driving through water, for example
on flooded roads:
— The water must not be any higher than the bot-
tom of the vehicle body.
— Do not drive faster than walking speed.
ZA WARNING
After driving through water or mud, the effec-
tiveness of the brakes may be reduced due to
moisture on the brake rotors and brake pads.
A few careful brake applications should dry off
the brakes and restore the full braking effect.
@) Note
— Vehicle components such as the engine,
transmission, suspension, or electrical sys-
tem, can be severely damaged by driving
through water.
— Always switch the Start/Stop system* off
when driving through water > page 62.
@) Tips
— Determine the depth before driving through
water.
— Do not stop the vehicle, drive in reverse, or
switch the engine off when driving through
water.
— Keep in mind that oncoming vehicles may
create waves that raise the water level and
make it too deep for your vehicle to drive
through safely.
— Avoid driving through salt water, because
this can cause corrosion.
aie e TRE erelie ltr)
driving
The amount of fuel consumption, the environ-
mental impact, and the wear to the engine,
brakes, and tires depends mostly on your driving
style. Note the following information for efficient
and environmentally-conscious driving:
— Do not let the engine run while the vehicle
parked.
— Use the Start/Stop system > page 62.
— Turn off electrical equipment that is not need-
ed, for example seat heating*.
— Anticipate upcoming traffic situations while
driving to avoid unnecessary acceleration and
braking.
— Utilize the engine braking effect.
— Avoid driving short distances or at high speeds
when possible.
— Avoid adding extra weight to the vehicle if pos-
sible, for example by not leaving roof racks or
bike racks installed when they are not needed.
— Have maintenance performed regularly on the
vehicle.
— Do not drive with winter tires during the summ-
er.
— Make sure the tire pressure is correct
=> page 254.
59
Page 69 of 308
4S1012721BA
Driving
— Hill hold assist cannot hold the vehicle in
place on all hills (for example, if the ground
is slippery or icy).
—To reduce the risk of an accident, always
make sure the vehicle is situated safely
while stationary.
Sporty driving
When driving in a sporty style, for example ona
driving track, the wear on all vehicle components
is greatly increased, especially on the engine,
transmission, tires, brakes, and suspension. This
can result in increased wear. Also note the fol-
lowing points:
— Make sure the vehicle is in good condition.
Make sure to check the brake pads, tire tread,
and tire pressure (when tires are warm).
— Beforehand, warm up the engine by driving no
higher than two-thirds of the maximum permit-
ted engine RPM. The engine oil temperature
must be brought to a minimum of 140 °F
(60 °C).
— Before stopping the vehicle, allow the engine
and brakes to cool back down to a regular oper-
ating temperature by driving normally.
If necessary, use the following functions:
— Audi drive select* Dynamic mode > page 78
— Launch Control > page 70
— Limit ESC > page 87
@) Tips
Wear caused by load does not constitute a ve-
hicle fault as defined by the terms of the war-
ranty.
Automatic transmission
Introduction
Your vehicle is equipped with an electronically-
controlled DSG transmission called S tronic. Two
independent clutches transfer the power be-
tween the engine and transmission. It allows the
vehicle to accelerate without a noticeable inter-
ruption in traction.
The transmission shifts up or down automatically
depending on which drive program is selected.
When a moderate driving style is used, the
transmission selects the most economical driving
mode. The transmission upshifts at a lower RPM
and downshifts at a higher RPM to improve fuel
efficiency.
If desired, the driver can also select the gears
manually (tiptronic mode) > page 71.
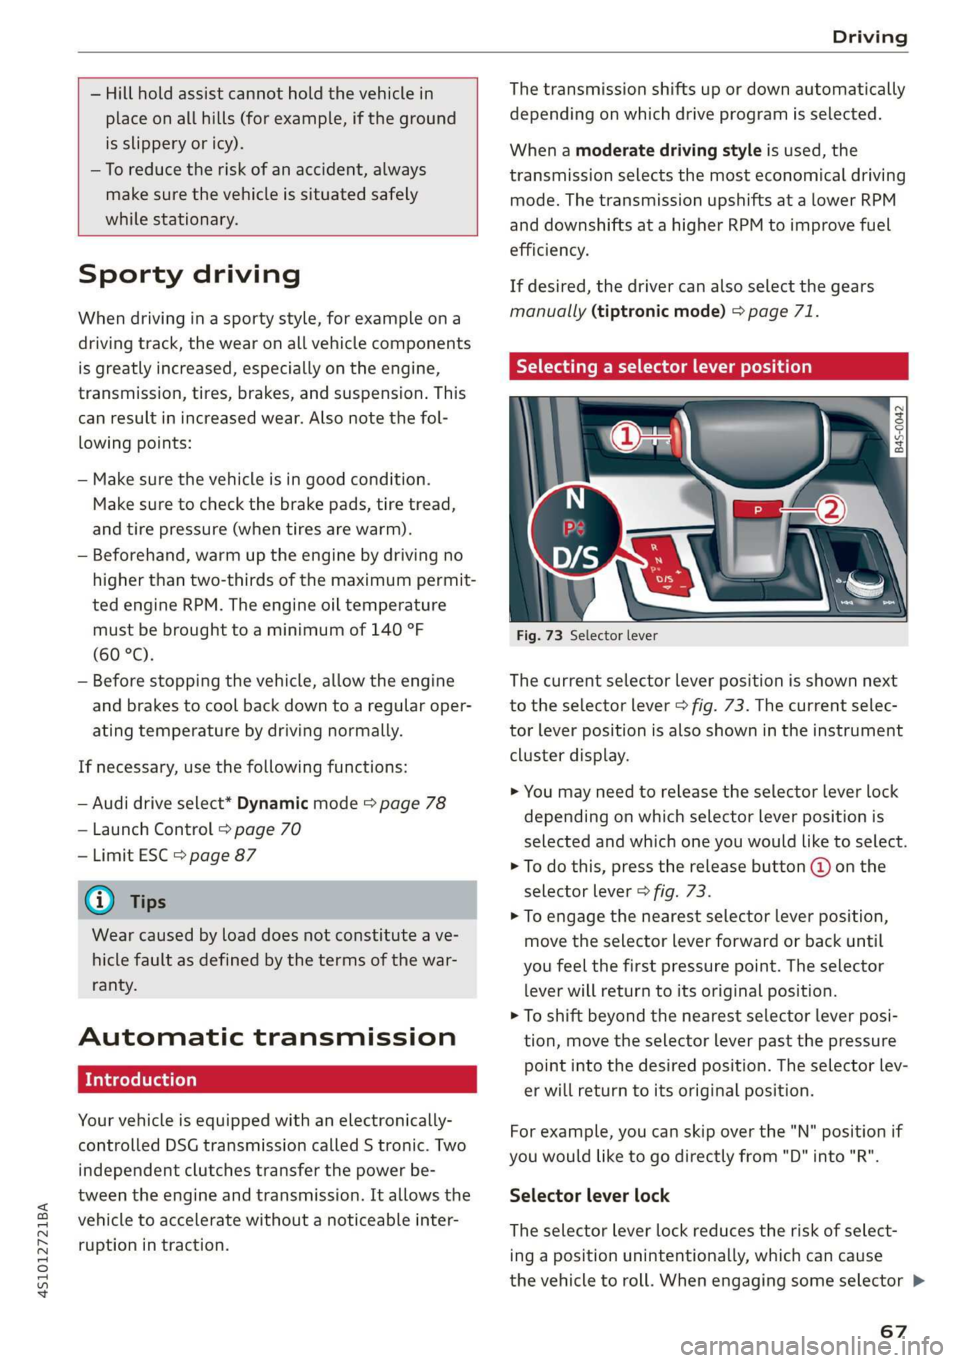
Selecting a selector lever position
Fig. 73 Selector lever
The current selector lever position is shown next
to the selector lever > fig. 73. The current selec-
tor lever position is also shown in the instrument
cluster display.
> You may need to release the selector lever lock
depending on which selector lever position is
selected and which one you would like to select.
> To do this, press the release button @ on the
selector lever > fig. 73.
> To engage the nearest selector lever position,
move the selector lever forward or back until
you feel the first pressure point. The selector
lever will return to its original position.
> To shift beyond the nearest selector lever posi-
tion, move the selector lever past the pressure
point into the desired position. The selector lev-
er will return to its original position.
For example, you can skip over the "N" position if
you would like to go directly from "D" into "R".
Selector lever lock
The selector lever lock reduces the risk of select-
ing a position unintentionally, which can cause
the vehicle to roll. When engaging some selector >
67
Page 175 of 308
4S1012721BA
Safe driving
Safe driving
Basics
SER Nails mali
Please remember - safety first!
The individual safety features of your vehicle can
work together as a system to help protect you
and
your passengers in a wide range of accidents.
These features cannot work as a system if they
are not always correctly adjusted and correctly
used.
This chapter contains important information,
tips, instructions and warnings that you need to
read and observe for your own safety, the safety
of your passengers and others. We have summar-
ized here what you need to know about safety
belts, airbags, child restraints as well as child
safety. Your safety is for us priority number 1. Al-
ways observe the information and warnings in
this section - for your own safety as well as that
of your passengers.
The information in this section applies to all
model versions of your vehicle. Some of the fea-
tures described in this sections may be standard
equipment on some models, or may be optional
equipment on others. If you are not sure, ask
your authorized Audi dealer.
ZA WARNING
— Always make sure that you follow the in-
structions and heed the WARNINGS in this
Manual. It is in your interest and in the in-
terest of your passengers.
— Always keep the complete Owner's Litera-
ture in your Audi when you lend or sell your
vehicle so that this important information
will always be available to the driver and
passengers.
— Always keep the Owner's literature handy so
that you can find it easily if you have ques-
tions.
Important things to do before driving
Safety is everybody's job! Vehicle and occupant
safety always depends on the informed and care-
ful driver.
For your safety and the safety of your passenger,
before driving always:
> Make sure that all lights and signals are operat-
ing correctly.
> Make sure that the tire pressure is correct.
> Make sure that all windows are clean and afford
good visibility to the outside.
> Secure all luggage and other items carefully
=> page 54, > page 54.
> Make sure that nothing can interfere with the
pedals.
> Adjust seat and mirrors correctly for your
height.
> Make sure to use the right child restraint cor-
rectly to protect children > page 211, Child
safety.
> Sit properly in your seat and make sure that
your passenger do the same © page 50, Front
seats.
> Fasten your safety belt and wear it properly. Al-
so instruct your passenger to fasten his safety
belt properly > page 180.
What impairs driving safety?
Safe driving is directly related to the condition of
the vehicle, the driver as well as the driver’s abili-
ty to concentrate on the road without being dis-
tracted.
The driver is responsible for the safety of the ve-
hicle and all of its occupants. If your ability to
drive is impaired, safety risks for everybody in the
vehicle increase and you also become a hazard to
everyone else on the road > /\. Therefore:
> Do not let yourself be distracted by passenger
or by using a cellular telephone.
> NEVER drive when your driving ability is im-
paired (by medications, alcohol, drugs, etc.).
> Observe all traffic laws, rules of the road and
speed limits and plain common sense.
> ALWAYS adjust your speed to road, traffic and
weather conditions.
173
>
Page 248 of 308
Wheels
@ US DOT number (TIN) and
manufacture date
The manufacture date is listed on
the tire sidewall (it may only ap-
pear on the inner side of the tire):
DOT... 2219...
means, for example, that the tire
was produced in the 22nd week of
the year 2019.
@) Audi Original Tires
Audi Original equipment tires
with the designation “AO” have
been specially matched to your
Audi. When used correctly, these
tires meet the highest standards
for safety and handling. An au-
thorized Audi dealer or author-
ized Audi Service Facility will be
able to provide you with more in-
formation.
@) Mud and snow capability
“M/S” or “M+S” indicates the tire
has properties making it suitable
to drive in mud or snow. /& indi-
cates a winter tire.
Composition of the tire cord
and materials
The number of plies indicates the
number of rubberized fabric lay-
ers in the tire. In general: the
more layers, the more weight a
246
tire can carry. Tire manufacturers
must also specify the materials
used in the tire. These include
steel, nylon, polyester and other
materials.
@ Maximum permitted load
This number indicates the maxi-
mum load in kilograms and
pounds that the tire can carry.
@ Uniform tire quality grade
standards for treadwear,
traction and temperature
resistance
Treadwear, traction and tempera-
ture ranges > page 260.
@ Running direction
@ Maximum permitted
inflation pressure
This number indicates the maxi-
mum pressure to which a tire can
be inflated under normal operat-
ing conditions.
Glossary of tire and loading
terminology
Accessory weight
means the combined weight (in
excess of those standard items
which may be replaced) of auto-
matic transmission, power steer-
ing, power brakes, power
Page 249 of 308
4S1012721BA
Wheels
windows, power seats, radio, and
heater, to the extent that these
items are available as factory-in-
stalled equipment (whether in-
stalled or not).
Aspect ratio
means the ratio of the height to
the width of the tire in percent.
Numbers of 55 or lower indicate a
low sidewall for improved steer-
ing response and better overall
handling on dry pavement.
Bead
means the part of the tire that is
made of steel wires, wrapped or
reinforced by ply cords and that is
shaped to fit the rim.
Bead separation
means a breakdown of the bond
between components in the bead.
Cord
means the strands forming the
plies in the tire.
Cold tire inflation pressure
means the tire pressure recom-
mended by the vehicle manufac-
turer for a tire of a designated
size that has not been driven for
more than a couple of miles (kilo-
meters) at low speeds in the three
hour period before the tire pres-
sure is measured or adjusted.
Curb weight
means the weight of a motor ve-
hicle with standard equipment in-
cluding the maximum capacity of
fuel, oil, and coolant, air condi-
tioning and additional weight of
optional equipment.
Extra load tire
means a tire designed to operate
at higher loads and at higher in-
flation pressures than the corre-
sponding standard tire. Extra load
tires may be identified as “XL”,
“xl”, “EXTRA LOAD”, or “RF” on
the sidewall.
Gross Axle Weight Rating
(“GAWR”)
means the load-carrying capacity
of a single axle system, measured
at the tire-ground interfaces.
Gross Vehicle Weight Rating
(“GVWR”)
means the maximum total loaded
weight of the vehicle.
Groove
means the space between two ad-
jacent tread ribs.
247
>
Page 250 of 308
Wheels
Load rating (code)
means the maximum load that a
tire is rated to carry for a given in-
flation pressure. You may not find
this information on all tires be-
cause it is not required by law.
Maximum load rating
means the load rating for a tire at
the maximum permissible infla-
tion pressure for that tire.
Maximum loaded vehicle
weight
means the sum of:
(a) Curb weight
(b) Accessory weight
(c) Vehicle capacity weight, and
(d) Production options weight
Maximum (permissible)
inflation pressure
means the maximum cold infla-
tion pressure to which a tire may
be inflated. Also called “maxi-
mum inflation pressure.”
Normal occupant weight
means 150 lbs (68 kg) times the
number of occupants seated in
the vehicle up to the total seating
capacity of your vehicle.
248
Occupant distribution
means distribution of occupants
in a vehicle.
Outer diameter
means the overall diameter of an
inflated new tire.
Overall width
means the linear distance be-
tween the exteriors of the side-
walls of an inflated tire, including
elevations due to labeling, deco-
rations, or protective bands or
ribs.
Ply
means a layer of rubber-coated
parallel cords.
Production options weight
means the combined weight of
those installed regular production
options weighing over 5 lbs
(2.3 kg) in excess of those stand-
ard items which they replace, not
previously considered in curb
weight or accessory weight, in-
cluding heavy duty brakes, ride
levelers, roof rack, heavy duty
battery, and special trim.
Radial ply tire
means a pneumatic tire in which
the ply cords that extend to the >