phone AUDI R8 SPYDER 2012 Owners Manual
[x] Cancel search | Manufacturer: AUDI, Model Year: 2012, Model line: R8 SPYDER, Model: AUDI R8 SPYDER 2012Pages: 236, PDF Size: 59.24 MB
Page 9 of 236
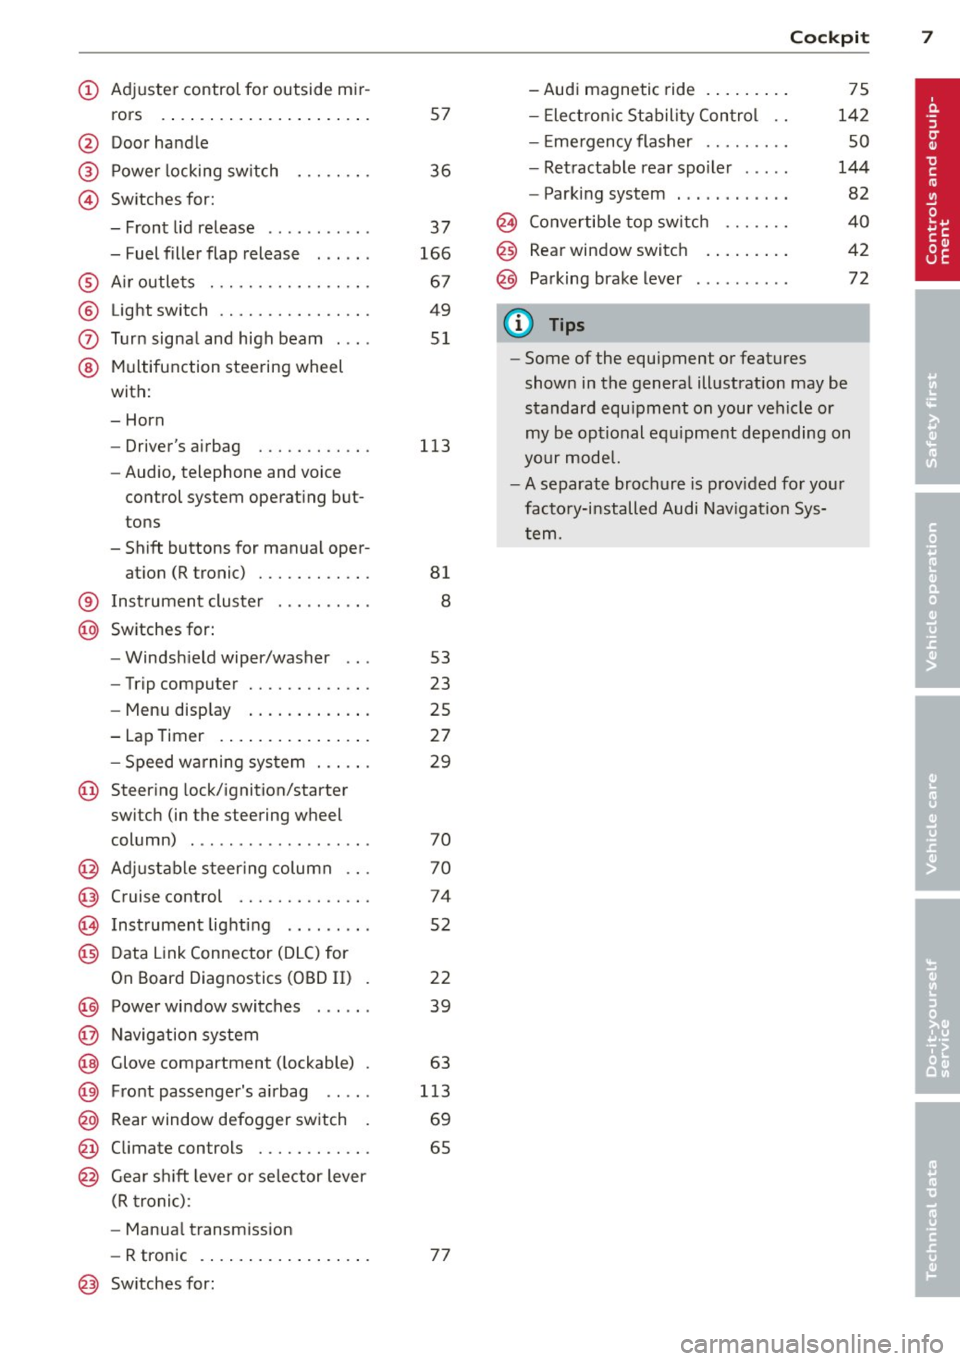
(!) Adjuster control for outside mir-rors .... ..... .......... .. .
@ Door handle
@ Power locking switch
© Switches for:
- Front lid release .......... .
- Fuel filler flap release . .. .. .
® Air outlets ............ .... .
® Light switch ............... .
(J) Turn signal and high beam ... .
@ Multifunction steering wheel
with:
- Horn
- Driver's airbag ........... .
- Audio, telephone and voice
control system operating but
tons
- Shift buttons for manual oper-
at ion (R tronic) ........... .
® Instrument cluster
@ Switches for: 57
36
37
166
67
49
51
113
81
8
- Windshield wiper/washer 53
- Trip computer . . . . . . . . . . . . . 23
- Menu display . . . . . . . . . . . . . 25
- Lap Timer . . . . . . . . . . . . . . . . 27
- Speed warning system . . . . . . 29
@ Steering lock/ignition/starte r
switch (in the steering wheel
column) . . . . . . . . . . . . . . . . . . . 70
@ Adjustable steering column . . . 70
@ Cruise control . . . . . . . . . . . . . . 74
@ Instrument lighting . . . . . . . . . 52
@) Data Link Connector (DLC) for
On Board Diagnostics (OBD II) . 22
@) Power window switches . . . . . . 39
@ Navigation system
@ Glove compartment (lockable) . 63
@ Front passenger's airbag . . . . . 113
@ Rear window defogger switch . 69
@ Climate controls . . . . . . . . . . . . 65
@ Gear shift lever or selector lever
(R tronic) :
- Manual transmission
- R tronic . . . . . . . . . . . . . . . . . . 77
@ Switches for: -Audi magnetic ride ........
.
- Electronic Stability Control ..
- Em ergency flasher ........ .
- Retractable rear spoiler .... .
- Parking system ...... ..... .
Cockpit 7
75
142
so
144
82
@ Convertible top switch . . . . . . . 40
@ Rear window switch . . . . . . . . . 42
@ Parking brake lever . . . . . . . . . . 72
(D Tips
-Some of the equipment or features
shown in the general illustration may be
standard equipment on your vehicle or
my be optional equipment depending on
your model.
-A separate brochure is provided for your
factory-installed Audi Navigation Sys
tem.
Page 35 of 236
Master key with remote control
The remote control allows you to lock or un
lock the vehicle electronically .
The transmitter and battery are located in the
head of the remote control. The receiver is lo
cated inside the vehicle . The maximum effec
tive range depends on several things . Remem
ber, if the battery is wea k, the effective range
decreases.
If you need to replace the remote control, or if
you need to have it repaired, you must see
your authorized Audi dealer. Only then can
you use the key again.
(D Tips
- If the ignition is sw itched on, the remote
control system is deactivated .
- The remote control system can be affect
ed by other systems operating in the
same frequency range close to the vehi
cle, such as mobile telephones, televi
sion broadcasting stations, etc.
- Fo r Declaration of Compliance to United
States FCC and Indus try Canada regula
tions
¢ page 222.
Resetting the remote control
The remote control must be reset if the vehi
cle does not unlock.
• Press the unlock@ button on the remote
control.
• Within 30 seconds, unlock or lock the vehi
cle once at the door lock using the stem of
the remote control key.
• Press the unlock button~ or the lock but
ton ~.
Opening and closing 33
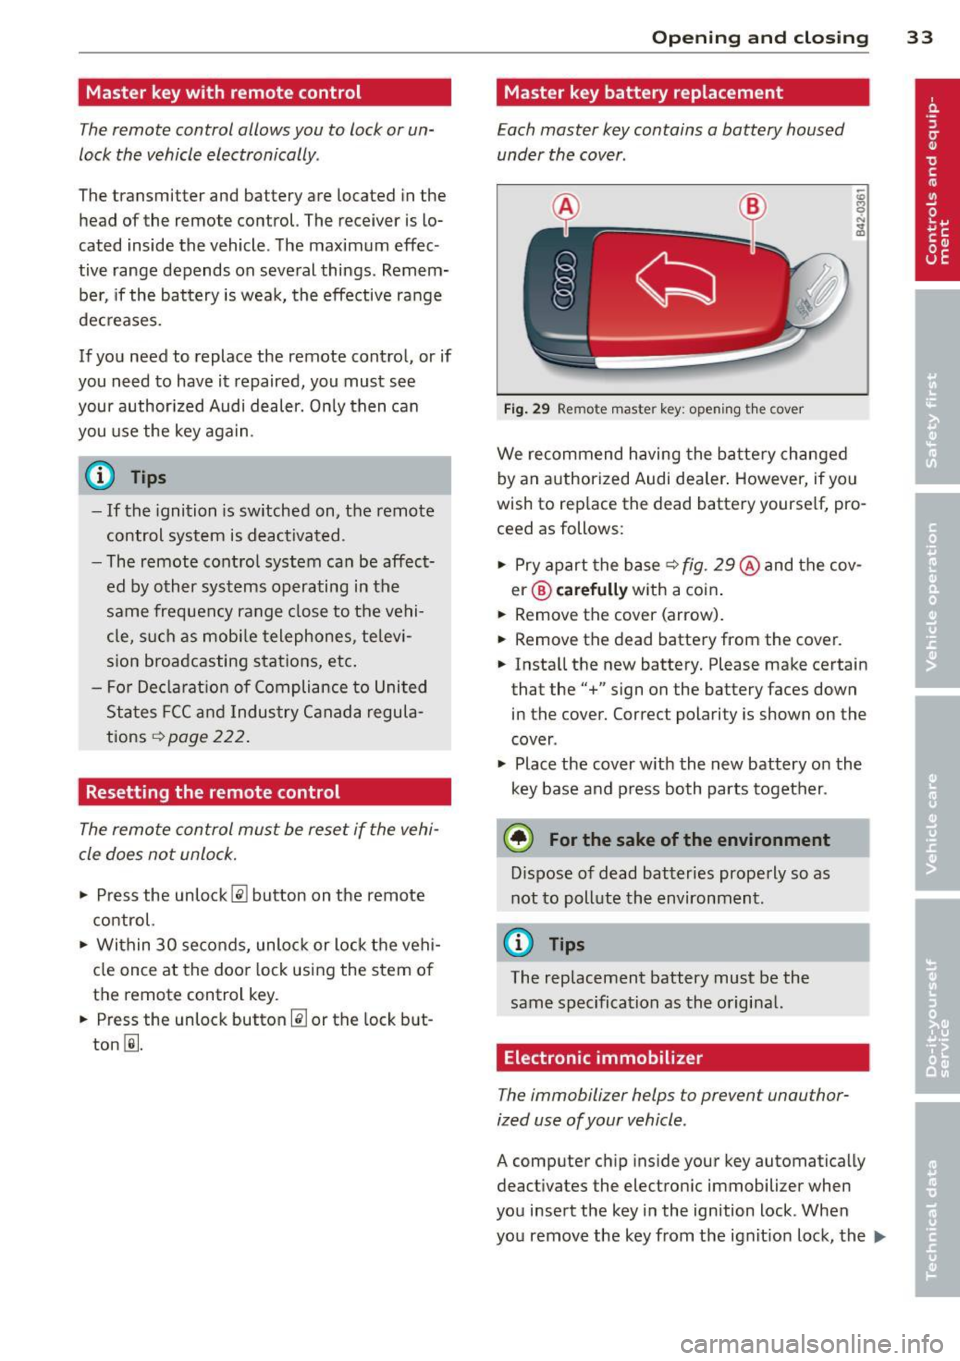
Master key battery replacement
Each master key contains a battery housed
under the cover.
Fig . 29 Remote master key: opening t he cover
We recommend having the battery changed
by an authorized Audi dea ler . However, if you
wish to rep lace the dead battery yourse lf, pro
ceed as follows:
• Pry apart the base
~ fig. 29@and the cov-
er@ carefully with a coin .
• Remove the cover (arrow).
• Remove the dead battery from the cover.
• Insta ll the new battery. Please make certain
that the"+" sign on the battery faces down
in the cover. Correct polarity is shown on the
cover .
• Place the cover w ith the new battery on the
key base and press both parts together .
@ For the sake of the environment
Dispose of dead batteries properly so as
not to pollute the environment.
(D Tips
The replacement battery must be the
same specification as the origina l.
Electronic immobilizer
The immobilizer helps to prevent unauthor
ized use of your vehicle .
A computer chip inside your key automatically
deactivates the electronic immobilizer when
you insert the key in the ignition lock . When
you remove the key from the ignit ion lock, the
II>
Page 94 of 236
92 Driving Safel y
• Fasten your safety belt and wear it proper ly.
Also instruct your passengers to fasten their
safety belts proper ly
¢ page 101.
What impairs driving safety?
Safe driving is directly related to the condi
tion of the vehicle, the driver as well as the
driver's ability to concentrate on the rood
without being distracted.
The driver is responsible for the safety of the
vehicle and all of its occupants. If your ability
to drive is impaired, safety risks for everybody
in the vehicle increase and you also become a
hazard to everyone else on the road
¢ .&, .
Therefore:
• Do not let yourself be distracted by passen
gers or by using a cellular telephone.
• NEVER drive when your dr iving ability is im
paired (by medicat ions, alcohol, drugs, etc.) .
• Observe all traffic laws, rules of the road
and speed limits and plain common sense .
• ALWAYS adjust your speed to road, traff ic
and weather condit ions.
• Take frequent breaks on long trips . Do not
drive for more than two hours at a stretch .
• Do NOT drive when you are tired , under
pressure or when you are stressed.
A WARNING , .
Impaired driving safety increases the risk
of serious personal injury and death when
ever a vehicle is being used .
Proper occupant
seating positions
Proper seating position for the driver
The proper driver seating position is impor
tant for safe, relaxed driving.
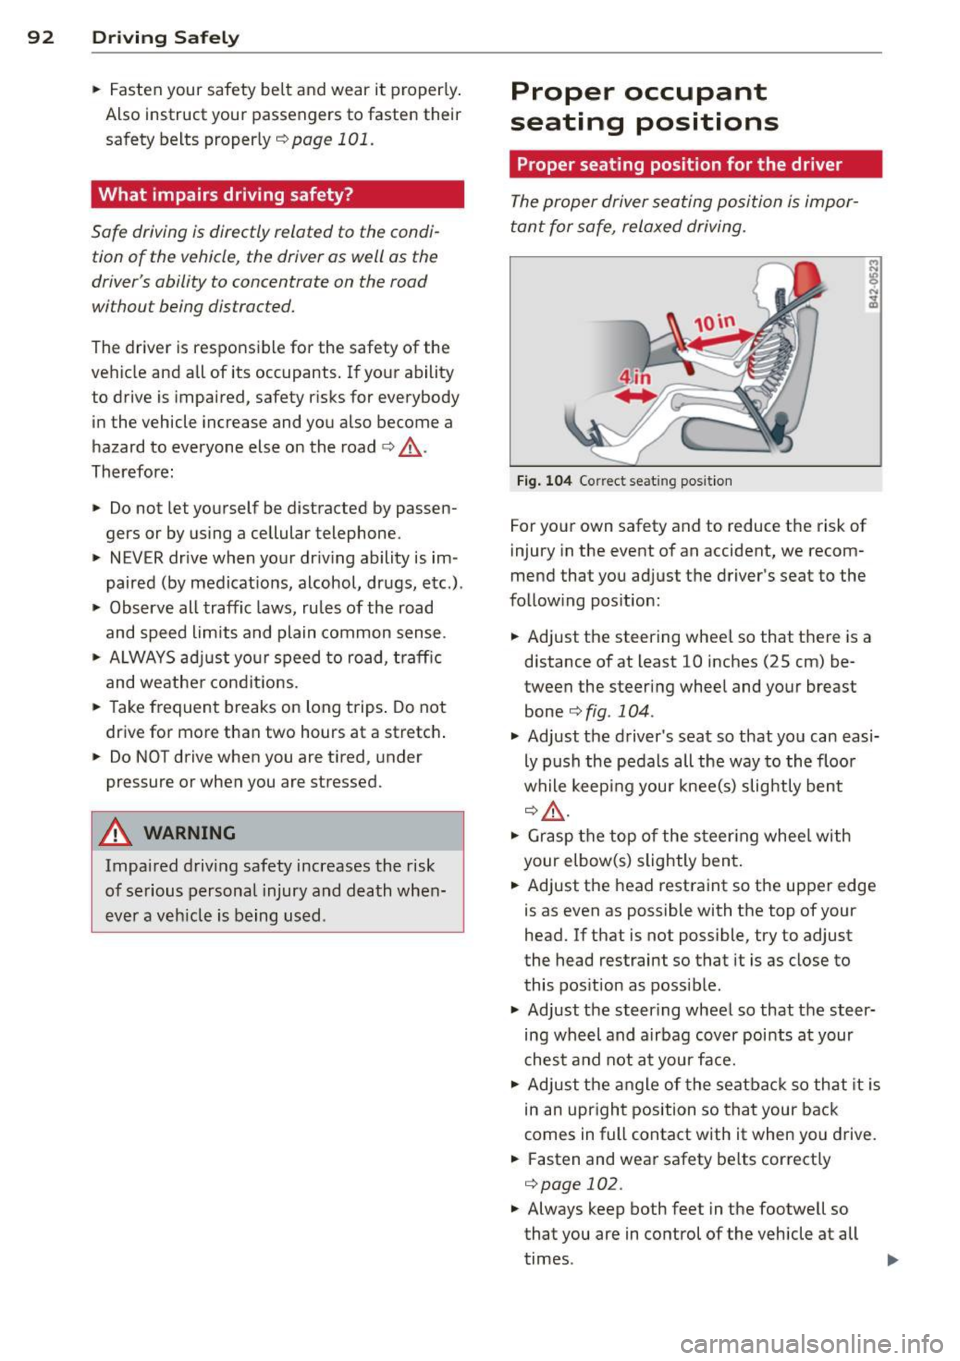
Fig. 104 Correct seat ing posit ion
For your own safety and to reduce the risk of
injury in the event of an accident, we recom
mend that you adjust the driver's seat to the
following position:
• Adjust the steering wheel so that there is a
distance of at least 10 inches (25 cm) be
tween the steering wheel and your breast
bone¢
fig . 104 .
• Adjust the driver's seat so that you can easi
ly push the pedals all the way to the floor
while keeping your knee(s) slightly bent
¢.&, .
• Grasp the top of the steer ing whee l with
your elbow(s) slightly bent.
• Adjust the head restraint so the upper edge
is as even as possible with the top of your
head. If that is not possible, try to adjust
the head restraint so that it is as close to
this position as possible .
• Adjust the steering wheel so that the steer
ing wheel and airbag cover points at your
chest and not at your face.
• Adjust the angle of the seatback so that it is
in an upright position so that your back
comes in full contact with it when yo u drive.
• Fasten and wear safety be lts correctly
¢ page 102.
• Always keep both feet in the footwell so
that you are in control of the vehicle at all
times .
Page 107 of 236
.. Hold the be lt by the tongue and pull it
evenly across the chest and pelvis
¢ _&..
.. Insert the tongue into the correct buckle of
your seat until you hear it latch securely
¢fig. 116.
.. Pu ll on the be lt to make sure that it is se -
curely latched in t he buckle .
Automatic safety belt retractor s
Every safety belt is eq uipped with an automat
ic belt retractor on the shoulder belt . This fea
ture locks the belt when the belt is pulled out
fast, dur ing hard braking and in an accident .
The belt may also lock when you drive up or
down a steep hill or through a sharp curve .
Du ring normal driving the belt let s you move
freely.
Switchable locking feature
Every safety belt except the one on the driver
seat is equ ipped w ith a switchable locking fea
ture that
must be used w hen the safety belt is
used to atta ch a child sea t. B e s ure to read the
i mportant information abo ut this fea ture
¢ page 138.
A WARNING
Imprope rly positioned safety belts can
cause serious injury in an accident
Q page 105, Safety belt position .
-Safety belts offer optimum protection
only when the seatback is upright and
belts are properly positioned on the
body.
-
- Never attach the safety belt to the buck
le for another seat. Attach ing the belt to
the wrong buckle w ill reduce safety belt
effect iveness and can cause serious per
sonal inj ury .
- A passenger who is not properly restrain
ed can be seriously in jured by the safety
belt itself whe n it moves from the stron
ger parts of the body into c ritical a reas
like the abdomen.
- Always lock the convert ible lock ing re
tra ctor when yo u are secur ing a chi ld
sea t in the vehicle¢
page 140 .
Safety belts 105
@ Tips
Depending on veh icle equipment, micro
phones * are located on the safety be lt to
i mprove hands-free call quality. For addi
tional information about safety belt m icro
phones, refer to the infotainment system
owner's manual.
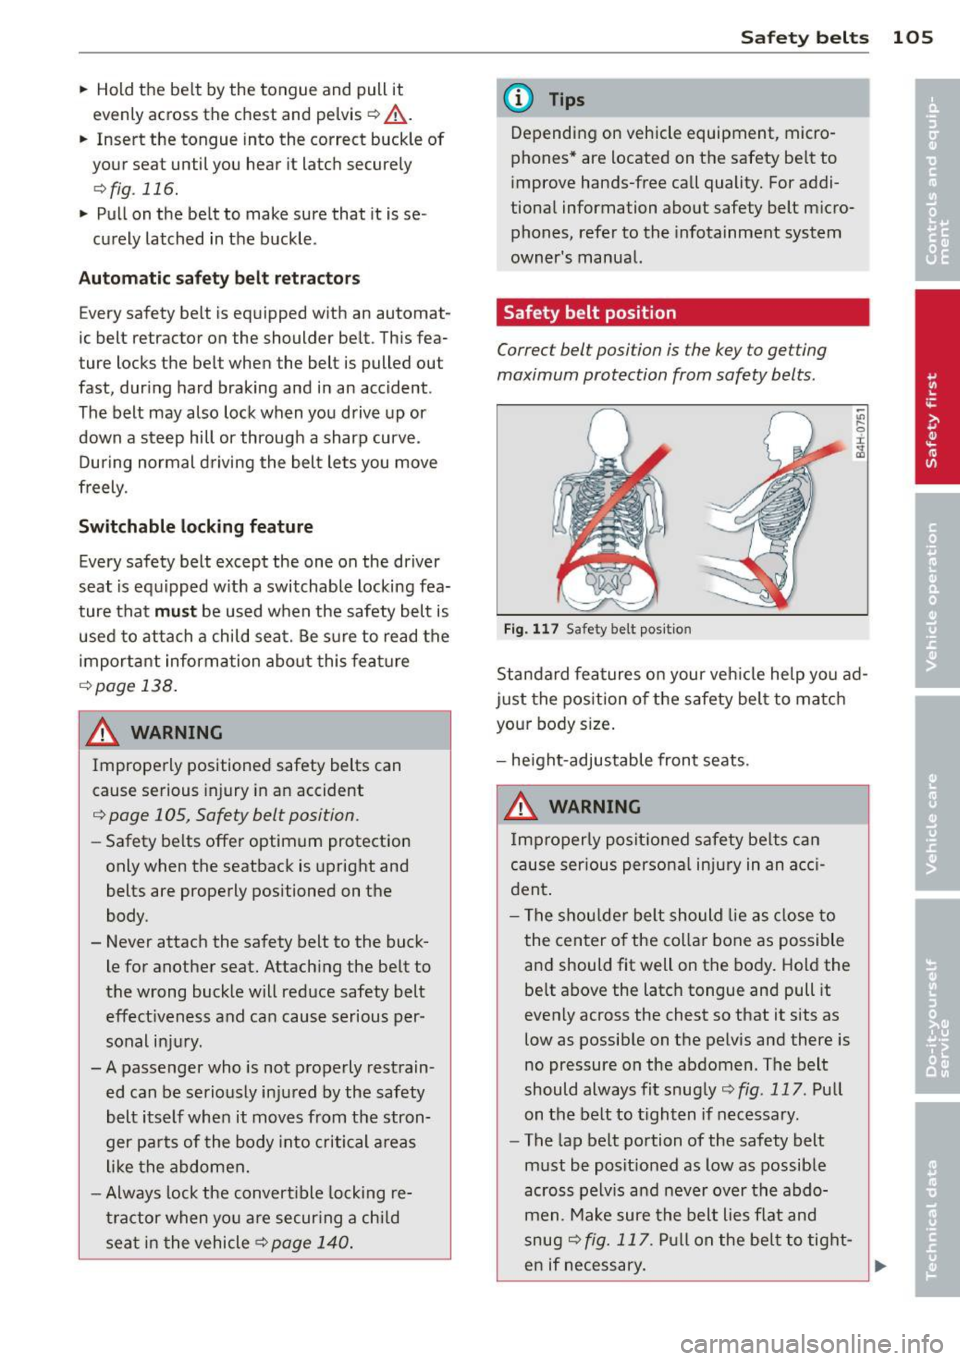
Safety belt position
Correct bel t position is the key to getting
maximum protection from safety belts .
Fig. 117 Safety belt posit ion
Standard features o n your ve hicle help yo u ad
j ust the pos ition o f the safety belt to ma tc h
your body size.
- he ight-adjustable front seats.
A WARNING
I mproperly posit ioned safety be lts ca n
cause ser ious perso na l injury in an a cci
dent .
-
-The shou lde r belt should lie as close to
the center o f the ca lla r bone as possible
a nd should fit well on the body. Hold the
be lt above the latc h tongue and pull it
even ly across the chest so that it sits as
low as possible on the pelv is and there is
no pressure on the abdomen. The belt
should always fit snug Ly
Q fig. 117. Pull
on the belt to t ighten if necessary.
- The lap be lt portion of the safety belt
must be posit ioned as low as possible
across pelv is and never over the abdo
men. Make sure the belt lies flat and
snug
¢ fig. 117. Pull on the belt to tight-
en if necessary. .,..
Page 121 of 236
electronic control unit (the PA SS ENGE R AIR
BAG OFF
light comes on and stays on).
A WARNING
Sitting in the wrong position can increase
the risk of serious injury in crashes.
- To reduce the risk of injury when the air
bags inflate, the driver and passengers
must always sit in an upright posit ion,
must not lean against or place any part
of the ir body too close to the area where
the a irbags are located .
- Occupants who are unbelted, out of posi
t ion or too close to the airbag can be se
riously injured by an airbag as it unfolds
with great force in the blin k of an eye
¢page 111.
A WARNING
A child in a rearward-facing child sa fety
sea t insta lled on the front passenger seat
wi ll be seriously injured and can be k illed if
the front ai rbag inflates -even with an Ad
vanced Airbag System.
-
-The inflating airbag will hit the child
safety seat or infant carrier w ith great
force and w ill smash the ch ild safety seat
and child against the backrest, center
armrest , door or roof.
- Never install a rearward facing child
safety seat on the front passenger seat
unless the
PASSENGER A IR BAG OFF
light comes on and stays on . If the PAS
SENGER AIR BAG OFF
light does not
c ome o n and stay on, the inflating airbag
will hit the child safety seat o r infant car
rier wi th great force and will smash the
child safety seat and child against the
backrest, door or roof . Have the airbag
system inspected immediately by your
authorized Audi dealer .
A WARNING
Objects between you and the a irbag will
increase the risk of in jury in a c rash by in
terfering with the way the airbag unfolds
A irbag system 119
or by be ing p ushed into you as the airbag
inflates.
- Never hold things in you r hands o r on
your lap when the veh icle is in use.
- Never transport items on or in the area
of the front passenger seat . Objects
could move into the a rea of the front air
bags during braking or other sudden ma
neuvers and become dangerous projec
tiles that can cause ser ious personal in
jury if t he a irbags inflate .
- Never p lace or attach accessories or oth
er objects (such as cup holders, te le
phone b rac kets, large, heavy or bulky ob
jects) on the doors, ove r o r near the area
marked "AIRBAG " on the s teering wheel,
instrument panel, seat bac krests or be
tween those areas and yo urself. These
objects could cause inju ry in a c rash, es
pecially when the airbags inflate.
- Never recline the front passenger's seat
to transport objects . Items can a lso
move into the area of the s ide a irbag or
the front a irbag during braking or in a
sudden maneuver. Objects near the air bags can become projec tiles a nd cause
in ju ry, partic ula rly when the seat is re
clined.
A WARNING
T he fine dus t created when airbags deploy
can cause breathing prob lems fo r people
wi th a history of as thma or other breath
ing cond itions.
- T o reduce t he risk of bre ath ing problems,
those wi th asthma o r other respiratory
conditions s hou ld get fresh air r ight
away by getting o ut of the veh icle or
open ing windows or doors.
- If you are in a collision in which airbags
deploy, wash your hands and face with
mild soap and water before eating .
- Be ca reful not to get the dust into your
eyes, or into any c uts or scratches.
- If the resi due should get into your eyes,
f lush them w ith wate r.
•
•
Page 125 of 236
A WARNING
1
Improper care, servicing and repair proce
dures can increase the risk of personal in
jury and death by preventing an airbag from deploying when needed or deploying an airbag unexpectedly:
- Never cover, obstruct, or change the
steering wheel horn pad or airbag cover
or the instrument panel or modify them
in any way .
- Never attach any objects such as cup
holders or telephone mountings to the
surfaces covering the airbag units.
- For cleaning the horn pad or instrument
panel, use only a soft , dry cloth or one
moistened with plain water. Solvents or
cleaners could damage the airbag cover
or change the stiffness or strength of the
material so that the airbag cannot de
ploy and protect properly.
- Never repair, adjust, or change any parts
of the airbag system.
- All work on the steering wheel, instru
ment panel, front seats or electrical sys
tem (including the installation of audio
equipment, cellular telephones and CB
radios, etc .) must be performed by a
qualified technician who has the training
and special equipment necessary.
- For any work on the airbag system, we
strongly recommend that you see your
authorized Audi dealer or qualified work
shop.
- Never modify the front bumper or parts
of the vehicle body .
- Always make sure that the side airbag
can inflate without interference:
- Never install seat covers or replace
ment upholstery over the front seat
backs that have not been specifically
approved by Audi.
- Never use additional seat cushions that
cover the areas where the side airbags
inflate.
- Damage to the original seat covers or
to the seam in the area of the side air bag module must always be repaired
Airbag system 123
immediately by an authorized Audi
dealer.
- The airbag system can be activated only
once . After an airbag has inflated, it
must be replaced by an authori zed Audi
dealer or qualified technician who has
the technical information, training and
special equipment necessary.
- The airbag system can be deployed only
once . After an airbag has been deployed,
it must be replaced with new replace
ment parts designed and approved espe
cially for your Audi model version . Re
placement of complete airbag systems
or airbag components must be per
formed by qualified workshops only. Make sure that any airbag service action
is entered in your Audi Warranty
& Main
t enance booklet under
AIRBAG REPLACE
MENT RECORD .
-For safety reasons in severe accidents,
the alternator and s tarter are separa ted
from the vehicle battery with a pyrotech
nic circuit interrupter .
- Work on the pyrotechnic circuit inter
rupter must only be performed by a
qualified dealer - risk of an accident!
- If the vehicle or the circuit interrupter
is scrapped , all applicable safety pre
cautions must be followed.
@ For the sake of the environment
Undeployed airbag modules and preten
sioners might be classified as Perchlorate
Material - special handling may apply, see
www .dtsc .ca. gov/hazard o u swaste/ per-
ch [orate . When the vehicle or parts of the
restraint system including airbag modules
and safety belts with pretensioners are
scrapped, all applicable laws and regula
tions must be observed. Your authorized
Audi dealer is familiar with these require
ments and we recommend that you have
your dealer perform this service for you.
•
•
•
•
Page 131 of 236
-Never install seat covers or replace
ment upholstery over the front seat
backs that have not been specifically
approved by Audi .
- Never use additional seat cushions that
cover the areas where the side airbags
deploy.
- Damage to the original seat covers or
to the seam in the area of the side air bag module must always be repaired
immediately by an authorized Audi
dealer.
- Objects between you and the airbag can
increase the risk of injury in an accident
by interfering with the way the airbag
deploys or by being pushed into you as
the airbag inflates.
- Never place or attach accessories or
other objects (such as cup holders, tel
ephone brackets, or even large, bulky
objects) on the doors, over or near the
area marked "AIRBAG" on the seat
backrests.
- Such objects and accessories can be
come dangerous projectiles and cause
injury when the supplemental side air
bag deploys.
- Never carry any objects or pets in the
deployment space between them and
the airbags or allow children or other
passengers to travel in this position.
- Always prevent the side airbags from be
ing damaged by heavy objects knocking
against or hitting the sides of the seat
backs.
- The airbag system can only be triggered
once. If the airbag has been triggered,
the system must be replaced by an au
thorized Audi dealer.
- Damage (cracks, deep scratches etc.) to
the original seat covers or to the seam in
the area of the side airbag module must always be repaired immediately by an au
thorized Audi dealer .
- If children are seated improperly, their
risk of injury increases in the case of an
accident ~
page 130, Child Safety .
Airbag system 129
-Never attempt to modify any compo
nents of the airbag system in any way .
•
•
Page 168 of 236
166 Fuel suppl y and filli ng your fuel t ank
transport fue l to use for your lawn mower,
snow blower, etc., be very careful and al
ways observe local and state laws regard
ing the use, transportat ion and storage of
such fuel containers. Make certain the con
tainer meets industry standards (ANSI/
AS TM F852 -86).
(D Note
Never drive your vehicle until the fuel tank
is completely dry. The irregular supply of
fuel can cause misfir ing. Gasoline cou ld
e nte r into the exhaust system and damage
the cata lytic conve rter.
Refueling
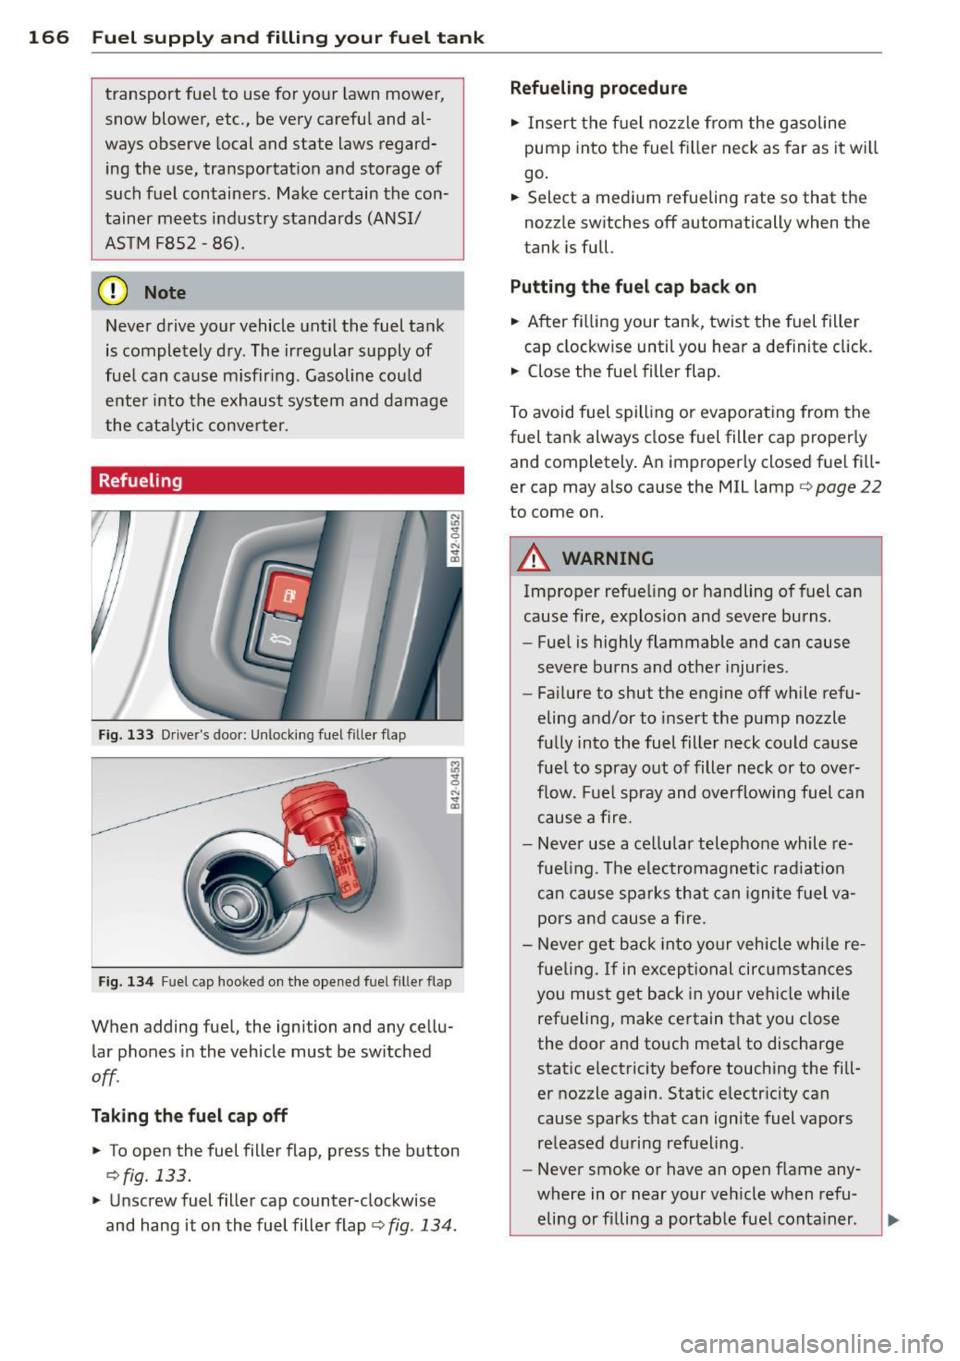
Fig. 133 D river 's doo r: Unlocki ng fuel filler flap
Fig. 134 Fuel cap hooked on the opened fuel filler flap
When adding fuel, the ignition and any cellu
lar phones in the vehicle must be sw itched
off .
Tak ing th e fuel cap off
• To open the fuel filler flap, press the button
9fig. 133.
• Unscrew fuel filler cap counter-clockwise
and hang it on the fuel filler flap ¢
fig. 134 .
Refueling procedure
• Insert the f uel nozzle from the gasoline
pump into the fuel fi ller neck as far as it wi ll
go .
• Select a med ium refueling rate so that the
nozzle switches off automatically when the
tank is full.
Putting th e fu el cap bac k on
• After fi lling your tank, twist the fuel filler
cap clockwise until you hear a definite click.
• Close the fue l filler flap.
T o avoid fuel spilling or evaporating from the
fuel tank always close fuel filler cap properly and completely. An improperly closed fuel fi ll
er cap may also cause the MIL lamp¢
page 22
to come on.
A WARNING
Improper refue ling or handling of fuel can
cause fire, explosion and severe burns.
- Fuel is highly flammable and can cause
severe burns and other injuries.
- Fai lure to shut the engine off while refu
eling and/or to insert the pump nozzle
fully into the fuel filler neck could cause
fuel to spray out of filler neck or to ove r
flow. F ue l spray and overflowing fuel can
cause a fire.
- Never use a ce llular telephone while re
fue ling. The electromagnet ic rad iat io n
can cause spa rks that can igni te fuel va
pors and cause a fire.
- Never get back into your vehicle whi le re
fue ling.
If in exceptio nal circumstances
you must get back in your vehicle while
ref ueling, make certain that you close
the door and touch metal to discharge
static electricity before touching the fill
er nozzle again. Static electricity can
cause sparks that can ignite fuel vapors
re leased d uring refueling .
- Never smoke or have an open f lame any
where in o r near your veh icle when refu
eling or filling a portable fue l conta iner.
Page 212 of 236

210 What do I do now?
connected to the battery of another veh icle,
using a pair of jump er cable s to start the en
g ine.
Both batter ies must be rated at 12 vo lts. The
ca pacity (Ah) of the booster battery must not
be substantially less than the capacity of the
d ischarged battery .
J umper cables
Use
only jumper cables of sufficiently large
cr oss sec tion to safely carry the starter cur
rent . Re fer to the manu facturer's specifica
tions .
Use only jumper cables which have
insulated
termina l clamps and are properly marked for
distinction :
plu s(+) ca ble: in most cases co lored red
minu s(-) ca ble: in most cases colored black
A WARNING
Batteries contain electricity, ac id, and gas .
Any of these can cause ve ry serious or fatal
injury. Follow the instructions below fo r
safe handl ing of your veh icle's battery.
- Always shield you r eyes and avoid lean
ing over the batte ry whenever possible.
- A discharged battery can already freeze
a t temperatures just be low 32 ° F (0 °C).
Before connecting a jumper cable, the
frozen battery must be thawed com
pletely, otherwise it could exp lode .
- Do not a llow battery ac id to contact eyes
or s kin. Fl ush any contacted area w ith
water immediately .
- Improper use o f a booster battery to
start a ve hicle may cause an explosion.
- Vehicle batteries gene rate explos ive gas
es . Keep sparks, flame and lighted ciga
rettes away from batteries .
- Do not try to jump s tar t any veh icle with
a low acid level in the battery.
- Th e volt age of the booster battery must
also have a 12-Volt rating . The capacity
(Ah) of the booster battery shou ld not be
lower than that of the discharged bat
tery. Use of batter ies of different voltage or substantially d
iffe rent "Ah" rating
may cause an exp losion and persona l in
jury.
- Never charge a frozen battery. Gas trap
ped in the ice may cause an explosion.
- Never charge or use a battery that has
been frozen . The battery case may have
be weakened .
- Use of batter ies of different voltage or
substantially d ifferent capacity (Ah) rat
ing may cause an exp losion and injury.
The capac ity (Ah) of the booster battery
should not be lower than that of the dis
charged battery.
- Before you check anything in the engine compa rtment, always read and heed a ll
WARNINGS
,=;, page 169, Working in the
engine comportment.
(!) Note
- App lying a higher voltage booster bat
tery will cause expens ive damage to sen
sitive e lectronic components, such as
cont ro l uni ts, relays, rad io, etc.
- There must be no electrical contact be
tween the vehicles as otherwise cur rent
c o ul d already start to f low as soon as the
positive( +) terminals are connected.
(D Tips
- T he d ischa rged ba ttery m ust be properly
c onnected to the veh icle's e lectr ica l sys
t em.
- Switch off any car phone, o r follow the
car phone instructions for th is si tuat ion.
Page 216 of 236

214 Fuses and bulbs
Fuse panel @
Consumer
Automatically dimming in-
side mirror, garage door
8 opener (Homel
ink), washer
pump relay, power outlets
relay
10
[ru button
11 Pressure sensor, climate
controls
12 Airbag
Fuse panel @
No . II Consumer
II
1 Radiator fan (1)
Radia
tor fan (2)
Exterior lighting
4 Exterior lighting
6 Blower regulator
Fuse panel@
No . II Consumer
II
1 Rear view camera
2
Tire pressure monitoring
system
4 Cell phone package, te
le-
phone antenna amplifier
5 Instrument cluster
6 Networking gateway
7 Steering column lever
8
Diagnostic interface, brake
pedal switch, selector lever
9 Rain/light sensor
10 Light switch
11 Special functions control
module
15 Sound amplifier
Radio
Fuse panel E
No. Consumer
3 Auxiliary water pump
5 Supply terminal 15, starter
Amps
10
10 5
5
Amps
40 40
40
40
40
Amps
5
10
7.5 5
5
5
10 5
5
5
30
20
Amps
10
30
Fuse panel @
No. Consumer
6 Pump for brake booster
7 Horn
8 Wiper motor
9 Wiper motor
10 Headlight washer system
12 Power outlets and cigarette
lighter
Fuse panel
®
No. !!Consumer
1 Electronic Stabi lity Control
2 Electronic Stability Control
4
5
6 Rear
window defogger
Power locking system
Interior lights, washer noz
zles
Anti-theft alarm system
Climate controls
Heated seats
10 Lumbar support
11 Control module for doors
12 Control module for doors
Bulbs
Note
Amps
15
20
30
30
30
20
ll Amps ,
10
25
30
20
20
5
10
25
10
30
10
Your vehicle is equipped with maintenance
free headlights and rear lights. However, if a
bulb has to be changed, please consult your
authorized Audi dealer or other qualified
workshop.