clock AUDI R8 SPYDER 2014 Owners Manual
[x] Cancel search | Manufacturer: AUDI, Model Year: 2014, Model line: R8 SPYDER, Model: AUDI R8 SPYDER 2014Pages: 244, PDF Size: 61.06 MB
Page 11 of 244
Instrument s and warning /indicator lights 9
Tachometer (engine rev counter)
The tachometer indicates the engine RPM
(revolutions per minutes).
If engine RPM drops below 1,500, you should
downshift to the next lower gear. The red area
at the end of the scale ind icates maximum
perm iss ible engine RPM after the break-in pe
riod . Before reaching th is area, move these
lector lever to posit ion "A (Automat ic opera
tion) " or ease your foot off the accelerator
pedal.
(D Note
The tachomete r needle should only briefly
be in the red zone : you could damage your
engine! The beginning of the red zone var
ies depending on the engine.
@ For the sake of the environment
Upshifting early saves fuel and reduces en
gine noise.
Digital clock with date display
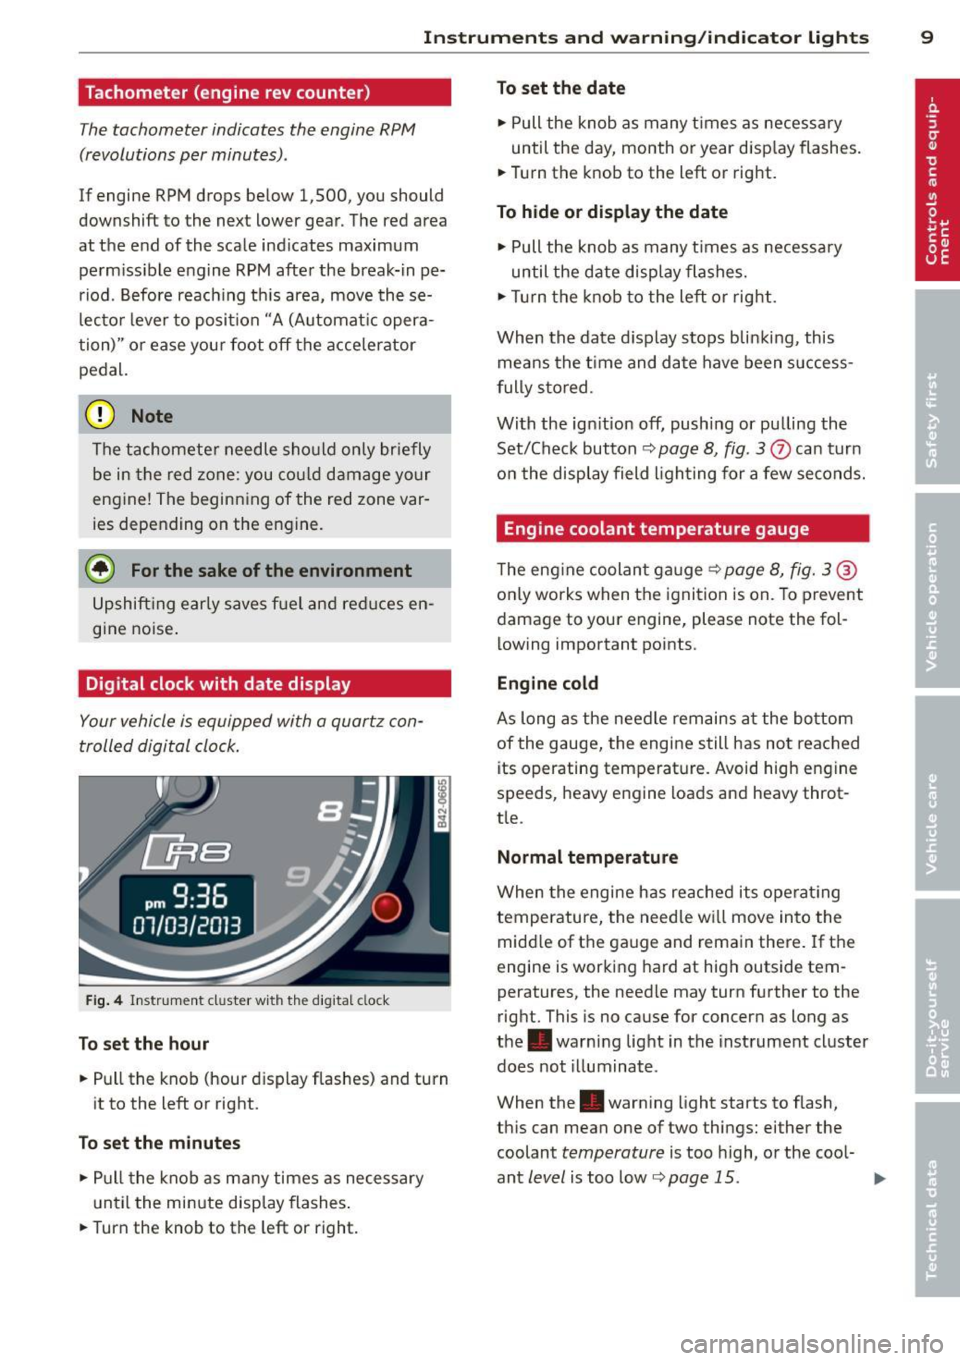
Your vehicle is equipped with a quartz con
trolled digital clock.
Fig. 4 Instr um ent cluster w ith t he digital clock
To set the hour
• Pull the knob (hour display flashes) and turn
it to the left or right.
To set the minutes
• Pull the knob as many times as necessary
until the minute display flashes.
• Turn the knob to the left or right.
To set the date
• Pull the knob as many times as necessary
until the day, month or year disp lay flashes.
• Tur n the knob to the left or right.
To hide or display the date
• Pull the knob as many times as necessary
until the date disp lay flashes.
• Turn the knob to the left or right.
When the date display stops blinking, this means the time and date have been success
fully stored.
With the ign it ion off, pushing or pu lling the
Set/Check button
c::> page 8, fig. 3
Engine coolant temperature gauge
The eng ine coolant gauge c::> page 8, fig. 3 ®
only works when the ignition is on. To prevent
damage to your engine, please note the fol
lowing important points.
Engine cold
As long as the needle remains at the bottom
of the gauge, the engine still has not reached its operating temperature. Avoid high engine
speeds, heavy engine loads and heavy throt
tle.
Normal temperature
When the engine has reached its operating
temperature, the needle will move into the
midd le of the gauge and remain there. If the
engine is working hard at high outside tem
peratures, the needle may turn further to the
right. This is no cause for concern as long as
the . warning light in the instrument cluster
does not illuminate.
When the. warning light starts to flash,
this can mean one of two things: either the
coolant
temperature is too high, or the cool-
ant
level is too low c::> page 15. IJJJ,
Page 25 of 244

Set Clock¢ page 24
Tire pressure ¢page206
Computer
c::> page 2 4
Speed warning
c::> page 73
Langu age
c::> page 24
Units (distance, fuel consump-
tion, temperature)
c::> page 24
Lap timer
c::> page 25
Lights
c::> page 46
Wiper (service posit ion)
c::> page 53
Doors (unlocking and locking
mode, for e xample Auto-lock)
c::> page 30, c::> page 30
Check Service c::> page 24
Chassis number
c::> page 223
Keys
Menu off The menu display is hidden and
. the lap timer appears .
Navigating the menu
Use the rocker switch on the windshield wiper
lever and the
I RESET I button to ope rote the
menu and carry out inquiries and selections.
~-- @
Fig. 12 W iper leve r: Co ntrols for the menu d isplay
F ig . 13 D isplay: Start menu
Driver in formation system 23
I Reset I button @ and rocker switch @
c::> fig. 12 fu nctions:
To open the menu
~ Press the I Reset I but to n @ unti l the me nu
disp lay
c::> fig . 13 appears
Selections and settings
~ Press the rocker switch @to reac h a menu
display. The switch is operated the same as
th e display (up/down) .
Entering and confirming
~ Press the I RESET I button @.
Returning to the Start menu
~ Press the I RESET I button longer than 2 sec
onds to return from any menu level to the
Start menu .
U sing the rocker swi tc h, you can selec t the
men us in the display or change settings. A
cu rsor appea rs on the left in front of th e se
lected values.
By press ing the
! RESET I button, you act ivate
the se lec tion you made or confirm the va lues
yo u set.
Sele cted functions are identified wit h
a check mark or are carried out directly .
Mean ings of the symbols i n the display:
Selec
tion bar
>
./
D
Selected funct io n Mea ning
Cursor
C heck ma rk
Box Curren
t Selec
tion
Selected or
Function active
Not selected
Tr ian gle pointi ng Previou s page
up
Triangle pointing IINext page
down
Page 43 of 244
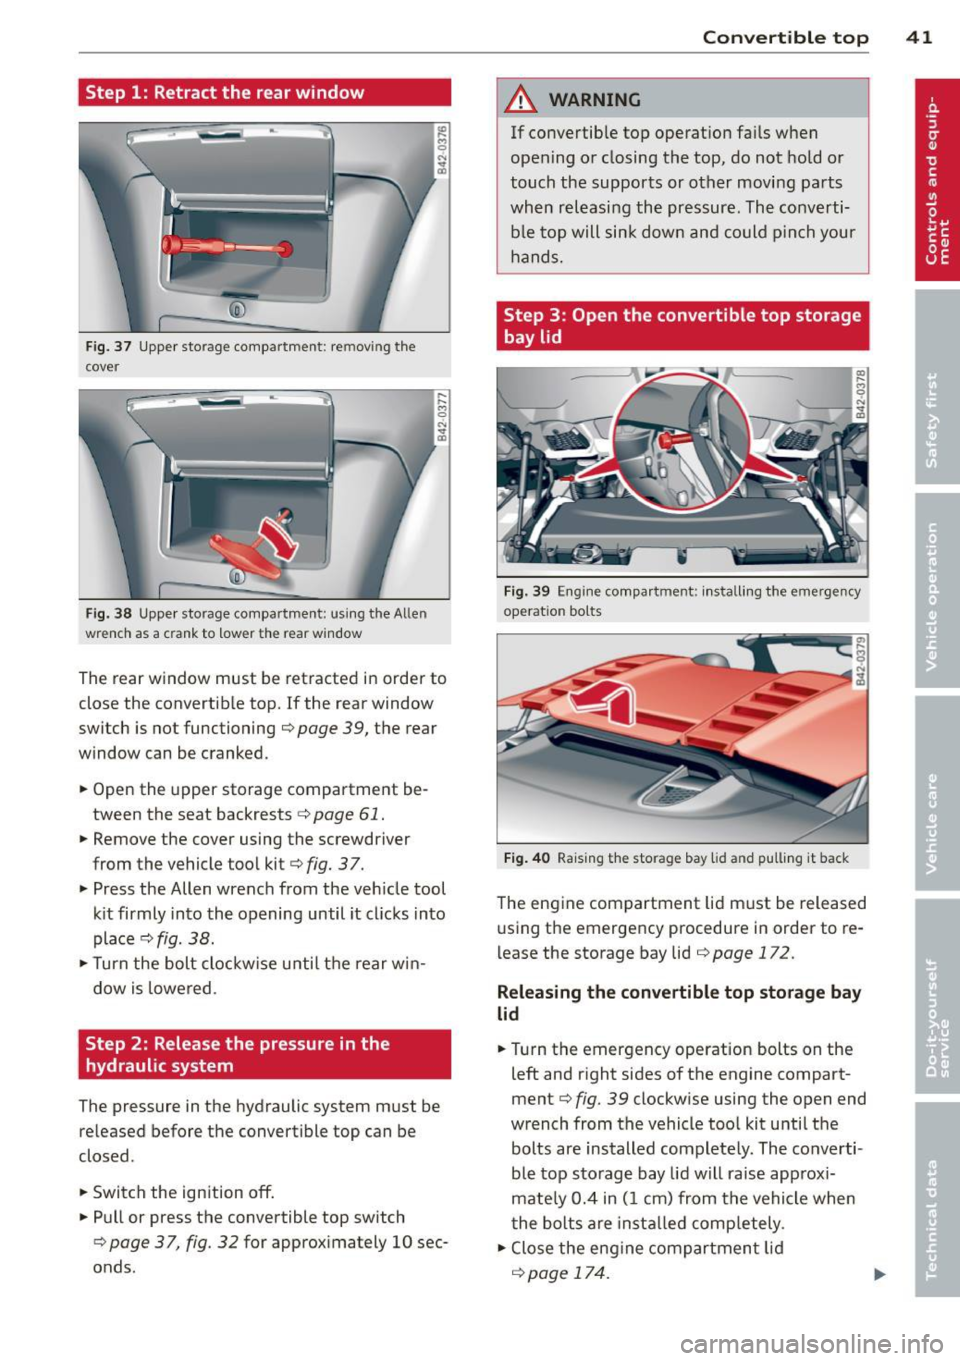
Step 1: Retract the rear window
Fig. 37 Upper storage compartment: removing the
cover
Fig. 38 Upper storage compartment: using the Allen
wrenc h as a crank to lower the rear window
~ 0 N ... a,
,__ ,-. M C)
"' ... a,
The rear window must be retracted in order to
close the convertible top. If the rear window
switch is not functioning ¢
page 39, the rear
window can be cranked .
.. Open the upper storage compartment be
tween the seat backrests ¢
page 61 .
.. Remove the cover using the screwdriver
from the vehicle tool kit¢
fig. 37 .
.. Press the Allen wrench from the veh icle tool
k it firmly into the opening until it cl icks into
place¢
fig. 38.
.. Turn the bolt clockw ise until the rear win
dow is lowered.
Step 2: Release the pressure in the
hydraulic system
The pressure in the hydraulic system must be
released before the convertible top can be
closed.
.. Switch the ignition
off.
.. Pull or press the convertible top switch
¢page 37, fig. 32 for approximately 10 sec
onds.
Convertible top 41
A WARNING
If convertible top operat ion fa ils when
opening or closing the top, do not hold or
touch the supports or other moving parts
when releasing the pressure. The converti ble top will sink down and could pinch your
hands.
Step 3: Open the convertible top storage
bay lid
Fig. 39 Engine compartment: install ing the emergency
operation bolts
Fig. 40 Raising t he storage bay lid and pulling it back
The engine compartment lid must be released
using the emergency procedure in order to re
lease the storage bay lid
¢page 172 .
Releasing the convertible top storage bay
lid
.. Turn the emergency operation bolts on the
left and right sides of the engine compart
ment¢
fig. 39 clockwise using the open end
wrench from the vehicle too l kit until the
bolts are installed completely . The converti
ble top storage bay lid will raise approxi
mately 0.4 in (1 cm) from the vehicle when
the bolts are insta lled comp letely.
.. Close the engine compartment lid
¢page 174.
Page 45 of 244
.. Pull the convertible top all the way out in
the direction indicated @. Position the fins
upward at the same t ime.
.. Press the convertib le top as far forward to
ward the windshield frame as possible
Q fig. 44 .
Have a second person assist when positioning
the convertible top. That person should stand
on the opposite side of the vehicle and per
form the same steps.
_& WARNING
-When positioning the convertible top,
avo id contact with the supports or othe r
moving pa rts. O the rw ise you cou ld pinch
yo ur hands.
- Whe n pressing the convert ible top down
onto the windsh iel d frame, make s ure
that you do not pinch yoursel f or anyone
else .
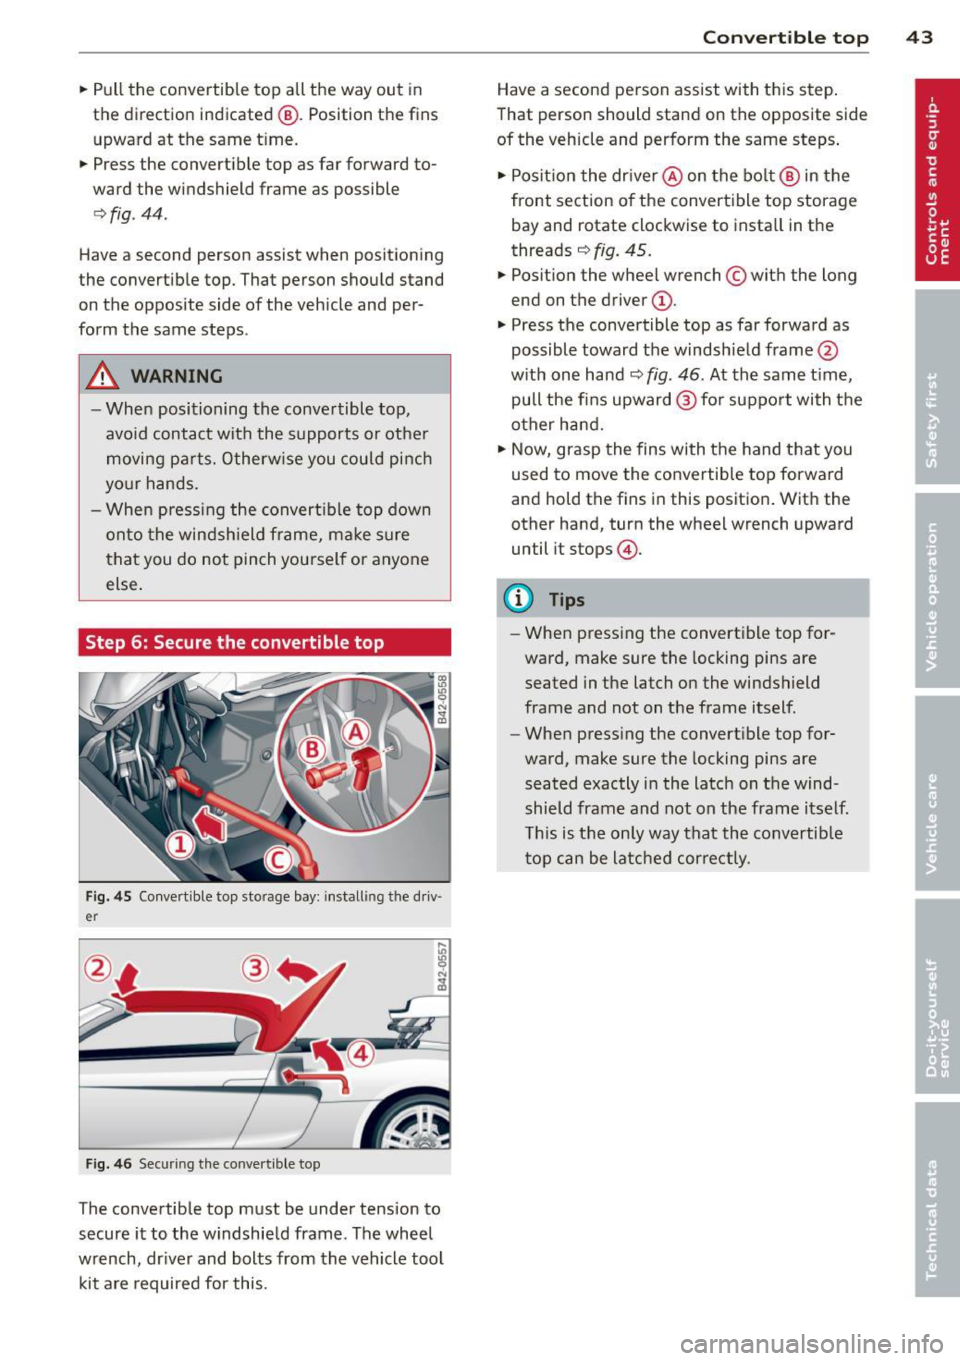
Step 6: Secure the convertible top
-
Fig . 4 5 Co nvertible top sto rage bay: installi ng the driv
er
F ig . 4 6 Securing th e convert ib le top
The convertible top must be under tension to
secure it to the windshie ld frame. The wheel
wrench, dr iver and bolts from the vehicle tool
kit a re required for this.
Con vert ible top 4 3
Have a second person assist with th is step .
That person should stand on the opposite side
of the vehicle and perform the same steps .
.. Posit ion the dr iver @ on the bo lt @ in the
front sect ion of the convert ible top storage
bay and rotate clockwise to insta ll in the
threads ~
fig. 45.
.. Posit ion the wheel wrench © with the long
end on the driver @.
.,. Press the convertible top as far forward as
possible toward the windshie ld frame @
w ith one hand~
fig. 46. At the same t ime,
pull the fins upward @for support with the
other hand.
.. Now, grasp the fins with the hand that you
used to move the convertib le top forward
and hold the fins in this position . Wit h the
other hand, turn the wheel wrench upward
until it stops @.
(D Tips
-When pressing the convertible top for
ward, make sure the locking pins are
seated in the latch o n the windshield
frame and not on the frame itself.
- When press ing the convert ible top for
ward, make sure the locking pins are
seated exactly i n the latch on t he wind
shield frame and not on the frame itself.
T his is t he on ly way that the convertib le
t op can be latched cor rect ly .
Page 47 of 244
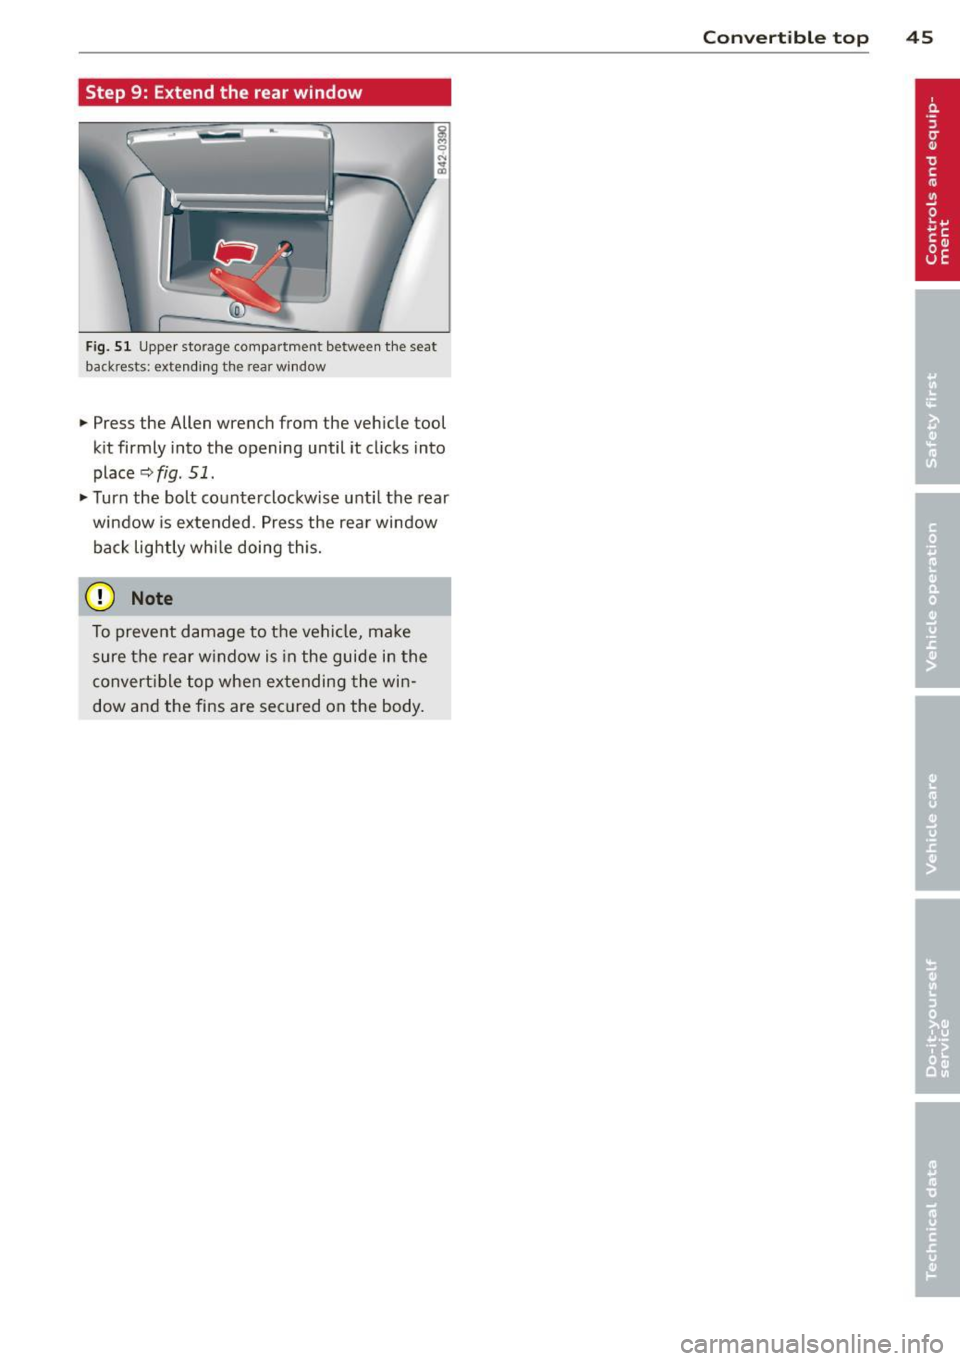
Step 9: Extend the rear window
~ 0 N ... a,
Fig. 51 Upper storage compartment between the seat
backrests: extending the rear w indow
... Press the Allen wrench from the vehicle tool
kit firmly into the opening until it clicks into
place
r::;, fig. 51 .
... Turn the bolt counterclockwise unti l the rear
window is extended. Press the rear window
back lightly whi le doing this.
(D Note
To prevent damage to the vehicle, make
sure the rear w indow is in the guide in the
convert ible top when extending the win
dow and the fins are secured on the body.
Con vert ible top 45
Page 70 of 244
68 On th e road
On the road
Steering
Adjusting the steering wheel column
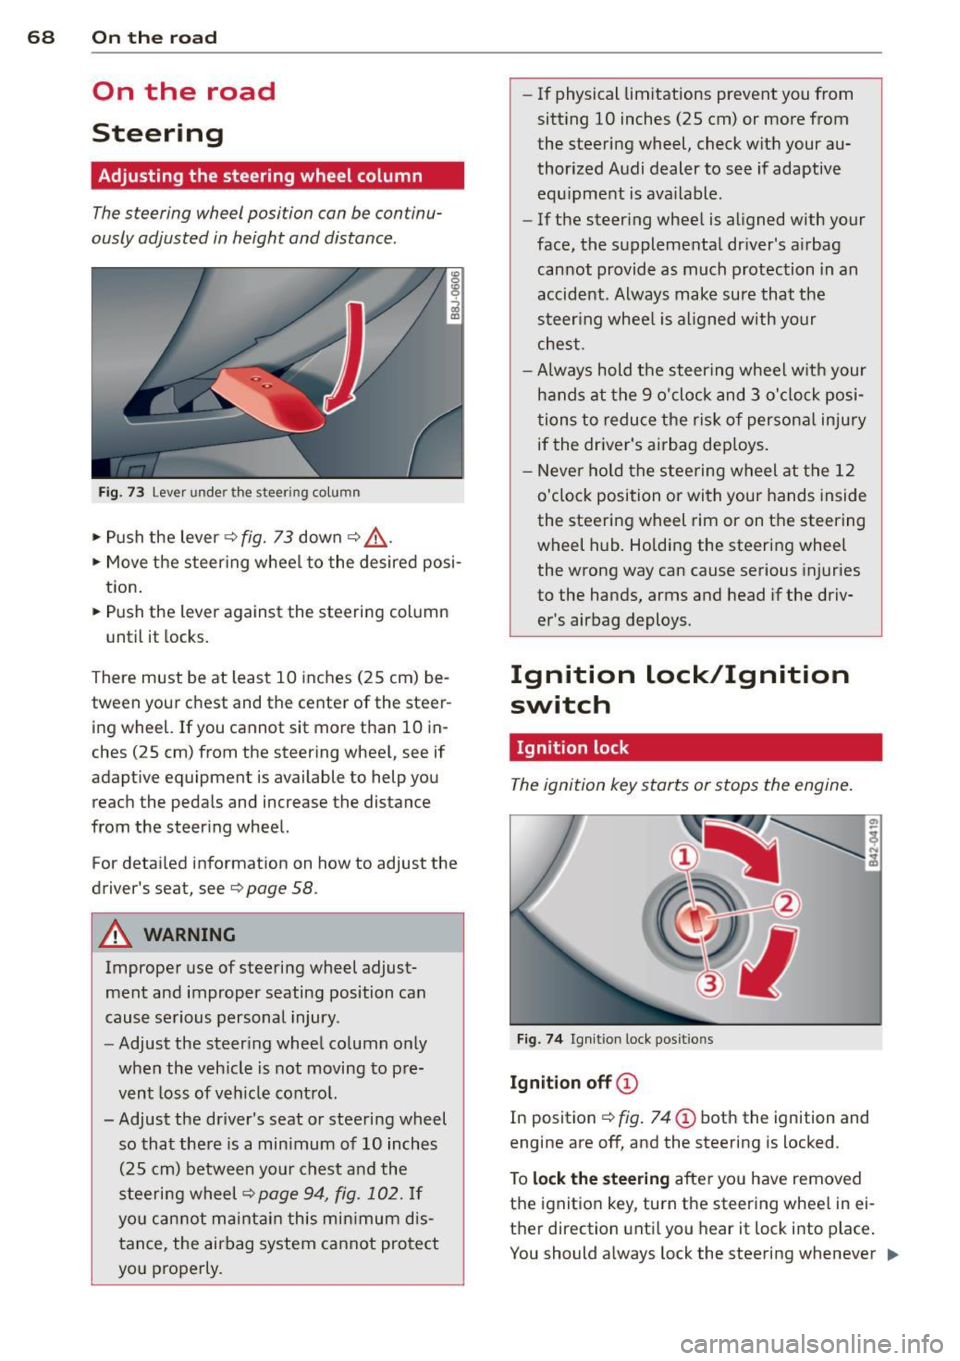
The steering wheel position can be continu
ously adjusted in height and distance .
Fig. 73 Lever under the steering column
~ Push the lever Q fig. 73 down Q ,&..
~ Move the steer ing whee l to the desired posi
tion.
~ Push the lever against the steering column
until it locks.
There must be at least 10 inches (25 cm) be
tween your chest and the center of the steer ing wheel. If you cannot sit more than 10 in
ches (25 cm) from the steering wheel, see if
adaptive equipment is available to help you
reach the pedals and increase the distance
from the steer ing wheel.
For detai led informat ion on how to adjust the
driver's seat, see
Q page 58.
A WARNING
Improper use of steering wheel adjust
ment and improper seating position can
cause serious personal injury .
- Adjust the steer ing wheel column only
when the veh icle is not moving to pre
vent loss of veh icle cont rol.
-
- Adjust the driver's seat or steering wheel
so that there is a min imum of 10 inches
(25 cm) between your chest and the
steering wheel
Q page 94, fig . 102. If
yo u can not maintain this min imum dis
tance, the airbag system cannot protect
you properly.
- If physical limitations prevent you from
sitt ing 10 inches (25 cm) or more from
the steering wheel, check with your au
thorized Audi dealer to see if adaptive equ ipment is ava ilable .
- If the steering wheel is aligned with your
face, the supplemental driver's airbag cannot provide as much protection in an
accident. Always make sure that the
steer ing whee l is aligned with your
chest.
- Always hold the steering wheel w ith your
hands at the 9 o'clock and 3 o'clock posi
tions to reduce the risk of persona l injury
if the driver's airbag dep loys .
- Never ho ld the steering wheel at the 12
o'clock position or with your hands inside
the steering wheel rim or on the steering
wheel hub . Holding the steering wheel
the wrong way can cause serious injuries
to the hands, arms and head if the driv
er's airbag deploys.
Ignition lock/Ignition
switch
Ignition lock
The ignition key starts or stops the engine.
Fig . 7 4 Ign ition lock positions
Igniti on off @
In position Q fig. 74 @ both the ignition and
engine are off, and the steering is locked .
T o
lo ck th e steering after yo u have removed
the ignition key, turn the steer ing whee l in ei
ther direction unti l you hear it lock into place .
You should always lock the steering whenever
II>
Page 75 of 244

indicate that the maximum speed has been
stored successfully. The maximum speed re mains stored until it is changed by pressing
the button again briefly or until it is deleted
by a lengthy push on the button.
Speed warning 2: setting a speed limit
Switches in the wiper arm ore used to operate warning threshold 2.
--------, @
Fig. 78 Controls
To store maximum speed
"'Turn off the ignition.
"'Br iefly press the button in the instrument
cluster
c::> page 72, fig. 77. The odometer
and the digital clock are now illuminated.
"' Press the button for at least 2 seconds. The
currently stored maximum speed appears in
the display
or the crossed out symbol for
warning threshold 2, if no maximum speed
was set previous ly.
"' Press the function selector switch in the
wiper lever @
c::> fig. 78 up or down to
change the set value . Values run up or down
in steps of 6 mph (10 km/h).
To delete maximum speed
"'Turn off the ignition.
"' Briefly press the button in the instrument
cluster
c::> page 72, fig. 77 . The odometer
and the digital clock are now illuminated.
"' Press the button for at least 2 seconds . The
currently stored maximum speed appears in
the display.
"' Press the
l"'R-=E =s =ET =I button in the wiper lever
® c::> fig . 78 until the crossed out speed
warning symbo l for warning threshold 2 ap
pears in the display.
On the road 73
A few seconds after the adjustment is com
pleted, the illumination for the odometer and
the d igital clock will go out.
(D Tips
This warning threshold can also be con
trolled through the trip computer
c::> page 23, Navigating the menu.
Cruise control
Switching the system on
The cruise control system makes it possible to
drive at a constant speed starting at 20 mph (30 km/h).
®-
Fig. 79 Control lever with set button
Fig. 80 D isplay: Se lected speed
"' Pull the lever to position (D c::> fig. 79 to
switch the system on.
"' Drive at the speed you wish to set.
"' Press button @ to set that speed.
T he disp lay
c::> fig. 80 will show the set speed.
The display may vary depending on the type of
display in your vehicle. The indicator light
M;W~1~ (US model) I. (Canadian model) will
also light up in the instrument cluster . .,..
Page 97 of 244
For detailed information on how to adjust the
driver's seat, see ¢
page 5 7, General recom
mendations.
A WARNING
Drivers who are unbelted, out of position
or too close to the airbag can be seriously
injured by an airbag as it deploys. To help
reduce the risk of serious personal injury:
- Always adjust the driver's seat and the
steering wheel so that there are at least
10 inches (25 cm) between your breast
bone and the steering wheel.
- Always adjust the driver's seat and the
steering wheel so that there are at least
4 inches (10 cm) between the knees and
the lower part of the instrument panel.
- Always hold the steering wheel on the
outside of the steering wheel rim with
your hands at the 9 o'clock and 3 o'clock
positions to help reduce the risk of per
sonal injury if the driver's airbag inflates.
- Never hold the steering wheel at the
12 o'clock position or with your hands at
other positions inside the steering wheel
rim or on the steering wheel hub. Hold
ing the steering wheel the wrong way
can cause serious injuries to the hands,
arms and head if the driver's airbag in
flates
- Pointing the steering wheel toward your
face decreases the ability of the supple mental driver's airbag to protect you in a
collision.
-Always sit in an upright position and nev
er lean against or place any part of your
body too close to the area where the air
bags are located.
- Before driving, always adjust the front
seats and head restraints properly and
make sure that all passengers are prop
erly restrained.
- Never adjust the seats while the vehicle
is moving. Your seat may move unexpect
edly and you could lose control of the ve
hicle.
- Never drive with the backrest reclined or
tilted far back! The farther the backrests
Driving Safely 95
are tilted back, the greater the risk of in
jury due to incorrect positioning of the
safety belt and improper seating posi
tion .
- Children must always ride in child seats
¢
page 132 . Special precautions apply
when installing a child seat on the front
passenger seat¢
page 111.
Proper seating position for the front
passenger
The proper front passenger seating position
is important for safe, relaxed driving.
For your own safety and to reduce the risk of
injury in the event of an accident, we recom
mend that you adjust the seat for the front
passenger to the following position:
"'Adjust the angle of the seatback so that it is
in an upright position and your back comes
in full contact with it whenever the vehicle is
moving.
"'Adjust the head restraint so the upper edge
is as even as possible with the top of your
head. If that is not possible, try to adjust
the head restraint
so that it is as close to
this position as possible ¢
page 96.
"' Keep both feet flat on the floor in front of
the front passenger seat.
"' Fasten and wear safety belts correctly .
For detailed information on how to adjust the
front passenger's seat, see ¢
page 5 7, Gener
al recommendations .
A WARNING
Front seat passengers who are unbelted,
out of position or too close to the airbag
can be seriously injured or killed by the air
bag as it deploys. To help reduce the risk of
serious personal injury:
- Passengers must always sit in an upright
position and never lean against or place
any part of their body too close to the
area where the airbags are located.
-
•
•
Page 171 of 244
transport fuel to use for your lawn mower,
snow blower, etc., be very careful and al
ways observe local and state laws regard
ing the use, transportation and storage of
such fuel containers. Make certain the con
tainer meets industry standards (ANSI/
ASTM F8S2 -86) .
@ Note
Never drive your vehicle until the fuel tank
is completely dry. The irregular supply of
fue l can cause misfiring. Gasoline cou ld
enter into the exhaust system and damage
the catalytic converter .
Refueling
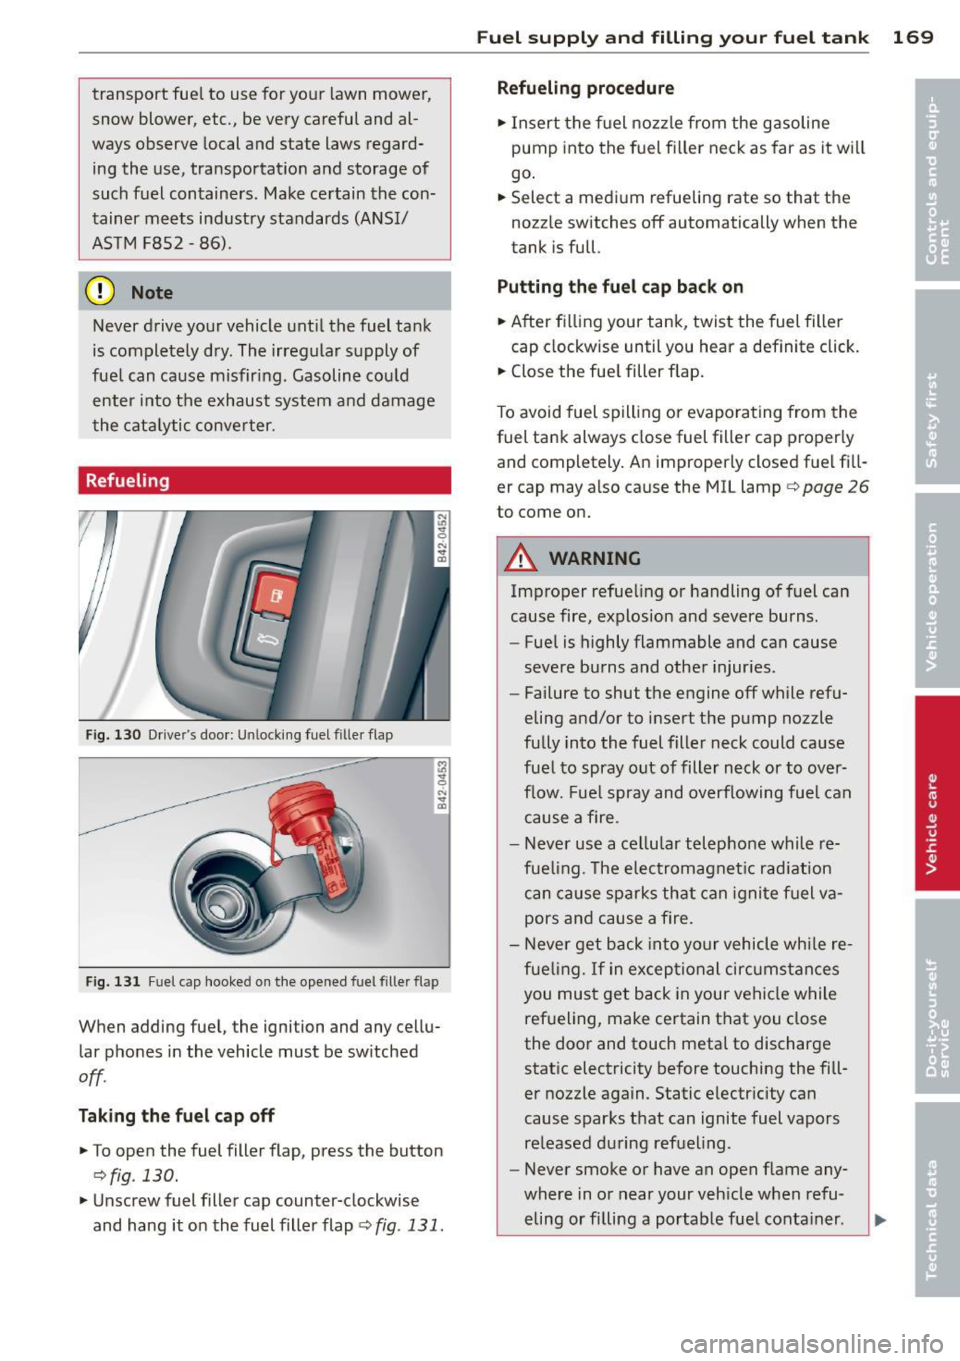
Fig. 130 Drive r's doo r: Unlock ing fuel filler flap
Fig. 131 Fu el cap hooked on the opened fuel filler flap
When adding fuel, the ignition and any cellu
lar phones in the vehicle must be switched
off .
Tak ing the fuel cap off
.. To open the fuel filler flap, press the button
9 fig . 130.
.. Unscrew fuel filler cap counter-clockwise
and hang it on the fuel filler flap ¢
fig. 131.
Fuel supply and filling your fuel tank 169
Refueling procedure
.. Insert the fuel nozzle from the gasoline
pump into the fuel filler neck as far as it will
go.
.. Select a medium refueling rate so that the
nozzle switches off automatically when the
tank is full.
Putting the fuel cap back on
.. After filling your tank, twist the fuel filler
cap clockwise until you hear a definite click.
.. Close the fuel filler flap.
To avoid fuel spilling or evaporating from the
fuel tank always close fuel filler cap proper ly
and completely. An improperly closed fuel fill
er cap may also cause the MIL lamp ¢
page 26
to come on.
A WARNING
Improper refueling or handling of fuel can
cause fire, explosion and severe burns.
- Fuel is highly flammable and can cause
severe burns and other injuries.
- Failure to shut the engine off while refu
eling and/or to insert the pump nozzle
fully into the fuel filler neck could cause
fuel to spray out of filler neck or to over
flow. Fuel spray and overflowing fuel can
cause a fire.
- Never use a cellular telephone while re
fueling. The electromagnetic radiation
can cause sparks that can ignite fuel va
pors and cause a fire.
- Never get back into your vehicle while re
fueling.
If in exceptional circumstances
you must get back in your vehicle while
refueling, make certain that you close
the door and touch metal to discharge static electricity before touching the fill
er nozzle again. Static electricity can
cause sparks that can ignite fuel vapors
released during refueling .
- Never smoke or have an open flame any
where in or near your vehicle when refu-
eling or filling a portable fuel container. ..,.
Page 184 of 244

182 Checking and filling
Checking the engine coolant level
Proceed carefully when checking the coolant.
Fig. 144 Convertible top: se rvice position
Fig. 145 Convert ible top sto rage bay: coo lant expan
sion tank
Before you check anything in the engine com
partment,
always read and heed all WARN
INGS c:::> &_ in Working in the engine compart
ment on page 173
and park your vehicle on a
level surface.
The coolant expansion tank is located in the
right side of the convertible top storage bay
under the round metal cover
c:::> fig. 145. The
convertible top must be in the service position
to check the coolant leve l
c:::> fig. 144.
Bringing the closed convertible top into
the service position
.. Switch the ignition on .
.. Pull and hold the convertible top switch .
.. Press and hold the rear window switch too
until the convertib le top moves into the
service position
c:::> fig. 144.
Bringing the open convertible to into the
service position
.. Switch the ignition on.
.. Press and hold the convertible top switch. ..
Press and hold the rear window switch too
until the convertible top moves into the
service position
c:::> fig. 144.
Opening the coolant expansion tank cover
.. Stop the engine and allow it to cool.
.. Switch the ignition off .
.. Care fully remove the bolts in the cover@
using a screwdriver and remove the cover.
The coolant reservoir is located below
¢fig. 145.
Checking the engine coolant level
.. Place a rag or cloth on the cap of the coolant
expansion tank and turn the cap
carefully to
the left (counter-clockwise)
c:::> .&, .
.. Read the coolant leve l inside the coolant ex
pansion tank¢
fig. 145. With a cold engine,
it must be above the "min" mark. With a hot
eng ine, it can be a little above the indicated
range.
To obtain an accurate reading, the engine must be switched off.
The expansion tank in your vehicle is equipped
with an electric coo lant level sensor
c:::> page 15. We still recommend you check the
coolant level from time to time .
Coolant loss
Coolant loss may indicate a leak in the cooling
system. In the event of coolant loss, the cool
ing system should be inspected immediately
by your authorized Audi dealer. It is not
enough merely to add coolant.
In a
sealed system, losses can occur on ly if
the boiling point of the coo lant is exceeded as
a result of overheating .
A WARNING
-- The cooling system is under pressure. Do
notopenthecapofthecoolantexpan
sion tank when the engine is hot. You
ris k be ing sca lded.
- The coolant additive, and therefore the
coo lant itself, is haza rdous to hea lth .
Keep the coolant additive in the original