change time AUDI RS5 CABRIOLET 2013 Owner's Manual
[x] Cancel search | Manufacturer: AUDI, Model Year: 2013, Model line: RS5 CABRIOLET, Model: AUDI RS5 CABRIOLET 2013Pages: 286, PDF Size: 71 MB
Page 215 of 286
@ For the sake of the environment
-Under no circ umstances can the oil come
i n contact w ith the sewage network or
the soil.
- Observe and follow lega l regu lations
when disposing of empty oil containers.
Changing the engine oil
We r ecommend that hove your oil changed by
on authorized Audi dealer or a qualified serv
ice station .
Before you check anything i n the engine com
pa rtment,
alwa ys read and heed all WARN
INGS c:> &. in Working in the engine comport
men t on page 207.
The engine oil must be changed according to
the intervals specified in your Warranty
&
Maintenance book let . T his is very important
because the l ubricating proper ties of oil di
minish gradua lly dur ing no rmal veh icle use.
Under some circ umstances the engine o il
should be changed more frequently . Change
oil more often if you drive most ly short dis
tances, operate the vehicle in dusty areas or
under predominantly stop-and -go traff ic con
d itions, or have your ve hicle where tempera
tures remain below free zing fo r extended pe
ri ods.
Detergent addi tives in the o il w ill make fresh
oil look dark after the eng ine has been run
n ing fo r a short time. This is norma l and is not
a reason to change the o il mo re often tha n
recommen ded.
Because of the problem of prope r disposal,
a long w ith the special tools and necessary ex
p e rti se require d, we strong ly recommend tha t
you have you r o il change d by an author ized
Audi dealer or a q ualified service sta tion.
If you choo se to change your oil yourself ,
please note the following importa nt informa
tion :
Checkin g and fillin g 213
A WARNING
To reduce the risk of personal inj ury if you
must change the eng ine oil in your vehicle
yourself:
- Wear eye protect io n.
- To reduce the risk of burns from hot en- gi ne oil, let the engi ne cool down to the
touch.
- When removing the o il dra in p lug with
your fi ngers, stay as far away as possible.
Always keep you r fo rearm parallel to the
grou nd to help p revent hot o il from run
ning down yo ur arm.
- Dra in the oil into a containe r designed
for this purpose, one la rge enough to
hold at least the tota l am ou nt of oi l in
your eng ine .
- E ngine oil is poisonous . Keep it we ll out
of the rea ch of childre n.
- Con tinuous contact wit h used eng ine o il
is harmful to yo ur ski n. A lways p rote ct
your skin by w ashing oil off tho ro ughly
wit h soap and wate r.
@ Note
N eve r mix oil addi tiv es with yo ur engine
oi l. These additives can damage your e n
g ine and adver se ly affec t yo u r A udi L imit
ed New Veh icle Warran ty.
@ For the sake of the environment
- B efore changi ng your oil, first make su re
yo u k now where yo u can prope rly dispose
o f t he used oil.
- Always dispose of used eng ine o il proper
ly. Do not dump it on garden soil, wood
ed are as, into open streams o r down
sewage drains .
- Re cy cl e used engine oil by taking i t to a
used engi ne oil col lect ion facility in your
area, or contact a service station .
•
•
Page 219 of 286
If the brake fluid level falls considerably be
l ow the "MIN" mark, the brake warning/indi
cator light (U.S . mode ls:
1111 . Canad ian
models: .) will come on
¢ page 15. Do not
continue to operate the vehicle. The complete brake system should be thoroughly checked
by an authorized Audi dealer or qualified
workshop and the cause co rrected . If the
b rake fluid level is too low, the brake warn ing/
in dicator light w ill illuminate. Contact an a u
thor ized Audi dealer
imm ediatel y.
@ Tips
The brake fluid rese rvoir is located unde r
neath the cover.
Changing brake fluid
Hove the broke fluid changed by on experi
enced technician .
Brake fluid absorbs moistu re from the a ir. If
the water content in the brake fluid is too
hi gh , corrosion in the b rake system may resul t
after a per iod of t ime . The bo iling po int of t he
b rake fluid w ill also decrease considerably and
decrease braking performance.
Therefore, the brake flu id must be changed
e ver y two year s. Always use new b rake fluid
which conforms to Federal Motor Vehicle
Standard "FMVSS 116 DOT 4".
The brake flu id rese rvoi r ca n be difficult to
r eac h, therefore , we recommend th at yo u
h ave the brake f luid changed by yo ur autho r
ized
Audi dealer . Your deale r has the correct
too ls, the right brake fluid and the know -how
to do th is for you.
A WARNING
- Brake fluid is po isonous . It must be stor
ed only in the closed orig inal container
out of the reac h of children!
- Brake fa ilure can result from old or inap
propr iate brake fluid . Observe these pre
caut ions:
- Use on ly bra ke fluid that meets SAE
specification
J 1 7 03 and conforms to
Checkin g and fillin g 217
Federa l Moto r Ve hicle Standard 1 16 .
Always check with your authorized Audi
dealer to make sure you are using the correct brake fluid . The correct type of
brake flu id is also ind icated on the
brake f luid rese rvoir .
- The brake fluid must be new . Heavy use
of the brakes ca n cause a vapo r lock if
the b rake fluid is left i n the system too
l ong. This can se riou sly affect the effi
c iency of the brakes as well as your
safe ty . T his co uld resu lt in an accident.
(D Note
B ra ke fluid wi ll damage the paint o f you r
vehicle.
@ For the sake of the environment
Because of the p rob lem of proper disposal
of bra ke fluid as well as the spec ial too ls
r equired and the necessary expertise, we
r ecomme nd th at yo u have the br ake fl uid
changed by yo ur autho rized Aud i dea le r.
Battery
General information
Un der normal operating cond itions , the bat
te ry in you r Audi does not need any ma inte
nance . With
high outside temperatures o r
long da ily d rives we recommend that you have
t h e e lectrolyte leve l chec ked by an au thori zed
A udi dealer or qualified workshop . The elec
trolyte leve l should also be checked each time
the batte ry is charged
¢ page 219.
Have the battery checked when yo u take your
vehicle in for se rvice. You are well advised to
replace a battery that is older than 5 years.
Wi th cer tain types of airbag deployment, the
ba ttery is disconnected from the veh icle elec
trical system for safety reasons¢.&
in Re
pair, core and disposal of the airbags on
page 151.
~
•
•
Page 221 of 286
-Always wear gloves and eye protection.
Do not tilt the battery because acid
could leak out of the ventilation open
ings .
- If you get battery acid in your eyes or
on your skin, immediately rinse with
cold water for several minutes and get
medical attention.
- If you should ingest any battery acid,
seek medical attention immediately.
- Do not expose the battery to an open
flame, electric sparks or an open light .
- Do not smoke.
- Do not interchange the positive and neg-
ative cables .
- When working on the battery, be sure
not to short-circuit the terminals with
tools or other metal objects. This would cause the battery to heat up very quickly,
which could lead to damage or explosion
and personal injury .
- When a battery is charged, it produces
hydrogen gas which is explosive and
could cause personal injury .
- Always keep the battery well out of the
reach of children .
- Before work is done on the electrical sys
tem, disconnect the negative ground ca
ble.
- Before performing any work on the elec trical system, switch off the engine and
ignition as well as any electrical equip
ment. The negative cable on the battery
must be disconnected.
If you are just go
ing to replace a light bulb, then it is
enough to switch off the lights.
- Before disconnecting the battery , switch
off the anti-theft alarm system! Other
wise you will set off the alarm.
- When disconnecting the battery, first
disconnect the negative cable and then
the positive cable.
- Before reconnecting the battery, make
sure all electrical consumers are switch
ed off. Reconnect the positive cable first
and then the negative cable. Never inter
change the cables - this could start a fire!
Checking and filling 219
- Never charge a frozen or a thawed-out
battery . It could explode! If a battery has
frozen, then it must be replaced. A dis
charged battery can freeze over at 32°F
(ooc).
- Make sure the vent hose is always attach
ed to the opening on the side of the bat
tery .
- Never use batteries which are damaged.
There is the danger of an explosion! Al
ways replace a damaged battery .
A WARNING
California Proposition 65 Warning:
- Battery posts, terminals and related ac
cessories contain lead and lead com
pounds, chemicals known to the State of
California to cause cancer and reproduc
tive problems . Wash hands after han
dling.
(D Note
- Do not disconnect the vehicle battery
when the ignition is switched on or when
the engine is running, otherwise, you will
damage electronic components in the
electrical system.
- If your vehicle is going to stand for a
long period of time without being driven,
protect the battery from "freezing", oth
erwise it will be damaged and will then
have to be replaced.
Battery charging
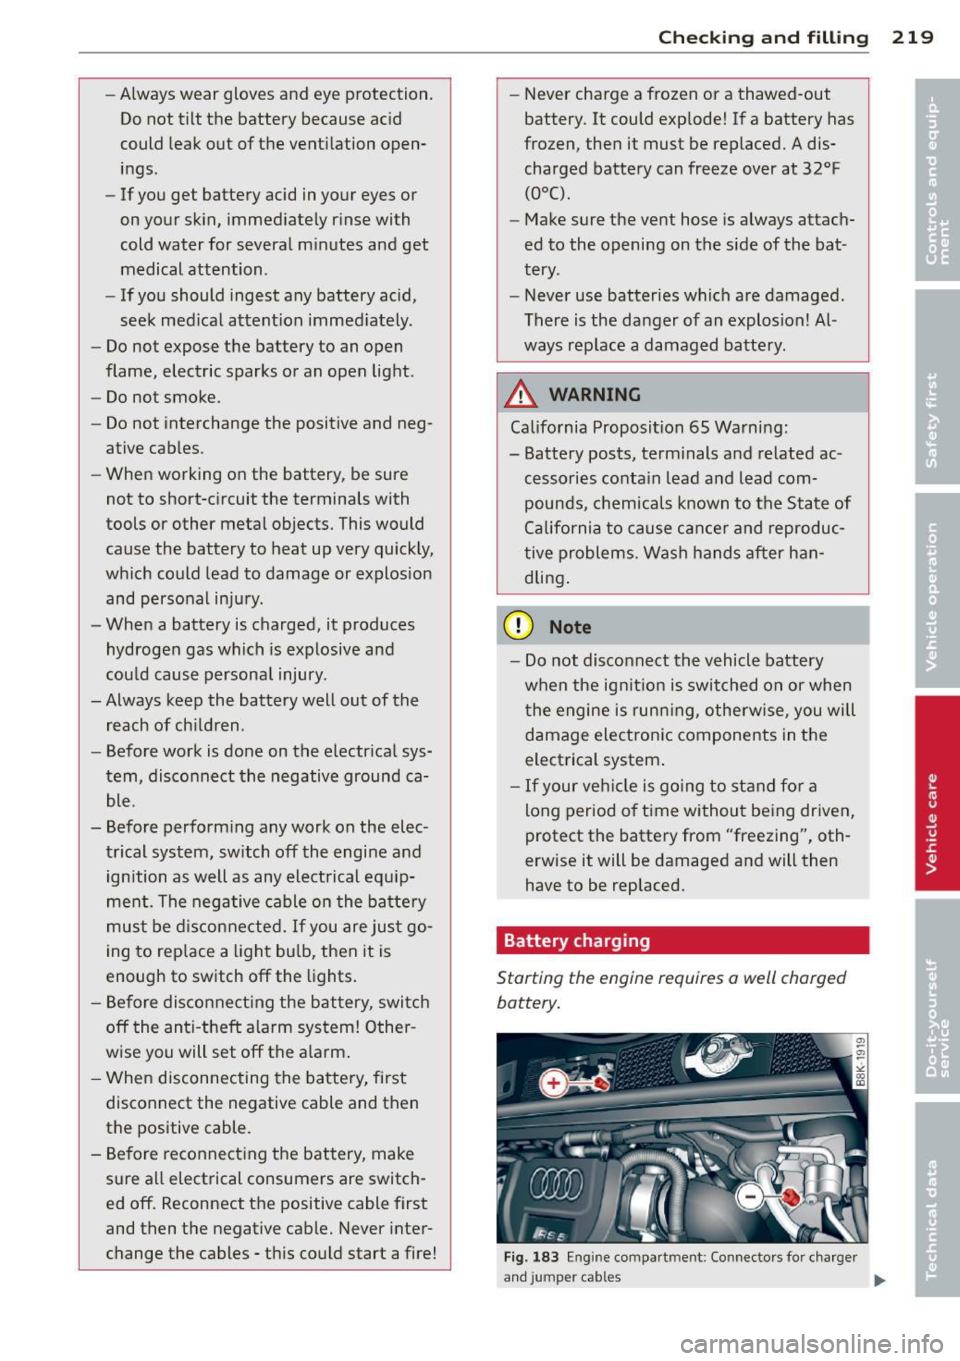
Start ing the engine requires a well charged
battery.
Fig . 183 Eng in e compart ment : Co nnectors fo r charger
and jum per cab les
1111>
Page 223 of 286

Battery replacement
The new battery must have th e sam e specifi
cations and dim ensions as the original equip
ment battery.
Intell igent energy management in your vehi
cle is respons ible for d istr ibuting the e lectr i
cal energy throughout your vehicle
c::>
pag e 182. The intel ligent e nergy ma nage
men t system w ill keep the eng ine ba tte ry
ch arged be tte r th en vehicles w ithout t his sys
tem . To make sure the additional e lectrica l en
e rgy is available once again after you have
changed th e battery, we recommend that you
install batteries of the same type and man u
facture only (the same as those installed at
the time your vehicle was delivered). Specifi
cations a re listed on the battery hous ing. Your
author ized Audi d ealer must code the battery
in the energy management system to enable
you to u se the ene rgy man agement func tions
correctly a fter rep lac ing the b att ery.
If it is not poss ible to use a battery of this
type, the new battery must have the same ca
paci ty, voltage ( 12-volts), ampe rage, con
s truc tion and pl ug sea ling.
W hen insta lli ng the battery, make sure the ig
ni tion and all e lectr ical c ons umers a re turned
off.
CD Note
Ma ke s ure the venti lation hose on the s ide
of the bat tery is connected, ot he rwise
fumes or ba ttery a cid c an leak out.
@, For the sake of the environment
Because of the probl em of proper d isposa l
of a batte ry, we recommend your autho r
i z e d Au di d ealer change the batt ery for
you. Batter ies co ntain s ulfu ric ac id and
lead and m ust always be dis posed of prop
erly i n complia nce w ith all environmental
reg ulations. D isposin g of vehicle batteries
improper ly is very dangerous to the envi
ronment.
Checkin g and fillin g 221
Windshield/headlight*
washer container
Fig. 184 Engine compartment: Cover on th e win d·
s hi eld and headlig ht' washer fluid conta iner
The was her fluid container is marked w ith the
symbol Won its cap c::>
fig. 184, c::> page 209,
fig. 177.
.. Before you check anything in the engine
compartment,
always read and heed all
WARNINGS c::> &. in Working in the engine
compartment on page 207.
.. Lift the fi ller cap tongue to add washer flu
id. You can fi ll the containe r to t he top .
.. Press the cap back o nto the fi lle r nec k afte r
filling the container.
You can find the reservo ir
capacity in t he table
in c::>
page 263.
Clean water should be used when filling up. If
poss ible, use soft water to prevent scaling on
the washer jets. A lways add a glass cleane r
solution (with frost pro te ction in t he winter).
CD Note
Do not mix engine coo lant antifreez e or
a ny other addit ives to f ill up t he win d
sh ield washer rese rvo ir.
•
•
Page 226 of 286
224 Tires and wheels
Groove
means the space between two adjacent tread
ribs .
Load rating (code)
means the maximum load that a tire is rated
to carry for a given inflation pressure. You
may not find this informat ion on all tires be
cause it is not req uired by law.
Maximum load rating
means the load rating for a t ire at the max i
mum permissible inflation pressure for that
tire.
Maximum loaded vehicle weight
means the sum of:
(a) Curb weight
(b) Accessory weight
(c) Vehicle capacity we ight, and
(d) Production options weight
Maximum (permissible) inflation pressure
means the maximum cold inflation pressure
to which a tire may be inflated. Also called
"maximum inflation pressure ."
Normal occupant weight
means 150 lbs. (68 kilograms) times the
number of occupants seated in the vehicle up
to the total seating capacity of your vehicle .
Occupant distribution
means distribution of occupants in a vehicle.
Outer diameter
means the overa ll diameter of an inflated new
tire.
Overall width
means the linear distance between the exteri
ors of the sidewalls of an inflated tire, includ
ing elevations due to labeling, decorations, or
protective bands o r ribs .
Ply
means a layer of rubber-coated parallel cords.
Production options weight
means the combined weight of those insta lled
regular production options weighing over 5
lb s. (2 .3 kg) in excess of those standard items
which they replace, not previously considered
in curb weight or accessory we ight, including
heavy duty brakes, ride levelers, heavy duty
battery, and special trim.
Radial ply tire
means a pneumat ic tire in which the ply cords
that extend to the beads are laid at substan
t ia lly 90 degrees to the center line of the
tread .
Recommended inflation pressure
see<=> page 223, Cold tire inflation pressure.
Reinforced tire
means a t ire design to operate at higher loads
and at h igher inflation pressures than the cor
responding standa rd tire. Reinforced tires
may be identified as "XL" "xl" "EXTRA LOAD"
' ' '
or "RF" on the sidewa ll.
Rim
means a metal support for a tire or a tire and
tube assembly upon which the tire beads are
seated.
Rim diameter
means nom inal diameter of the bead seat. If
you change your wheel s ize, you will have to
purchase new tires to match the new rim di
ameter.
Rim size designation
means r im diameter and width .
Rim width
means nominal distance between rim flanges.
Sidewall
means that portion of a tire between the
t read and bead.
Page 231 of 286

-Read the requir ed tire pressure from the tire
pressure label. The tire pressure label is lo
cated on the driver's side B-pillar. The tire
pressure label lists the recommended cold
t ire inf lation pressures for the vehicle at its
maximum capacity weight and the tires that
were on your vehicle at the time it was man
ufactured . For recommended tire pressures
for normal load conditions, please see chap
ter ~
page 226.
- Turn the valve stem cap counter-clockwise
to remove it from the tire valve.
- Place the air pressure gauge on the valve .
- The tire pressures should only be checked
and adjusted when the tires are cold . The
slightly raised pressures of warm tires must
not be reduced.
- Adjust the tire pressure to the load you are
carry ing.
- Reinstall the valve stem cap on the valve .
When should I check the tire pressure?
The correct tire pressure is especially impor
tant at high speeds. The pressure should
therefore be checked at least once a month
and always before starting a journey .
When should I adjust the tire pressures?
Adjust the tire pressure to the load you are
carry ing. After changing a wheel
or replacing
wheels you have to adjust the tire pressures
on all wheels. In addition, you must then initi
alize the new tire pressures in the tire pres
sure monitoring system*~
page 240.
A WARNING
Incorrect tire pressures and/or underinfla
tion can lead sudden tire failure, loss of
control, collision, serious personal injury
or even death.
- When the
[9] warning symbol appears in
the instrument cluster, stop and inspect
the tires.
- Incorrect tire pressure and/or underinfla
tion can cause increased tire wear and
can affect the handling of the vehicle and
stopping ability.
Tires and wheels 229
- Incorrect tire pressures and/or underin
flation can also lead to sudden tire fail
ure, including a blowout and sudden de
flation, causing loss of vehicle control.
- The driver is responsib le for the correct
tire pressures for all tires on the vehicle.
The applicable pressure values are locat
ed on a sticker on the driver's side B-pil lar.
- Only when all tires on the vehicle are fil
led to the correct pressure, the tire pres
sure monitoring system* can work cor
rectly.
- The use of incorrect tire pressure values
can lead to accidents or other damage.
Therefore it is essential that the driver
observe the specified tire pressure values
for the tires and the correct pressures for
the function of the tire pressure monitor ing system*.
- Always inflate tires to the recommended
and correct tire pressure before driving
off.
- Driving with underinflated tires bend
more, letting them get too hot resulting
in tread separation, sudden tire failure
and loss of control.
- Excessive speed and/overloading can
cause heat build-up, sudden tire failure
and loss of control.
- If the tire pressure is too low or too high,
the t ires will wear prematurely and the
vehicle will not handle well.
- If the tire is not flat and you do not have
to change a wheel immediately , drive at
reduced speed to the nearest service sta
tion to check the tire pressure and add
air as required.
(D Note
Driving without valve stem caps can cause
damage to the tire valves. To prevent this,
always make sure that factory installed
valve stem caps on all wheels are securely
mounted on the valve.
•
•
Page 277 of 286

K
Key ... .... .. .. .... .. .... ... .. .. .... 32
Battery rep lacement ... ... .. .. .. .. .. 33
Check light ..... ...... ... .. .. .. .... 33
Emergency key . . . . . . . . . . . . . . . . . 32, 76
Ignition/engine on/off ............... 74
Key replaceme nt . . . . . . . . . . . . . . . . . . . 32
Mechanical key . . . . . . . . . . . . . . . . . 32, 33
removing . . . . . . . . . . . . . . . . . . . . . . . . . 76
u nl ocking/ locking . . . . . . . . . . . 34, 35, 36
Kick-down . . . . . . . . . . . . . . . . . . . . . . . . . . 89
Knee airbags .... .. ..... ... .. .. .. ... 152
Descript io n ..... .. .... ... .. .. .. ... 152
How t hey work . ... .... ... .. .. .. ... 153
Important safety instructions . . . . . . . . 154
L
Lane Change Ass istant
refer to side assist ..... ... .. .. .. .. . 10 1
L ap time r .. .. .... ......... .... .. .. .. 28
E v a lu ating times . . . . . . . . . . . . . . . . . . . 29
Pausing tim ing . .. ..... ... .. .. .. .. .. 28
Starting ... .. .. ...... ... .. .. .. .... 28
L A T CH .. .. ...................... .. 172
D escr ip ti on ..... ......... .... .. .. . 173
I ns tall ing a chi ld res traint ........... 174
L ocat ion . . . . . . . . . . . . . . . . . . . . . . . . . 17 3
M ounting and releasing the ancho rage
hook . ..... .. ... ..... ... .. .. .. ... 174
L aunch Cont ro l Program .............. 90
Leather . . . . . . . . . . . . . . . . . . . . . . . . . . . 198
C leaning . ................ ...... .. 199
L eaving home . . . . . . . . . . . . . . . . . . . . . . . 53
L eft ha nd d rive . ........... .. .. .. .... 54
Lifting jack .. ............. .... .. ... 248
L ifting vehicle .. .. .. .... ... .. .. .. ... 259
Light adapt ive light ...... ...... .. .. .. .. .. 52
Com ing/ Leavi ng home ............... 53
D aytime r unning lig hts . . . . . . . . . . 52, 53
E xterior lighting . . . . . . . . . . . . . . . . 5 2, 53
I nter ior/reading .. ..... ... .. .. .. .. .. 55
L ow beam . ... .... .... ... .. .. .. .... 52
Rear fog lights . . . . . . . . . . . . . . . . . . . . . 52
Side marker lights . . . . . . . . . . . . . . . . . . 52
Travel mode . . . . . . . . . . . . . . . . . . . . . . . 54
Inde x 275
Light/ rain senso r
Head lights . ... .... . ... ...... ... .. . 52
Intermittent (w indshie ld w ipers) ... .. . 57
Sensor defective . . . . . . . . . . . . . . . . . . . . 22
L ights
E mergency flashe rs . . . . . . . . . . . . . . . . . 54
Hig h beam . ..... ... .. .. ..... ... .. . 53
Turn signals ... .. .. .. ... ..... ... .. . 53
Locking Re ar li d ... .... .. .. . ............... 37
Locking/unlock ing
at the lock cylinder . . . . . . . . . . . . . . . . . . 36
by remote control . . . . . . . . . . . . . . . . . . 34
with t he centra l locking sw itch ... .. .. . 35
wi th t he conve nien ce key .......... .. . 35
Low beams . . . . . . . . . . . . . . . . . . . . . . . . . 52
Lower anchorage locator button ... .. .. 173
Lower universal a nc horage bars (Canada) 172
Lower universal anchorages (Canada) 172
Luggage Stow ing . ... .... .. . .. .. ..... ... .. 124
Luggage compartm ent . . . . . . . . . . . . . . . . 67
En larging . .. .. .. ................. . 67
Li d ............................... 37
L oad ing ... .. .... .. . .. .. ..... ... .. 124
S ki sack ... .. .... .. . .. .. ..... ... .. . 68
Tie-downs . . . . . . . . . . . . . . . . . . . . 68, 125
Luggage compar tment l id
E mergency un lock ing .. ......... .. .. . 38
Lumbar support . . . . . . . . . . . . . . . . . . . . . 62
M
Maintenance .. .. .. .... ........... .. 264
Malfunc tion Ind icator Lamp (MIL) . . 20, 29
Matte finish paint ................... 192
Mechan ica l key . . . . . . . . . . . . . . . . . . 32, 33
Memo ry func tion . . . . . . . . . . . . . . . . . . . . 64
Mileage Average ................ ........... 25
Instantaneous ... .. . .. .... ...... .. . 25
Mirrors Adjusting the exterior mirrors . . . . . . . . . 5S
Compass .. .. .. .. ................. . 59
dimming .. ... .... ........... ...... 56
Vanity mir ro rs .... ........... ...... 57
Monitoring the Advanced Airbag System 148
•
•
Page 285 of 286
It has always been Audi's policy to continu
ously improve its products. Aud i, therefore,
reserves the right to make changes in design
a nd specifications, and to make additions or
improvements in its p roducts, w ithout incur
ring any obl igat ion to insta ll t hem on p rod
uc ts p revio usly man ufac tured.
Text, illustrat ions and specifications in th is
manual a re based on the most up-to-date in
formation available at the time of p rinting.
All rights reserved. May not be reproduced or
translated in whole or in part without the wr
itten consent of AUDI AG. Specifications are
subject to change without notice.
"Audi", "q uattro" and the four r ings emblem
are registered trademarks of AUDI AG.
Editor ial de adlin e: 11 /02 /2012
@ For the sake of the environment
P rinted on environmentally friendly pape r
(b leached without chlorine, recyclable).
Printed in Germany
© 2012 AUDI AG