fog light AUDI RS7 SPORTBACK 2016 Owners Manual
[x] Cancel search | Manufacturer: AUDI, Model Year: 2016, Model line: RS7 SPORTBACK, Model: AUDI RS7 SPORTBACK 2016Pages: 282, PDF Size: 70.78 MB
Page 11 of 282
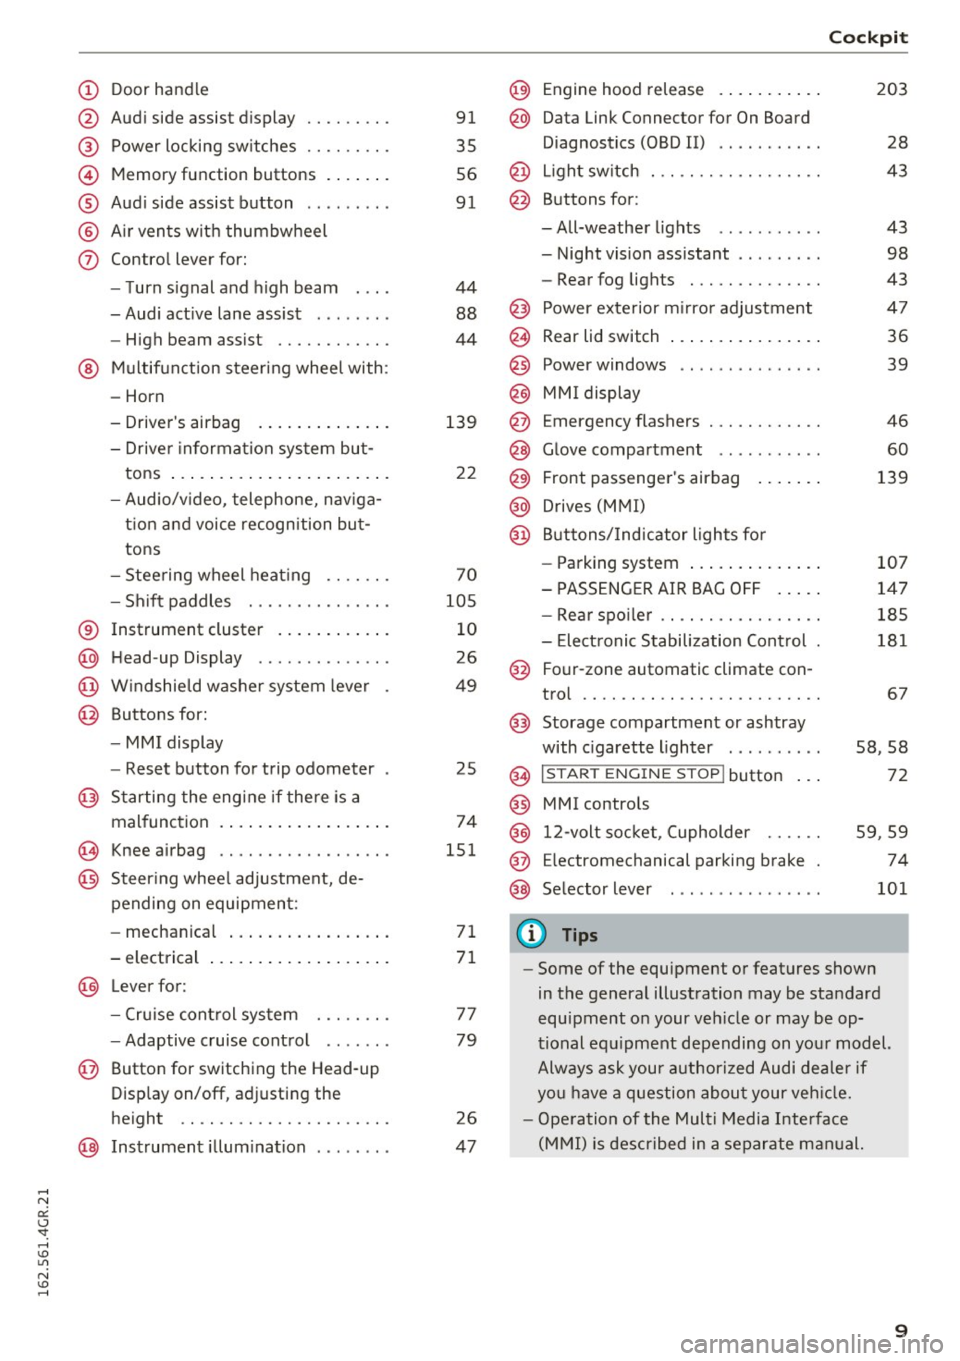
(!) Door handle
@
®
©
®
®
(j)
Audi side assist display
Power locking switches ...... .. .
Memory function buttons ...... .
Audi side assist button .. .. ... . .
Air vents with thumbwheel
Control lever for:
- Turn signal and high beam
- Audi active lane assist . .. ... . .
- High beam assist ......... .. .
@ Multifunction steering wheel with:
- Horn
- Driver's airbag
- Driver information system but-
tons ...................... .
- Audio/video, telephone, naviga
tion and voice recognition but
tons
- Steering wheel heating ...... .
- Shift paddles ............ .. .
® Instrument cluster ........... .
@ Head-up Display ............ . .
@ Windshield washer system lever
@ Buttons for:
- MMI display
- Reset button for trip odometer
@ Starting the engine if there is a
malfunction ................. .
~ Knee airbag .. ............. .. .
@ Steering wheel adjustment, de
pending on equipment:
- mechanical ................ .
- electrical
@ Lever for :
- Cruise control system ... .. .. .
- Adaptive cruise control ...... .
@ Button for switching the Head-up
Display on/off, adjusting the
height .. .. ............... .. .
@ Instrument illumination ....... .
91
35
56
91
44
88
44
139
22
70
105
10
26
49
25
74
151
71
71
77
79
26
47
@) Engine hood release .......... .
@ Data Link Connector for On Board
Diagnostics (OBD II) .... ...... .
@ Light switch . .. .............. .
@ Buttons for :
-All-weather lights - Night vision assistant .. ...... .
- Rear fog lights ............. .
@ Power exterior mirror adjustment
@ Rear lid switch ............... .
@
@
@ Power windows
MMI display
E mergency flashers
@ Glove compartment .......... .
@ Front passenger's airbag ...... .
@ Drives (MMI)
@ Buttons/Indicator lights for
- Parking system ............. .
- PASSENGER AIR BAG OFF .... .
- Rear spoiler .. .............. .
- Electronic Stabilization Control .
@ Four-zone automatic climate con-
trol .... .... .. .............. .
@) Storage compartment or ashtray
with cigarette lighter ......... .
@ I ST AR T ENGINE ST OP ! button
@ MMI controls
@
@
@ 12-volt socket, (upholder
E lectromechanical parking brake
Selector lever
(D Tips
Cockpit
203
28
43
43
98
43
47
36
39
46
60
139
107
147
185
181
67
58,58
72
59 ,59
74
101
- Some of the equipment or features shown
in the general illustration may be standard
equipment on your vehicle or may be op
tional equipment depending on your model.
Always ask your authorized Audi dealer if
you have a question about your vehicle.
- Operation of the Multi Media Interface
(MMI) is described in a separate manual.
9
Page 15 of 282
TPMS
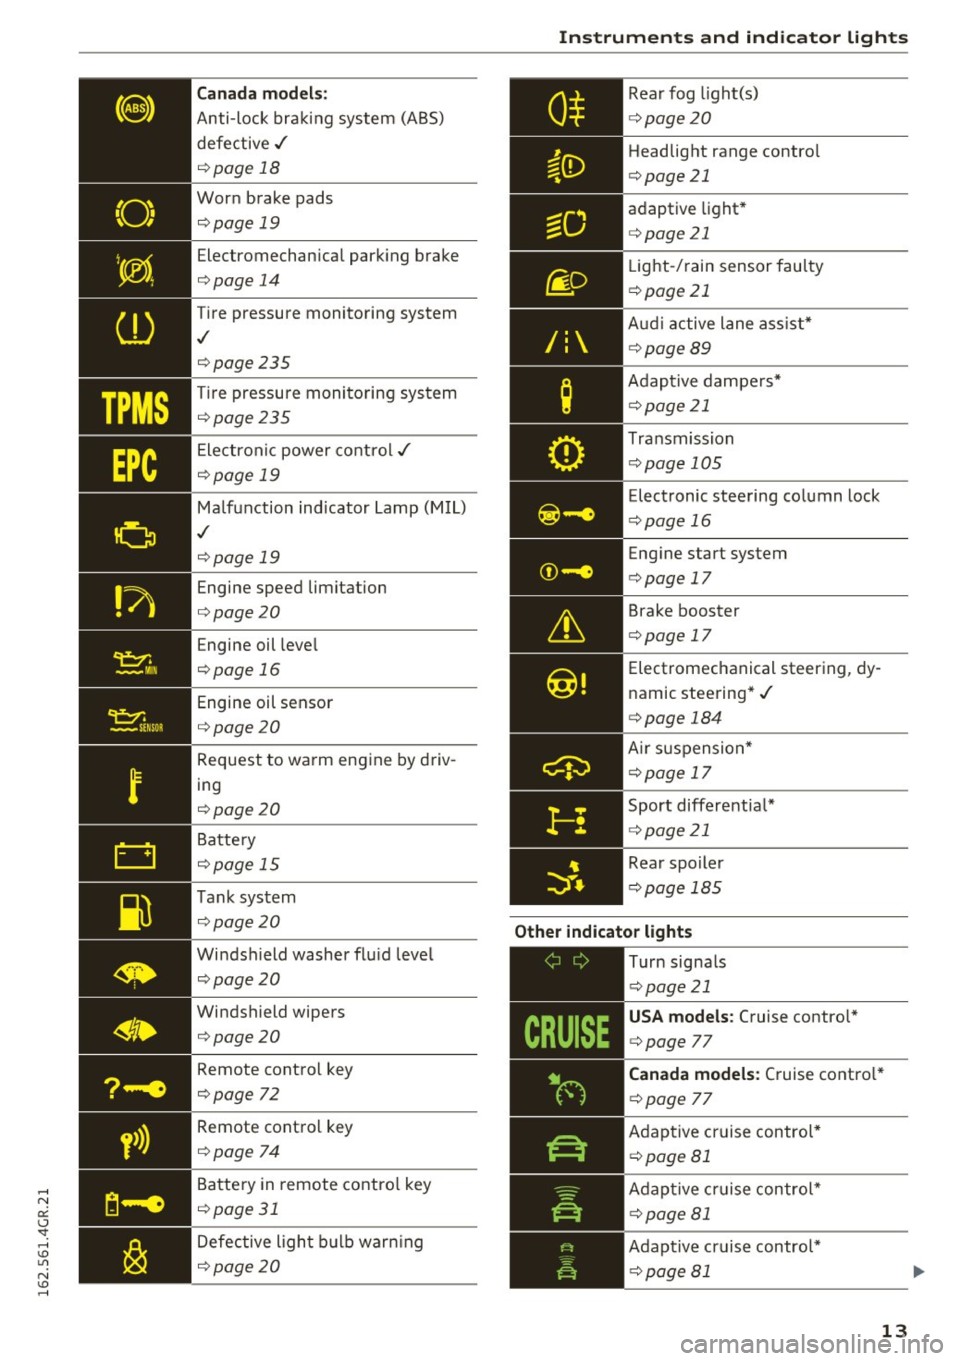
Canada models:
Anti-lock bra king system (ABS)
defective ,/
¢page 18
Worn brake pads
¢page 19
Electromechan ica l park ing brake
¢ page 14
Tire pressure monito ring system
,I
¢page 235
Tire pressu re moni toring sys tem
¢page 235
Ele ct ron ic power co ntro l./
¢page 19
Malf u nction ind icator La mp (M IL)
,I
¢page 19
Engine speed limitation
¢page 20
Engine oil leve l
¢page 16
Engine oil sensor
¢page 20
Request to wa rm eng ine by driv
ing
¢ page 20
Battery
¢ page 15
T ank sys tem
¢page 20
Windshield washer flu id leve l
¢page 20
Windshield wipers
¢page 20
Remote cont rol key
¢page 72
Remote cont ro l key
¢ page 74
Battery in remote contro l key
¢page 31
Defective ligh t bulb warning
¢ page 20
Instruments and ind icator lights
R ea r fog light(s)
Headlight range contro l
¢page 21
ad aptive light *
¢page 21
Light-/ rain sensor fau lty
¢ page 21
Audi a ctive lane as sist*
¢ page89
Adap tive da mpe rs*
¢ page 21
Tra nsmission
¢pag e 105
Elec tronic steering column lock
¢ page 16
Engine start system
¢ page 17
Brake booster
¢page 17
Electromechanical steer ing, dy
namic stee ring* ./
¢page 184
Air su sp ensio n*
¢page 17
Sport differentia l*
¢page 21
Rear spoiler
¢ pag e 18 5
Other indicator lights
-------------
Turn signa ls
¢ pag e 21
USA models : Cruise contro l*
¢ page 77
Canada models: Cruise co ntro l*
¢ page 77
Adap tive c ruise contro l*
¢ page 81
Adap tive c ruise contr ol*
¢page 81
Adap tive cr uise contro l*
¢ page 81
13
Page 22 of 282
Instruments and indicator lights
For more information ¢page 28.
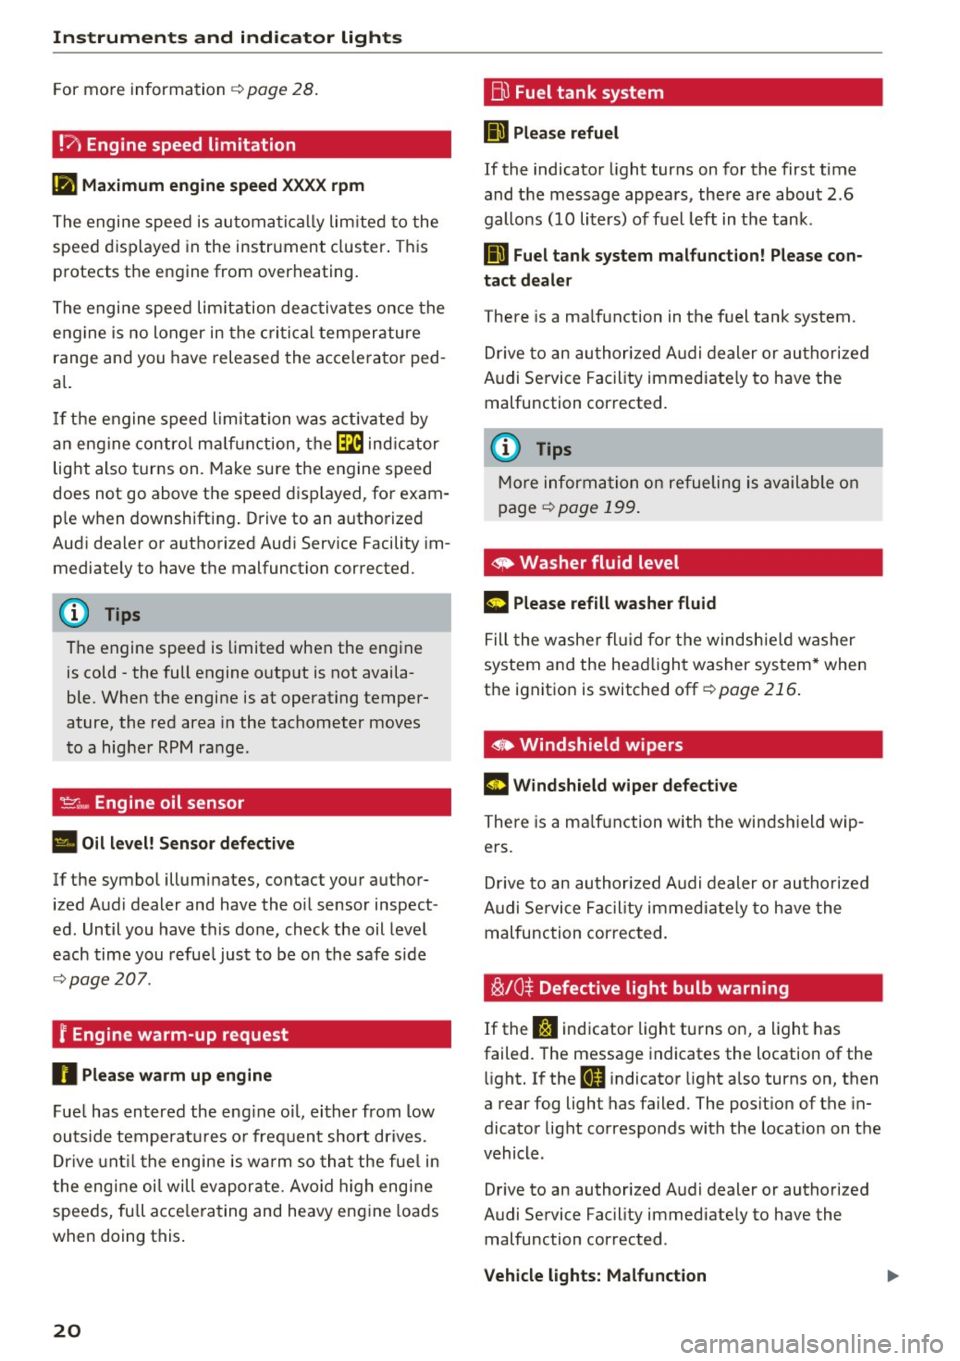
!?) Engine speed limitation
(II Maximum engine speed XXXX rpm
The engine speed is automatically limited to the
speed displayed in the instrument cluster. This
protects the engine from overheating.
The engine speed limitation deactivates once the
engine is no longer in the critical temperature
range and you have released the accelerator ped
al.
If the engine speed limitation was activated by
an engine control malfunction, the~ indicator
light also turns on. Make sure the engine speed
does not go above the speed displayed, for exam
ple when downshifting. Drive to an authorized
Audi dealer or authorized Audi Service Facility im
mediately to have the malfunction corrected.
(D Tips
The engine speed is limited when the engine
is cold -the full engine output is not availa
ble. When the engine is at operating temper
ature, the red area in the tachometer moves
to a higher RPM range .
-Engine oil sensor
• Oil level! Sensor defective
If the symbol illuminates, contact your author
ized Audi dealer and have the oil sensor inspect
ed. Until you have this done, check the oil level
each time you refuel just to be on the safe side
¢page 207 .
f Engine warm-up request
n Please warm up engine
Fuel has entered the engine oil, either from low
outside temperatures or frequent short drives.
Drive until the engine is warm so that the fuel in
the engine oil will evaporate . Avoid high engine
speeds, full accelerating and heavy engine loads
when doing this.
20
~ Fuel tank system
II] Please refuel
If the indicator light turns on for the first time
and the message appears , there are about 2.6
gallons (10 liters) of fuel left in the tank .
111 Fuel tank system malfunction! Please con
tact dealer
There is a malfunction in the fuel tank system.
Drive to an authorized Audi dealer or authorized
Audi Service Facility immediately to have the
malfunction corrected.
(D Tips
More information on refueling is available on
page
¢ page 199.
· <9 Washer fluid level
g, "$ Please refill washer fluid
Fill the washer fluid for the windshield washer
system and the headlight washer system* when
the ignition is switched off ¢
page 216.
• Windshield wipers
m Windshield wiper defective
There is a malfunction with the windshield wip
ers.
Drive to an authorized Audi dealer or authorized
Audi Service Facility immediately to have the
malfunction corrected.
~ /0* Defective light bulb warning
If the J:i indicator light turns on, a light has
failed. The message indicates the location of the
light. If the
I) indicator light also turns on, then
a rear fog light has failed. The position of the in
dicator light corresponds with the location on the
vehicle .
Drive to an authorized Audi dealer or authorized
Audi Service Facility immediately to have the malfunction corrected .
Vehicle lights: Malfunction
Page 45 of 282
Lights and Vision
Exterior Lighting
Switching the lights on and off
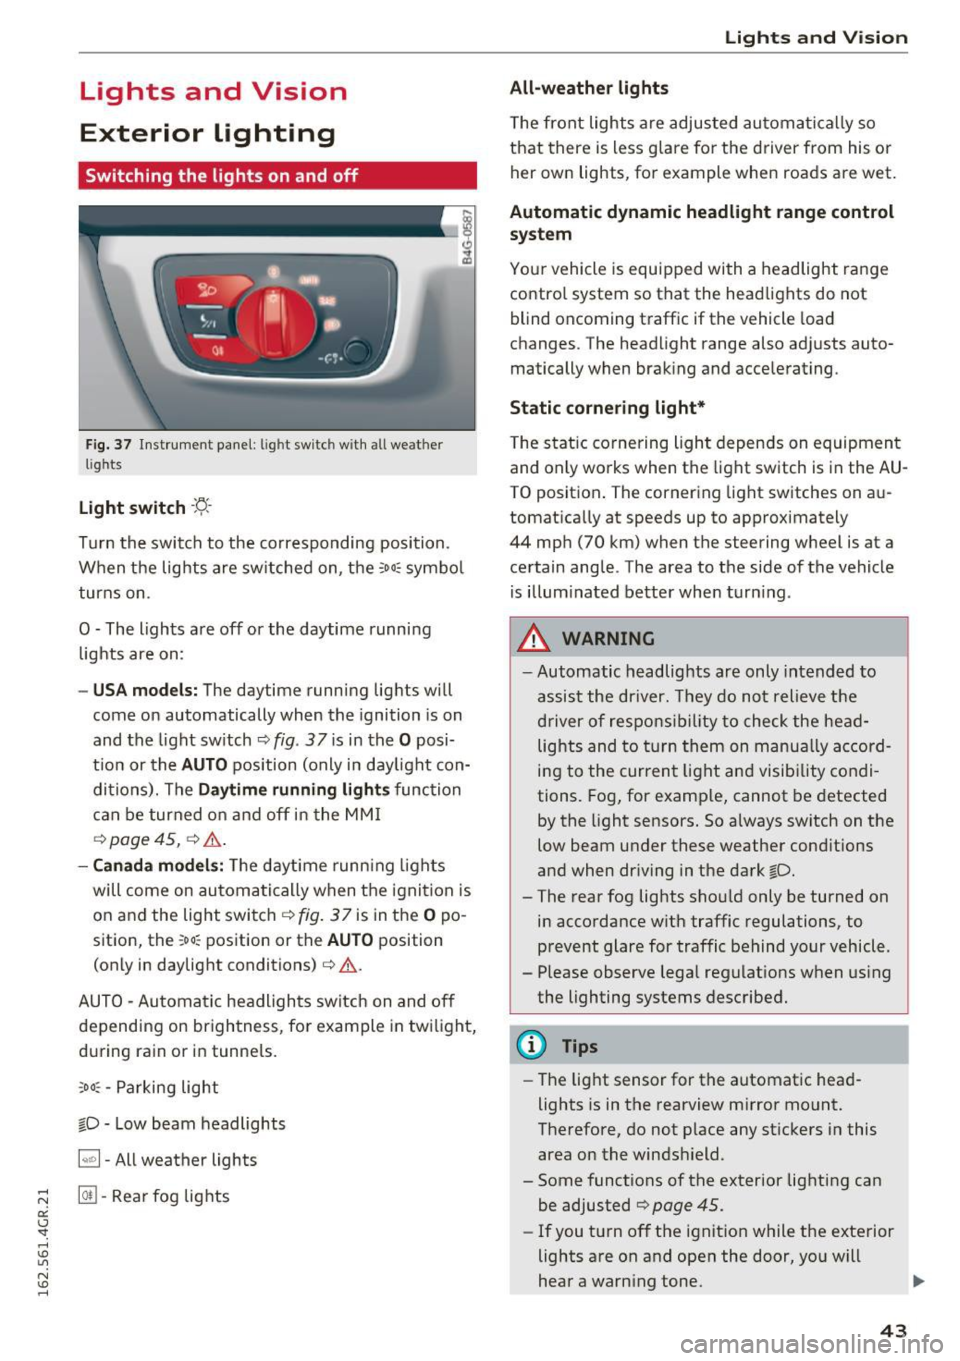
Fig. 3 7 Instrument panel: l ig ht sw itc h w ith all we ath er
li g hts
Light switch -f/
Tu rn the switch to the co rresponding posi tion .
When the lights are sw itched on, the
:oo: symbo l
turns on .
O -The lights are off or the daytime running
l ights are on :
-USA models: The daytime running lig hts will
come on automatically when the ignition is on
and the light sw itch
9 fig . 37 is in the O posi
t io n or th e
AUTO pos ition (only i n day light con
di tions). The
Daytime running lights func tion
c an be turned on and off in the MM I
q page 45, q .&..
-Canada models : The daytime runn ing ligh ts
will come on au toma tically when t he ig nit ion is
on a nd the light swi tch
q fig . 37 is in the O po
sition, the
: oo: position or the AUTO position
(only in daylig ht conditions) ¢,&. .
AUTO -Au tomatic hea dligh ts switc h on and o ff
depending on br igh tness, for example in tw ilight,
d ur ing ra in or in tunne ls.
,oo : -Parking light
io -Low beam headlights
~ - All weather lights
@II -Rea r fo g lig hts
Lights and V ision
All-weather lights
T he front lights a re adju sted au toma tic a lly so
that there is less g lare for the driver from his or
her own lights, fo r example whe n roa ds are wet.
Automatic dynamic headlight range control
system
Yo ur vehicle is equip ped with a headlight r ange
contro l system so that the headlights do not
blind oncoming t raffic if the vehicle load
c h anges . The head light range also ad justs auto
matically when brak ing and acce lerating.
Static cornering light*
T he s tat ic cornering li ght depends on equipment
and only wo rks when the lig ht switch is in the AU·
TO position . The cornering light switches on au
tomat ica lly at speeds up to approximately
44 mp h (70 km) when the steering wheel is a t a
ce rtain ang le . The area to the side of the vehicle
is illum inated bette r when turn ing .
A WARNING
-Automatic headlights are only intended to
a ssi st the driver. They do no t relieve the
dr iver of resp ons ibility to check the head
lig hts and to turn them on manu ally a ccord
i ng to the cur rent light and visib ility co ndi
tions. Fog, for e xamp le , cannot be detected
by the ligh t sensors. So always switch on the
low beam under these weather cond itions
and when dr iving in the da rk
io.
- The rear fog lights sho uld only be turned on
in accordance w ith traffic regulations, to
p revent glare for traffic behind your vehicle.
- Please observe lega l regulat ions w hen us ing
the lighting systems described .
(D Tips
-The lig ht sensor for the automat ic head
lights is in t he rearview m irror mount.
Therefore, do not p lace any st ic kers i n this
area on the winds hield.
- Some functions of the exterior lighting can
be adjusted ¢
page 45.
-If you t urn off the i gnit io n while the exte rior
lights a re on a nd open the d oor, yo u will
hear a warn ing tone.
1J,,
43
Page 46 of 282
Lights and Vision
-In cool or damp weather, the inside of the
headlights, turn signals and tail lights can
fog over due to the temperature difference between the inside and outs ide. They will
clear short ly after sw itching them on. This
does not affect the service life of the light i ng.
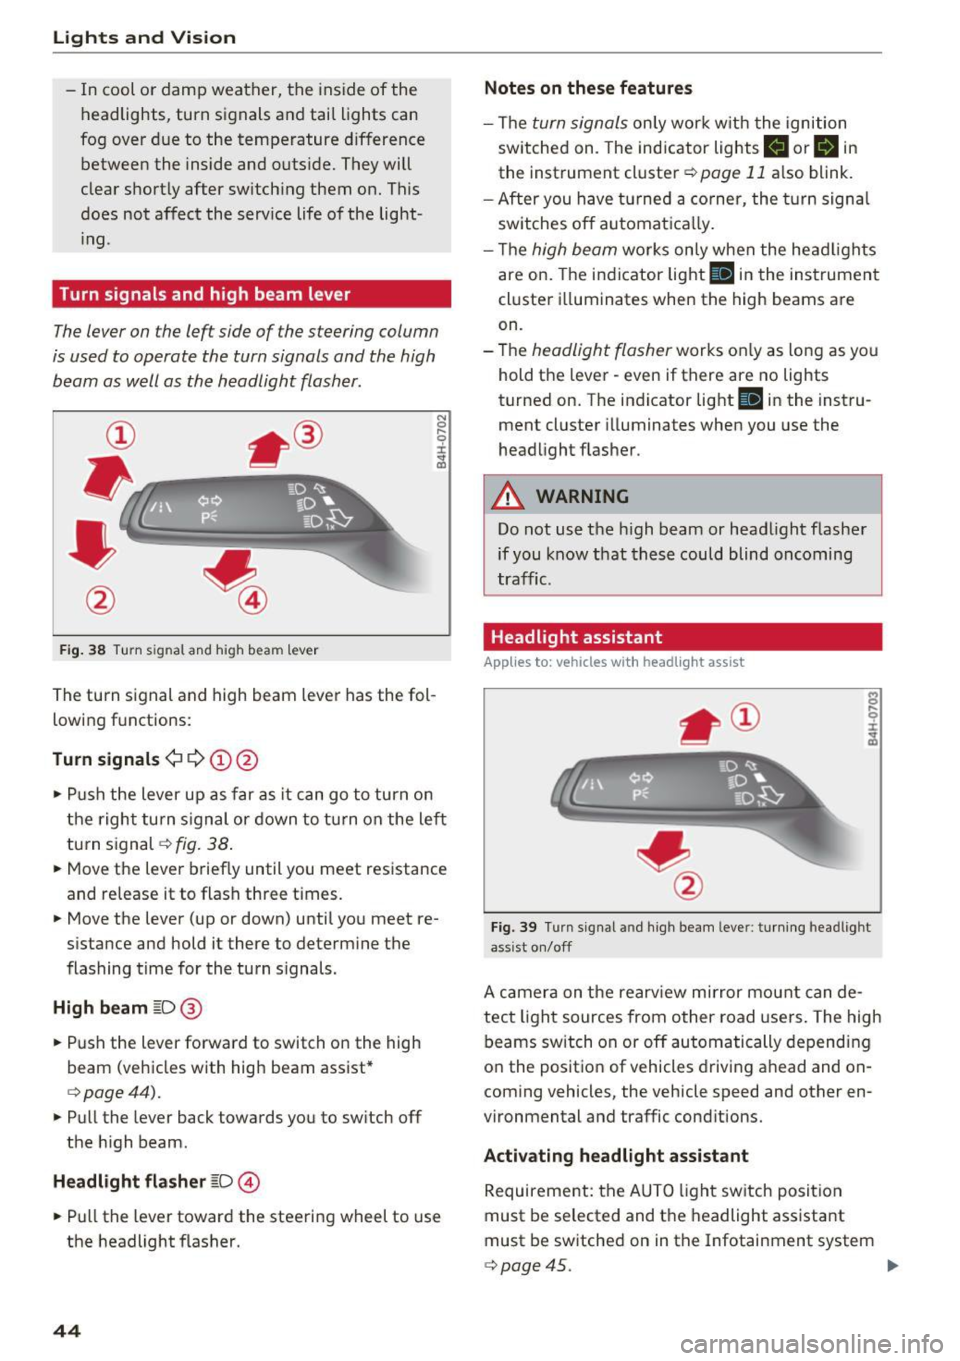
Turn signals and high beam lever
The lever on the left side of the steering column
is used to operate the turn signals and the high
beam as well as the headlight flasher.
F ig . 38 Turn signal and high beam lever
The turn s ignal and high beam lever has the fol
lowing f unctions:
Turn signals ¢¢@@
N
0 ,.._ 0 ±
~
• Pu sh the lever u p as far as it can go to turn on
t he righ t turn s ignal or down to t urn on the left
turn s ignal
c:> fig. 38 .
• Move the lever briefly until you meet resistance
and release it to flash three t imes.
• Move the lever (up or down) until you meet re
s istance and hold it there to determine the
flashing time for the tu rn signals.
High beam ~D @
• Push the lever forward to switch on the high
beam (veh icles with high beam assist*
c:> page44).
• Pull the lever back towards you to sw itch off
the h igh beam.
Headlight flasher ~D ©
• Pull the lever toward the steering wheel to use
the headlight flasher.
44
Notes on these features
- The turn signals on ly wor k w it h the ignition
sw itched on. The ind icator lights
II or B in
the instrument cluster c:> page 11 also blink.
- After you have turned a co rner, the turn signa l
sw itches o ff automat ica lly.
- Th e
high beam works only when the head ligh ts
are on. The indicator light
Bl in the instrumen t
cl uster illuminates when the high beams are
on.
- The
headlight flasher works o nly as long as yo u
hold the lever - even if there are no lights
turned on. T he indicator light
Bl in the instru
ment cluster i lluminates when you use the
headlight flas her .
A WARNING
Do not use the h igh beam or head light flasher
if you know that these could blind oncoming
traffic.
Headlight assistant
App lies to: vehicles with headlight assist
Fig. 39 Turn s ig nal and high beam leve r: turn ing headlight
ass ist o n/off
A camer a on the rearv iew mirror mou nt can de
tect light sources from other road users. The high
beams switch on or off automatically depending
o n the positio n of vehicles driving ahead and on
coming vehicles, the vehicle speed and other en
vironmental and traffic cond itions.
Activ ating headlight assistant
Requirement: the AUTO light sw itch posit ion
must be selected and t he headlight assistant
must be sw itched on in the Infotainment system
c:> page45. "'
Page 47 of 282
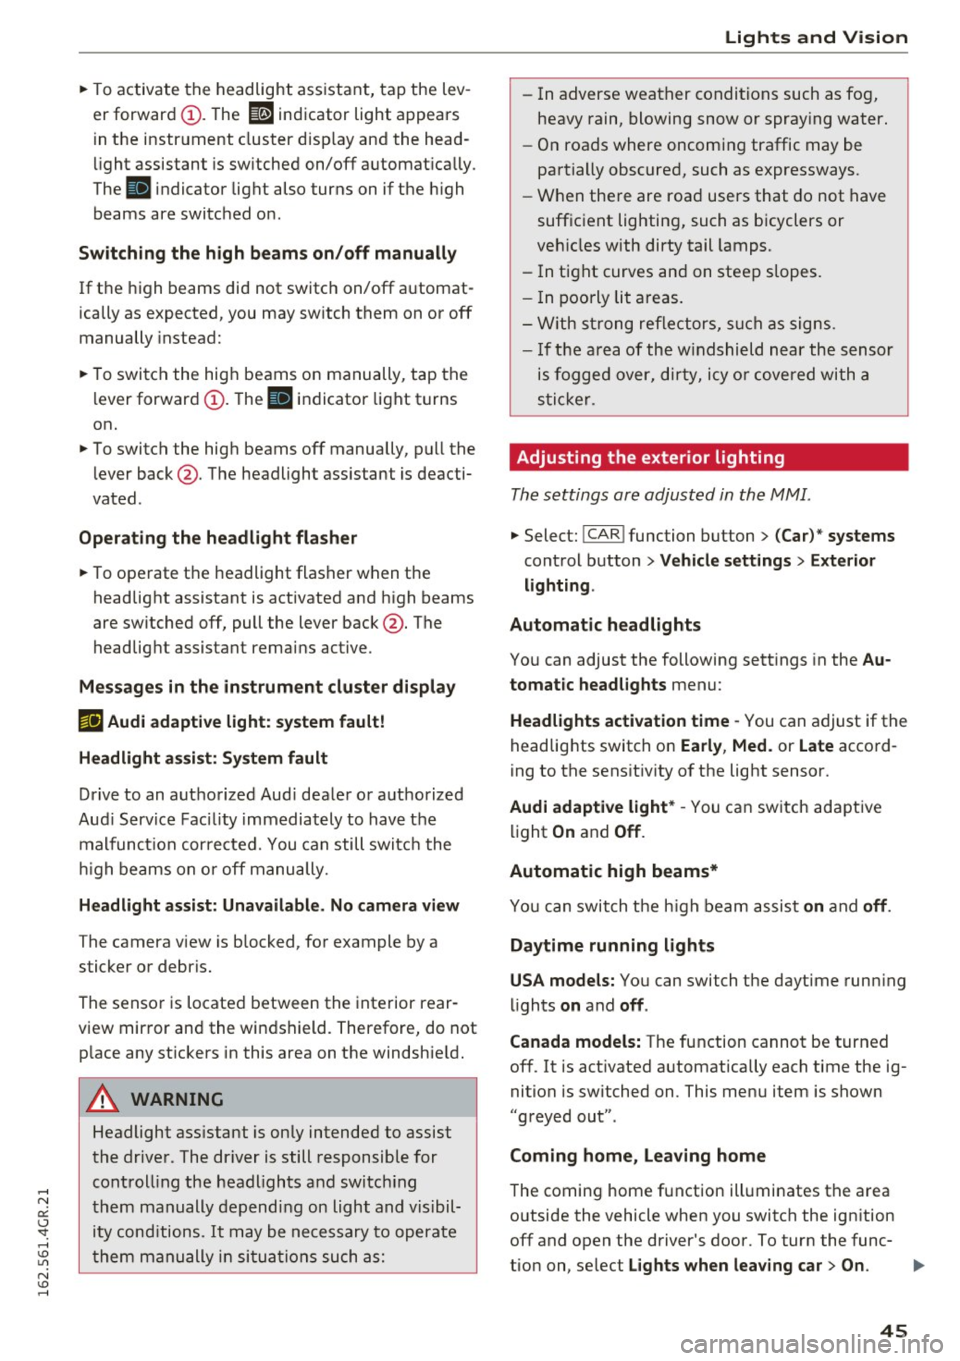
~ To activate the headlight assistant, tap the lev
er forward (!). The
112 indicator light appears
in the instrument cluster disp lay and the head
light assistant is switched on/off automatically .
The
El indicator light also turns on if the high
beams are switched on .
Switching the high beams on/off manually
If the high beams did not switch on/off automat
ically as expected, you may switch them on or off
manually instead:
~ To switch the high beams on manually, tap the
l ever forward (!). The
El indicator light turns
on.
~ To switch the high beams off manually, pull the
lever back@. The headlight assistant is deacti
vated .
Operating the headlight flasher
~ To operate the headlight flasher when the
headlight assistant is activated and h igh beams
are switched off, pull the lever back@. The
headlight assistant remains active .
Messages in the instrument cluster display
r!IJ Audi adaptive light: system fault!
Headlight assist: System fault
Drive to an authorized Aud i dealer or authorized
Aud i Service Facility immediately to have the
malfunction corrected. You can still switc h the
high beams on or off manually.
Headlight assist: Unavailable. No camera view
The camera view is blocked, for example by a
sticker or debris.
The sensor is located between the interior rear
view mirror and the windshield. Therefore, do not p lace any st ickers in this area on the windshie ld.
A WARNING
Headlight ass istant is only intended to assist
the driver . The dr iver is still responsible for
controll ing the headlights and switching
them manually depending on light and visibil
i t y cond itions.
It may be necessary to operate
them manually in situations such as:
Lights and Vision
-In adverse weather conditions such as fog,
heavy rain, blowing snow or spraying water.
- On roads where oncoming traffic may be
partially obscured, such as expressways.
- When there are road users that do not have
suff icient lighting, such as b icyclers or
veh icles with dirty tail lamps.
- In tight curves and on steep slopes.
- I n poorly lit areas.
- With strong reflectors, such as signs.
- If the area of the w indshield near the sensor
is fogged over, dirty, icy or covered with a
sticker.
Adjusting the exterior lighting
The settings are adjusted in the MMI .
~ Select: !CAR ! function button> (Car) " systems
control button > Vehicle settings> Exterior
lighting .
Automatic headlights
You can adjust the following settings in the Au
tomatic headlights
menu:
Headlights activation time -You can adjust if the
headlights switch on
Early , Med . or Late accord
ing to the sensit ivity of the light sensor.
Audi adaptive light* -You can switch adaptive
light
On and Off .
Automatic high beams*
You can switch t he h igh beam assist on and off.
Daytime running lights
USA models:
You can switch the daytime running
lights
on and off .
Canada models:
The function cannot be turned
off. It is activated automatically each time the ig
nition is switched on. This menu item is shown
"greyed out" .
Coming home, Leaving home
The coming home function illuminates the area
outside the vehicle when you switch the ignition
off and open the driver's door. To turn the func-
tion on, select
Lights when leaving car> On. .,.
45
Page 63 of 282
pockets on the coat hooks. During sudden
braking or in an accident- especially if the
airbag is deployed -these objects could in
jure any passengers inside the vehicle .
- To reduce the risk of personal injury in an
accident or sudden stop, always keep the
glove compartment closed while driving.
- Read and follow all WARNINGS
q page 155, Important safety instructions
on the side airbag system.
- Hang clothes in such a way that they do not
impair the driver's vision.
- The coat hooks must only be used for light
weight clothing . Do not leave any heavy or
sharp edged objects in the pockets which
may interfere with the side curtain airbag
deployment and can cause personal injury in
a crash .
- Do not use coat hangers for hanging cloth
ing on the coat hooks as this can interfere
with proper deployment of the side curtain
airbags in an accident.
- Do not hang heavy objects on the coat
hooks, as they could cause personal injury in
a sudden stop.
CD Note
Objects located on the rear shelf that rub
against the rear window could damage the
heat ing wires for the rear window defogger.
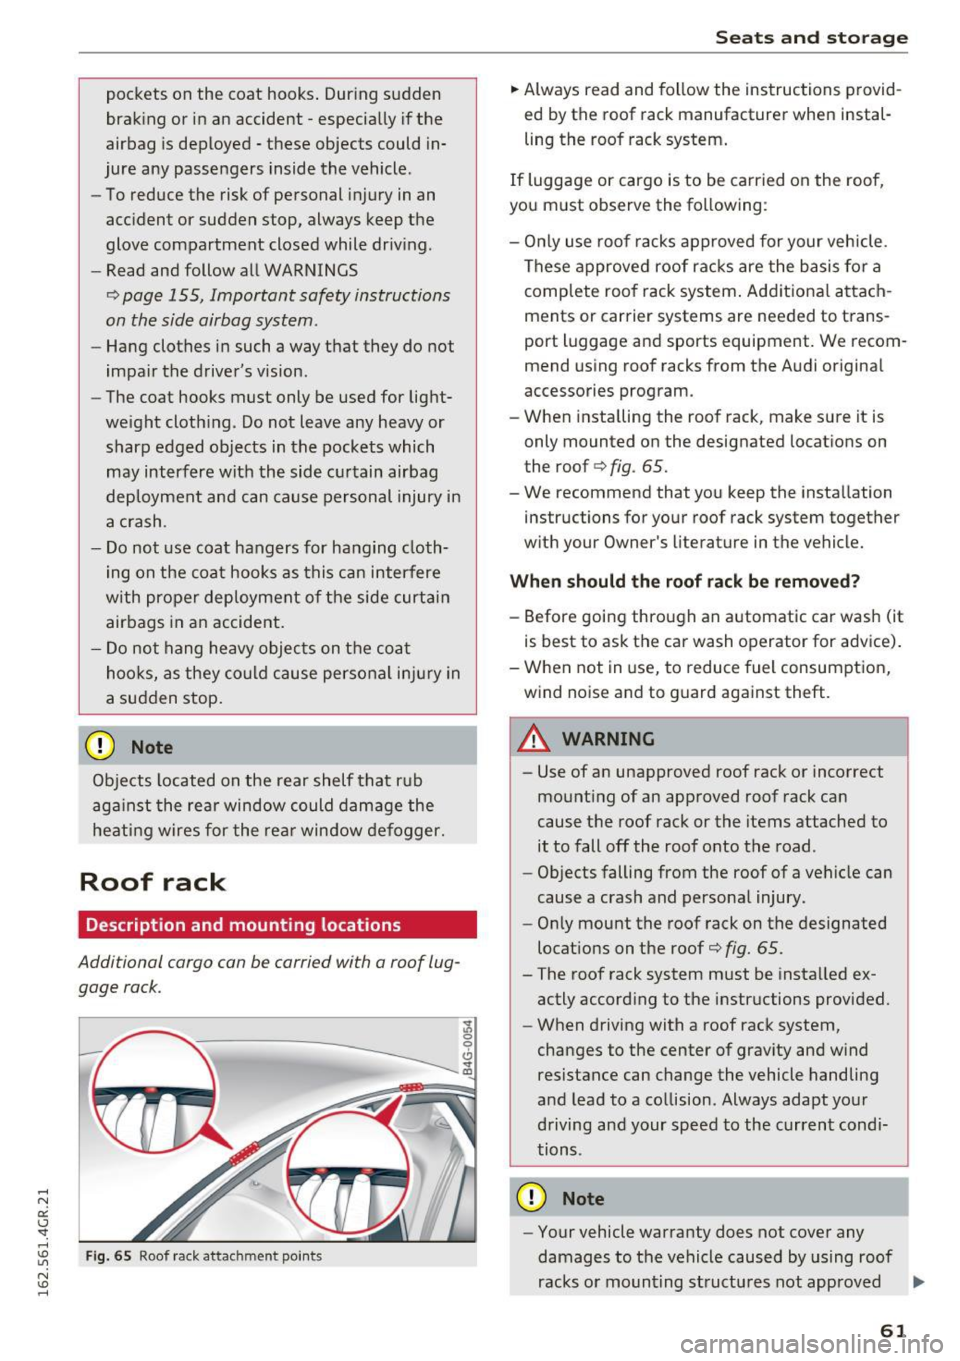
Roof rack
Description and mounting locations
Additional cargo can be carried with a roof lug
gage rack.
Fig. 65 Roof rack attac hment point s
'J, 0 9 Cl sr CD
Seats and storage
.,. Always read and follow the instructions provid
ed by the roof rack manufacturer when instal
ling the roof rack system.
If luggage or cargo is to be carried on the roof,
you must observe the following :
- Only use roof racks approved for your vehicle.
These approved roof racks are the basis for a
complete roof rack system. Additional attach
ments or carrier systems are needed to trans
port luggage and sports equipment. We recom mend using roof racks from the Audi original
accessories program.
- When installing the roof rack, make sure it is
only mounted on the designated locations on
the roof
q fig. 65.
- We recommend that you keep the installation instructions for your roof rack system together
with your Owner's literature in the vehicle.
When should the roof rack be removed?
-Before going through an automatic car wash (it
is best to ask the car wash operator for advice).
- When not in use, to reduce fuel consumption,
wind noise and to guard against theft.
_8 WARNING
=
- Use of an unapproved roof rack or incorrect
mounting of an approved roof rack can
cause the roof rack or the items attached to it to fall off the roof onto the road.
- Objects falling from the roof of a vehicle can
cause a crash and personal injury.
- Only mount the roof rack on the designated
locations on the roof¢
fig. 65.
- The roof rack system must be installed ex
actly according to the instructions provided.
- When driving with a roof rack system,
changes to the center of gravity and wind
resistance can change the vehicle handling
and lead to a collision. Always adapt your
driving and your speed to the current condi
tions.
CD Note
- Your vehicle warranty does not cover any
damages to the vehicle caused by using roof
racks or mounting structures not approved ..,.
61
Page 70 of 282
Warm and cold
Operating
Applies to: vehicles with 4-zone deluxe automatic climate control
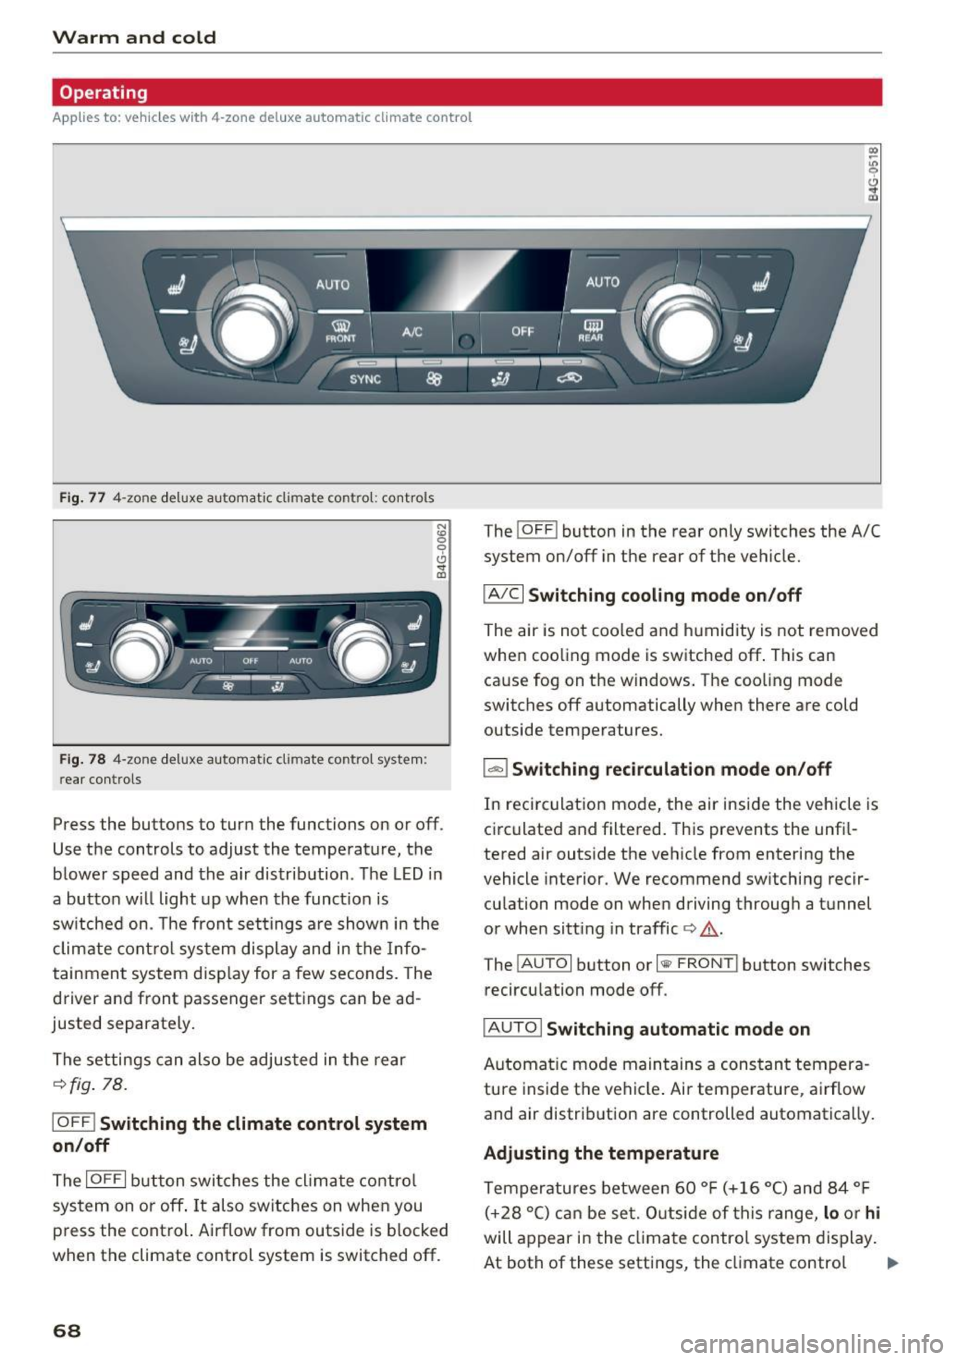
Fig . 77 4-zone deluxe a utomat ic climate contro l: cont rols
F ig. 78 4-zone deluxe automat ic climate contro l syste m:
rear controls
N :g
9 CJ
" lD
Press the buttons to turn the functions on or off.
Use the controls to adjust the temperature, the
b lower speed and the a ir distribution . The LED in
a butto n wi ll light up when the funct ion is
sw itched on. The front settings a re shown in the
clim ate cont rol sys tem display and in the Info
tainment system disp lay for a few seconds. The
driver and front passenger settings can be ad
justed separately.
The settings can also be adjus ted in the rear
¢fig . 78.
IOFF ! Switching the climate control syst em
on /off
The I OFF I b utton swi tc h es the clima te contro l
system on or off . It also switches on whe n you
p ress the control. Airflow from outside is b locked
when the climate control system is switched off.
68
The ! O FF ! button in the rear only switches the A/C
system on/off in the rear of the ve hicle.
IA/C l Switching cooling mode on /off
The air is not coo led and h umid ity is not removed
when coo ling mode is switched off . This can
cause fog on the windows. The coo ling mode
switches off automatically when there are cold outside temperatures.
l ""-'I Switching recirculation mode on /off
In recirculat ion mode, the air inside the vehicle is
c irculated and filtered. This prevents the unf il
tered air outs ide the ve hicle from entering the
vehicle interior. We recommend sw itching recir
cu lation mode on when driving throug h a tunnel
or when sitt ing in traffic ¢,&. .
The
! AUTOI button or l lllP FRONT ! button switches
recircu lation mode off.
IAUTO I Switching automatic mode on
Automat ic mo de main tains a constan t tempera
ture inside t he vehi cle. Ai r temperatu re, a irflow
and air distrib ution are controlled automatically.
Adjusting the temperature
Temperatures between 60 ° F (+ 16 °C) and 84 ° F
( + 28 °C) c an be se t. O utsi de of t his range,
lo o r hi
will appear in the cl imate control system display .
At both of these settings, the cl imate contro l
1111-
Page 79 of 282
Cruise control system
Switching on
Applies to: vehicles with cruise control system
The cruise control system makes it possible to
drive a constant speed that is 30 km/h or higher.
0
f
®t
0
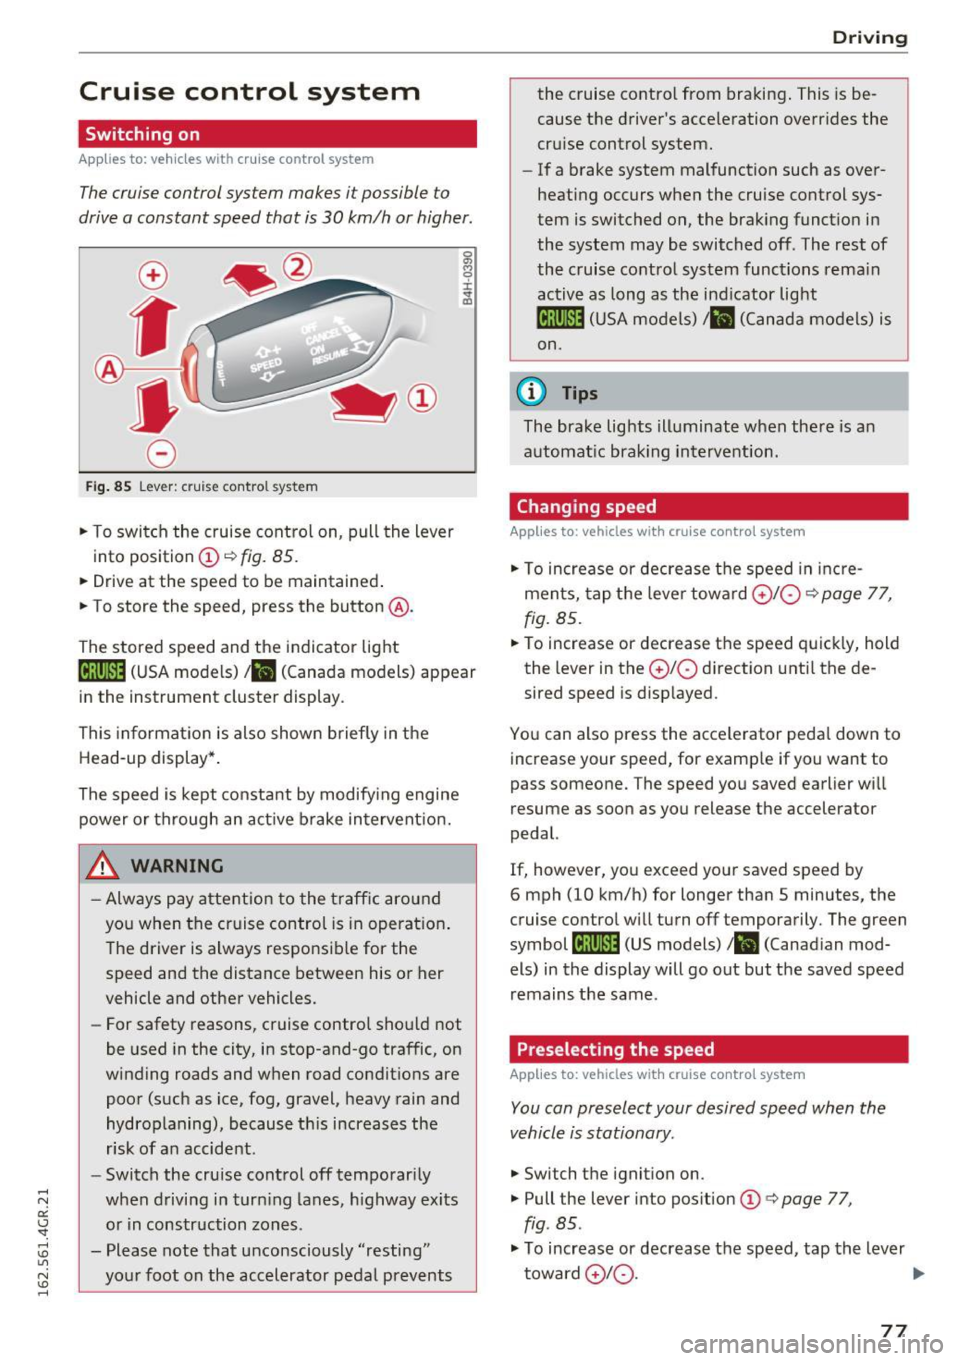
Fig . 85 Lever : cruise control system
.,. To switch the cruise control on, pull the lever
into position
(D ~ fig. 85.
.. Drive at the speed to be maintained .
.. To store the speed, press the button @.
The stored speed and the indicator light
tij;jl)~i4 (USA models)/ .. (Canada models) appear
in the instrument cluster display .
This informat ion is also shown briefly in the
Head-up display* .
The speed is kept constant by modify ing engine
power or through an act ive brake intervent ion.
_& WARNING
- Always pay attention to the traff ic around
you when the cruise control is in operat ion .
T he driver is always respo nsib le for the
speed and the distance between his or her
vehicle and other vehicles.
- For safety reasons, cruise control should not
be used in the city, in stop-and-go traffic, on
winding roads and w hen road condit ions are
poor (such as ice, fog, gravel, heavy rain and
hydroplaning), because th is increases the
r isk of a n accident.
- Switch the cruise control off temporar ily
when driving in turn ing lanes, h ighway exits
o r in construction zones .
- Please note that unconsciously "resting" yo ur foot on the accelerator pedal prevents
-
D rivi ng
the cruise co ntro l from bra king . This is be
cause the d river's accele ration overr ides the
cru ise control system.
- If a brake system malfunction such as over
heating occurs when the cruise control sys
tem is switched on, the brak ing funct io n in
the system may be switched off . The rest of
the cruise contro l system functions rema in
active as long as the ind icator light
ml1Jlm (USA models) / .. (Canada models) is
on.
(0 Tips
The brake lights illuminate when the re is an
automat ic brak ing intervent ion.
Changing speed
Applies to: vehicles with cruise control system
.,. To increase or dec rea se t he speed in inc re
ments, tap the leve r towa rd
0 10 ¢ page 77,
fig. 85 .
.. To increase or decrease the speed quick ly, hold
the lever in the
0 10 d irection unti l the de
sired speed is disp layed.
You can also press the accele rator peda l dow n to
increase your speed, for example if you want to
pass someone. The speed yo u saved earlier wi ll
resume as soon as you release the accelerator
pedal.
If, however, you exceed your saved speed by
6 mph (10 km/h) for longer than 5 minutes, the
cruise contro l will turn off temporarily . The green
symbol
li! j(9~14 (US models)/ .. (Canad ian mod
els) in the display will go out but the saved speed
remains the same.
Preselecting the speed
Applies to: vehicles with cruise control system
You can preselect your desired speed when the
vehicle is stationary.
.,. Switch t he ignition on .
.,. Pull the lever into pos ition
(D q page 77,
fig . 85.
.,. To increase or decrease t he speed, tap the lever
toward
0 10 . .,,_
77
Page 90 of 282
Audi acti ve la n e ass is t
Audi active lane assist
Lane assist
Description
A pp lies to: ve hicles w ith Audi active lane assist
Active lane ass ist detects lane marker lines with
in the limits of the system us ing a camera in the
windshie ld. If you are approaching a detected
lane marker line and it appears likely that you
will leave the lane, the system will warn you with
corrective steering. You can override this steering
at any time. If you pass over a line, the steering
wheel will vibrate lightly. In order for this warn ing vibration to occur, it must first be switched
on in the Infotainment system. Act ive lane assist
is operable when the lane marker line is detected
on at least one side of the vehicle.
The system is designed for driving on freeways
and expanded highways and thus works only at
speeds of 40 mph (65 km/h) or more.
Applies to vehicles w ith side assist*: if you act i
vate a turn s ignal when active lane assist is ready
and it classif ies a lane change as critical because
of vehicles traveling alongside you or approach ing you, there w ill be not iceable correct ive steer
i n g short ly before you leave the lane. This will at
tempt to keep your vehicle in the lane.
Appl ies to veh icles w ithout s ide ass ist* : the sys
tem does not warn when it is ready if you activate
the t urn signa l before crossing the lane marker
line. In this case, it ass umes that you a re chang
ing lanes intentionally.
Applies to vehicles w ith adapt ive cr uise control*
or pa rk ing aid*: the co rrective steering is ta rget
ed based on the d riving situation. In addition to
the lane marker lines, the system can also take
into account other objects such as guard rails. If
they are detected in close proximity to the vehi
cle, active lane assist helps prevent the vehicle
from dr iv ing too close to them. There is a lso
passing assistance . The system does not provide
any corrective steer ing if it detects that you are
passing anothe r vehicle.
88
A WARNING
-
- The system warns the driver that the vehicle
is leaving the lane using correct ive steering.
The driver is always responsible for keeping
the vehicle within the lane.
- The system can help you keep the vehicle in the lane, but it does not drive by itse lf. Al
ways keep your hands on the steering
wheel.
- Cor rective steering may not occur in certain
situations, such as du ring heavy braking.
- There may be cases whe re the camera does
not recognize all lane marker lines. Correc
tive stee ring can only take place on the s ide
of the vehicle where lane marker lines are
detected.
- Othe r road stru ctures or objects could poss i
bly be identified un intent ionally as lane
marker lines . As a result, corrective steering
may be unexpected or may not occ ur.
- The camera view can be restricted, for ex
ample by vehicles driving ahead or by rain,
snow, heavy spray or lig ht shining into t he
camera. Th is can result in active lane ass ist
not detecting the lane marker lines or de
tect ing them incorrectly.
- Under certain cond it ions such as r uts in the
road, a banked roadway or crosswinds, the
corrective steer ing alone may not be enough
to keep the vehicle in the m iddle of the lane .
- For safety reasons, act ive lane assist must
not be used when there are poor road and/
or weather conditions such as slippery
roads, fog, gravel, heavy rain, snow and the po tential fo r hydrop laning. Using active lane
assist under these cond it ions may increase
the risk of a crash .