fuel cap release AUDI S3 2009 Owners Manual
[x] Cancel search | Manufacturer: AUDI, Model Year: 2009, Model line: S3, Model: AUDI S3 2009Pages: 324, PDF Size: 76.02 MB
Page 224 of 324

-Fuel supply and filling your fuel tank Pll:I-----=--=----:.------=-=---------------
Refuelling procedure
-Insert the fuel nozzle from the gasoline pump into the
fuel filler neck as far as it will go.
- Select a medium refuelling rate so that the nozzle switches off automatically when the tank is full.
Putting the fuel cap back on
- After filling your tank, twist the fuel filler cap clockwise
until you hear a definite click.
Close the fuel filler flap.
To avoid fuel spilling or evaporating from the fuel tank always close
fuel filler cap properly and completely. An improperly closed fuel
filler cap may also cause a message in the driver information system
or cause th e MIL lamp => page 21 to come on.
& WARNING
Improper refueling or handling of fuel can cause fire, explosion
and severe burns.
• Fuel is highly flammable and can cause severe burns and other
injuries.
• Failure to shut the engine off while refueling and/or to insert
the pump nozzle fully into the fuel filler neck could cause fuel to
spray out of filler neck or to overflow. Fuel spray and overflowing
fuel can cause a fire.
• Never use a cellular telephone while refueling. The electromag
netic radiation can cause sparks that can ignite fuel vapors and
cause a fire.
• Never get back into your vehicle while refueling.
If in excep
tional circumstances you must get back in your vehicle while refu eling, make certain that you close the door and touch metal to
discharge static electricity before touching the filler nozzle again.
& WARNING (continued)
Static electricity can cause sparks that can ignite fuel vapors
released during refueling.
• Never smoke or have an open flame anywhere in or near your
vehicle when refueling or filling a portable fuel container.
• For your safety, we strongly recommend that you do not travel
with a portable fuel container in your vehicle. The container, full or empty may leak and could cause a fire, especially in a crash.
• If, under exceptional circumstances, you must transport a
portable fuel container, please observe the following: -Never fill a portable fuel container while it is anywhere in or
on the vehicle (for example, in the luggage compartment, or on
the trunk). Static electricity can build up while filling and can ignite fuel vapors causing a fire.
- Always place a portable fuel container on the ground before
filling.
- Always keep the filler nozzle completely inside the portable
container before and during filling.
- If filling a portable container made of metal, the filler nozzle
must always be in contact with the container. This will help
prevent static electricity from discharging and cause a fire.
- Never spill fuel inside the vehicle or luggage compartment. Fuel vapors are highly flammable .
- Always observe local and state/provincial laws regarding the
use, storage and transportation of fuel containers.
- Make certain the fuel container meets industry standards
(ANSI / ASTM F852-861.
(D Note
If any fuel has spilled onto the car, it should be removed immedi -
ately to prevent damage to the paint.
~
Page 225 of 324

Fuel supply and filling your fuel tank -------------=-=--=-------=:a....:.--------J
<£> For the sake of the environment
As soon as the correctly operated nozzle switches off automatically
for the first time, the tank is full. Do not try to add more fuel because
fuel may spill out. In addition, the expansion space in the fuel tank
will be filled -causing the fuel to overflow when it becomes warm
and pollute the environment.
[ i] Tips
• Running your engine while refuelling may cause vapors to
escape or even fuel to spill out of the tank. This would then shut off
the fuel nozzle before the tank is full.
• Do not refuel your vehicle with the ignition switched on. The fuel
gauge may otherwise not indicate the correct fuel level after
refuelling. •
Unlocking th e fuel filler flap by hand
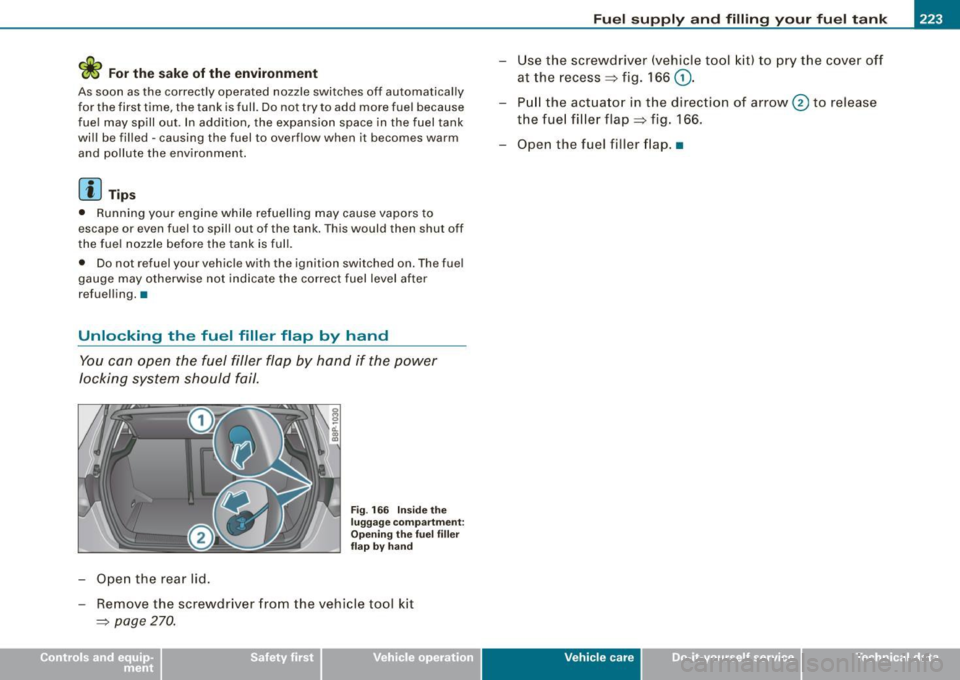
You can open the fuel filler flap by hand if the power
locking system should fail.
- Open the rear lid.
Fig . 166 Inside the
luggage compartment:
Opening the fuel filler
flap
by hand
- Remove the screwdriver from the vehicle tool kit
=> page 270.
-Use the screwdriver (vehicle tool kit) to pry the cover off
at the recess => fig. 166
G).
- Pull the actuator in the direction of arrow @ to release
the fuel filler flap
=> fig. 166 .
- Open the fuel filler flap.•
Vehic le care I I irechnical data
Page 311 of 324

______________________________________________ A_ l_,_ p _h_ a_ b_e _t_i c_ a _ l _in _ d_e _ x __ lll
Asterisk
What does it mean when something is marked with an asterisk? ... .. .. .. .. 5
Audi magnet ic ride .. .... .... ..... 12, 115
Description ...................... 115
Ind icator light .. ...... .... .... .... . 12
Audi parking system ................. 112
Audi Service Repair Manuals and Literature 303
AUTO Climate controls ...... .... ... .... . 101
Switching on .................... 101
When should I use AU TO? . ....... . 10 1
Au to Safety Ho tline ... .. .... .... .... . 135
Automatic air recircu lation ........... 102
A utomatic belt retracto r ...... .... .... 1 41
Automa tic car wash
See Washing ...... .... ... .. .. .... 207
Automatic headlight control ....... .... 53
Automat ic headlights
defective ... .. .... .... ... .... .... . 34
Automat ic Transmission
Au tomatic Transmission . ...... .... 120
Automatic transmission . ............. 117
Driving Notes . . . . . . . . . . . . . . . . . . . . 119
Emergency program . ........... .. 123
Emergency release . . . . . . . . . . . . . . . 123
I gn ition key safety lock ....... .... . 108
Kick-down ... .... .... .... ... .... . 122
L aunch Co ntrol Program ...... ..... 122
Se lector lever lock .. ...... ...... .. 1 18
Se lecto r lever posi tions .. ...... ... 11 7
Controls and equip
ment Safety first
T
iptronic ... .... . .. .. ... ... .. .... 121
Tiptronic controls on the steering whee l
122
Average fuel mileage ................ . 22
Average speed ... .... ..... ... .... ... . 22
Avo id damagi ng the v ehicle ...... .... . 199
B
Battery ... .. .... ... .... .... .... .... 236
charg ing (4-cy lind er engine) . ....... 240
c harging (6 -cy li n der engine) ... ..... 241
Disconnecting and c onnecting .. ... 237
I mpo rtant warnings when working on the
battery . .... .... .... .... .... ... 238
Replaci ng the battery .. ... .... .... 237
Winter operation ... .. .... .... .... 237
Working on the battery .. ...... .... 238
Battery voltage ...................... 33
Before driving . ....... .. .... .... .... 127
Bi -Xenon headlights .. ........ .... ... . 58
Blended gasoline . ... ... ..... .... .... 219
Body cavity sealing ...... ...... ... .. . 212
Booster seats .... .... .... .... .... ... 177
How do I properly install a booster seat i n
my vehicle? .. ... .... .... .... ... 177
Safety instructions ................ 177
Brake assistan t ..... .... .... .... .... 195
Brake booster .......... ...... ..... .. 194
Brake fluid Changing the brake fluid .. ........ 236
Checking the brake fluid leve l .. .... 235
Reservoir ........................ 235 What is
the correct brake fluid leve l? 235
What should I do if the brake fluid warning
light c omes on? ... .. .... .... .... 235
Brake pads ... ... .... ....... .... ... . 198
Brake system ....................... 235
Anti -lock brake system (ABS) .. .... .. 16
Brake fluid ....................... 235
Brake f luid specifications for refi ll and
r eplacement ... .. .... .... ...... . 236
Brake light defective . ........ .... .. 33
General information .. .... .... .... 193
How does moisture or road salt affect the
b rakes? .. ............... .... ... 193
Ma lfunct io n . .... .... .... .... ..... 30
Warning/indica tor lights .... .... .... 15
Worn brake pads symbo l ...... .... . 32
Break -in period ...... .... .... .... ... 197
Brake pads ....... ........ ....... 198
Tires ... .. .... .... .... ... .... .... 197
Bu lbs .... .... .... .... ... ....... .... 285
C
California Proposition 65 Warning . .... 226
Battery specific ...... ... .. ... ..... 239
Capac it ies . .... ... ... .... ... .... .... 300
Car care . .... ........ ....... .... .... 206
In ter ior . ...... .... .... ... .... .... 213
P last ic a nd vinyl . ...... .... .... ... 210
Weatherstrips ... .. .... ...... ... .. 211
Care of exterior .... ... .. .... .... .... 206
Ca rgo area
See Loading the luggage compartment
133
Vehicle operation Vehicle care Do-it-yourself service Technical data