clock AUDI S3 2012 User Guide
[x] Cancel search | Manufacturer: AUDI, Model Year: 2012, Model line: S3, Model: AUDI S3 2012Pages: 280, PDF Size: 70.11 MB
Page 207 of 280
& WARNING
-The cooling system is under p ress ure and
can get very hot . Reduce the risk of
sca ld ing from hot coo lant by following
these steps.
- Tur n off the engine and a llow it to cool
down.
- Protect your face, hands and arms from
escap ing flu id and steam by cover ing
the cap wi th a large, thick rag.
- Tu rn the cap slowly and very ca refully
i n a cou nte r-clockw ise d irect ion w hile
ap ply ing ligh t, downw ard press ure on
the top of the cap.
- To avo id being burned, do no t sp ill an
tifreeze o r coolan t on the exhaust sys
tem or hot engine parts. Under certa in
conditions, the ethylene glyco l in en
gine coolant can catc h fir e.
- An tifreeze is poisonous . Always store an
tifreeze in its or iginal co ntainer and we ll
o ut o f the reach of children.
- If you drain the coolant, it must be
caught and safely stored in a p roper con
tainer clearly marked "poison".
(D Note
- Coolant po llutes the env ironment and
could cause an engine fire. Excess coo l
ant wi ll be forced out throug h the pres
su re re lief va lve in the cap when the en
gine becomes hot.
- If, in an emergency, only water can be
added, the cor rect ratio between water
and antifreeze
c:> page 203 must be re
stored as soon as possib le.
@) For the sake of the environment
Drained coolant shou ld n ot be re used. Al
ways dispose of used coolant while obse rv
ing all environmental regulations.
Checkin g and fillin g 205
Radiator fan
The radiator fan switches on automatically by
itself .
The electric radiator fan is controlled by ther
moswitches t hat sw itch on a nd off depending
o n coo lant and eng ine compartment tempera
tures .
An a uxiliary electric radiator fan* sw itches on
and off depending on coolant temperature
and othe r vehicle operat io n conditions.
After switching off the eng ine, the auxiliary
fan -even with the ignition off -can continue
runn ing for up to 10 minutes. It ca n even
switch on aga in later by itself
c:> A , if
- the temperature of the engine coo lant rises
due to the heat build-up from the engine in
the engi ne compartment , or
- the engine compa rtment heats up because
the vehicle is parked in intense sunlig ht.
& WARNING
- To reduce the risk of personal in ju ry nev
er touch the radiator fan .
- The auxiliary electric fan is temperature
contro lled a nd can switch on suddenly
even when the engine is not ru nning.
- The a uxiliary radiator fa n sw itches on a u
tomatically when the engine coo lant
reaches a certa in te mpera tu re and w ill
con tinue to ru n until t he coo lant temper
a ture drop s.
•
•
Page 209 of 280
@ For the sake of the environment
Because of the problem of proper disposal
of brake fluid as we ll as the special tools
req uired and the necessary expert ise, we
recommend that you have the brake fluid
changed by your author ized Audi dealer.
Battery
General information
All work on the battery requires technical
knowledge!
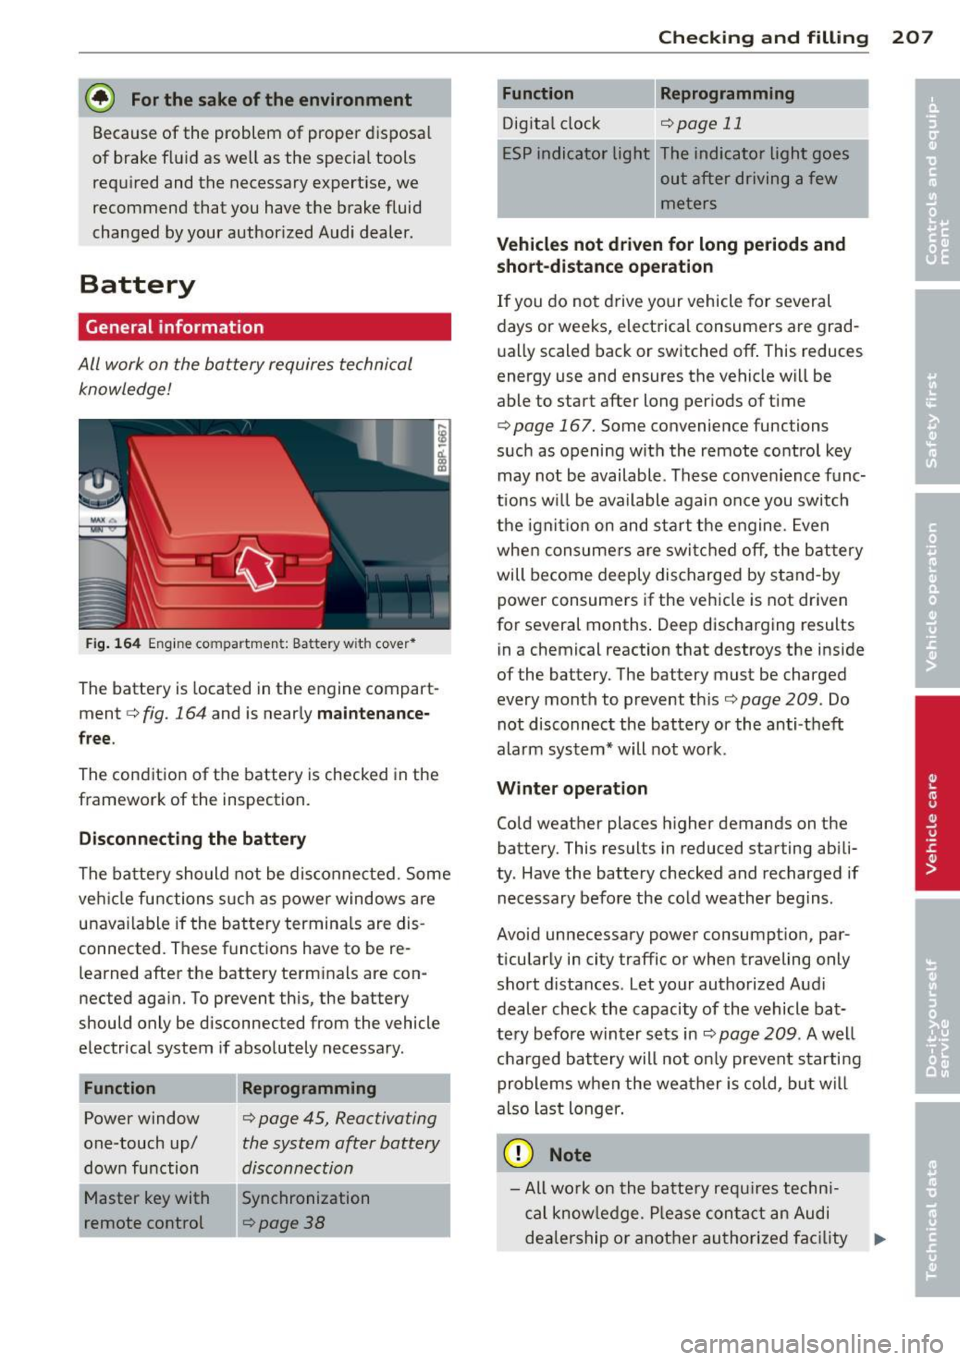
F ig . 1 64 Eng ine co mpa rtment: Batte ry w it h cover*
The battery is located in the engine compart
ment
c::> fig. 164 and is near ly m ain te nance
fre e.
The condition of the battery is checked in the
framework of the inspection.
Disconnecting the battery
The batte ry should not be disconnected. Some
ve hicl e functions such as power windows are
unavailable if the battery termina ls are dis
connected. These funct ions have to be re
l earned after the battery term inals are con
nected aga in. To prevent this, the battery
should only be disconnected from the vehicle
electrical system if absolutely necessary .
Function
Power window
one-touch up/
down function
Master key with
remote control
Reprogramming
c::, page 45, Reactivating
the system after battery
disconnection
Synchronization
~page 38
Checkin g and fillin g 207
Reprogramming
Digita l clock c::, page 11
ESP indicator light The indicator ligh t goes
out after driving a few
meters
Vehicl es not driven for long periods and
sho rt -d is tance op eration
If you do no t drive your vehicle for several
days or weeks, electrical consumers are grad
u ally scaled back or switched off . This reduces
energy use and ensures the vehicle will be
able to start after long periods of time
c::, page 167. Some convenience functions
such as opening w it h the remote control key
may not be available. These conve nience func
tions wi ll be available again once you switch
the ignit io n on and sta rt the engine. Even
whe n consume rs a re switched off, the battery
will become deeply discharged by stand -by
power consumers if the vehicle is not driven
for several months . Deep discharging results
in a chemical reaction that destroys the inside
of the battery. The battery must be charged
every month to prevent th is
c::, page 209. Do
not disconnect the battery or the anti-t heft
alarm system* will not work .
Winter operation
Cold weather places higher demands on the
battery. This results in reduced starting abili
ty. Have the battery checked and recharged if
necessary befo re the cold weather begins.
Avoid unnecessary power consumpt ion, par
ticularly in city traffic or when traveling only
short distances . Let your authorized Audi
dealer check the capacity of the vehicle bat
tery before winter sets in
c::, page 209 . A well
c harged bat tery will not o nly prevent s tarti ng
problems when the weather is cold, but will
also last longer .
(D Note
-All wo rk on the batte ry requ ires techn i
cal know le d ge. P lease con ta ct an Audi
dealership or another authorized fa cility
lill>
Page 221 of 280
used today are underinflated just by looking
at them.
Therefore, be sure to check tire pressures at l eas t once a mon th and always before going
on a long trip. Make sure to take the number
of people and the amount of luggage into ac
count when adjusting tire pressure for a trip -
even one that you would not consider to be
"long." See ¢
page 220, Tires and vehicle
load limits
for more important information .
A lways use an accurate tire pressure gauge
when check ing and adjusting inflation pres
sures . Check all of the tires and be sure not to
forget the spare t ire . If the pressure in any tire
is too high when the tire is "cold," let air out
of the tire slowly with the edge of the t ire
gauge and keep checking the pressure until
you reach the p ress ure th at is cor rect for the
l oad (passengers and luggage) and kind of
driving you plan to do .
I f the p ressu re in any tire is too low , note the
d ifference between the pressure in the cold
tire and the pressure you need and add the air
that you need to reach the correct pressure for
the vehicle load (passengers and luggage) for
the tires on your vehicle as listed on the on
your veh icle and in this manual and the kind
of dr iving you p lan to do.
Never e xceed the m aximum inflation pre s
su re li sted on th e tir e side wall for any rea
son.
Remember that the vehicle manufacturer, not
the tire manufacturer, determines the co rrect
tire p ressure for the tires on your vehicle .
It is important to check the tire pressure when
the tires are cold .
- Read the requ ired ti re p ressu re from the tire
pressure label. On USA veh icles, the t ire
pressure label is located on driver's side 8-
pillar . On Canada vehicles, the tire pressure
label is located either on the driver's side 8-
pillar or inside the fuel fi ller flap.
- Turn the valve stem cap counter-clockwise
to remove it from the tire valve.
- Place the air pressure ga uge on the valve.
Tire s an d wheel s 219
- The tire pressures should only be checked
and adj usted when the tires are co ld . The
slightly raised pressures of warm tires must
not be reduced.
- Adjust the tire pressure to the load you are
carrying.
- Reinstall the valve stem cap on the va lve.
When should I check the tir e pressu re?
T he co rrect tire pressu re is especially impor
tant a t high speeds. The pressure should
therefore be checked at least once a month
and always before starting a jo urney . Do not
forget to check the tire pressure for the spare
whee l
¢page 234.
When should I adjust the tire pres sur es?
Adjus t the t ire press ure to the load you a re
carrying . After changing a whee l
or rep lacing
whee ls you have to adjust the tire pressu res
on all whee ls. In addition, yo u m ust then initi
ali ze the new t ire pressures in the tire pres
sure monitoring system*¢
page 230.
A WARNING
...---
Incorrect tire pressures and/or underinfla-
tion can lead sudden tire fa ilure, loss of
control, collision, serio us personal injury
or even death.
- When the warning symbol
ti] appears in
the instrument cluster, stop and inspect
the t ires.
- Inco rrect tire pressure and/or underinfla
tion can cause increased tire wea r and
can affect the hand ling of the vehicle and
s topping abi lity.
- I nco rrect tire pressures and/or unde rin
flation can a lso lead to sudden t ire fail
ure, including a blowou t and sudden de
flation, ca using loss of vehicle contro l.
- The driver is responsib le for the correc t
tire pressures for all tires on the veh icle.
The applicable pressure values are locat
ed on a sticker on the dr iver's side 8-pil
lar or on the ins ide of the fuel filler flap. •
•
Page 240 of 280
238 What do I do now?
Wheels with cap-covered wheel bolts
Applies to vehicles: wit h cap-cove red w hee l bo lts
The caps must be removed first from the
wheel bolts before the bolts can be un
screwed.
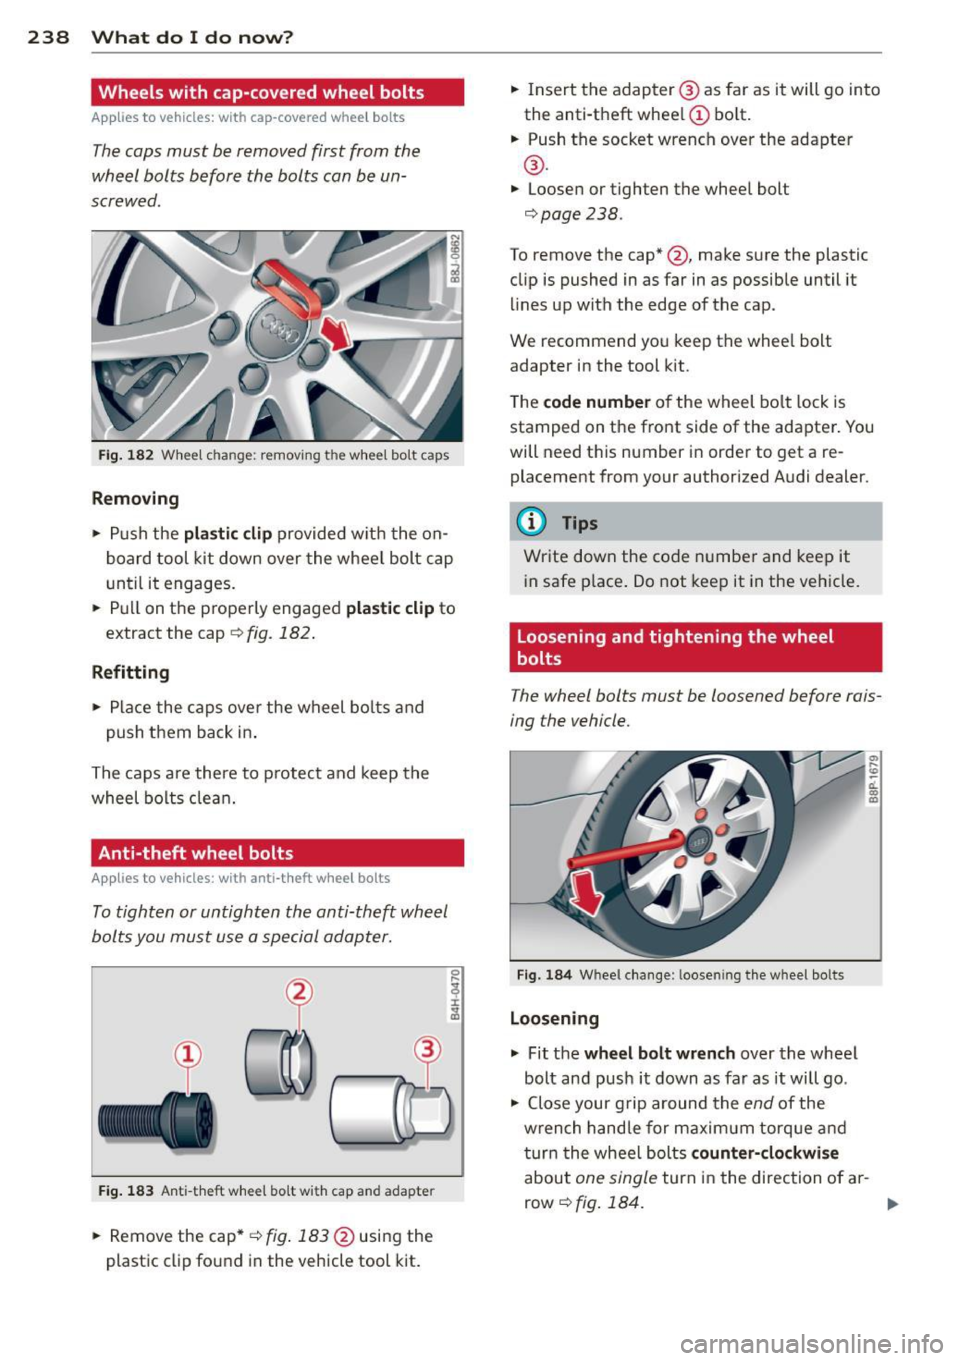
Fig. 182 Whee l change : removing the wheel bo lt caps
Removing
.,. Push the plastic clip provided w ith the on
board tool kit down over the wheel bolt cap
u nt il it engages .
.. Pull on the properly engaged
plastic clip to
extract the cap
¢ fig. 182 .
Refitting
.. Place the caps over the wheel bolts and
push them back in .
The caps are there to p rotect and keep the
wheel bolts clean.
Anti-theft wheel bolts
Applies to vehicles : wit h ant i-t heft wheel bo lts
To tighten or untighten the anti-theft wheel
bolts you must use a special adapter.
(~
'
Fig. 183 Anti-theft w hee l bo lt w it h cap and adapter
.. Remove the cap* ¢fig. 183 @using the
plastic clip found in the vehicle tool kit. ..
Insert the adapter @ as far as it will go into
the anti -theft wheel
CD bolt.
.. Push the socket wrench over the adapter
@ .
.. Loosen or tighten the wheel bolt
¢page 238.
To remove the cap* @, make sure the plastic
clip is pushed in as far in as possible until it
lines up with the edge of the cap .
We recommend you keep the whee l bolt
adapter in the tool kit.
T he
code number of the wheel bolt lock is
stamped on the front side of the adapter . You
will need this number in order to get a re placement from your authorized A udi dealer.
Q) Tips
Write down the code number and keep it
in safe place. Do not keep it in the vehicle.
Loosening and tightening the wheel
bolts
The wheel bolts must be loosened before rais
ing the vehicle.
Fig. 184 W hee l change : loosen ing the wheel bolts
Loosening
.,. Fit the wheel bolt wrench over the wheel
bolt and push it down as far as it will go .
"' ...
.,. Close your g rip around the end of the
w rench handle for maximum torque and
turn the wheel bolts
counter-clockwise
about one single turn in the direction of ar-
row ¢
fig. 184. .,.
Page 241 of 280
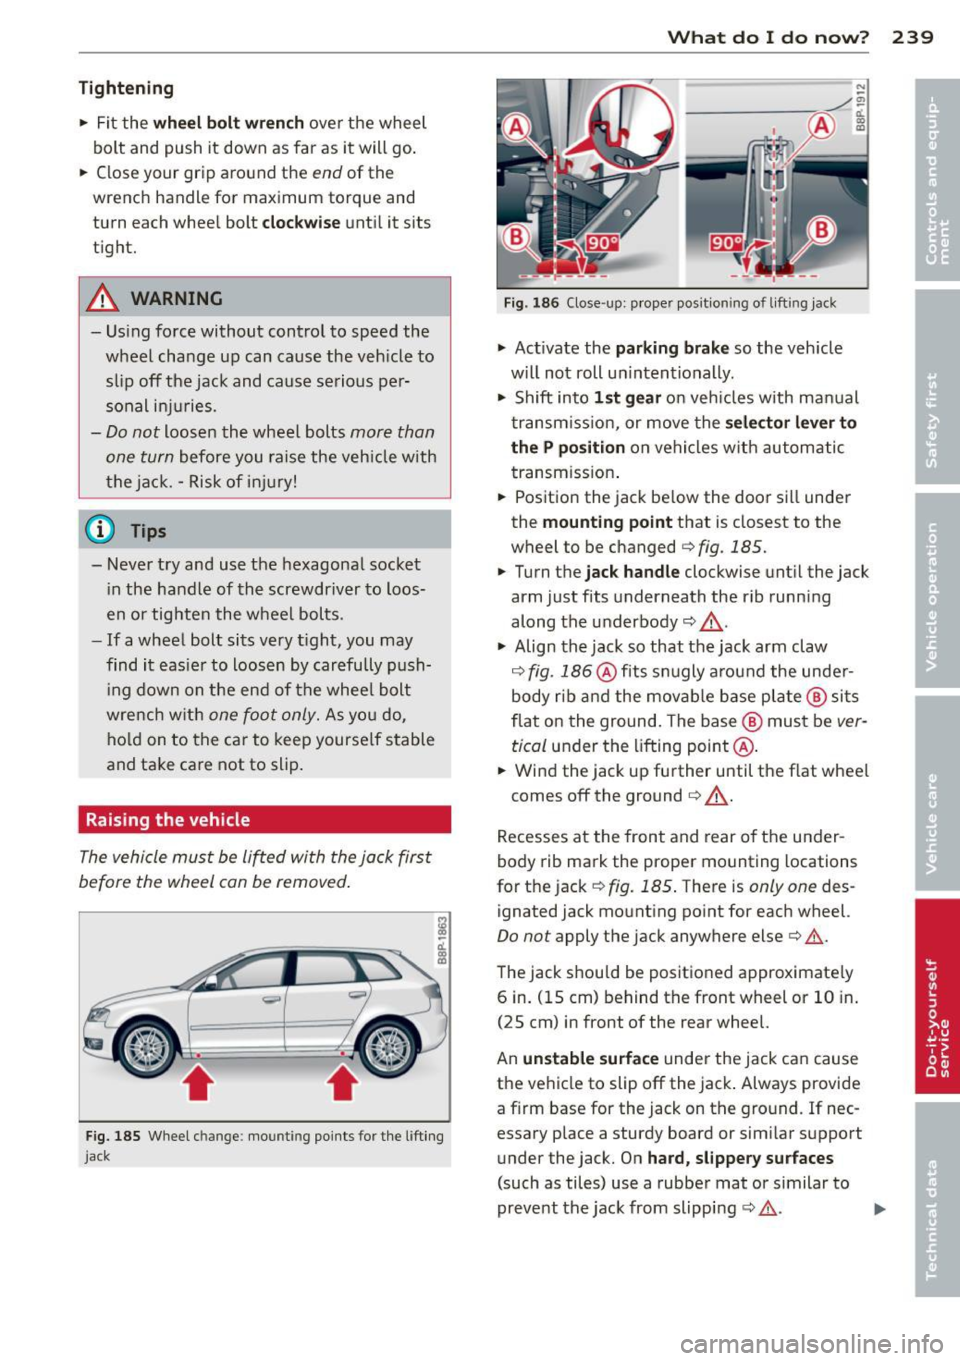
Tightening
• Fit the wh eel b olt wren ch over t he wheel
bolt and push it down as far as it will go .
• Close your gr ip aro und the
end of the
wrench handle for maximum torque and
turn each whee l bolt
cl ock wise until it sits
tight.
A WARNING
- Us ing force without control to speed the
wheel change up can cause the veh icle to
slip off the jack and cause serious pe r
sonal inj uries.
- Do not loosen the wheel bolts more than
one turn
before you ra ise the veh icle with
the jack. -Risk of inj ury!
@ Tips
- Never t ry and use the hexagonal socket
i n the handle of the screwdriver to loos
en o r tighten the wheel bolts .
- If a wheel bolt sits very t ight, you may
find it easie r to loosen by carefully push
i ng down on the end of the whee l bolt
wre nch w ith
one foot only. As you do,
ho ld on to the ca r to keep yourse lf stable
and ta ke care not to slip .
Raising the vehicle
The vehicle must be li~ed with the jack first
before the wheel can be removed .
Fig. 185 W heel c hange: mo untin g po ints for the lift ing
j ac k
What do I d o now ? 239
Fig. 1 86 Close -up: p roper pos ition ing o f lift in g jack
• Act ivate the parking brak e so the vehicle
w il l not roll u nintentionally .
• Shift into
1st gear on vehicles with manual
transm iss ion, or move the
se lecto r l ev e r to
the P p ositio n
on vehicles with automatic
transm ission .
• Pos it ion the jack be low the door sill under
the
mounting point that is closest to the
wheel to be changed
r=> fig. 185.
• Turn the jack handle clockwise unt il the jack
arm just fits underneath the rib running
along the underbody
c::> & ..
• Align the jack so that the jack arm claw
c:;, fig. 186 @fits snugly around the unde r
body rib and the movab le base plate ® sits
flat on the ground. The base @ must be
ver
tical
under the lifting point @.
• Wind the jack up further until the flat wheel
comes off the ground
c::> . & ..
Recesses at the front and rear of the under
body rib mark the proper mo unting locations
for the jack
c:;, fig. 185 . There is only one des
ignated jack mounting po int for each wheel.
Do not apply the jack anywhere else c::> .&. .
The jack shou ld be positioned approximate ly
6 in. (15 cm) behind the front wheel or 10 in.
(25 cm) in front of the rear wheel.
An
unstable surfa ce under the jack can cause
the vehicle to slip off the jack . Always provide
a firm base for the jack on the ground . If nec
essary place a sturdy board or sim ilar support
under the jack. On
hard , slipper y su rf a ces
(such as tiles) use a rubber mat or similar to
prevent the jack from slipp ing
c::> .&. . .,.
Page 242 of 280
240 What do I do now?
& WARNING
-You or your passengers could be injured
while changing a wheel if you do not fol
low safety precautions:
- Mounting the jack under the vehicle at
any other place than indicated above
may damage the vehicle or may result
in personal injuries .
- A soft or unstable surface under the
jack may cause the vehicle to slip off
the jack. Always provide a firm base for
the jack on the ground . If necessary,
use a sturdy board under the jack.
- On hard, slippery surface (such as tiles)
use a rubber mat or similar to prevent
the jack from slipping .
- To help prevent injury to yourself and
your passengers:
- Do not raise the vehicle until you a re
sure the jack is securely engaged.
- Passengers must not remain in the ve
hicle when it is jacked up.
- Make sure that passengers wait in a
safe place away from the vehicle and
well away from the roadway and traffic.
- Make sure jack position is correct , ad
just as necessary and then continue to
raise the jack.
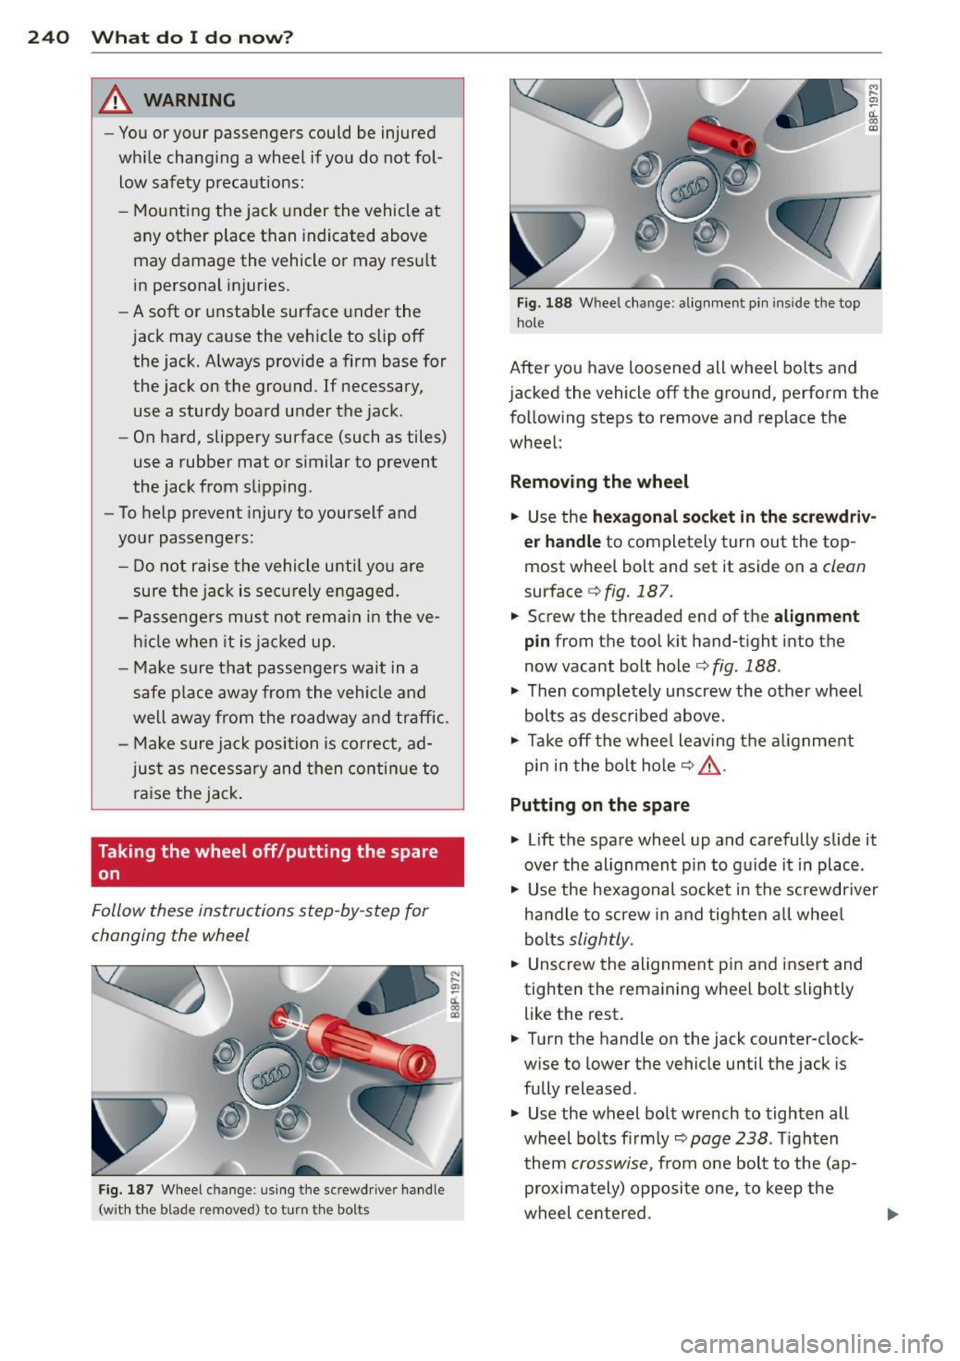
Taking the wheel off/putting the spare
on
Follow these instructions step-by-step for
changing the wheel
Fig. 187 Wheel c han ge: using the sc rewdrive r handle
(w ith the blade removed) to turn the bolts
... ,._
"' i
"'
Fig. 188 W hee l change : alignmen t pin inside the top
hol e
M ,._
"' d. 00
"'
After you have loosened all wheel bolts and
jacked the vehicle off the ground, perform the
following steps to remove and replace the
wheel:
Removing the wheel
.,. Use the hexagonal socket in the screwdriv·
er handle
to completely turn out the top
most wheel bolt and set it aside on a
clean
surface c;, fig. 187 .
.,. Screw the threaded end of the alignment
pin from the tool kit hand-tight into the
now vacant bolt hole <=>
fig. 188 .
.,. Then completely unscrew the other wheel
bolts as described above.
.,. Take off the wheel leaving the alignment
pin in the bolt hole
c;, &,.
Putting on the spare
.,. Lift the spare wheel up and carefully slide it
over the alignment pin to guide it in place .
.,. Use the hexagonal socket in the screwdriver
handle to screw in and tighten all wheel
bolts
slightly .
.,. Unscrew the alignment pin and insert and
tighten the remaining wheel bolt slightly
like the rest.
.,. Turn the handle on the jack counter-clock
wise to lower the vehicle until the jack is
fully released .
.,. Use the wheel bolt wrench to tighten all
wheel bolts firmly
r:::;, page 238 . Tighten
them
crosswise , from one bolt to the (ap
proximately) opposite one, to keep the
wheel centered.
Page 268 of 280
26 6 Index
Changing engine oil
Chass is 201
Unde rcoat ing . ............. .. .... . 183
also refer to Aud i magnetic ride ... .... 95
Checking
Eng ine coolant level ........ .... ....
204
Checking tire pressure . ... .. .. ... ... . 218
C hi ld restra int
Danger of us ing c hild restra ints in the
front seat ... .... ..... ... .. .. .... .
123
Child restra ints
Where can I get add it iona l information
about child restra ints and their use? ..
160
Ch ild restra int system anchors ... .. ... 155
Child safety . . . . . . . . . . . . . . . . . . . 143, 148
Convertible locking retractor . . . . . . . . . 152
Important safety instructions for using
chi ld safety seats ..................
146
Important things to know when dr iving
with children ............. .... ....
143
Install ing a child restraint using the
LA TC H system ............. ... .. ...
157
M ount ing and releasing the ancho rage
hook .. .... ... .......... .. .. .. .. .
157
158
158
Tether anchors
Tether straps
Ch ild safety lock
· ............... ..... 42
Child safety seats ................... 148
Booster seats .. .......... .. .. .... . 151
Convertible child seats .... .. .. .. .. . 149
Convertible locking retractor .. .. .. ... 152
H ow do I properly install a child safety
seat in my vehicle? ........ .. .. .... .
146
Infant seats ...................... 148
Ins tall ing ... ............ .. .. .. .. . 152
LA T CH system .... ..... ... .. .. .... . 157
Safety instructions . . . . . . . . . . . . . . . . . 146
Child seats
L owe r ancho rages ........ .. .. .... .
156
Clean ing
Alcantara (synthet ic suede) ..........
186
Eng ine compartment ...... .. .. .. .. . 187
Exhaust tail pipes .................. 183
Fabrics and fabr ic coverings .. .. .... . 184
Instrumen t panel .................. 184
Inter ior
L eather .. .. ... .. ..... ... .. .. .... .
. ... ... . ...... ... ... ...
' . .
183
186
Plastic and vinyl ..... .. ..... .... . .. 181
Plastic parts ..... ... .. ..... ... .. .. 184
Safety be lts ... .. ... ....... ... .. .. 187
trim strips
Tr im strips 181
181
Cleaning and protection .. ..... ... .. .. 178
Cl imate controls . .. ................ .. 79
Additional heater . ... .......... .. .. . 85
Air distrib ution . .. ............. .... . 83
Air o utlets · · · · · · · · · · · · · · · ......... 84
Air recirculation . . .. ... ..... .... ... . 83
Air recircu lation mode (manual) . ... .. . 82
Automatic air recirculation ... .... . .. . 82
AUTO (standard setting) ........ .. .. . 81
Controls . . . . . . . . . . . . . . . . . . . . . . . . . . 80
Defrost ing/defogging ............. .. 82
Description . . . . . . . . . . . . . . . . . . . . . . . . 79
Fan ......... ... .. .............. .. 83
Key- coded setting ... .......... .. .. . 84
Recommended settings ......... .... . 79
Setting the temperatu re ........ .. .. . 82
Switching between Fa hrenhe it and Centi-
grade . ... .... .. .. .... .... ... .. .. .
83
Switching the air conditioning on and off 81
Using the climate control economically . 84
Warm and cold . .. ............. .... . 79
Clock . ... .. .... .. .. ... ..... ... .. .. . 11
Clutch overheat ing ................. . 101
Coat hooks ..... .. ............. .... . 78
Cold tire infla tio n press ure ........ .... 216
coming home ... .................. .. 48
Compartments in the door trims ... .. .. . 77
Compass mir ro r . . . . . . . . . . . . . . . . . . . . . 59
Compliance . .... .. ............. .... 262
Consumer Information. .. ..... .. 111,259
Contacting NHTSA ................. . 111
Convenience close/open feature
Windows . .... .. ............. .... .
44
Convertib le child safe ty seats ..... .. . . 149
Convertible locking retractor
At· .
c 1vatmg ... .. .. .. ... ....... ... . .
154
D t" t· eac 1va mg ... .. ............. .. .. 155
Using to secu re a child safety seat 1.52, 154
Coolant system ..................... 203
Cooling System
Expansion tank ... .. .... .... ... .. ..
204
Page 269 of 280
Index 267
-----------------------------------.......
Cruise control ... ... .... ... .. .. .. .... 94
Changing speed ... .... ... .. .. .. .... 94
Presetting your speed .... ... .. .. .. .. 95
Sw itching off ... .. .... ... .... .. .. .. 95
Sw it ching on .... ......... .... .. .. .. 94
Warn ing/ indicator lights ........ .... . 22
Cup holder ... .. .... .... ... .. .. .. .... 74
Cup holders fro nt .. .. .. .. .. ........... .. .. .. .. 74
Current fuel mileage . . . . . . . . . . . . . . . . . 26
D
Damping
refer to Audi magnetic ride . .. .. .. .. .. 95
D ata . ... .. .. .. .... .. .... ... .. .. ... 257
Data recorder .. .... .. ... .. .. .. .. .. . 161
Date display . . . . . . . . . . . . . . . . . . . . . . . . 11
D aytime r unning lights ...... .. .. .. .. .. 47
Daytime running lights (Canada) .. .. .. .. 47
D eclaration of compliance
Cell phone package .... ... .. .. .. .. . 262
E lectronic immobili zer ..... .. .. .. .. . 262
HomeLink ® univer sal remo te control . . 262
Remote control key ..... .. .. .. .. .. . 262
Tire pressure monitor ing system .... . 262
def What does this mean when it appears in
the trip odometer d isplay? . .. .. .. .. .. 12
D efective light bulb warning . . . . . . . . . . . 21
Defogging the windows . . . . . . . . . . . . . . . 82
Defrosting/defogging w indows ....... .. 84
D efrosting the w indow s ..... .. .. .. .. .. 8 2
Determin ing cor rect load limit . .. .. .. . 221
D iese l engine
Adding engine oil . ..... ... .. .. .. .. . 202
Changing engine o il ....... .. .. .. .. . 202
Eng ine oil .. ............. .... .. .. . 202
D iese l fue l ... .. ... ..... ... .. .. .. ... 190
Diesel particu late filter . . . . . . . . . . 22, 17 1
Dig ita l clock ... .... .... ... .. .. .. .... 11
Sett ing the time .......... .. .. .. .. .. 11
Di git al compass ........... .. .. .. .. .. 59
Dimensions .................. .... .. 256
Dimming the rearview mirro r . . . . . . . . . . 54
Di pstick
Reading the d ipstick p roperly . .. .. .. . 200 D
irec t Shift Gearbox
Emergency re lease . .. ... .... ... .. .. 102
Distance ... .. .. .. ................. . 26
Doors, power locks . . . . . . . . . . . . . . . . . . . 38
Driver in format ion sys tem
Engine o il temperature display ... .. .. . 31
Gearshift indicator . .. ... .... ... .. .. . 24
Menu button . . . . . . . . . . . . . . . . . . . . . . 28
Open door or front lid warn ing ... .. .. . 23
Outs ide temperature disp lay . . . . . . . . . . 23
Red symbols ..... .. ..... ........... 13
Se rv ice interval display . . . . . . . . . . . . . . 30
Setting ... .. .. .. .. .. ........... .. . 28
Sound sys tem disp lay . ......... .. .. . 23
T rip comp uter .. .. ................. . 25
yellow symbo ls . . . . . . . . . . . . . . . . . . . . . 14
Driver Information System Menu disp lay .. .. .. . ... ...... ... .. . 27
Driver seat
refer to Seating position .......... .. 104
Driving safely ... .... . ... ...... ... .. 103
Drivi ng throug h wate r .............. . 170
D uplicate key . .. .. .... ............. . 34
E
Efficiency program ... . .. .. ... ... .. .. . 29
Fuel economy m essages ..... ... .. .. . 29
Other equipment . ................. . 29
E lapsed time . . . . . . . . . . . . . . . . . . . . . . . . 26
E lectrically heated front seats . . . . . . . . . . 85
E lectro-mechanica l power assist . . . 17, 165
El ec tronic d ifferential lock ( EDL)
Warning/ind icator lights ........ .. .. . 18
E lectronic immob ilizer . . . . . . . . . . . . 12, 36
E lectronic power contro l
EPC warn ing/ indicator light .. ... .. .. . 19
El ec tronic s peed limi ter .......... .. .. . 25
Elec tronic stab ilizat ion program (ESP)
Warning/ind icator lights ........... .. 18
Emergency flasher Warning/ind icator lights .......... .. . 22
E mergency flashe rs . . . . . . . . . . . . . . . . . . 50
Emergency operation Rear l id ...... ... .. ................ 41
Emergency re lease for selecto r lever . ... 102
E mergency s tarti ng .... ............. 248
•
•
Page 274 of 280
272 Index
p
Paint
Touch-up ... .. ........ ... .. .. .... . 181
Paint no . .... ..... ..... ...... ... .. . 255
panoramic sliding sunroof ..... .. .. .. .. 45
Comfort closing .................... 46
to close . . . . . . . . . . . . . . . . . . . . . . . . . . . 45
to open . . . . . . . . . . . . . . . . . . . . . . . . . . . 45
Park assist . . . . . . . . . . . . . . . . . . . . . . . . . . 93
Park ing . .. .. .. . .......... .. .. .. .. .. 92
Automatic transmission . . . . . . . . . . . . . 98
Park ingbrake .............. ... .. .... 91
Setting and releasing . . . . . . . . . . . . . . . . 91
Park ing brake warning ................ 15
Park ing on a decline (downhill) ... .. .... 92
Park ing on an incline (uphill) ...... ..... 92
Particle filter
refer to Diesel particulate filter . . . . . . . 22
Parts rep lacement .................. 261
PASSENGER AIR BAG OF F light . .. .... . 133
Passive safety system ...... ... .. .... .
Pedals .. .. .. ................ ... .. .
Physical principles of a frontal collision . 103
108
114
Polishing
.. ... ............ .. .. .. .. . 180
Power locking switch ........... .. .... 39
Rearcenterconso~ ......... .. .. .. .. 40
Power locking system ................. 36
Conven ience close/open feature ... .. .. 44
Locking and unlocking the vehicle from
ins ide . . . . . . . . . . . . . . . . . . . . . . . . . . . . 39
Opening and closing the w indows .. .. . . 44
Operating locks from w ith key . . . . . . . . . 38
Rear lid .. .... ............. .. .... .. 40
Remote control . . . . . . . . . . . . . . . . 35, 37
Unlocking and locking vehicle ..... .. .. 3 7
Power outlets .............. .... ... .. 75
Power seat
Adjusting the seatback .............. 64
Adjustment ............. .. .. .. .. .. 63
Power steering
refer to Electro -mechanica l power as-
sist . . . . . . . . . .. . . . . . . . . . . . . . . 17, 165
Power sunroof
refer to panoramic slid ing sunroof . .. .. 45 Power window switches
....... ... .. .. . 43
In the driver's door .. ....... ... .. .. . 43
Reactivating the system .......... .. . 45
Pregnant women Spec ial considerations when wear ing a
safety belt . ..... ... ....... ... .. .. 118
Proper occupant seating positions ..... 104
Proper safety belt position . . . . . . . . . . . . 117
Proper seating position Front passenger .. ... .. ..... ... .. .. 105
Occupants ..... .. .. .... .... ... .. .. 104
Rear passengers . ... ............ ... 106
Q
Quartz clock . . . . . . . . . . . . . . . . . . . . . . . . 11
quatt ro ®
refer to All Wheel Dr ive .... ..... .. .. 166
Question Wha t happens to unbelted occupants? 114
Why safety belts? ................. 113
R
Radiator fan 205
Radio
Replacing ..... .. .. ............ ... 262
Rain sensor defective . . . . . . . . . . . . . . . . . 22
Reading light Rear . ........ .. ............. .... . 52
Reading lights Front ... .. .... .. ... .. .. ... ... .. .. . 51
Rear ... .. .... .. .. ... .. ... ... .. .. . 51
Rea r a rmrest . . . . . . . . . . . . . . . . . . . . . . . . 67
Rear lid Emergency release .................. 41
Locking/unlock ing ................ .. 40
Rear light defective ............. .... . 21
Rear power lock ing swi tch ........ .... . 40
Rear seat bottom .................. .. 67
Rear view mirror ... ... .. ..... ... .. .. . 54
Rear window defogger with air-cond it ion ing ........... .. .. . 85
Refuell ing .. .. .. .. ............. .. .. 192
Re lease lever for engine hood . . . . . . . . . 194
Page 276 of 280
274 Index
Occupants . ...... ..... ... .. .. .... . 104
Rear passengers . . . . . . . . . . . . . . . . . . . 106
Seats Number of seats ....... .. .. .. .. .. . 113
Selector lever pos it ions
Automatic transm ission . . . . . . . . . . . . . 96
Service and disposal Safety belt pretensioner ... .. .. .... . 120
Service interval d isp lay .... .. .. .. .. .. . . 30
Service pos ition for w indshie ld w ipers ... 57
Set menu ..... .. .. ..... ... .. .. .... .. 28
Sett ing
D ate display . . . . . . . . . . . . . . . . . . . . . . . 11
Di gita l clock ........... .. .. .. .. .. .. 11
Side airbags Descr ipt ion . ..... ......... ... .. .. . 137
H ow they work ........... .. .. .... . 139
Side curta in a irbags ........ .. .. .... . 140
Descr ipt ion .............. .. .. .. .. . 140
H ow they work ............ ... .. ... 141
Safety instructions . . . . . . . . . . . . . . . . . 142
Side marker lights ........... .. .... .. 47
Ski sack . .. .. ............. .. .. .. .. .. 70
Snow chains ........... .... ... .. .. . 228
Sockets ..... ... .. ..... ... .. .. .... .. 75
Sound system Rep lacing .... ........... .. .. .. .. . 262
Sound system display . . . . . . . . . . . . . . . . . 23
Sources of in format ion about child re -
straints and their use .. ... .. .. .. .... . 160
Spare tire .. ... ............ .. .. .. .. . 234
Spare wheel
refer to Spare t ire .. ...... .. .. .. .. . 234
Speedometer . .. .. ..... ... .. .. .... .. 12
Speed rat ing letter code . .. .. .. .. .. .. . 224
Speed warn ing system ...... .. .. .. .. . . 31
S tart ing assistance ......... .. .. .... . 249
Starting on hills Hill hold assist ............ ... .. .. .. 92
Starting the engine . . . . . . . . . . . . . . 89, 90
What should I do if the eng ine does not
start? . .. ... ... .... ..... .. .. .. .. .. 90
Steel wheels .. .. .. ..... ... .. .. .... . 182 Stee
ring . ... .... .. ... .. ..... .... . .. . 88
Locking the steering . .. ..... ... .. .. . 89
also refer to Electro-mechan ica l power
ass ist .... .... .. ............. 17,165
Stee ring wheel col umn
Adjusting ..... .. .. ... ..... ... .. .. . 88
Steps for determin ing correct load limit. 221
Stopping the eng ine ............. .... . 91
Storage .. .. .. .. .. .. ........... .. .. . 7S
Compartments in the door trims ... .. . 77
C up ho lder rear center armrest ... .. .. . 74
G love compartment .... ..... ... .. .. . 76
Small objects . . . . . . . . . . . . . . . . . . . . . . 76
Storage comp artment
Increas ing s ize ... ... .. ..... ... .. .. . 67
S tronic ...... .. .. .. ... .. ... ..... .. . 96
Driving Notes . . . . . . . . . . . . . . . . . . . . . . 98
E mergen cy prog ram ........... .... 101
Ki ck-down . .. .. .. ............. .. .. 101
Launch Control Program ..... ... .. .. 101
Se lector lever lock . .... ..... ... .. .. . 97
Se lector lever positions . . . . . . . . . . . . . . 96
Tiptronic .. .. .. .. ............. .. .. 100
Tiptronic controls on the steering
wheel .... .... ................... 100
Su n blind ... .... .. .. ... ..... ... .. .. . 53
Sun roof
refer to pano ram ic sliding s unroof .. .. . 45
Sun visors .. .... .. ............. .... . 53
Switches Emergency flasher . . . . . . . . . . . . . . . . . . 50
Switching the a ir condit ioner (automatic)
on/off .. .. .... .. ............. .... . 81
Symbols Red symbo ls in the center display ..... . 13
Yellow symbols in the ce nter display 14
T
Tachometer . . . . . . . . . . . . . . . . . . . . . . . . . 10
T ailgate
refer to Rear lid . .... .. ..... ... .. .. . 40
T echnical modifications .......... .... 262
Temperature Climate controls . . . . . . . . . . . . . . . . . . . . 82
Setting for the dr iver's and front pas-
senger's s ide . ... ... .. .. ... ..... .. . 82