oil level AUDI S3 2012 User Guide
[x] Cancel search | Manufacturer: AUDI, Model Year: 2012, Model line: S3, Model: AUDI S3 2012Pages: 280, PDF Size: 70.11 MB
Page 203 of 280
Before you check anything in the engine com
partment,
always r ead and heed all W ARN
ING S
¢ A in Working in the engine compart
ment on page 194.
.. Park your vehicle so that it is horizontally
level.
.. Stopping the eng ine.
.. Unscrew the cap
«t=;,. to the engine oil fill ing
hole
¢fig. 161 .
.. Carefully top off with the appropriate o il in
0 .5 lite r doses.
.,. Check the o il leve l again after two minutes
¢ page 200.
.,. Top off the oil again, if necessary.
.. Screw the cap back on the filling hole and
slide the oil dipstick in as far as it will go.
A WARNING
- While topping off, the oil must not come
in contact with hot engine parts -fire
hazard!
- The oil filler cap must be properly se
c u red to prevent oil from being sprayed
on the hot engine and exhaust system
when the eng ine is running - fire hazard!
- If your skin has come in contact w ith the
engine oil, you must subsequently
cleanse it tho roughly .
(D Note
-The oil leve l must not be above range~
- danger of converter or eng ine damage!
Contact a qualified workshop to draw off
oi l, if necessary .
-Audi does not recommend the use of o il
add iti ve s. They may damag e the engine
and adve rsely affect you r New Vehicle
Limited Warranty .
@) For the sake of the environment
-Under no circumstances can the o il come
i n contact with the sewage network or
the soil.
- Observe and follow legal regu lations
when d isposing of empty oil containers.
Checkin g and fillin g 201
Changing the engine oil
We recommend that have your oil changed by
an authorized Audi dealer or a qualified serv
ice station .
Before you check anyth ing in the eng ine com
partment,
alw ays read and h eed all WARN
INGS ¢
A in Working in the engine compart
ment on page 194 .
The engine oil mus t be changed according to
the intervals spec ified in your Warranty
&
Maintenance booklet. This is very important
because the lubricat ing properties of o il di
min ish g radually du ring normal vehicle use .
Under some c ircumstances the engine oil
should be changed more frequent ly . Change
o il more ofte n if you drive mostly short d is
tan ces, opera te the veh icle in dus ty a reas or
u nder p redominant ly stop -and-go traffic con
ditions, or have you r vehicle where tempera
tures remain below freezing for extended pe
riods .
Dete rgent additives in the oil will make fres h
o il look dar k after t he engine has been run
ning for a sho rt time. T his is normal a nd is not
a reason to change the oil more often t han
recommended.
Because of the prob lem of p roper disposal,
along with the specia l tools and necessary ex
pertise req uired, we strongly recommend that
you have your oil changed by an authorized
Audi dealer or a qualified service station.
If you choo se to change your oil your self ,
please note the fo llowing important informa
tion:
A WARNING
To reduce the risk of personal injury if you must change the eng ine oil in your vehicle
yourself:
- Wear eye protect ion.
- To reduce the risk of burns from hot en-
gine oil, let the engine cool down to the
touch.
•
•
Page 204 of 280
202 Checking and filling
-When removing the oil drain plug with
your fingers, stay as far away as possible.
Always keep your forearm parallel to the
ground to help prevent hot oil from run
ning down your arm.
- Drain the oil into a container designed
for this purpose, one large enough to
hold at least the total amount of oil in
your engine.
- Engine oil is poisonous. Keep it well out
of the reach of children .
- Continuous contact with used engine oil
is harmful to your skin. Always protect
your skin by washing oil off thoroughly
with soap and water.
(D Note
Never mix oil additives with your engine
oil. These additives can damage your en
gine and adversely affect your Audi New
Vehicle Limited Warranty.
@) For the sake of the environment
- Before changing your oil, first make sure
you know where you can properly dispose
of the used oil.
-Always dispose of used engine oil proper
ly. Do not dump it on garden soil, wood
ed areas, into open streams or down
sewage drains.
- Recycle used engine oil by taking it to a
used engine oil collection facility in your
area, or contact a service station.
Important information for vehicles with
diesel engine when adding or changing
engine oil
App lies to vehicles: with diesel engine
On vehicles with a diesel engine always use
engine oil that conforms to Audi oil specifica
tion VW
507 00 when adding or changing en
gine oil.
Vehicles with diesel engines require and
must
always
use special engine oil that conforms to
Audi oil specification
VW 507 00 .
Never use any other kind of engine oil in your
vehicle, not even to top off the oil level.
At the time of printing, we are aware that Cas
trol ® produces engine oil that conforms to Au
di oil specification VW 507 00. This oil may
not yet be available throughout North Ameri
ca. Other oil manufacturers may offer engine
oil that conforms to Audi oil specification
VW 507 00 at this time or some future date.
Please be sure to consult with your authorized
Audi dealer for information and availability of
the proper engine oil for your vehicle's diesel
engine and for the latest technical informa
tion .
Because this special engine oil may not be
available when need it, we strongly recom
mend that you always carry with you extra
quart (liter) of oil that conforms to Audi oil
specification VW 507 00, in case you have to
top off oil while on the road .
.&, WARNING
Failure to use engine oil for your diesel en
gine that expressly conforms to Audi oil
specification VW 507 00 can cause engine
failure on the highway that can cause a crash and serious personal injury.
- Never use any amount of engine oil in
the diesel engine that does not conform
to Audi oil specification VW 507 00.
- Always carry with you an extra quart (li ter) of engine oil that conforms to Audi
oil specification VW 507 00 in case you must top off the oil while on the road.
.&, WARNING
Improperly stored items can become airborne missiles, flying through the vehicle
causing serious personal injury in the
event of hard braking or an accident . To
help reduce the risk of serious personal in
Jury:
-Always store extra quart (liter) of engine
oil for your diesel engine in its original oil
container that is securely closed in the
~
Page 206 of 280
204 Checking and filling
Checking the engine coolant level
The engine coolant level can be checked with
a quick glance .
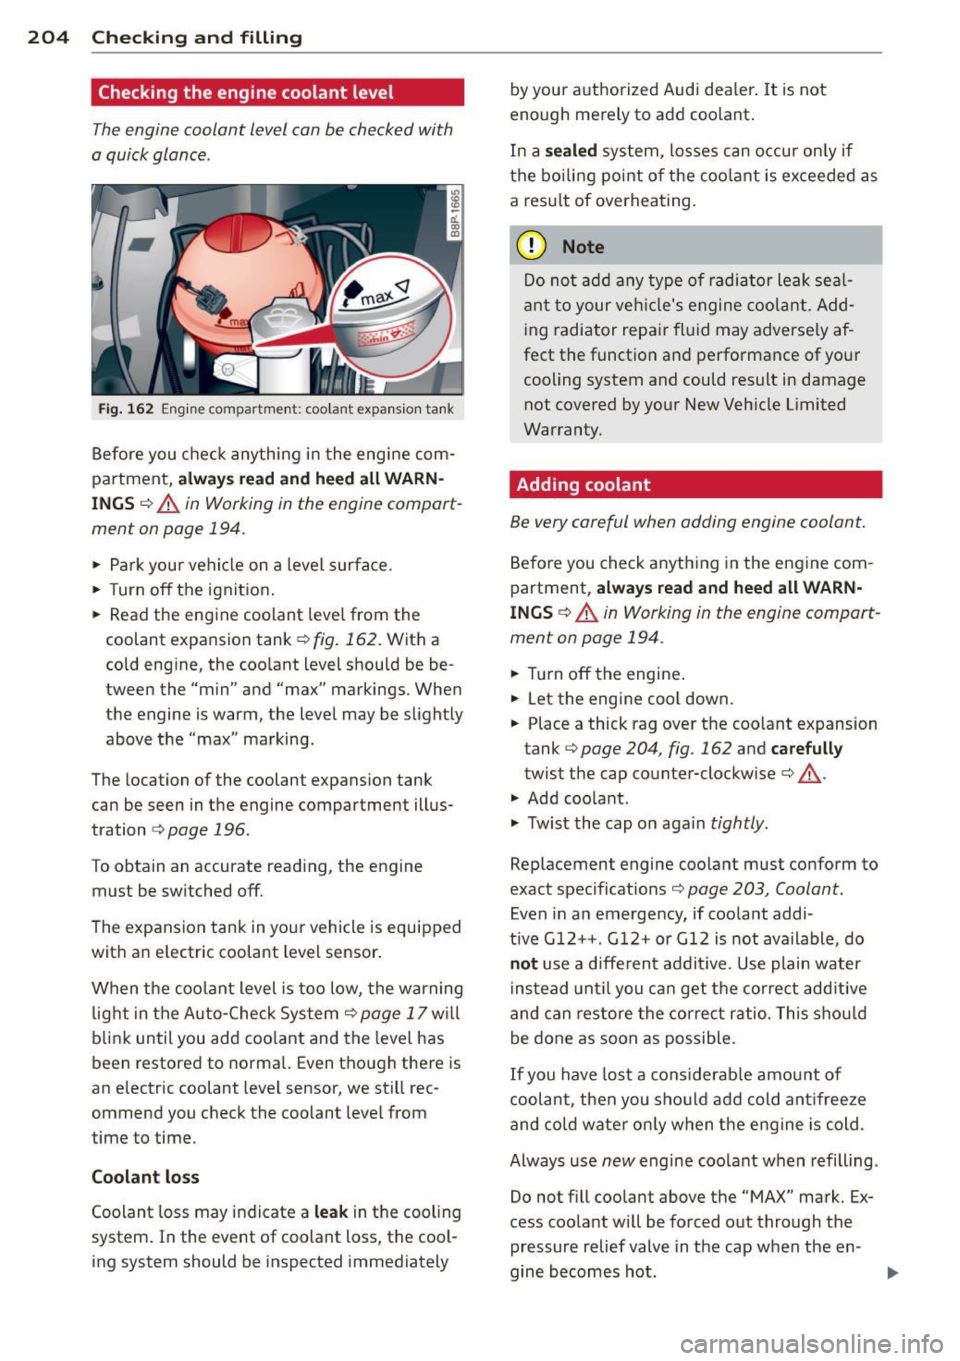
Fig. 162 Engine compartme nt: coo lant expansio n tank
Before you check anything i n the eng ine com
partment,
a lw ays rea d and h eed all WARN
ING S ¢&. in Working in the engine compart
ment on page 194.
.. Park your vehicle on a level surface.
.. Turn
off the ignit ion .
.. Read the eng ine coolant leve l from the
coolant expansion tank<=>
fig. 162 . With a
cold eng ine, the coo lant level should be be
tween the "min" and "max" markings . When
the engine is warm, the level may be slightly above the "max" marking.
The location of the coolant expansion tank
can be seen in the engine compartment illus
tration
i:> page 196.
To obtain an accurate read ing, the engine
must be switched
off.
The expansion tank in yo ur vehicle is equipped
with an e lectric coolant level sensor .
When the coolant level is too low, the warning light in the Auto -Check System
c> page 17 w ill
blink until you add coo lant and the level has
been restored to norma l. Even though there is
an electric coolant level sensor, we still rec
ommend you check the coolant level from
time to time.
Coolant lo ss
Coolant loss may indicate a le ak in the cooling
system . In the event of coolant loss, the cool
ing system should be inspected immediately by your authorized Audi dea
ler .
It is not
enough merely to add coolant .
In a
se aled system, losses can occur on ly if
the boiling point of the coo lant is exceeded as
a res ult of overheating.
(D Note
Do not ad d any type of radiator leak sea l
ant to your veh icle's engine coolant . Add
i ng radiator repair fl uid may adverse ly af
fect the funct ion and performance of your
cooling system and could result in damage not covered by your New Veh icle Limited
Warranty .
Adding coolant
Be very careful when adding engine coolant.
Before you check anything in the eng ine com
partment,
a lw ays re a d and heed all WARN
INGS c::> A in Working in the engine compart
ment on page 194 .
.. Turn off the engine .
.. Let the engine cool down.
.. Place a thick rag over the coolant expansion
tank
c::> page 204, fig . 162 and ca refull y
twist the cap counter-clockwise c::> A.
.. Add coo lant .
.. Twist the cap on aga in
tightly .
Replacement engine coolant must conform to
exact spec ificat ions
c::> page 203, Coolant.
Even in an emergency, if coolant addi-
t ive G12++ . G 12+ or G12 is not ava ilable, do
n ot use a d iffe rent addit ive. Use plain water
instead unt il you can get the correct add itive
and can restore the correct ratio. This shou ld
be done as soon as possible .
If you have lost a considerab le amou nt of
c oolant, then you sho uld add cold ant ifree ze
and co ld wate r on ly when the engine is cold.
Always use
new engine coo lant when refilling .
Do not f ill coolant above the
"MAX" mark. Ex
cess coolant will be forced out through the
pressure relief valve in the cap when the en -
gine becomes hot .
Iii>
Page 208 of 280
206 Checking and filling
Brake fluid
Checking brake fluid level
The brake fluid level can be checked with a
quick glance .
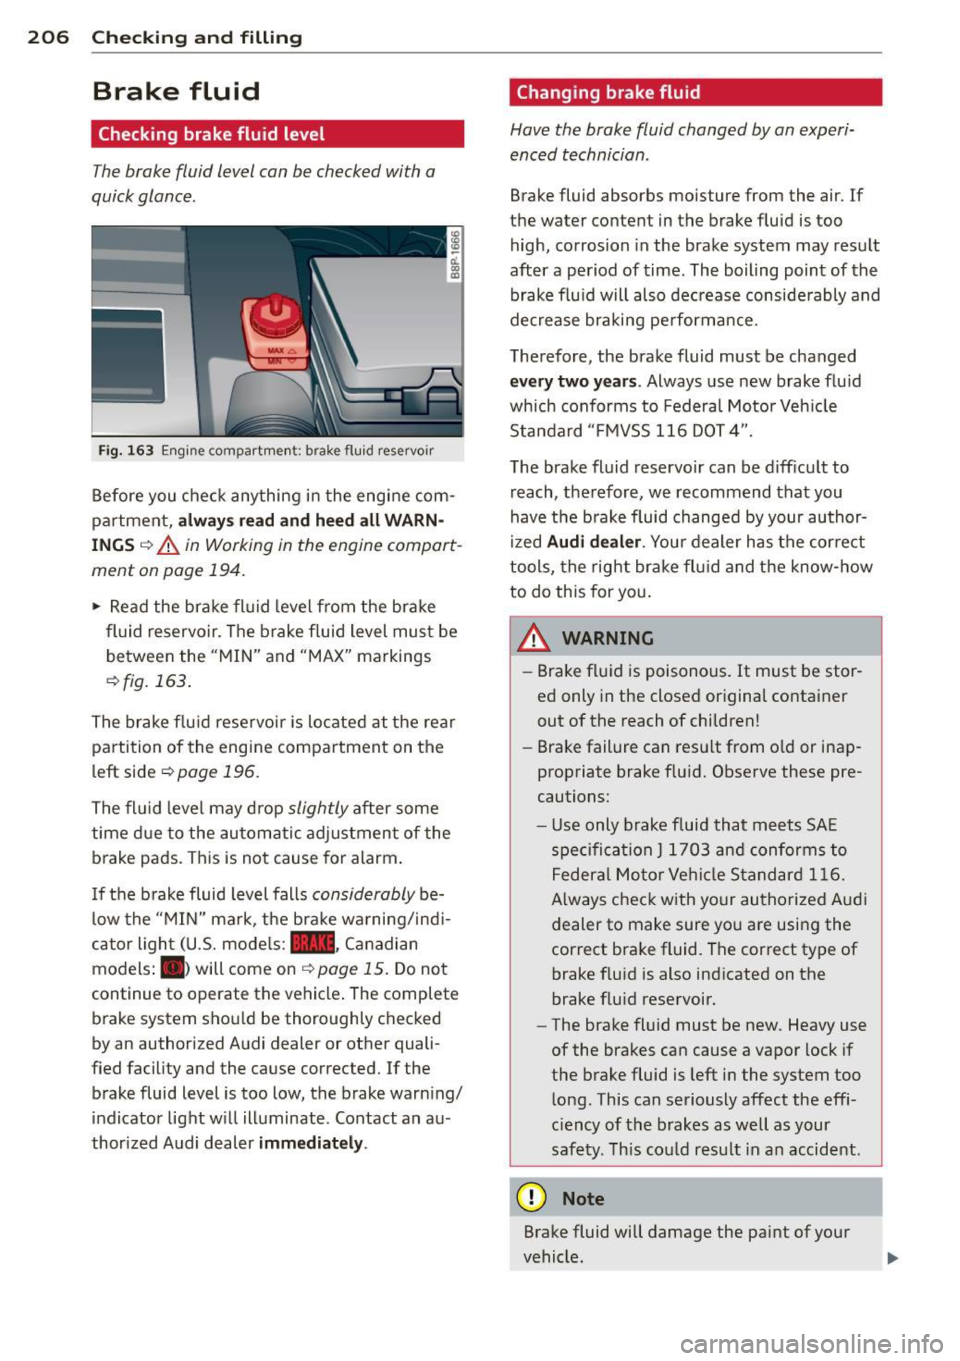
Fig. 163 Engine compartme nt: brake flu id reservo ir
Before you check anything i n the engine com
partment,
a lwa ys rea d and h eed a ll WA RN·
ING S c:> & in Working in the engine compart
ment on page
194.
~ Read the brake fluid level from the bra ke
fluid reservoir. The brake fluid Level must be
between the "MIN" and "MAX" markings
9fig. 163 .
The brake f lu id rese rvoir is located at the rear
partition of the engine compartment on the
L eft side
¢page 196.
The fluid level may drop slightly after some
time due to the automatic adjustment of the b rake pads . This is not cause for alarm .
I f the b rake fluid Level falls
considerably be
low the "MIN" mark, the brake wa rning/ind i
cator Light (U.S. models:
1111 , Canadian
models:
llllt will come on c:> page 15 . Do not
continue to operate the vehicle . The complete
brake system sho uld be thoroughly checked
by an authorized Audi dealer or other quali
fied facility and the cause corrected. If the
brake fluid level is too low, the brake warn ing/
indicator Light w ill illuminate . Contact an au
thor ized Audi dealer
imm ediatel y.
Changing brake fluid
Have the brake fluid changed by an experi
enced technician .
Brake fluid absorbs moisture from the air. If
the water content in the brake fluid is too high, corrosion in the brake system may result
after a period of time . The boiling point of the
brake flu id will also decrease conside rably and
decrease braking pe rformance.
Therefore, the brake fluid must be changed
eve ry two y ears. Always use new brake flu id
which conforms to Federal Motor Veh icle
Standard "F MVSS 116 DOT 4".
The brake fluid reservoir can be diff icult to
reach, therefore, we recommend that you
have the b rake fluid changed by your author
ized
Audi dealer . Your dealer has the correct
tools, the right brake fl uid and the know -how
to do this for you.
A WARNING
- Brake fluid is poisonous . It must be stor
ed only in the closed original container
out of the reach of children!
- Brake failure can resu lt from o ld or inap
propriate brake flu id. Observe these pre
cautions:
- Use only brake f luid that meets SA E
specifica tion
J 1 7 03 and conforms to
Federa l Moto r Ve hicl e Standard 1 16.
Always check with yo ur authorized Aud i
dealer to make sure yo u are using the
correct brake fluid. The correct type of brake f lu id is also ind icated on the
brake flu id reservoir.
- The brake fluid must be new. Heavy use
of the brakes can cause a vapor lock if
the brake fluid is left in the system too
l ong. This can seriously affect the effi
c iency of the brakes as well as your
safety. This cou ld resu lt in an accident.
(D Note
Brake fluid will damage the paint of your
vehicle .
Page 246 of 280
244 Fuses and bulbs
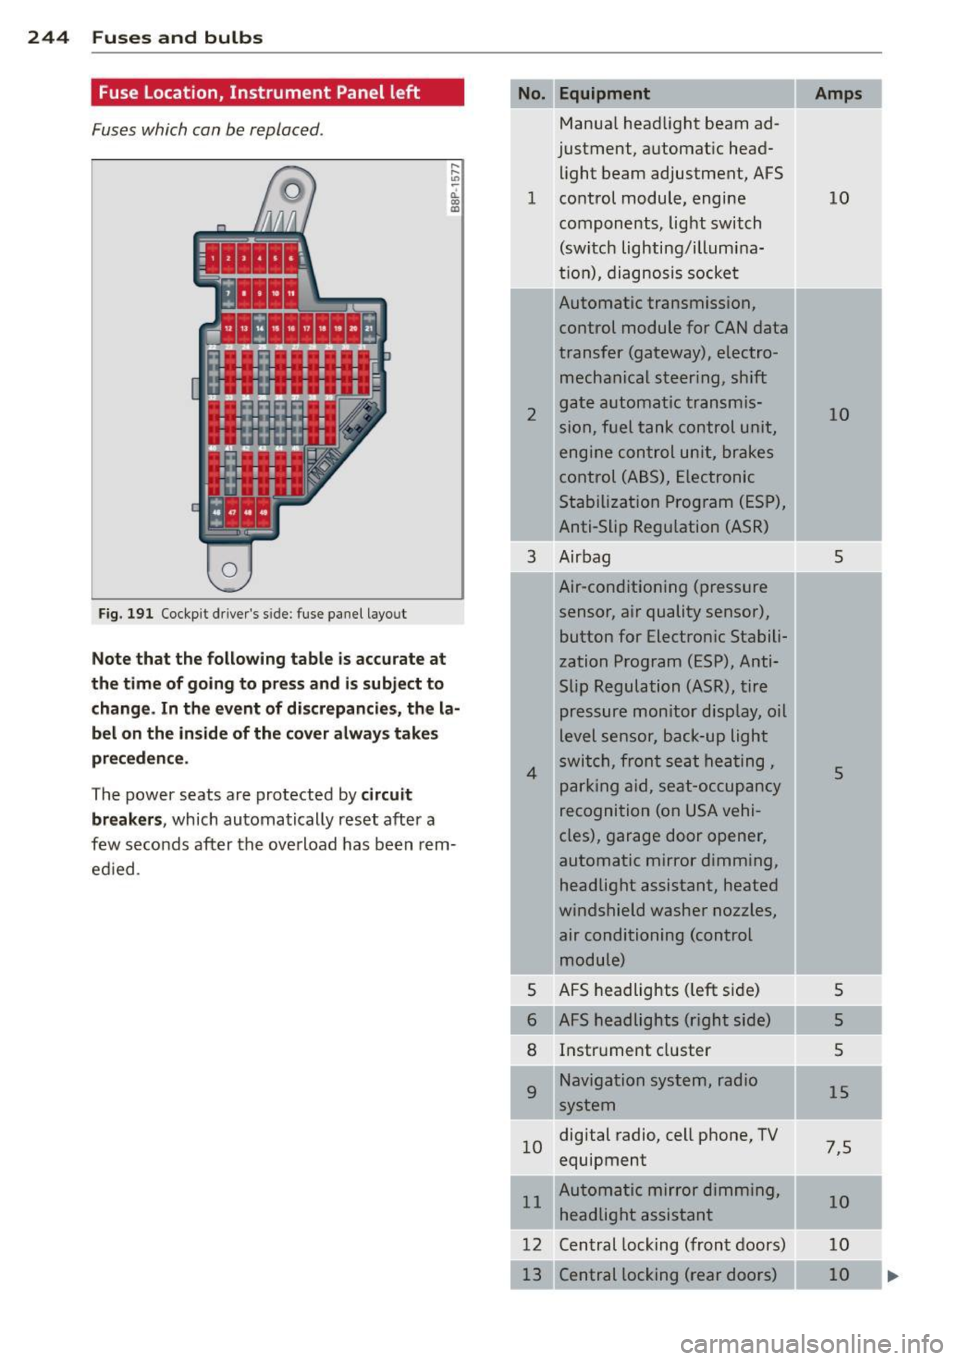
Fuse Location, Instrument Panel left
Fuses which can be replaced.
Fig. 191 Cockp it driver 's s ide: fuse pane l layout
Note that the following table is accurate at
the time of going to pr ess and i s subject to
change . In the event of d iscrepancies, the la
bel on the in side of the cover always take s
pr eceden ce .
The power seats are protected by circuit
break ers,
which automatically reset after a
few seconds after the ove rload has been rem
ed ied .
Equipment
Manua l head light beam ad
justment, a utomat ic head
light beam adjustment, AFS
1 co ntrol m odule, engine
components, light switch
(switch lighting/illumina
ti on), diagnosis socke t
2
3
4
5
6
8
9
Automatic transmission,
control module for CAN data
transfer (gateway), electro
mechanical steering, shift
gate automatic transmis
sion, fuel tank control unit,
engine control unit, brakes
control (A BS), Electronic
Stabili zation Program (ESP) ,
Anti-Slip Regulation (ASR)
Air bag
Air-conditioning (pressure
sensor, air quality sensor), button for Electronic Stabili
zation Program (ESP), Anti
Slip Regulat ion
(ASR), tire
pressure monitor display, oil
level senso r, back-up ligh t
s w itch, front se at he ati ng ,
p ark ing aid, sea t-occupancy
recognition (on USA vehi
cles), garage door opener,
automa tic mirror dimming,
headlight assistant, heated
windshield washer nozzles, air conditioning (control
module)
AFS headlights ( left si de)
AFS headlights (right side) Instr ument cluster
Navigation system, radio
system
1 0 digital
radio, cell phone, TV
equipment
11 Automatic mirror dimming,
headlight assistant
12 Central lock ing (front doors)
Central locking ( rear doors)
Amps
10
10
5
5
5
5
5
15
7 ,5
10
10
10
Page 263 of 280
-If you must work underneath the vehicle
with the whee ls on the ground, always
make sure the vehicle is on level ground,
that the wheels are always secu rely
blocked and tha t the eng ine cannot be
started.
- Always make sure the transm ission se
lector lever (automatic transmiss ion) is
in "P" (Pa rk position) (a utomat ic trans
mission) or Neutral (manual transmis
sion) and the hand brake is fi rm ly ap
plied.
@, For the sake of the environment
- Changing the eng ine settings w ill ad
versely affect em ission levels. This is det
rimental to the environment and increas
es fue l cons umption.
- Always obse rve env ironmental regula
tions when d ispos ing of old engine oil,
used b rake fluid, dirty engine coolant,
spent batteries or worn out tires .
- Undeployed airbag modules and preten
s ioners might be classified as Perchlo
rate Mate rial -special handling may ap
ply, see www.dtsc.ca.gov/hazardous
waste/perchlorate. When the veh icle or
parts of the restraint system includ ing
airbag modules safety belts with preten
s ioners are scrapped, all appl icable laws
and regulations must be observed. Your
autho rized Audi dea le r i s familiar w ith
these req uirements and we recommend
that yo u have your dea le r perform this
service for you.
Additional accessories, modifications and
parts replacement
Additional accessories and parts
replacement
Always consult an authorized Audi dealer be
fore purchasing accessories .
Your vehicle incorporates the latest safety de
sign features ensuring a high standard of ac
tive and passive safety .
Consumer In formation 26 1
This safety could be compromised by non-ap
proved changes to the vehicle . For this reason,
if parts have to be replaced, please observe
the following points when installing add ition
al accessories:
Approved Audi accessories and genuine Audi parts are available from authorized Audi deal
ers.
T hese dea lers a lso have the necessary facili
ties, tools and trained specialists to install the parts and accessories properly .
_& WARNING
Using the wrong spare parts non-approved
accessories can cause damage to the vehi
cle and serious personal injury.
- Use on ly accessories expressly approved
by Audi and genu ine Audi spare parts
- These parts and accessories have been
specially designed to be used on your ve
hicle.
- Never install accessor ies such as tele
phone cradles or beverage ho lders on air
bag covers or within the airbag deploy
ment zones. Do ing so will increase the
ris k of injury if a irbags are triggered in an
accident!
- Before you check anything in the engine
compa rtment, always read and heed a ll
WARNINGS
<:!)page 187.
(D Note
-If items other than genu ine Audi spare
parts, add-on equipment and accessory
items are used o r if repair wo rk is not
performed accord ing to specified meth
ods, this can resu lt in severe damage to
your vehicle's engine and body (such as
corrosion) and adve rsely affect yo ur vehi
cle 's warranty.
- If emergency repairs must be performed
elsewhere, have the vehicle examined by
an authorized Audi dealership as soon as
possible.
- The manufacturer cannot be held liable
for damage wh ich occ urs due to failure
to comply with these stipulations.
•
•
Page 268 of 280
26 6 Index
Changing engine oil
Chass is 201
Unde rcoat ing . ............. .. .... . 183
also refer to Aud i magnetic ride ... .... 95
Checking
Eng ine coolant level ........ .... ....
204
Checking tire pressure . ... .. .. ... ... . 218
C hi ld restra int
Danger of us ing c hild restra ints in the
front seat ... .... ..... ... .. .. .... .
123
Child restra ints
Where can I get add it iona l information
about child restra ints and their use? ..
160
Ch ild restra int system anchors ... .. ... 155
Child safety . . . . . . . . . . . . . . . . . . . 143, 148
Convertible locking retractor . . . . . . . . . 152
Important safety instructions for using
chi ld safety seats ..................
146
Important things to know when dr iving
with children ............. .... ....
143
Install ing a child restraint using the
LA TC H system ............. ... .. ...
157
M ount ing and releasing the ancho rage
hook .. .... ... .......... .. .. .. .. .
157
158
158
Tether anchors
Tether straps
Ch ild safety lock
· ............... ..... 42
Child safety seats ................... 148
Booster seats .. .......... .. .. .... . 151
Convertible child seats .... .. .. .. .. . 149
Convertible locking retractor .. .. .. ... 152
H ow do I properly install a child safety
seat in my vehicle? ........ .. .. .... .
146
Infant seats ...................... 148
Ins tall ing ... ............ .. .. .. .. . 152
LA T CH system .... ..... ... .. .. .... . 157
Safety instructions . . . . . . . . . . . . . . . . . 146
Child seats
L owe r ancho rages ........ .. .. .... .
156
Clean ing
Alcantara (synthet ic suede) ..........
186
Eng ine compartment ...... .. .. .. .. . 187
Exhaust tail pipes .................. 183
Fabrics and fabr ic coverings .. .. .... . 184
Instrumen t panel .................. 184
Inter ior
L eather .. .. ... .. ..... ... .. .. .... .
. ... ... . ...... ... ... ...
' . .
183
186
Plastic and vinyl ..... .. ..... .... . .. 181
Plastic parts ..... ... .. ..... ... .. .. 184
Safety be lts ... .. ... ....... ... .. .. 187
trim strips
Tr im strips 181
181
Cleaning and protection .. ..... ... .. .. 178
Cl imate controls . .. ................ .. 79
Additional heater . ... .......... .. .. . 85
Air distrib ution . .. ............. .... . 83
Air o utlets · · · · · · · · · · · · · · · ......... 84
Air recirculation . . .. ... ..... .... ... . 83
Air recircu lation mode (manual) . ... .. . 82
Automatic air recirculation ... .... . .. . 82
AUTO (standard setting) ........ .. .. . 81
Controls . . . . . . . . . . . . . . . . . . . . . . . . . . 80
Defrost ing/defogging ............. .. 82
Description . . . . . . . . . . . . . . . . . . . . . . . . 79
Fan ......... ... .. .............. .. 83
Key- coded setting ... .......... .. .. . 84
Recommended settings ......... .... . 79
Setting the temperatu re ........ .. .. . 82
Switching between Fa hrenhe it and Centi-
grade . ... .... .. .. .... .... ... .. .. .
83
Switching the air conditioning on and off 81
Using the climate control economically . 84
Warm and cold . .. ............. .... . 79
Clock . ... .. .... .. .. ... ..... ... .. .. . 11
Clutch overheat ing ................. . 101
Coat hooks ..... .. ............. .... . 78
Cold tire infla tio n press ure ........ .... 216
coming home ... .................. .. 48
Compartments in the door trims ... .. .. . 77
Compass mir ro r . . . . . . . . . . . . . . . . . . . . . 59
Compliance . .... .. ............. .... 262
Consumer Information. .. ..... .. 111,259
Contacting NHTSA ................. . 111
Convenience close/open feature
Windows . .... .. ............. .... .
44
Convertib le child safe ty seats ..... .. . . 149
Convertible locking retractor
At· .
c 1vatmg ... .. .. .. ... ....... ... . .
154
D t" t· eac 1va mg ... .. ............. .. .. 155
Using to secu re a child safety seat 1.52, 154
Coolant system ..................... 203
Cooling System
Expansion tank ... .. .... .... ... .. ..
204
Page 270 of 280
268 Index
Eme rgency towing ......... .. .. .... . 251
E ne rgy management ........... .. ... 167
Ba ttery power ........... .... .. .. . 168
Dr iver notific ation ...... .. .. .. .. .. . 16 8
Eng ine
4-cylinder diesel (140 hp) ....... .... 197
4-cyl ind er g asoline (200 hp) .. .. .. ... 196
Coolant .. ... ............ .. .. .. .. . 203
H ood .. ...... ........... .. .. .... . 194
Pr ehea ter . . . . . . . . . . . . . . . . . . . . . . . . . 86
Start ing . . . . . . . . . . . . . . . . . . . . . . 89, 90
Starting with j umper cab les . ..... .. . 248
Stopping . . . . . . . . . . . . . . . . . . . . . . . . . . 91
E ng ine compartmen t ................ 196
Safety instruc tions .......... .. .... . 194
Working in the engine compar tment .. 194
Eng ine coolant system ........... .... 203
Adding coo lant ............ ... .. .. . 204
Chec king coolan t leve l ..... .. .. .... . 204
Che cking the eng ine coolant leve l ..... 204
M alfunct ion . . . . . . . . . . . . . . . . . . . . . . . 17
Radiator fan . .. .. ..... ... .. .. .... . 205
E ng ine coolant temperature
Gauge ... .. ................ ... .. .. 11
Eng ine data .. ............... ...... . 257
Engine fault Warning light .. .. ..... ... .. .. .... .. 20
E ng ine hood
C lo sing .. .. ............. .. .. .. .. . 194
Release lever . ........... .... .... . 194
Releasing and open ing . ... .. ... ... . 194
Eng ine malfunction (diesel engine)
War ning light ............ .. .. .... .. 20
Eng ine oil . ............... .. .. .... . 197
Adding .. .. ............... .... .. . 200
Addit ives . .. ................ ... ... 200
C hanging .. ... .... ...... ... ... .. . 20 1
Chec king the eng ine o il level .. .. .. .. . 200
Di ese l eng ine ............ .. .. .... . 20 2
I ndications and con ditions req uiring ex-
tra check ing . .. .. ..... ... .. .. .... . 200
Oil consumption .. ..... ... .. .. .... . 199
Oi l grades . .... . ...... ... .. .. .... . 197
Recommended oil check intervals ..... 200
Specification and viscos ity .... .. .... . 197
Specifications Diesel engine .. .... ... 202
Specifications gasoline engine .. .. ... 197
Tempe ratu re d isplay ...... .. .. .. .. . . 31 E
ngine oi l leve l . . . . . . . . . . . . . . . . . . . . . . 20
E ngine o il pressu re (malfunction) ....... 16
Engine oil sensor defective ............ 20
En gine preheate r .................... 86
C onnect ing . ..... .. ... ..... ... .. .. . 86
E ngine speed limitation . . . . . . . . . . . . . . . 20
Environment Break-in per iod . .. ............. .... 169
Catalytic converter ............. .... 170
Diesel particulate f ilter ............ . 171
D ispos ing of your veh icle battery ... .. 210
D riv ing at high speeds .............. 172
D riving to minimize pollution and noise 171
F uel ............................. 192
F uel economy . . . . . . . . . . . . . . . . . . . . . 171
Leaks under your vehicle ..... ... .. .. 194
Letting the vehicle stand and warm up . 172
Proper d isposal of drained bra ke fluid . 206
Proper disposal of drained eng ine cool-
ant ............................. 204
Proper d isposal of drained eng ine
o il . . . . . . . . . . . . . . . . . . . . . . . . . 200, 201
Recycling used engine oil ............ 200
U nleaded fuel . ... ................ . 189
Wha t shou ld I do w ith an o ld b att ery? . 210
EPC
refer to E lect ron ic power co ntrol ... .. . 19
Event Data Recorder (EDR) ........ .... 161
E xh aus t tai l pipes
Cleaning .. .... .. ............. .... 183
Expansion tank .. .. ................ . 204
Exterior mirrors Adjusting . . . . . . . . . . . . . . . . . . . . . . . . . 53
Dimming .......................... 54
Heating ........................... 53
F
Fahrenheit
Switching between Fa hrenhe it and Centi-
grade ....... .... .... ........... .. 83
F an
Adjusting the fan speed ...... .... . .. . 83
Climate controls ............... .. .. . 83
Radiator ......................... 205