change time AUDI S3 2012 Owners Manual
[x] Cancel search | Manufacturer: AUDI, Model Year: 2012, Model line: S3, Model: AUDI S3 2012Pages: 280, PDF Size: 70.11 MB
Page 12 of 280

10 Instruments and warning/indicator lights
Instruments and warning/indicator Lights
Instruments
Instrument cluster and controls
The instrument cluster is your central source of information.
Fig. 3 Ove rv iew of t he inst ru m ent cluster
CD Tac home ter w ith t ime and date
d is play .. .......... ....... .
@ Indicator lights ( tur n signa ls) .
®
©
®
®
0
®
Coolant temperature gauge .. .
Fu el gauge ............ .. .. .
Speedometer with odometer ..
Set/Check bu tton , ...... ... .
Warn ing/indic ator li gh ts
Reset button for
- T rip odom eter ...... ..... . .
- Se rv ice interval display
(D Note
1 0,11
1 3
11
12
12
11 , 13
1 3
12
30
The instrument cl uster and center console
illumi nat io n (gauges and need les) c omes
on when you switch on the ignition and the
vehicle headlights are off . Be aware o f the
f ollowing diffe re nc e betwee n mode ls built
t o US or C ana di an specific ati ons :
-USA models: illumination of the instru
ment clu ster (gauges and needles),
dash and center console around the
gearshift lever is controlled by a light
sensor located in the instrument panel.
The instrument panel illumination will automatically become dimmer as the daylight fades away and eventually will
go out completely when outside light is
very low . This is to remind you, the driv
er , to switch on the headlight s before it
gets too dark.
- Canada model s: instrum ent pan el illu
mination will stay bright regardless of
the intensity of ambient light. Always be aware of changes in out side light
conditions while you are driving. Re
spond in time to fading daylight by
turn ing the light switch to position
iD
(or ,;AUTO" if your car is equipped w it h
this feat ure)
to turn on your headlights .
Tachometer (engine rev counter)
The tachometer indicates the engine RPM
(revolutions per minutes).
The tachometer CD c> page 10, fig. 3 is the left
one of the two large clock-type d isplays.
T he eng ine turns at a speed
1 000 times the
s ingle digit in the display, e.g . if the needle
po ints at the "2", the engine t urns at
2000RPM. ~
Page 23 of 280
Instruments and warning/indicator lights 21
If the message does not turn off, have your
authorized Audi dealer or qualified workshop
correct the malfunction .
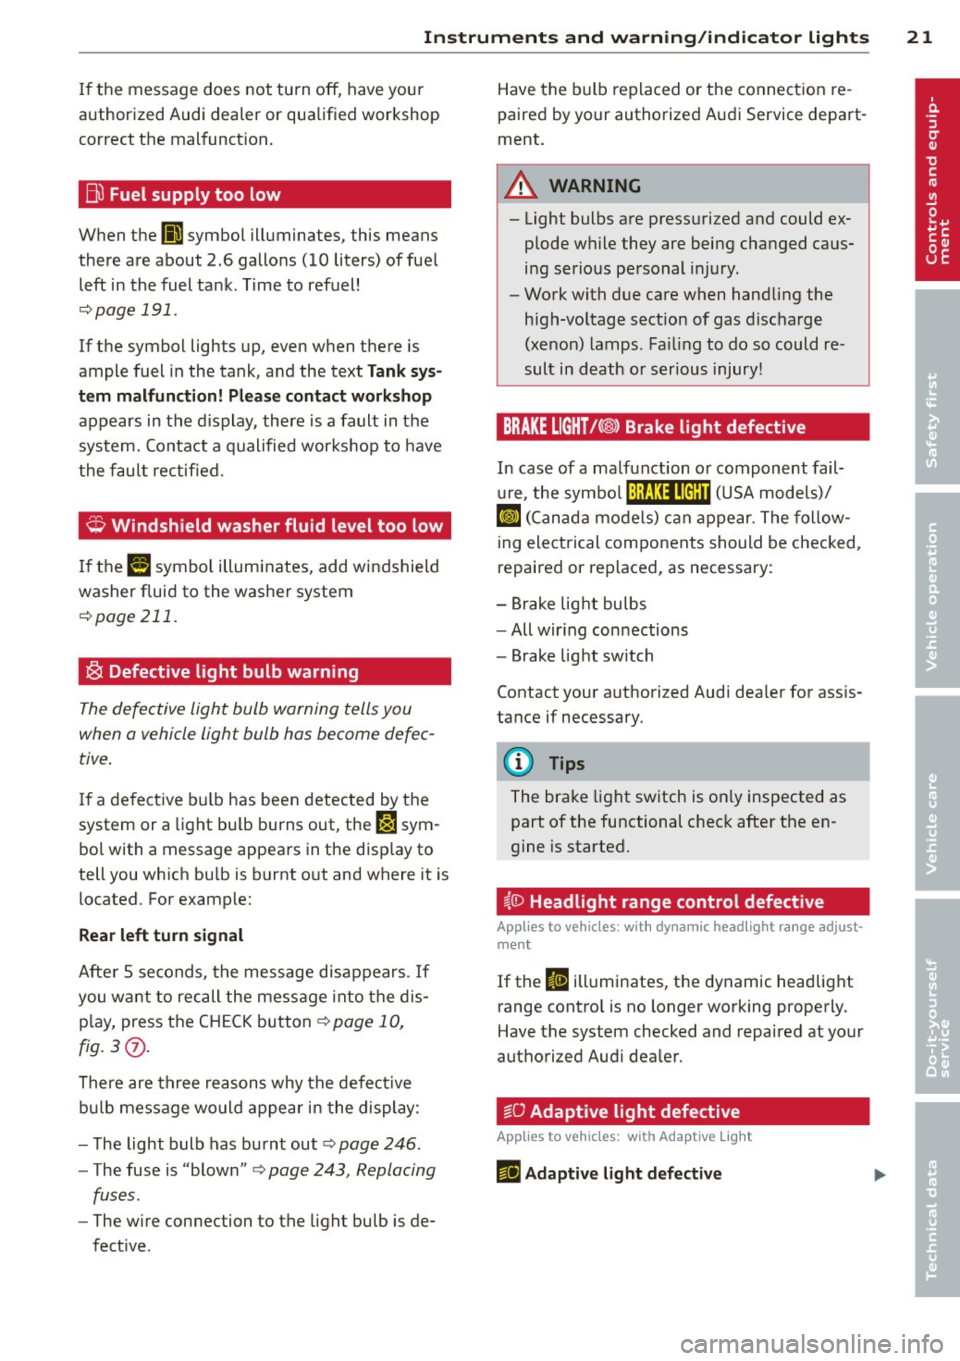
Bil Fuel supply too low
When the (I symbol illuminates, this means
there are about 2.6 gallons (10 liters) of fuel left in the fuel tank. Time to refuel!
Qpage 191.
If the symbol lights up, even when there is
ample fuel in the tank, and the text
Tank sys
tem malfunction! Please contact workshop
appears in the display, there is a fault in the
system. Contact a qualified workshop to have
the fault rectified.
Q Windshield washer fluid level too low
If the I! symbol illuminates, add windshield
washer fluid to the washer system
Q page211.
~ Defective light bulb warning
The defective light bulb warning tells you
when a vehicle light bulb hos become defec
tive .
If a defective bulb has been detected by the
system or a light bu lb burns out , the ~ sym
bol with a message appears in the disp lay to
tell you which bu lb is burnt out and where it is
located. For example:
Rear left turn signal
After 5 seconds, the message disappears . If
you want to recall the message into the dis
p lay, press the C H ECK button
Q page 10,
fig. 3(?) .
There are three reasons why the defective
bulb message wo uld app ear in the display:
- T he light bulb has burnt out
Q page 246 .
-The fuse is "blown" c> page 243, Replacing
fuses .
-The w ire connection to the light bulb is de
fective. Have the
bulb replaced or the connection re
paired by your authorized Audi Service depart
ment .
_& WARNING
- Light bulbs are pressurized and could ex
plode wh ile they are being changed caus
ing serious pe rsonal injury .
- Work with due care when handling the
high-vo ltage sect ion of gas discharge
(xenon) lamps. Failing to do so could re
sult in death or serious injury!
BRAKE LIGHT!<@> Brake light defective
In case of a malfunction or component fail-
ure, the symbol (USA models)/
tlJ (Canada models) can appear. The follow
ing electrical components should be checked,
repaired or replaced , as necessary:
- Brake light bulbs
- All wir ing con nections
- Brake light switch
Contact your authori zed Audi dea ler for assis
tance if necessary.
(D Tips
The brake light switch is only inspected as
part of the functional chec k after the en
gine is started.
i,0 Headlight range control defective
Applies to vehicles : wi th dynamic headl ig h t ra nge adjus t
m ent
If the II illumi nates, the dynamic headlight
range contro l is no longer working p roperly.
Have the system checked and repaired at your
authori zed Aud i dealer.
§'0
Adaptive light defective
App lies to vehicles: with Ada ptive Light
FJl Adaptive light defective
Page 32 of 280

30 Driver in formation d ispl ay
Fue l economy messages are displayed when
fuel consumption is increased by certa in con
d itions. If you follow these fuel economy mes
sage s, you can reduce your vehicle's consump
t ion of fuel. The messages appear automati
cally and a re o nly disp layed in the eff iciency
program . The fuel economy messages turn off
automatically after a certain period of time .
.,. To turn a fuel economy message off imme-
diately after it appears, press the
I RES ET I
button ~ page 26, fig . 11 @ , or
.,. Press the function selection switch
¢ page 26, fig. 11 @ .
(D Tips
-Once you have t urned a fue l eco nomy
message off, it will only appear again af
te r you turn the ignition on aga in.
- The fuel economy messages are not dis
played in every insta nce, bu t rathe r in in
te rv al s over a period o f ti me .
Service interval display
The service interval display reminds you when
your next service is due.
F ig. 2 0 Sectio n of inst rume nt cl uster : Serv ice inte rv al
d isplay
The schedule for the nex t oil change o r inspec
tion is calculated a utomatically and displayed
according ly . The display works in two stages :
Service reminder
30 days befo re the next service is due, a se rv
i ce rem inder appears in the d isplay when you
turn on the igni tion.
After abo ut 5 seconds the display sw itches
back to normal. The d ista nce and time re- main
ing are upda ted each time the ig nition is
turned on unti l the date d ue for service is
reached.
Service due
When the d ue da te for service is reached, t he
message
Service due! appears in the i nstr u
ment cluster imme diate ly after yo u turn on
the ignit io n. Add itiona lly, a warning tone
sounds. After about 5 seconds the disp lay
switches back to normal.
Calling up the service schedules
If or when an oil change or inspec tion is due,
can be shown in the instrument cluster by se
lecting the service interva l disp lay . Select
Chec k > Service > Oil change or Service by us
ing the
I RESE T! button and the rocker sw itch
¢ page 27, fig. 12 .
Resetting the ser vic e interval di splay
Your a uthorized Audi dea ler w ill reset the cor
responding service sc hedule after performing
the appropr iate service on you r veh icle. You
also have the possib ility to rese t the oil
change schedule after hav ing performed an
o il change acco rding to Aud i specif ications .
- Switch the ignit ion on.
- Pull the knob@~
page 10, fig. 3. The mes -
sage.
Se rvice due! appears .
- Pull the knob unt il the display
Oil change in
----- mi (km )--- days appears in the disp lay.
If the reset button is not pulled within 5
seconds, the display reset mode closes.
(D Note
If yo u disconnect the battery te rm inals , no
ca lculations can be made for the service
i nterval disp lay dur ing th is time and no
se rv ice reminder will appear. Remember
that observ ing the proper service intervals
i s vitally important to extending t he life of
your ve hicle, pa rticula rly t he e ngine, and
maint ain ing its value. Eve n if the mileage
drive n is low, the max imum per iod of one
year from one service to the next m ust no t
be exceeded.
II>-
Page 33 of 280
@ Tips
-If a malfunction is present (red symbol),
the distance remaining cannot be called
up.
- Do not reset the display between service
interva ls. Doing so will result in an incor
rect display.
- If the battery is disconnected, the Serv
ice Interval Display values are retained.
- On vehicles with the Driver Information
System, you can also call up the service
i nterval display
¢page 27.
-If service was not performed at the cor
rect time or the service interval display
was not reset after service was per
formed, the add itiona l mi leage driven or
the elapsed days will be shown as nega
tive numbers.
Engine oil temperature
display
A ppl ies to vehicles : wit h engin e temperat ure cont rol dis
p lay
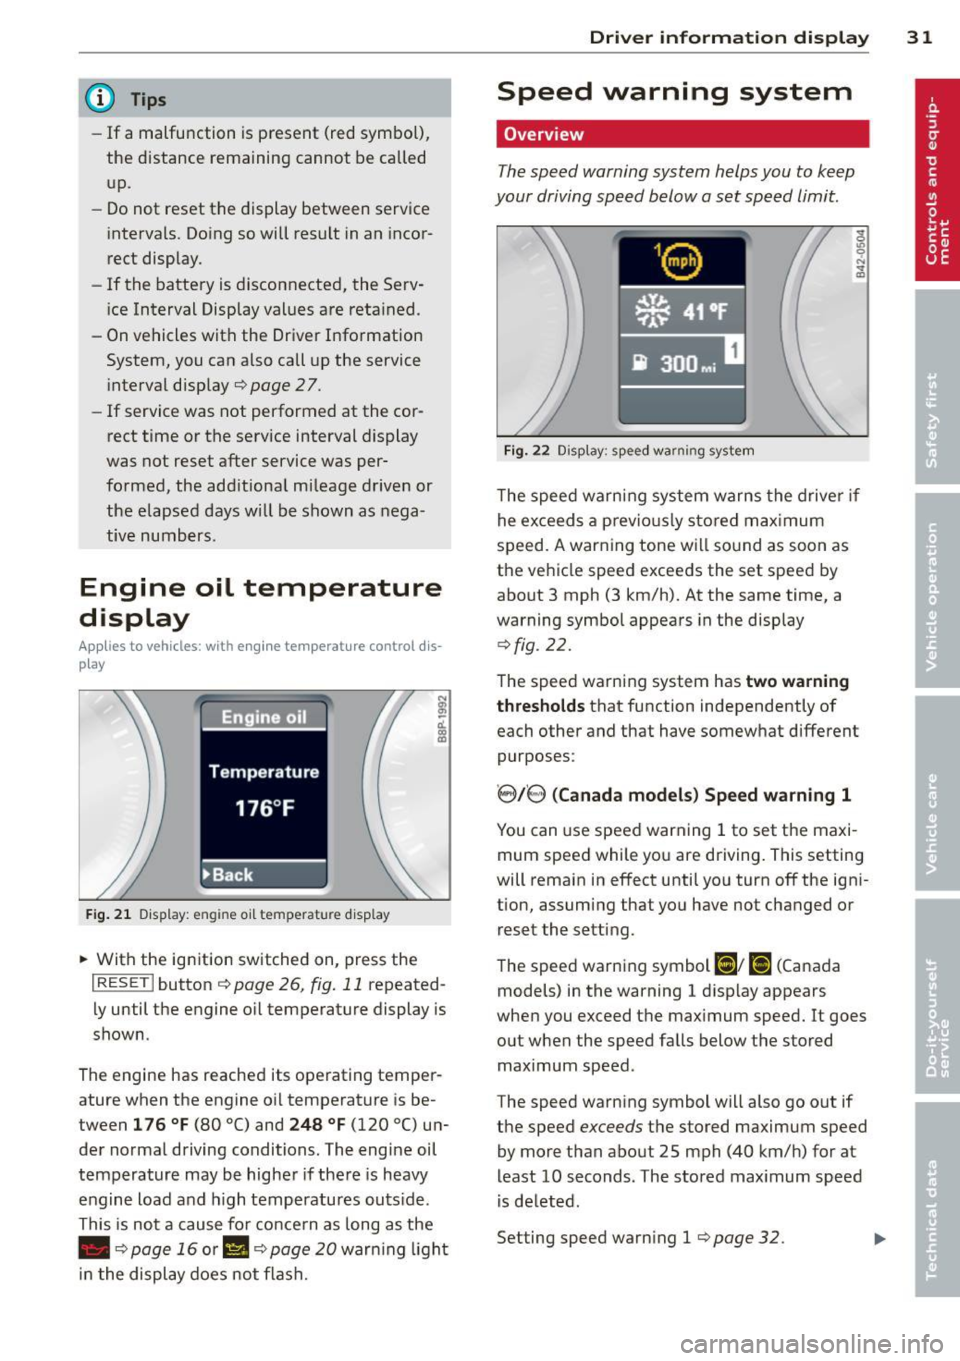
F ig . 21 Display: engine oil temperatu re disp lay
• With the ignition switched on, press the
I RESET I button ¢ page 26, fig. 11 repeated
l y until the engine o il temperature display is
shown.
The engine has reached its operating temper
ature when the engine oil temperature is be
tween
1 76 ° F (80 °() and 248 °F (120 °() un
der normal driving conditions. The engine oil
temperature may be higher if the re is heavy
engine load and h igh temperatures outs ide .
This is not a cause for concern as long as the
• ¢
page 16 or II ¢ page 20 war ning light
i n the display does not flash.
Dri ver inform ation di spl ay 31
Speed warning system
Overview
The speed warning system helps you to keep
your driving speed below a set speed limit.
Fi g. 22 Display: speed warning system
The speed warning system warns the drive r if
he exceeds a previo usly stored max imum
speed. A warning tone will sound as soon as
the vehicle speed exceeds the set speed by
about 3 mph (3 km/h). At the same time, a
warning symbol appears in the display
q fig. 22.
The speed warning system has two warning
t hr es hol ds
that function independently of
each other and that have somewhat different
purposes:
' 8/8 ( Canad a model s) Sp eed warn ing 1
You can use speed warning 1 to set the maxi
mum speed while you are driving. This setting
will remain in effect until you turn
off the igni
tion, assuming that you have not changed or reset the setting.
The speed warning symbol
Ci] ; [i (Canada
models) in the warning 1 disp lay appears
when you exceed the maximum speed.
It goes
out when the speed falls below the stored
maximum speed .
The speed warning symbol will also go out if
the speed
exceeds the stored maximum speed
by more than about 25 mph (40 km/h) for at
least 10 seconds. The stored maximum speed
is de leted.
Setting speed warning 1
¢ page 32. .,.
Page 51 of 280
:l:D Front fog lights
Use the light switch to turn on the front fog
lights.
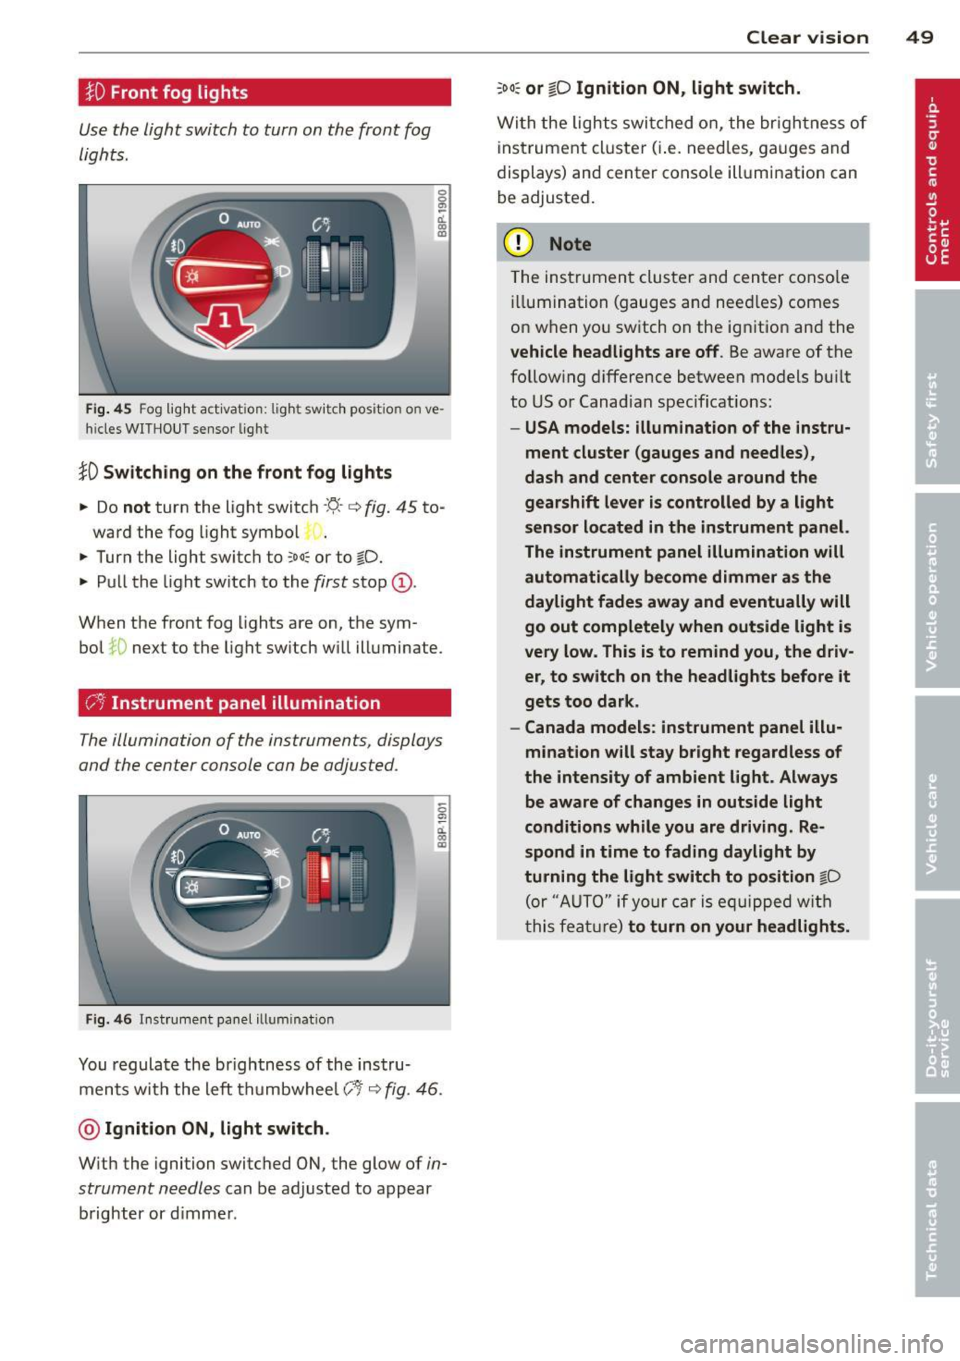
Fig. 45 Fog light act ivat ion: light sw itc h pos it ion o n ve
h icles WITHO UT sensor light
}D Switching on the front fog lights
.. Do not turn the light switch -"t;.. -<=> fig. 45 to-
ward the fog light symbol
.. Turn the light switch to
coo: or to @:D.
.. Pull the light switch to the first stop (D.
When the front fog lights are on, the sym
bol
:iO next to the light switch will illuminate.
C:t:t Instrument panel illumination
The illumination of the instruments, displays
and the center console can be adjusted .
Fig. 46 In st rum ent pa nel illum inat ion
0
"' d. .. m
You regulate the brightness of the instru
ments with the left thumbwhee l
Co/<=> fig. 46 .
@ Ignition ON, light switch.
With the ignition switched ON, the glow of in
strument needles
can be adjusted to appear
brighter or d immer.
Clear vision 49
:oo: or io Ignition ON, light switch.
With the lights swit ched on, the brightness of
instrument cluste r (i.e. needles, gauges and
displays) and center console illumination can
be adjusted.
(D Note
The instrument cluster and center console
ill umination (gauges and need les) comes
on when you switch on the ignition and the
vehicle headlights are off . Be aware of the
follow ing difference between models built
to US or Canadian specifications:
-USA models: illumination of the instru
ment cluster (gauges and needles),
dash and center console around the
gearshift lever is controlled by a light
sensor located in the instrument panel.
The instrument panel illumination will
automatically become dimmer as the
daylight fades away and eventually will
go out completely when outside light is
very low. This is to remind you, the driv
er, to switch on the headlights before it
gets too dark.
- Canada models: instrument panel illu·
mination will stay bright regardless of
the intensity of ambient light. Always be aware of changes in outside light
conditions while you are driving. Re
spond in time to fading daylight by
turning the light switch to position
gD
(or "AUTO " if your car is equipp ed with
th is feature)
to turn on your headlights.
Page 52 of 280
50 Clear vis ion
Emergency flasher
The emergency flasher makes other motorists
aware that you or your vehicle are in an emer
gency situation .
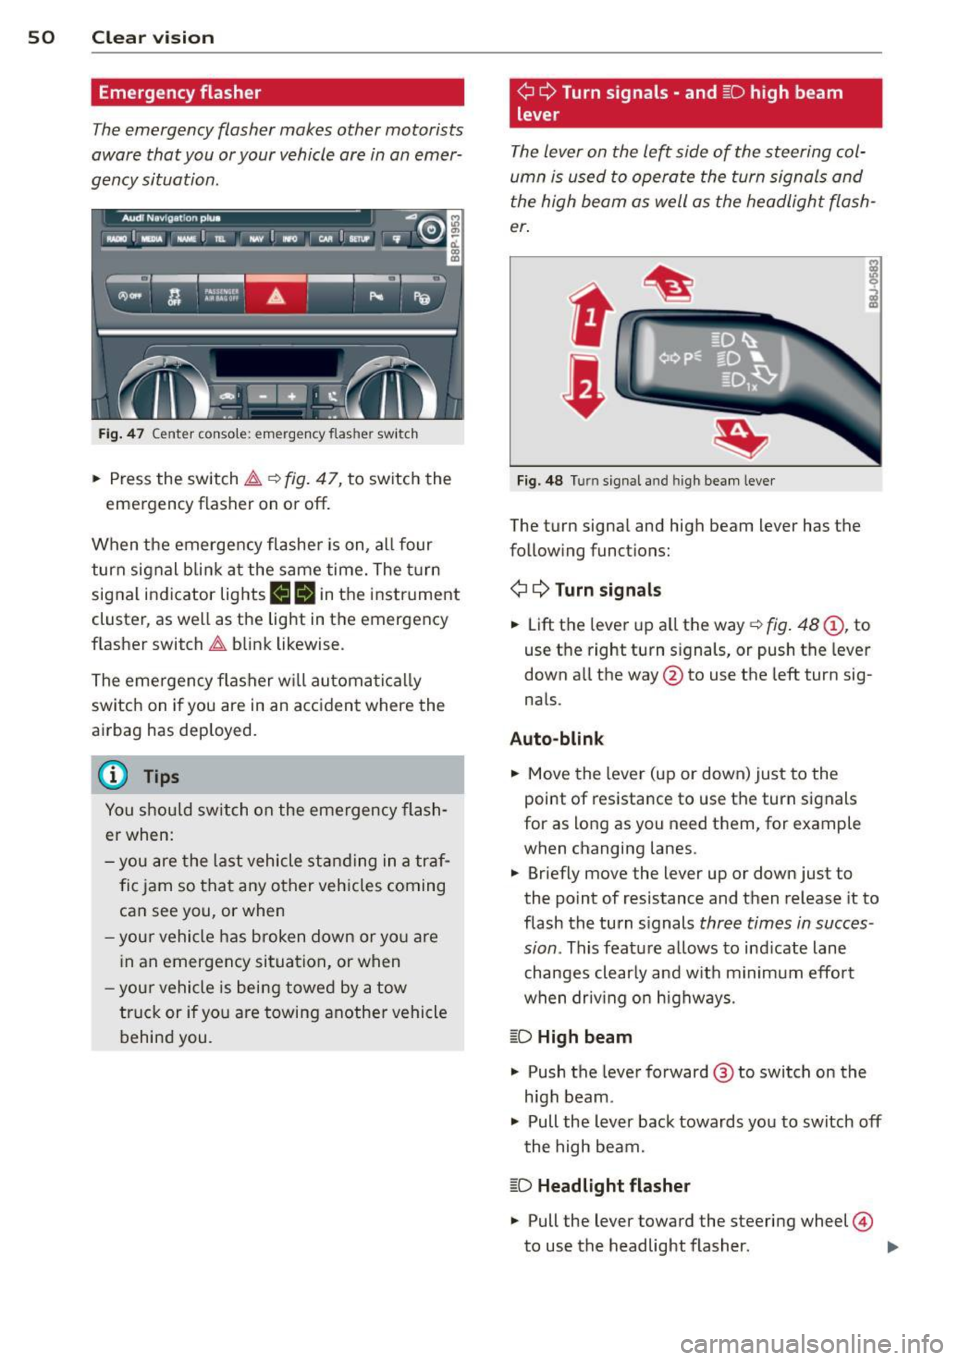
Fig. 47 Center console: emergency flasher switch
.. Press the switch ~ c:> fig. 47, to switch the
emergency flasher on or off.
When the emergency flasher is on, a ll four
turn signal b link a t the same time. The t urn
signal indicator lights
liliN in the instrument
cluster, as we ll as the light in the emergency
f lasher switch ~ blink likewise .
The emergency f lasher w ill automa tica lly
switch on if you are in an accident where the
ai rbag has deployed.
(D} Tips
You shou ld switch on the emergency flash
er when:
- you are the last vehicle st anding in a tr af
fic jam so that any other veh icles coming
can see you, or when
- you r vehicle has broken down or yo u are
i n an emergency situation, or when
- you r vehicle is being towed by a tow
truck or if yo u are towing a nothe r vehicle
behind you.
¢ Q Turn signals - and ~D high beam
lever
The lever on the left side of the steering col
umn is used to operate the turn signal s and
the high beam as well as the headlight flash
er .
t
'
F ig. 48 Tu rn signal and high beam lever
The turn signal and high beam lever has the
following functions:
¢ Q Turn signals
.. Lift the lever up a ll the way c:> fig. 48 (D , to
use the right turn signals, or push the leve r
down all the way @to use the left turn sig
nals.
Auto -blin k
.. Move the lever (up or down) just to the
point of resistance to use the turn signals
for as long as you need them, for example
when changing lanes.
.. Briefly move the lever up or down just to
the point of resistance and then release it to
flash the turn s ignals
three times in succes
sion .
This featu re allows to ind icate lane
changes clearly and w ith minimum effo rt
when driv ing on highways.
~D High beam
.. Push the lever forward @ to switch on the
h igh beam .
" Pull the lever back towards you to switch off
the high beam.
~D Headlight flasher
" Pull the lever toward the steering wheel@
to use the headlight flasher. ..,_
Page 57 of 280
-Automat ic dimming for the m irror only
operates p roperly if the lig ht striking the
i ns ide mirror is not hindered in any way.
Wiper and washer
system
{sf) Windshield wiper
The windshield wiper lever controls both the
windshield wipers and the washer system.
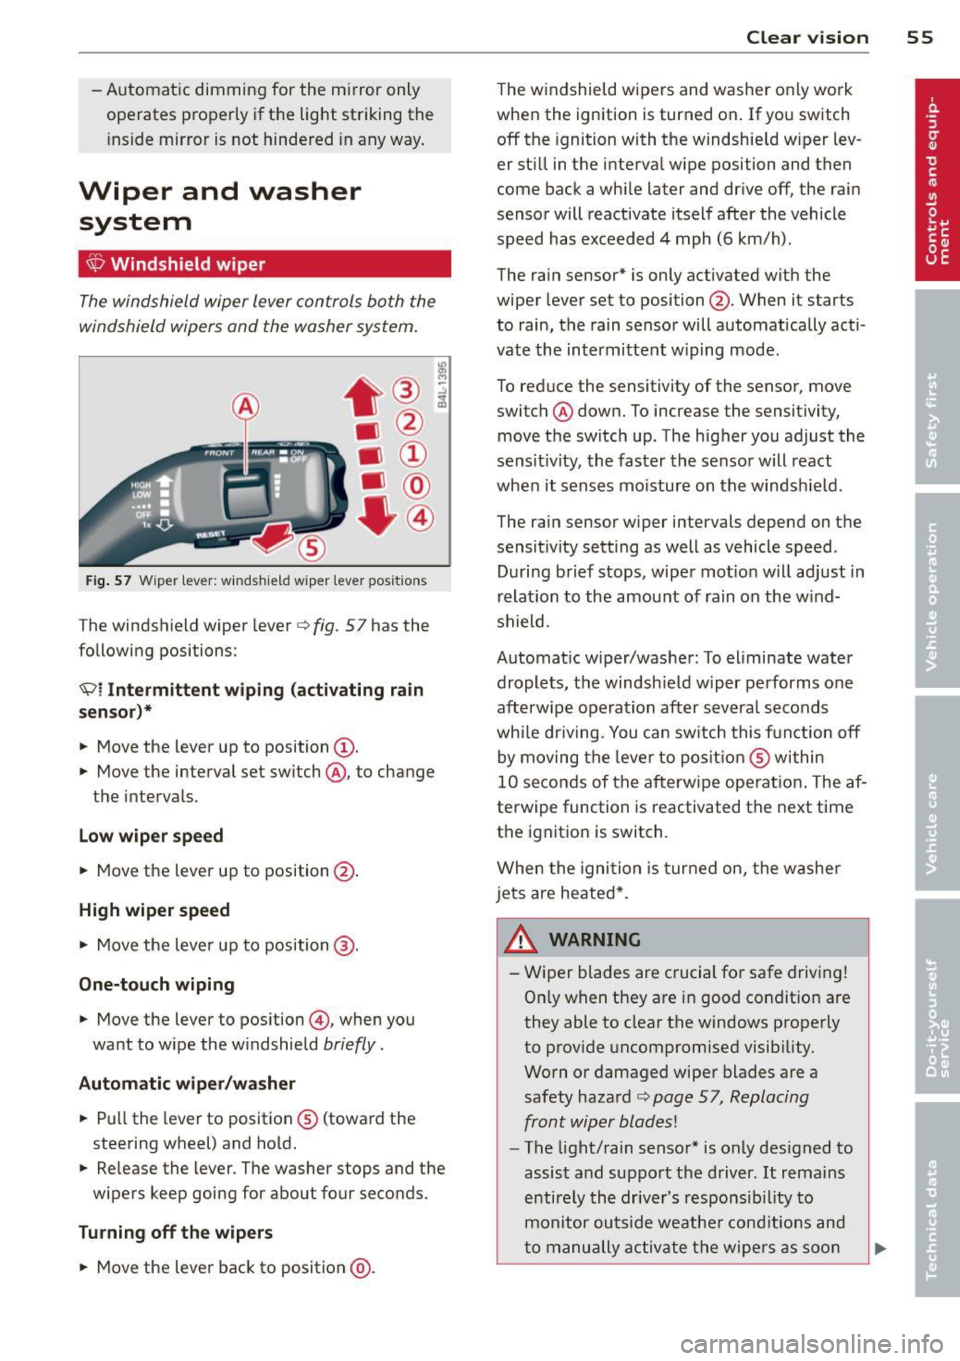
F ig . 57 Wiper lever: w inds hie ld w iper lever positions
The windshield wiper lever c> fig. 57 has the
following positions:
Ql Intermittent wiping (activating rain
senso r)*
.. Move the lever up to position@.
.. Move the interval set sw itch @, to change
t h e interva ls.
Low wiper speed
.. Move the lever up to position@.
High wiper speed
.,. Move the lever up to position @.
One-touch wiping
.. Move the lever to position @, when you
want to w ipe the w indshield
briefly .
Automatic wiper /w asher
.. Pu ll the lever to posit ion ® (toward the
steering wheel) and ho ld.
.. Re lease the lever . The washer stops and the
wipers keep going for about four seconds.
Turning off th e wiper s
.. Move the lever back to position @ .
Clear vi sion 55
The w indshield wipers and washe r only work
whe n the ignition is turned on . If you switch
off the ignition with the w indshie ld w iper lev
er st ill in the interva l wipe position and then
come back a whi le later and drive off, the rai n
senso r will reactivate itsel f after the vehicle
speed has exceeded 4 mph (6 km/h) .
The rain sensor* is only activated with the
wiper lever set to position @. When it starts
to rain, the rain sensor will automat ically acti
vate the intermittent w iping mode.
To reduce the sensitivity of the sensor, move
switch ® down. To increase the sensitivity,
move t he switch up. The h igher you adjust the
sens it ivity, the faster the senso r will react
when it senses mo isture on the windsh ield .
The rain sensor w iper intervals depend on the
sensit ivity sett ing as well as vehicle speed.
D uring brief s tops, wipe r mot io n will adjust in
r elat ion to the amou nt of rain on the w ind
shield .
Automat ic w iper/was her : To eliminate water
drople ts, t he windsh ield wiper pe rforms o ne
afterw ipe ope ra tion after severa l seconds
whi le dr iv ing . You ca n sw itch this f unct ion off
by moving the leve r to posit io n ® within
10 seconds of the afterw ipe operat io n. The af
terwipe function is reactivated the next time
the ignitio n is switch.
When the igni tio n i s tur ned on, the washe r
jets are heated*.
& WARNING ~
- Wiper blades are crucial for safe drivi ng!
On ly when they are in good condit io n are
they able to clear the windows properly
to prov ide uncompromised visib ility.
Worn o r damaged wiper blades are a
safety haza rd
c> page 57, Replacing
front wip er blades!
- The light/rain senso r* is only des igned to
assis t and suppo rt the driver.
It rema ins
e ntire ly th e drive r's respo nsib il ity to
m onitor outside weathe r cond itions and
t o manu ally a ctiv ate the wipe rs as soo n
Page 81 of 280

Warm and cold Climate controls
Description
The air conditioner is fully automatic and is
designed to maintain a comfortable and uni
form climate inside the vehicle .
We recommend the following settings:
... Se lect and set a temperature between 64 °F
(+ 22 °C) and 84 °F (+28 °C).
... Press the
!AU TO ! button.
With this setting, you attain maximum com
fort in the least amount of time. Change this
setting, as desired, to meet your personal
needs.
The climate controls are a combination of
heating, ventilation and cooling systems,
which automatically reduce humidity and cool the air inside your vehicle.
The air temperature, air flow and air distribu
tion are automatica lly regulated to achieve
and maintain the desired passenger compart
ment temperature as quickly as possib le.
The system automatically compensates for
changes in the outside temperature and for
the intensity of the sunlight entering the vehi
cle. We recommend you use the
Automatic
mode c> page 81 for year-round comfort.
Please note the following:
Turn on the air conditioner to reduce humidity
in the vehicle. This also p revent the windows
from fogging up .
When the outside temperature is high and the
air is very hum id,
condensation from the
evaporator may drip under the vehicle . This is
normal and does not indicate a leak.
If the outside temperature is low, the fan nor
mally only switches to a h igher speed once
the engine coolant has warmed up sufficient
ly.
Warm and cold 79
T he air conditioner temporari ly switches off
when you drive off from a standstill using full
throttle to save engine power.
T he compressor also switches off if the cool
ant temperature is too high so that the engine
can be adequately cooled under extreme
l oads.
Air pollutants filter
T he air pollutants filter (a combined particle
filter and activated charcoa l filter) reduces or
eliminates outside air pollution (dust, or pol
l en) from entering the vehicle .
T he air pollutants filter must be changed at
the interva ls specified in yo ur Warranty
&
Maintenance booklet, so that the air condi
tioner can properly work.
If you drive your vehicle in an area with high
air pollution, the filter may need to be
changed more frequently than specified in
your Audi Warranty
& Maintenance booklet. If
in doubt, ask your authorized Audi Service Ad
visor for advice.
Energy management
To prevent the battery from being discharged
and to restore the ba lance of energy, compo
nents which require large amounts of energy
are temporarily cut back or switched off c> page 167. Heating systems in particular re
quire a great deal of energy. If you notice, for
example, that the rear window heater is not
heating, then it has been temporarily cut back
o r switched off by
energy management.
These systems are available again as soon as
the energy balance has been restored.
_& WARNING
.-----
Reduced visibility is dangerous and can
cause accidents .
- For safe driving it is very important that
all windows be free of ice, snow and con-
densation.
- Fully familiarize yourself with the proper
use and function of the heating and ven
tilation system and especia lly how to de
fog and defrost the windows.
Page 85 of 280
The air recirculation opera tes for a maximum
of 12 minutes. If the windows start to fog up
while the air rec irculat ion is on, press~
Unde r certain operating condi tions (fo r exam
p le, if~ or
1-1 are pressed) the air recircu la
tion automatica lly switches off.
If the air con
d itioner is sw itched off, or if the temperature
is below 18 °F (-8 °C), the air recircu lation wi ll
operate only for 12 seconds.
Switching between Fahrenheit and
Centigrade
You can change the temperature display from
°F (Fahrenheit) to °C (Centigrade) and vice
versa.
.,. Hold the l.,s,! button down c:> page 80,
fig.
96.
.,. Turn the rotary switch (d river 's s ide) @ for
3 seconds +.
G;J Air recirculation
The air recirculation prevents exhaust fumes
or oth er pollution from entering the vehicle .
Switching air recirculation on
.,. Press ~ c:> page 80, fig. 96 c:> A
Switching air recirculat ion off
.,. Press~ again, or
.,. press
IAUTOI, or
.,. press~-
I n the ai r recircula tion mode, the air in the
passenger compa rtment is recirculated to
p revent exhaust fumes and ot her pollution
from entering the vehicle. We recommend
that you use the manual air recircu lation un
der the following conditions:
- when d riving through t unnels
- in a traffic jam.
,8. WARNING
Do not use this setting for extended pe ri
ods of time . The windows could fog up
since no fresh a ir can ente r the vehicle . If
Warm and c old 83
the windows fog u p, press the ai r rec ircula
tion button aga in immed iately to sw itch
off the air rec irculation function or select
defrost.
G IB Adjusting the fan speed
The automatically selected fan speed can be
increased or decreased.
.,. Press the[:] or El buttons in the center of
the control panel
c:> page 80, fig. 96 to ad
just the fan speed to your comfort.
T he air conditioning system automatically
r egulates the fa n speed i n respo nse to the in
terior tempe rat ure. However, you can a lso ad
j ust the fan speed ma nually. A line of small
bars in the center display above the fan con
trol buttons w ill re treat or extend to reflect
you r adjustments to the fan speed .
Air distribution
The automatically controlled air distribution
can be changed manually.
You can use the @J , [fil or~ buttons separate
ly or together in combination. To switch back
to the automatic air d istr ibu tion sett ing, ei
the r switch off the b uttons you prev iously se
lected , or press
IAUTOI.
Each of the three buttons has its own spec ific
funct io n (t he reference numbers refer to the
a ir out lets)
c:> page 84, fig. 97.
~ Air directed to the windows
A ll the air is directed to outlets
a ir remains the same .
~ Air directed to the driver /front
passenger
All the a ir is directed to outlets@,@ and ©
in the instrument panel. Air also is directed
th ro ugh the center console in the rear.
~ Air d irected to the footwells
A ll the air is directed to outlets ® and to the
outlets under the front seats.
Page 139 of 280
Other things that can affect Advanced
Airbag performance
Changing the vehicle's suspension system can
change the way that the Advanced Airbag Sys
tem performs in a crash. For example, us ing
tire-r im combinations not approved by Aud i,
lowering the vehicle, changing the stiffness of
the suspension, including the springs, suspen sion struts, shock absorbers etc. can change
the forces that are measured by the a irbag
se nsors and sent to the electron ic control
u ni t. Some suspens ion changes c an, for exam
p le, increase the force levels measured by the
sensors and make the airbag system deploy in
crashes in w hic h it would not dep loy if the
changes had not been made. Other k inds of
changes may reduce the force levels meas
ured by the sensors and prevent the airbag
from deploying when it shou ld .
The sensors in the safety belt buckle for the
driver and front passenger seat tell the elec
tronic control module if the safety belt is
l atched or not. If the safety belt is being used,
the front airbag will deploy at a slightly high
e r rate of vehicl e deceleration than if the safe
ty belt is not being used. Therefore, in a par
ticular co llision, it is poss ible th at an a irbag
will not deploy at a seating position where the
safety be lt is bei ng used but will inflate at the
position whe re the safety belt is not being
used. It is important that nothing interfere
with the safety belt buckles so t hat the sen
sors can send the correct information about
safety belt use to the electron ic cont rol unit.
A WARNING
Cha nging the vehicle's s uspension inclu d
ing use of u napproved t ire-rim comb ina
ti ons can change Advan ced A irb ag pe r
formance and incre ase the risk of ser io us
personal in jury in a crash.
- Never ins tall suspe nsion compone nts
t h at d o not h ave the same per forman ce
characteristics as the components origi
nally installed on you r vehicle .
- Never use t ire-r im combinat ions that
have not bee n approved by A udi.
A irba g sy stem 13 7
A WARNING
Items stored between the safety be lt
buckle and the center console can cause
the sensors in the b uckle to send the
wrong informa tion to the e lectronic con
trol module a nd prevent t he A dvan ced Air
bag System from wo rking properly.
- Always ma ke sure t ha t nothing can inter
fe re wi th the safety belt buckles and that
t hey are not obs truc te d .
Side airbags
Description of side airbags
The airbag system can provide supplemental
protection to properly restrained occupants.
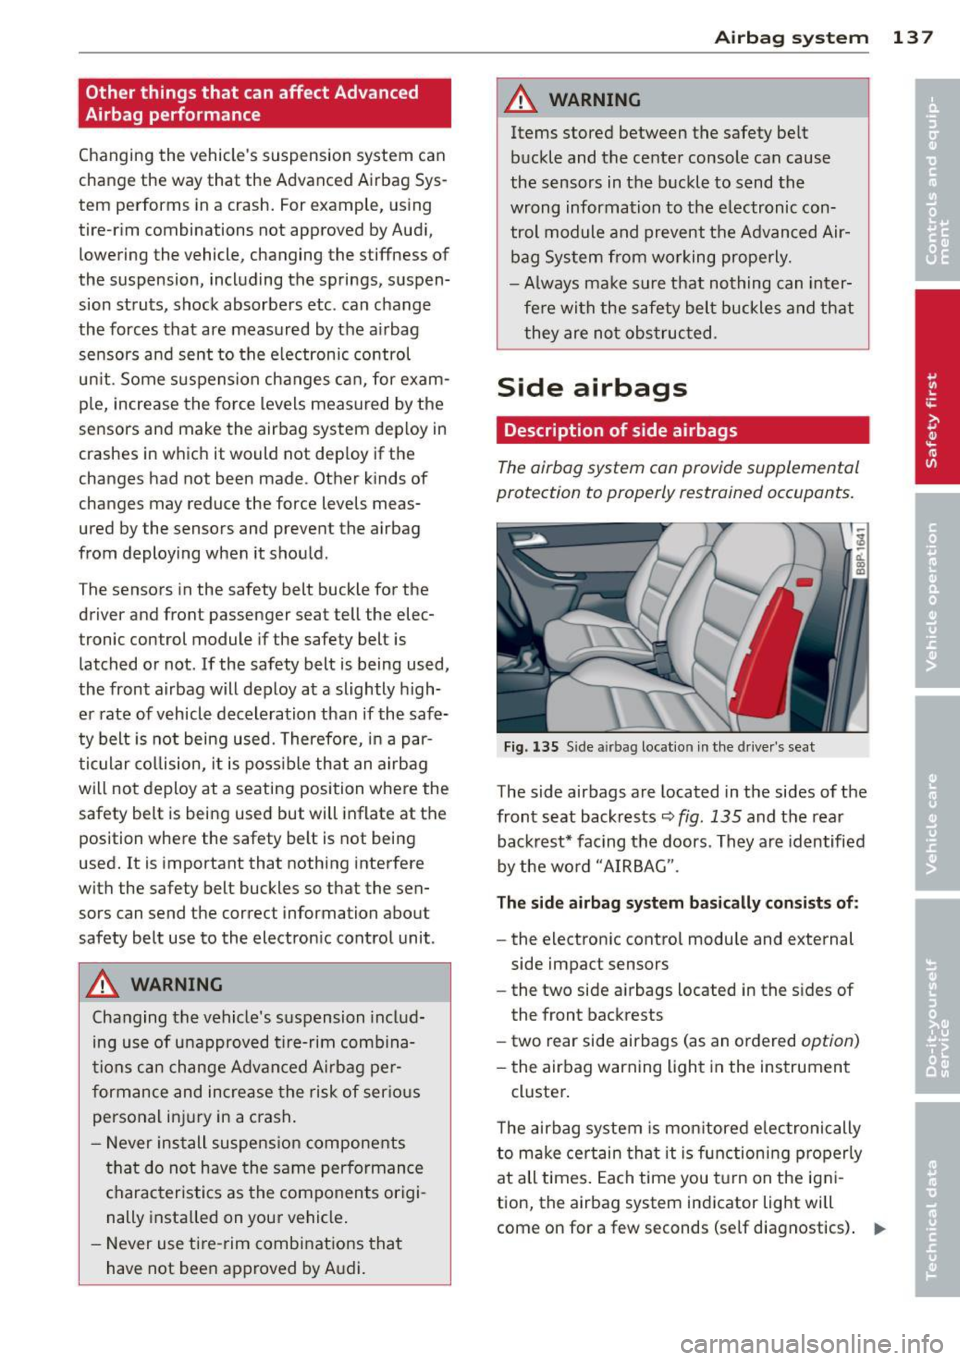
Fi g. 135 Side a irbag location in t he drive r's seat
The side airbags are located in the sides of the
front seat backrests~
fig. 135 and the rear
back rest* facing the doors . Th ey are id entified
by the wo rd "AIRBAG".
The side airbag sy stem basically consi st s of :
-the electron ic control modu le and external
side impact sensors
- the two side airbags located in the s ides of
the front backrests
- two rear side airbags (as an ordered
option)
- t he airbag warn ing light in the ins trument
cl uste r.
T he airbag system is mo nitored e lec tronically
t o m ake ce rtain tha t it is fu nction ing p ro perl y
at all times . Each time you turn on the ig ni
tion, the airbag system indicator light will
come on for a few seconds (self diagnostics) . ..,.