ECU AUDI S3 2015 Owners Manual
[x] Cancel search | Manufacturer: AUDI, Model Year: 2015, Model line: S3, Model: AUDI S3 2015Pages: 310, PDF Size: 76.15 MB
Page 41 of 310
....,
N
0 > co
rl I.O
"' ....,
"' rl
WARNING
----Read and following all WARNINGS. ¢ & in
Key set on page 35
@ Tips
If your vehicle is left standing for a long
period of time, note the following:
- The proximity sensor switches off after a
few days to save energy. You then have
to pull once on the door handle to unlock
the vehicle and a second time to open it.
- To prevent the battery from draining and
to retain the starting ability of yo ur vehi
cle as long as possible, the energy man
agement system gradua lly tuns off un
necessary convenience functions You
may not be able to unlock your vehicle
using the convenience key .
- For an explanation on conformity with
the FCC regulations in the United States
and the Industry Canada regulations, re
fer to ¢page
292 .
Unlocking/locking with the key
In the event that the power locking system
fails, the driver's door can locked and un
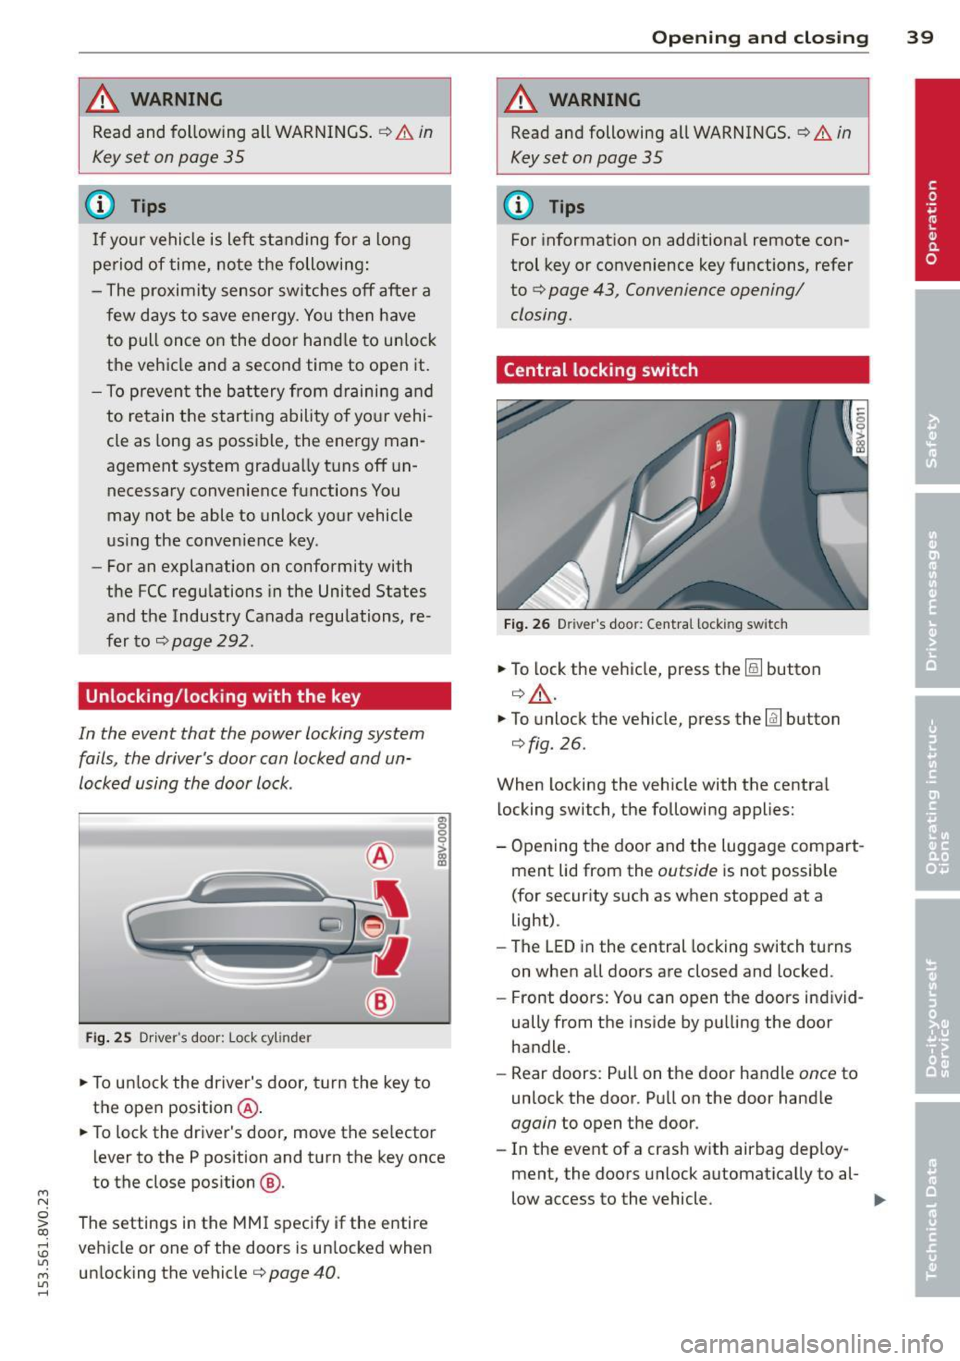
locked using the door lock .
Fig. 25 Driver 's door: Lock cy linder
.,. To unlock the driver's door, turn the key to
the ope n position @.
en 0 g
~
.,. To lock the driver's door, move the se lector
lever to the P position and turn the key once
to the close position
@ .
The settings in the MMI specify if the entire
vehicle or one of the doors is un locked when
unlocking the vehicle¢ page 40 .
Opening and closing 39
A WARNING
Read and following all WARNINGS. ¢ & in
Key set on page 35
(D Tips
For information on additional remote con
trol key or convenience key functions, refer
to
¢ page 43, Convenience opening/
closing.
Central locking switch
Fig. 26 Drive r's doo r: Centra l locki ng sw itch
.,. To lock the vehicle, press the@! button
¢.&, .
.,. To unlo ck the vehicle, press the @J button
¢fig.
26.
When locking the vehicle with the central locking switch, the following applies:
- Opening the door and the Luggage compart
ment lid from the outside is not possible
(for security such as when stopped at a
light).
- The
LED in the central locking switch turns
on when all doors are closed and locked .
- Front doors: You can open the doors ind iv id
ually from the inside by pulling the door
handle.
- Rear doors: Pull on the door handle once to
unlock the door. Pull on the door hand le
again to open the door .
- In the event of a crash w ith airbag deploy·
ment, the doors unlock automatically to al-
low access to the vehicle. ..,.
Page 64 of 310
62 Seats and storage
The glove compartment can be locked using
the vehicle key.
.&_ WARNING
Always leave the lid on the glove compart ment cover closed while driving to reduce
the risk of injury.
Additional storage compartments
There are additional storage compartments,
compartments and holders at other locations
in the vehicle :
- In the upper part of the glove compart
ment .
- In the center console under the center arm
rest* .
- On the back of the right front seat. The com
partment* can hold a maximum weight of
2 lbs (1 kg).
- Garment hooks on the 8-pillar
c:> &, .
.&_ WARNING
-Do not place any objects on the instru
ment panel. Objects that are not stored
securely can slide around in the vehicle
while driving, when accelerating or brak ing or when turning.
- Make sure that objects cannot fall out of
the center console storage compartment
or other compartments and into the
footwell while driving. These objects
could prevent you from braking or accel
erating during sudden braking maneu
vers.
- Garments hung on the hooks must not obstruct the driver's view. The garment
hooks are only designed for light objects.
Do not hang any garments with hard,
sharp or heavy objects in the pockets on
the garment hooks. These objects could
injure vehicle occupants during sudden
braking or in a collision - especially if the
airbags deploy.
-Always keep the glove compartment
closed while driving to reduce the risk of
injury during a collision or heavy braking. -
Read and following the WARNINGS in
c:> page 165, Important safety instruc
tions on the side airbag system .
- Hang garments so that they do not ob
struct the driver's view.
- The garment hooks should only be used
for light articles of clothing. Do not leave
any heavy or sharp-edged objects in the
pockets that could interfere with the side
airbags unfolding and cause injuries in
the event of a collision.
- Do not use coat hangers to hang gar ments, because this could reduce the ef
fectiveness of the side curtain airbags .
- Do not hang any heavy objects on the garment hooks, because they could
cause injury during heavy braking.
- Because of their load capacity, the hooks
should only be used to secure objects
that weigh a maximum of 10 lb (5 kg).
Heavy objects will not be secured suffi
ciently, and this increases the risk of in
jury.
Roof rack
Description and mounting locations
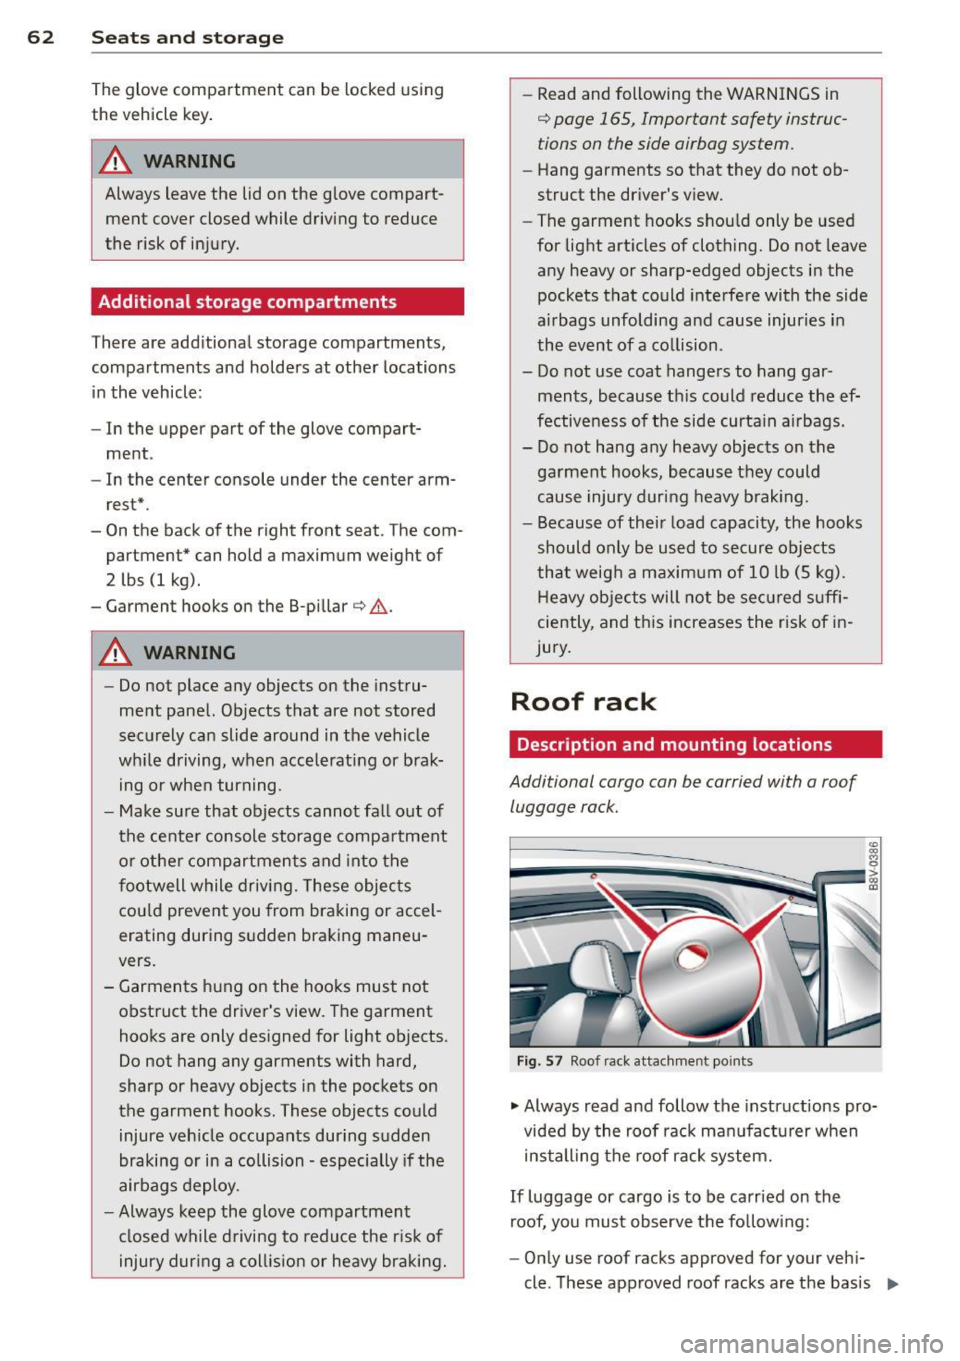
Additional cargo can be carried with a roof
luggage rack.
Fig. 57 Roof rack attachment po ints
• Always read and follow the instructions pro
vided by the roof rack manufacturer when
installing the roof rack system.
If luggage or cargo is to be carried on the
roof, you must observe the following:
- Only use roof racks approved for your vehi-
cle. These approved roof racks are the basis ..,
Page 65 of 310
M N
0 > co ,...., \!) 1.1'1
M 1.1'1 ,....,
for a complete roof rack system. Additiona l
attachments or carrier systems are needed
to transport luggage and sports equipment.
We recommend using roof racks from the
Audi original accessories program.
- When installing the roof rack, make sure it
is only mounted on the designated locations
on the roof¢
fig. 57.
-We recommend that you keep the installa
tion instructions for your roof rack system
together with your Owner's literature in the
vehicle .
When should the roof rack be remo ved ?
-Before going through an automatic car wash
(it is best to ask the car wash operator for
advice).
- When not in use, to reduce fuel consump
t ion, w ind no ise and to guard against theft .
A WARNING
-Use of an unapproved roof rack or incor
rect mount ing of an approved roof rack
can cause the roof rack or the items at
tached to it to fa ll off the roof onto the
road.
- Objects fall ing from the roof of a veh icle
can cause a c rash and persona l injury.
- Only mount the roof rack on the desig
nated locations on the roof¢
fig. 57.
-The roof rack system must be installed
exactly according to the instructions pro
vided.
- When driving w ith a roof rack system,
changes to the center of g ravity and wind
resistance can change the veh icle han
dling and lead to a collision. A lways
adapt your driving and your speed to the
c u rrent conditions.
(D Note
- Your veh icle warranty does not cover any
damages to the veh icle caused by using
r oof racks or mo unting structures not
approved by Audi for your vehicle. The
same applies to damage resulting from i ncorrect roof rack installation.
S eat s an d sto rage 63
- Always check the roof rack mountings
and hardware before each trip and dur
ing a trip to make s ure everyth ing is se
curely tightened. If necessary, ret ighten
the mountings and check the entire sys
tem from time to time.
- After mount ing a roof rack system, or
when you transport objects on the roof
of your vehicle, the height of the veh icle
is naturally increased . Be careful when
dr iving unde r low bridges or in parki ng
garages for example. This cou ld cause
damage to the load and even the vehicle
itself .
- Make sure the open rear lid and the sun
roo f* do not come in to contact with the
roo f rac k.
Loading the roof rack
Always distribute loads evenly. Make sure
anything on the roof rack is securely tied
down .
.,. Always dis tribute the loads on the roof rack
even ly .
.,. Always attach items to the roof rack securely
before you drive off .
T he maxim um permissible roof we ight is
1 6 5 lb (75 kg ). The roof weight is the total of
the weight of the roof rack, the attachments
and the cargo you are carrying. You must a lso
not exceed the maximum load weight for the
roof rack you are using.
When using a roof rack system which has a
lower load carrying capacity, you must not use
up the tota l maximum permissible load carry
ing capacity specified above. Instead, you
should load the roof rack system only to the
max imum capacity specified by the manufac
ture r of the roof rack system .
A WARNING
Weak, damaged or imprope r straps used
to secure items to the roof rack can fail
during ha rd braking o r in a coll is ion and
cause ser ious persona l injury .
.
•
Page 66 of 310
64 Seats and storage
-Make sure the roof rack is installed exact
ly as specified above
r::;, page 62.
- Always use suitable mounting straps for
securing items to the roof rack to help
prevent items from shifting or flying for
ward.
- Items on the roof rack must always be
securely mounted.
- The use of a roof rack can negatively af
fect the way a vehicle handles. Cargo
that is large, heavy, bulky, long or flat
will have a greater negative influence on
the vehicle's aerodynamics, center of gravity and overall handling. Always
drive slowly, avoid sudden braking and
maneuvers when transporting cargo on
the roof of your vehicle.
- Never exceed the maximum permissible
load carrying capacity of the roof of your
vehicle, the permissible axle weights and
the permissible total weight of your veh i
cle
r::;, page 286, Weights.
@ For the sake of the environment
As a result of the increased wind resist
ance created by a roof rack, your vehicle is
using fuel unnecessarily. So remove the
roof rack after using it .
Luggage compartment
Loading luggage compartment
Luggage items must be stowed securely .
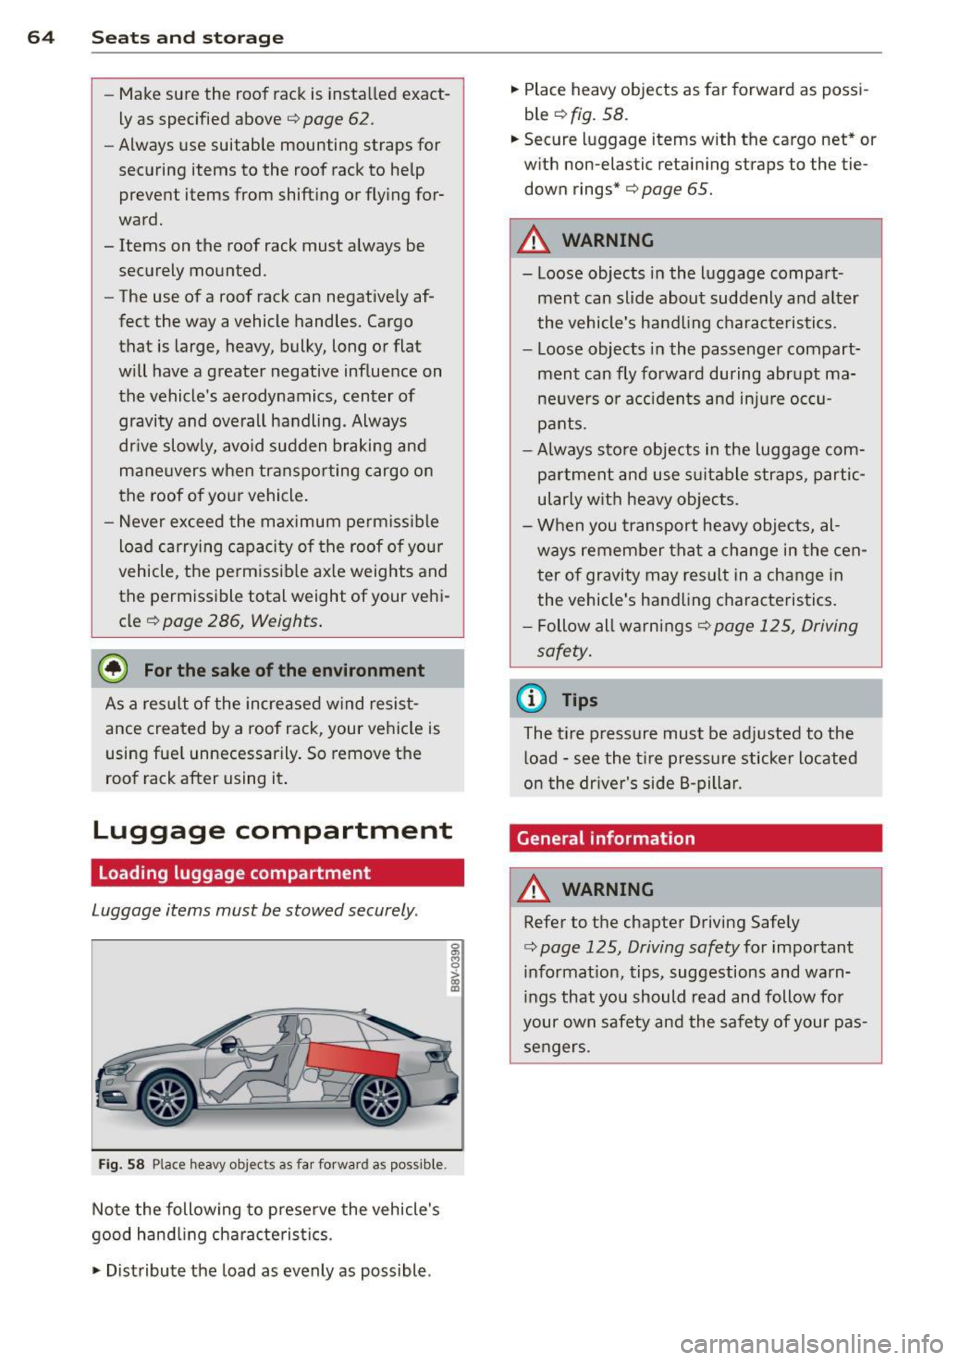
Fig. 58 Place heavy objects as far forward as possible.
Note the following to preserve the vehicle's
good handling characteristics .
.,. Distribute the load as evenly as possible .
0
s
> "' m
.,. Place heavy objects as far forward as possi
ble
r::;, fig. 58.
.,. Secure luggage items with the cargo net* or
with non-elastic retaining straps to the tie
down rings*
r::;, page 65.
A WARNING
- Loose objects in the luggage compart
ment can slide about suddenly and alter
the vehicle's handling characteristics.
- Loose objects in the passenger compart
ment can fly forward during abrupt ma
neuvers or accidents and injure occu
pants.
- Always store objects in the luggage com
partment and use suitable straps, partic
ularly w ith heavy objects.
- When you transport heavy objects, al
ways remember that a change in the cen
ter of gravity may result in a change in
the vehicle's handling characteristics.
- Follow all warnings
¢page 125, Driving
safety.
'
(D Tips
The tire pressure must be adjusted to the
load -see the tire pressure sticker located
on the driver's side B-pillar.
General information
A WARNING ,-
Refer to the chapter Driving Safely
r::;, page 125, Driving safety for important
information , tips, suggestions and warn
ings that you should read and follow for
your own safety and the safety of your pas
sengers .
Page 67 of 310
....,
N
0 > co
rl I.O
"' ....,
"' rl
Increasing the size of the luggage
compartment
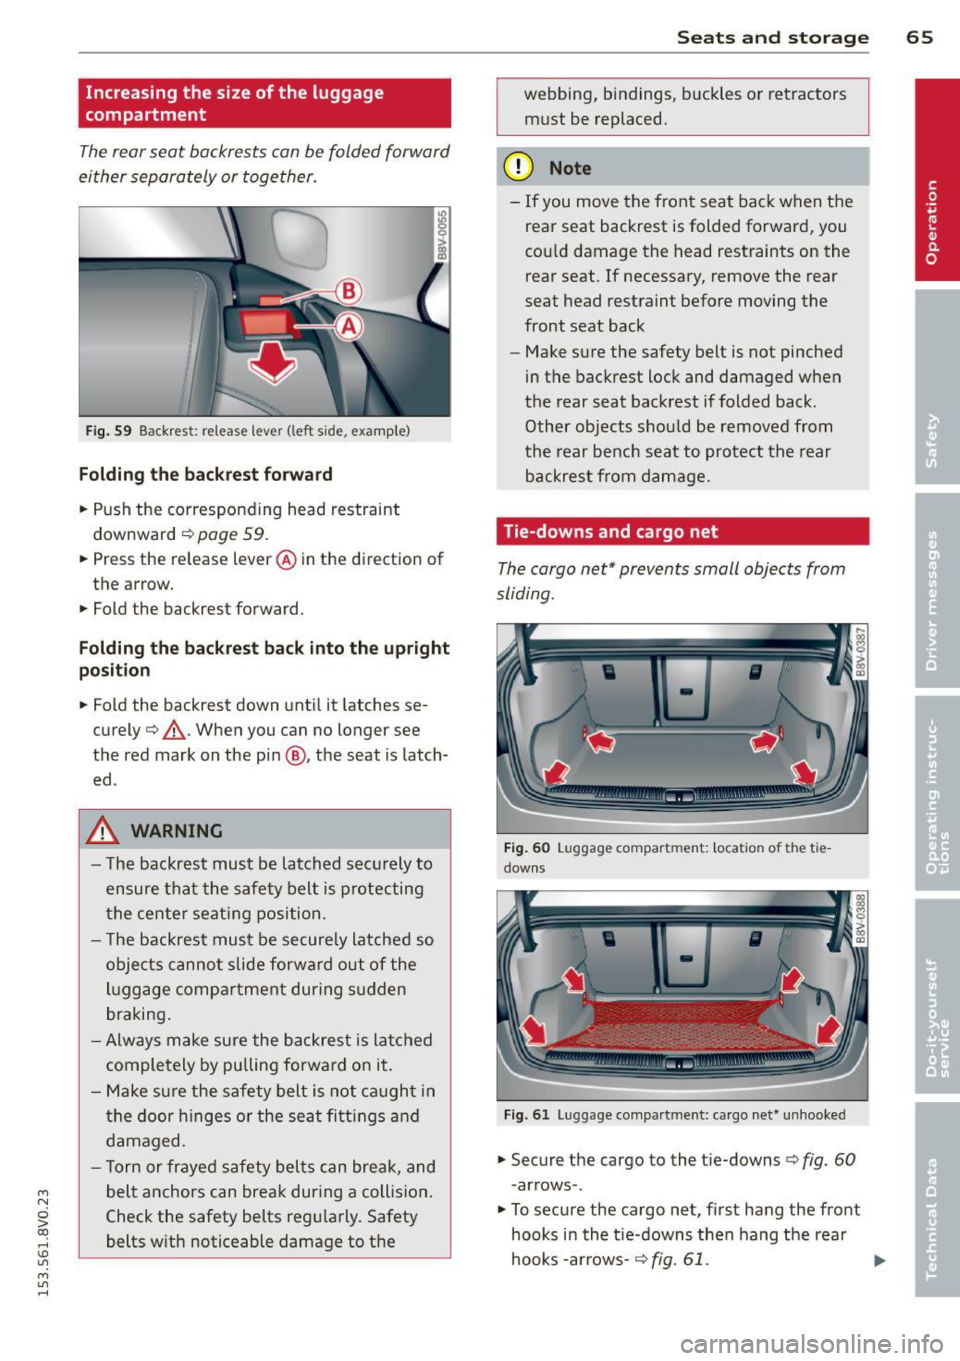
The rear seat backrests can be folded forward
either separately or together .
I
Fig. 59 Backres t: release leve r (left s ide, examp le )
F o lding th e back res t fo rward
.. Push the corresponding head restraint
downward ¢
page 59 .
.. Press the release lever @ in the direction of
the arrow.
.. Fold the backrest forward .
Folding the back res t back into th e up right
po sit ion
.. Fold the backrest down until it latches se
curely¢ ,&.. When you can no longer see
the red mark on the pin @, the seat is latch
ed .
A WARNING
-The backrest must be latched securely to
ensure that the safety belt is protecting
the center seating position.
- T he backrest must be secure ly latched so
objects canno t slide forwa rd out of the
luggage compa rtment during s udden
braking .
- Always make sure the backrest is latched
completely
by pulling forward on it.
- Make sure the safety belt is not caught in
the door h inges o r the seat fitti ngs and
damaged.
- T orn or frayed safety belts can break, and
belt anchors can break during a collision .
Check the safety belts regularly. Safety
belts with noticeable damage to the
S ea ts a nd s to rage 65
webbing, bindings, b uckles or retractors
must be replaced.
(D Note
- If you move the front seat back when the
rear seat backrest is folded forward, you
cou ld damage the head restraints on the
rear seat. If necessary, remove the rear
seat head restraint before moving the
front seat back
- Make sure the safety belt is not pinched
in the backrest lock and damaged when
the rear seat backrest if folded back.
Other objects should be removed from
the rear bench seat to protect the rear
backrest from damage .
Tie-downs and cargo net
The cargo net* prevents small objects from
sliding .
F ig . 60 Lu gg age compar tment: locat io n of th e tie
downs
F ig . 61 Lu ggage compart ment: ca rgo net * un hooke d
.. Secure the cargo to the tie-downs c> fig. 60
- arrows -.
.. To secure the cargo net , first hang the front
hooks in the t ie-downs then hang the rear
hooks -arrows -¢
fig. 61. ...,
Page 68 of 310
66 Seats and st o rage
• Observe the safety notes q page 132 , Tie-
downs.
Due to the laws of phys ics , even small objects
that are loose in the vehicle can become heavy
p rojectiles and cause serious inj uries during a
collision . Objects in the vehicle inc rease in ki
neti c energy, wh ich varies depend ing on the
vehicle and the we ight of the objec t. The vehi
cle speed is the most important factor in t his.
F or example: In a fronta l impact at a speed of
30 mph (48 km/h). the weight of a 10 lb
(5 kg) object increa ses to approxima tely
20 times its normal weight due to the forces
acting upon it . This means the we ight of the
object is suddenly equ ivalent to approximate
ly 200 lb (90 kg) . It is easy to imagine the
type of injuries a n objec t of that weight could
cause if it slides thro ugh the passenger com
pa rtment unrestrained during a collision at a
re lative ly low speed.
A WARNING
Weak, damaged or faulty straps used to
secure objects to the tie-downs can fa il
during heavy braking or a collision and
lead to serious injuries .
- Always use suitable straps and secure
objects to the t ie-downs in the luggage
compartment to prevent objects from
shifting and slid ing fo rward.
- Never secure a ch ild seat restraint to a
t ie-down .
- Because of their load capacity, the hooks
should only be used to secu re objects
that weigh a max imum of 10 lb (5 kg) .
Heavy objec ts will not be secured suffi
c iently, a nd this increases the risk of in
jury.
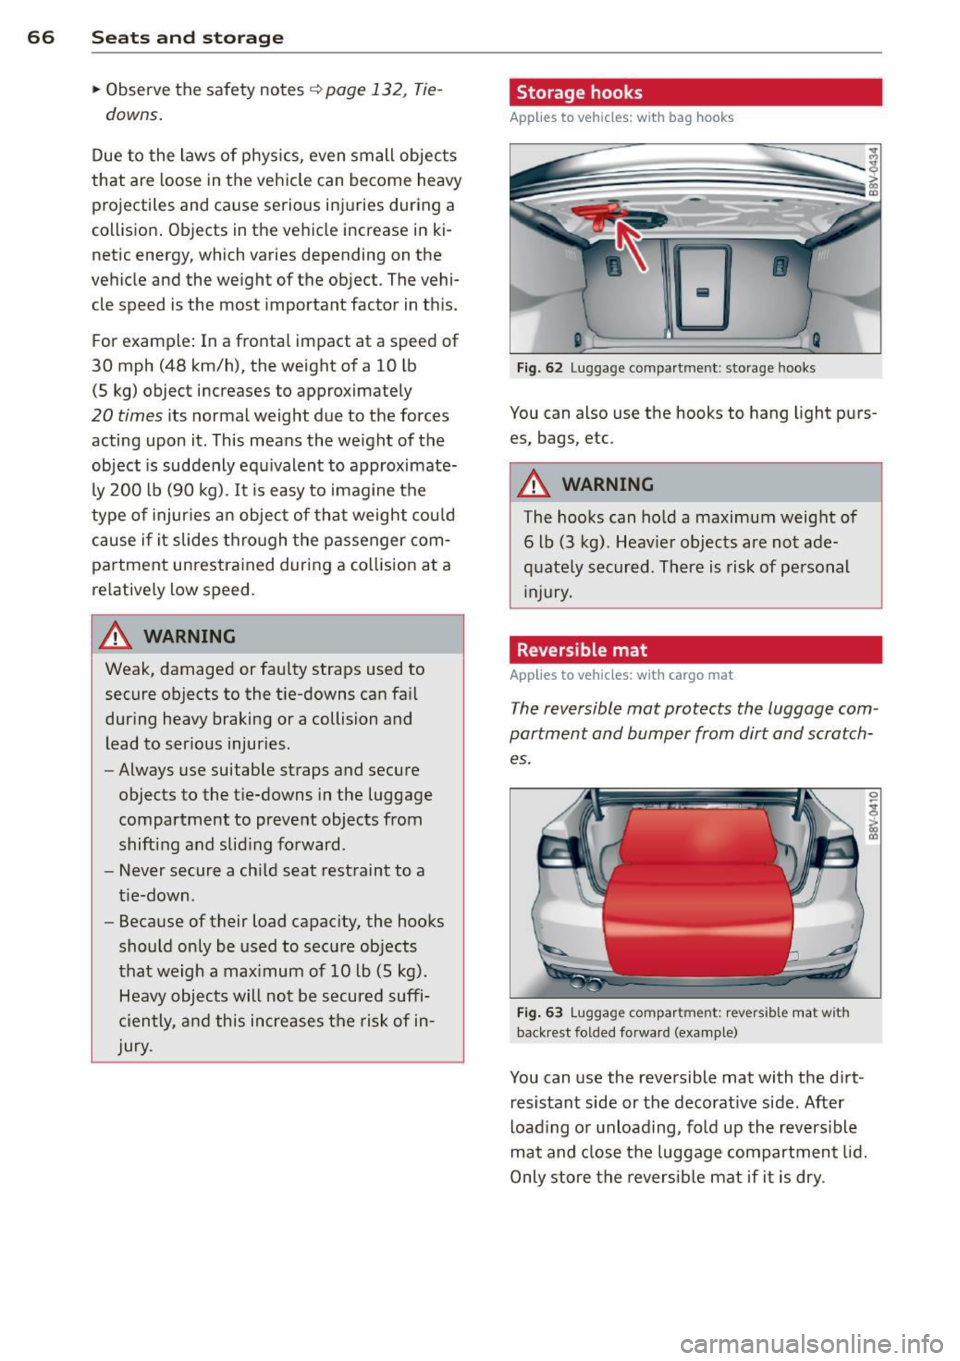
Storage hooks
Applies to vehicles: with bag hooks
F ig. 62 Lugg age compart men t: s torage hooks
You can also use the hooks to hang light purs
es, bags , etc .
A WARNING
-The hooks can ho ld a maximum weight of
6 lb (3 kg). Heav ier objects are not ade
q uate ly secured . Th ere is risk of personal
Injury.
. Reversible mat
Applies to vehicles: with cargo mat
The reversible mat protects the luggage com
partment and bumper from dirt and scratch
es.
F ig . 63 Lu gg age compar tment: re vers ible mat w it h
back re st fo lded fo rwa rd (example)
You can u se the reversible mat with the d irt
resistant side or the decorat ive side. After
load ing or unload ing, fold up the revers ible
mat and close the luggage compartment lid.
Only store the reversib le mat if it is dry .
Page 83 of 310
M N
0 > co ,...., \!) ..,.,
M ..,., ,....,
driving force has been built up at the
whee ls.
E mergenc y brake fun ction
An emergency braking funct ions ensures that
the vehicle can be slowed down even if the
normal brakes fail¢ page 82, Emergency
braking function .
A WARNING
-Do not press the accelerator pedal inad
vertent ly when the vehicle is stationary
and the engine is runn ing and a gear is
selected. Otherwise the vehicle will start
to move immediately and could result in a crash .
- If the power supply fa ils, the re leased
park ing brake can no longer engage. In
this case, par k the vehicle on level
ground and secure it by placing the se
lector lever i n the P pos ition. See an au
thori zed Aud i dea ler or a utho rized Aud i
Serv ice Facility for ass istance.
(D Note
I f the . or. (U SA mode ls) /. (Cana
da mode ls) indicato r light in t he instru
ment cluster blinks, there is a mal fun ct ion
in the brake system . Re fer to the detailed
description of the indicator lights
r=:>page 18.
-If the . (USA models) /. (Cana-
da models) or
Iii indicator light turns
on, there is a malfunct ion in the park ing
brake
r=:> page 19.
(D Tips
- If the electromechanical parking brake is
set wh ile the ignition is switched off, the
¢C)'A indicator light in the button and in
the instrument cluster dis- play . (USA models)
I. (Cana-
da models) w ill t urn off afte r a ce rtain
amount of time.
- If dr iver's door is opened while the ign i
tion is switched on, the parking b rake
sets automat ically. This prevents unin
tended ro lling of the vehicle .
Dri vin g 81
-Occasional noises when the pa rking
brake is set and released are normal and
are not a cause for concern.
- When the vehicle is pa rked, the park ing
brake goes through a self -test cycle at
regu lar interva ls. Any no ises assoc iated
w ith this are normal.
- If there is a power fa ilure, the park ing
brake will not set if it is released, and it
w ill not release if it is set
r=;, & . See a n
authorized Audi dealer or autho rized
Audi Service Facility fo r ass ista nce.
Parking
" Press the b rake pedal to stop the veh icle.
" Pull the switch @¢
page 80, fig. 73 to set
t he par king brake.
" Place the se lecto r lever in the P position .
.. Turn the engine off¢
A_.
"Tu rn the steering wheel when parking on in
clines so that the wheels w ill roll into the
curb if the vehicle starts moving.
A WARNING
- Always take the vehicle key w ith you
when leav ing the vehicle, even for a
short pe riod of time. This applies part ic
ularly when children rema in in the veh i
cle . Ot herwise children co uld s tart the
engine, release the pa rking brake o r op
erate electrical equipment such as power
windows, which increases the risk of an
accident.
- No one should remain in the vehicle
when it is locked, especially children.
Loc ked doors make it more difficult for
emergency workers to get into the ve hi
cle, which puts lives at risk.
•
Page 98 of 310
96 Audi pre sen se
it is necessary. A lways follow traffic laws
regarding mainta ining a safe distance
between your vehicle and vehicles ahead.
- pre sense front works within certain lim
its and cannot react to situations that
are outside of the system lim its, such as
when approaching a stationary vehicle or
a stationary obstacle (the end of a traffic
jam or a vehicle that has broken down).
-Always keep i n m ind that the radar sen
sor fo r pre sense front only works within
defined detection zones, which mea ns
other vehicles may not always be dete ct
ed correct ly.
- T he function and range of the radar sen
sor can be impaired by rain, snow and
heavy mist. Veh icles ahead may not be
detected right away, or not detected at
all.
- Reflective surfaces such as g uard rails or
entrances to t unnels may impair the
function of the radar sensor .
{[) Note
The senso r can be disp laced by impacts or
damage to the bumper, whee l housing and
underbody . The pre sense front sensor can
be damaged by this . Have your authorized
Aud i dea ler or authorized service facility
check the ir function.
(D Tips
- You can cance l the braking w ith increas
ing force that is initiated by the system
by braking yourself, by accelerating no
ticeab ly or by swerving.
- For information on dr iver messages
about pre sense, refer to¢ page 96.
- Keep in mind that pre sense can brake unexpectedly. Always secure any cargo or
objects that you are transporting to re
duce the r isk of damage or injury .
- Certain pre sense front funct ions sw itch
off when ESC is sw itched off (sport
mode) or when drivi ng in reve rse .
- The pre sense front funct ions are not
available if there is a malfunction in the adaptive cru
ise cont ro l* system
¢ page
92 or ¢ page 96.
- Keep in mind that pre sense front can
brake abruptly. Always sec ure cargo or
objects that you transport to red uce the
r isk of damage or injury.
Settings in the Infotainment system
Applies to vehicles: with Aud i pre sense front or Aud i
adaptive crui se con trol
.,. Select in the MM I: I MENU I button > Car >
Systems * control button > Drive r assi st a nce
> Audi pre sense .
Switching the system on and off
Audi pre sense (Sys tem): If the system is
switched off, it switches on again automati
ca lly once the ignition is switched on aga in.
S ys te m -Swit ch A udi pre sense o n-off . With
th is, yo u can switch the p rewarning and the
braking intervention from Audi pre sense on
or off.
Prewarning -The distance and app roach
warnings can be switched
o n/off .
(D Tips
-If you restrict or sw itch off the ESC, the
pre sense also sw itches i tself off
¢page
190.
- Switch the p re sense off when you a re
loading the vehicle onto a veh icle carrier,
t rain, ship o r othe r type of transporta
tion . This can prevent undesired warn
ings from the pre sense system .
Driver messages
Applies to vehicles: wit h Aud i pre sense or Aud i adapt ive
cruise control
Aud i pr e se nse curr ently un availabl e. No sen
so r vi sion
This message appears if the sensor v iew is ob
structed, for examp le by leaves, snow , heavy
spray or d irt. Clean the sensor¢ page
86,
fig. 75.
Audi pre sense: off
Page 117 of 310
M N
ci > co ,...., \!) ..,.,
M ..,., ,....,
Launch Control-Program
App lies to vehicles: with launch control
The Launch Control Program enables maxi
mum acceleration.
Requirement : The engine must be at operat
ing temperature and the steering wheel must
not be turned .
.. With the engine running, press the
!.$OFFI
button briefly one time 1) .
.. Pull the selector lever back out of the 0/S
position briefly to select the S position, or
press it toward the right into the t ipt ronic
pos ition or select the
d ynamic driv ing mode
i n drive select*
~ page 106.
.. Press the brake peda l firmly with your left
foot and hold it all the way down for at least
1 second.
.. At the same time, press the gas peda l all the
way down with your right foot unti l the en
gine reaches and stays at a high RPM level.
.. Remove your left foot from the brake.
A WARNING
- Always adapt your driving to the traffic
flow.
- Only use Launch Control when road and
t raff ic conditions a llow it and other driv
ers wi ll not be endangered or impacted
by yo ur driving and the veh icle's acceler
a tion.
- Please note tha t the dr ive whee ls can
spin and the vehicle can brea k away
when sport mode is switched on, espe
c ially when the road is sl ippery.
- Once the vehicle has started moving,
press the
I.$ OFF I button br iefly to turn
the sport mode off.
(j) Tips
- The transm ission tempe rat ure may in
crease significantly after using the
l ) In vehicles with a dr iver info rmat ion system, an ESC
light in the in stru m ent cl us ter stays on contin uo usly
and the m essage
Stabilizatio n cont rol (ESC): spor t.
W arning! Restricted stability
appears temporarily.
Automa tic tran sm iss ion 115
Launch Control Program . If that hap
pens, the program may not be availab le
for a few m inutes. It will be ava ilable
again after a cool-down per iod.
- When accelerating using the Launch
Contro l Program, all vehicle parts are
subject to heavy loads. Th is can lead to
increased wear .
Emergency mode
Applies to vehicles: with S tronic transm ission
In the event of a system malfunction, there is
an emergency program.
If all of the selector lever positions are high
li ghted with a light backgro und in the instru
ment cluster d isplay, there is a system mal
funct ion and the S tronic transmission is run
ning in the emergency program . The vehicle
can still be driven in emergency mode, but on
ly w ith reduced speed and not in all gears. In
some cases, the veh icle
c ann ot driv e in re
v e rs e .
(D Note
If the transmission runs in emergency
mode, drive to your author ized Audi dealer
or q ua lified repa ir facil ity immed iate ly to
have the ma lf u nction corrected.
Transmission malfunction
• Tran smiss ion malfuncti on! Please stop
the vehicle and select P
T here is a malfunction in the transmiss ion .
Park the vehicle securely and do not continue
driv ing. See an authorized Audi dealer or au
thorized Audi Service Facility for assistance.
• Tran smi ssion overh eatin g! Plea se stop
the vehicle!
The transm iss io n is too hot and can become
damaged . Stop and let the transmission cool .,.
•
Page 118 of 310
116 Automatic transmission
with the eng ine runn ing (a t id le) in the P se
lector lever position . Then the indicator light
and the message turn off, drive to an author
ized A udi dealer or qualified repair facility im
mediately to have the malfunct ion corrected.
If the indicator lig ht and the dr ive r message
do not tur n off, do not cont inue dr iv ing. See
a n author ized Audi d eal er or author ized A udi
S ervi ce Fa cili ty for a ssis tance.
Di] Transmiss ion malfunction: you can con
tinue driving
Drive to an autho rized Aud i dea le r or a uthor
ized A udi Service Facility immed iate ly to have
the ma lf u nction corrected .
Di] Transmission malfunction: no reverse
gear (you can continue driving)
D rive to an authorized Aud i dea le r or a uthor
ized A udi Service Facility immediate ly to have
the ma lf u nct ion co rrected .
Di] Transmi ssion malfunction: You can con
tinue dri ving in D until engine off
Drive the ve hicle away from mov ing traff ic and
p ar k. See an au thori zed A udi d ealer or author
iz ed A udi Service F acility for assis tance .
Di] Transmi ssion overheating! Please adapt
driving style
Continue driving moderate ly. When t he in di
cato r ligh t turns off, you can continue dr iving
normally .
Di] Transmission : Please press brake pedal
and select gear again
If t h e tra nsmission mal functions beca use the
temperature is too h igh , a message appears
when t he transmission is coo led.
Selector lever emergency release
Applies to vehicles: with S tronic transmission
If the vehicle 's power supply fails, the selec
tor lever can b e released in an emergency.
Fig. 101 Se lector leve r: remov ing t he cover
Fig. 10 2 Selector leve r: Us ing the emergency re lease
to move out of t he Park pos itio n
The emergency release mechanism is located
in the right a rea under the selector lever sh ift
gate. Using the eme rgency release ca n be
complicated. We recommend contacting an
au tho rize d Audi d eale r o r a uth o rized Aud i
Se rv ice Facility for assistance, if necessary.
The sc rewd river from t he ve hicle too l kit locat
ed in the luggage compartmen t is needed to
fo r the emergency release ¢ page
268 . Use
the f lat s ide of the reve rsible screwdriver
blade .
Removing the selector lever cover
"'Set the park ing brake «el)¢&. to secure
your veh icle from rolling .
"' Insert the flat side o f the scr ewdr ive r side
ways in the s lot near the s hift cove r and pry
t he shi ft cove r up <=> fig.
101 .
.,. Pull up the co rner s of the shift c over car eful
ly wi th yo ur hands and fold it over the s hift-
er knob ¢fig.
10 2. ..,.