clock AUDI S3 2015 Owners Manual
[x] Cancel search | Manufacturer: AUDI, Model Year: 2015, Model line: S3, Model: AUDI S3 2015Pages: 310, PDF Size: 76.15 MB
Page 76 of 310
74 Driving
Driving
Steering
Adjusting the steering wheel position
The steering wheel position is fully adjustable
up and down and forward and bock .
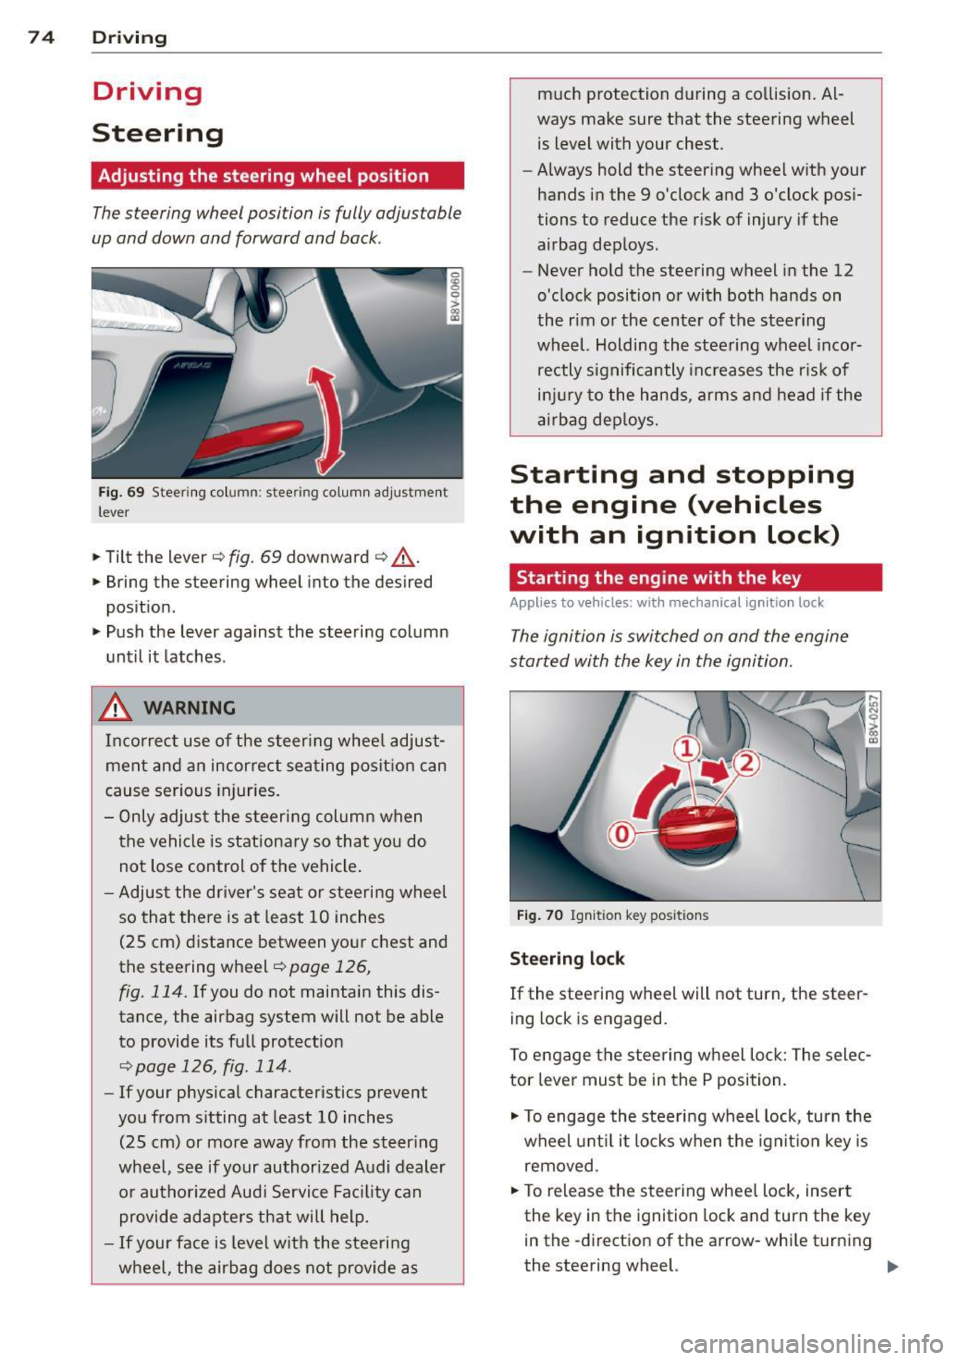
Fig. 69 Steering column: stee ring column adjustmen t
lever
.. Tilt the lever ¢ fig. 69 downward ¢ &_.
.. Bring the steering wheel into the desired
position .
.. Push the lever against the steering column
until it latches .
_& WARNING
Incorrect use of the steer ing whee l adjust
ment and an incorrect seating position can
cause serious injuries.
- Only adjust the steering column when
the vehicle is stationary so that you do
not Lose control of the vehicle .
- Adjust the driver's seat or steering wheel
so that there is at least 10 inches
(25 cm) distance between your chest and
the steering wheel~
page 126,
fig. 114.
If you do not maintain this dis
tance, the airbag system will not be able
to provide its full protect ion
<=> page 126, fig. 114.
- If your phys ical characteristics prevent
you from sitting at least 10 inches
(25 cm) or more away from the steer ing
wheel, see if your authorized Audi dealer or authorized Audi Service Fac ility can
provide adapters that will help.
- If your face is level with the steering
wheel, the airbag does not provide as much protection during a co
llision. Al
ways make sure that the steering wheel is level with your chest .
- Always hold the steering wheel with your
hands in the 9 o'clock and 3 o'clock pos i
tions to reduce the risk of injury if the
airbag deploys.
- Never hold the steering wheel in the 12
o'clock position or with both hands on
the rim or the center of the steering
wheel. Holding the steering wheel incor
rectly significantly increases the r is k of
inj ury to the hands, arms and head if the
airbag deploys.
Starting and stopping
the engine (vehicles
with an ignition lock)
Starting the engine with the key
Applies to vehicles: wit h mechanical ignition loc k
The ignition is switched on and the engine
started with the key in the ignition.
Fig. 70 Ignit ion key pos itions
Steering lock
If the steering wheel will not turn, the steer
ing lock is engaged.
To engage the steering wheel Lock: The selec
tor leve r must be in the P position.
.. To engage the steering wheel lock, turn the
wheel until it locks when the ignition key is
removed .
.. To release the steering wheel Lock, insert
the key in the ignition lock and turn the key
in the -direction of the arrow-whi le turning
the steering wheel. .,.
Page 129 of 310
M N
0 > co ,...., \!) 1.1'1
M 1.1'1 ,....,
is not possible, try to adjust the head re
straint so that it is as close to this position
as possible. Move the head restraint so that
it is as close to the back of the head as pos
sible.
.. Fasten and wear safety belts correctly
Q page 138.
.. Always keep both feet in the footwell so
that you are in control of the vehicle at all
times.
For detailed information on how to adjust the
driver's seat, see
Q page 58.
.&, WARNING
Drivers who are unbelted, out of position
or too close to the airbag can be seriously
injured by an airbag as it unfolds. To help
reduce the risk of serious personal injury:
- Always adjust the driver's seat and the
steering wheel so that there are at least
10 inches (25 cm) between your breast
bone and the steering wheel.
- Always adjust the driver 's seat and the
steering wheel so that there are at least
4 inches (10 cm) between the knees and
the lower part of the instrument panel.
- Always hold the steering wheel on the
outside of the steering wheel rim with
your hands at the 9 o'clock and 3 o'clock positions to help reduce the risk of per
sonal injury if the driver's airbag inflates.
- Never hold the steering wheel at the
12 o'clock position or with your hands at
other positions inside the steering wheel
rim or on the steering wheel hub. Hold
ing the steering wheel the wrong way
can cause serious injuries to the hands,
arms and head if the driver's airbag in
flates.
- Pointing the steering wheel toward your
face decreases the ability of the supple
mental driver's airbag to protect you in a
collision.
- Always sit in an upright position and nev
er lean against or place any part of your
body too close to the area where the air
bags are located.
-
Driving safety 127
-Before driving, always adjust the front
seats properly and make sure that all passengers are properly restrained .
- For adjustable head restraints: before
driving, always also adjust the head re
straints properly.
- Never adjust the seats while the vehicle is moving. Your seat may move unexpect
edly and you could lose control of the ve hicle .
- Never drive with the backrest reclined or
tilted far back! The farther the backrests are tilted back, the greater the risk of in
jury due to incorrect positioning of the safety belt and improper seating posi
tion .
- Children must always ride in child seats
Q page 170 . Special precautions apply
when installing a child seat on the front
passenger seat ¢
page 144.
Proper seating position for the front
passenger
The proper front passenger seating position
is important for safe, relaxed driving.
For your own safety and to reduce the risk of
injury in the event of an accident, we recom
mend that you adjust the seat for the front
pass enger to the following position :
.. Adjust the angle of the seatback so that it is
in an upright position and your back comes
in full contact with it whenever the vehicle is
moving.
.. Fo r adjustable head restraints: adjust the
head restraint so the upper edge is as even
as possible with the top of your head. If that
is not possible, try to adjust the head re
straint so that it is as close to this position
as possible
¢ page 129. Move the head re
straint so that it is as close to the back of
the head as possible .
.. Keep both feet flat on the floor in front of
the front passenger seat.
.. Fasten and wear safety belts corr ectly
¢ page 138.
•
•
•
Page 151 of 310
M N
0 > co ,...., \!) ..,.,
M ..,., ,....,
detailed information about airbags, safety
belts and child safety in this and the other
chapters that make up the owner's literature.
Please be sure to heed the WARNINGS -they
are ex tremely important for your safety and
the safety of your passengers, especially in
fants and small children .
A WARNING
Never rely on airbags alone for protection.
- Even when they deploy, airbags provide only supplemental protection .
- Airbag work most effectively when used
with properly worn safety belts .
- Therefore, always wear your safety belts
and make sure that everybody in your ve
hicle is properly restrained .
- Always hold the steering wheel with both
hands on the outside of the steering
wheel rim at the 9:00 o'clock and 3:00
o'clock positions to help reduce the risk
of personal injury if the driver's airbag in
flates.
- Never hold the steering wheel at the 12
o'clock position or with your hands any
where inside the steering wheel or on the
steering wheel hub. Holding the steering
wheel the wrong way increases the risk of severe injury to the arms, hands, and
head if the driver airbag deploys .
A WARNING
Objects between you and the airbag will
increase the risk of injury in a crash by in
terfering with the way the airbag unfolds
and/or by being pushed into you as the air
bag inflates.
- Always make sure nothing is in the front
airbag deployment zone that could be
struck by the airbag when it inflates.
- Objects in the zone of a deploying airbag
can become projectiles when the airbag
deploys and cause serious personal in
jury.
- Never hold things in your hands or on
your lap when the vehicle is in use .
-
Airbag system 149
-Never place accessories or other objects
(such as cup holders, telephone brackets,
note pads, navigation systems, or things
that are large, heavy, or bulky) on the
doors; never attach then to the doors or
the windshield; never place them over or
near or attach them to the area marked
,,AIRBAG " on the steering wheel, instru
ment panel or the seat backrests; never
place them between these areas and you
or any other person in the vehicle.
- Never attach objects to the windshield
above the passenger front airbag, such
as accessory GPS navigation units or mu
sic players. Such objects could cause seri
ous injury in a collision, especially when
the airbags inflate.
- Never recline the front passenger seat to transport objects. Items can also move
into the deployment area of the side air
bags or the front airbag during breaking
or in a sudden maneuver . Objects near
the airbags can fly dangerously through
the passenger compartment and cause
injury, particularly when the seat is re
clined and the airbags inflate.
A WARNING
-=
A person on the front passenger seat , es-
pecially infants and small children, will re
ceive serious injuries and can even be kil
led by being too close to the airbag when
it inflates.
- Although the Advanced Airbag System in your vehicle is designed to turn
off the
front passenger airbag if an infant or a
small child is on the front passenger
seat, nobody can absolutely guarantee
that deployment under these special conditions is impossible in all conceiva
ble situations that may happen during
the useful life of your vehicle.
- The Advanced Airbag System can deploy
in accordance with the ,,low risk" option
for 3-and 6-year-old children under the
•
•
•
Page 214 of 310
212 Checking and Fill in g
- If you put any amount of incorrect fue l in
the fue l tank, do not start the engine un
der any circumstances. Immediately con
tact the nearest authorized Audi dealer
or authorized Audi Service Facility for as
sistance. These fuels contain substances
that can severely damage the fuel sys
tem and the engine if the engine is start
ed.
- If the diesel fuel quality is poor, it may
be necessary to have the water drained
from the water sepa rator in the
f ue l fi l
te r
more often than specified in the
maintenance schedu le . This can help re
duce engine ma lfunctions
Q page 24.
Fuel tank
Fuel filler neck
The fuel filler neck is located on the right rear
side panel behind the fuel fi ller flap.
If the power locking system should fail, you
can st ill open the flap manually- for detailed
instructions
seer:::.> page 214.
You can find the fuel tank capacity of your ve
hicle in
Qpage 288.
The label on the inside of the fuel filler flap
tells you the correct fuel for your vehicle. For
more information about fuel specifications,
see
c;,page 210.
Your veh icle fuel tank has an onboard refue l
ling vapor recovery system . This feature helps
to prevent fuel vapors from escaping from the
tank and polluting the environment while you refuel your vehicle . In order to fill the tank
properly while protect ing the env ironment,
p lease follow t his refueling procedure careful
ly.
.&_ WARNING
Under norma l operating conditions, neve r
carry additiona l fuel containers in your car .
Gas can isters and other containers used to
transport fue l can be dangerous. Such con
tainers, full or empty, may leak and cou ld
cause a f ire in a collision. If you must transpo
rt fuel to use for your lawn mower,
snow b lower, etc., be very careful and al
ways observe local and state laws regard ing the use, transportation and storage of
such fuel containers. Make certa in the con
tainer meets industry standa rds (ANSI/
ASTM F8S2 -86).
(D Note
Neve r drive your veh icle until the fue l tank
i s completely empty. The irregular supply
of fue l can cause misfir ing. Gasoline cou ld
enter the exhaust system and damage the
catalytic converter.
Fueling procedure
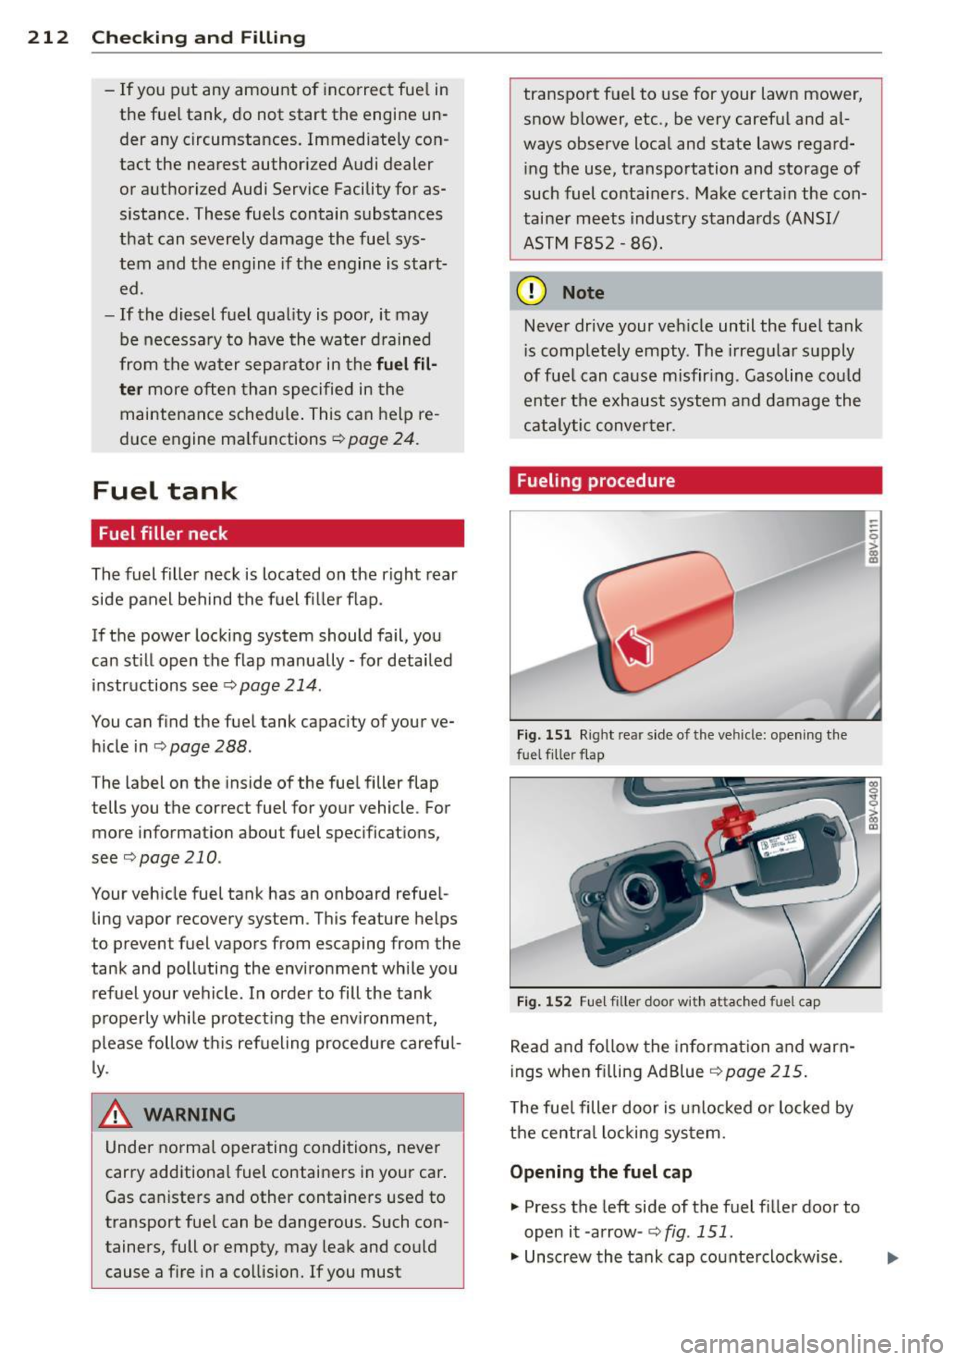
F ig. 15 1 Righ t rear side of the vehicle: opening the
fuel filler flap
Fig . 1 52 Fue l filler door w ith attached fuel cap
Read and follow the information and warn
ings when filling Ad B lue
c;, page 215.
T he fue l filler door is u nlocked or locked by
the centra l locking sys tem.
Openin g the fuel c ap
" Press the left side of the fuel f iller door to
open it -arrow-
Q fig. 151.
"Unscrew the tank cap counterclockw ise .
-;:;
> a, a,
Page 215 of 310
M N
0 > co ,...., \!) ..,.,
M ..,., ,....,
~ Place the cap from above on the open fuel
filler door
¢ fig. 152.
Closing the fuel cap
~ Turn the fuel cap clockwise until you hear it
lock.
~ Close fuel filler door until it latches.
Once the pump nozzle switches off, the fuel
tank is "full". Do not fill the tank more. Other
wise the expansion space in the tank will be
filled.
The correct fuel type for your vehicle can be
found on a label located on the inside of the
fuel filler door. For additional information on
fuel, refer to ¢
page 210.
The fuel tank capacity of your vehicle is in the
Technical Data ¢ page 288.
To avoid fuel spilling or evaporating from the
fuel tank always close fuel filler cap properly
and completely. An improperly closed fuel fill
er cap may also cause the MIL lamp ¢
page 30
to come on .
A WARNING
Not paying attention when fueling or han
dling fuel incorrectly can lead to fires, ex
plosions or serious injuries.
- Fuel ignites easily and can cause serious
burns and other injuries.
- If you do not switch the engine off when
fueling and/or do not insert the fuel noz
zle completely into the tank opening,
fuel can leak out or run over. Leaked fuel
can ignite and start a fire.
- Do not use the telephone while fueling.
The electromagnetic rays can cause
sparks, which can ignite fuel vapors and
start a fire .
- Do not sit in your vehicle while fueling. If
you must make an exception and enter
your vehicle again while fueling, close
the door and touch metal to discharge
static electricity before touching the fuel
nozzle. Static electricity can create
sparks, which can ignite vapors when fu
eling.
Checking and Filling 213
- Do not smoke or have an open flame in
the area when fueling your vehicle or fill
ing a fuel container because this increas
es the risk of an explosion .
- For your safety, carrying fuel containers
in your vehicle is recommended. Wheth
er full or empty, the container can leak
and cause a fire in the event of an acci
dent.
- If you must make an exception and
transport a fuel container, note the fol lowing:
- Never fill the fuel container with fuel
while it is in or on the vehicle. Static
electricity is discharged when filling
which can cause the fuel vapors to ig nite and increases the risk of an explo
sion.
- Always place a fuel container on the
ground before filling.
- Always hold the fuel nozzle completely
in the fuel container when filling .
- If the fuel container is made of metal,
the fuel nozzle must always be in con
tact with the container when filling it
with fuel. This prevents static electrici
ty from discharging.
- Never spill fuel in the vehicle or the
luggage compartment. Evaporated fuel
is explosive and increases the risk of
serious injury or death.
- Follow legal requirements when using,
storing and transporting fuel contain
ers.
- Make sure the fuel container conforms
to industry standards (ANSI/ASTM
F8S2-86).
@ Note
- Remove spilled fuel from vehicle paint
immediately, because it can damage
paint.
- Never drive until the fuel tank is com
pletely empty . The irregular supply of
fuel that results from that can cause the
engine to misfire. Uncombusted fuel will
enter the exhaust system and increase
1111-
•
•
Page 218 of 310
216 Checking and Filling
¢..ij Incorrect filling /sy stem malfunction
A message ap pears if the Ad Bl ue tank was fil
l ed with a fluid other t han Ad B lue and the sys
tem has detected t hat the tank was fi lled in
correctly, or if the re is a system malfunction .
Ad Blue/ Ad Blue: Sy stem fault! No re start
in 600 miles (1000 km ). See owner' s man
ual.
This message appears whe n it is only poss ible
to drive the distance i ndi cated in the dr iver in
formation system. Drive to the neares t au
thorized A udi dealer or author ized A udi Se rv
ice Facility to have the ma lfunction co rrected.
Otherwise the engine will not start again if
you stop it once the distance i nd icated has
been drive n.
AdBlue: system fault . Engine
start not possible! See owner 's manual
This message appears if the system has de
tected t hat the ta nk was fi lled incorrectly or
that the re is a ma lfunction . Drive immediate ly
to the nearest authorized A udi dealer or au
thor ized Audi Serv ice Facility to have the ma l
function corrected . Otherwise you will not be
ab le to start the engine aga in o nce you stop
it .
Filling the Ad Blue
App lies to vehicles: with selective cata lyt ic reduction
A special refill bottle must be used to fill the
AdBlue .
Fig. 155 R ig ht re ar s id e of th e v ehi cle: re mov ing the
Ad Blue cap
F ig . 1 56 AdBl ue f ille r tube: i nse rtin g the ref ill bottl e
The Ad Blue tank ope ning is located near the
di ese l ta nk open ing . A lways ad d 1 gallon (3.8
li te rs) of AdB lue ( two bottles). This is the min
i mum amo unt req uired to ensure the system
de te ct s the refilling and to s tart the engine .
T he Ad Blue tank holds approximately
4 gal
lo ns
(1 5 liters) .
Opening the filler tube and adding
AdBlue
Req uirement : The request to add Ad Blue mus t
appea r in the instrument cluster disp lay.
" Switch th e ignit io n off.
.. Open the tank door¢
page 212.
.. Tur n the cap on the tank opening to the left
to remove
¢ fig . 155 .
.. Remove the cap from the ref ill bott le.
.. Posit ion the refill bottle on the filler tube
and tur n the bottle clockwise until it stops
turn ing (D ¢fig .156 .
" Press lightly aga inst the bottom of the bot
tle @to empty it . Continue pressing the
bo ttom of the bottle unt il it is empty or un
t il f lu id stop s flow ing in to the ta nk.
" Turn the bottle to t he left w it h out pressing
on t he bot tom.
Closing the filler tube
" Tur n the Ad B lue cap to the right on the filler
t ube until the cap clicks into pla ce.
" Clo se the tank cover.
After filling
The vehicle must be driven. The system may
ta ke up to two m inutes to detect that the
AdBl ue has been f illed . .,.
Page 228 of 310
226 Checking and Fill in g
- Do not add any type of radiator leak sea l
ant to your ve hicle's engine coolant.
Adding rad iator repair fluid may adverse
ly affect the function and performance of
your cooling system and could result in damage not covered by your New Vehicle
Limited Warranty.
Adding coolant
Fig . 164 Engine co mpa rtment: mark in gs on the coo l
ant expans ion tank
R ea d a nd f ollow ing th e W ARNING S before
checking anything in the eng ine compartment
¢ page 217.
Ch eck ing t he e ngi ne coolant level
"Park your vehicle on a level surface .
.. Switch the ign ition off .
" Read the coo lant level on the coolant expan
s ion tank ¢
fig. 164. The coo lant level must
be between the markings when the eng ine
in cold. When the engine is warm it can be
sl ightly above the upper marking .
Adding coolan t
Requirement : There must be a residual
amount of coolant in the expansion tank ¢(D .
.. Let the engine cool down.
" Place a cloth over the coolant expansion
tank cap and unscrew the cap counterclock
wise ¢&_ .
.. Add coolant mixed in the correct ratio
¢ page 225 up to the upper marking.
.. Make sure that the fluid level remains sta
ble. Add more coolant if necessary.
" Clove the cap securely. A coolant loss suggests a
leak. Immediately
drive your vehicle to an authorized repair fa
c ility and have the cooling system inspected.
If the cooling system is not leaking, a loss can
come from the coolant boiling through over
heating and being pushed out of the cooling
system.
A WARNING
The cooling system is press urized and can
become very hot. To reduce the r isk of
b urns from hot coolant:
- Do not open the coolant expansion tank
cap with the engine ho t. T here is a risk of
burns.
- Stop the eng ine and a llow it to cool.
- Protect your face, hands and arms from
escaping coolant and steam by covering
the coolant tan k cap with a large, th ick
cloth.
- Turn the coolan t tank cap counterclock
wise slowly and keep light pressure on
the cap .
- To reduce the risk of burns, do not allow
any antifreeze or coolant to drip onto the
exhaust system or hot engine compo
nents. The ethy lene g lycol in engine
coo lant can catch fire under certain cir
cumstances.
- The coolant additive and the coolant can
be dangerous to your health . For this
reason, keep the coo lant in the origina l
container away from ch ildren . There is a
risk of poisoning.
- When working in the engine compart
ment, remember that the rad iator fan
can switch on even if the ignition is
sw itched off, which increases the risk of
pe rsonal injury.
(D Note
Do not add coolant if the expansion tank is
empty . Air could enter the cooling system
and damage the eng ine .
If this is the case,
do no t continue dr iving. See a n author ized
A udi dealer or authori zed Aud i Service Fa
cility for assist ance.
Page 249 of 310
Tires and wheels 24 7
It is important to check the tire sure for the spare wheel
pressure when the tires are
¢page 268.
cold.
When should I adjust the
-Read the required tire pres-tire pressures?
'
sure from the tire pressure la-
Adjust the tire pressure to the •
•
bel. The tire pressure label is load you are carrying. After
located on the driver's side B- changing a wheel
or replacing
pillar. wheels you have to adjust the
-Turn the valve stem cap coun- tire pressures on all wheels. In
ter-clockwise to remove it addition, you must then store
from the tire valve. the new tire pressures in the
-Place the air pressure gauge tire pressure monitoring sys-
on the valve. tern
¢ page 264.
-The tire pressures should only
A WARNING
be checked and adjusted when
Incorrect tire pressures and/
the tires are cold . The slightly
or underinflation can lead
raised pressures of warm tires
sudden tire failure, loss of
must not be reduced.
control, collision, serious per-
-Adjust the tire pressure to the
sonal injury or even death.
load you are carrying.
-When the warning symbol
-Reinstall the valve stem cap
RI] appears in the instru-
on the valve.
ment cluster, stop and in-
When should I check the tire spect the tires.
pressure? -Incorrect tire pressure and/
The correct tire pressure is es- or underinflation can cause
pecially important at high increased tire wear and can
speeds. The pressure should affect the handling of the
therefore be checked at least vehicle and stopping ability.
once a month and always be- -Incorrect tire pressures
fore start ing a journey. Do not
and/or underinflation can
' • M N
forget to check the tire pres-0 > co .... \!) 1.1'1
M 1.1'1 ....
Page 270 of 310
268 What do I do n ow ?
Equipment
Vehicle tool kit
Applies to vehicles: with vehicle tool kit
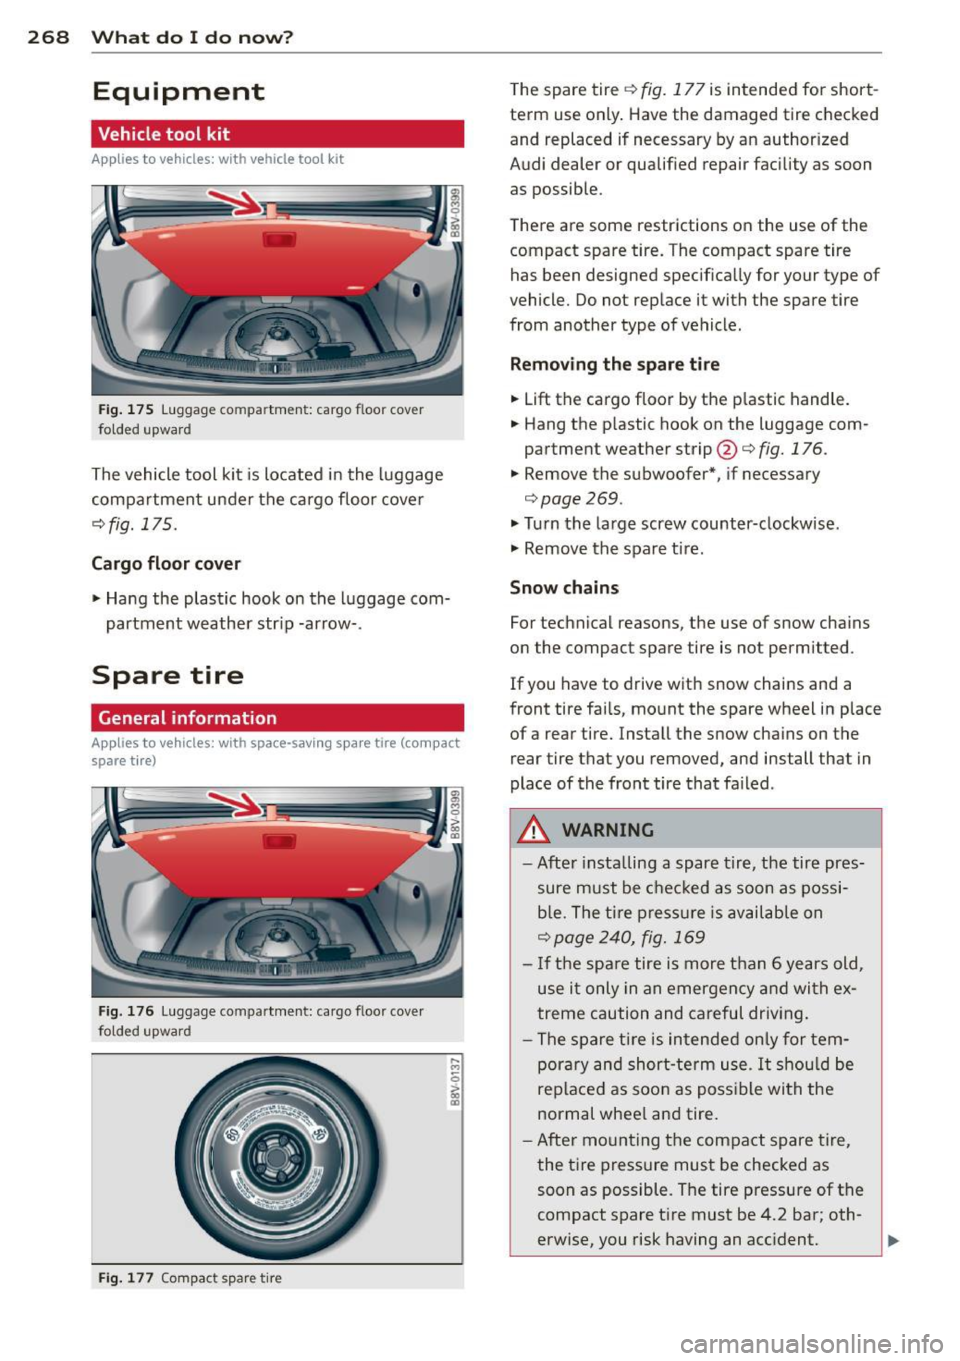
Fig . 175 Luggage compart ment: cargo floor cover
folded upward
The vehicle tool kit is located in the luggage
compartment under the cargo floor cover
¢fig. 175 .
Carg o flo or c over
.. Hang the plastic hook on the luggage com
partment weather str ip -arrow-.
Spare tire
General information
Applies to vehicles: with space-saving spa re tire (compact
spare tire)
Fig. 176 Luggage compartment: cargo floor cove r
fo lded upward
Fi g. 177 Compact spare tire
The spare tire~ fig. 177 is intended for short
term use only. Have the damaged tire checked
and replaced if necessary by an author ized
Audi dealer or qualified repair facility as soon
as possible.
There are some restrictions on the use of the
compact spare tire. The compact spare tire
has been designed specifically for your type of
vehicle. Do not replace it with the spare tire
from another type of vehicle.
Rem ovi ng the sp are tir e
.. Lift the cargo floor by the plastic handle.
.. Hang the p lastic hook on the luggage com
partment weather strip@¢
fig. 176 .
.. Remove the subwoofer*, if necessary
¢page 269.
.. Turn the large screw counter-clockwise.
.. Remove the spare tire.
Snow ch ain s
For technical reasons, the use of snow chains
on the compact spare tire is not permitted.
If you have to drive with snow chains and a
front tire fails, mount the spare wheel in place
of a rear tire. Install the snow chains on the
rear tire that you removed, and install that in
place of the front tire that failed .
A WARNING
--After installing a spare tire, the tire pres-
sure must be c hec ked as soon as possi
b le. The tire p ress ure is available on
¢ page 240, fig. 169
- If the spa re tire is more t han 6 years old,
use it only in an emergency and with ex
treme caution and careful driving.
- The spare ti re is intended only for tem
pora ry and short-term use.
It shou ld be
replaced as soon as poss ible with the
normal wheel and tire.
- After mounting the compact spare tire, the tire pressure must be checked as
soon as possible . The tire pressure of the
compact spare tire must be 4.2 bar; oth
erwise, you risk having an accident.
Page 273 of 310
....,
N
0 > co
rl I.O
"' ....,
"' rl
.. Pull off the decorative wheel cover
r=> fig. 179.
Wheels with wheel bolt caps
Applies to vehicles: with wheel bolts with caps
The caps must be removed first from the
wheel bolts before the bolts can be un
screwed .
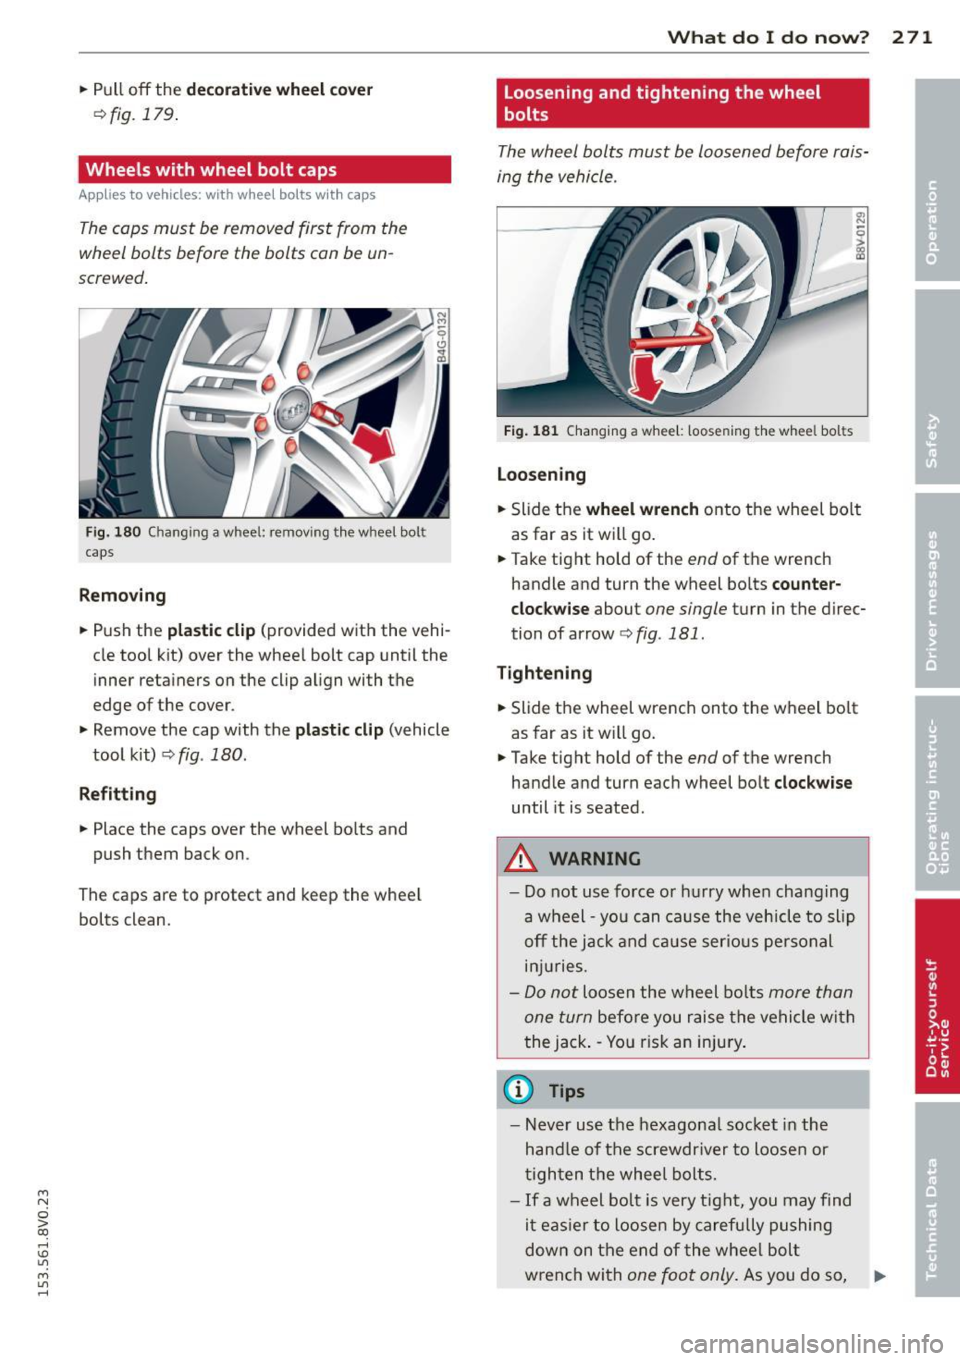
Fig. 180 Ch ang ing a w hee l: re movi ng the wheel bo lt
caps
Removing
.. Push the plastic clip (provided with the vehi
cle tool kit) over the whee l bolt cap until the
inner reta iners on the clip align with the
edge of the cover .
.. Remove the cap with the
plastic clip (vehicle
tool kit)
r=> fig. 180.
Refitting
.. Place the caps over the wheel bolts and
push them back on.
The caps are to protect and keep the wheel bolts clean.
What do I do now? 271
Loosening and tightening the wheel
, bolts
The wheel bolts must be loosened before rais
ing the vehicle .
Fig. 181 Changing a whee l: loosening the whee l bol ts
Loosening
"' "' -0 > g3
.. Slide the wheel wrench onto the wheel bolt
as far as it will go .
.. Take tight hold of the
end of the wrench
handle and turn the wheel bolts
counter
clockwise
about one single turn in the d irec
tion of arrow
c:> fig . 181 .
Tightening
.. Slide the wheel wrench onto the wheel bolt
as far as it w ill go.
.. Take tight hold of the
end of the wrench
handle and turn each wheel bolt
clockwise
until it is seated .
A WARNING
- Do not use fo rce or hurry when changing
a wheel - you can ca use the vehicle to slip
off the jack and cause serious personal
inj uries.
-Do not loosen the wheel bolts more than
one turn
befo re you raise the vehicle with
the jack . - Yo u risk an injury .
(D Tips
-Never use the hexagonal socket in the
hand le of the screwdriver to loosen or
tig hten the wheel bolts .
- If a wheel bolt is very tight, you may find
it eas ier to loosen by carefully pushing
down on the end of the wheel bolt
wrench with
one foot only. As you do so, Ill>-