window AUDI S3 SEDAN 2015 Owner's Manual
[x] Cancel search | Manufacturer: AUDI, Model Year: 2015, Model line: S3 SEDAN, Model: AUDI S3 SEDAN 2015Pages: 282, PDF Size: 71.14 MB
Page 145 of 282
....,
N
0 > C() rl I.O
"'
"'
"'
rl
_& WARNING
Not wearing safety belts or wearing them im
properly increases the risk of serious personal
injury and death. Safety belts can work only
when used correctly .
- Always fasten your safety belts correctly be
fore driving off and make sure al l passen
gers are correctly restrained.
- For maximum protection, safety belts must
always be pos itioned properly on the body.
- Never strap more than one person, includ
ing small ch ildren, into any belt.
- Never place a safety belt over a child sitting
on your lap.
- Always keep feet in the footwell in front of
the seat while the vehicle is being driven.
- Never let any person ride with their feet on
the instrument panel or sticking out the
window or on the seat.
- Never remove a safety belt while the vehicle
is moving . Doing so will increase your risk of
being injured or killed.
- Never wear belts twisted.
- Never wear belts over rigid or breakable ob-
jects in or on your clothing, such as eye
glasses, pens, keys, etc., as these may cause
injury.
- Never allow safety belts to become dam
aged by being caught in door or seat hard
ware.
- Do not wear the shoulder part of the belt
under your arm or otherwise out of position.
- Several layers of heavy clothing may inter
fere with correct positioning of belts and re duce the overall effectiveness of the system.
- Always keep belt buckles free of anything
that may prevent the buckle from latching
securely.
- Never use comfort clips or devices that cre
ate slack in the shoulder be lt. However, spe
cial clips may be required for the proper use
of some child restraint systems.
- Torn or frayed safety belts can tear, and
damaged belt hardware can break in an acc i
dent. Inspect belts regularly. If webb ing,
bind ings, buckles, or retracto rs are dam-
Safety belts
aged, have belts replaced by an authorized
Audi dealer or qualified workshop.
- Safety belts that have been worn and loaded
in an accident must be replaced with the
correct replacement safety belt by an au
thorized Audi dealer. Replacement may be
necessary even if damage cannot be clearly
seen. Anchorages that were loaded must al
so be inspected.
- Never remove, modify, d isassemble, o r try
to repair the safety belts yourself.
-Always keep the belts clean. Dirty belts may not work properly and can impair the func
tion of the inertia reel~
table Internal
cleaning on page 237.
Safety belts
Fastening safety belts
Safety first -everybody buckle up!
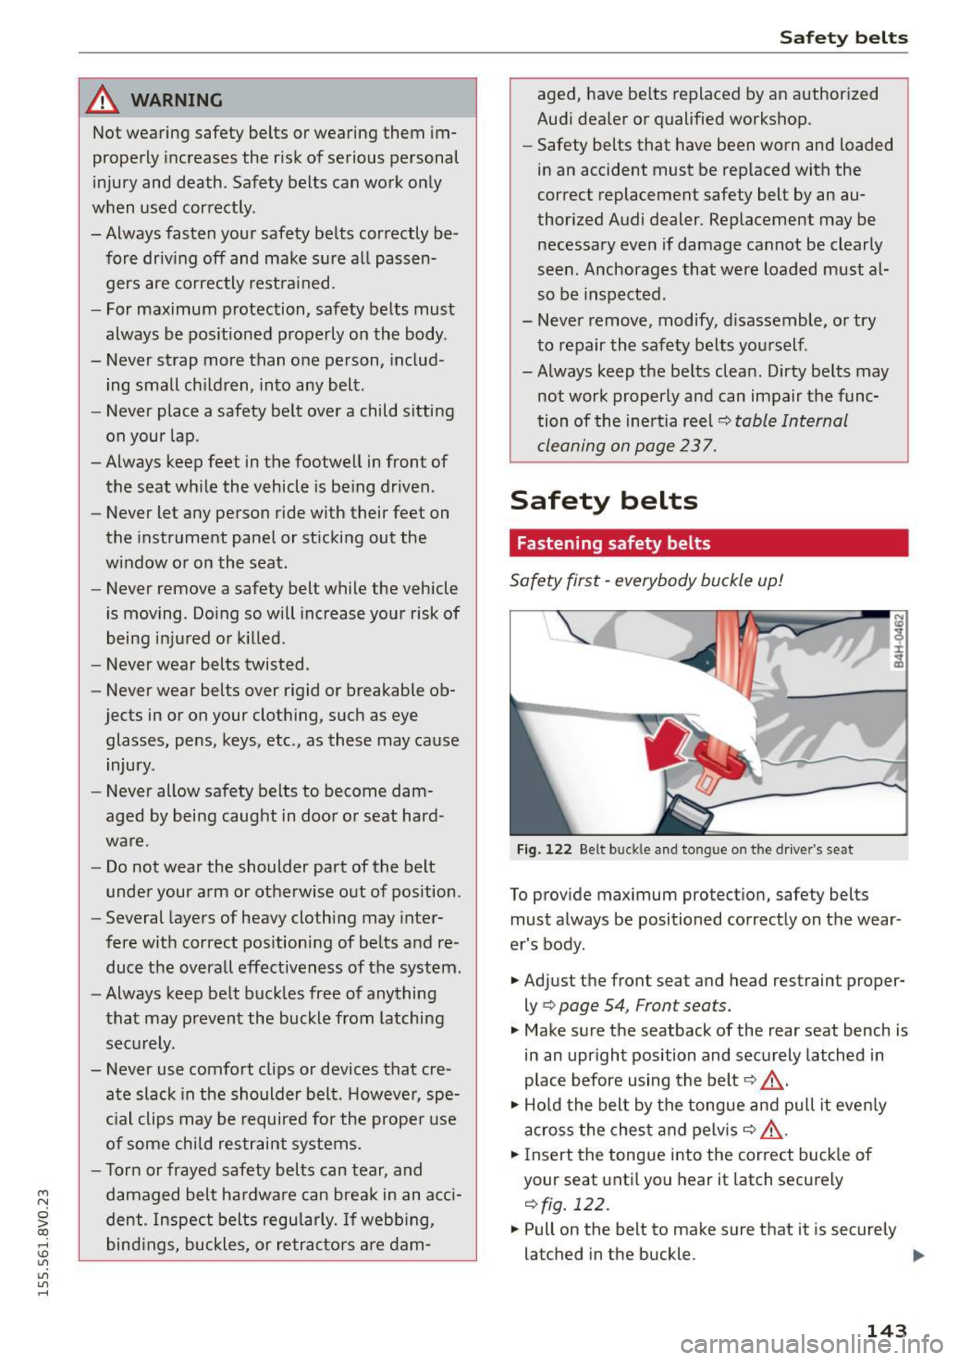
Fig. 122 Belt buck le and tongue on the d rive r's seat
To provide maximum protection, safety belts
must always be positioned correctly on the wear
er's body.
.. Adjust the front seat and head restraint proper
ly ¢
page 54, Front seats.
.. Make sure the seatback of the rear seat bench is
in an upright position and securely latched in
place before using the belt¢.&, .
.. Ho ld the belt by the tongue and pull it even ly
across the chest and pelvis ¢.&_ .
.. Insert the tongue into the correct buckle of
your seat until you hear it latch securely
¢ fig. 122 .
.. Pull on the belt to make sure that it is securely
latched in the buckle.
Ill>
143
Page 170 of 282

Airb ag syst em
-If the airbag indicator light ¢ page 20
comes when the vehicle is being used, have
the system inspected immediately by your
authorized Aud i dealer. It is possible that
the a irbag will inflate when it is not sup·
posed to, or w ill not inflate when it should.
How supplemental side airbags work
Side airbags deploy instantly and can help re·
duce the risk of upper torso injuries for occu
pants who are properly restrained.
F ig. 135 S ide impact protection: inflated s ide airbags
When the system is triggered, the airbag is fi lled
with prope llant gas and breaks thro ugh a seam in
the seat surface area marked "AIRBAG". It ex
pands between the side trim pane l and the pas
senger . In order to help prov ide th is additional
protection, the side airbag must i nflate within a
fraction of a second at very high speed and with great force. The supplemental side airbag cou ld
inju re you if your seating pos ition is not prope r or
upright o r if item s are located in the area where
the supplemental side airbag expands . This ap
plies especially to children
c::> page 172, Child
safety .
Supplemental side airbags inflate be
tween the occupant and the door pane l on the
side of the vehicle that is struck in certain side
collis ion¢
fig. 135 .
Although they are not a soft pillow, they can
"cushion" the impact and in this way they can
help to reduce the risk of injury to the upper part
of the body.
A fine dust may develop when the airbag deploys.
This is normal and does not mean there is a fire
in the vehicle.
168
Important safety instructions on the side
airbag system
Airbags are only supplemental restraints . Always
properly wear safety bel ts and ride in a proper
seating position .
There is a lot that you and your passengers must
k now and act accordingly to help the safety bel ts
and airbags do their job to provide supp lemental
protection.
_& WARNING
-
An inflating side airbag can cause serious or
fata l injury. Improperly wear ing safety be lts
and improper seating positions increase the
risk of serious personal injury and death
whenever a vehicle is being used.
- In order to reduce the risk of injury when
the supplemental side airbag inflates:
- Always sit in an upright position and never
l ean again st the area where the supple
mental s ide airbag is located .
- Never let a child or anyone else res t the ir
head against the side tr im panel in the
area where the supplemen tal side airbag
inflates .
- Always make sure tha t safety be lts are
worn correctly,
- Do no t let anyone s itting in the fron t seat
p ut their hand or any other parts of their
body out of the window.
- Always m ake sure that the s ide airb ag can
inflate without interference.
- Never install seat covers or rep lacement
upholstery over the front seatbacks that
have not been specifically approved by
A udi .
- Never use additional seat cushions that cover the areas where the side a irbags de
ploy.
- Damage to the orig inal seat cove rs or to
the seam in the area of the side airbag
module mu st a lways be repaired immedi
ate ly by an autho rized Aud i dealer .
- Objects between you and the a irbag can in
crease the risk of inj ury in an a cciden t by i n
t erfer ing wi th the way the airbag unfolds or .,._
Page 173 of 282

M N
0 > co ,...., \!) ..,.,
..,.,
..,., ,....,
through a seam above the front and rear side
windows identified by the AIRBAG label. In order
to help provide this additional protection, the
side curtain airbag must inflate within the blink
of an eye at very high speed and wi th great force.
T he side curtain airbag could injure you if your
seating position is not proper or upright or if
items are located in the area where the supple
mental side curtain airbag inflates . This applies
especially to children
q page 172 .
Although they are not a soft pillow, side curtain
airbags can "cushion " the impact and in this way
they can help to reduce the risk of injury to the
head and the upper part of the body.
A fine dust may develop when the airbag deploys.
This is quite normal and does not mean there is a
fire in the vehicle .
Important safety instructions on the side
curtain airbag system
Airbags are only supplemental restraints. Always
properly wear safety belts and ride in a proper
seating position.
There is a lot that you and your passengers must
know and do to help the safety belts and airbags
do their job to provide supplemental protection.
,&. WARNING
Improperly wearing safety belts and improper
seating positions increase the risk of serious
personal injury and death whenever a vehicle
is being used.
- Never let occupants place any parts of their bodies in the area from which the side cur
tain airbag inflate.
-Always make sure that the side curtain air bags can inflate without interference.
- Use the built-in coat hooks only for light
weight clothing . Never leave any heavy or
sharp-edged objects in the pockets that may
interfere with airbag deployment and can
cause personal injury in a collision.
- Never use hangers to hang clothes on the
hooks.
Airbag system
-Only use factory-installed sun shades or, if
shades installed after the vehicle leaves the
factory, use only genuine Audi sun shades.
- Never swing the sun visors over to the side
windows if things such as pens, garage door
openers, hands-free speakers, etc. are at
tached to the sun visors . They could come
loose and cause serious injury if the side cur
tain airbag inflates.
- A deploying airbag inflates in a fraction of a second and with great force .
- Never attach objects to the cover or in the deployment zone of a side curtain airbag .
- The airbag deployment zones must be kept
clear at all times. Make sure there are no ob
jects, pets, or other persons in the space be
tween any vehicle occupant and any airbag
at any time.
- Do not attach any accessories to the doors .
,&. WARNING
-- The airbag system can deploy only once. If
the airbag has been triggered, the system
must be replaced by an authorized Audi
dealer or qualified workshop.
- Always have work involving the side curtain
airbag system, removal and installation of
the airbag components, or other repairs per
formed by a qualified dealership. Otherwise the airbag system may not work correctly.
- Never attempt to modify any components of the airbag system in any way.
171
Page 190 of 282
Child safety
Tether anchors and tether straps
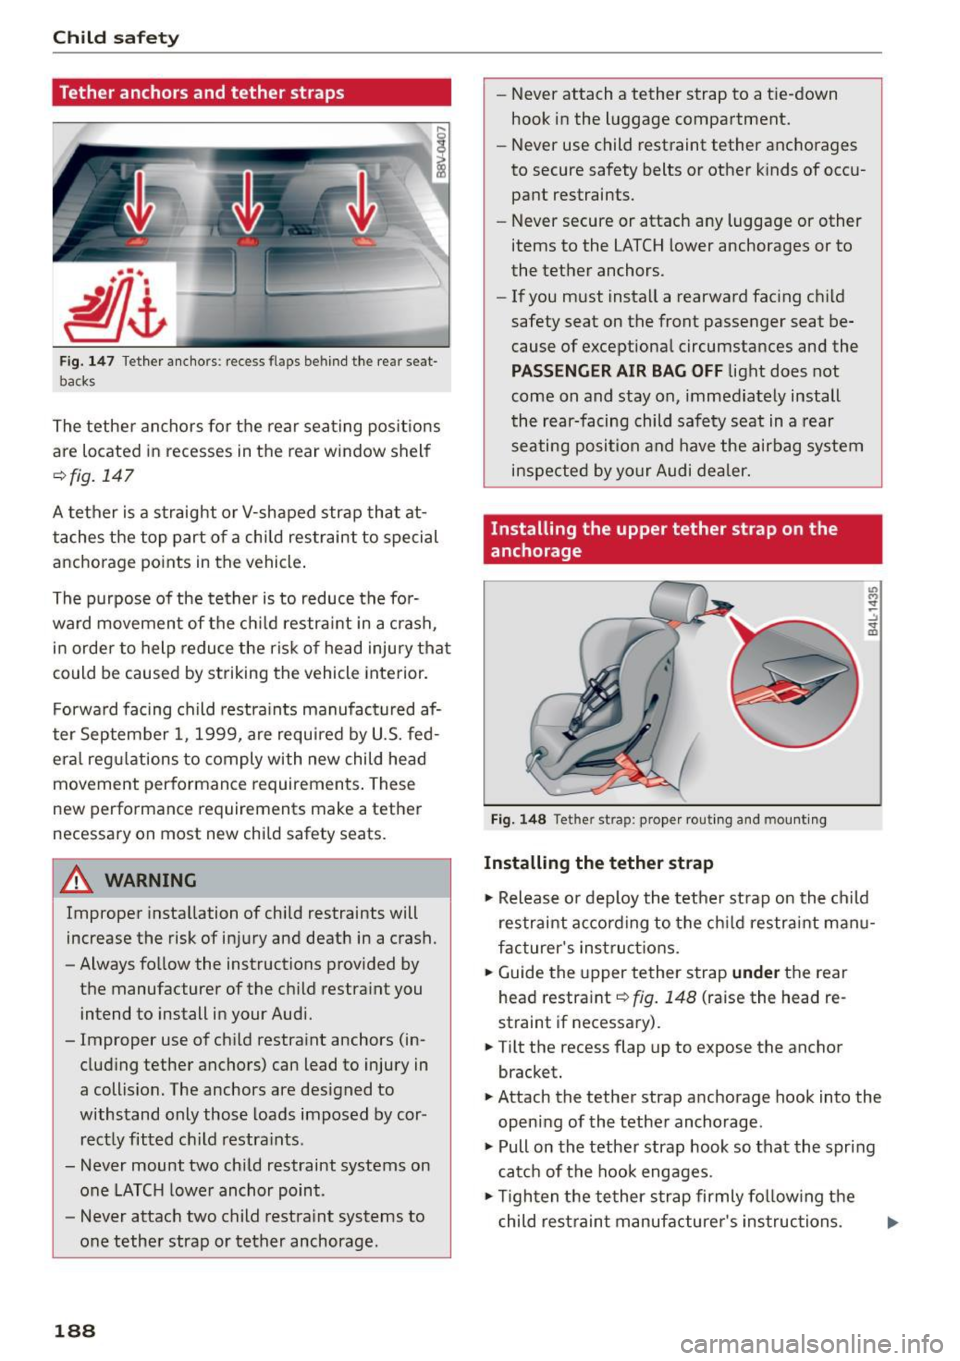
Fig. 147 Tether anchors: recess flaps behind the rear seat
ba cks
The tether anchors for the rear seating positions
are located in recesses in the rear window shelf
~fig. 147
A tether is a straight or V-shaped strap that at
taches the top part of a child restraint to special
anchorage points in the vehicle.
The purpose of the tether is to reduce the for ward movement of the child restraint in a crash,
in order to help reduce the risk of head injury that
could be caused by striking the vehicle interior.
Forward facing child restraints manufactured af
ter September 1, 1999, are required by U.S. fed
eral regulations to comply with new child head
movement performance requirements. These
new performance requirements make a tether
necessary on most new child safety seats.
&_ WARNING
Improper installation of child restraints will
increase the risk of injury and death in a crash.
- Always follow the instructions provided by
the manufacturer of the child restraint you
intend to install in your Audi.
- Improper use of child restraint anchors (in
cluding tether anchors) can lead to injury in
a collision. The anchors are designed to
withstand only those loads imposed by cor
rectly fitted child restraints .
- Never mount two child restraint systems on
one LATCH lower anchor point .
- Never attach two child restraint systems to
one tether strap or tether anchorage.
188
.
- Never attach a tether strap to a tie-down
hook in the luggage compartment.
- Never use child restraint tether anchorages
to secure safety belts or other kinds of occu
pant restraints.
- Never secure or attach any luggage or other
items to the LATCH lower anchorages or to
the tether anchors.
- If you must install a rearward facing child
safety seat on the front passenger seat be
cause of exceptional circumstances and the
PASSENGER AIR BAG OFF light does not
come on and stay on , immediately install
the rear-facing child safety seat in a rear
seating position and have the airbag system
inspected by your Audi dealer.
Installing the upper tether strap on the
anchorage
Fig. 148 Tether st ra p : proper routing and mounting
Installing the tether strap
11> Release or deploy the tether strap on the child
restraint according to the child restraint manu
facturer's instructions.
"Guide the upper tether strap
under the rear
head restraint ~
fig. 148 (raise the head re
straint if necessary) .
"Tilt the recess flap up to expose the anchor
bracket.
"Attach the tether strap anchorage hook into the
opening of the tether anchorage .
11o Pull on the tether strap hook so that the spring
catch of the hook engages.
11> Tighten the tether strap firmly following the
child restraint manufacturer's instructions.
Page 210 of 282
Checking and F ill in g
sure you are using the correct brake f luid .
The correct type of brake fluid is also indi
cated on the brake fluid reservoir .
- The brake fluid must be new. Heavy use of
the brakes can cause a vapor lock if the
brake fluid is left in the system too long.
This can ser iously affect the effic iency of
the brakes as well as your safety . This
could res ult in an accident.
(D Note
Brake flu id will damage the paint of your vehi
cle .
@ For the sake of the environment
Because of the problem of proper d isposa l of
brake fluid as well as the spec ia l tools re-
quired and the necessary expertise, we rec
ommend tha t you have the b rake fluid
changed by your author ized Audi dealer.
Battery
General information
The battery in yo ur Audi does not need any ma in
tenance under normal operating conditions. Aud i
recommends having the electro lyte level check by
an author ized Audi dealer or author ized Audi
Service Fac ility when the re a re
high outside tem
pe ratu res or when dr iv ing a ll day. The electroly te
leve l sho uld also be checked ea ch t ime the bat
t ery is charged
9 page 210 .
Have the battery checked when you br ing you r ve
hicle in fo r an inspec tio n. It is a good idea to re
p la ce the batte ry if i t is more than 5 ye ars old .
During certai n types of a irbag dep loyments, the
battery is disconnect ed from the vehicle electr i
cal system fo r safety reasons
9 .&. in Repair, care
and disposal of the airbags on page 163.
Disconnecting the battery terminals
Some veh icle functions (such as power windows)
are not ava ilable when the batte ry is disco nnect
ed. These functions must be programmed after
the ba ttery is reconnec ted. To avoid havi ng to do
t his , on ly disconnect the b attery from the veh icle
208
electrica l sys tem when that is necessa ry to pe r
form repairs.
To reprogram the func tion s, proceed as fo llows:
Function Reprogramming
P owe r window one-
9 page 41, Correcting
to uch up/down f unc-power window malfunc-
tion tions
Remote control key o r If the vehicle does not
Conve nience key reac t to the key , it must
be synchronized
9 page 35
Digita l clock 9 page 10
ESC indi cato r light The ind icator lig ht goes
o ut afte r driving a few
meters
Not running the vehicle for long periods of
time
If you do not d rive yo ur vehicle for several days or
weeks, e lectr ica l components are gradua lly re
duced or switched off. Th is red uces energy con
s u mption and maintains the vehicle's ability to
start over a long per iod of t ime ¢
page 128.
Some conven ience functions , such as inter ior
li ght ing or power seats* may not wo rk . These
convenienc e functions w ill be availabl e agai n
o nce you swi tch the ig nition on and sta rt the en
gine.
Winter operation Du ring the winter months , it is common for the
batte ry capaci ty to dec rease as the tempe rat ur es
become lower . This is because more powe r is
needed to start the vehicle and componen ts such
as the he ad lights and the rear window defogger
are used more frequent ly.
Avoid using powe r unnecessar ily, especially in
c ity dr iv ing o r o n short trips . H ave yo ur au thor
iz ed Audi de aler or author ized A udi Se rv ice Facili
ty check the ba ttery capacity before the start of
winter ¢
page 210. A well-charged battery will
not only reduce starting problems in co ld weath
er, but it will a lso last longer .
Page 214 of 282
Checking and Filling
of vehicle batteries improperly is very danger
ous to the environment.
Windshield washer system
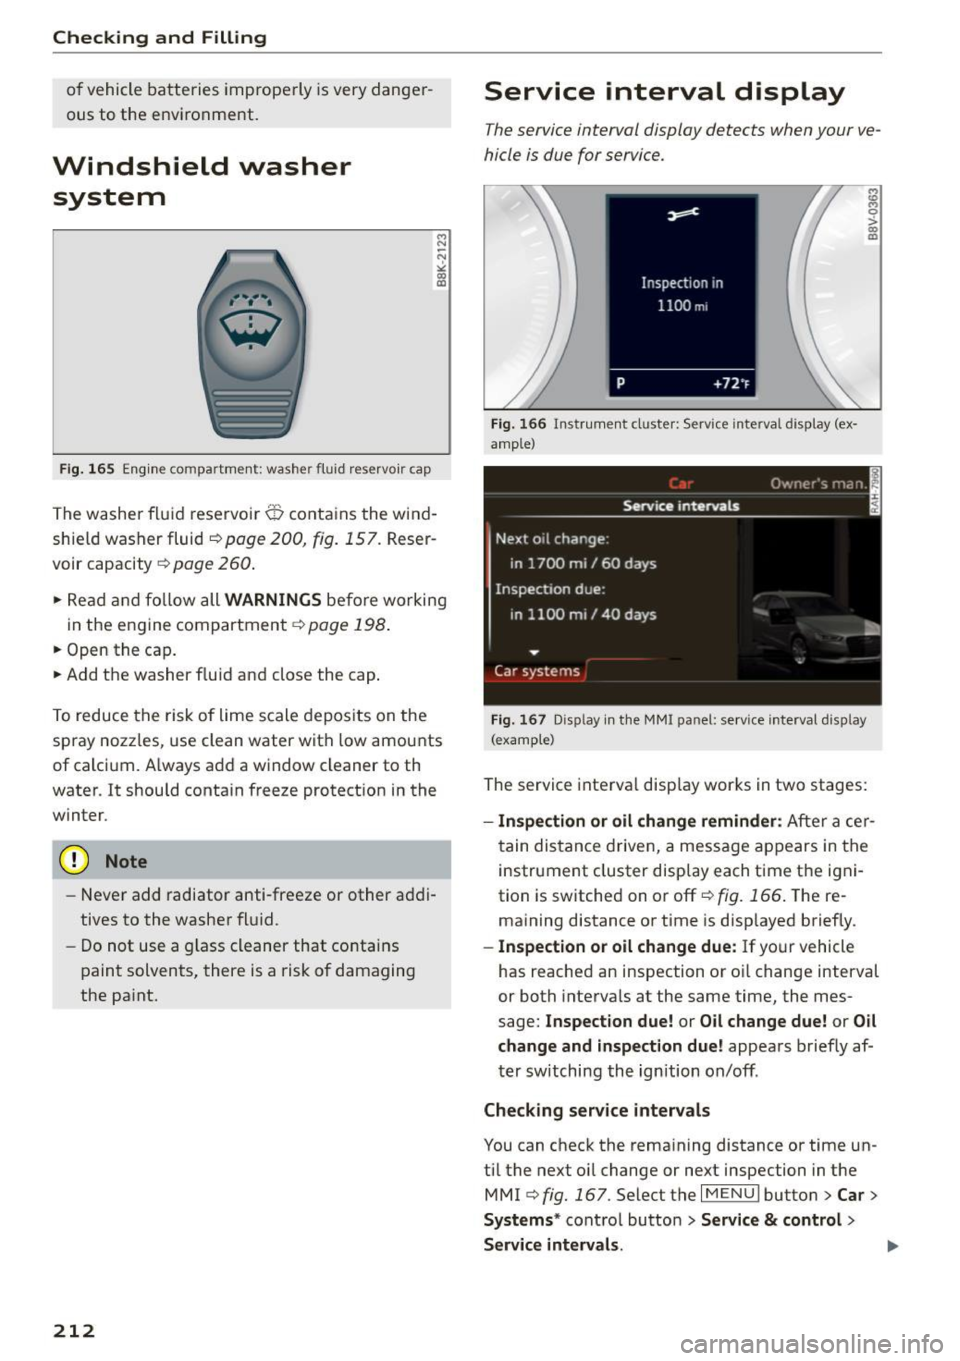
F ig . 165 Eng ine compartment: washer fluid reservoir cap
M
"' -')'
"" 00 a,
The washer fluid reservoir O contains the wind
shield washer fluid¢ page 200, fig. 157. Reser
voir capacity¢ page 260.
"' Read and follo w all
WARNINGS before working
in the engine compartment ¢page
198 .
... Open the cap .
... Add the washer f luid and close the cap .
To reduce the risk of lime scale depos its on the
spray nozzles, use clean water with low amounts
of calcium. Always add a window cleaner to th
water. It should contain freeze protection in the
winter.
(D Note
- Never add radiator anti-freeze or other addi
tives to the washer fluid.
- Do not use a glass cleaner that contains
paint solvents, there is a risk of damaging
the pa int.
212
Service interval display
The service interval display detects when your ve
hicle is due for service.
Fig. 166 Instrument cluster: Service interval display (ex·
amp le)
Fig. 167 Display in the MMI panel: service interval display
(example)
l6 M 0 ;:;. co m
The service interval display works in two stages:
-Inspection or oil change reminder: After a cer
tain distance driven, a message appears in the
instrument cluster display each time the igni
tion is switched on or off¢ fig. 166. The re
maining distance or time is disp layed briefly.
- Inspection or oil change due: If your vehicle
has reached an inspection or oi l change interval
or both intervals at the same time, the mes
sage:
Inspection due! or Oil change due! or Oil
change and inspection due!
appears briefly af
ter switching the ignition on/off.
Checking service intervals
You can check the rema ining distance or time un
til the next oil change or next inspection in the
MMI
¢ fig. 167. Select the I MENU I button> Car>
Systems*
control button > Service & control >
Service intervals.
Page 239 of 282
M N
0 > co ,...., \!) 1.1'1
1.1'1
1.1'1
,....,
Care and cleaning
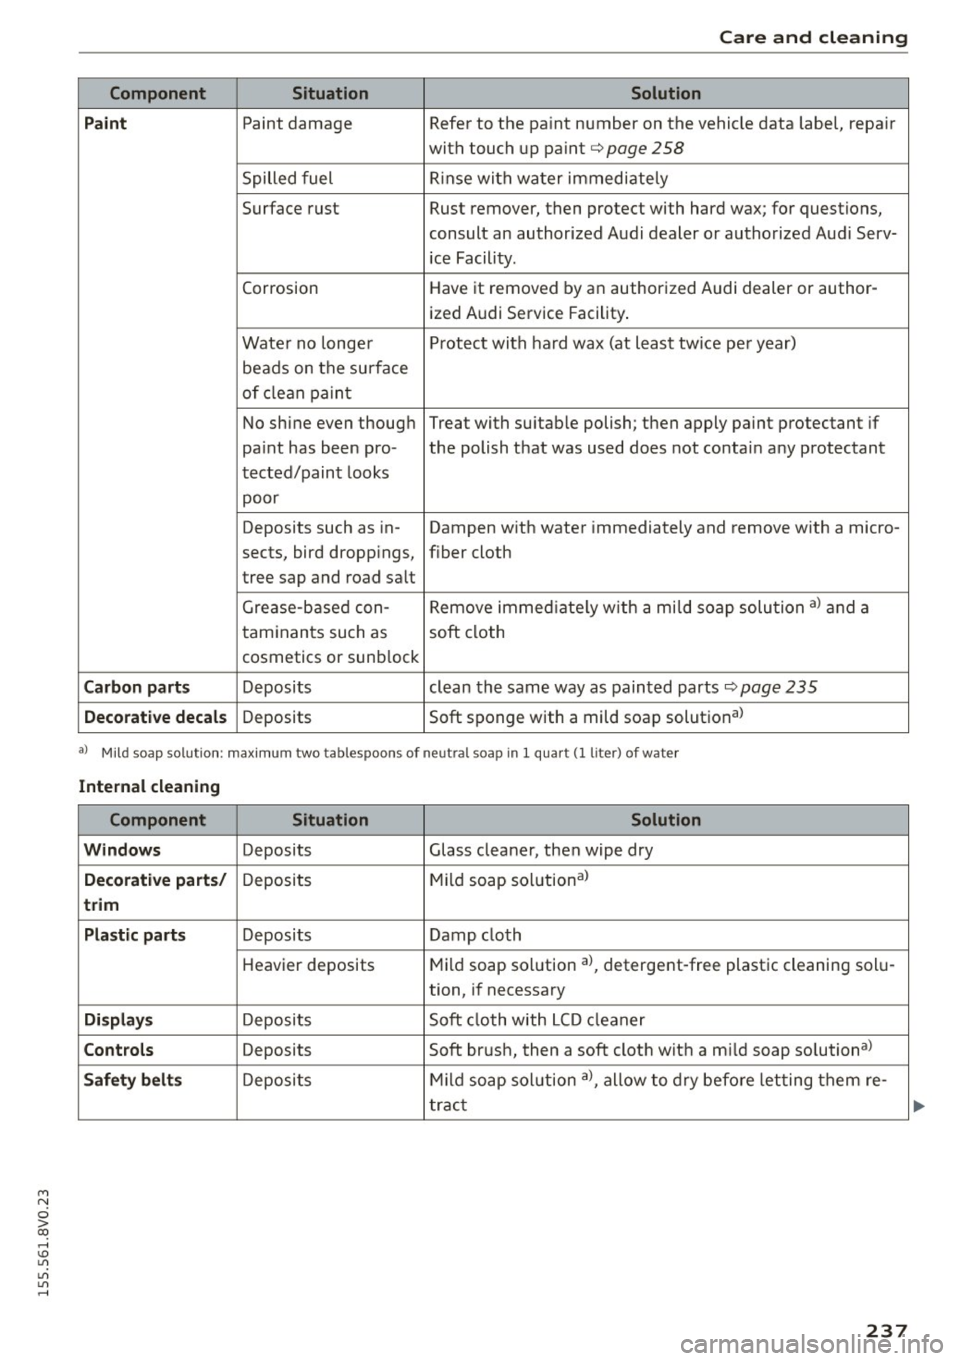
Component Situation Solution
Paint
Paint damage Refer to the paint number on the vehicle data label, repair
with touch up paint
c> page 258
Spilled fuel Rinse with water immediately
Surface rust Rust remover, then protect with hard wax; for questions,
consult an authorized Audi dealer or authorized Audi Serv-
ice Facility.
Corrosion Have it
removed by an authorized Audi dealer or author -
ized Audi Service Facility .
Water no longer Proteclt with hard wax (at least tw ice per year)
beads on the surface
of clean paint
No shine even though Treat with suitable polish; then apply paint protectant if
paint has been pro- the polish that was used does not contain any protectant
tected/paint looks
poor
Deposits such as in-Dampen with water immediately and remove with a micro-
sects, bird droppings, fiber cloth
tree sap and road salt
Grease-based con-Remove immediately
with a mi ld soap solution a) and a
taminants such as soft cloth
cosmetics or sunb lock
Carbon parts Deposits clean the same way as painted parts c> page 235
Decorative decals Deposits Soft sponge with a mild soap solutiona>
al
Mild soap solut ion: maximum two tablespoons of neutral soap in 1 quart (1 liter) of water
Internal cleaning
Component Situation Solution
Windows
Deposits Glass cleaner, then wipe dry
Decorative parts/ Deposits Mild
soap solution a>
trim
Plastic parts
Deposits Damp cloth
Heavier deposits Mild
soap so lution al, detergent-free plastic cleaning solu-
tion, if necessary
Displays Deposits Soft cloth with LCD cleaner
Controls Deposits Soft brush, then a soft cloth with a m
ild soap solutiona>
Safety belts Deposits Mild soap solution a>, allow to dry before letting them re-
tract
237
Page 240 of 282
Care and cleaning
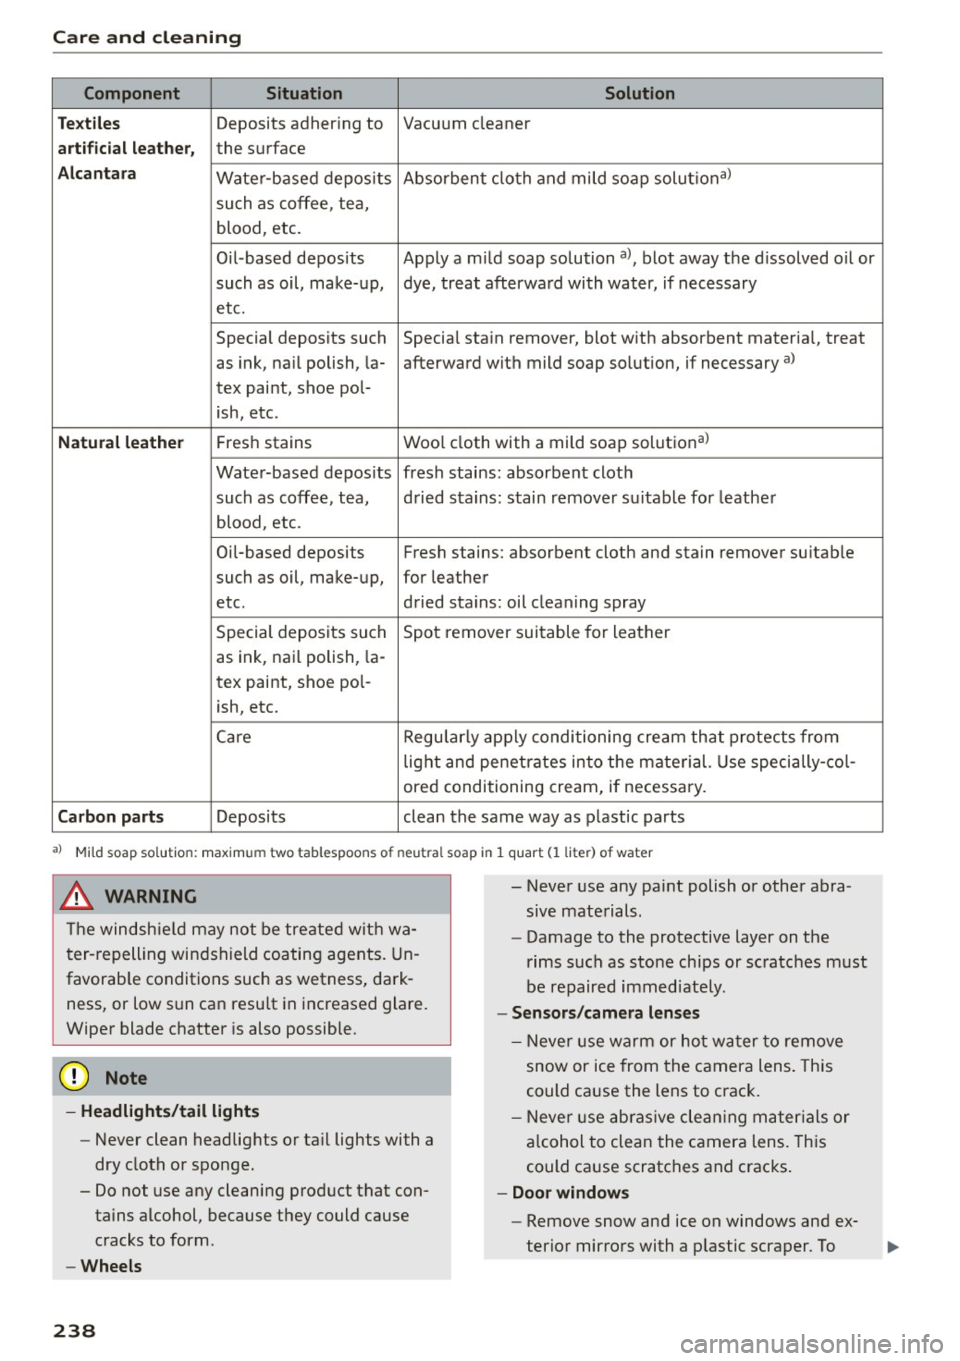
Component S ituation Solution
Te xtiles
Deposits adhering to Vacuum cleaner
arti ficial leath er, the surface
Alca ntara Wate r-based depos its Absorben
t cloth and mild soap solutional
such as coffee, tea,
blood, etc.
Oil-based deposits Apply a m ild soap solution al, blot away the d issolved oil or
such as oil, make-up, dye, treat afterwa rd with water, if necessary
etc.
Special deposits such Special stain remover, blot w ith absorbent materia l, treat
as ink, na il polish, la- afterward with mild soap so lution, if necessary a)
tex paint, shoe pol-
ish, etc.
Natural leather Fres h stains Wool cloth with a mild soap solutional
Wate r-based depos its fresh stains: absorbent clot h
such as coffee, tea, d ried stains: stain remover suitable for leathe r
blood, etc.
Oil-based deposits Fresh stains: absorbent cloth and stain remover suitab le
such as oil, make- up, for leather
etc. dried stains: oil cleaning spray
Special deposits such Spot remover sui table for leather
as ink, nai l polish, la -
tex paint, shoe pol-
ish, etc.
Care Regularly app ly condi tioning cream that protects from
lig ht and penet rates in to the mate rial. Use specially -col -
ored conditioning cream, if necessary.
Carbon part s Deposits clean the same way as plastic parts
al Mild soap sol ution: maxim um two tablespoons of neutral soap in 1 quar t (1 liter ) of water
_& WARNING
The windshie ld may not be tre ate d wit h wa
t er- repelling win dsh ield co ating agents. Un
favorab le conditions such as wetness, dark
ness, or low s un can resu lt in increased glare.
Wiper blade chatter is also possible.
(D Note
- Headlights/tail light s
-Never clean headlights or ta il lights with a
dry cloth or sponge.
- Do not use any cleaning prod uct that con
tains alcohol, because they could cause cracks to form.
- Wheels
238
-
- Never use any paint polish or other abra
sive mate rials.
- Damage to the protective layer on the
rims such as sto ne chips or sc ratches must
be repaired immediately.
- Sensors /camera lenses
- N eve r use warm or ho t w at er to remove
snow or ice from the camera lens . This
could ca use the lens to crack.
- N eve r use abras ive cle an ing m ateria ls or
a lcohol to clea n the camera lens. This
could ca use scratches and cracks .
-Doo r windows
- Remove snow and ice on windows and ex-
terio r mirro rs with a p lastic scraper. To
Page 241 of 282
M N
0 > co ,...., \!) 1.1'1
1.1'1
1.1'1
,....,
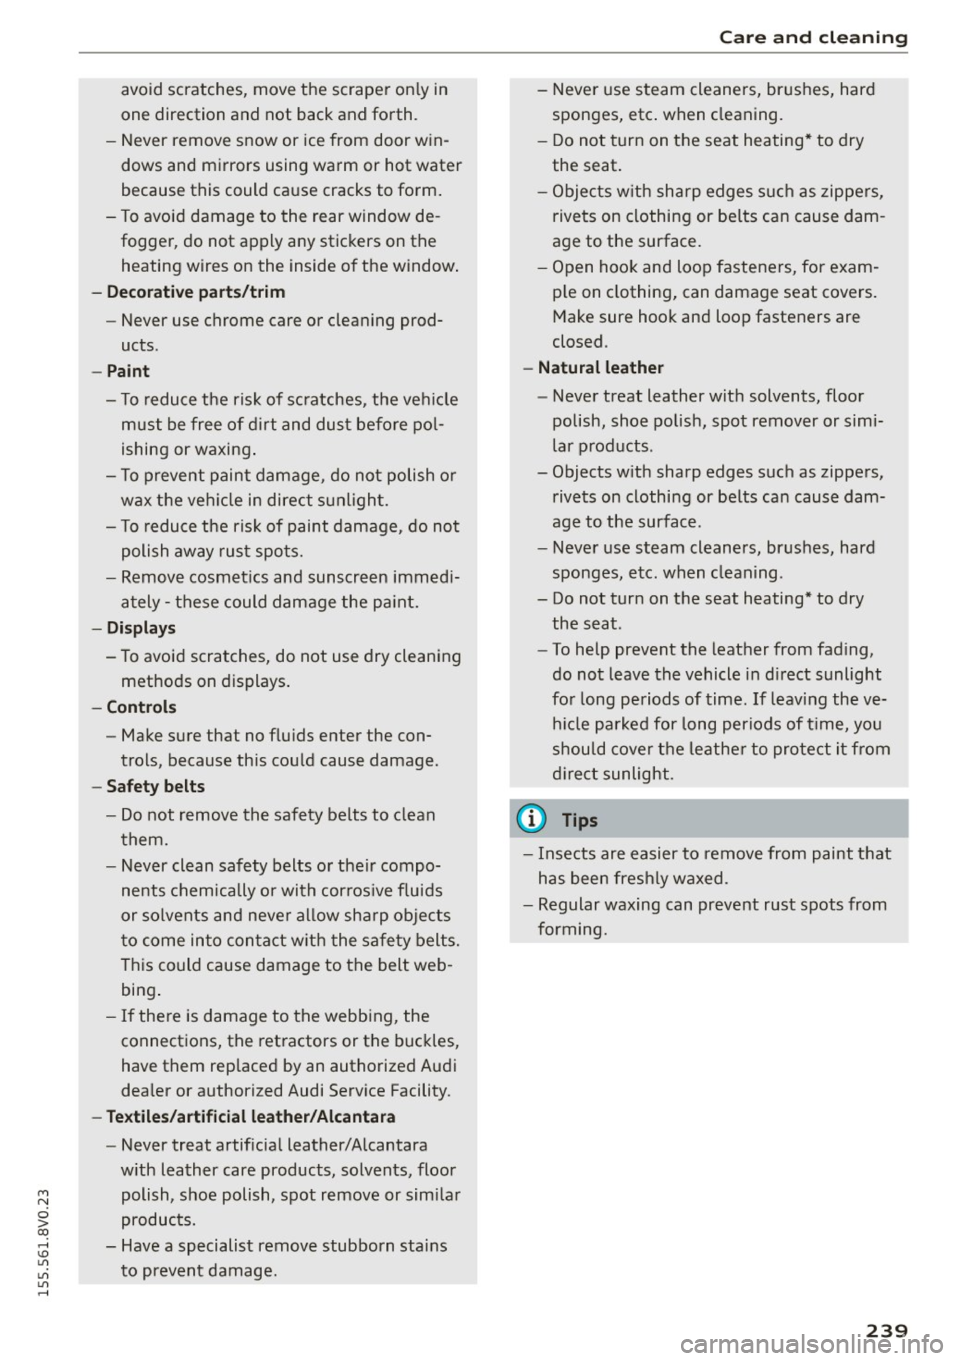
avoid scratches, move the scraper only in
one direction and not back and forth.
- Never remove snow or ice from door win
dows and mirrors using warm or hot water
because this could cause cracks to form.
- To avoid damage to the rear window de
fogger, do not apply any stickers on the
heating wires on the inside of the window.
- Decorative parts/trim
- Never use chrome care or cleaning prod-
ucts .
- Paint
- To reduce the risk of scratches, the vehicle
must be free of dirt and dust before pol
ishing or waxing.
- To prevent paint damage, do not polish or
wax the vehicle in direct sunlight.
- To reduce the risk of paint damage, do not
polish away rust spots.
- Remove cosmetics and sunscreen immedi
ately -these could damage the paint.
- Displays
- To avoid scratches, do not use dry cleaning
methods on displays.
- Controls
- Make sure that no fluids enter the con-
trols, because this could cause damage.
- Safety belts
- Do not remove the safety belts to clean
them.
- Never clean safety belts or their compo
nents chemically or with corrosive fluids
or solvents and never allow sharp objects
to come into contact with the safety belts.
This could cause damage to the belt web
bing.
- If there is damage to the webbing, the
connections, the retractors or the buckles,
have them replaced by an authorized Audi
dealer or authorized Audi Service Facility.
- Textiles/artificial leather/Alcantara
- Never treat artificial leather/Alcantara
with leather care products, solvents, floor polish, shoe polish, spot remove or similar
products.
- Have a specialist remove stubborn stains
to prevent damage.
Care and cleaning
- Never use steam cleaners, brushes, hard
sponges, etc. when cleaning.
- Do not turn on the seat heating* to dry
the seat.
- Objects with sharp edges such as zippers,
rivets on clothing or belts can cause dam
age to the surface.
- Open hook and loop fasteners, for exam
ple on clothing, can damage seat covers.
Make sure hook and loop fasteners are
closed .
- Natural leather
- Never treat leather with solvents, floor
polish, shoe polish, spot remover or simi
lar products .
- Objects with sharp edges such as zippers, rivets on clothing or belts can cause dam
age to the surface .
- Never use steam cleaners, brushes, hard
sponges, etc. when cleaning .
- Do not turn on the seat heating* to dry the seat.
- To help prevent the leather from fading,
do not leave the vehicle in direct sunlight
for long periods of time . If leaving the ve
hicle parked for long periods of time, you
should cover the leather to protect it from
direct sunlight.
(D Tips
- Insects are easier to remove from paint that
has been freshly waxed .
- Regular waxing can prevent rust spots from
forming.
239
Page 251 of 282
....,
N
0 > co
rl I.O
"'
"'
"'
rl
-Some of the equipment listed in the follow
ing tables applies only to certain model
versions or certain opt ional equ ipment.
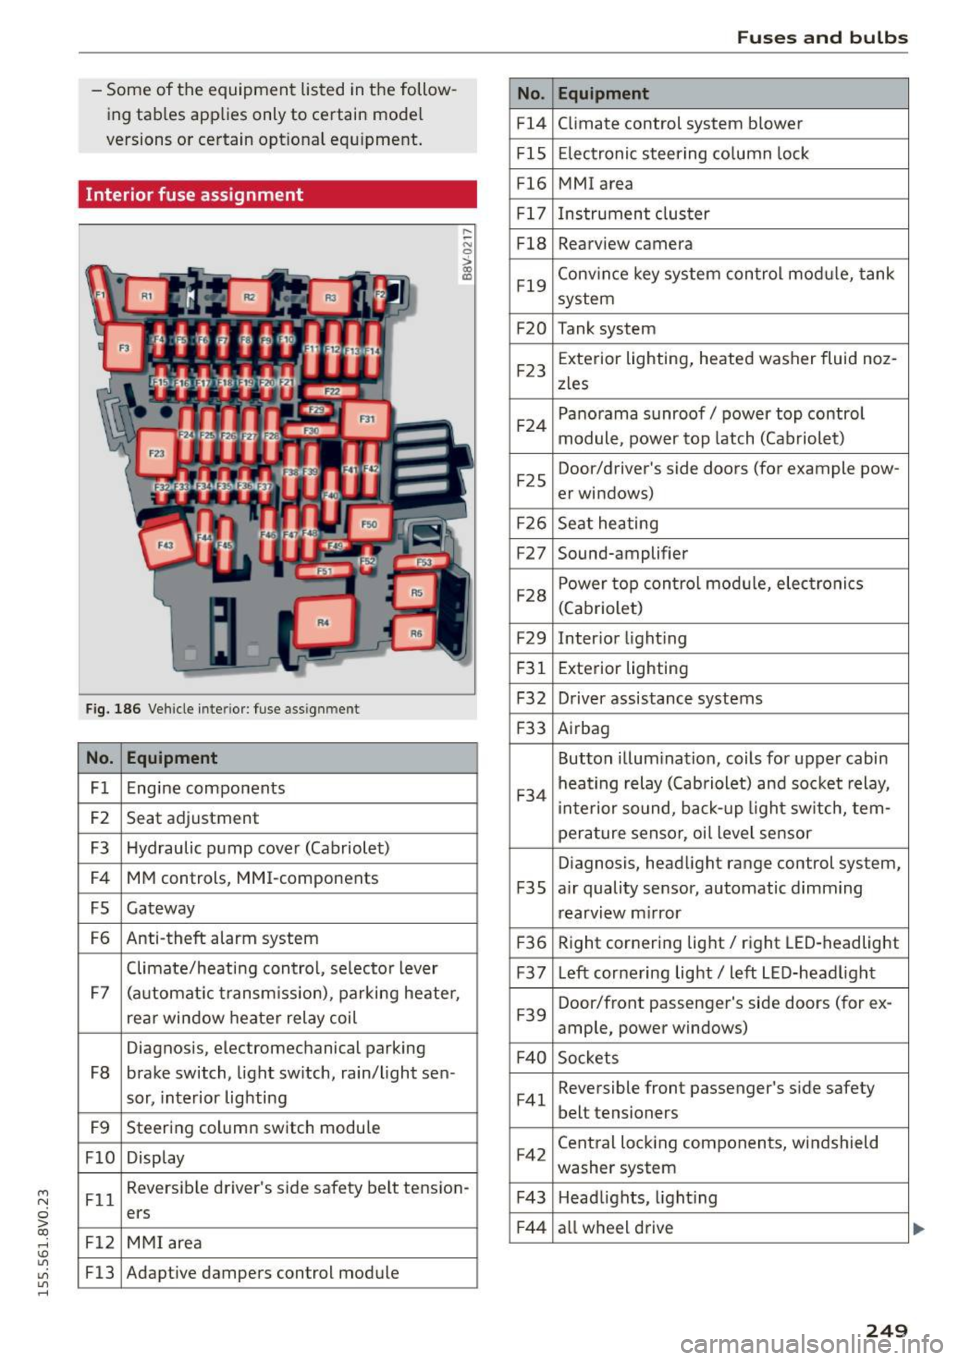
Interior fuse ass ignment
F ig. 186 Vehicle interior: fuse assignment
No. Equipment
Fl Engine components
F2 Seat
adjustment
F3 Hydraulic pump cover (Cabriolet)
F4 MM
controls, MMI-components
FS Gateway
F6 Anti-theft
alarm system
Climate/heati ng control, selector lever
F7 (automat ic transm ission), parking heater,
rear window heater relay coil
Diagnosis, electromechanical parking
F8 brake switch, light switch, rain/light sen-
sor, interior lighting
F9 Steering column switch module
FlO Display
.... ~ N
0
>
"' (0
Fll Reversible
driver's side safety belt tension-
ers
F12 MMI area
F13 Adapt ive dampers control module
No.
Fl4
FlS
Fl6
F 1 7
F18
F19
F20
F23
F 24
F 25
F 26
F27
F28
F29
F 31
F32
F 33
F34
F3S
F 36
F37
F 39
F 40
F 41
F42
F43
F 44
Fu ses a nd bulb s
Equipment
Climate control system blower
Electronic steering co lumn lock
MMI area
Instrument cluster
Rearview camera
Conv ince key system control mod ule, tank
system
Tank system
Exterior lighting, heated washer fluid noz-
zles
Panorama sunroof/ power top control
module, power top latch (Cabriolet)
Door/driver 's side doors (for example pow-
er windows)
Se at heating
Sound-amplifier
Power top control modu le, electronics
(Cab riolet)
Inter ior light ing
E xterior lighting
Driver assistance systems
Airbag
Button illumination, coils for upper cabin
heating relay (Cab riolet) and socket relay,
i nte rior sound, back- up light sw itch, tern-
perature sensor, oi l level sensor
Diagnosis, headlight range control system,
a ir quality sensor, automatic d imming
rearview m irror
Right cornering light/ right LED-headlight
Left cornering light/ left LED-headlight
Door/front passenger's side doors (for ex-
ample, power windows)
Sockets Reversible front passenger's side safety
belt tensioners
Central locking components, windshield
washer system
Head lights, l ight ing
a ll wheel drive
249