Tire AUDI S3 SEDAN 2015 Owners Manual
[x] Cancel search | Manufacturer: AUDI, Model Year: 2015, Model line: S3 SEDAN, Model: AUDI S3 SEDAN 2015Pages: 282, PDF Size: 71.14 MB
Page 5 of 282
M N
0 > co ,...., \!) ..,.,
..,.,
..,., ,....,
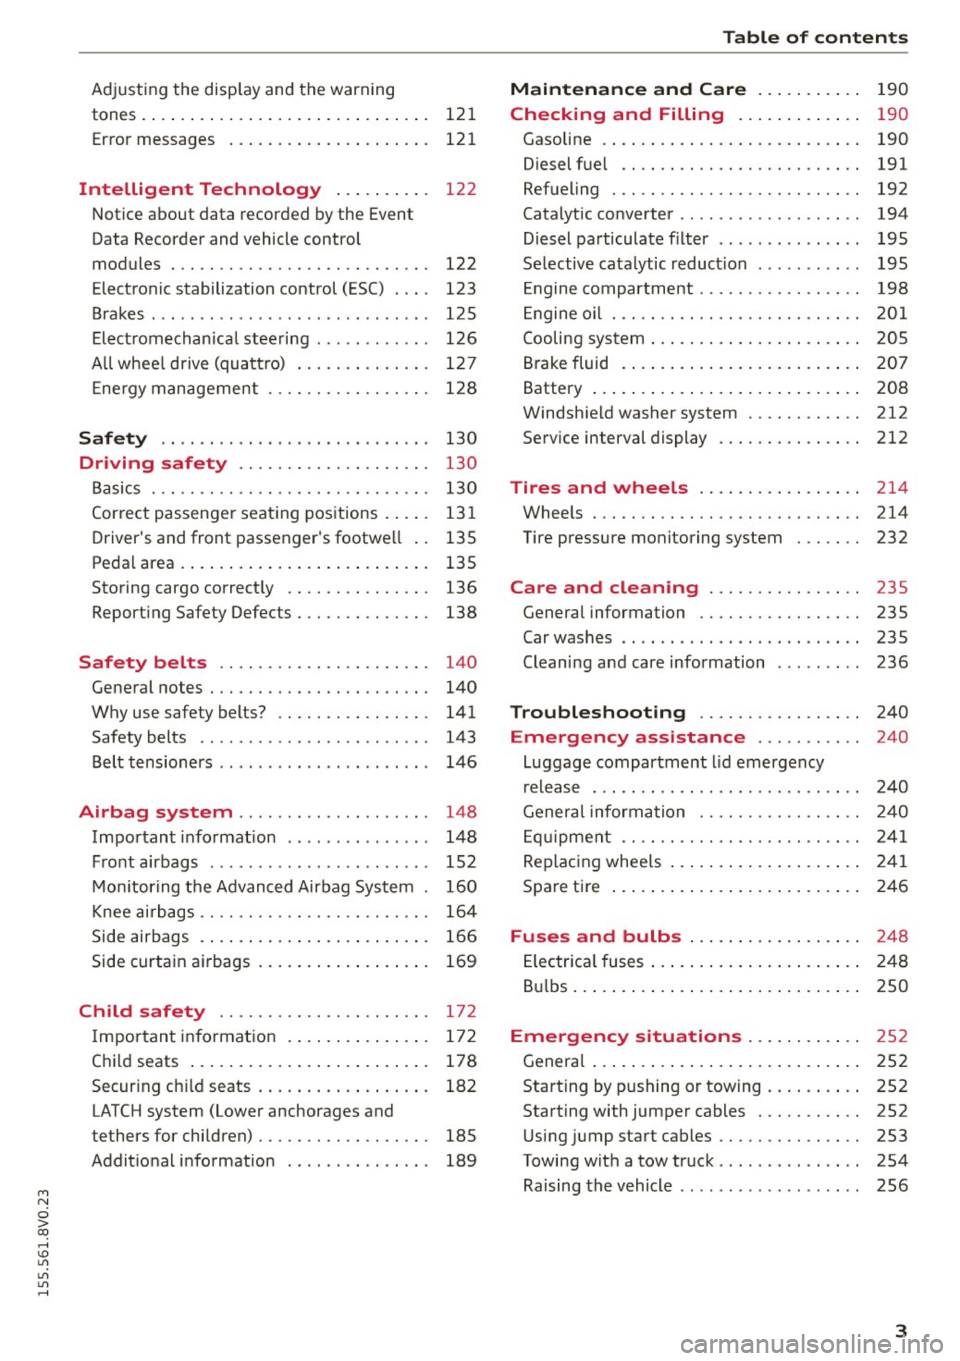
Adjusting the disp lay and the warning
tones .... .. .. .. .... .... ... .. .. .... . 121
Error messages . . . . . . . . . . . . . . . . . . . . . 121
Intelligent Technology . . . . . . . . . . 122
Notice about data recorded by the Event
Data Recorder and vehicle cont rol
modules . . . . . . . . . . . . . . . . . . . . . . . . . . . 122
Electronic stabilization control (ESC) . . . . 123
Brakes . . . . . . . . . . . . . . . . . . . . . . . . . . . . . 125
Electromechanical steering . . . . . . . . . . . . 126
All wheel drive (quatt ro) . . . . . . . . . . . . . . 127
En ergy management 128
Safety . . . . . . . . . . . . . . . . . . . . . . . . . . . . 130
Driving safety . . . . . . . . . . . . . . . . . . . . 130
Basics . . . . . . . . . . . . . . . . . . . . . . . . . . . . . 130
Correct passenger seating positions..... 131
Driver's and front passenger's footwe ll . . 13 5
Pedal area . . . . . . . . . . . . . . . . . . . . . . . . . . 135
Storing cargo correct ly . . . . . . . . . . . . . . . 136
Reporting Safety Defects . . . . . . . . . . . . . . 138
Safety belt s . . . . . . . . . . . . . . . . . . . . . . 140
General notes . . . . . . . . . . . . . . . . . . . . . . . 140
Why use safety belts? . . . . . . . . . . . . . . . . 141
Safety belts . . . . . . . . . . . . . . . . . . . . . . . . 143
Belt tensioners . . . . . . . . . . . . . . . . . . . . . . 146
Airb ag sy stem . . . . . . . . . . . . . . . . . . . . 148
Important information . . . . . . . . . . . . . . . 148
Front airbags . . . . . . . . . . . . . . . . . . . . . . . 152
Monito ring the Advanced Airbag System . 160
Knee airbags . . . . . . . . . . . . . . . . . . . . . . . . 164
Side airbags . . . . . . . . . . . . . . . . . . . . . . . . 166
Side curtain airbags . . . . . . . . . . . . . . . . . . 169
Child safety . . . . . . . . . . . . . . . . . . . . . . 172
I mportant information . . . . . . . . . . . . . . . 172
Child seats . . . . . . . . . . . . . . . . . . . . . . . . . 178
Securing child seats . . . . . . . . . . . . . . . . . . 182
LATCH system (Lower anchorages and
tethers for children) . . . . . . . . . . . . . . . . . . 185
Additional information . . . . . . . . . . . . . . . 189
Table of contents
Maintenance and Care . . . . . . . . . . .
190
Checking and Filling . . . . . . . . . . . . . 190
Gasoline . . . . . . . . . . . . . . . . . . . . . . . . . . . 190
Diesel f uel . . . . . . . . . . . . . . . . . . . . . . . . . 191
Refueling . . . . . . . . . . . . . . . . . . . . . . . . . . 192
Catalytic co nverter . . . . . . . . . . . . . . . . . . . 194
D ie sel particulate filter . . . . . . . . . . . . . . . 195
Selective catalytic reduction . . . . . . . . . . . 195
En gine compartm ent . . . . . . . . . . . . . . . . . 198
Eng ine oil . . . . . . . . . . . . . . . . . . . . . . . . . . 20 1
Cooling system . . . . . . . . . . . . . . . . . . . . . . 205
Brake fluid . . . . . . . . . . . . . . . . . . . . . . . . . 207
Battery . . . . . . . . . . . . . . . . . . . . . . . . . . . . 208
Windshield washer system . . . . . . . . . . . . 212
Serv ice interval display
212
Tires and wheels . . . . . . . . . . . . . . . . . 214
Wheels . . . . . . . . . . . . . . . . . . . . . . . . . . . . 214
Tire pressure monitoring system . . . . . . . 232
Care and cleaning . . . . . . . . . . . . . . . . 235
General information . . . . . . . . . . . . . . . . . 23S
Car washes . . . . . . . . . . . . . . . . . . . . . . . . . 23S
Cleaning and care information 236
Troubleshooting . . . . . . . . . . . . . . . . . 240
Emergency assistance . . . . . . . . . . . 240
Luggage compartment lid emergency
re lease . . . . . . . . . . . . . . . . . . . . . . . . . . . . 240
General informat ion . . . . . . . . . . . . . . . . . 240
Equipm ent . . . . . . . . . . . . . . . . . . . . . . . . . 241
Replacing wheels . . . . . . . . . . . . . . . . . . . . 241
Spare tire . . . . . . . . . . . . . . . . . . . . . . . . . . 246
Fu se s and bulbs . . . . . . . . . . . . . . . . . . 248
El ectrica l fuses . . . . . . . . . . . . . . . . . . . . . . 24 8
Bulbs. . . . . . . . . . . . . . . . . . . . . . . . . . . . . . 250
Emergency situation s . . . . . . . . . . . . 252
General . . . . . . . . . . . . . . . . . . . . . . . . . . . . 252
Starting by pushing or towing . . . . . . . . . . 252
Starting with jumper cables . . . . . . . . . . . 252
Using jump start cables . . . . . . . . . . . . . . . 253
Towing with a tow truck . . . . . . . . . . . . . . . 254
Raising the vehicle . . . . . . . . . . . . . . . . . . . 256
3
Page 17 of 282
M N
0 > co ,...., \!) ..,.,
..,.,
..,., ,....,
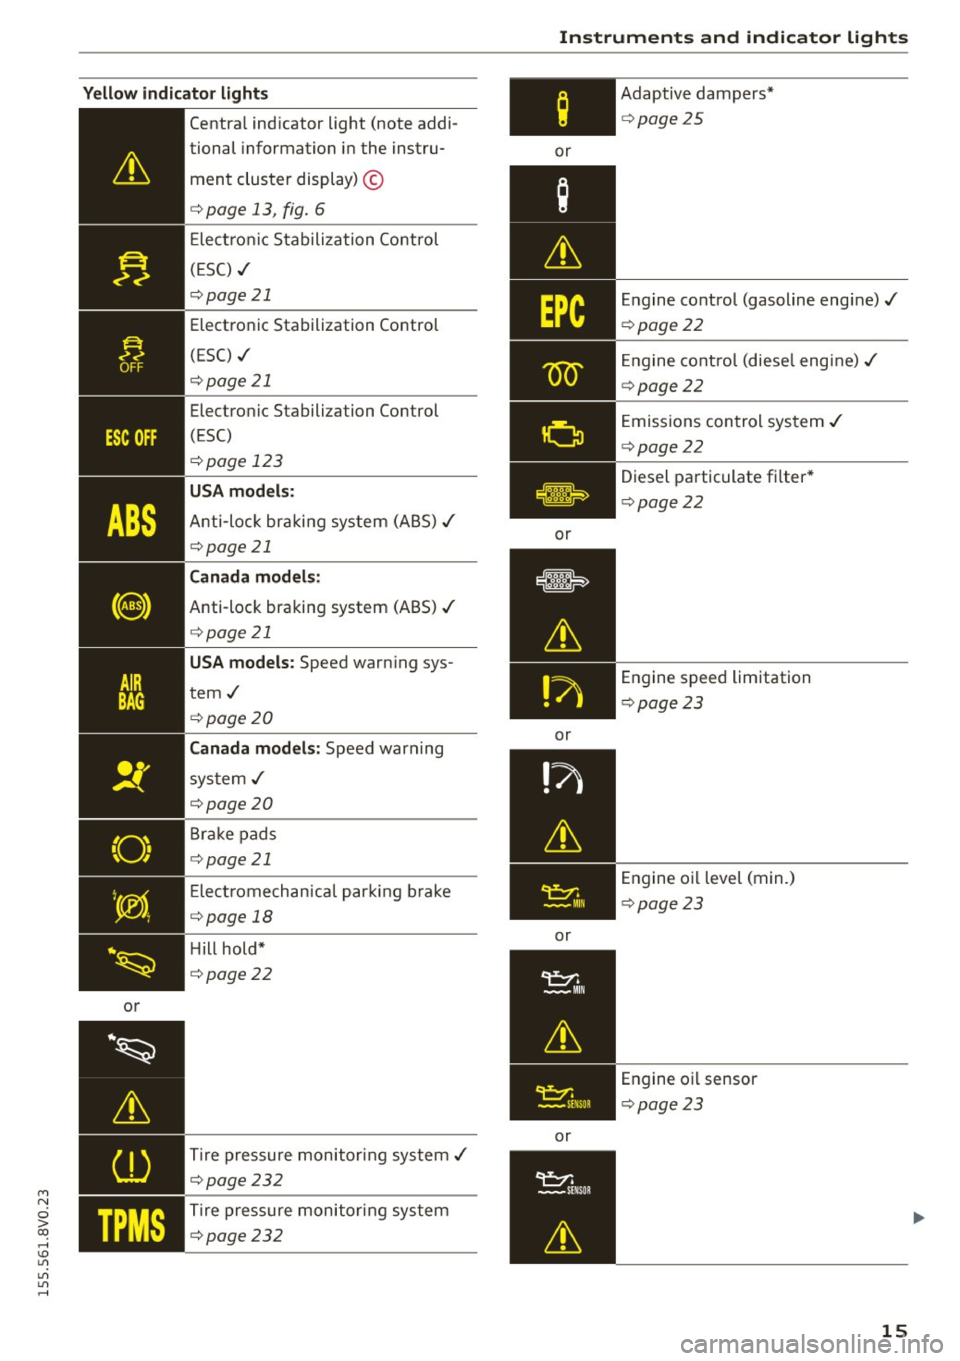
Yellow indicator light s
or
·~
&
(D
TPMS
Centra l ind icator light (note addi-
tional information in the instru-
ment cluste r display) ©
c> page 13 , fig . 6
Ele ctr onic Stabilization Control
(ESC) ./
c::>page 21
Electro nic Stabilization Control
(ESC) ./
c>page21
Electronic S tabili za tion Control
(ESC)
c::> page 123
USA models:
Anti-lo ck brak in g sys tem (ABS) ./
c::> page 21
Canada models:
Anti-loc k braki ng system (ABS) ./
c::> page 21
USA models: Speed warning sys-
tern./
c::> page 20
Canada models: Speed warn ing
sy stem./
c::> page 20
Bra ke pads
c::> page 21
Ele ct ro m echan ica l par kin g b rake
c::> page 18
H ill hold*
c::> page 22
Ti re pressure monitor ing sys tem ./
c::> page 232
Tire pressure monitor ing system
c::> page 232 Instruments and indicator lights
or
or
or
or
or
Adaptive dampers
*
c>page 25
En gine co ntrol (gasoline eng ine) ./
c> page 22
Engine co ntro l (diese l eng ine) ./
c>page 22
Emissions con trol sys tem ./
c>page 22
Diesel particulate fi lter *
c>page 22
Engine speed limitation
c>page 23
Engine o il level (min.)
c::> page 23
Engine o il sensor
c::> page 23
15
Page 36 of 282
Opening and closing
only the driver 's door or the entire vehicle should
un lock when unlocking
q page 3 7 .
Automatic locking (Auto L ock )
The Auto Lock funct ion loc ks all doors and the
luggage compartmen t lid once the speed has ex
ceeded approximate ly 9 mph (15 km/h).
The ca r is unlocked aga in once the ignition key is
removed . In add ition, the vehicle can be unlo cked
if the opening function in the power locki ng sys
tem sw itch is used or one o f the door handles is
pu lled .*
Add it io nally, in the event of a cr ash with a irbag
dep loymen t the doors are au tom atic ally un
lo cked to allow access to the vehicle.
Anti-theft alarm system*
If th e a nti-theft alarm system detects a ve hicle
break-in, audio and v is u a l warning s ignals are
tr iggered.
The ant i-theft alarm system tu rns on automati
cally when you lock the veh icle. It deact ivates
wh en unlocking usi ng the remote cont ro l key or
by to uchin g the se nsor on the door handle ( con
ven ience key).
To switch the a larm off, press th em butto n on
the r emote co ntro l key or convenience key or
sw itch the igni tion on. The alarm a lso stops au to
ma tica lly aft er a cer ta in amoun t of time.
Turn signals
W hen you unlock the vehicle, the t urn signa ls
flash twice . W hen you lock the vehicle, the t urn
signals flash once.
If they do not flash, one of the doo rs, the lug
gage compartment lid or the hood is not loc ked
or the ignition is still sw itched on (the la tter ap
plies to veh icles with a convenience key).
Unintentionally locking yourself out
In the following cases there safeguards to pre
ve nt you lock ing you r remote master key in the
ve hicle:
- The vehicle does not lock with the centra l lock
ing switch if the driver's door is open
c> page 37 .
34
-On veh icles with a convenience key*, the l ug
gage compa rtment lid unlocks again after clos
ing if the most recently used key is in the lug
gage compa rtment.
Do not loc k your vehicle w ith the remote control
key or convenience key * until all doors and the
l uggage compartment lid a re closed. In this way
you avoid locking yourse lf out accidentally .
@ Tips
-Do not leave va luab les unattende d in the ve
hicle. A locked veh icle is not a safe!
- If the LE D in the u pper edge of the drive r's
doo r tu rns o n for a bout 30 seconds after
the vehicle is locked, there is a ma lf u nction
in the power locki ng or the anti-theft alarm
system*. Have the problem corrected by an
autho rized Aud i dealer or autho rized Audi
Service Facility .
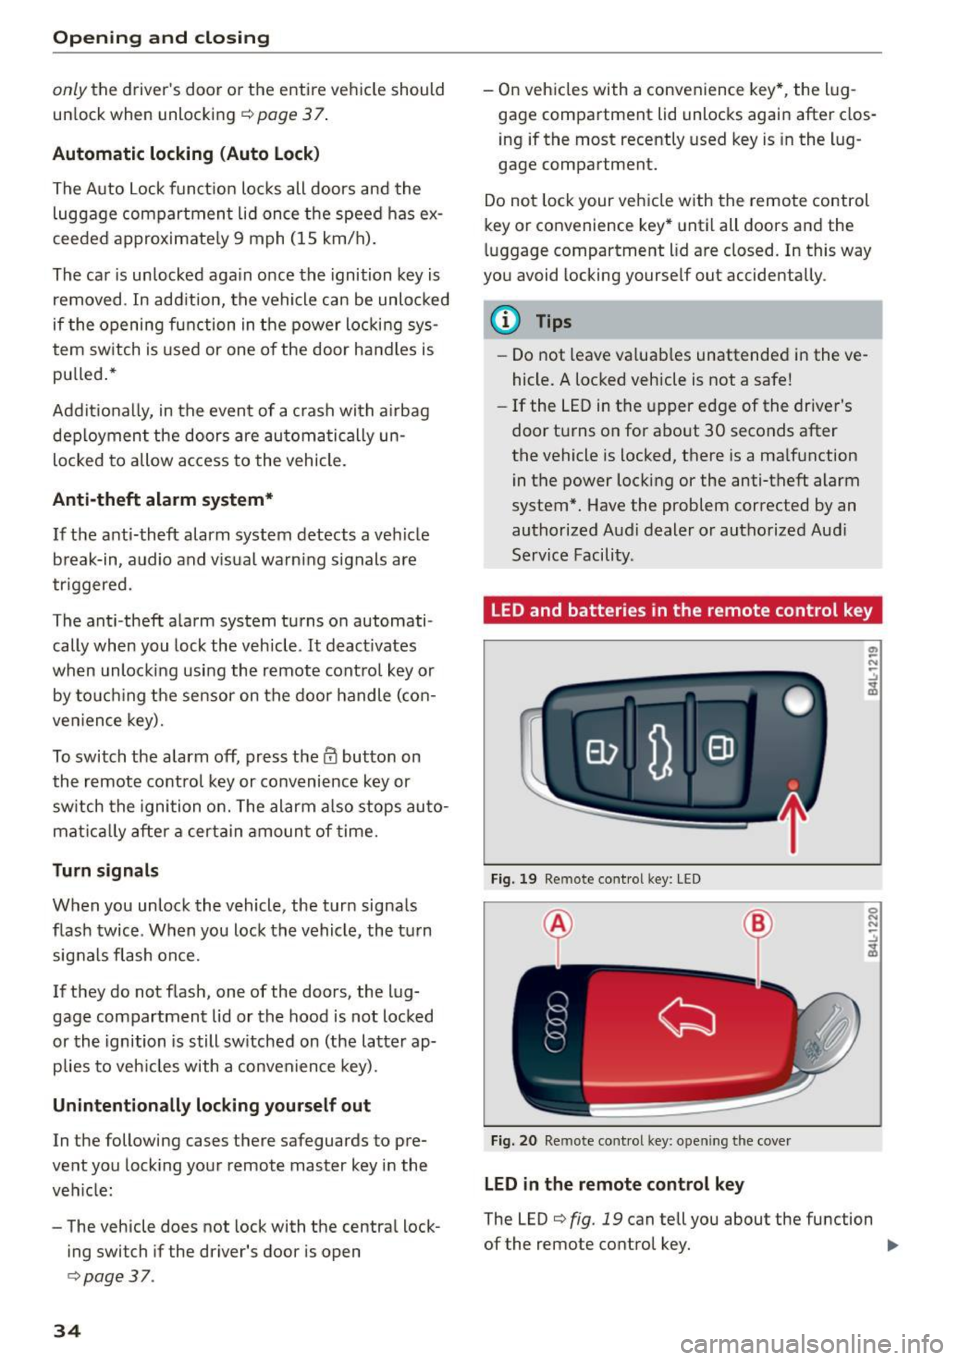
LED and batterie s in the remote control key
Fi g. 19 Remote con trol key: LED
Fig. 20 Remote con trol key: open ing the cove r
LED in the remote control key
The LED c> fig. 19 can tell you about the fu nction
of the remote control key. ..,_
Page 37 of 282
....,
N
0 > co
rl I.O
"'
"'
"'
rl
• If you press a button quickly, the LED blinks
once .
• If you press a button longer (convenience open
ing*), the LED blinks several times.
• If the LED does not blink, the remote control
key battery is dead. The message=
Please
ch ange ke y batt ery
can also appear in the in
strument cluster d isplay . Replace the battery .
Replacing the remote cont rol ke y batte ry
"Pry off the cover with a co in c;, fig. 20.
• Insert the new battery w ith the" +" facing up .
• Press the cover back onto the key until it clicks
into place .
We recommend having the battery replaced by
an authorized Audi dealer or authorized Audi
Service Fac ility .
@.) For the sake of the environment
Dead batteries must be disposed of using
methods that will not harm the env ironment.
Do not dispose of them i n household trash .
{!) Tips
The replacement battery must meet the same
specifications as the original battery .
Remote control key synchronization
The remote control key must be synch ron ized if
the vehicle does not lock and unlock with the re
mote cont ro l.
• Press the remote control key button
l@J .
• Insert the key in the dr iver door lock within 30
seconds.
• Press the
[m] button o r Im button.
Opening and clo sing
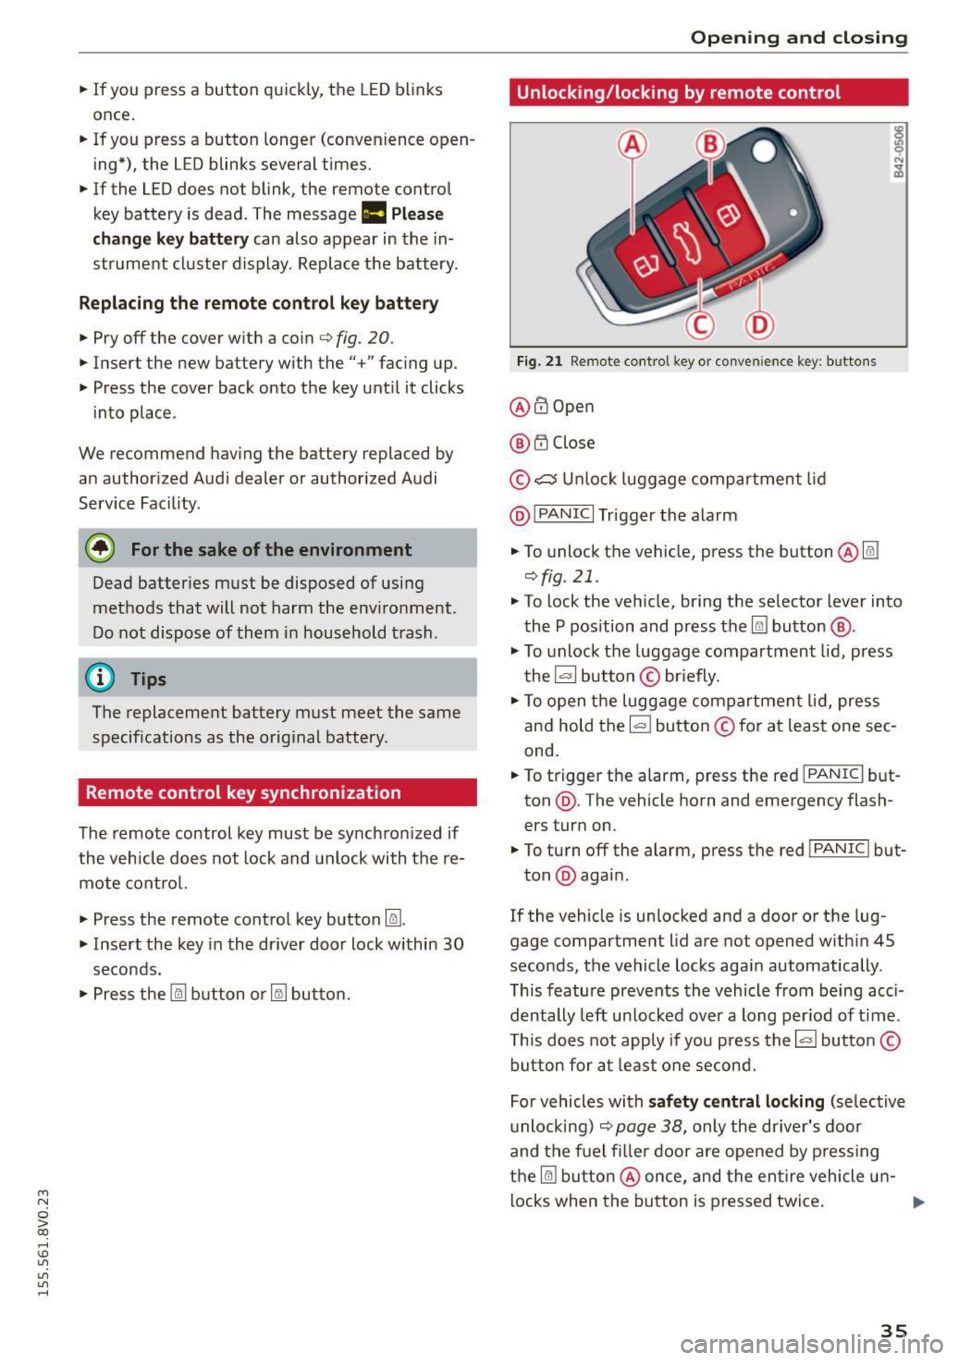
Unlocking/locking by remote control
Fig. 2 1 Remote cont rol key o r conven ience key: b uttons
@ @Open
@ t'.D Close
© ,;:::::::, U nlock luggage compartment lid
@ I
PANIC I Trigger the alarm
• To unlock the vehicle, press the button @@:!
¢fig.21 .
• To lock the ve hicle, br ing the selector lever into
the P position and press the
Im button @ .
• To unlock the luggage compartment lid, press
the~ button © briefly .
• To open the luggage compartmen t lid, press
and hold the I= ! button © for at least one sec
ond.
• To trigger the alarm, press the red I
PANIC I but
ton @. The vehicle horn and emergency flash
ers turn on.
• To turn off the alarm, press the red I
PANIC ! but-
ton @again .
If the vehicle is unlocked and a door or the lug
gage compartment lid are not opened w ith in 45
seconds, the vehicle locks aga in automatically .
This feature prevents the vehicle from being acci
dentally left un locked over a long per iod of t ime .
T his does not app ly if you press the~ button©
button for at least one second.
For vehicles with
s af ety ce ntral locking (se lective
u nlocking)
c;, page 38, only the dr iver's door
and the fuel filler door are opened by press ing
the
@I button @once, and the en tire vehicle u n-
locks when the button is pressed twice. ..,.
35
Page 38 of 282
Opening and closing
A WARNING
Read and following all WARNINGS. ¢ & in
Key set on page 33
(D Tips
- Only use the remote control key or conven
ience key within view of the vehicle.
- Do not use the remote control when you are
inside the vehicle. Otherwise, you could un
intentionally lock the vehicle. If you then
tried to start the engine or open a door, the
alarm would be triggered. If this happens, press the unlock button
m.
- The vehicle can only be locked when these
lector lever is in the
P posit ion.
- Only use the panic function in an emergen
cy.
- For information on additional remote con
trol key or convenience key functions, refer
to ¢
page 41, Convenience opening/clos
ing .
Locking and unlocking with the
convenience key
A ppl ies to veh icles: w ith conve nien ce key
The front doors and the luggage compartment
lid can be unlocked and locked without using the
remote control key .
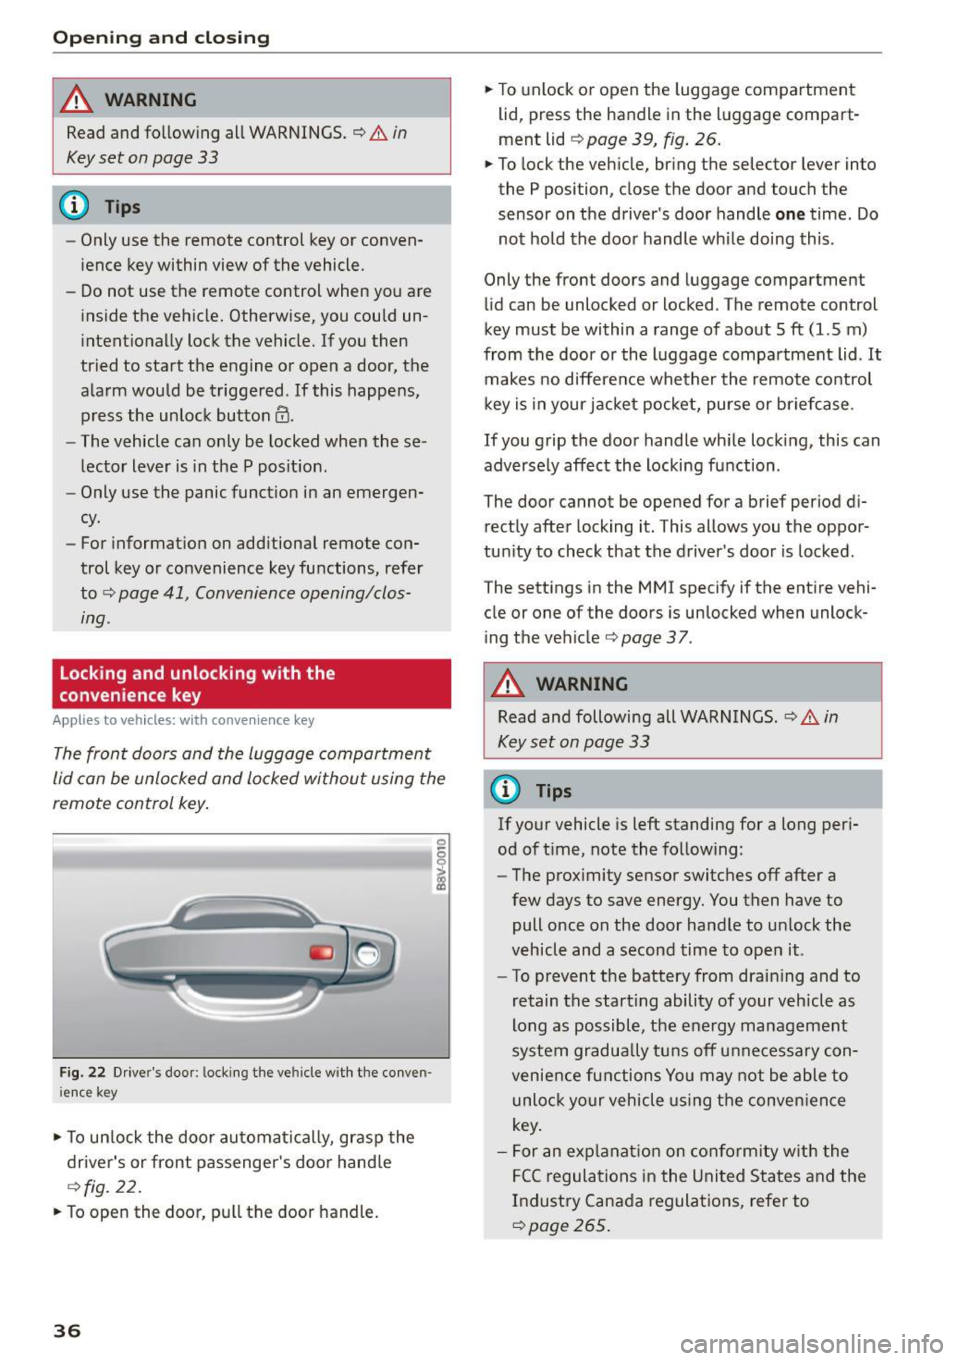
Fig. 22 Driver's door : locking the ve hicle with the conven
i ence key
• To unlock the door automatically, grasp the
driver's or front passenger 's door hand le
¢ fig. 22.
• To open the door, pull the door handle.
36
• To unlock or open the luggage compartment
lid, press the handle in the luggage compart
ment lid
¢ page 39, fig. 26.
• To lock the vehicle, bring the selector lever into
the P position, close the door and touch the
sensor on the driver's door handle
one time. Do
not hold the door handle while doing this .
Only the front doors and luggage compartment
lid can be unlocked or locked . T he remote control
key must be within a range of about
5 ft (1.5 m)
from the door or the luggage compartment lid . It
makes no difference whether the remote control
key is in your jacket pocket, purse or briefcase .
If you grip the door handle wh ile locking, this can
adversely affect the locking function .
The door cannot be opened for a brief period di rectly after locking it. This allows you the oppor
tunity to check that the driver's door is locked .
The settings in the
MMI specify if the entire vehi
cle or one of the doors is unlocked when unlock
ing the vehicle¢
page 37.
A WARNING
Read and following all WARNINGS . ¢ & in
Key set on page
33
@ Tips
If your vehicle is left standing for a long peri
od of time, note the following:
- The proximity sensor switches off after a
few days to save energy. You then have to
pull once on the door handle to unlock the
vehicle and a second time to open it.
- To prevent the battery from drain ing and to
retain the starting ability of your vehicle as
long as possible, the energy management
system gradua lly tuns off unnecessary con
venience functions You may not be able to
unlock your vehicle using the convenience
key .
- For an exp lanation on conformity with the
FCC regulations in the United States and the
Industry Canada regulations, refer to
¢page 265.
Page 39 of 282
....,
N
0 > co
rl I.O
"'
"'
"'
rl
Unlocking/locking with the key
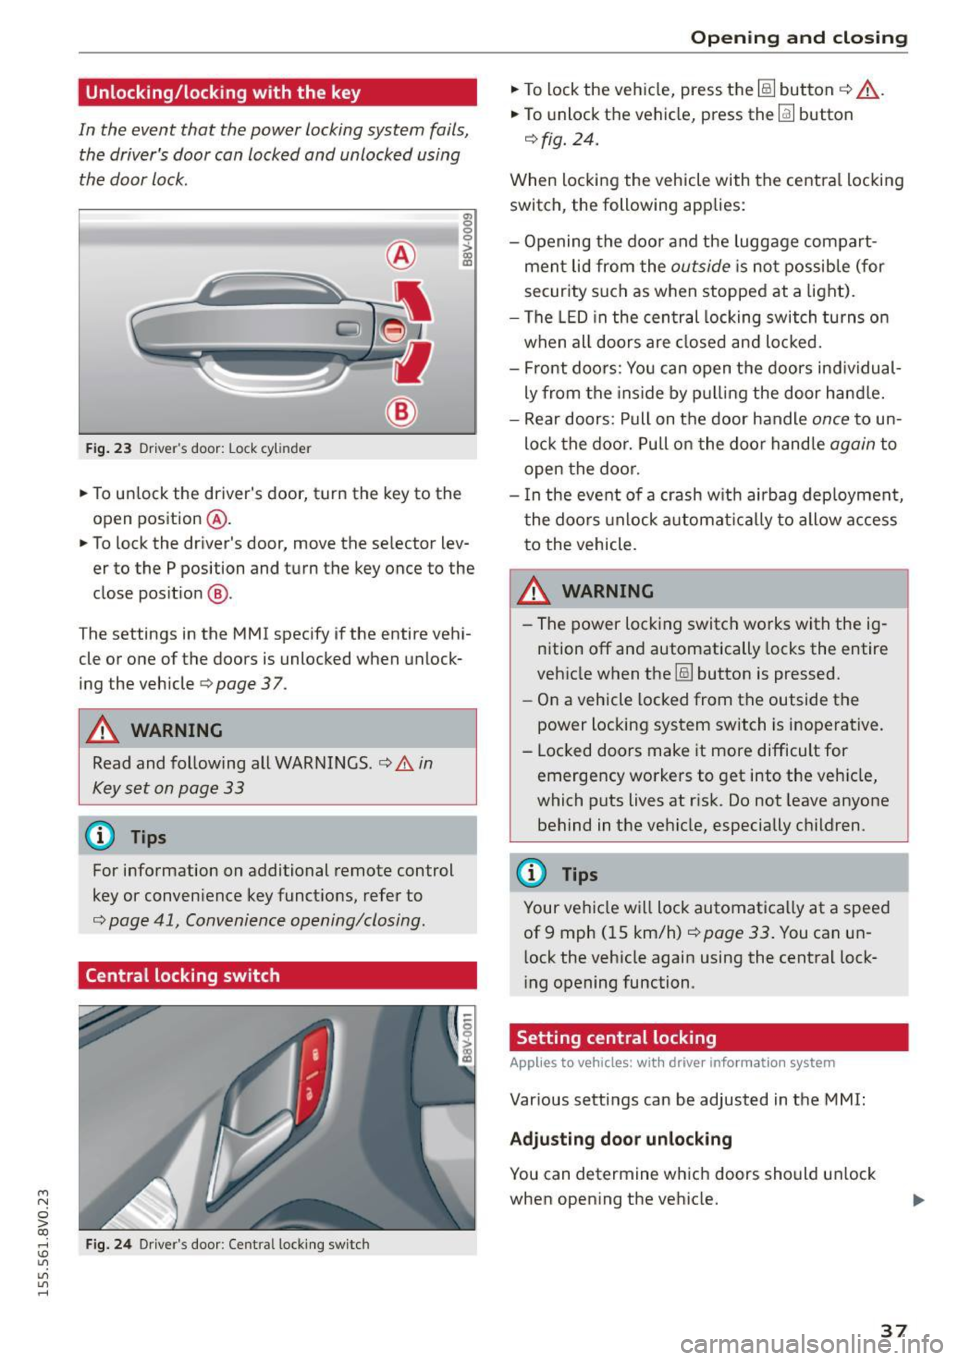
In the event that the power locking system fails,
the driver's door can locked and unlocked using
the door lock.
F ig . 23 Dr ive r's door: Lock cylinder
• To un lock the driver's door, turn the key to the
open position
® ·
a, 0 0 0 :> Q) a,
• To lock the driver's door, move the selector lev
er to the P position and turn the key once to the
close pos it ion
® ·
The settings in the MMI specify if the entire vehi
cle or one of the doors is unlocked when unlock
ing the vehicle
c:::> page 3 7.
A WARNING
Read and following all WARNINGS. c:::> &. in
Key set on page 33
@ Tips
For information on additional remote control
key or conven ience key functions, refer to
c::> page 41, Convenience opening/closing .
Central locking switch
Fig. 24 Dr iver 's door : Centra l lock ing switch
Open ing and clo sing
• To lock the vehicle, press the~ button c:::> .&_.
• To unlock the vehicle, press the~ button
c:::>fig. 24.
When loc king the vehicle with the centra l locking
switch, the following app lies:
- Opening the door and the luggage compart
men t lid from the
outside is not possible (for
secur ity such as when stopped at a light).
- The LED in the central locking switch tu rns o n
when all doors are closed and loc ked.
- Front doo rs: You can open the doors ind ividual
ly from the ins ide by p ulling the door hand le.
- Rear doors: Pull on t he door handle
once to un
lo ck the doo r. Pull on the doo r handle
again to
open the doo r.
- I n the event of a crash w it h ai rbag deploymen t,
t he doo rs unlock a utoma tically to allow access
to the vehicle.
_&. WARNING
- The power locking switch wo rks with the ig
n ition off an d automatically locks the entire
veh icle when the~ button is pressed.
- On a vehicle locked from the outside the
power loc king system switch is inoperative.
- Locked doors make it more difficult for emergency workers to get into the ve hicle,
which puts lives at ris k . Do not leave anyone
behind in the ve hicle, especially c hildren.
(D Tips
Your ve hicle w ill lock automatica lly at a speed
of 9 mph ( 15 km/h)
c::> page 33 . You can un
l ock the vehicle again using the central lock
i ng opening function.
Setting central locking
Applies to vehicles: with drive r in fo rmat io n system
Var ious settings can be adjusted in the MMI:
Adju sting door unlocking
You can determine wh ich doors should u nlock
when open ing the vehicle.
37
Page 40 of 282
Opening and closing
"'Select: the IMENU ! button> Car> Systems*
control button > Vehicle settings > Central
locking > Door unlocking.
Selecting All and pressing the~ button on the
remote control key unlocks the entire vehicle.
If you select
Driver and then press the~ button
on the remote control key, only the driver's door
will unlock. In vehicles with a convenience key,
only the front door whose handle you pull will
unlock. If you press the~ button twice, the en
tire vehicle will unlock. If you press the~ button,
the entire vehicle will always lock.
Folding* the exterior mirrors
"'Select: the IMENU ! button> Car> Systems*
control button > Vehicle settings > Central
locking > Fold mirrors when locking.
For more
information, refer to
c:> page 47, Adjusting
the exterior mirrors.
If you select On, the outside mirrors will fold in
automatically when you press the~ button on
the remote control key
i:> page 47.
Tone when locking
"'Select : the IMENU ! button> Car> Systems*
control button > Vehicle settings > Central
locking> Tone when locking.
When checked off./, a tone will sound when you
lock the vehicle.
If you press the~ button twice, the entire vehi
cle will lock. There is a locking tone at the same
time
1l .
Electronic immobilizer
The immobilizer prevents unauthorized use of
your vehicle.
A microchip in the key automatically deactivates
the electronic immobilizer when the key is locat
ed in the vehicle.
If you remove the key from the
vehicle, the electronic immobilizer activates
again automatically.
l) Thi s fu nct io n is not availabl e in all cou ntri es .
38
A WARNING ,_ -
Always take the key with you whenever you
leave your vehicle. The electronic immobilizer
can be deactivated with the key, so this could
make it possible for unauthorized persons to
start the engine and operate vehicle systems
such as the power windows or sunroof. This
can increase the risk of serious injury.
(D Tips
-The vehicle cannot be started if an unau
thorized key is used.
It may not be possible
to start the vehicle under certain circum
stances, for example if there is another ra
dio module like the key from another vehicle
or a transponder on the same keychain.
- For an explanation on conformity with the
FCC regulations in the United States and the
Industry Canada regulations, refer to
i:>page 265.
Safety central locking
App lies to vehicles : wi th safe ty cen tral lock ing
Safety central locking provides the possibility, to
only unlock the driver's door and the fuel filler
door. The rest of the vehicle remains locked.
Unlocking the driver's door and the fuel filler
door
"' Press the remote control key or convenience key
Ifill button once or turn the key once in the open
ing direction.
Unlocking all doors, the luggage
compartment lid and the fuel filler door
"' Press the remote control key or convenience key
Ifill button twice within five seconds or turn the
key
twice within five seconds in the opening di
rection.
When unlocking just the driver's door, the anti
theft alarm system* is also immediately deacti
vated.
In vehicles with an MMI, you can directly adjust
the safety central locking
c:> page 3 7.
Page 45 of 282
....,
N
0 > co
rl I.O
"'
"'
"'
rl
Light and Vision
Exterior Lighting
Switching lights on and off
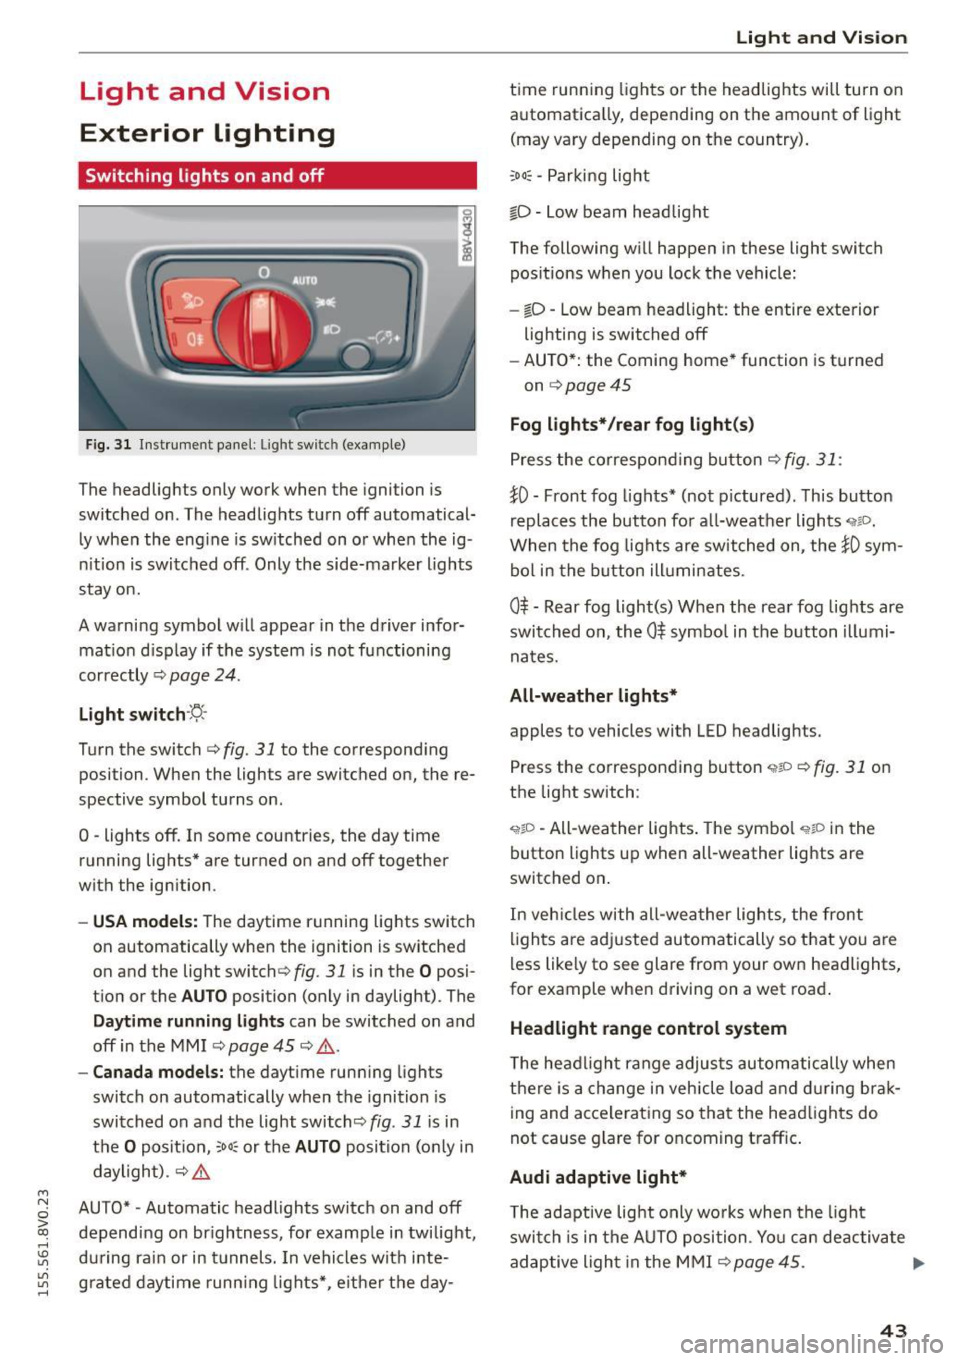
Fig. 31 Instrument panel: Ligh t swi tc h (examp le )
The headlights only work when the ignition is
switched on . The headlights turn off automatical
ly when the eng ine is switched on or when the ig
nition is switched off . Only the side-marker lights
stay on.
A warning symbol w ill appear in the driver infor
mat ion d isp lay if the system is not functioning
correctly ¢
page 24.
Light switch ·~-
Turn the switch c::> fig. 31 to the corresponding
position . When the lights are switched on, the re
spective symbol turns on .
0 -lights off. In some countries, the day time
running lights* are turned on and off together
with the ignition .
-USA models: The daytime running lights switch
on automatically when the ignition is switched
on and the light switch¢
fig. 31 is in the O posi
tion or the
AUTO position (only in daylight) . The
Daytime runn ing lights can be switched on and
off in the MMI
c::> page 45 c::> & .
-Canada models: the daytime running lights
switch on automatically when the ignition is
switched on and the light switch<::>
fig. 31 is in
the
O position, ;ooc or the AUTO position (on ly in
daylight) .
c::> &.
AUTO* -Automatic headlights switch on and off
depending on brightness, for example in twilight,
during rain or in tunnels. In vehicles with inte
grated daytime running lights*, e ither the day-
Light and Vision
time running lights or the headlights will turn on
automatica lly, depend ing on the amount of light
(may vary depending on the country).
;oo~ -Parking light
io -Low beam headlight
The following will happen in these light switch
pos itions when you lock the vehicle:
- iD -Low beam headlight: the entire exterior
lighting is switched off
- AUTO*: the Coming home* function is turned
on
c::> page 45
Fog lights* /rear fog light(s)
Press the correspond ing button c::> fig. 31 :
!0 -Front fog lights* (not pictured) . This button
replaces the button for all-weather lights
'i'liD.
When the fog lights are switched on, the !0 sym
bol in the button illuminates.
0$ -Rear fog light(s) When the rear fog lights are
switched on, the
0$ symbol in the button illumi
nates.
All-weather lights*
apples to vehicles with LED headlights.
Press the corresponding button
<,1gD <=> fig. 31 on
the light switch :
'i'!io -All-weather lights . The symbo l 'i'!io in the
button l ights up when all-weather lights are
switched on .
In veh icles with all-weather lights, the front
lights are adjusted automatically so that yo u are
less likely to see glare from your own headlights,
for example when driving on a wet road .
Headlight range control system
The headlight range adjusts automatically when
there is a change in vehicle load a nd during brak
ing and accelerating so that the headlights do
not cause glare for oncoming traff ic.
Audi adaptive light*
T he adaptive light only wo rks when the light
switch is in the AUTO position . You can deactiva te
adaptive light in the MMI ¢
page 45. ..,.
43
Page 62 of 282
Seats and storag e
-Loose objects in the passenger compart
ment can fly forward during abrupt maneu
vers or acc idents and injure occupants.
- Always store objects in the luggage com
partment and use suitable straps, particu
larly with heavy objects.
- When you transport heavy objects, a lways
remember that a change in the center of
gravity may result in a change in the veh i
cle's handling character istics.
- Follow all warnings
Q page 130, Driving
safety .
(D Tips
The tire pressure must be adjusted to the load
- see the tire pressure sticker located on the
driver's side B-pillar.
General information
.&, WARNING
Refer to the chapter Dr iving Safely
Q page 130, Driving safety for important in
formation, tips, suggestions and warnings that you should read and fo llow for your own
safety and the safety of your passengers.
Increasing the size of the luggage
compartment
The rear seat backrests can be folded forward ei
ther separately or together.
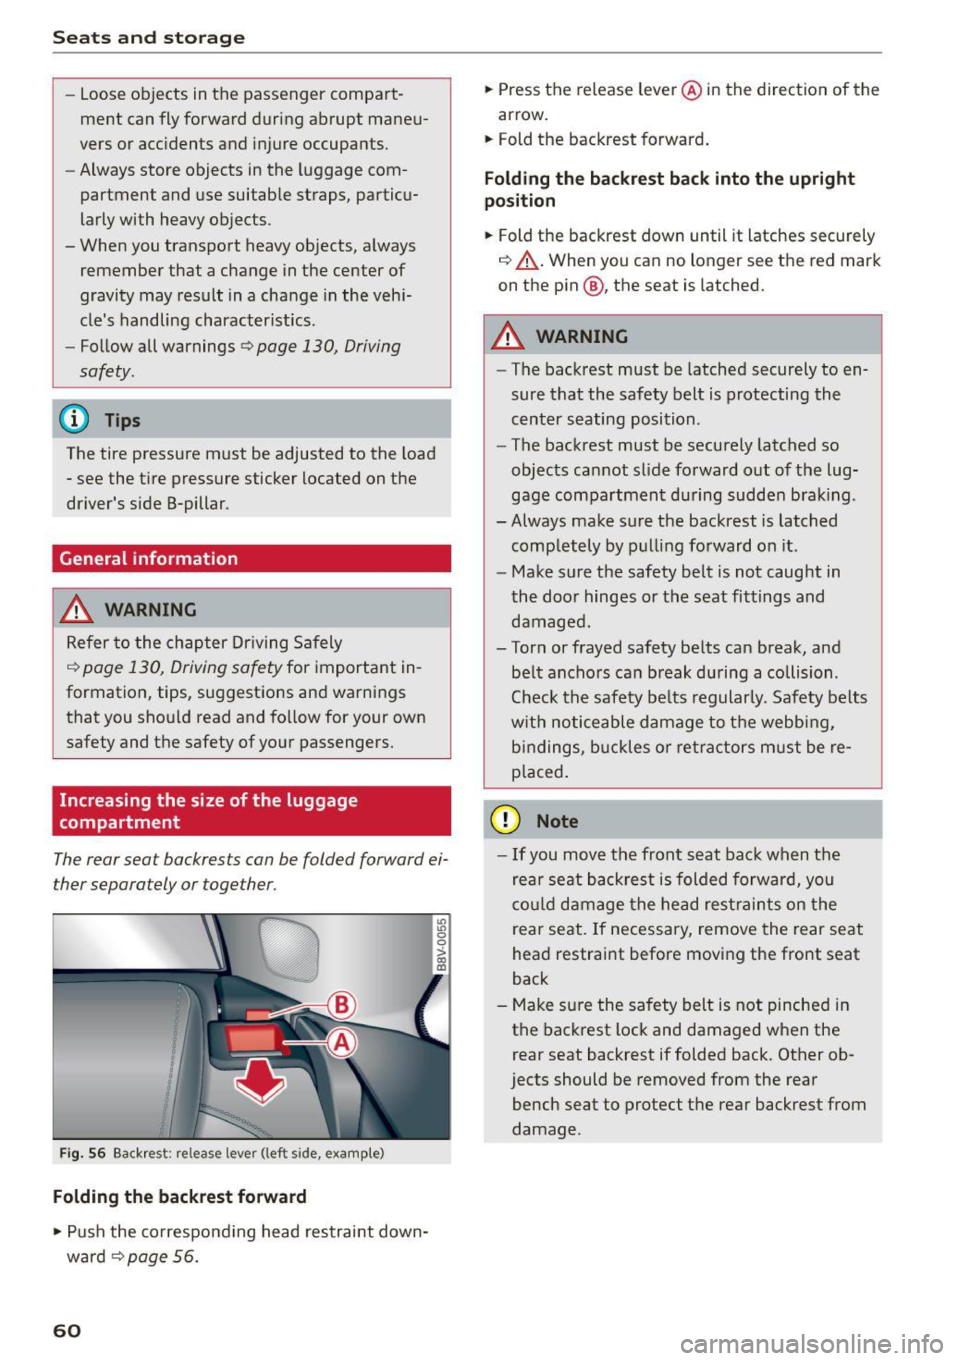
Fig. 56 Backrest: release lever (left side, example)
Folding the backrest forward
.,. Push the co rresponding head restraint down
ward ¢
page 56.
60
.,. Press the release leve r@ in the direction of the
arrow.
.,. Fold the backrest forward .
Folding th e backre st back into the upright
po sition
.,. Fold the backrest down until it latches securely
¢ ,&. .When you can no longer see the red mark
on the pin@, the seat is latched.
.&, WARNING
- The backrest must be latched securely to en
sure that the safety belt is protecting the
cent er seating position .
- The backrest must be securely latched so
objects cannot slide forward o ut of the lug
gage compartment du ring sudde n brak ing .
- Always make sure the backrest is latched
comp letely by pulling forward on it .
- Make sure the safety belt is not caught in
the doo r hinges or the seat fittings and
damaged.
- Torn or frayed safety be lts can break, and
be lt ancho rs can b reak du ring a collision .
Check the safety be lts regularly. Safety belts
w it h noticeable damage to t he webb ing,
bi ndings, b uckles o r ret ra ctors m ust be re
placed.
(D Note
- If you move the front seat back when the
rear seat backrest is folded forward, you
c o ul d damage the head res traints on the
rear seat. If necessary, remove the rear seat
head restraint before moving the front seat
back
- Make su re the safety belt is not pinched in
the back rest lock and damaged when the
rear seat backrest if folded back. Other ob
jects should be removed from the rear
bench seat to protect the rear backrest from
damage .
Page 65 of 282
M N
0 > co ,...., \!) ..,.,
..,.,
..,., ,....,
tightened. If necessary, retighten the mountings and check the entire system
from t ime to t ime.
- After mounting a roof rack system, or when
you transport objects on the roof of your ve
hicle, the height of the veh icle is naturally
increased. Be careful when driving under
l ow bridges or in parking garages for exam
ple. This could cause damage to the load
and even the vehicle itself.
- Make sure the open rear lid and the sun
roof* do not come into contact with the roof
rac k.
Loading the roof rack
Always distribute loads evenly . Make sure any
thing on the roof rack is securely tied down .
... Always distribute the loads on the roof rack
evenly .
... Always attach items to the roof rack securely
before you d rive off .
The maximum perm iss ible roof weight is
165 lb
( 75 kg ). The roof weight is the total of the
weight of the roof rack, the attachments and the
cargo you a re ca rrying . You must also not exceed
the maximum load weight fo r the roof rack you
a re using.
When using a roof rack system wh ich has a lower
l oad carrying capacity, you must not use up the
tota l maxim um permissible load car ry ing capac i
ty specified above. Inste ad , you shou ld load t he
roof rack system only to the maximum capacity
specified by the manufact urer of the roof rack
system .
A WARNING
Weak, damaged or improper straps used to
secure items to the roof rack can fa il during
hard brak ing or in a collision and cause seri
ous personal injury.
- Make sure the roof rack is insta lled exactly
as spec ified above
¢ page 62.
- Always use suitable mounting straps for se
curing items to the roof rack to help prevent
items from shift ing or f ly ing fo rward.
-
S eat s and stor age
- Items on the roof rac k must always be se
curely mounted.
- The use of a roof rack can negatively affect
the way a vehicle handles. Cargo that is
large, heavy, bulky, long or flat will have a
greater negative inf luence on the vehicle's
ae rodynamics, center of gravity and overall
h a ndling. Always drive slowly, avoid sudden
b rak ing and maneuvers when transpor ting
cargo on the roof of your veh icle.
- Never exceed the maxim um permissible
load carrying capacity of the roof of your ve
h icle, the permiss ible axle weights and the
perm issib le tota l we igh t of your vehicle
¢ page 258, Weights .
@ For the sake of the environment
As a result of the increased wind resistance
created by a roof ra ck , your vehicle is using
fuel unnecessarily. So remove the roof rac k af
ter using it.
63