wipers AUDI S3 SEDAN 2015 Owners Manual
[x] Cancel search | Manufacturer: AUDI, Model Year: 2015, Model line: S3 SEDAN, Model: AUDI S3 SEDAN 2015Pages: 282, PDF Size: 71.14 MB
Page 4 of 282
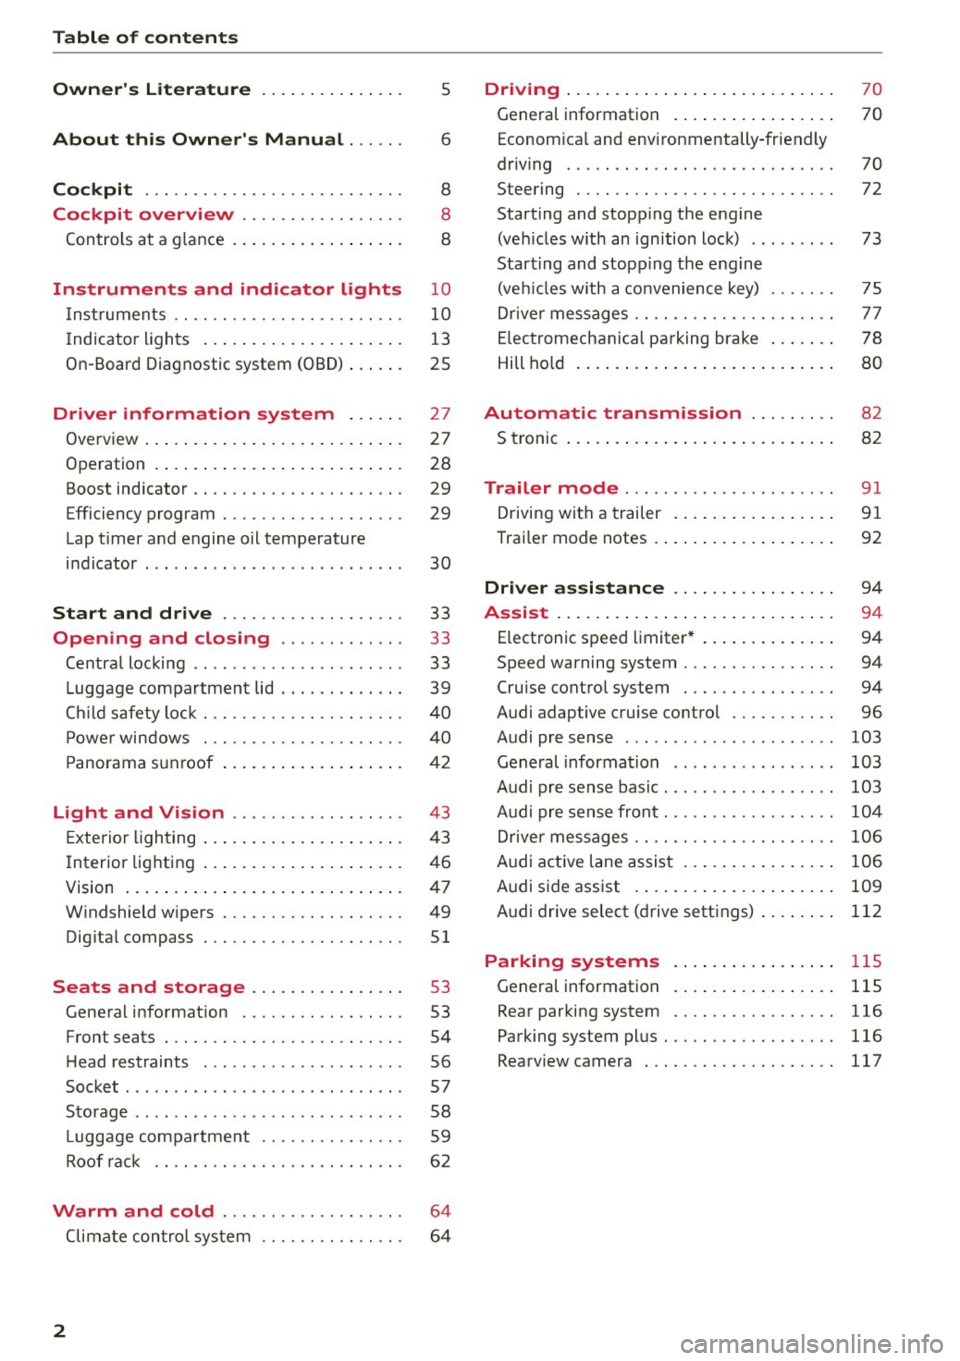
Table of contents
Owner's Literature
About this Owner's Manual ... .. .
Cockpi t ... ...... ........... .. .. .. .
Cockpi t overview .......... .. .. .. .
Controls at a g lance . ..... ... .. .. .. .. .
Instrument s and indicator lights
Instruments .. .. ........... .. .. .. .. .
I ndicator ligh ts .... ..... ... .. .. .. .. .
On-Board Diagnostic system (OBD) ..... .
Driver inform ation system ..... .
Overview ..... .. ... .. ..... ... .. .. .. .
Operation . ..... .. . .. ..... ... .. .. .. .
Boost indicator .... ........... .. .. .. .
Efficiency program ............ .. .. .. .
Lap t imer a nd engine oil temperature
i n dicator . .. .... .......... ...... ... .
Start and drive .............. .. .. .
Opening and clo sing ...... .. .. .. .
Centra l locking .. .............. ... .. .
L uggage compa rtment lid .. .. .. .. .. .. .
Ch ild safety loc k ... ......... .. .. .. .. .
P ower windows . ............. .. .. .. .
P anorama s unroof .. ..... ... .. .. .. .. .
5
6
8
8
8
10
10
13
25
27
27
28
29
29
30
33
33
33
39
4 0
40
42
Light and Vi sion . . . . . . . . . . . . . . . . . . 43
Exterior lighting . . . . . . . . . . . . . . . . . . . . . 4 3
Interior lighting . . . . . . . . . . . . . . . . . . . . . 46
V1s1on . . . . . . . . . . . . . . . . . . . . . . . . . . . . . 4 7
W indshield wipers . . . . . . . . . . . . . . . . . . . 49
Dig ita l compass . . . . . . . . . . . . . . . . . . . . .
51
Seats and storage ....... .. .. ... . .
General information .......... .. .. .. .
53
53
Front seats . . . . . . . . . . . . . . . . . . . . . . . . . 54
H ead rest raints . . . . . . . . . . . . . . . . . . . . . 56
Socket . . . . . . . . . . . . . . . . . . . . . . . . . . . . . 57
S to rag e . . . . . . . . . . . . . . . . . . . . . . . . . . . . 58
L uggage compa rtmen t . . . . . . . . . . . . . . . 59
Roof rac k . . . . . . . . . . . . . . . . . . . . . . . . . .
6 2
Warm and cold . . . . . . . . . . . . . . . . . . . 64
Climate con trol sy stem . . . . . . . . . . . . . . . 6 4
2
Driving . . . . . . . . . . . . . . . . . . . . . . . . . . . . 70
General information . . . . . . . . . . . . . . . . . 70
Econom ica l and envi ronmentally-friendly
driving . . . . . . . . . . . . . . . . . . . . . . . . . . . . 70
Steering . . . . . . . . . . . . . . . . . . . . . . . . . . . 72
Starting and stopp ing the engine
(ve hicles w ith an ign ition lock) . . . . . . . . . 73
Start ing and stopp ing the engine
(ve hicl es w ith a convenience key) . . . . . . . 75
Drive r messages . . . . . . . . . . . . . . . . . . . . . 7 7
E lectromechanica l pa rking brake . . . . . . . 78
Hill ho ld . . . . . . . . . . . . . . . . . . . . . . . . . . . 80
Automatic tran smission . . . . . . . . . 82
S troni c . . . . . . . . . . . . . . . . . . . . . . . . . . . . 8 2
Trailer mode . . . . . . . . . . . . . . . . . . . . . . 91
Driving with a trailer . . . . . . . . . . . . . . . . . 91
Trai ler mode notes . . . . . . . . . . . . . . . . . . . 92
Driver assi stance . . . . . . . . . . . . . . . . . 9 4
Assi st .. .. .. .... .. .. ... .. ..... ... .. 94
E lectronic speed limiter* . . . . . . . . . . . . . . 94
Speed warning system . . . . . . . . . . . . . . . . 94
Cruise contro l system . . . . . . . . . . . . . . . . 94
Audi adaptive cruise control . . . . . . . . . . .
96
Audi pre sense . . . . . . . . . . . . . . . . . . . . . . 103
General informa tion . . . . . . . . . . . . . . . . . 103
Audi pr e sense bas ic . . . . . . . . . . . . . . . . . . 103
Audi pre se nse front. . . . . . . . . . . . . . . . . . 10 4
Driver messages . . . . . . . . . . . . . . . . . . . . . 106
Audi active lane assist . . . . . . . . . . . . . . . . 106
Audi s ide ass ist . . . . . . . . . . . . . . . . . . . . . 109
A udi drive select (d rive settings) . . . . . . . . 112
Parking systems
General information
Rear par king system
115
115
116
Parking system pl us. .. ........... .. .. 116
Rearv iew camera . . . . . . . . . . . . . . . . . . . . 117
Page 18 of 282
Instruments and indicator lights
or
or
or
or
or
16
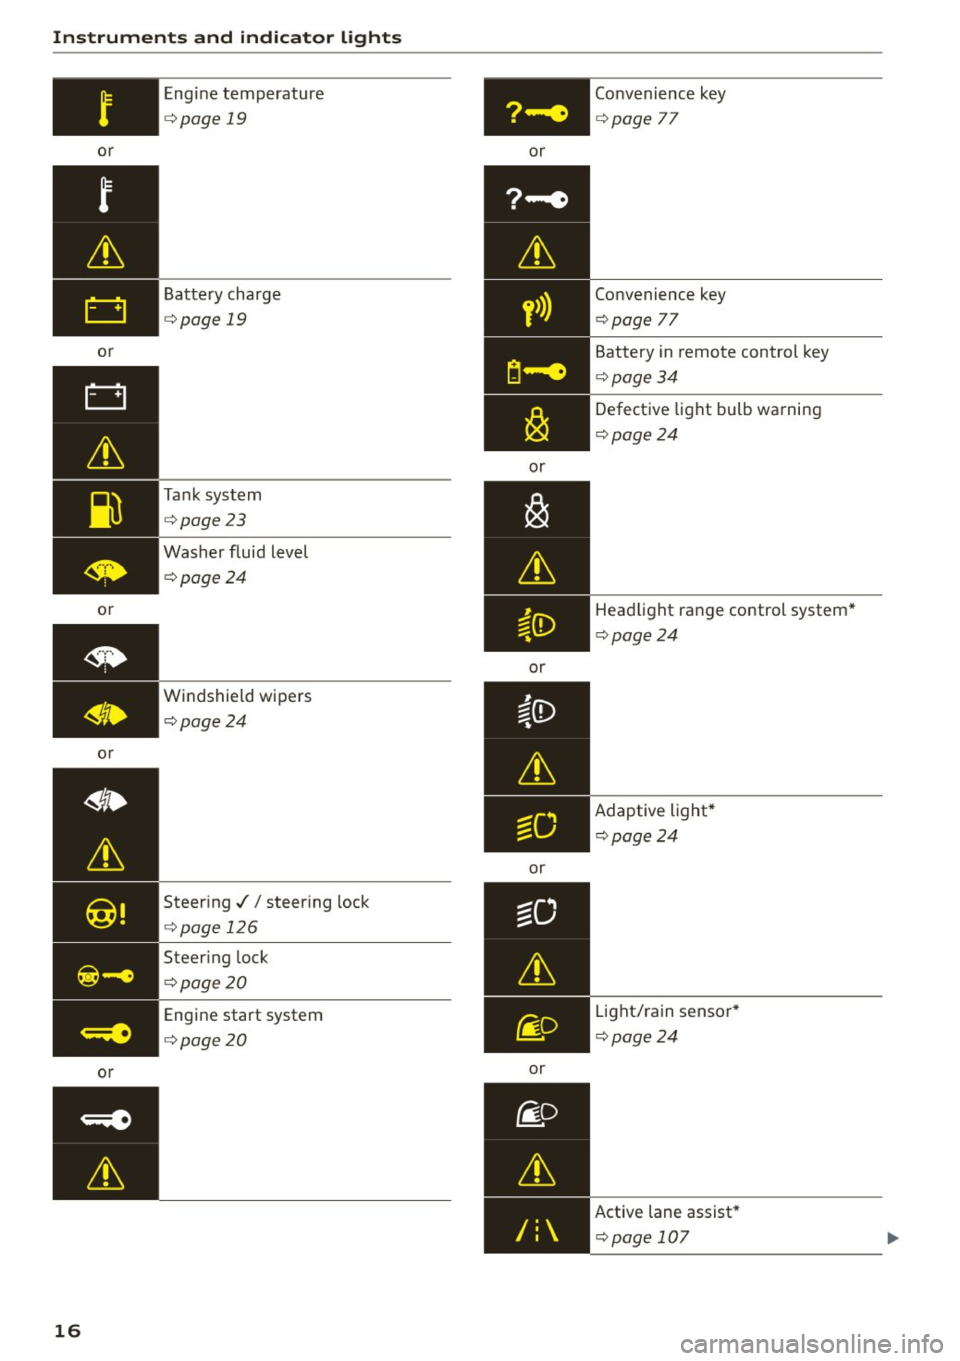
Engine temperature
¢page 19
Battery charge
¢page 19
Tank system
¢page23
Washer fluid level
¢page24
Windshield wipers
¢page24
Steer ing .// steer ing lock
¢ page 126
Steering lock
¢page20
Engine start system
¢ page20 or
y>)}
or
or
or
or Convenience key
¢
page
77
Convenience key
¢page
77
Battery in remote control key
¢page34
Defective light bulb warning
¢ page24
Headlight range control system *
¢ page24
Adaptive light* ¢ page24
Light/rain sensor *
¢ page24
Active lane assist *
¢ page 107
Page 26 of 282
Instruments and indicator lights
Drive to an authorized Aud i dea ler or authorized
Audi Service Faci lity immediately to have the
malfunct ion corrected .
(D Note
Applies to veh icles with diesel engines: If the
diese l fue l quality is poor , it may be necessary
to have the water drained from the water sep
arator
l) in the fuel filter more often than
specified in the ma intenance schedule. Th is
can help reduce engine malfunct ions.
@ For the sake of the environment
Fuel should never enter the sewer system or
come into contact w ith the ground.
More information on refueling is ava ilable on
page
c:> page 192.
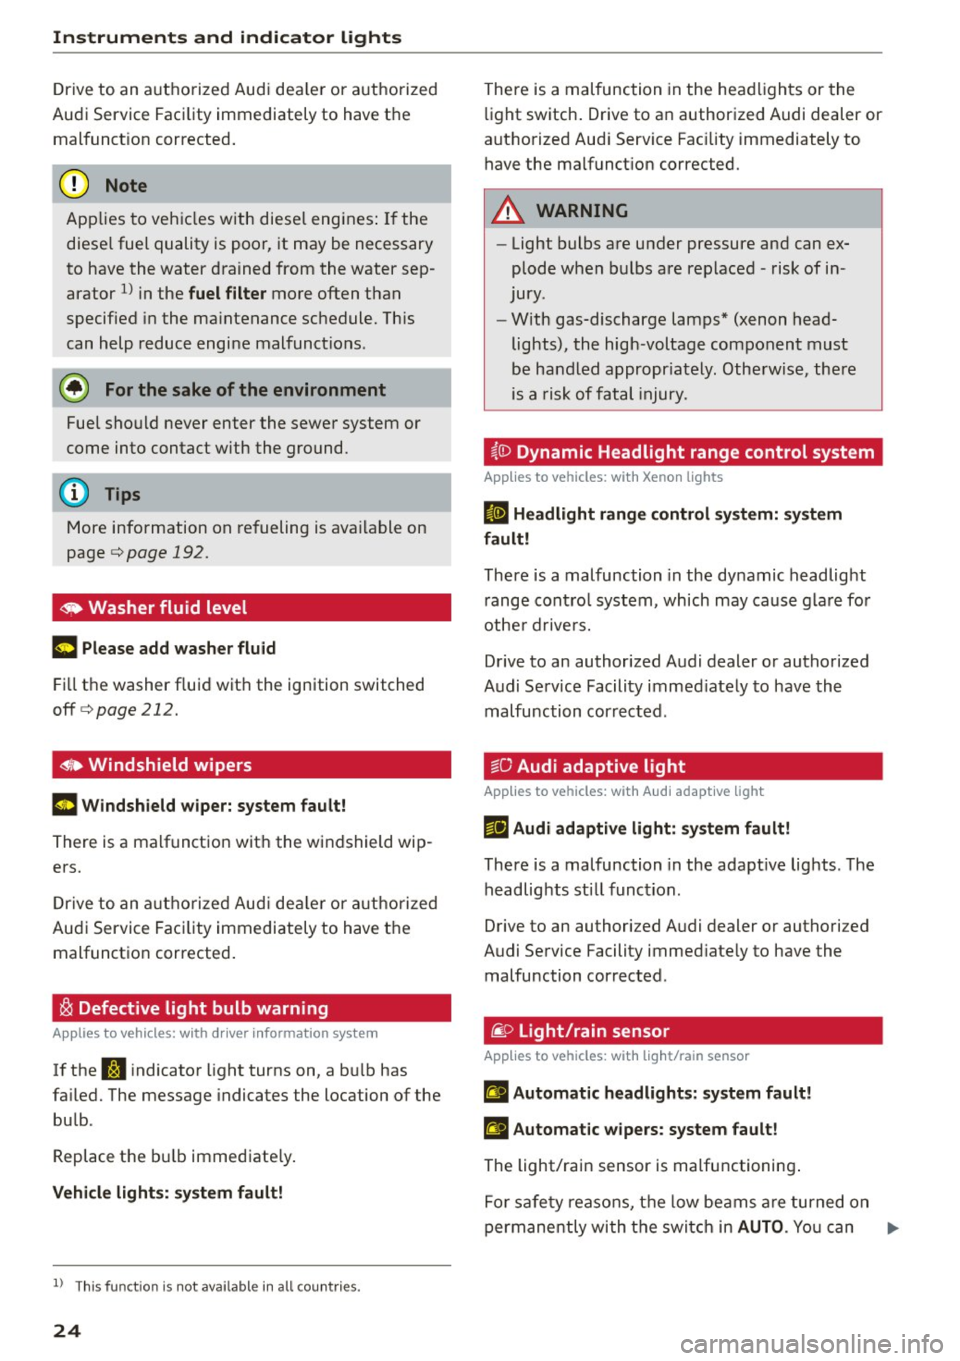
~ Washer fluid level
~ Pl ease add w asher flu id
F ill the washer fluid with the ignition switched
off
c:> page 212.
~~ Windshield wipers
m Wind shield w iper: s yste m fault!
There is a malfunction with the windshield wip
ers.
Dr ive to an a utho rized Aud i dea le r or a uthorized
Audi Service Faci lity immediately to have the
malfunct ion corrected .
~ Defective light bulb warning
Applies to veh icles: w ith driver information system
If the S:i indicator light turns on, a bu lb has
fa iled. The message indicates the location of the
bu lb.
Replace the bu lb immediate ly.
Vehi cle l ight s: syste m fault!
l) Thi s fun ction is not av ailable in all c ountri es.
24
There is a malfunction in the headlights or the
li ght switch . Drive to an authorized Audi dealer or
authorized Aud i Service Fac ility immediately to
have the malfunct ion corrected.
A WARNING
--
- Light bulbs are under pressure and can ex
plode when bulbs are replaced -risk of in
jury .
- With gas-discharge lamps* (xenon head
lights), the high -voltage component must
be handled appropr iately. Otherwise, there
is a risk of fatal injury.
~(D Dynamic Headlight range control system
App lies to vehicles: wit h Xeno n lights
II He adlight r an ge control system: sy ste m
f a ult!
There is a malfunction in the dynamic headlight
r ange contro l system, which may cause glare for
othe r drive rs.
Drive to an authorized Audi dealer or authorized
Audi Service Facility immed iate ly to have the
malfunction corrected.
go Audi adaptive light
App lies to vehicles : wi th Audi adapt ive ligh t
l'!J Audi adaptiv e light : system fault!
There is a malfunction in the adapt ive lights . T he
headlights sti ll function.
Drive to an authori zed Audi dealer or authori zed
Audi Service Facility immed iate ly to have the
malfunction corrected.
@ Light/rain sensor
App lies to vehicles: wit h lig ht/rain sensor
II Automat ic headlight s: s ys tem fault!
El Automat ic wipe rs: s ystem fault !
The light/rain sensor is ma lfunctioning .
Fo r safety reasons, the low beams a re turned on
permanently wi th the switch in
AUTO . You can .,..
Page 51 of 282
....,
N
0 > co
rl I.O
"'
"'
"'
rl
Sun visors
C1o... ___ J
Fig. 39 Left side: su n viso r
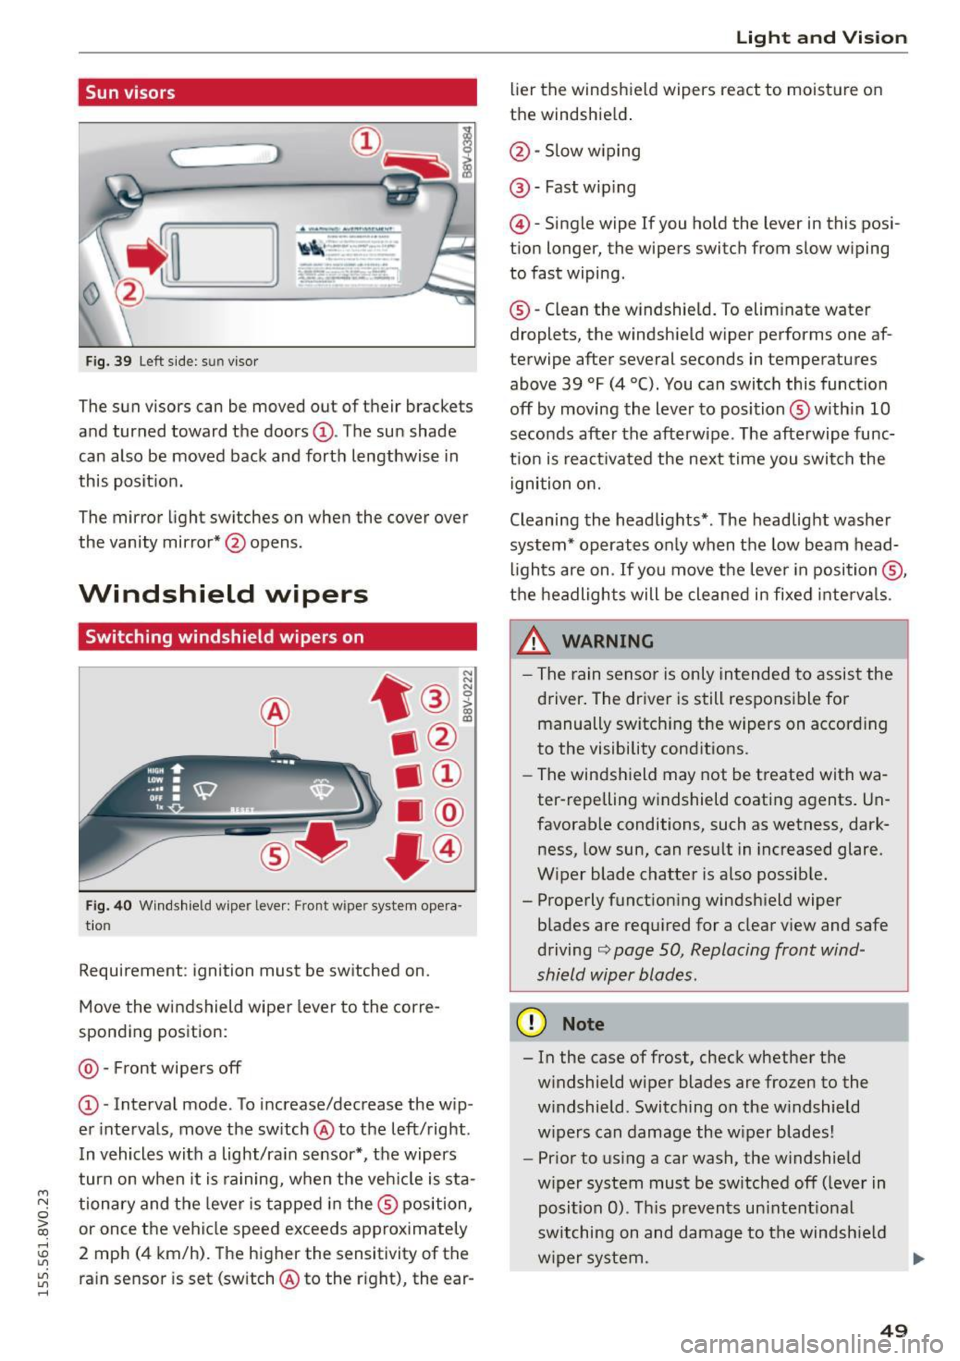
The sun visors can be moved out of their brackets
and turned toward the doors@. The sun shade
can also be moved back and forth lengthwise in
this posit ion.
The mirror light switches on when the cover over
the vanity mirror* @opens .
Windshield wipers
Switching windshield wipers on
Fig. 40 Windshield wiper leve r: Front wiper system opera
tion
Requirement : ignition must be switched on.
Move the windshield wiper lever to the corre
sponding position:
@ -Front wipers off
@ -Interval mode. To increase/decrease the w ip
er intervals, move the switch @to the left/right .
I n vehicles with a light/ra in sensor*, the wipers
turn on when it is ra ining, when the veh icle is sta
tionary and the lever is tapped in the ® position,
or once the vehicle speed exceeds approximately
2 mph (4 km/h). The higher the sensitivity of the ra in sensor is set (switch @to the r ight), the ear-
Light and Visio n
lier the windshield wipers react to moisture on
the windshield .
@-Slow w iping
@ -Fast wip ing
@ -Single wipe If you ho ld the lever in this posi
tion longer, the wipers switch from slow wiping
to fast wiping.
® -C lean the w indshield. To elim inate water
droplets, the windsh ield wiper performs one af
terwipe after several seconds in temperatures
above 39 °F (4 °(). You can switch this function
off by moving the lever to position ® with in 10
seconds after the afterwipe. The afterwipe func
t ion is react ivated the nex t time you switch the
ignition on.
Cleaning the headlights*. The headlight washer
system* operates only when the low beam head
li ghts are on . If you move the lever in position @,
t h e headlights will be cleaned in fixed interva ls .
_& WARNING
- The rain sensor is only intended to assist the
driver. The driver is still responsible for manually switch ing the w ipers on according
to the visibility cond itions.
- The windshield may not be treated with wa
ter-repelling w indshield coat ing agents. Un
favorable conditions, such as wetness, dark
ness, low sun, can result in increased glare.
W iper blade chatter is also possib le.
- Properly function ing windsh ield wiper
b lades are req uired for a clear v iew and safe
driving
c::> page 50, Replacing front wind
shield wiper blades .
(D Note
- In the case of frost, check whether the
windshield wiper blades are fr ozen to the
w indshield. Switching on the w indshield
w ipers can damage the w iper blades!
- Prior to using a car wash, the windshield
w iper system must be sw itched off (leve r in
posit ion 0). T his prevents un intent ional
switching on and damage to the windsh ield
w iper system. .,.
49
Page 52 of 282
Light and Vi sion
- Do not use the wipers to remove ice from
the windows. Using windshie ld wipers as ice
scrapers destroys the wiper blades.
(D Tips
- The windshield wipers are switched off
when the ignition is turned off. Activate the
windsh ield wipers after the ignition is
switched back on by moving the windsh ield
wiper lever to any pos it ion.
- Worn or dirty windshie ld wiper b lades result
i n streaking. This can affect the rain sensor
funct ion. Check your windshield wiper
blades regularly .
- The washer fluid nozzles in the w indshield
washer system are heated* at low tempera
tures when the ignit io n is on.
- When stopp ing temporarily, such as at a
traffic light, the speed of the windsh ield
wipers automatically reduces by one level.
- In vehicles with an MMI, you can switch the
rain sensor or off in the
Dri ver ass istanc e
menu.
Cleaning windshield wiper blades
Clea n the wiper blades when you see wipe r
s treaks. Use a soft cloth and a glass cleaner.
.., Place the w indshield wiper arms in the serv ice
pos ition ¢
page 50 .
.., Fo ld the windshield wipe r arms away from the
winds hield .
A WARNING
Dirty windshie ld wiper blades can impai r vi
sion , which increases the risk of an accident.
(D Note
If you see streaks aga in after cleaning the
w iper blades, the b lades must be replaced
¢page SO.
so
-
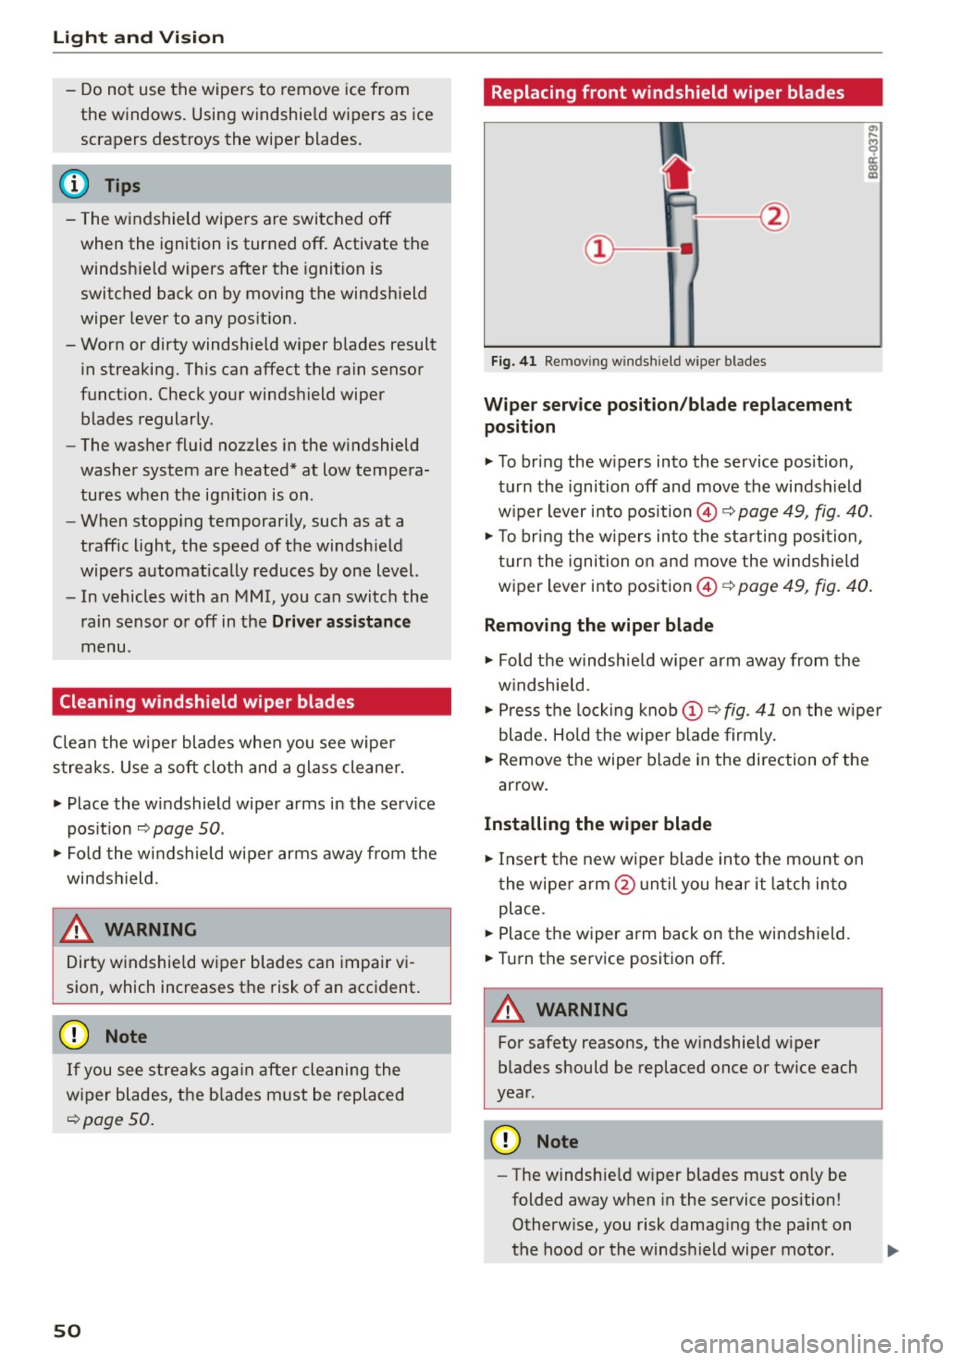
Replacing front windshield wiper blades
F ig. 41 Re mov ing wind shi eld w iper blades
Wiper service po sit ion /blade repl acement
position
.., To br ing the w ipers into the service pos ition,
turn the ignition off and move the windsh ield
w iper lever into position @¢
page 49, fig. 40.
.., To br ing the w ipers into the sta rting position ,
turn the ignition on and move the w indshield
wiper lever into position ©¢
page 49, fig. 40.
Removing the wiper blade
... Fold the windshie ld w iper arm away from the
w indshield.
.., Press the locking knob
(D C? fig . 41 o n the wiper
blade . Hold the wipe r blade firmly.
... Remove the wiper blade in the direction of the
arrow .
Installing the wipe r blade
.., Insert the new wiper blade into the mount on
the wiper arm @unt il you hear it latch in to
place.
... Place the wiper arm back on the windshield.
... Turn th e service position off .
A WARNING
-
For safety reasons, the w indshie ld w iper
b lades should be replaced once or tw ice each
year .
Q) Note
-The windshie ld w iper blades must only be
folded away when in the service position!
Otherw ise, you risk damag ing the pa int on
the hood or the windshield wiper motor .
Page 53 of 282
....,
N
0 > co
rl I.O
"'
"'
"'
rl
-You should not drive your vehicle or press
the windshie ld wiper lever when the wiper
arms are folded away from the w indshield.
The windshield wipers would move back in
to their original position and could damage
the hood and windshield .
- To prevent damage to the windshield wash
er system, a lways loosen wiper blades that
have frozen to the windsh ield before turn
i ng the wipers on .
- To prevent damage to the wiper blades, do
not apply gasoline, petro leum, th inning
agents or other solvents on the wiper b lades or near them.
- To prevent damage to the wiper arms or
othe r components, do not try to move the
windsh ield wipers by hand.
@ Tips
- Commerc ial hot wax such as the types used
by car washe s make it more difficult t o clean
the w indshie ld.
- You can also use the service pos ition, for ex
ample, if you want to p rotect the w indshie ld
from i cing by us ing a cover.
- You cannot activate the service pos it ion
whe n the hood is open.
Digital compass
Switching the compass on and off
Ap plies to vehicles: w ith digi tal compass
Fig. 4 2 Rearview mirro r: Dig ital compass act ivated
... To turn the compass on or off, press the button
@ until the compass in the mirror appears or
disappears.
Light and Visio n
The dig ita l compass on ly works when the ignit ion
is turned on . The directions a re indicated with ab
breviations:
N (nort h), NE (northeast), E (east),
SE (southeast), S (south), SW (southwest), W
(west), NW (northwest).
You must recalibrate t he compass if it does not
display the correct direct ion
¢ page 52, Cali
brating the compass.
(D Tips
To prevent inaccurate compass readings, do not br ing any remote controls, electrical devi
ces or metallic objects near the mirror.
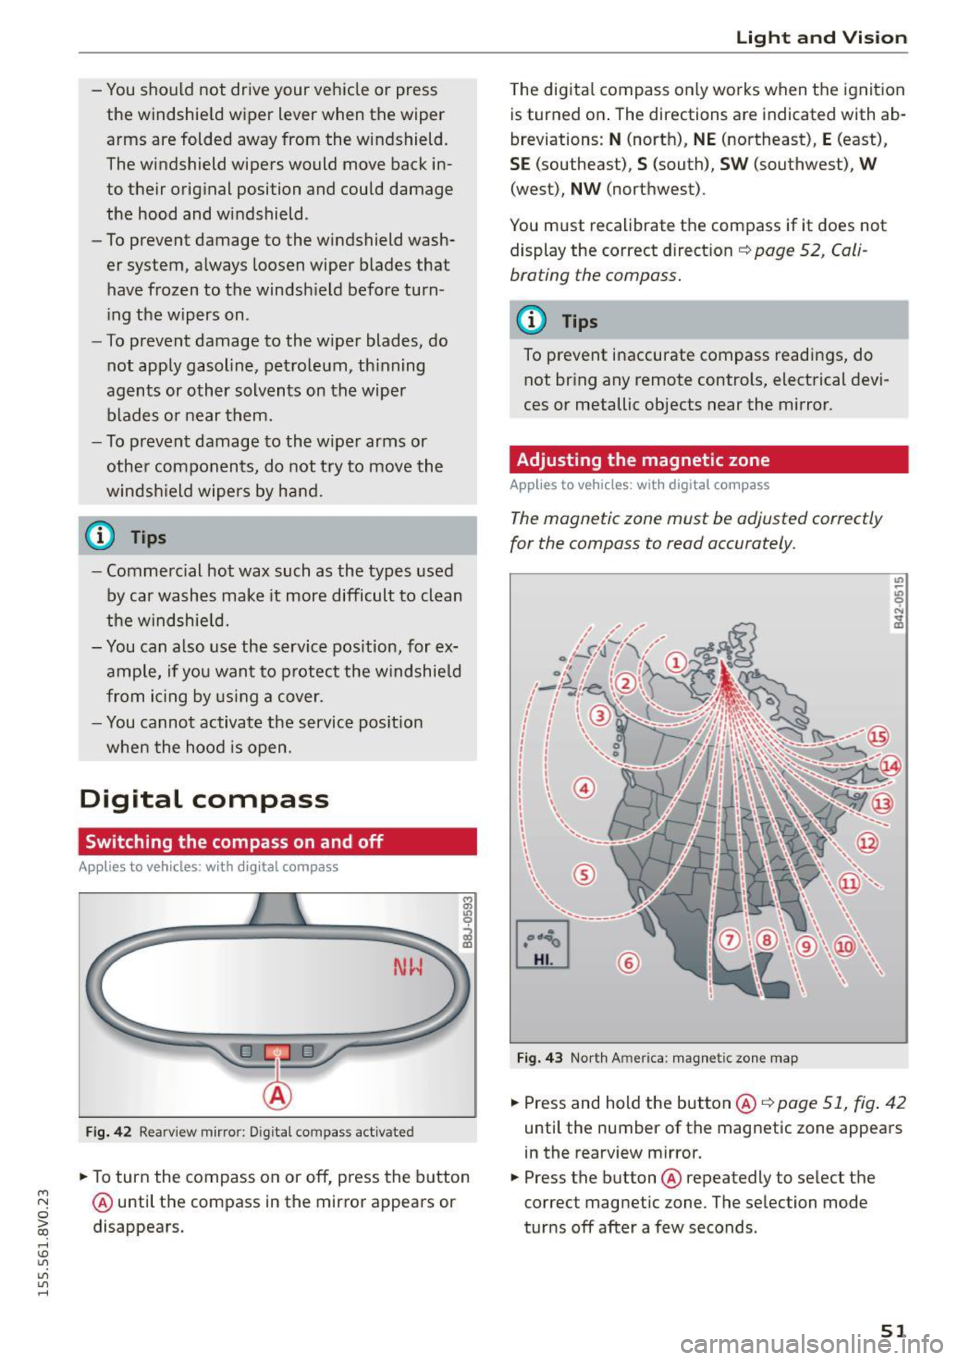
Adjusting the magnetic zone
Appl ies to vehicles: wit h digita l co mp ass
The magnetic zone must be adjusted correctly
for the compass to read accurately.
®
Fig. 4 3 Nor th Ameri ca: magnet ic zone map
... Press and hold the button @ ¢page 51, fig . 42
until the number of the mag netic zone appears
in the rearview mirror .
... Press the butt on @ repeatedly to select the
correct magnetic zone. The se lection mode
tur ns off after a few seconds .
51
Page 127 of 282
M N
0 > co ,...., \!) 1.1'1
1.1'1
1.1'1
,....,
A WARNING
You should only switch sport mode on or switch ESC/ASR off if your driving ab ilities and
road condit ions perm it.
- The stabilization function is limited when
sport mode is switched on. The dr iving
wheels could sp in and the veh icle could
swerve, especially on slick or slippery road
surfaces.
- There is no vehicle stabilization when ESC/
ASR are switched off.
(D Tips
- ESC/ASR cannot be switched off or sport
mode cannot be sw itched on if the cru ise
control system* or the adapt ive cruise con
trol* is switched on.
- Malfunctions in the Audi magnetic r ide may
make it impossible to sw itch the ESC/ASR
off or to switch spo rt mode o n.
Brakes
New brake pads
New brake pads do not achieve their full braking
effect during the first 250 mi (400 km). They
must be "broken in" f irst. Howeve r, you can com
pensate for the slightly reduced braking force by
press ing firmly on the b rake pedal. Avoid heavy
braking during the break -in period.
Wear
Brake pad wear is large ly dependent on the way
the veh icle is d riven and on operating co nditions.
This is especially t rue if you are driving frequent ly
in the city and on cu rves or with a sporty driving
style.
Operating noise
Noises may occur when braking depending on the
speed, b rak ing force and o utside conditions s uch
as tempe rat ure and h umid ity.
Effect of water and road s alt
In certain situat ions, for example after driving
throug h wate r, in heavy ra in, after overn ight con
densat ion or afte r wash ing you r car, the braking
In te llig ent T echnolog y
effect can be reduced by moisture or ice on the
brake rotors and brake pads . The brakes must be
"dried" first with a few careful brake applications.
At higher speeds and with the windsh ield wipers
turned on, the brake pads press against the b rake
rotors for a short amount of time . This action
wh ich is not felt by the driver happens at regular
intervals and facilitates a better reaction t ime for
the brakes in wet weather.
The braking effect can a lso be reduced if you are
driv ing on salted roads and you do not apply the
brakes for long periods of time. The layer of salt
on the brake rotors and pads must be worn off
first whe n the brakes a re applied .
Corro sio n
Leav ing the ve hicle parked for long periods of
t ime, low mileage and avoiding heavy braking can
contribute to corros ion on the brake rotors and
dirty brake pads.
If you usua lly avoid heavy b raking or if there is
corrosion present, occas ional heavy braking at
high speeds is recommended to clean the brake
rotors and pads¢,&.
Brake sy stem malfunct ion
if you notice that the b rake pedal travel has sud
denly gotten larger, then a brake circ uit may have
failed. Drive to an authorized Audi dealer or au
thori zed Audi Service Facility immediately to have
the problem cor rected. On the way there, dr ive
with reduced speed and keep in mind that a long
braking distance and increased pressu re on the
brake pedal will be necessa ry.
Low br ake fluid level
When the brake f lu id level is low, malfunct ions in
the brake system may occur. The brake flu id leve l
is electronically mon itored.
Brake boo ste r
The brake booster amplifies the pressure yo u ap
ply to the brake peda l.
It only works when the en-
gine is running.
IJ>
125
Page 237 of 282
M N
0 > co ,...., \!) 1.1"1
1.1"1
1.1"1
,....,
Care and cleaning
General information
Regular, proper care helps to maintain your vehi
cle's value.
It can a lso be a req uirement when
submitting warranty claims for corrosion damage
and paint defects on the body.
The necessary care products can be obtained
from an a uthorized Audi dea ler or authorized
Audi Service Faci lity . Read and fo llow the instruc
tions for use on the packaging.
A WARNING
- Us ing clean ing and care products incorrectly
can be dangerous to your health.
- Always store cleaning and care products out
of reach of children to reduce the r isk of po i
soning.
@ For the sake of the environment
- Preferably use environmentally-friendly products when buying cleaning agents.
- Do not d ispose of leftover cleaning and care
p roducts with household trash.
Car washes
The longer that depos its s uch as insects, bird
droppings, tree sap or road sa lt rema in on the ve
h icle, the more the surface can be damaged. High
temperatures such as those caused by sunlight
in crease the damaging effect.
Before washing, rinse off heavy depos its with
p le nty of water.
Stubborn deposits s uch as bird droppings or tree
sap are best removed w ith p lenty of water and a
m ic rofiber cloth.
Also, wash the underside of your vehi cle once
road salt stops being used for the season.
Pressure washers
W hen washi ng your ve hicles w ith a pressure
washer, always fo llow the oper ating instr uctions
p rov ided wi th the p ress ure washer. This is espe
cially importan t in rega rd to the p ress ure and
spraying distance . Do not aim the spray direct ly
Care and cleaning
at seals on side w indows, doors, t he hood, the
lu ggage compartment lid or the sunroof* or at
tires, rubber hoses, insulating material, sensors *
or camera lenses*. Keep a distance of at least 16
inches (40 cm).
Do not remove snow and ice with a pressure
washe r.
Neve r use rotary nozzles or high pressure no z
zles .
T he wate r temperature must not be above 140 °F
(60 °( ).
Automatic car washes
Sp ray off the veh icle before washing.
Make sure that the w indows and roo f* are closed
and the windsh ield wipers are off. Follow instruc
tions from the car wash operator, especially if
the re are accessor ies attached to you r vehicle .
If possible, use car washes that do not have
brushes .
Washing by hand
Clean the ve hicl e starting from the top and work
ing down using a soft sponge or cleani ng b rush.
U se solvent -free cleaning p rod ucts .
Washing vehicles with matte finish paint by
hand
To avoid damaging the paint when was hing, first
remove dust and large particles from yo ur vehi
cle. Insects, g rease spots and fingerprints are
best removed with a spec ia l cleaner for matte
finish pai nt.
Apply the p rod uct us ing a microfiber cloth . To
avo id damaging the paint surface, do not use too
much pressure.
Rinse the vehi cle thoro ughly with water . Then
clean usi ng a neutra l shampoo and a soft micro
fiber cloth.
Rinse the ve hicl e thoroughly again and le t it air
dry. Remove any wate r residue using a s ham my . .,.
235
Page 252 of 282
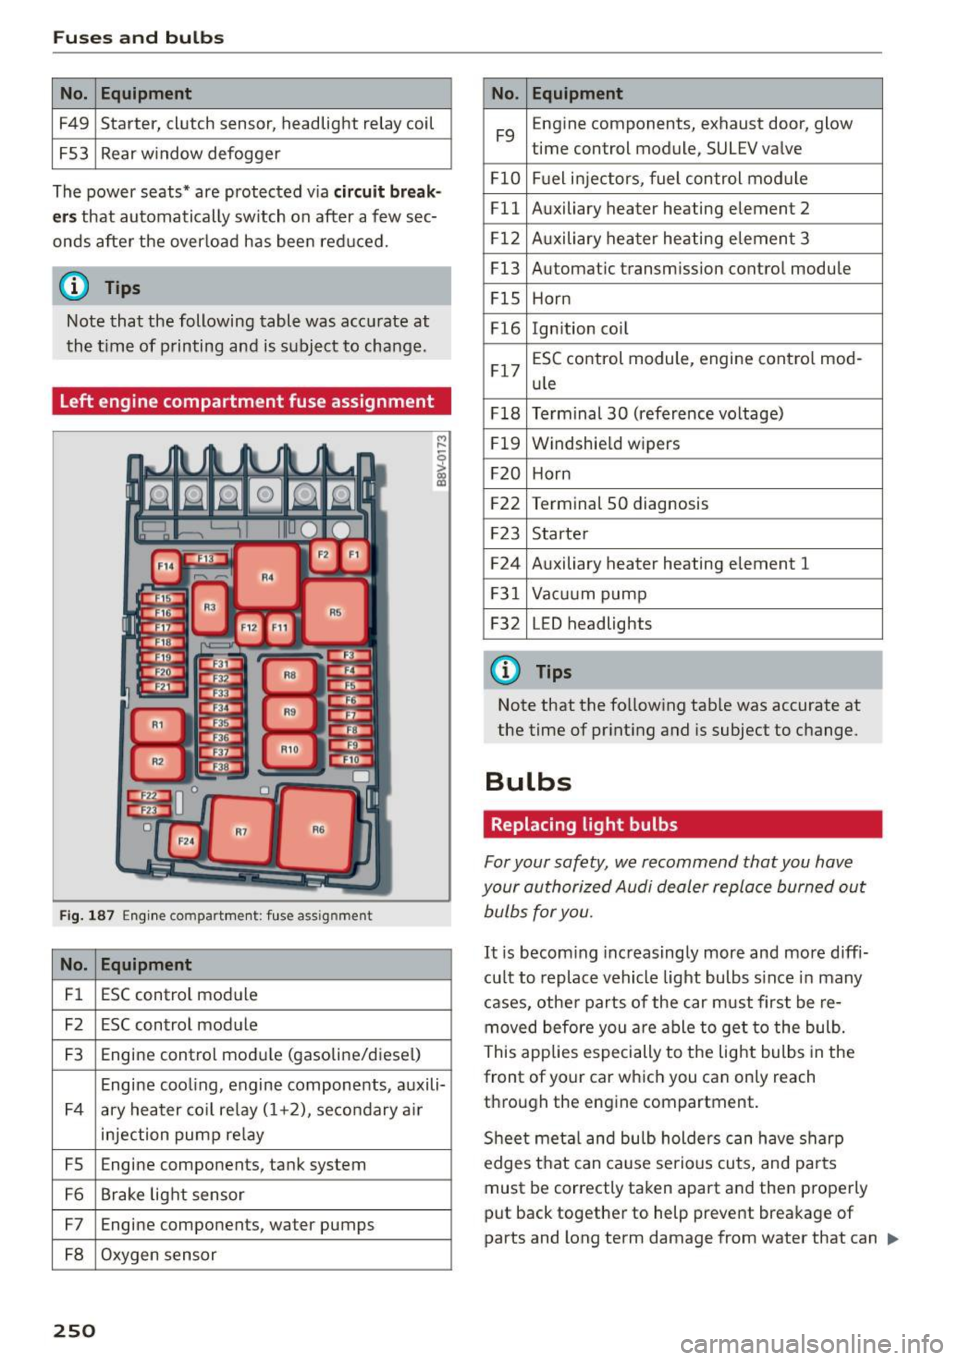
Fuses and bulbs
No. Equipment
F49 Starter, clutch sensor,
headlight relay coil
F53 Rear window defogger
The power seats* are protected via
circuit break
ers
that automatically switch on after a few sec
onds after the overload has been reduced.
(0 Tips
Note that the following table was accurate at
the time of printing and is subject to change.
Left engine compartment fuse assignment
Fig. 187 Engine compartmen t: fuse assig nme nt
No. Equipment
Fl ESC control module
F2 ESC control module
F3 Engine control module (gasoline/diesel)
Engine cooling, engine components, auxili-
F4 ary heater coil relay (1+2), secondary a ir
injection pump relay
FS Engine components, tank system
F6 Brake light sensor
F7 Engine components, water pumps
F8 Oxygen sensor
250
No. Equipment
F9 E
ngine components, exhaust door, glow
time control module, SULEV valve
Fl0 Fuel injectors, fuel control module
Fll Auxiliary heater heating element 2
F12 Auxiliary heater heating element 3
F13 Automatic transmission control module
FlS Horn
F16 Ign ition coil
F17 ESC
control module, engine contro l mod-
ule
F18 Terminal 30 (reference voltage)
F19 Windshie
ld wipers
F20 Horn
F22 Terminal 50 diagnosis
F23 Starter
F24 Auxiliary heater heating element 1
F31 Vacuum pump
F32 L
ED headlights
(!') Tips
Note that the following tab le was accurate at
the time of printing and is subject to change.
Bulbs
Replacing light bulbs
For your safety , we recommend that you have
your authorized Audi dealer replace burned out
bulbs for you.
It i s becoming increasingly more and more diffi
cu lt to replace vehicle light bulbs s ince in many
cases, other parts of the car must first be re
moved before you are able to get to the bulb.
This applies especially to the light bulbs in the
front of your car which you can only reach
through the engine compartment.
Sheet meta l and bulb holders can have sharp
edges that can cause serious cuts, and pa rts
must be correctly taken apart and then properly
put back together to help prevent breakage of
parts and long term damage from water that can .,,_
Page 274 of 282
Index
Heated exterior mirrors . . . . . . . . . . . . . . . . . . . . . . 47
Rear window . . . . . . . . . . . . . . . . . . . . . . . . . 68
Seats . . . . . . . . . . . . . . . . . . . . . . . . . . . . . . . 68
Washer fluid nozzles . . . . . . . . . . . . . . . . . . 49
Heating (diesel engine auxiliary heater) . . . . 69
Heavy clothing and safety belts . . . . . . . . . . 142
Hex socket . . . . . . . . . . . . . . . . . . . . . . . . . . . 241
High voltage warning label . . . . . . . . . . . . . 258
Highway light . . . . . . . . . . . . . . . . . . . . . . . . .
44
Hill descent control . . . . . . . . . . . . . . . . . . . . 86
Hill hold . . . . . . . . . . . . . . . . . . . . . . . . . . . . . 80
Hill hold assist
refer to Hill hold . . . . . . . . . . . . . . . . . . . . . 80
Horn . . . . . . . . . . . . . . . . . . . . . . . . . . . . . . . . .
8
How are child restraint system anchors relat-
ed to child safety . . . . . . . . . . . . . . . . . . . . . 185
How many airbags does my vehicle have? . . 155
How safety belt pretensioners work 146
I
Ignition
I ndicator light . . . . . . . . . . . . . . . . . . . . . . . 20
Switching on/off (with button) . . . . . . . . . . 75
Ignition key safety interlock . . . . . . . . . . . . . 73
Ignition lock
mechanical . . . . . . . . . . . . . . . . . . . . . . . . . . 73
I mbalance (wheels) . . . . . . . . . . . . . . . . . . . 222
Immobilizer . . . . . . . . . . . . . . . . . . . . . . . . . . 33
Important things to do before driving . . . . 130
I mp roperly worn safety belts . . . . . . . . . . . . 146
Indicator lights . . . . . . . . . . . . . . . . . . . . . . . . 13
I nfant seats . . . . . . . . . . . . . . . . . . . . . . . . . 178
Inflation pressure (tires) . . . . . . . . . . . . . . . 224
Inspection interval with driver information system . . . . . . . . . 212
I nstalling chi ld safety seats
Safety belts . . . . . . . . . . . . . . . . . . . . . . . . 182
I nstalling the upper tether strap on the an
chorage . . . . . . . . . . . . . . . . . . . . . . . . . . . . . 188
Instrument cluster . . . . . . . . . . . . . . . . . . . . . 10
Instruments . . . . . . . . . . . . . . . . . . . . . . . . . . 10
Adjusting the lighting . . . . . . . . . . . . . . . . . 47
I nterior lighting . . . . . . . . . . . . . . . . . . . . . . . 46
Intermittent (windshield wipers) . . . . . . . . . 49
272
J
Jump-starting
Jump start cables 252
253
K
Key........
.. .. .. .. .. ............. .. . 33
Checking the number. . . . . . . . . . . . . . . . . . 33
Driver messages (mechanical ignition key) . 77
Driver messages (with convenience key) . . . 77
Key not recognized . . . . . . . . . . . . . . . . . . . . 77
Key replacement . . . . . . . . . . . . . . . . . . . . . 33
Rep lacing the battery . . . . . . . . . . . . . . . . . 34
unlocking/locking .. ............ 35, 36 , 37
Key recognition Cl imate control system . . . . . . . . . . . . . . . . 64
Kick-down Automatic transmission . . . . . . . . . . . . . . . 87
Knee airbags . . . . . . . . . . . . . . . . . . . . . . . . . 164
Description . . . . . . . . . . . . . . . . . . . . . . . . . 164
How they work . . . . . . . . . . . . . . . . . . . . . . 165
Important safety instructions . . . . . . . . . . 166
L
Lane assist
refer to Active lane assist . . . . . . . . . . . . . 106
Lap timer. . . . . . . . . . . . . . . . . . . . . . . . . . . . . 30
Evaluating recorded times . . . . . . . . . . . . . . 32
Starting . . . . . . . . . . . . . . . . . . . . . . . . . . . . 31
LATC H . . . . . . . . . . . . . . . . . . . . . . . . . . . . . . 185
Description . . . . . . . . . . . . . . . . . . . . . . . . . 186
Installing a child restraint . . . . . . . . . . . . . 187
Location . . . . . . . . . . . . . . . . . . . . . . . . . . . 186
Mounting and releasing the anchorage
hook . . . . . . . . . . . . . . . . . . . . . . . . . . . . . . 187
Launch Control-Program (automatic transmis-
s ion) . . . . . . . . . . . . . . . . . . . . . . . . . . . . . . . . 88
Leather care/cleaning . . . . . . . . . . . . . . . . . . 238
Leaving home . . . . . . . . . . . . . . . . . . . . . . . . . 45
LED headlights All-weather lights . . . . . . . . . . . . . . . . . . . . 43
Left hand drive . . . . . . . . . . . . . . . . . . . . . . . . 46
Lifting jack . . . . . . . . . . . . . . . . . . . . . . . . . . 243
Light Adaptive light . . . . . . . . . . . . . . . . . . . . . . . . 43
Adjusting automatic headlights . . . . . . . . . 45