AUDI S3 SEDAN 2017 Repair Manual
Manufacturer: AUDI, Model Year: 2017, Model line: S3 SEDAN, Model: AUDI S3 SEDAN 2017Pages: 400, PDF Size: 67.32 MB
Page 61 of 400
a, co .... N
" N .... 0 N > 00
_& WARNING
For safety reasons, the windshield wiper
blades should be replaced once or twice each
year .
(D Note
-The windshield wiper blades must only be
folded away when in the service position!
Otherwise, you risk damaging the paint on
the hood or the windshield wiper motor .
- You should not drive your vehicle or press
the windshield wiper lever when the wiper
arms are folded away from the windshield.
The windshield wipers would move back in
to their original position and could damage
the hood and windshield .
@ Tips
- You can also use the service position, for ex
ample, if you want to protect the windshield
from icing by using a cover.
- You cannot activate the service position
when the hood is open .
Replacing rear wiper blade
Applies to: vehicles with rear window wiper
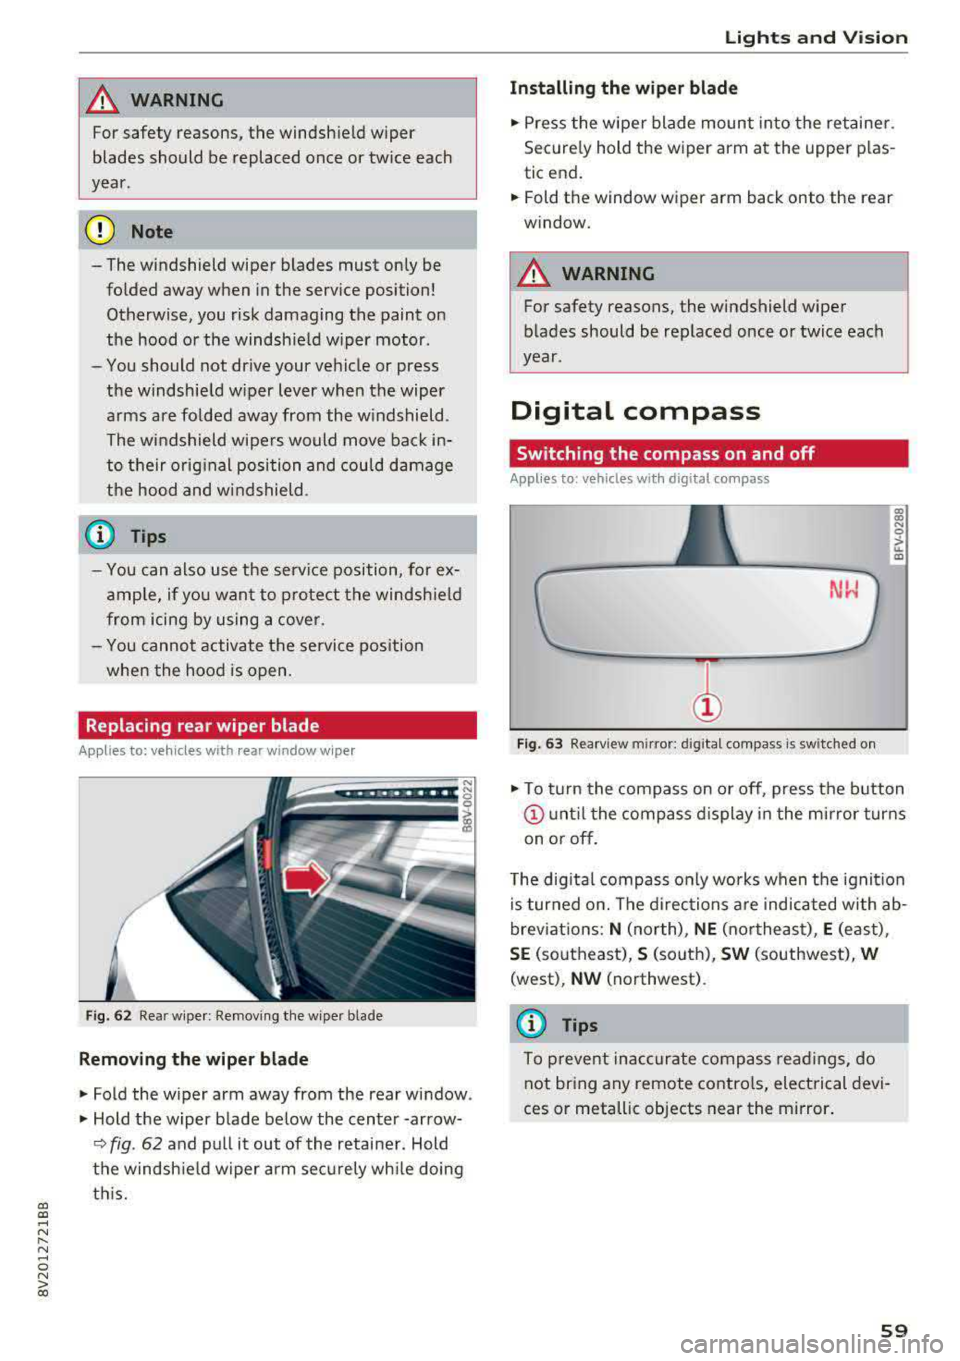
Fig. 62 Rear wiper : Removing the wiper bla de
Removing the wiper blade
"Fold the wiper arm away from the rear window .
" Hold the wiper blade below the center -arrow-
¢ fig. 62 and pull it out of the retainer . Hold
the windshield wiper arm securely while doing
this.
Lights and Vision
Installing the wiper blade
"Press the wiper blade mount into the retainer.
Securely hold th e wiper arm at the upper plas
tic end.
"Fold th e window wiper arm back onto the r ear
window.
_& WARNING
= -
For safety reasons, the windshield wiper
blades should be replaced once or twice each
year .
Digital compass
Switching the compass on and off
Applies to: vehicles with digital compass
Fig. 63 Rearview mir ror : digi tal compa ss is s wit c hed on
gi N 0
> u. m
"To turn the compass on or off, press the button
@until the compass display in the mirror turns
on or off.
The digital compass only works when the ignition
is turned on. The directions are indicated with ab
breviations:
N (north), NE (northeast), E (east) ,
SE (southeast), S (south), SW (southwest), W
(west) , NW (northwest) .
(D Tips
To prevent inaccurate compass readings, do
not bring any remote controls, electrical devi
ces or metallic objects near the mirror.
59
Page 62 of 400
Lights and Vision
Adjusting the magnetic zone
Applies to: ve hicles w ith d ig ital compass
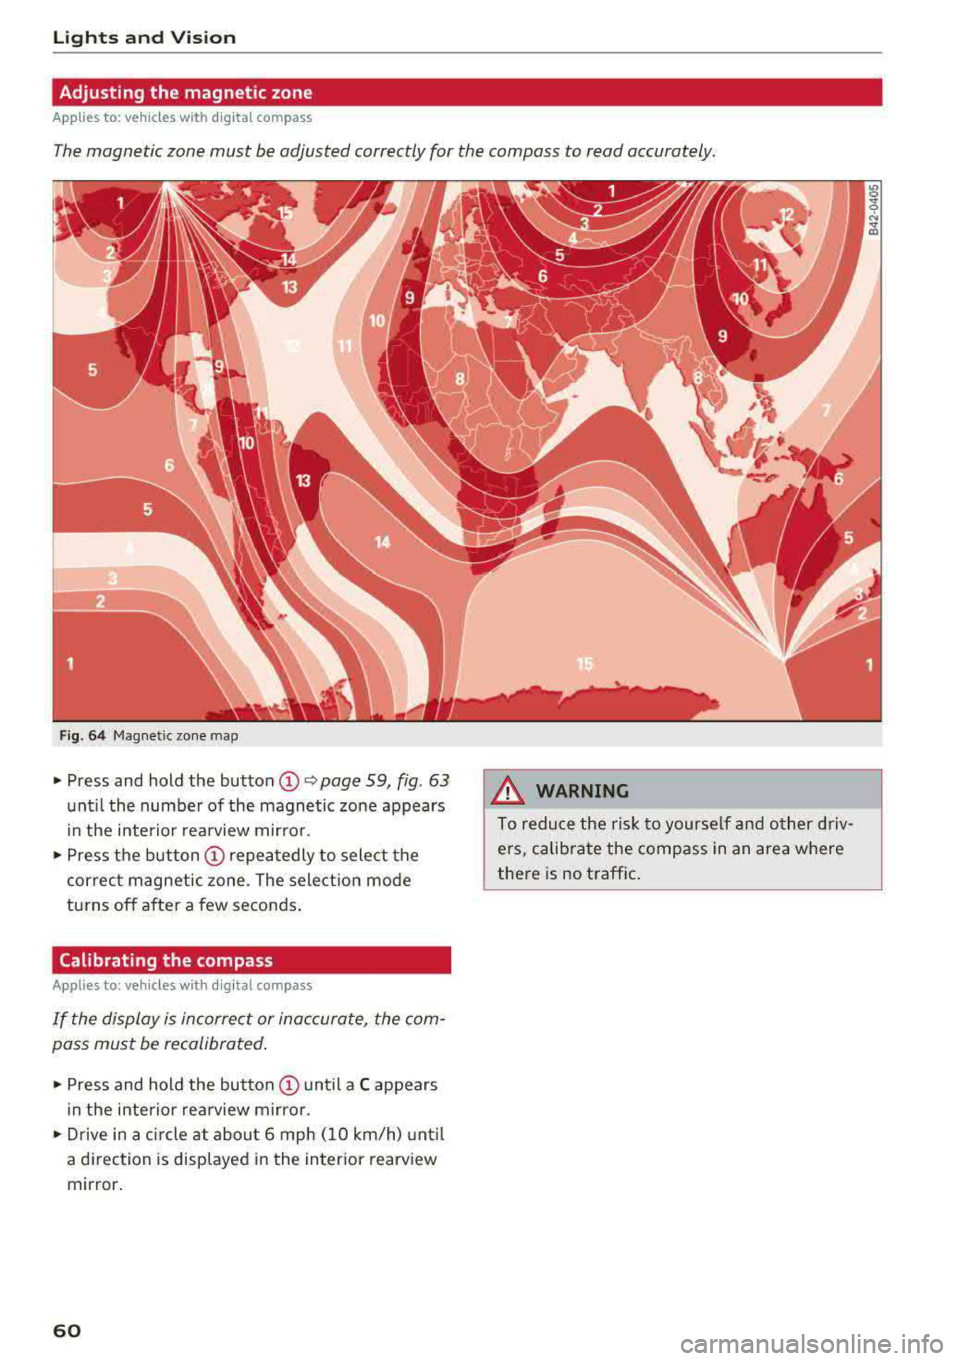
The magnetic zone must be adjusted correctly for the compass to read accurately.
Fig. 64 Magnetic zone map
• Press and hold the button CD~ page 59, fig. 63
unt il the number of the magnetic zone appears
i n the interior rea rview m irro r.
• P ress the b utton CD repeatedly to select the
correc t magnetic zone . The sele ct ion mode
turns off after a few seconds .
Calibrating the compass
App lies to: ve hicles w ith d ig ital compass
If the display is incorrect or inaccurate, the com
pass must be recalibrated .
• Press and hold the button CD until a C appears
in the inte rio r re arview mir ro r.
• Drive in a circle at about 6 mph ( 10 km/h) unt il
a d irec tion is displayed i n the in ter ior rearv iew
mir ror .
60
A WARNING
To reduce the ris k to yourse lf and o ther driv·
e rs, calibra te the compass in an area where
there is no traffic .
Page 63 of 400
a, a, ..... N
" N ..... 0 N > 00
Seats and storage
General information
A WARNING
Refer to the chapter Driving Safely
~ page 247, Driving safety for important in
formation, tips, suggestions and warnings
that you should read and follow for your own
safety and the safety of your passengers.
Front seats
Manual seat adjustment
Applies to vehicles with manual adjustable seats
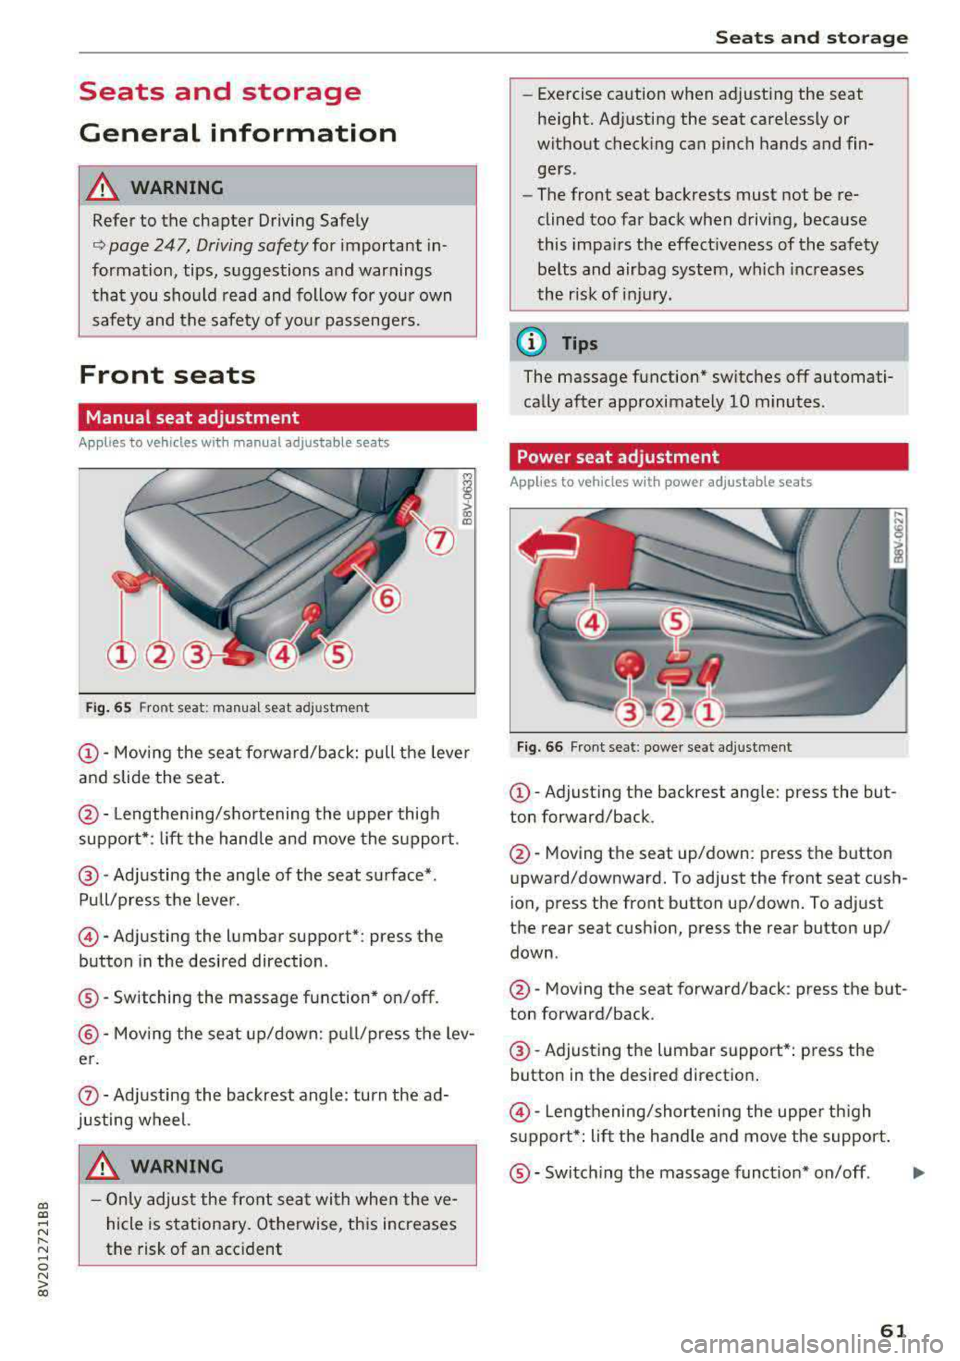
Fig. 65 Fro nt seat: manual seat adj ustment
@ -Moving the seat forward/back: pu ll the lever
and slide the seat .
@-Lengthening/shortening the upper thigh
support* : lift the handle and move the support.
@-Adjusting the angle of the seat surface*.
Pull/press the lever .
@-Adjusting the lumbar support* : press the
button in the desired direction .
®-Switching the massage function* on/off.
@ -Moving the seat up/down: pull/press the lev
er.
0 -Adjusting the backrest angle : turn the ad
justing wheel.
A WARNING
- Only adjust the front seat with when the ve
hicle is stationary. Otherwise, this increases
the risk of an accident
Seats and storage
-Exercise caution when adjusting the seat
height. Adjusting the seat carelessly or
without checking can pinch hands and fin
gers .
- The front seat backrests must not be re
clined too far back when driving, because
this impairs the effectiveness of the safety
belts and airbag system, which increases
the risk of injury.
(D Tips
The massage function* switches off automati
cally after approximately 10 minutes.
Power seat adjustment
Applies to vehicles w ith power adjustab le seats
Fig. 66 Front seat : power seat adj ustment
@ -Adjusting the backrest angle: press the but
ton forward/back .
@-Moving the seat up/down: press the button
upward/downward. To adjust the front seat cush
ion, press the front button up/down. To adjust
the rear seat cushion, press the rear button up/
down .
@-Moving the seat forward/back : press the but
ton forward/back .
@-Adjusting the lumbar support*: press the
button in the desired direction .
@-Lengthening/shortening the upper thigh
support*: lift the handle and move the support.
®-Switching the massage function* on/off .
61
...
Page 64 of 400
Sea ts and stor age
_& WARNING
- Only adjust the front seat with when the ve
hicle is stat ionary . Otherwise, this increases
the risk of an acc ident
- The power adjustment for the front seats al
so works with the ignition switched off or
with the ignition key removed . For this rea
so n, children should never be left unattend
ed in the veh icle
-they co uld be inj ured!
- Exercise caution when adjusting the seat
height. Uns upervised or careless seat ad
justment can p inch fingers or hands causing
injur ies .
- T he front seat backrests m ust not be re
cl ined too far back when driving, because
this impairs the effectiveness of the safety
belts and airbag system, which increases
the risk of injury .
(Di Tips
The massage function* switches off a utomat i
cally after approximately 10 mi nutes.
Entry assistance
Applies to: vehicles with entry ass istance
E asy seat entry makes it easier to get into the
back seats .
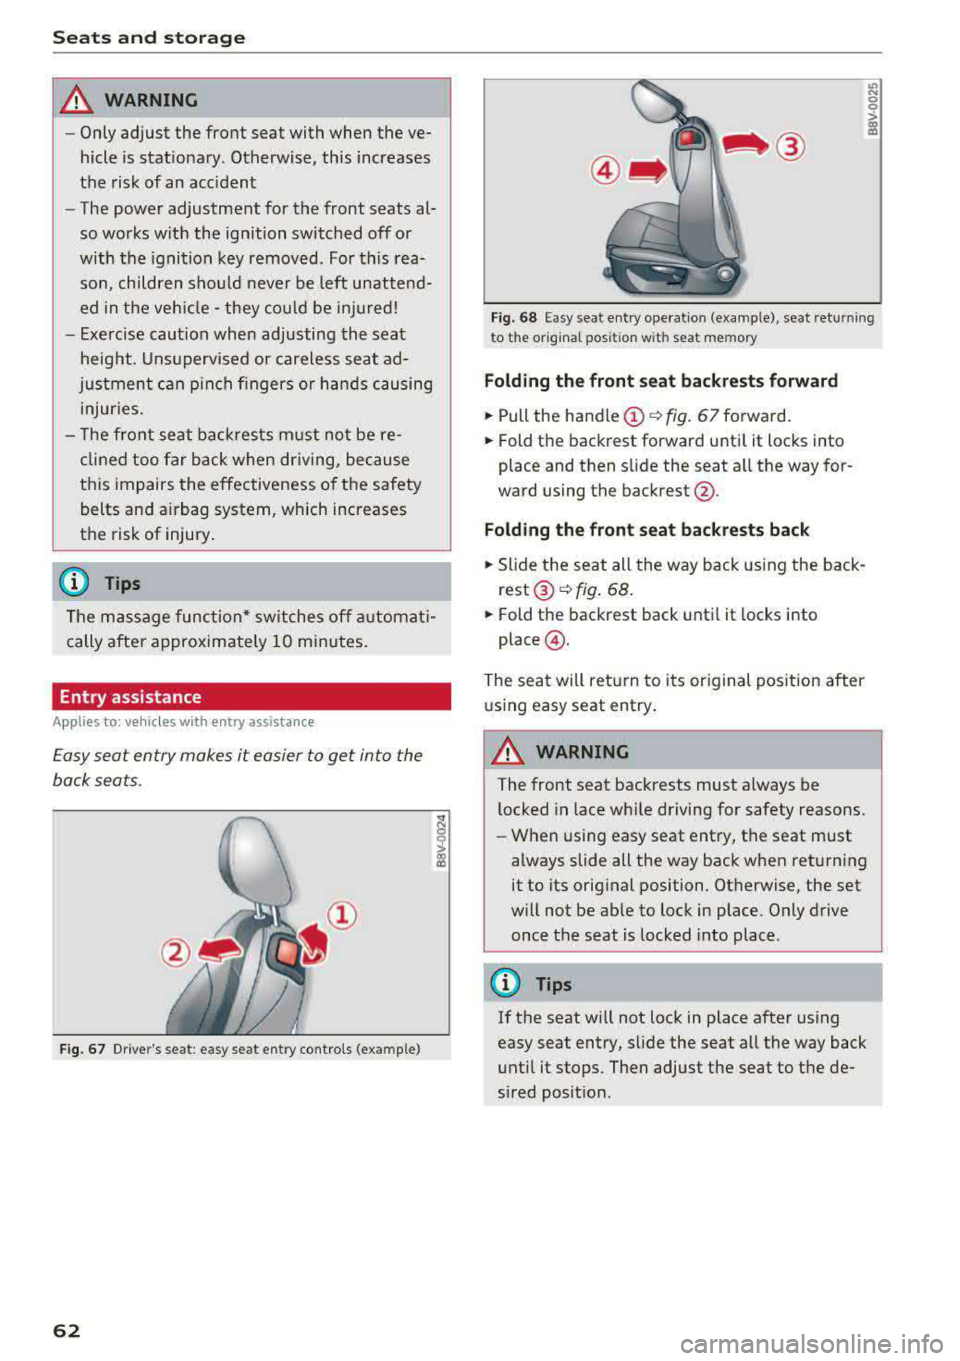
Fig. 67 Dr ive r's seat : easy se at ent ry controls (ex ample )
62
'° ::: 0 ::l-a) 113
F ig. 6 8 Easy sea t en try ope rat io n (examp le) , seat ret urnin g
t o t he origina l pos ition w it h se at mem ory
Fold ing th e front seat backrests forward
.,. Pull the handle (!)¢ fig. 67 forward.
.,. Fold the backrest forward unti l it locks into
place and then slide the seat a ll the way for
ward using the backrest @.
Fold ing the front seat back rests back
.,. Slide the seat all the way back using the back
rest ®~ fig. 68 .
.,. Fold the backrest back until it locks into
place @.
The seat will ret urn to its original posit ion after
u sing easy seat entry.
A WARNING
-The front seat backrests must a lways be
l ocked in lace wh ile driving for safety reasons.
- When using easy seat entry, t he seat must
always slide all the way back when returning
it to its orig inal position . Otherwise, the set
w ill not be ab le to lock in place. Only drive
once the seat is locked into place .
(D Tips
If the seat w ill not lock in place after using
easy seat entry, slide the seat all the way back
unt il it stops. Then adjust the seat to the de
sired posit ion.
Page 65 of 400
a, a, ..... N
" N ..... 0 N > 00
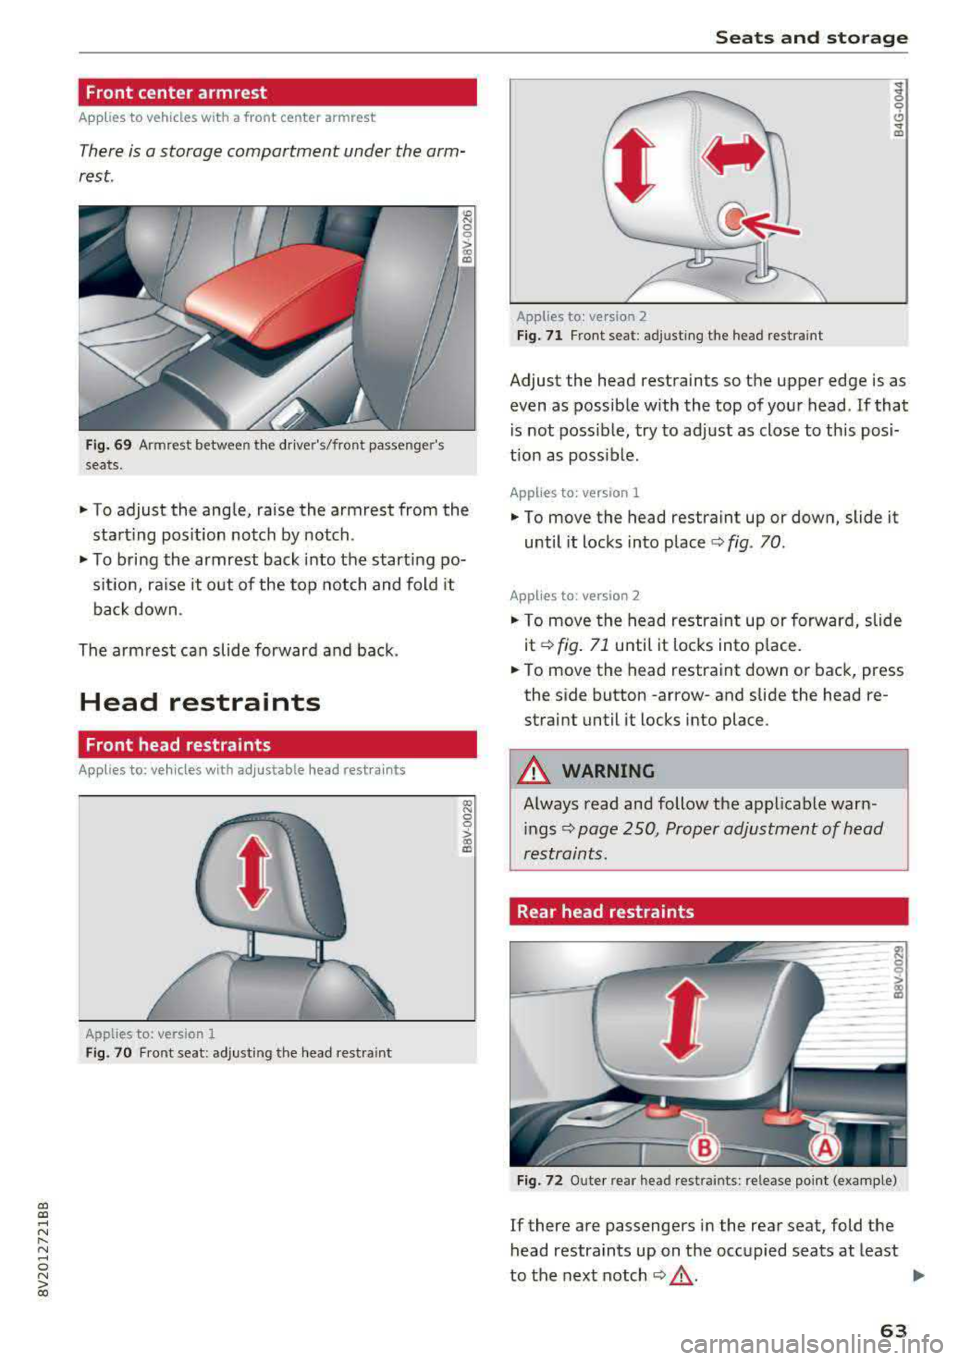
Front center armrest
Applies to vehicles with a front center armrest
There is a storage compartment under the arm
rest.
Fi g. 69 Armrest between the driver's/front passenge r's
seats.
.. To adjust the angle, raise the armrest from the
start ing pos ition notch by notch.
.. To bring the armrest back into the starting po
s it ion, ra ise it out of the top notch and fold it
back down .
The armrest can slide forward and back.
Head restraints
Front head restraints
Applies to: ve hicles with ad justable head rest ra in ts
Applies to: version 1
Fig. 70 Fr ont seat: adjusting the head restraint
Seats and storag e
Applies to: vers ion 2
F ig . 71 Front seat: adjusting the head restra int
Adjust the head restraints so the upper edge is as
even as possible with the top of you r head . If that
is not possible, try to adjust as close to th is posi
t ion as poss ible .
Applies to: version 1
.. To move the head restraint up or down, slide it
until it locks into place
c:> fig. 70 .
Applies to : version 2
.. To move the head restraint up or forward, slide
it
c:>fig . 71 until it locks into p lace.
.. To move the head restraint down or back, press
the side button
-arrow-and slide the head re
straint until it locks into place.
_& WARNING
-A lways read and follow the applicable warn-
i ngs
c:> page 250, Proper adjustment of head
restraints.
Rear head restraints
F ig . 72 O ute r rear head rest rain ts: release point (exam ple)
If there are passengers in the rear seat, fold the
head restraints up on the occupied seats at least
-
to the next notch c:> _& . Iii-
63
Page 66 of 400
Sea ts and stor age
Mov ing the head rest raints
.. T o move the head res traint up, ho ld it at the
sides with both hands and slide it upward unt il
you fee l it click into place .
.. To move the head restraint down, press the
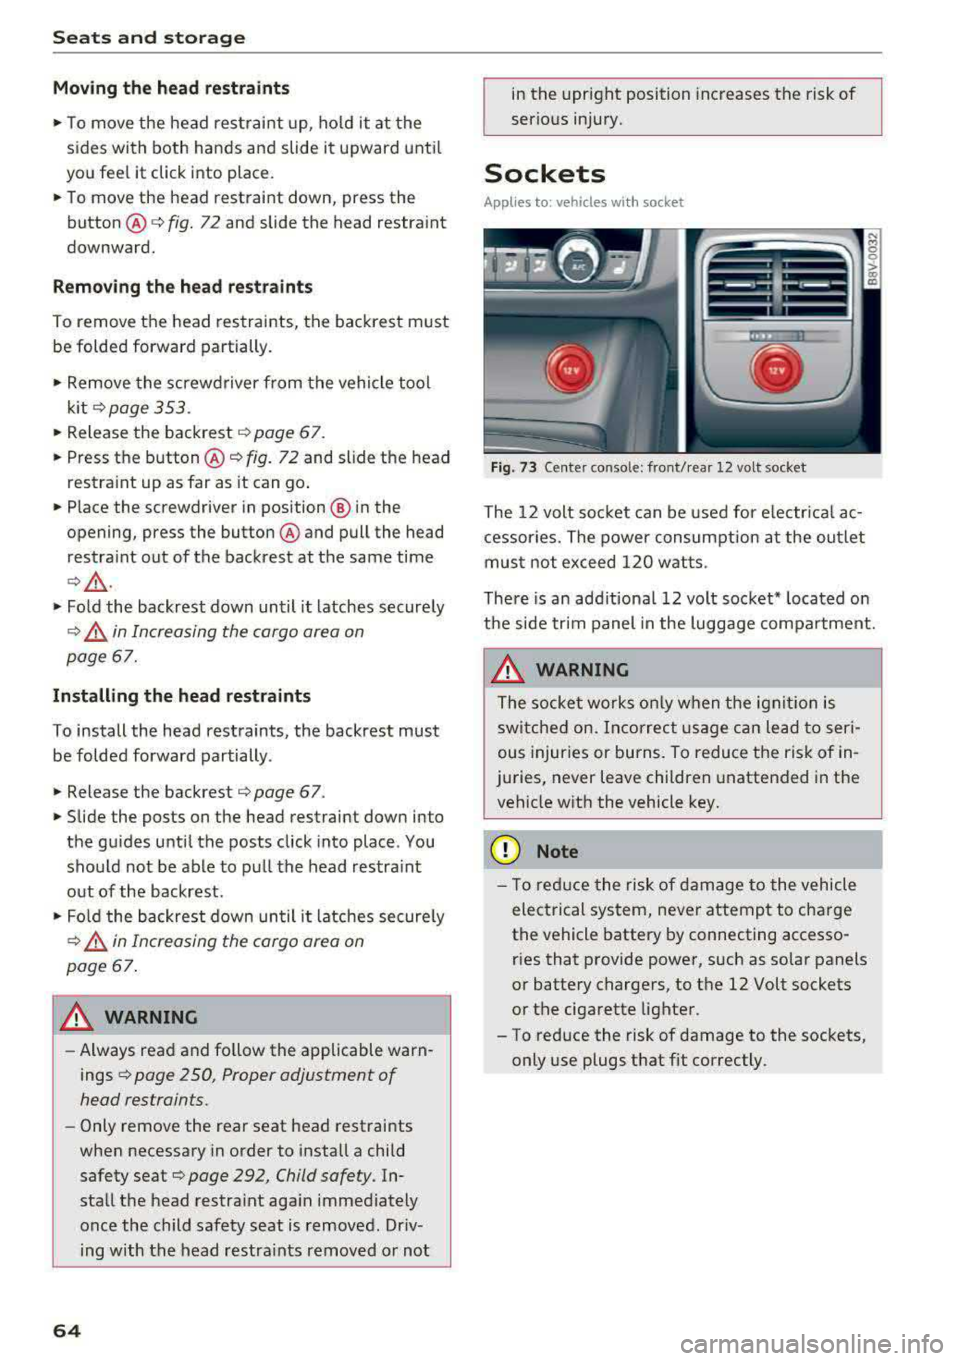
button @¢ fig. 72 and slide the head restra int
downward.
R emov ing th e head rest raints
To remove the head restraints, the backrest must
be folded forward partially .
.. Remove the screwd river from the vehicle tool
k it
¢page 353 .
.. Release the backrest ¢ page 67 .
.. Press the button @ c::> fig. 72 and slide the head
restra int up as far as it can go .
.. Place the screwdriver in position @ in the
opening, press the button @ and pull the head
restra int out of the backrest at the same time
¢ &_ .
• Fold the backrest down until it latches secure ly
¢ &_ in Increasing the cargo area on
page
67.
Installing the head restraints
To install the head restraints, the backrest must
be folded forward partially .
.. Release the backrest c::> page 67.
.. Slide the posts on the head restraint down into
the gu ides unti l the posts click into place . You
should not be able to pull the head restra int
out of the backrest .
• Fold the backrest down un til it latches secure ly
¢ &_ in Increasing the cargo area on
page
67 .
_& WARNING
-Always read and fo llow the applicable warn
ings
c::> page 2 50, Proper adjustment of
head restraints.
- Only remove the rear seat head restraints
when necessary in order to install a child
safety seat
c::> page 292, Child safety. In
sta ll the head restra int aga in immediately
once the child safety seat is removed. Dr iv
ing with the head restra ints removed o r not
64
in the upright position increases the risk of
serio us injury .
Sockets
Applies to: vehicles with socket
-,:~
I '
Fig. 73 Center console: front/rea r 12 volt socket
The 12 volt soc ket can be used for e lectr ica l ac
cessor ies. The power consum ption at the out let
mus t not exceed 120 w atts.
There is an add itiona l 12 volt socket * located on
the side trim panel in the luggage compa rtment.
_& WARNING
T he socke t works only w hen t he igni tion is
switche d on. Incorrec t usage c an lead to seri
ous injur ies or burns. To reduce the ri sk of in
juries, never leave children unattended in the vehicle wit h the vehicle key .
{[) Note
-
- T o red uce the risk of dam age to t he vehicle
electrical system, never attemp t to cha rge
the vehicle battery by connecting accesso ries that p rovide power, such as solar panels
or battery chargers, to the 12 Volt sockets
o r the ciga rette lighter.
- To reduce the risk of damage to the sockets, only use plugs t hat fit correctly.
Page 67 of 400
a, a, ..... N
" N ..... 0 N > 00
Storing
Cup holders
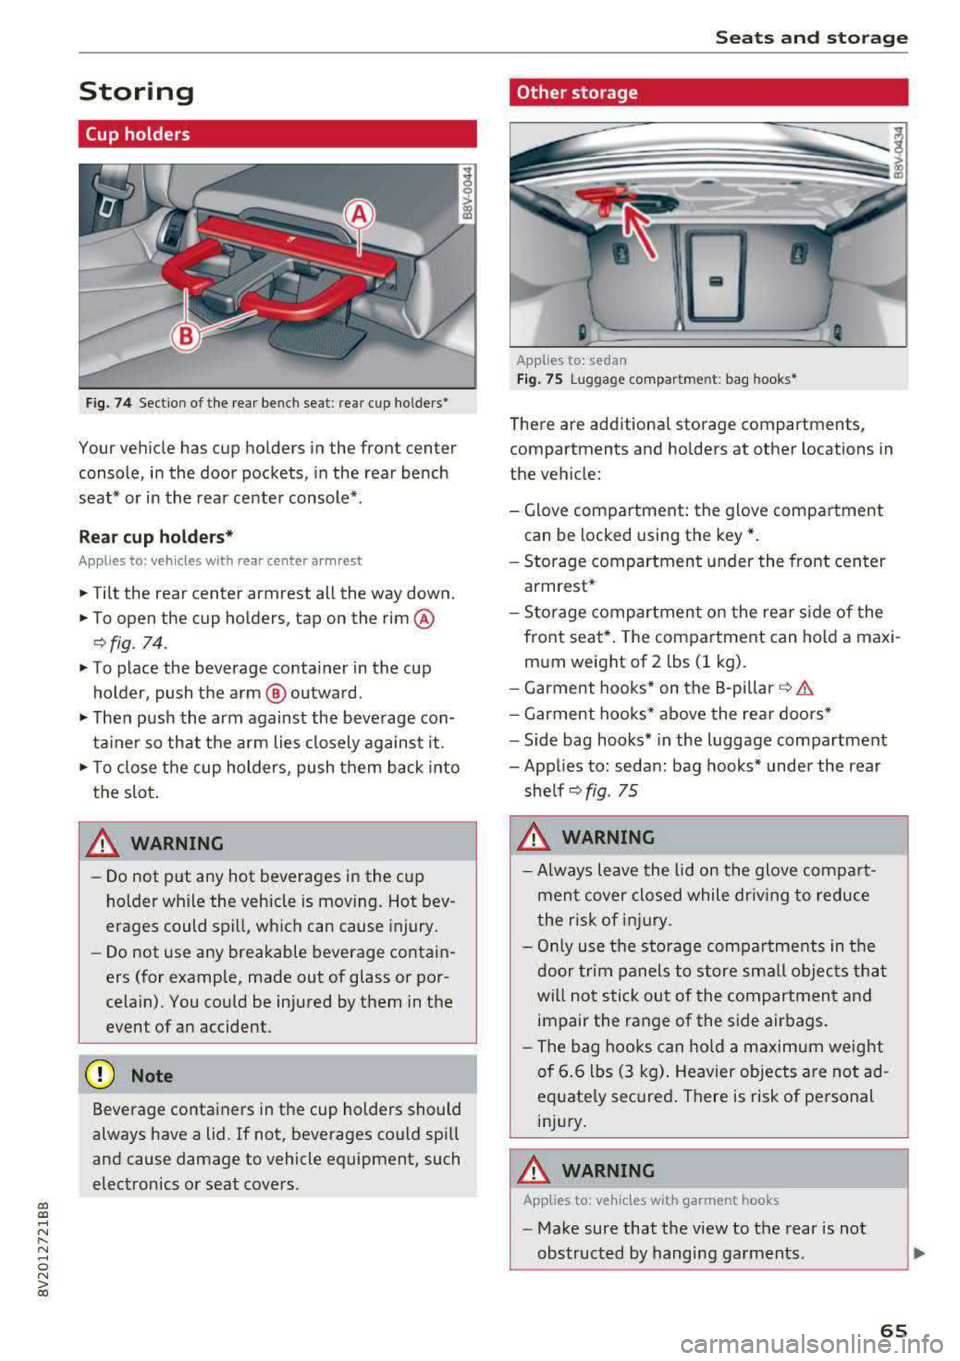
Fig. 74 Sectio n of the rear bench seat : rea r cup ho lders•
Your vehicle has cup holders in the front center
console, in the door pockets, in the rear bench
seat* or in the rear center console*.
Re ar cup ho lders*
Applies to: ve hicles with rear center arm rest
.,. Tilt the rear center armrest all the way down.
.,. To open the cup holders, tap on the rim @
r:=>fig . 74.
.,. To place the beverage co nta iner in the cup
holder , push the arm @ outward .
.,. Then push the arm against the beve rage con
ta iner so that the a rm lies closely against it .
.,. To close the cup holders, push t hem back into
the slot .
A WARNING -
-Do not put any hot beverages in the cup
holder while the vehicle is moving. Hot bev
erages could spill, wh ic h can cause injury.
- Do not use any breakable beverage contai n
ers (for example, made out of glass or por
celain). You co uld be injured by them in the
event of a n accident .
(D Note
Beverage containers in the cup holders should
always have a lid. If not, beverages cou ld sp ill
and cause damage to vehicle equipment, such
electronics or seat covers .
Seats and storage
Other storage
Applies to: sedan
Fig. 75 Lu gga ge compar tm en t: bag hooks *
There are add itiona l storage compartments,
compartments and holders at other locations in
the vehicle:
- Glove compartment: the glove compa rtme nt
can be locked using the key* .
- Storage compartment under the front cen ter
armrest*
- Storage compartment o n the re ar side of the
front seat*. The com partment can hold a maxi
m um weight of 2 lbs (1 kg) .
- Garment hooks* on the B -pillar
r=> &.
- Garment hoo ks* above the rea r doo rs *
- Side bag hooks* in the luggage compartment
- Applies to: sedan : bag hooks* under the rear
she lf
r=> fig . 75
A WARNING
-Always leave the lid on the glove compa rt
men t cover closed while driv ing to red uce
t he risk of injury .
- Onl y use t he storage compa rtme nts in the
door trim panel s to sto re sm all obje cts th at
will not sti ck ou t of the compartmen t and
impair the range of the side air bags .
- Th e bag hoo ks c an ho ld a m aximum weight
of 6.6 lbs (3 kg) . Heavier objects are no t ad
equate ly secured . There is risk of pe rsonal
inj ury.
A WARNING
-App lies to: ve hicles with garment hooks
- Make sure that the view to the rear is not
obs tructed by hangi ng garments .
-
65
Page 68 of 400
Sea ts and stor age
-Hang only lightweight cloth ing and be s ure
that there are no heavy or sharp-edged ob
jects in the pockets.
-Do not use coat hangers to hang garments,
because th is could reduce the effectiveness
of the side curtain airbags.
Luggage compartment
General information
A WARNING
Read and follow the important safety p recau
tions in
¢ page 253, Storing cargo correctly.
Luggage compartment cover
A pp lies to: ve hicles with luggage compart men t cover
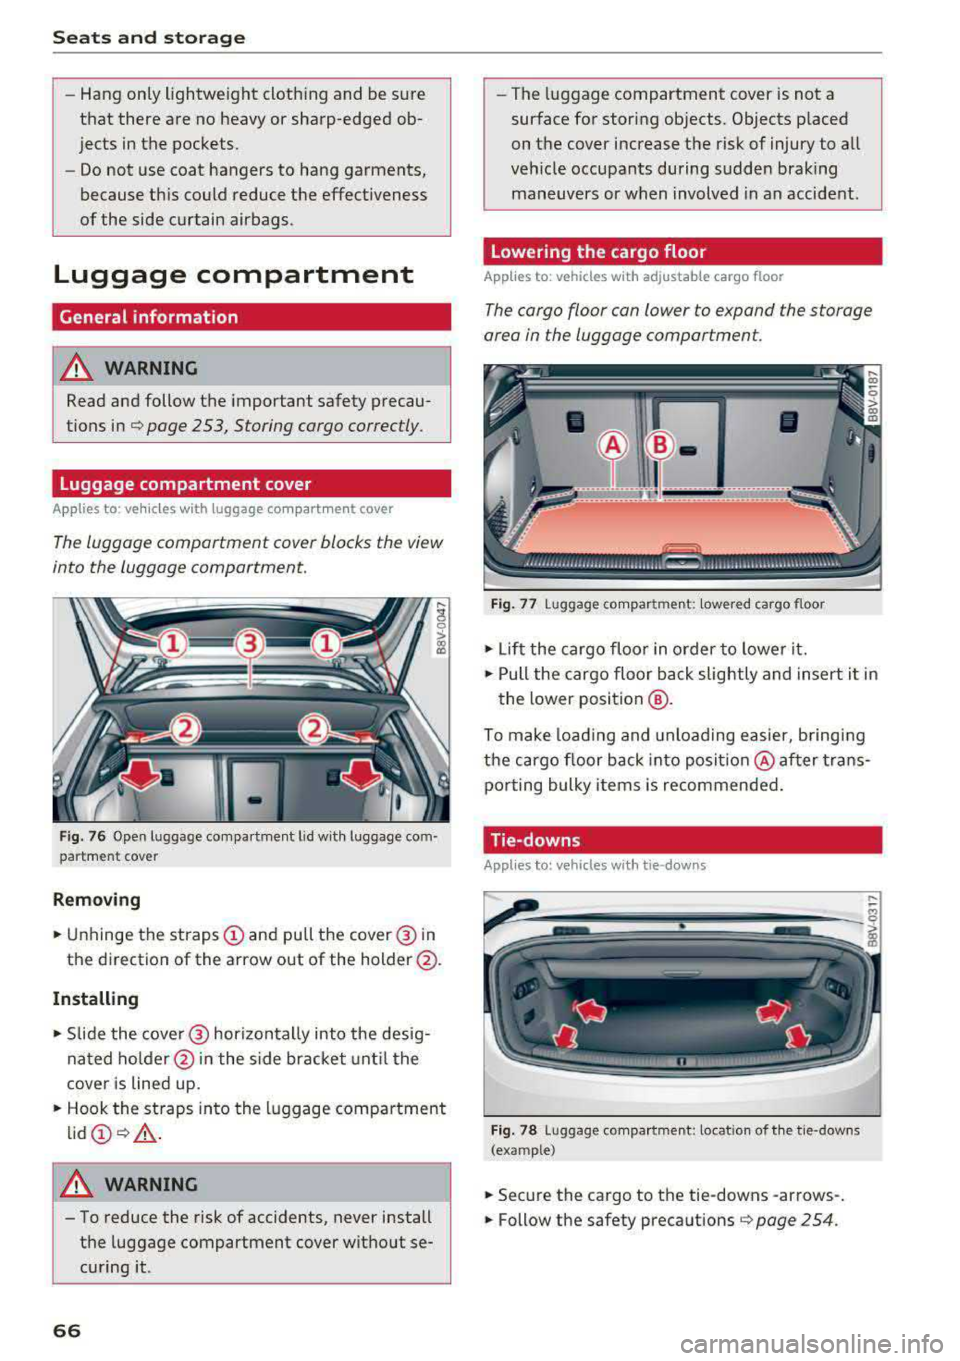
The luggage comportment cover blocks the view
into the luggage comportment.
F ig . 76 Open luggage com pa rtment l id w ith luggage com
partment cover
Remov ing
... U nhinge the straps (D and pull the cover @ in
the d irection of the arrow out of the holder @.
Installing
... Slide the cove r@ horizontally into the desig
nated ho lder @in the s ide bracket until t he
cove r is lined up .
... Hook the st raps into the luggage compartment
lid @ ¢,& .
A WARNING
-To reduce the risk of accidents, never install
t h e luggage compartment c over wit hout se
cu ring it.
66
-The luggage compartment cover is not a
surface for storing objects. Objects p laced
on the cover increase the risk of injury to all
veh icle occupants during sudden braking
maneuvers or when involved in an accident.
Lowering the cargo floor
App lies to: vehicles with adjustable cargo floor
The cargo floor con lower to expand the storage
area in the luggage comportment.
Fi g. 7 7 Luggage co mpa rt ment: lowe re d cargo floor
... Lif t the cargo floo r in o rder to lowe r it .
... Pull the cargo floor ba ck slightly and insert i t in
the lower position
@ .
To make load ing and unloading easier, b ringi ng
the cargo floor back into posit io n @ aft er trans
po rting bulky item s is recommended.
Tie-downs
Appl ies to: vehicles with tie-downs
- ------- --
Fig. 7 8 Luggage compa rtment: locat io n of t he t ie-downs
(example)
... Secure the cargo to the tie-downs -arrows-.
... Follow the safety preca utions ¢ page 254.
Page 69 of 400
a, a, ..... N
" N ..... 0 N > 00
Cargo net/cargo bag
Applies to: vehicles with luggage compartment cargo net/car
go bag
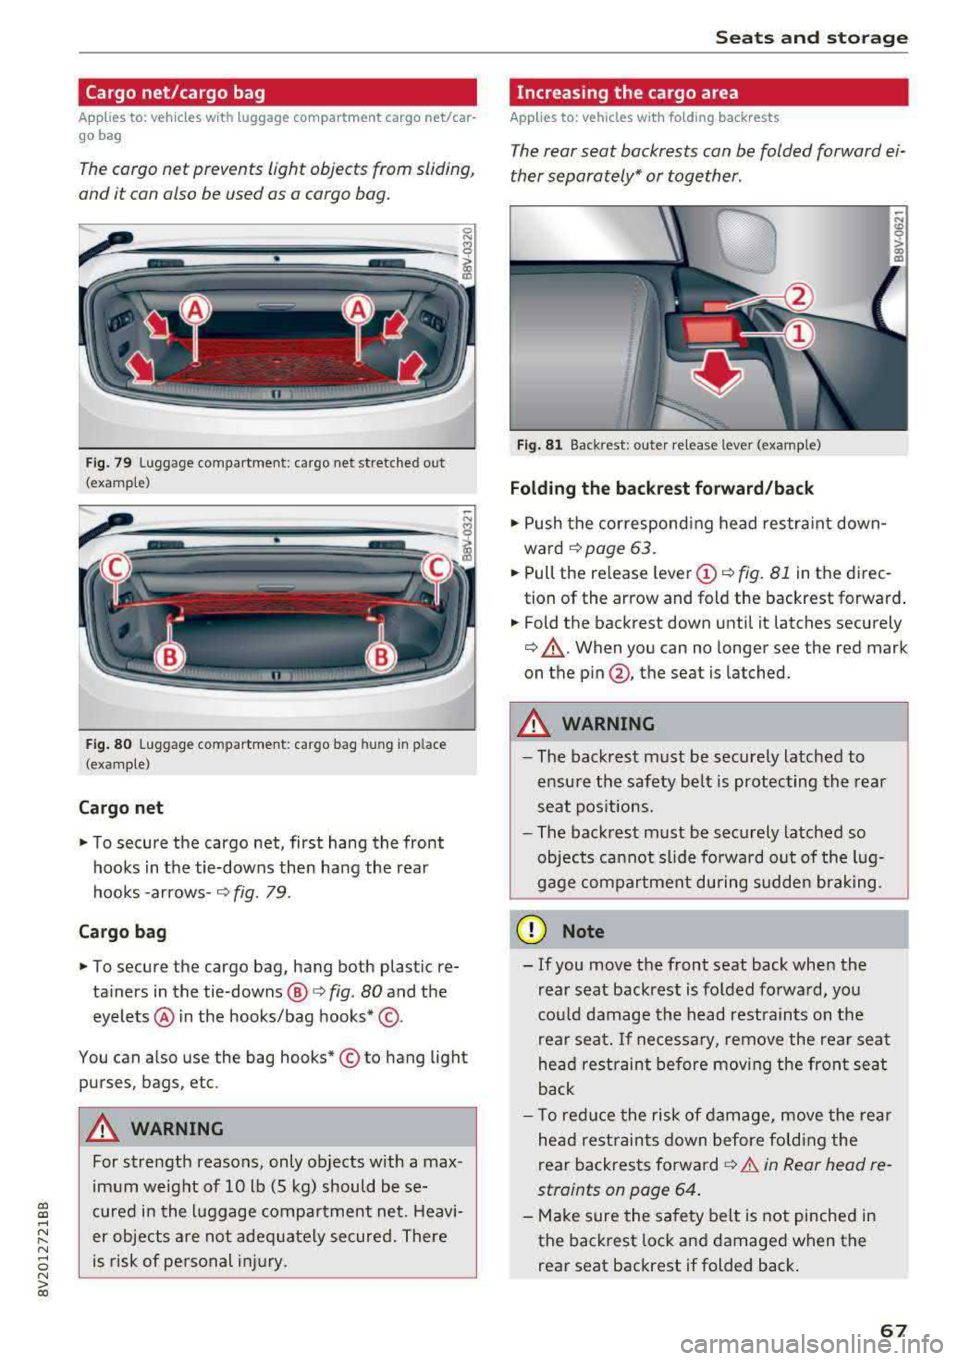
The cargo net prevents light objects from sliding,
and it can also be used as a cargo bog.
Fig. 79 Luggage compartment: cargo net stretched out
(examp le)
F ig . 80 Luggage compartme nt: cargo bag hung in place
(examp le)
Cargo net
.. To secure the cargo net, first hang the front
hooks in the tie-downs then hang the rear
hooks
-arrows-¢ fig. 79.
Ca rgo b ag
.. To secure the cargo bag, hang both plastic re
tainers in the tie-downs @
c> fig. 80 and the
eyelets @ in the hooks/bag
hooks* @.
You can also use the bag hooks* © to hang light
purses, bags, etc .
&_ WARNING
For strength reasons, only objects with a max
imum weight of 10 lb (5 kg) should be se
cured in the l uggage compartment net. Heavi
er objects are not adeq uately secured. There
is risk of personal injury .
Seats and storag e
Increasing the cargo area
Applies to: vehicles with folding backrests
The rear seat backrests con be folded forward ei
ther separately" or together .
n
Fig. 81 Backrest: outer re lease lever (example)
Folding the b ackrest forward /back
.. Push the correspond ing head restraint down
ward
¢page 63 .
.. Pull the release lever (D ¢ fig. 81 in th e direc
tion of the arrow and fold the backrest forward .
.. Fold the backrest down until it latches securely
¢ .,&.. When you can no longer see the red mark
on the
pin @ , the seat is latched.
&_ WARNING
~ -
-The backrest must be sec urely latched to
ensu re the safety belt is protecting the rear
seat pos it ions.
- The back rest must be securely latched so
objects ca nnot slide fo rwa rd out of the lug
gage compartment during sudden brak ing.
(D Note
- If you move the front seat back when the
rear seat backrest is folded fo rwa rd, you
co uld damage the head restrain ts on t he
rear seat.
If ne cessary, remove the rea r seat
he ad restraint before mov ing the front seat
back
- T o red uce the risk of damage, move the rea r
he ad rest raints down before fo ldi ng the
rear backrests
forward¢ .&. in Rear head re
straints on page 64 .
-Make sure the safety belt is not pinched in
the back rest lock a nd damaged when the
rear seat backrest if folded back .
67
Page 70 of 400
Sea ts and stor age
Pass-through
Applies to: vehicles with pass-through
Applies to: version
1
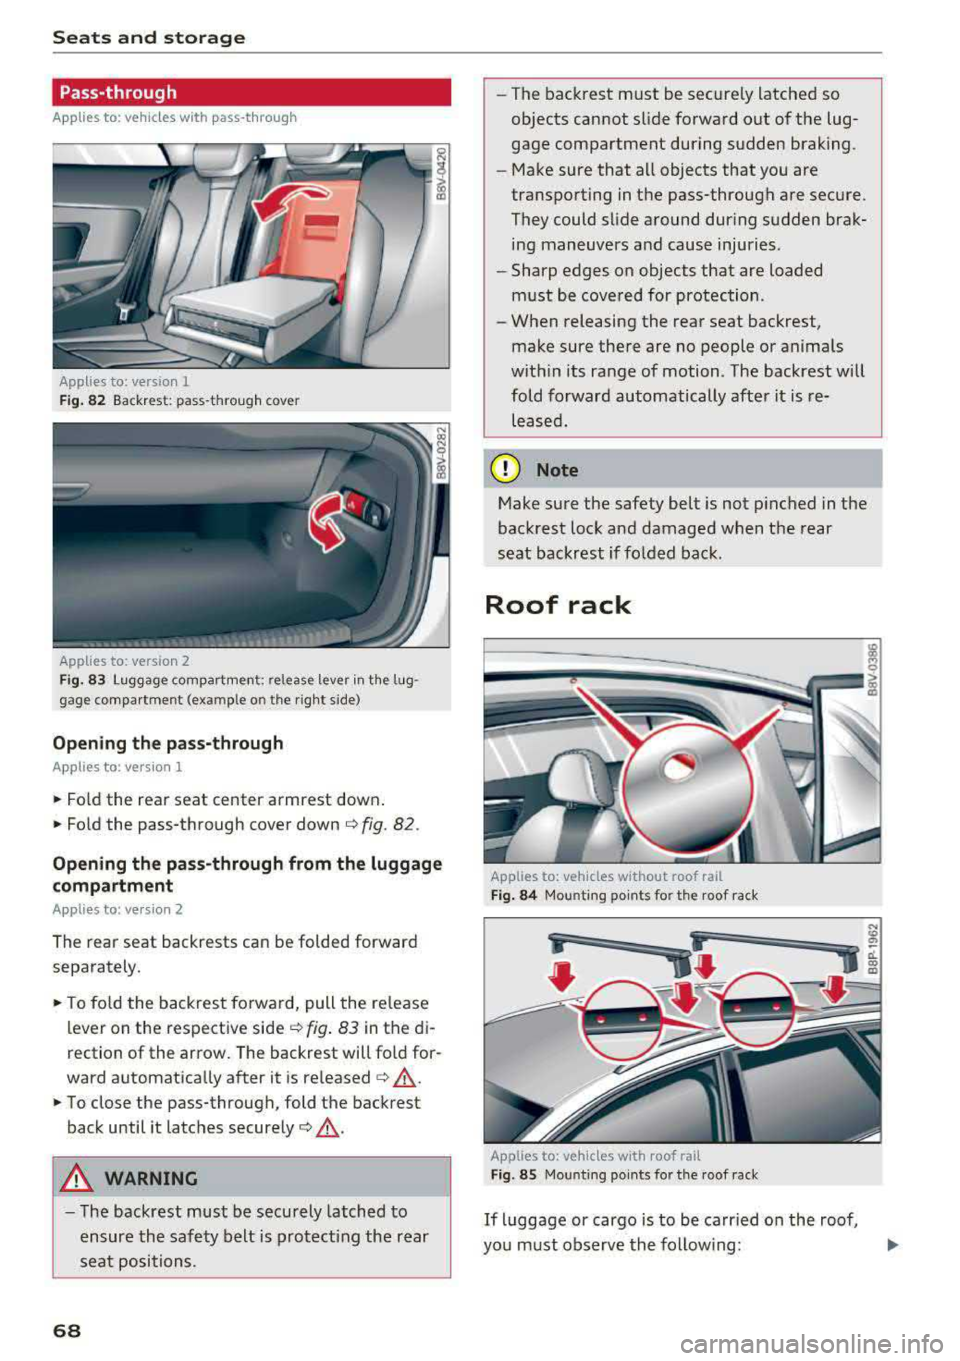
F ig . 82 Backrest : pass-throug h cover
App lies to: version 2
Fig. 83 Luggage compart ment: release lever in th e lug
gage compartme nt (ex am ple o n the r ight s ide)
Opening th e pass -through
Applies to : vers ion 1
.. Fo ld the rear seat center armrest down .
.. Fold the pass -through cover down¢ fig. 82 .
0 N
i (D
Opening the pas s-through from the luggage
compa rtment
Applies to : version 2
The rear seat backrests can be folded forward
separately .
.. To fo ld the backrest forward, pull the re lease
lever on the respective side
¢ fig . 83 in the di
rection of the arrow. The backrest will fo ld for
ward automatically after it is
released ¢,&. .
.. To close the pass-through, fold the backrest
back until it latches
securely ¢,&. .
A WARNING
-The backrest must be securely latched to
ensure the safety belt is protect ing the rear
seat positions.
68
- The backrest must be securely latched so
objects cannot slide forward o ut of the lug
gage compartment during sudden brak ing.
- Make sure that all objects that you are
transporting in the pass-through are secure.
They could slide around dur ing sudden brak
ing maneuvers and cause injuries .
- Sharp edges on objects that are loaded
must be covered for protection .
- When releasing the rear seat backrest,
make sure there are no people or animals
with in its range of motion . The backrest will
fold forward automatically after it is re leased.
(D Note
Make sure the safety be lt is not p inched in the
backrest lock and damaged when the rear
seat backrest if folded bac k.
Roof rack
Applies to: vehicles w ithout roof rail
F ig . 84 Mou nti ng po ints for the roof rack
Applies to: vehicles with roof rail
F ig. 85 Mou nting po ints fo r the roof rack
If luggage or cargo is to be carr ied on the roof,
you must observe the fo llow ing: