ESP AUDI S3 SEDAN 2018 Owners Manual
[x] Cancel search | Manufacturer: AUDI, Model Year: 2018, Model line: S3 SEDAN, Model: AUDI S3 SEDAN 2018Pages: 404, PDF Size: 62.3 MB
Page 8 of 404
About this Owner's Manual
This Owne r's Manual applies to a ll versions of
this mode l.
It contains important information,
tips, suggestions and warn ings for using your ve
h icle.
Keep this manual in yo ur vehicle at all times . This
is especially important if you loan your vehicle to
others or sell it.
This owner's manua l descr ibes the
equipment
range
specified for this mode l at the time of
printing. Individua l equipment options described
may on ly be availab le at a later date or may on ly
be offered in certain countries .
Some sections in this manua l do not apply to all
ve hicl es. When this is the case, the beginning of
the sect ion ind icates the
validity, for example
"Applies to vehicles : with cruise contro l system".
Optional or vehicle-specific equipment is also
ident ified with an asterisk"*" .
The
illustrations in this manual are a guide .
Some of the detai ls in your vehicle may differ
from the illustration .
A ll
directions , such as "left", "right", "front" and
"rear", are based on the vehicle's direction of
travel.
* Optiona
l or vehicle -specific equipment
.., The section continues on the next page.
~ & Cross reference to a "WARNING" with in a
section . If a page number is indicated , the
WARNING is located o utsid e of the section.
_& WARNING
Text with this symbol contains informat ion
about safety and how to reduce the risk of se
rious personal injury or death.
(LlJ) Note
Text with this symbol contains informat ion
about reducing the risk of damage to your ve
hicle.
@ For the sake of the environment
6
Text with this symbol contains informat ion on
protecting the environment .
-
(D Tips
Text with this symbo l contains additional use
f ul info rmation.
Page 16 of 404
Cockpit overview
Control buttons
Applies to: vehicles with Audi v irtual cockp it
i rM
' j M ..,
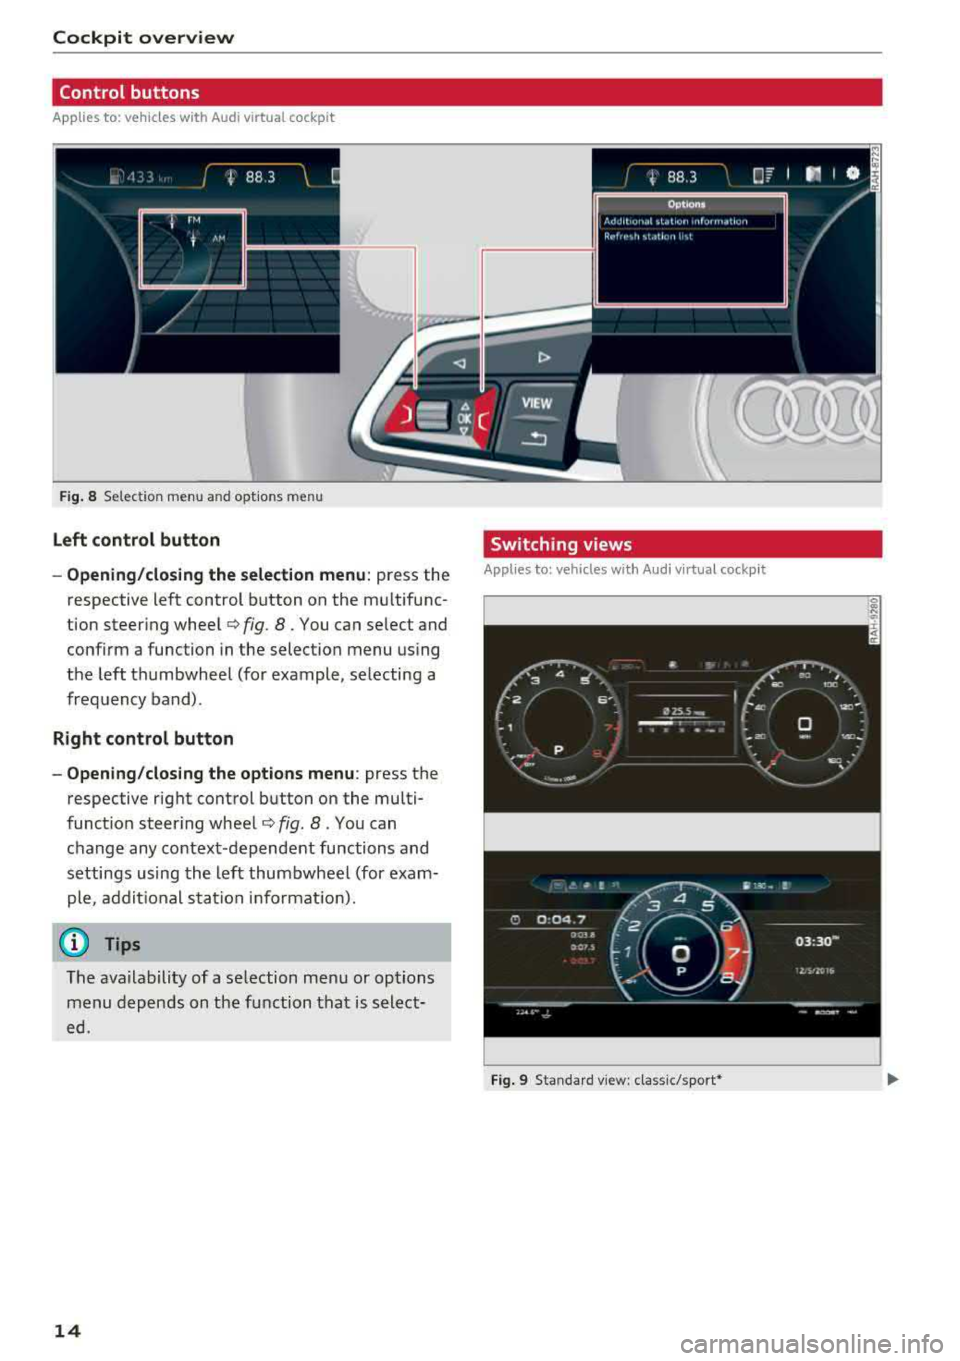
Fig . 8 Select ion menu and optio ns m en u
Left control button
- Opening/closing the selection menu:
pr ess the
respective left control button on the mu ltifunc
tion steering wheel ¢
fig. 8. You can select and
confirm a function in the selection menu using
the left thumbwheel (for example, selecting a
frequency band).
Right control button
- Opening/closing the options menu:
press the
respective right control button on the multi
function steering wheel ¢
fig. 8. You can
change any context -dependent functions and
settings using the left thumbwheel (for exam
ple , additional station informat ion).
(D Tips
The availability of a selection menu or options
menu depends on the function that is select
ed.
14
Switching views
Appl ies to: vehicles with Aud i v ir tual cockpit
Fig. 9 Standard view: cla ssic/sport *
Page 20 of 404
Cockpit overview
Resetting values to zero
Requirement: the Fuel consumption, Short-term
memory or Long-term memory
display must be
selected.
.,. T o reset the values in t he respect ive memory to
zero, press and hold the left thumbwheel on
the multif unction steering whee l for one sec
ond. Or
.,. On the multifunction steering whee l, select:
the right control button
> Reset values* .
The following displays are available, depending
on vehicle equipment:
- Date and
time r=> page 243
-Plug-in hybr id drive : range r=> page 97
-Average consumpt io n
- Short-term memory overview
- Long-term memory overview
- Energy consumers
r=> page 18
-Driver assistance r=> page 120
The sh o rt -term memo ry collects driving informa
tion from the time the ignit ion is switched on un
t il it is switched off. If yo u continue driv in g with
in two hours aft er switching the ignition off, the
new values are included when calcu lating the cur
rent trip information.
Unlike the short-term memory , the long-term
memory is not erased automatica lly. Yo u can se
lect the time period for evaluating trip informa
tion yourself.
Fuel consumption
The current fuel consumpt ion can be shown us
ing a bar graph
r=> fig. 14. The average consump
tion stored in the short-term memory is also dis
p layed . If the bar is green, your vehicle is saving
fue l through the following function:
-Recuperation : electrical energy can be stored in
the vehicle battery when the vehicle is coasting
or driving downhill. The bar will move toward
0.
Energy consumers*
The Energy consumers view lists other equip
men t that is currently affecting fuel consump
tion. The display shows up to t hree energy con -
18
sumers. The eq uipment using the most power is
li sted first . If more than three items using power
are switched on, the eq uipment that is c urrent ly
using the most power is displayed. A chart also
shows you the current tota l of a ll other consum
ers .
Q) Tips
The date, time of day and time and date for
mat can be set in the Infota inment system
r=> page 2 43.
Trip computer (analog instrument cluster)
Applies to: vehicles wit h analog inst rument cl uster
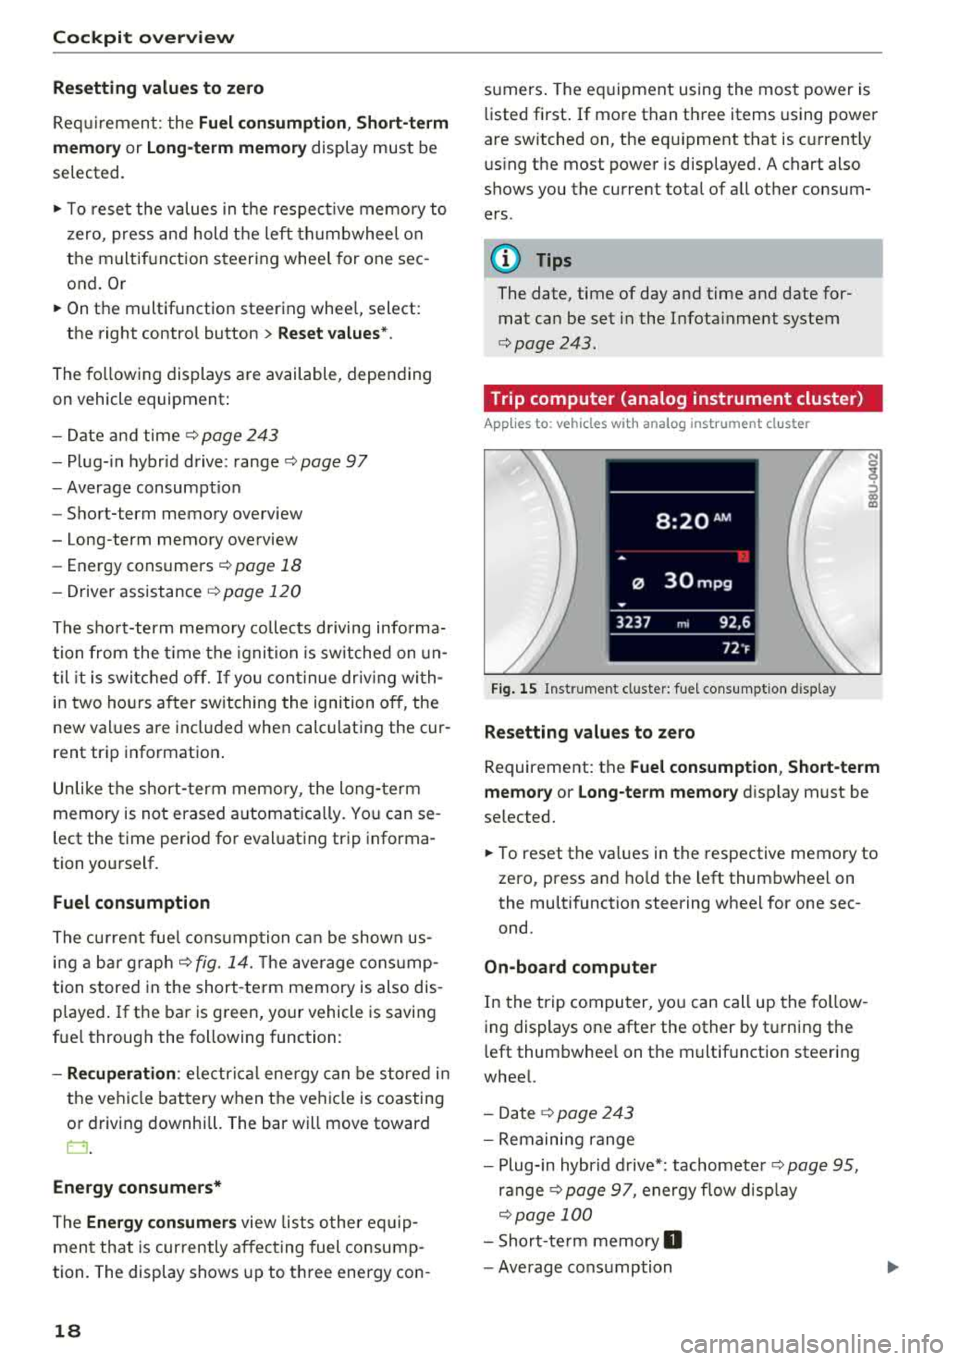
Fig. 15 Instrument cl uster: fuel consumpt ion d isp lay
Resetting values to zero
N 0
9
ffl
Requirement: the Fuel consumption , Short-term
memory or Long-term memory
display must be
selected.
.,. To reset the va lues in the respective memory to
zero, press and hold the left thumbwheel on
the multifunction steering wheel for one sec
ond.
On-board computer
In the trip computer, you can call up the follow
ing displays one after the other by t urning the
l eft thumbwhee l on the multifunction steering
wheel.
- Date
r=> page 243
-Remaining range
- Plug-in hybr id drive*: tachomete r
r=> page 95,
ranger=> page 97, energy flow display
r=>page 100
-Short-te rm memory 0
-Average consumption
Page 21 of 404
u. 00 .-< N l' N .-< 0 N > 00
-Lon g-term memory fJ
- En gine o il temper ature*
The sho rt-term memo ry co llects driving informa
tion from the t ime the ignition is sw itched on un
til it is switched off. If yo u cont inue dr iv ing wi th
in two ho urs after sw itching the ign ition off, t he
new val ues a re in clu ded when calculat ing the cur
rent trip information .
Unlike the s hort-term memo ry , the long -te rm
memory is not e rased a utoma tically. Yo u ca n se
l ect the time period fo r eval uat ing trip informa
tion yo urself .
(D Tips
The date, time of d ay and time and d ate fo r
mat can be set in the Infotainment system
r::!) page 2 43 .
Efficiency program
Applies to: vehicles with efficiency program
Resetting values to zero
~ T o reset the va lues in t he respective memory to
zero, press and hold the left thumbwhee l on
the m ultif unct ion steer ing whee l for one sec
ond.
The efficiency program can help you to use less
f u el. It evaluates driving informat ion in reference
to fuel consumption and shows other equipment i n fluencing consumption. Economy t ips provide
adv ice for efficient driving .
T he efficiency program receives distance and con
sumpt ion data from the short-term memory. If
the data in the effic iency program is deleted, the
va lues in the s hort -term memory are also reset .
T he fo llow ing additional displays may be availa
b le in the efficiency program, depending on vehi
cle equipment:
- Other equipment : other equipment that is cur
rently affecting fue l consumption is listed in
the efficiency program. The d isp lay shows up to
t h ree other equipment items. The equipmen t
us ing the most power is listed first . If more
than three items us ing power are switched on,
the equ ipment that is currently using the most
Coc kpit o ver view
powe r is d isp layed. A chart also shows you the
current total of all other consumers.
- Economy tip s: in ce rtain s ituations, economy
tips appea r automatically for a s hort time in
the efficiency prog ram . If you follow these
economy tips, you can reduce yo ur vehicle's fue l
consumption. To turn an economy message off immed iate ly after it appears, press any button
on the multifunct io n steer ing wheel.
Engine oil temperature display and boost
indicator
Applies to: vehicles with engine oil temperature display/boost
indicator
Engine oil temperature ind icator
Applies to: vehicles with analog instrumen t cl uste r
The eng ine o il temperature is o nly show n in the
lap timer display
<:!) page 122 .
Applies to: vehicles with Audi virtual cockpit
The engine oi l temperat ure is on ly shown i n the
enhanced view or in the sport
view* ¢ page 14.
When eng ine o il temperatures are low, the dis
play--- °F (--- °C) appea rs in the instr ument clus
te r.
The eng ine has reached its operating tempera
ture whe n the eng ine oil temperat ure is between
176 °F (80 °C) and 248 °F (120 °C) unde r no rma l
driv ing cond it ions. The e ng in e o il tempe rature
may be hig he r i f t here is heavy engine load and
high tempe ra tures o utsid e. This is no t a cause fo r
conce rn as long as
the .¢ page 25 or Ell
¢ page 28 indicator lights do not t urn on.
Boost indicator
Applies to: vehicles with Audi virtual cockpit
The boost ind ic a tor is o nly show n in t he en
hanced view or in the spo rt view*
r::!) page 14.
The current engine load (meaning the current
boost pressure) is ind icated by a bar.
19
Page 33 of 404
u. 00 .-< N l' N .-< 0 N > 00
Opening and closing
Central locking
Description
You can lock and un lock the veh icle centrally . You
h ave the following options:
-Remote control key c> page 33, or
-Sensors in the front door hand les"
c> page 34, or
-Lock cylinder on the driver's door c> page 36,
or
-Interior central locking switch c> page 34.
Turn sign als
The turn s ignals flas h twice when yo u un lo ck the
vehicle and flash once when you lock the vehicle.
I f t hey do not flas h, then the ignition may still be
sw itched on o r one of the doo rs, the luggage
compa rtme nt, o r the hood may be open, for ex
ample.
Automatic locking (Auto Lock )
The Auto Lock funct io n locks all doors and the
l uggage compartment lid once the speed has ex
ceeded approx imately 9 mph (lS km/ h).
The vehicle will unlock aga in if the ign it ion key is
removed, the opening function in the centra l
l o cki ng switch is act ivated , or one of t he door
h andles is operated. The A uto Lock f unc tion can
be sw itched on and off in t he Infotainment sys
tem
c> page35 .
In the event of a crash with a irbag deployment,
the doo rs will a lso automa tica lly unloc k to allow
access to t he ve hicle.
Selective door unlocking
The doors and luggage compartment lid w ill lock
when they close . You can set in the Infotainment
sys tem whether
only the d river's doo r or the en
tire ve hicl e should be unlocked w hen unlocking
c> page 35 .
Unintentionally locking yourself out
Only lock your veh icle when all of the doors and
the luggage compa rtment lid a re closed and the
Open ing and cl osing
remote cont rol key is not in t he ve hicle . Thi s
helps to prevent you from locking yourself out
accidentally .
T he following condi tions p revent yo u from lock
ing yo ur remote control key in the vehi cle:
-If the d river's door is open, the vehicle cannot
be locked by press ing t he
lil button on t he re
mote co ntro l key o r by touching the locking
sensor* on a doo r.
-If the most recently used conve nience key* is in
the luggage compa rtment, t he luggage com
partment lid a utomatically unlocks again after
closing it.
-If the convenience key* that was last used is de
tected inside the ve hicle, then the vehicle can
not be locked from the o utside .
A WARNING
--
-If you leave the vehicle, sw itch the ignition
off and take the ve hicle key with you. T his
app lies part ic u larly whe n children remain in
the vehicle . O therwise the children could
s tart the engine o r operate elect rical eq uip
men t such as power w indows.
-N o one, especially c hild re n, should stay in
t he vehicle whe n it is loc ked from the out
side, because the windows can no longe r be
opene d from the inside
c> page 3 6. Locked
doors ma ke it more diffic ult for emergency
wo rkers to get into the vehicle, which puts
lives at risk .
(D Tips
-Do not leave v aluables u natten ded i n the ve
hicle. A lo cked vehi cle is not a sa fe!
-Th e LE D in t he dr iver's door ra il blink s when
yo u lock the veh icle . If th e LED li ghts up for
app roximate ly 30 seconds a fter locking,
there is a malfunction in the centra l locking
system . Have the prob lem corrected by an
authorized Audi dealer or authorized Aud i
Service Facility.
31
Page 37 of 404
~ To lock the vehicle, press the ~ button ¢.&_ .
~ To unlock the vehicle, press the Iii button
¢ fig. 20.
When locking the vehicle with the centra l locking
switch, the fo llowing applies :
- Open ing the doors and the l uggage compart
ment lid from the
outside i s not possib le for se
curity reasons , such as when stopped at a light.
- T he L ED in the cent ral lock ing switch turns o n
when a ll doo rs a re closed and locked.
- Front doo rs: you can open the doors indiv idual
ly from the ins ide by p ulling the doo r hand le.
- Rear doors*: pu ll on the door hand le
once to
u nlock the door. Pull on the doo r hand le
again
to open t he door.
- In the event of a crash w ith airbag dep loyment,
the doors un lock automatically to a llow access
to the vehicle .
A WARNING
-Read and following all warnings ¢.& in De
scription on page 31 .
- The powe r locking sw itch works w ith the ig
nition off and a utomatically locks the entire
vehicle when
the [@] button is p ressed.
- T he centra l locking switc h is inoperative
when the vehicle is locked from the o utside .
- L ocked doors make it mo re difficult for
emergency worke rs to get into the vehicle,
which puts lives at risk. Do not leave anyone
behind in the vehicle, especially children.
(D Tips
Your veh icle locks automat ica lly w hen it
reaches a speed of 9 mph (15 km/h) (Auto
Lock)
¢ page 31. You can unloc k the vehicle
aga in using the
63 button in the centra l lock
ing sw itch.
u. 00 .-< N l' N .-< 0 N > ll Th is fun ctio n is not a vail abl e in a ll co untries. 00
Open ing and cl osing
Central locking settings
You con set which functions ore controlled by the
central locking system .
~ Select in the Infotainment system: I MENU! but
ton
> Vehicle > lef t control button > V ehicle
setting s> Central lo cking .
Door unloc king
-you can decide if All doors or
o n ly the
Dr iver's door shou ld unlock. The lug
gage compartment lid also unlocks when
All is
selected . If you select
Driver' s door in a veh icle
with a conve nience key*, on ly the doo r whose
hand le you p ull will u nlock .
If you se lect
Driver 's door , all the doors and lug
gage compartment l id w ill unlock if you press the
~ button on the remote co ntrol key twice .
Long press to open windo ws -the convenience
opening/closing function can be switched on/off
¢ page 40 .
Fold mirror s* -if you switch the function on, the
ex ter ior mirrors fold in automatically when the
vehicle is locked .
Confirmation tone -when checked off./, a tone
will sound when yo u lock the vehicle
l).
35
Page 39 of 404
LL co .... N
" N .... 0 N > co
Luggage compartment
lid
Opening/closing the luggage compartment
lid
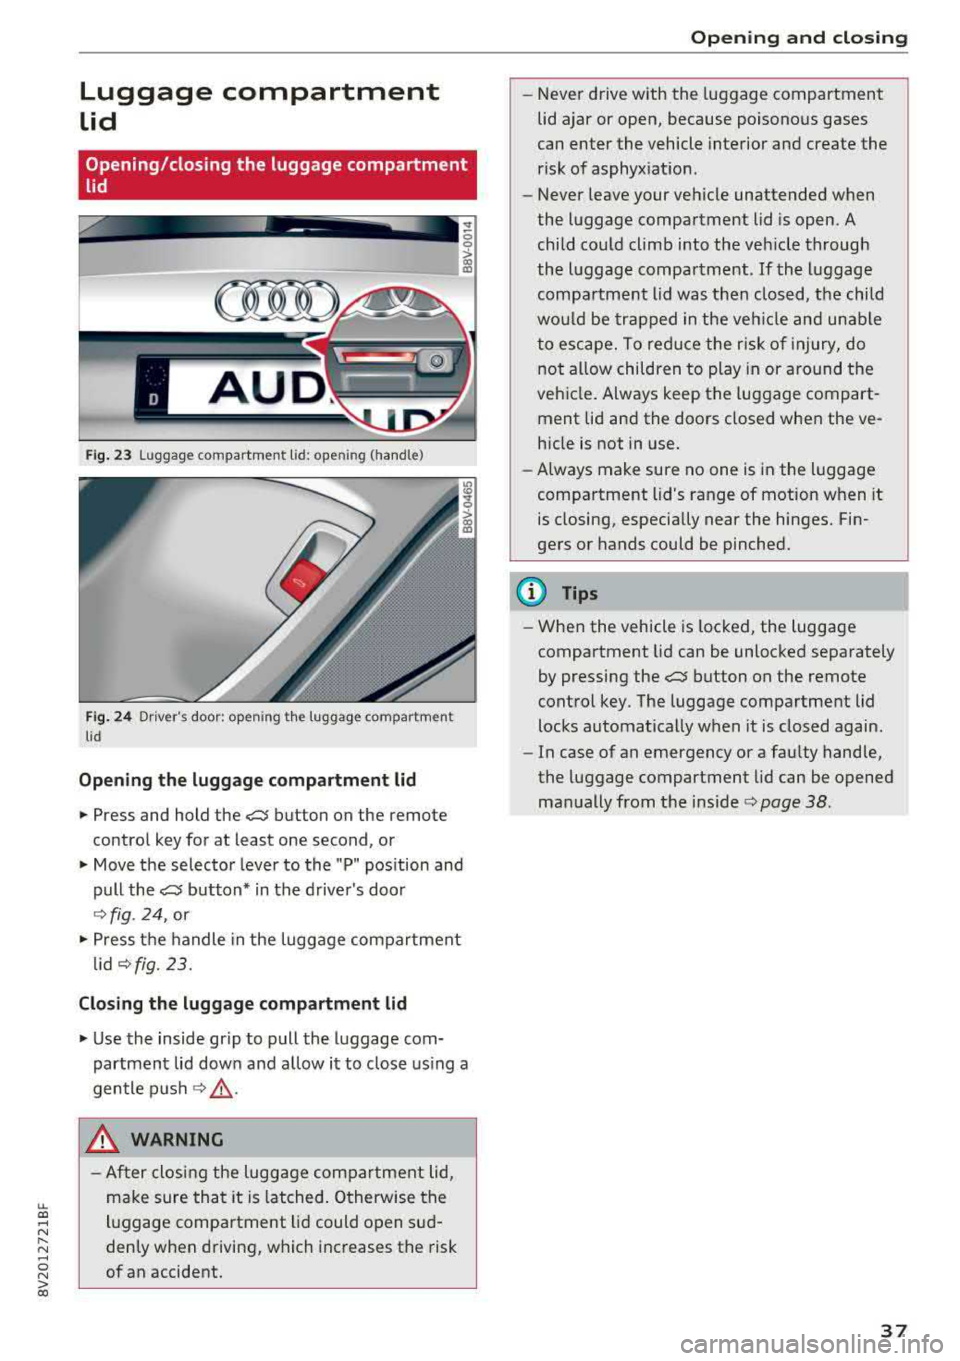
F ig . 23 Luggage compartment lid : ope ning (handle)
Fig . 24 Driver 's door : opening th e luggage compartment
lid
Opening the luggage comp artment lid
.,. Press and hold the?:$ button on the remote
control key for at least one second, or
.,. Move the selector lever to the "P" position and
pull the?:$ button* in the driver's door
¢ fig. 24, or
.,. Press the handle in the luggage compartment
lid
¢fig. 23.
Closing the luggage compartment lid
.,. Use the inside gr ip to pull the luggage com
partment lid down and allow it to close using a
gentle push
¢ &_ .
_& WARNING
-After closing the luggage compartment lid,
make sure that it is latched. Otherwise the
luggage compartment lid could open sud
denly when driving, which increases the risk
of an accident.
Opening and closing
-Never drive with the luggage compartment
lid ajar or open, because poisonous gases
can enter the vehicle interior and create the
risk of asphyxiation.
- Never leave your vehicle unattended when
the luggage compartment lid is open. A
child could climb into the vehicle through
the luggage compartment .
If the luggage
compartment lid was then closed, the child
would be trapped in the vehicle and unable
to escape. To reduce the r isk of injury, do
not allow children to play in or around the
vehicle. Always keep the luggage compart
ment lid and the doors closed when the ve hicle is not in use.
- Always make sure no one is in the luggage
compartment lid's range of motion when it
is closing, especially near the hinges. Fin
gers or hands could be pinched.
@ Tips
- When the vehicle is locked, the luggage
compartment lid can be unlocked separately
by pressing the?:$ button on the remote
control key. The luggage compartment lid
locks automatically when it is closed again.
- In case of an emergency or a faulty handle,
the luggage compartment lid can be opened
manually from the inside
c::> page 38 .
37
Page 41 of 404
Child safety lock
Applies to: veh icles wit h mechanica l child safety locks
The child safety lock prevents the rear doors
from being opened from the inside and the rear
power windows from be operated .
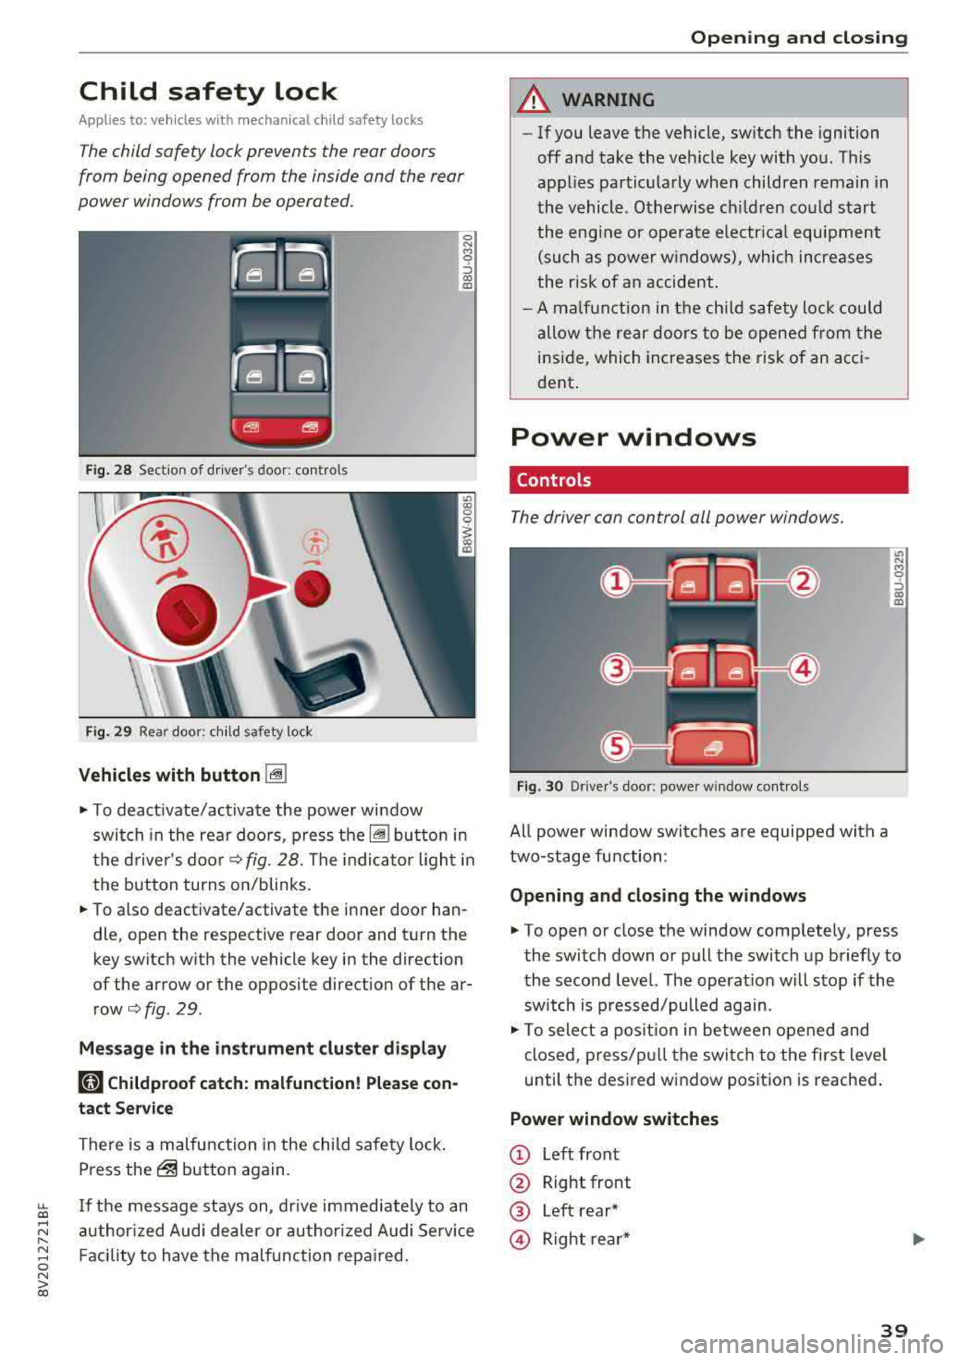
Fig . 2 8 Section of d river's door: co ntro ls
Fi g. 29 Rea r door: chil d safety lock
Vehicles with button [@]
0 N M 0 ::, a,
"'
.,. To deact ivate/activate the powe r wi ndow
swit ch in the rea r doo rs, p ress the[@] bu tton in
the d rive r's doo r
¢fig. 28. The indica to r ligh t in
the button turns on/blinks.
.,. To also deactivate/activate the i nner door han
dle, open the respective rear door and t urn the
key switch w ith the vehicle key in the direction
of the arrow or the opposite direction of the ar
row¢ fig. 29.
Mes sage in the instrument clu ster di splay
181 Childproof catch: malfunction! Please con
tact Service
There is a malfunction in the child safety lock .
Press
the@ but ton again.
~ If the message stays on, d rive immedia tely to an
;:::: a uthor ized Audi dealer or author ized A udi Se rvice
" ~ F aci lity to have the malfunc tion repa ired. 0 N > co
Opening and closing
A WARNING
- If you leave the vehicle, sw itch the ignition
off and take the veh icle key with you . T his
applies partic ularly when children remain in
the vehicle. Otherwise ch ildren cou ld st art
t he eng ine or opera te e lectr ical equi pme nt
(such as power w indows), which increases
t he r isk of an accident .
- A m alfu nction in the ch ild safety lock cou ld
al low the rear doors to be ope ned from the
i n side, which incre ases the risk of an acci
dent .
Power windows
Controls
The driver can control all power windows.
Fig. 30 Drive r's door: power w indow controls
All powe r win dow swi tches a re equipped with a
two-stage fu nction:
Opening and closing the w indows
.,. To open or close the window comp letely, press
the switch down or pull the switch up briefly to
the second level. The operat ion w ill stop if the
sw itch is p ressed/pulled again.
.,. To select a pos it ion in between opened and
cl osed, pres s/p ull th e switch t o the first level
until the des ired w indow position is reache d.
Power window switches
© Left front
@ Right front
® Left rear*
@ Right re ar *
39
Page 51 of 404
LL co .... N
" N .... 0 N > co
Lights and Vision
Exterior Lighting
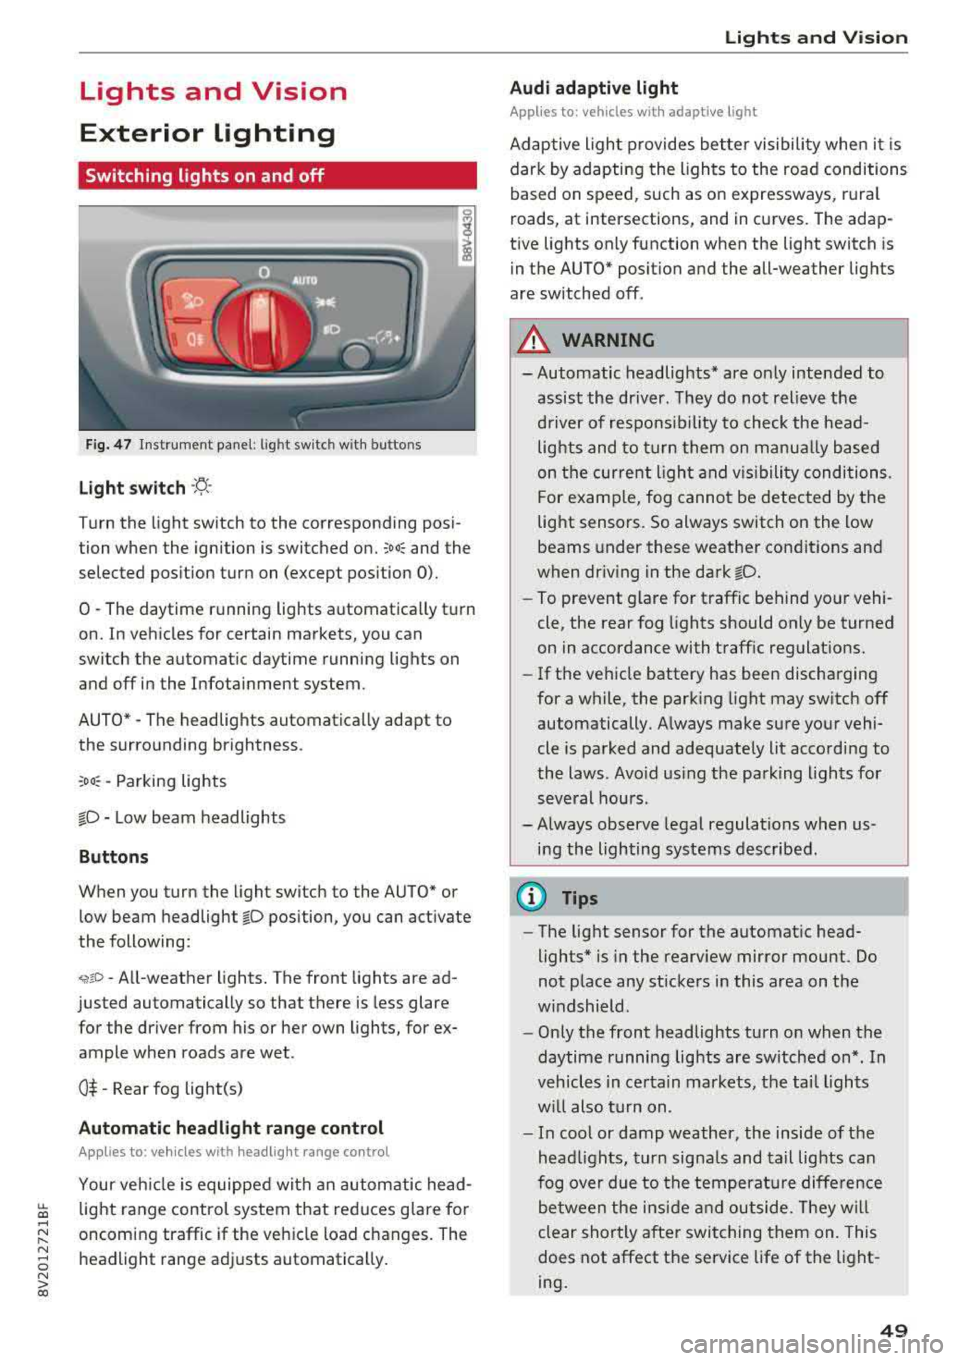
Switching lights on and off
F ig . 4 7 Instrument p anel: l ig ht sw itc h w ith buttons
Li ght switch ·'A ·
Turn the light sw itch to the corresponding posi
tion when the ignition is switched on.
;oo : and the
selected pos ition turn on (except pos ition 0).
0
-The daytime r unning lights automat ica lly t urn
on. In veh icles for certain markets, you can
switch the automat ic daytime running lights on
and off in the Infotainment system.
AUTO *
-The headlights automatica lly adapt to
the surro unding brightness.
:oo : -Parking lights
fD -Low beam headlights
Buttons
When you turn the light switch to the AUTO" or
low beam headlight
fD position, you can activate
the following:
<,if.D -All-weather lights. The front lights are ad
justed automatically so that there is less glare
for the driver from his or her own lights, for
ex
ample whe n roads are wet .
0$ -Rear fog light(s)
Automatic headlight range control
Applies to: ve hicles with headlig ht range control
Your veh icle is equipped with an autom atic head
light range control system that red uces g lare fo r
oncoming traffic if the veh icle load c hanges. The
headlight range ad justs automatica lly .
Lights and V ision
Audi adaptive light
Appl ies to: vehicles wit h adaptive light
Adaptive ligh t provides bet ter visibili ty whe n it i s
dark by adapting the ligh ts to the road conditions
based on speed , such as on e xpressways, rura l
roads, at intersections, and in c urves. The adap
t ive lights only function when the light switch is
i n the AUTO* posit io n and the all-weather lig hts
are switched off.
A WARNING
-
- Automatic headlights * are on ly intended to
assis t the driver. They do not relieve t he
d river of re spo nsibility to check the head
lights and to t urn them on m anua lly b ased
on t he cur re nt ligh t an d visibility condition s.
For e xam ple, fo g canno t be detecte d by the
light senso rs . So always switch on the low
beams under these weather con dit ions an d
when dr iv ing in the dark
fD.
-To prevent glare for traffic behind yo ur vehi ·
cle, the rear fog lights shou ld only be turned
on in accordance with t raff ic regulat ions.
- If the ve hicle battery has been discharging
for a while , the park ing light may switch off
automatically. A lways make su re you r vehi
cle is parked and adequately lit acco rding to
the laws . Avo id us ing the pa rking ligh ts for
sev eral hou rs .
- Always observe legal regula tions when us
ing the lighting sys tems desc ribed.
@ Tips
- The lig ht sensor for the automat ic head
lights* is in the rearview mirror mount . Do
not p lace any st ickers in this area on t he
w indshield .
- Only the front headlights turn on when the
daytime running lig hts are sw itched on *. In
veh icles in ce rtain markets, t he tai l lights
w ill also turn on .
- In cool or damp weather, the inside of the
hea dlights, t urn sign als and tail lights can
fog ove r due to t he tempera ture diffe rence
b etween the insi de an d outside. They will
clear shortly after swit ching them on. This
does not affect the service life of the light
ing .
49
Page 52 of 404
Lights and Vi sion
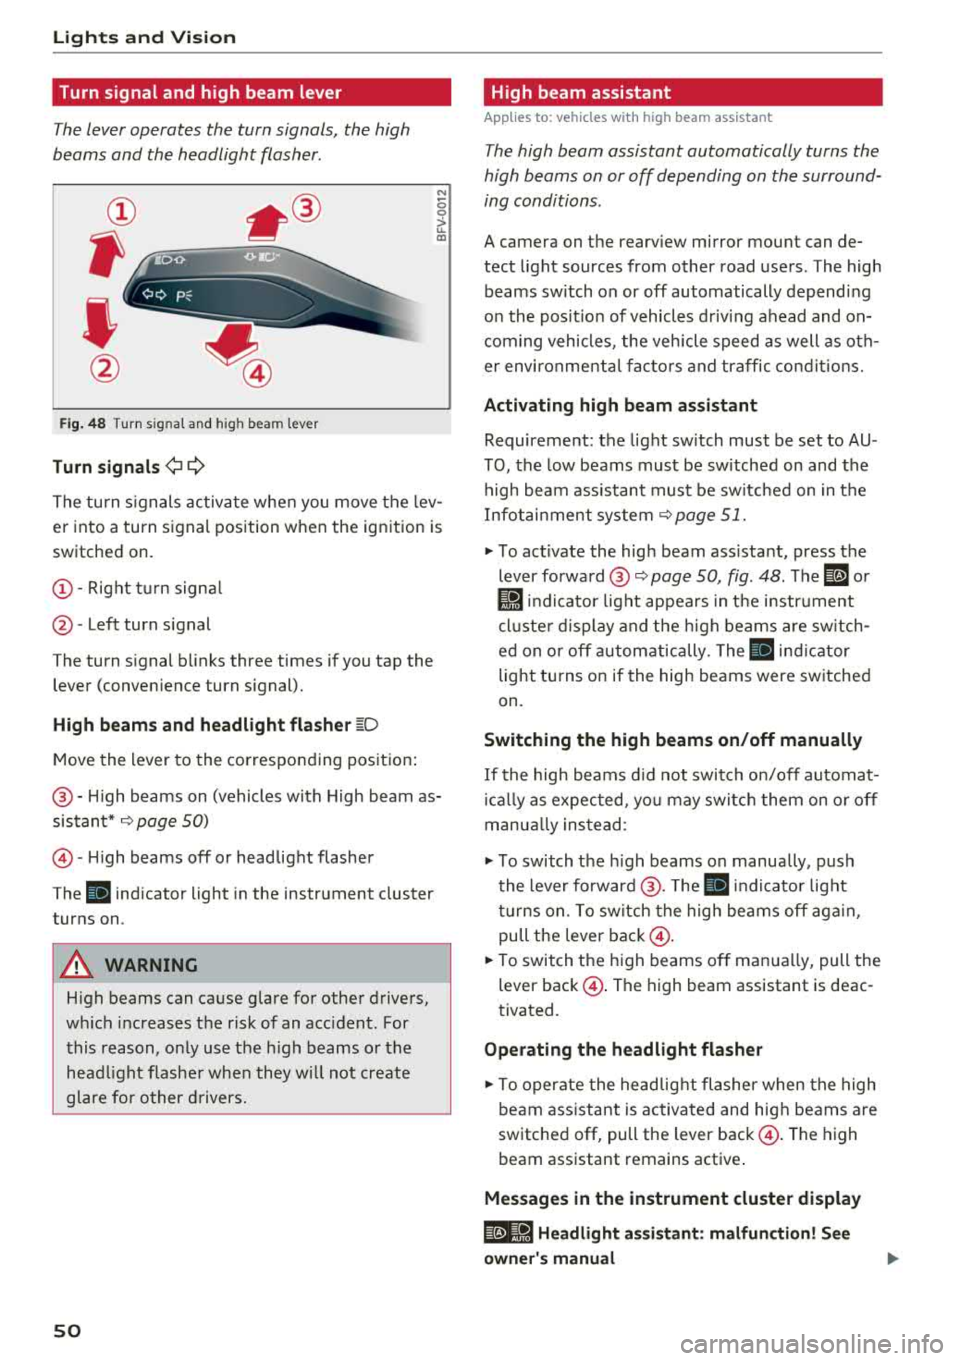
Turn signal and high beam lever
The lever operates the turn signals, the high
beams and the headlight flasher .
®
,
I
@
Fig . 48 Turn s ig nal and hig h bea m le ver
Tu rn signals ¢i Q
N
0 0
> u. a,
The turn s ignals activa te whe n you move the lev
er into a turn signal position w hen the ignition is
switched on.
(D -Right tu rn signa l
@-Left turn signal
The turn signal b links three times if you tap the
lever (conven ience turn signal).
High b eams and h eadlight flash er ~D
M ove the lever to the corresponding position :
@-High beams on (vehicles w ith High beam as
sistant*
9 page 50)
© -High beams off or headlight flasher
The
ii indicator light in the instrument cluster
turns on .
A WARNING
High beams can cause g lare for other drivers,
w hi ch increases the risk of an accident . For
this reason, o nly use the high beams or the
head light flashe r whe n they w ill not create
glare fo r other d rivers.
so
High beam assistant
App lies to : vehicles wit h high bea m ass istant
The high beam assistant automatically turns the
high beams on or off depending on the surround
ing conditions .
A camera on the rearv iew mirror mou nt can de
tect light sources from other road users . The high
beams sw itch on or off automatically depend ing
on the pos it ion of vehicles d riving ahead and on
com ing vehicles , the veh icle speed as well as o th
e r environme nta l fac to rs and traffic co ndit io ns.
Activating high beam assistant
Requirement: the light sw itch must be set to AU
TO, the low beams must be sw itched on and the
high beam assistant must be sw itched on in t he
Infotai nment system
9 page 51.
"" To act ivate the hig h beam ass istant, press the
lever forward @
9 page 50, fig. 48 . The ID or
Ji1 indicator light appears in t he i nstr ument
cl uste r d isplay and the h igh beams are sw itch
ed on o r off autom atically. The
ii ind icator
light tu rns on if the high beams were sw itched
on.
Switching the high beams on /off manually
If the high beams d id not swi tch on/off automat
i ca lly as expected, yo u may switc h them on o r off
manua lly ins tead :
""To switch the h igh beams on manually, push
the lever forward @. T he
ii indicator light
tu rns on. To sw itch the high beams off aga in ,
pull the leve r
back@.
""To switch t he high beams off man ua lly, pull the
lever
back @. The high beam assistant is deac
tivated .
Operating the headlight flasher
""To operate the headlig ht flashe r when the high
beam ass istant is activated and hig h beams a re
switched off, pull the lever
back @. The high
beam assistant remains active .
Messages in the instrument cluster display
@e-8·1 Headlight assistant : malfun ction! See
owner' s manual