door lock AUDI S4 2014 User Guide
[x] Cancel search | Manufacturer: AUDI, Model Year: 2014, Model line: S4, Model: AUDI S4 2014Pages: 296, PDF Size: 73.56 MB
Page 42 of 296
40 Opening and closing
Power opening/closing rear lid
Applies to vehicles: wit h au tomat ic rear lid ope rat ion
The open position can be adjusted .
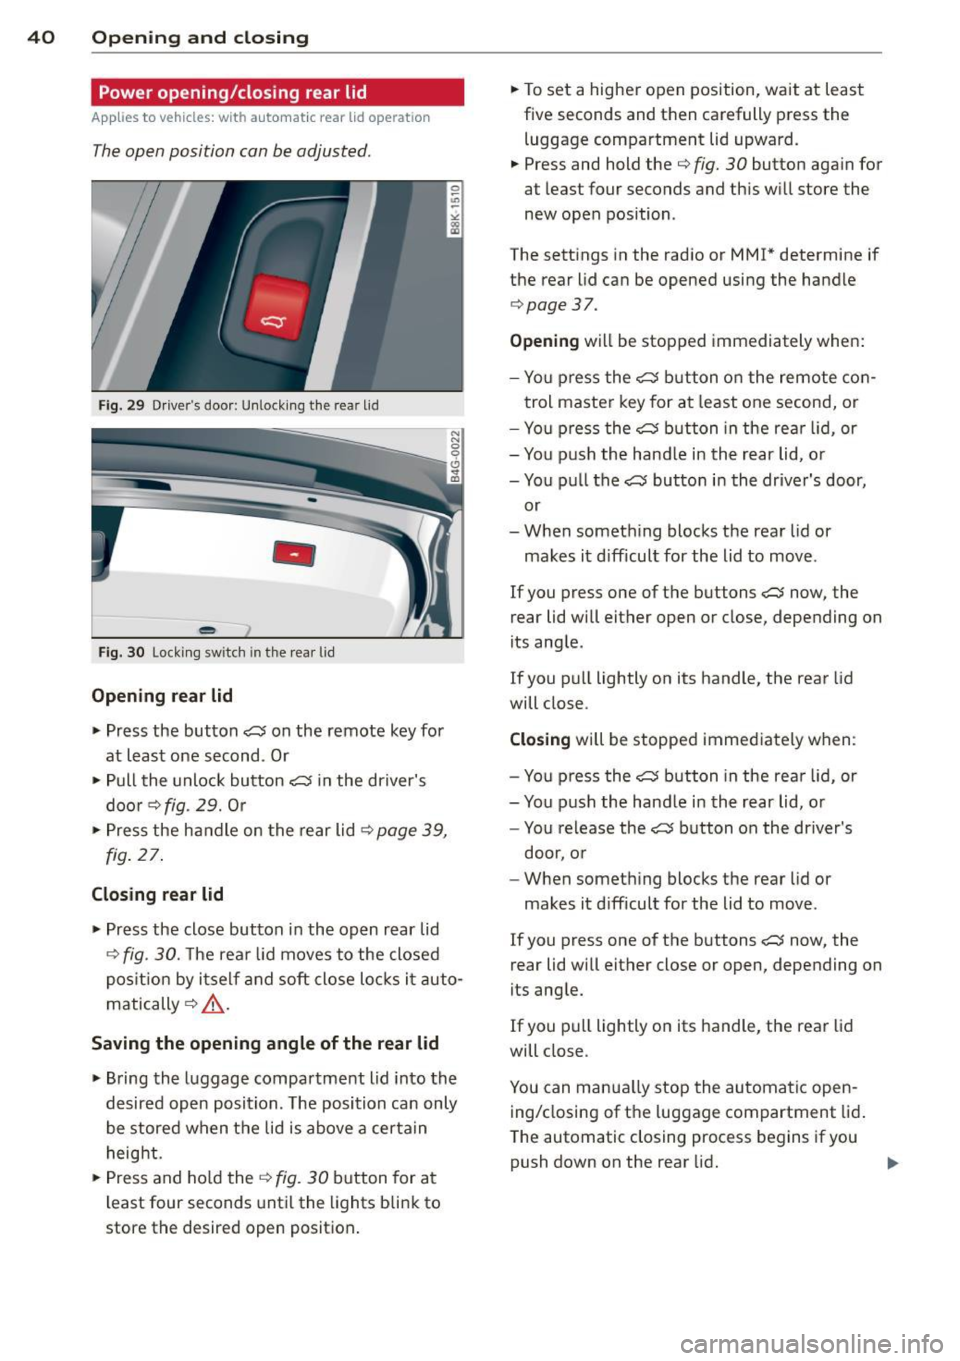
Fig. 29 Drive r's door: Unlock ing the rea r lid
-
Fig. 30 Locking sw itch in the rear lid
Opening rear lid
• Press the button cs on the remote key for
at least one second . Or
• Pull the unlock button
cs in the driver's
door¢
fig. 29. Or
• Press the handle on the rear lid~
page 39,
fig. 27.
Closing rear lid
• Press the close button in the open rear lid
~ fig. 30. T he rear lid moves to the closed
position by itself and soft close locks it auto
matically ¢,&. .
Saving the opening angle of the rear lid
• Bring the luggage compartment lid into the
desired open position. The position can only
be stored when the lid is above a certain
height.
• Press and hold the
~ fig. 30 button for at
least four seconds until the lights blink to
store the desired open position . •
To set a highe r open position, wait at least
five seconds and then carefully press the
luggage compartment lid upward.
• Press and hold the¢
fig. 30 button aga in for
at least four seconds and this will store the
new open position .
The settings in the radio or MMI* determine if
the rear lid can be opened using the handle
¢page 37.
Opening will be stopped immediately when:
- You press the
cs button on the remote con-
trol maste r key for at least one second, or
- You press the
cs button in the rear lid , or
- You push the handle in the rear lid, or
- You pull the
cs button in the driver's door,
or
- When something blocks the rear lid or
makes it d ifficult for the lid to move .
If you press one of the buttons
cs now, the
rear lid will ei ther open or close, depending on
its ang le .
If you pull lightly on its handle, the rear lid
will close .
Closing will be stopped immed iately when :
- You press the
cs button in the rear lid , or
- You push the handle in the rear lid, or
- You release the
cs button on the driver's
door, or
- When something blocks the rear lid or
makes it difficult for the lid to move .
If you press one of the buttons
cs now, the
rear lid will either close or open, depending on
its angle.
If you pull lightly on its handle, the rear lid
will close .
You can manually stop the automatic open
ing/closing of the luggage compartment lid.
T he automatic closing process begins if you
push down on the rear lid.
Page 43 of 296
_& WARNING
-Never close the rear lid inattentively or
without checking first. Although the
closing force of the rear lid is lim ited,
you can stfll seriously injure yourself or
o the rs.
- Always ensure that no one is w ithin
range of the rear lid when it is mov ing, in
part icu lar close to the hinges and the up
per and lower edges -fingers or hands
can be pinched.
- To help preven t po isonous exha ust gas
from being drawn into the vehicle, al
ways keep the rear lid closed while driv
ing. Never transport objects larger than
those which fit completely into the lug gage area, because then the rear lid can
not be fully closed.
- Never leave your vehicle unattended es pecially with the rear lid left open. A
child could crawl into the car through the
luggage compartment and pull the lid
shut, becom ing trapped and unab le to
get out. To reduce the risk of persona l in
jury, never let children p lay in or around
yo ur vehicle. A lways keep the rear lid as
well as the vehicle doors closed when not
in use .
- If there is a luggage rack or bicycle rack
mounted on the rear lid, it may not be
able to open completely or an opened
rear lid may close by itself because of the
added weight. So the open rear lid must
be supported or the weight must be re
moved from the luggage rack first .
@ Tips
-When the vehicle is locked, the rear lid
can be unlocked separately by pressing
the button
~ on the master key. When
the rear lid is closed aga in, it locks auto
matically.
- The following applies to veh icles equip
ped with the conve nience key* feature: if
the remote contro l key is left in the lug
gage compartment, luggage compart ment will a utomat ica lly unlock itse lf af-
Op enin g an d clos ing 41
ter you lock the vehicle. This prevents
you from unintentionally locking your
key in the l uggage compartment.
- If the vehicle battery charge drops be
low a certain level, you can still open or
close the rear lid manually, however, you
w ill need to apply more force to close it.
Sedan: Rear lid emergency release
Applies to vehicles: with fixed rear seat backrest
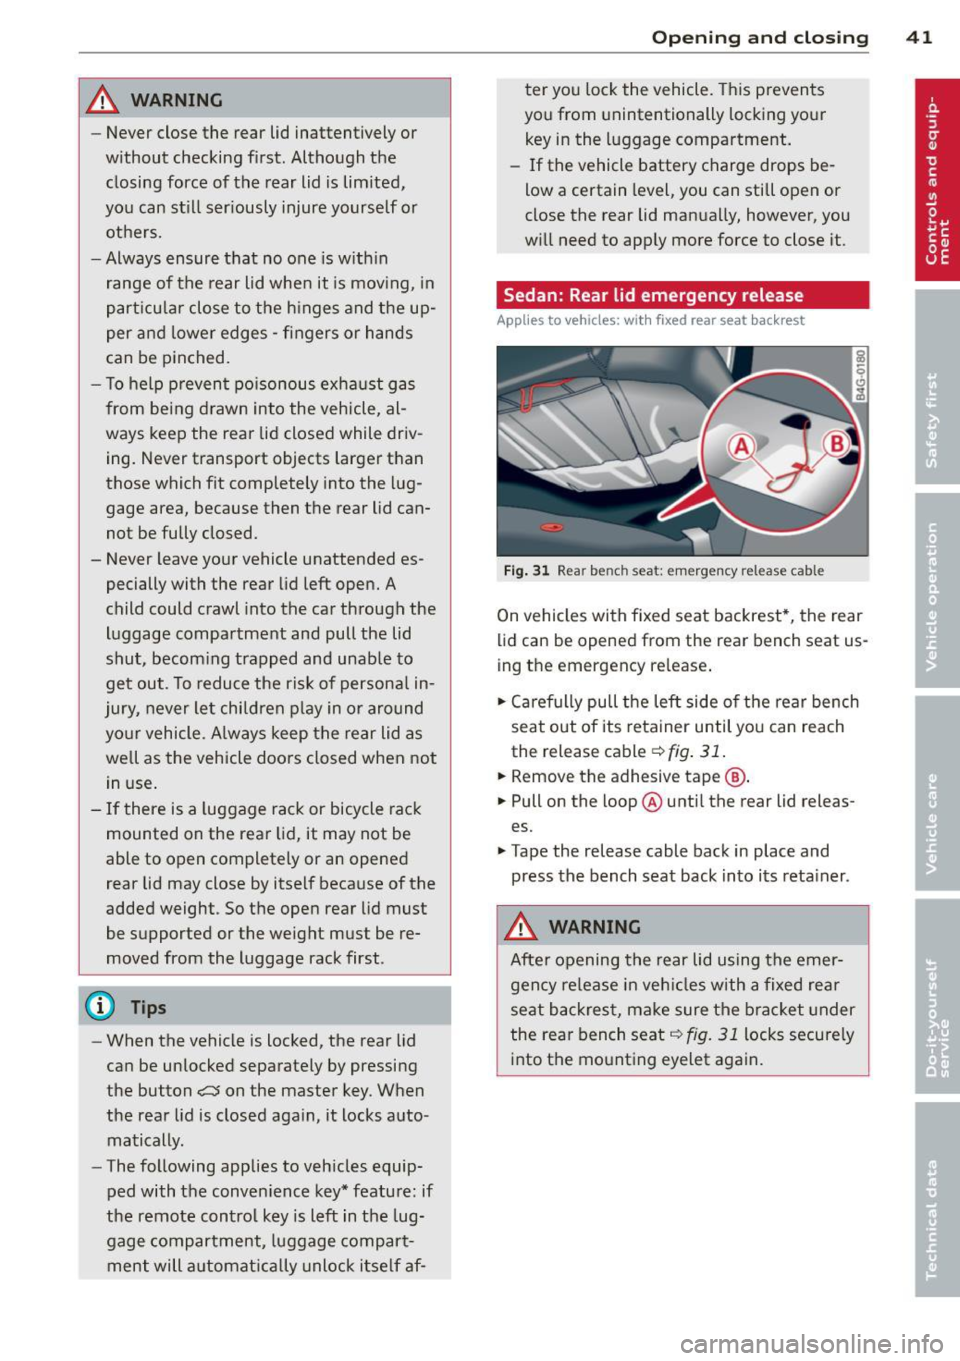
F ig . 31 Rea r be nch seat: em ergency release cab le
On vehicles with fixed seat backrest *, the rear
lid can be opened from the rear bench seat us
ing the emergency re lease .
.,. Ca re fully pull the left side o f the rear bench
seat out of its retainer until you can reach
the release cable
¢ fig . 31 .
.,. Remove the adhesive tape @.
.,. Pull on the loop ® until the rear lid releas
es.
.,. Tape the release cable back in place and
press the bench seat back into its reta iner.
_& WARNING
After opening the rear lid using the emer
gency re lease in veh icles with a fixed rear
seat backrest, make sure the bra cket under
the rear bench seat
¢ fig. 31 locks secure ly
into the mounting eyelet again.
Page 44 of 296
42 Opening and clo sing
allroad: Rear lid emergency release
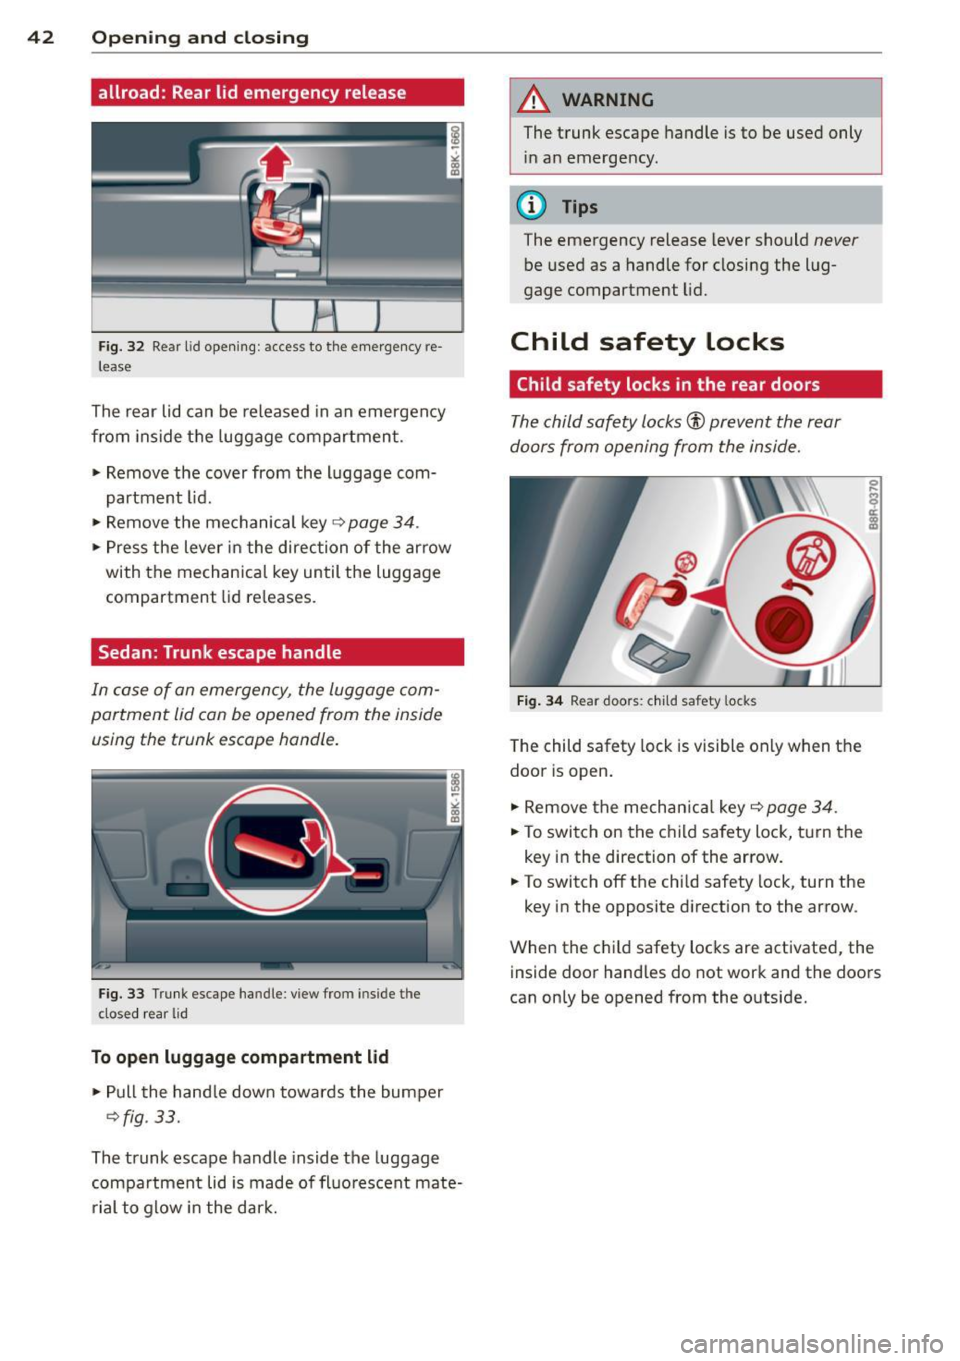
Fig. 32 Rear lid open ing: access to the emergency re
lease
The rear lid can be released in an emergency
from inside the luggage compartment.
.. Remove the cover from the luggage com
partment lid .
.. Remove the mechanical key
9 page 34 .
.. Press the lever in the direction of the ar row
with the mechanica l key until the luggage
compartment lid re leases.
Sedan: Trunk escape handle
In case of an emergency, the luggage com
partment lid con be opened from the inside
using the trunk escape handle.
F ig. 33 Trunk escape handle: view from inside the
closed rear lid
To open luggage compartment lid
.. Pul l the hand le down towards the bumper
9fig. 33.
The trunk escape handle inside the luggage
compartment lid is made of fl uo rescent mate
r ial to glow in the dark.
A WARNING
-The trunk escape handle is to be used only
in an emergency.
(D Tips
The emergency release lever should never
be used as a handle for closing the lug
gage compartment lid.
Child safety locks
Child safety locks in the rear doors
The child safety locks® prevent the rear
doors from opening from the inside .
F ig . 34 Rear doors: c hild safety locks
The child safety lock is visible only when the
door is open .
.. Remove the mechan ica l key
9 page 34 .
.. To swi tch on the child safety lock, turn the
key in the direction of the arrow .
.. To switch off the chi ld safety lock, turn the
key in the opposite di rection to the arrow.
When the c hild safety locks are activated, the
inside door hand les do not work and the doors
can only be opened from the outs ide.
Page 45 of 296
Power windows
Controls
The driver can control all power windows.
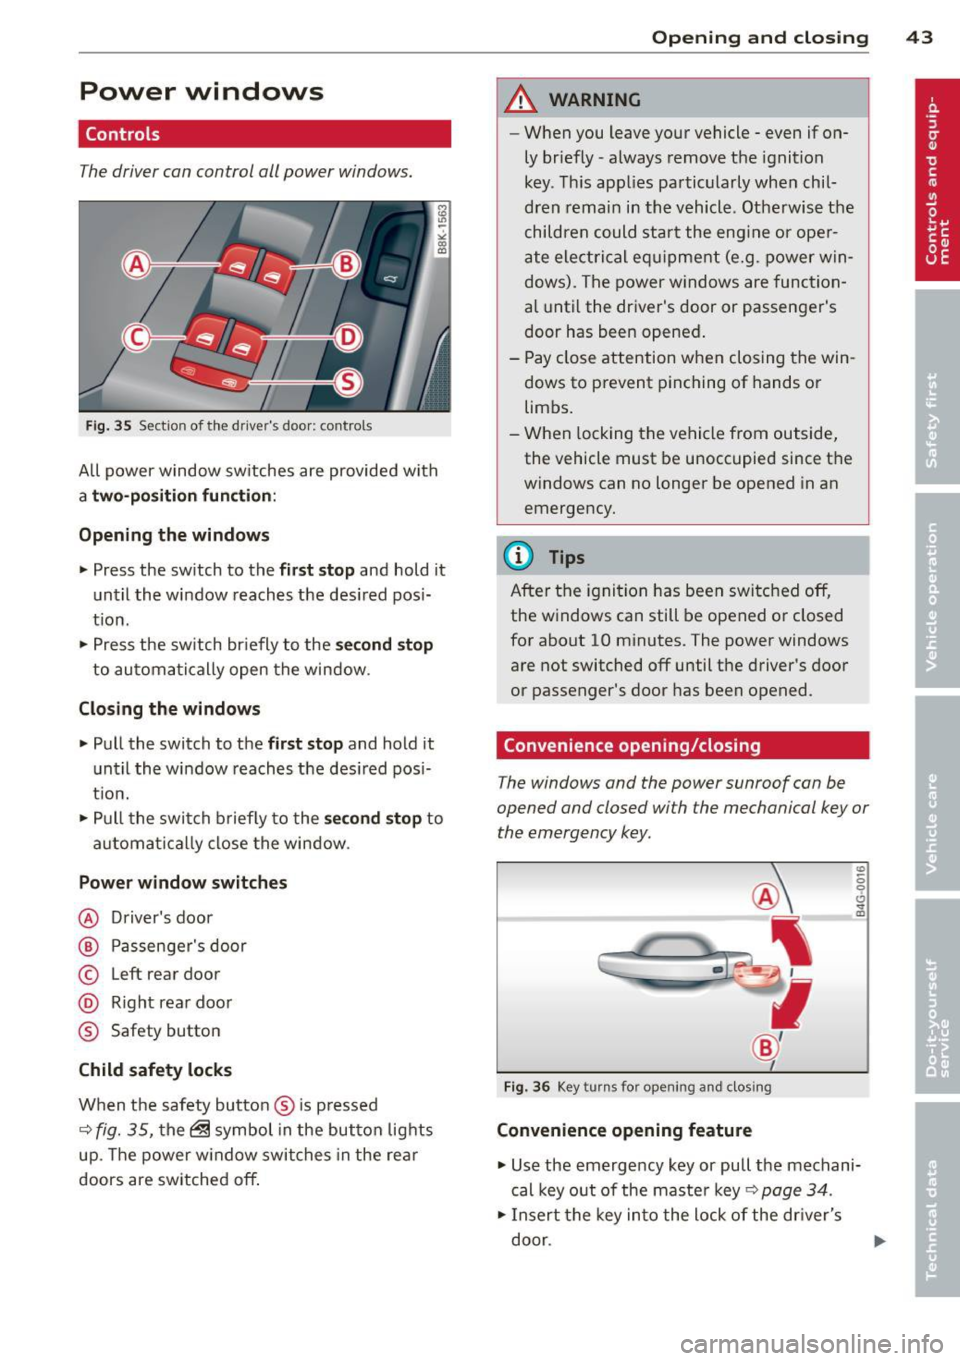
F ig . 35 Section of the driver 's doo r: co ntrols
All power window sw itches are provided with
a two -position function :
Opening the windows "' Press the sw itch to the first stop and hold it
un til the window reaches the des ired pos i
t io n.
"' Press the sw itch br iefly to the se cond stop
to au tomatically open the window .
Closing the windows "' Pull the switch to the first stop and hold it
unt il the window reaches the des ired pos i
t ion.
"' Pull the swi tch b riefly to the sec ond stop to
a utoma tica lly close the window.
Power window switches
@ Driver's door
@ P assenger's door
© Left rear door
@ Right rear door
® Safety button
Child safety locks
W hen the safety button ® is p ressed
~ fig. 35, the@ symbol in the but ton lights
up. The power w indow swi tches in the re ar
doors are switched
off .
Opening and clo sin g 43
A WARNING
-When you leave your vehicle - even if on
ly briefly -always remove the ignit ion
key. This app lies pa rtic ularly whe n chil
d ren remain in th e vehicle. Othe rwise t he
child ren c ould sta rt the eng ine o r ope r
a te elect ric al e quipme nt (e.g. power win
dows). The power w indows are func tio n
a l until the dr iver's door or passenge r's
door has been opened .
- Pay close attention when closing the win
dows to p revent pinching of hands o r
limbs .
- When locking the ve hicle from outside,
the vehicle must be unoccupied since the
windows can no longer be opened in an
emerge ncy.
(D Tips
After the ignition has been switc hed
off,
the w indows can still be opened o r closed
for about 10 minutes. The power windows
a re not switched
off until the driver's door
or passenger's door has been opened.
Convenience opening/closing
The windows and the power sunroof can be
opened and closed with the mechanical key or
the emergency key.
Fig . 36 Key turns for opening and closing
Convenience opening feature
"' 6 0 0 ... m
"' Use the emergency key or pull the mechani
cal key out of the maste r key ~ page 34 .
"' Insert t he key in to the lock of the dr iver's
door .
Page 46 of 296
44 Opening and clo sing
• Turn the key to position ¢ fig. 36@ until all
the windows have reached the desired posi
t ion and the power sunroof is open.
Conv eni ence closing feature
• Use the eme rgency key or pull the mechan i
cal key out of the master key ¢
page 34.
• Turn the key in the lock of the driver's door
to the lock position ® until the windows
and the power sunroof are closed
¢ &_ .
F or vehicles w ith Panoramic sliding sunroof*:
When you open or close the Panoramic sliding
sunroof* , the power sunshade wi ll also open
or close.
A WARNING
- Never close the windows and the power
sunroof inattentively and without check
ing -there is risk of inj ury .
- You must always watch whe n the win
dows are being ra ised so that no one can
be trapped. If you release the key, the
closing action is immed iate ly canceled .
- Always read and heed WARNING
¢ .&. in
General description on page 32 .
Correcting window regulator
malfunction
After disconnecting the vehicle battery, the
one-tou ch up and down feature must be acti
vated again.
• Pull and hold the power w indow switch unt il
the window is completely closed.
• Re le ase the switch and pull the switch again
f or one second.
Sunroof
Operation sliding/tilting sunroof
Applies to vehicles: with sliding/tilting sunroof
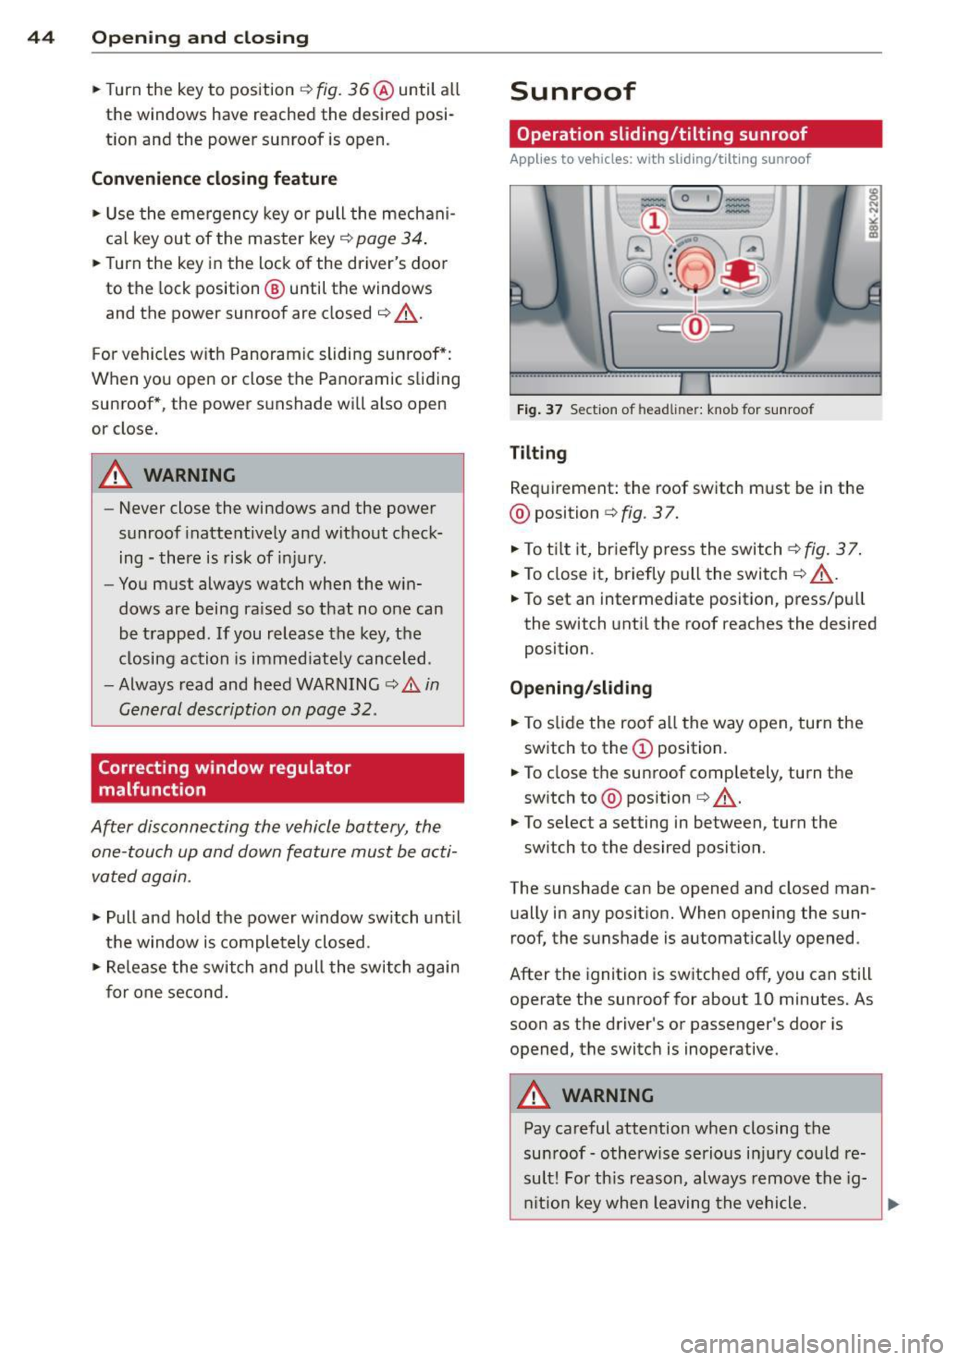
F ig. 37 Se ction of head lin er: k nob for s unroof
Tilting
Requirement: the roof switch must be in the
@ position
¢fig . 37.
• To t ilt it, br ie fly p ress the switch ¢ fig. 37.
• To close it, briefly pull the switch ¢&_ .
• To set an intermediate position, press/pu ll
the switch unt il the roof reaches the desired
position .
Opening /sliding
• To slide the roof a ll the way open, turn the
switch to the
(D position.
• To close the sunroof completely, turn the
sw itch to @ position
¢ &_.
• To select a setting in between , turn the
sw itch to the desired position.
The sunshade can be opened and closed man u ally in any posit ion. When opening the sun
roof, the sunshade is automatically opened .
After the ignition is sw itched off, you can still
operate the sunroof for about 10 minutes. As
soon as the driver's or passenger's door is
opened, the switc h is inoperative.
A WARNING
--
Pay careful atte ntion when closing the
su nroof- otherw ise serio us i njur y cou ld re
sul t! Fo r th is reason, always remove the ig-
ni tio n key when leaving the vehicle.
~
Page 48 of 296
46 Opening and clo sing
Valet parking
Appli es to vehicles: wit h folding a nd lockable rear seat
backs
The va le t parkin g feature protects the lug
gage comportm ent from unauthorized ac
cess.
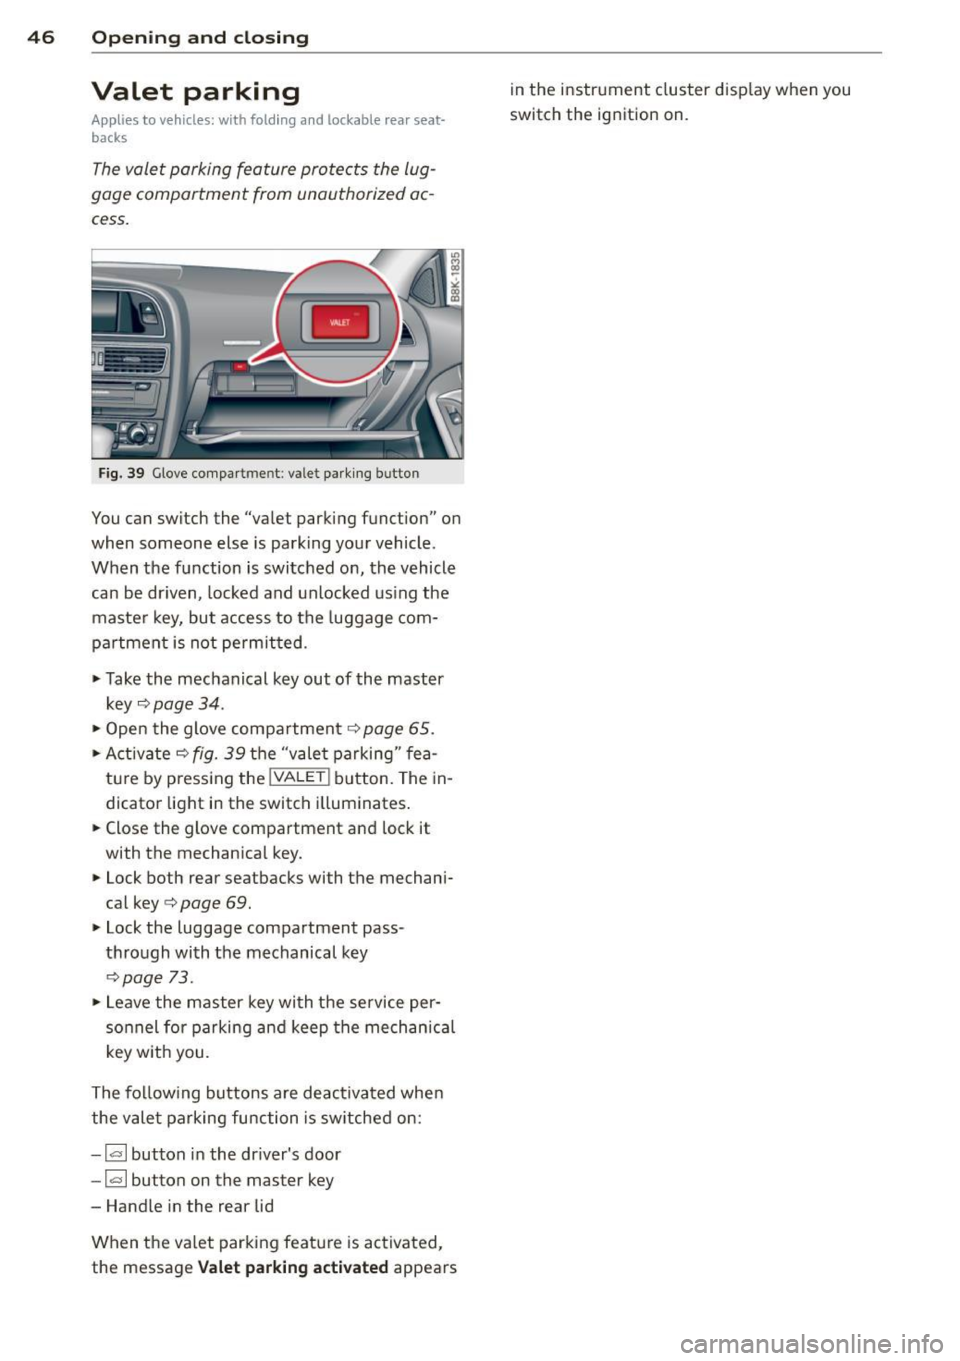
Fig. 39 Glove compa rtm en t: val et pa rkin g button
You can switch the "va let parking function" o n
when someone else is parking your vehicle .
When the function is switched on, the vehicle can be dr iven, locked and unlocked using the
maste r key, but access to the luggage com
p a rtment is not perm itted .
• Take the mechanical key out of the master
key
c:> page 34 .
• Ope n the glove compartment c:> page 65.
• Act iv a te c:> fig. 39 the "v alet parking " fea
tu re by p ress ing the
! VALE T! bu tton. The in
d icator light in the switc h il luminates .
• Close the glove compartment and lock it
with the mechanical key.
• Lock both rear seatbacks with the mechani
cal key
c:> page 69.
> Lock the luggage compartment pass
t hr ough wi th the mechanical key
c:> page 73.
• Leave the master key with t he service per
sonnel fo r parking an d keep the mechanica l
key w ith you.
The fol low ing buttons are deac tiva ted whe n
the v ale t parking fu nction is sw itched on:
- la l but ton in the dr iver's door
-
~ button on the master key
- Handle in the rear lid
W hen t he va let parkin g feat ure is activated ,
the message
Valet parking activated appears in the instrument cluster disp
lay when you
switch the ig nition on .
Page 50 of 296
48 Clear vis ion
@ Tips
- The light sensor* for headlight control is
located in the rear view m irror mount.
You should therefore not apply any st ick
ers to the windsh ield in this area in order
to prevent malfunctions or failures.
- Some exterior lighting functions can be
adjusted
c> page 48.
- When you remove your key from the igni
tion while the vehicle's lights are turned
on, a buzzer sounds as long as the driv
er's door is open .
- In cool or damp weather, the ins ide of
the headlights, turn signals and tail lights can fog over due to the tempera
ture difference between the inside and
outside. They will clea r shor tly after
switching them on. This does not affect
the service life of the lighting.
- In the even t of a light sensor malfunc
tion, the driver is no tified in the instru
ment cluster disp lay¢
page 22.
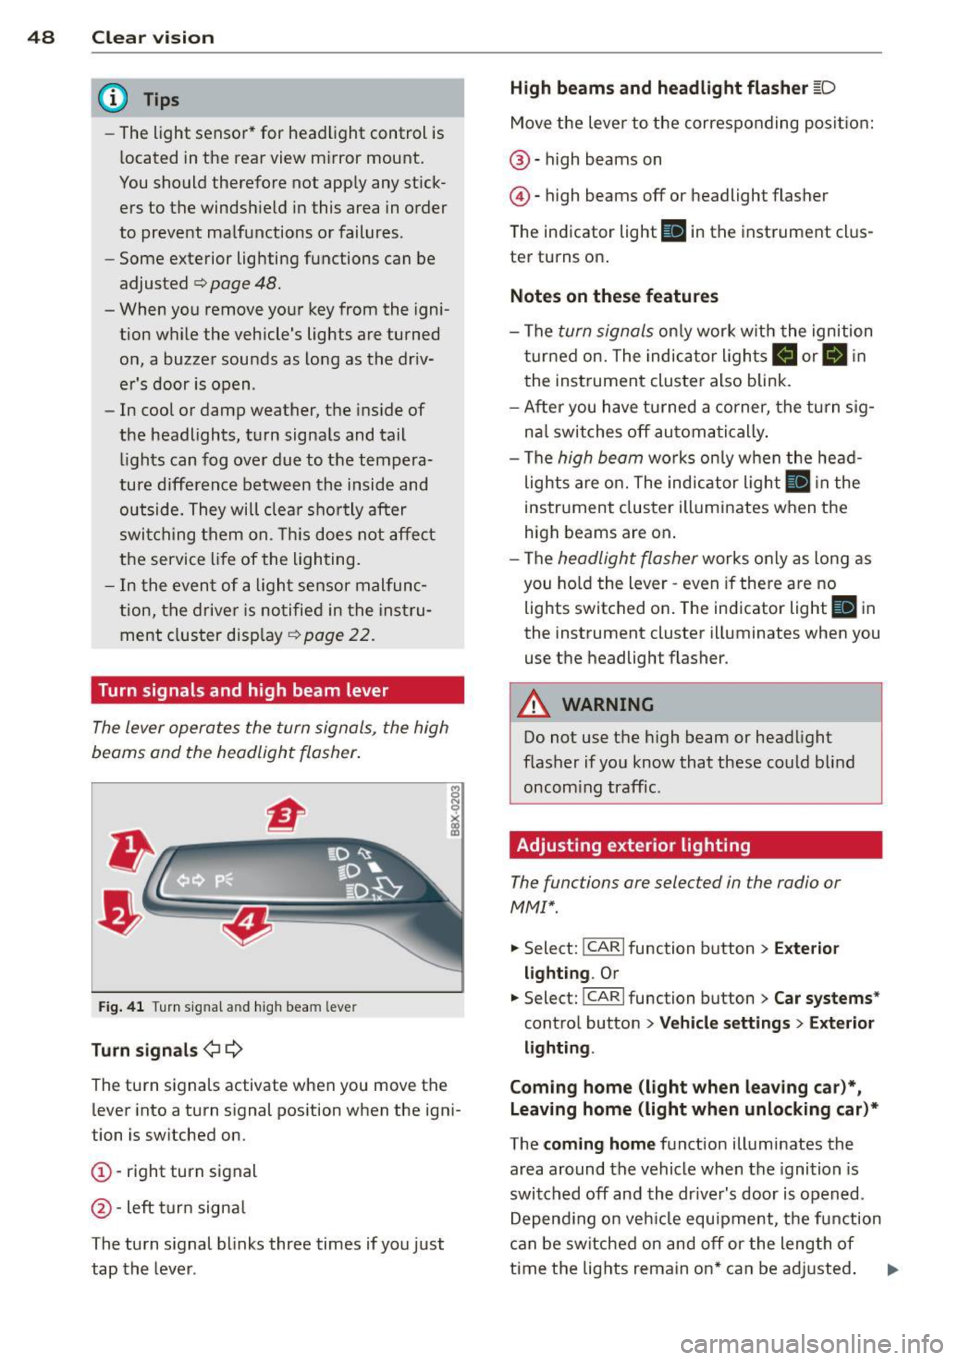
Turn signals and high beam lever
The lever operates the turn signals, the high
beams and the headlight flasher .
Fig. 4 1 Tu rn s ig na l and hig h beam lever
Turn sign als ¢i ¢
The turn signals activate when you move the
l ever into a turn s ignal pos ition when the ign i
tion is switched on.
(D -right turn signal
@-left tur n signa l
The turn s ignal blinks three times if you just
tap the lever .
High be ams and headlight flasher [D
Move the lever to the correspon ding posit io n:
@ -high beams on
@ -high beams off or headlight flasher
The indicator light
ii in the instrument cl us
ter turns on .
Notes on thes e features
-The turn signals on ly wor k w ith the ignition
t urned on. The indicator ligh ts
Ct or a in
the instrument cluster also blink.
- After you have turned a co rner, the turn s ig
na l switches off au toma tically .
- The
high beam works on ly w hen the head
lights a re on. The indicator ligh t
II in the
instrument cluster illuminates when the
high beams are on .
- The
headlight flasher works o nly as long as
you ho ld the lever -even if there a re no
lights switched on . The indicator light
II in
the instrument cluster illuminates when you
use the headlight flasher.
A WARNING
--
Do not use the h igh beam or headlight
flasher if you know that these could blind
oncom ing traffic.
Adjusting exterior lighting
The functions ore selected in the radio or
MMI" .
.,. Select: !CARI function button> Exte rior
light ing .
Or
.,. Select: !CARI function button > Car systems *
control button > Vehicle s etting s> Exterior
lighting .
Coming home (light when leav ing car }*,
Leav ing home (light when unlocking car )*
The coming home function illuminates the
area around the vehicle when the ignition is
switched off and th e dr ive r's door is opened.
Depend ing on vehi cle equ ipment, the function
can be switched on and off or the length of
time the lig hts remain on* can be ad justed . ..,.
Page 52 of 296
50 Clear vis ion
Interior lights
Front /rear interior lights
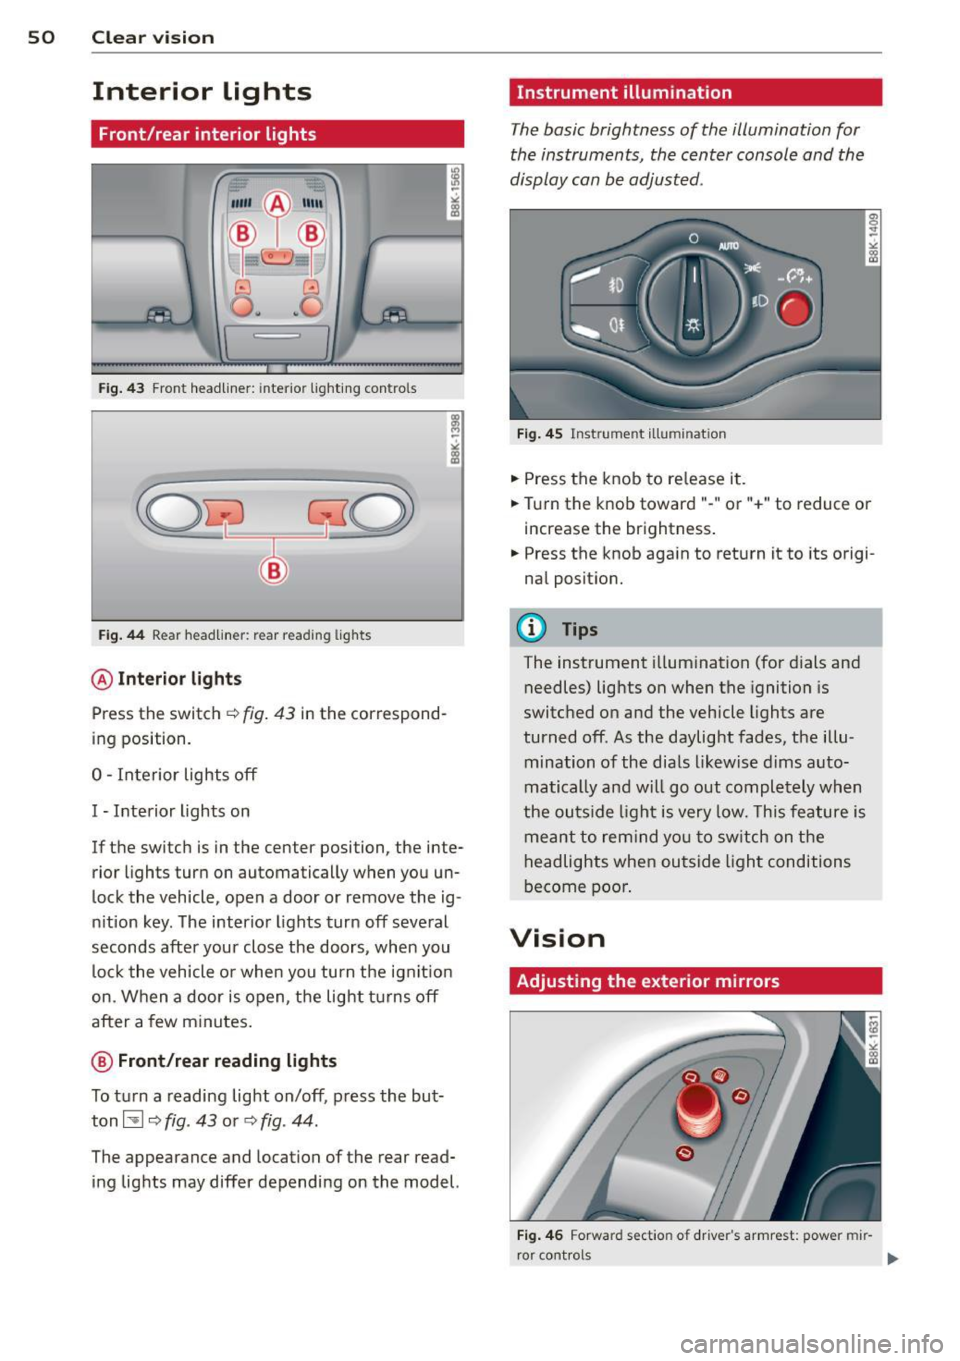
Fig . 43 Front headliner: inte rior lighting controls
Fig. 44 Rear headliner: rear reading lights
@Interio r ligh ts
Press the switch ~ fig. 43 in the correspond
ing position.
0 -Interior lights off
I -Interior lights on
If the switch is in the center position, the inte
rior l ights turn on automatically when you un
lock the vehicle, open a door or remove the ig
n ition key. The interior lights turn off several
seconds after your close the doors , when you
lock the vehicle or when you turn the ign it ion
on. When a door is open, the light tu rns off
after a few minutes.
@ Fr ont /rear r eading lights
To turn a reading light on/off, press the but
ton~
c::> fig. 43 or c::> fig. 44.
The appearance and location of the rear read
ing lights may differ depending on the model.
Instrument illumination
The basic brightness of the illumination for
the instruments, the center console and the
display can be adjusted .
Fig . 45 Inst rume nt illu mination
.,. Press the knob to release it .
.,. Turn the knob toward"-" or"+" to reduce or
increase the brightness .
.,. Press the knob again to return it to its origi
nal posit ion.
(!') Tips
The instrument i llumination (for dials and
needles) lights on when the ignition is
switched on and the vehicle lights are
turned off . As the daylight fades, the illu
mination of the dia ls likewise dims auto
matically and wi ll go out completely when
the ou tside light is very low. This feature is
meant to rem ind you to sw itch on the
headlights when ou tside light conditions
become poor .
Vision
Adjusting the exterior mirrors
Fig . 4 6 Forward section of driver's a rmrest: power mir
r or controls
Page 53 of 296
Turn the knob to the desired position:
Q/ P -In this position , you can adjust the
driver's and front passenger's exterior mirrors by turning the knob in the desired direction.
(ijjl -The mirrors are heated depending on the
outside temperature.
8 -The exterior mirrors fold in*. You can ad
just whether or not the mirrors fold in auto
matically when locking the vehicle using the
radio/MM I*¢
page 3 7.
Passenger exterior mirror tilt function*
To help you see the curb when backing into a
parking space, the surface of the mirror tilts
slightly . The knob must be in the P position
for this to happen .
You can adjust the tilted mirror surface by
turning the knob in the desired direction .
When you move out of reverse and into anoth
er gear, the new mirror position is stored and
assigned to the key you are using.
T he mirror goes back into its original position
once you drive forward faster than 9 mph (15 km/h) or switch the ignition off .
_& WARNING
Curved mirror surfaces (convex or spheri
cal*) increase your field of view. Remem
ber that vehicles or other objects will ap
pear smaller and farther away than when
seen in a flat mirror. If you use this mirror
to estimate distances of following vehicles
when changing lanes, you could estimate
incorrectly and cause an accident .
(D Note
-If the mirror housing is moved uninten
tionally (for example, while parking your
vehicle), then you must first fold the mir ror electrically. Do not readjust the mir
ror housing manually . You could damage
the motor which controls the mirror .
- If you wash the vehicle in an automatic
car wash, you must fold the exterior m ir
rors in to reduce the risk of damage to
the mirrors. Never fold power folding ex-
.
Clear vision 51
terior mirrors* by hand. Only fold them
in and out using the power controls.
a) Tips
- The exterior mirror sett ings are stored
with the memory function*
~ page 62.
-If there should be a malfunction in the
electrical system, you can still adjust the
exterior mirrors by pressing the edge of
the mirror.
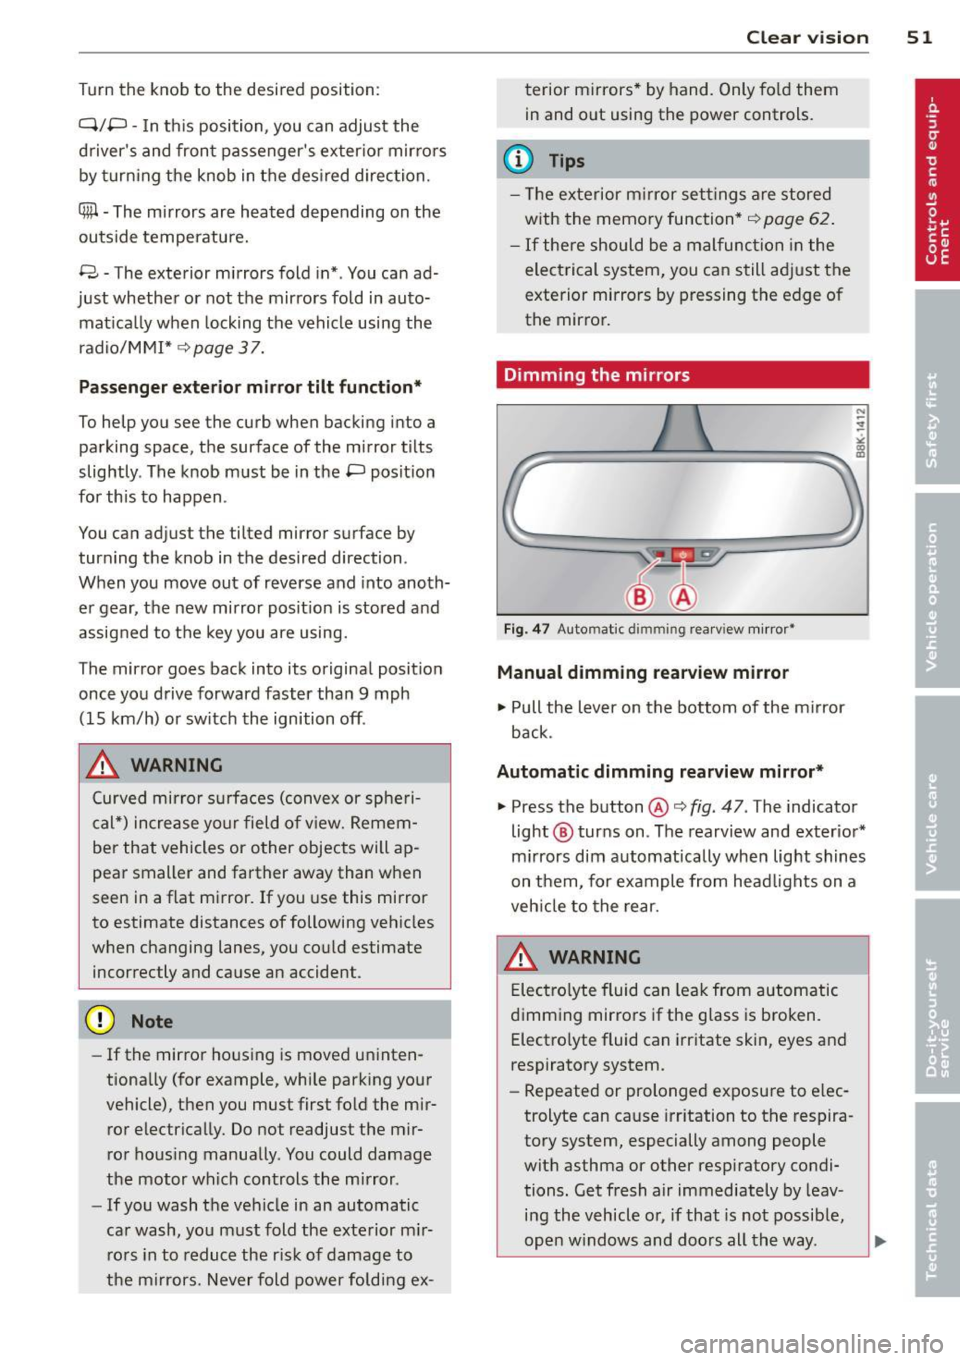
Dimming the mirrors
Fig. 47 Auto mat ic dimmin g rearv iew mirror •
Manual dimming rearview mirror
11>-Pull the lever on the bottom of the mirror
back.
Automatic dimming rearview mirror*
.,. Press the button@¢ fig. 47 . The indicator
light @ turns on . The rearview and exterior*
mirrors dim automatically when light shines
on them, for example from headlights on a
vehicle to the rear.
A WARNING
Electrolyte fluid can leak from automatic
dimming mirrors if the glass is broken .
Electrolyte fluid can irritate skin, eyes and
respiratory system .
- Repeated or prolonged exposure to elec
trolyte can cause irritation to the respira
tory system, especially among people
with asthma or other respiratory condi
tions. Get fresh air immediately by leav
ing the vehicle or, if that is not possible,
open windows and doors all the way. .,..
Page 64 of 296
62 Seats and storage
r:!vfig. 62. Pull the head restraint out of the
backrest at the same time¢
,A.
Installing the head restraints
.. Slide the posts on the head rest raint down
into the guides until you feel the posts click
into place.
.. Press the button @
<::?v fig. 62 and slide the
head restraint all the way down. You shou ld
not be able to pull the head restraint out of
the backrest.
So that the driver can have a better view to
the rear, the head restraints shou ld be pushed
down complete ly when the rear seats are not
occupied.
A WARNING
- Read and heed all WARNINGS
r:!v page 132, Proper adjustment of head
restraints.
- Only remove the rear seat head restraints
when necessary in order to install a child
seat¢
page 175. Install the head re
straint again immediately once the child
seat is removed. Driving without head re
straints or with head restraints that are
not properly adjusted increases the risk
of serious or fata l neck injury dramatical
ly.
(D Tips
Correctly adjusted head restraints and
safety belts are an extremely effective
combination of safety features .
Seat memory
Description
Applies to vehicles: with memory function
The memory function allo ws you to quickly
and easily store and reca ll personal seating
p ro files for the driver. The memory function is
ope rated through the master key and the
memory buttons in the driver's door.
The driver's seating profile is stored and as
signed to the master key each time the vehicle
is locked. When you open the door, the seat profile
is automatically recalled. If two peop le
use one vehicle, it is recommended that each
person always uses "their own" master key.
Up to 2 seat profiles can be stored in the
memory buttons in the drive r's door. Once
they are stored, these seat profiles can be se
l ected at any time .
In addition to the driver's seat settings, you
can a lso store and access the exterior mirror
adjustment settings* using the remote con
trol key or memory button.
Remote control key
Applies to vehicles: wit h seat memory
To assign the driver's seat settings to the re
mote control key when locking the veh icle, the
function must be activated in the rad io or
MMI*
.. Select:
!CARI function button > Seat adjust
ment > Driver's seat > Remote control key
>
on.Or
.. Select : !CARI function button> Car systems*
cont ro l button > Vehicle settings > Seats >
Driver's seat> Remote control key> On .
@ Tips
If you do not want another driver's set
tings to be assigned to the remote key,
switch off the memory function using the
radio or
MMI* or the IOFFI button
¢page 62.
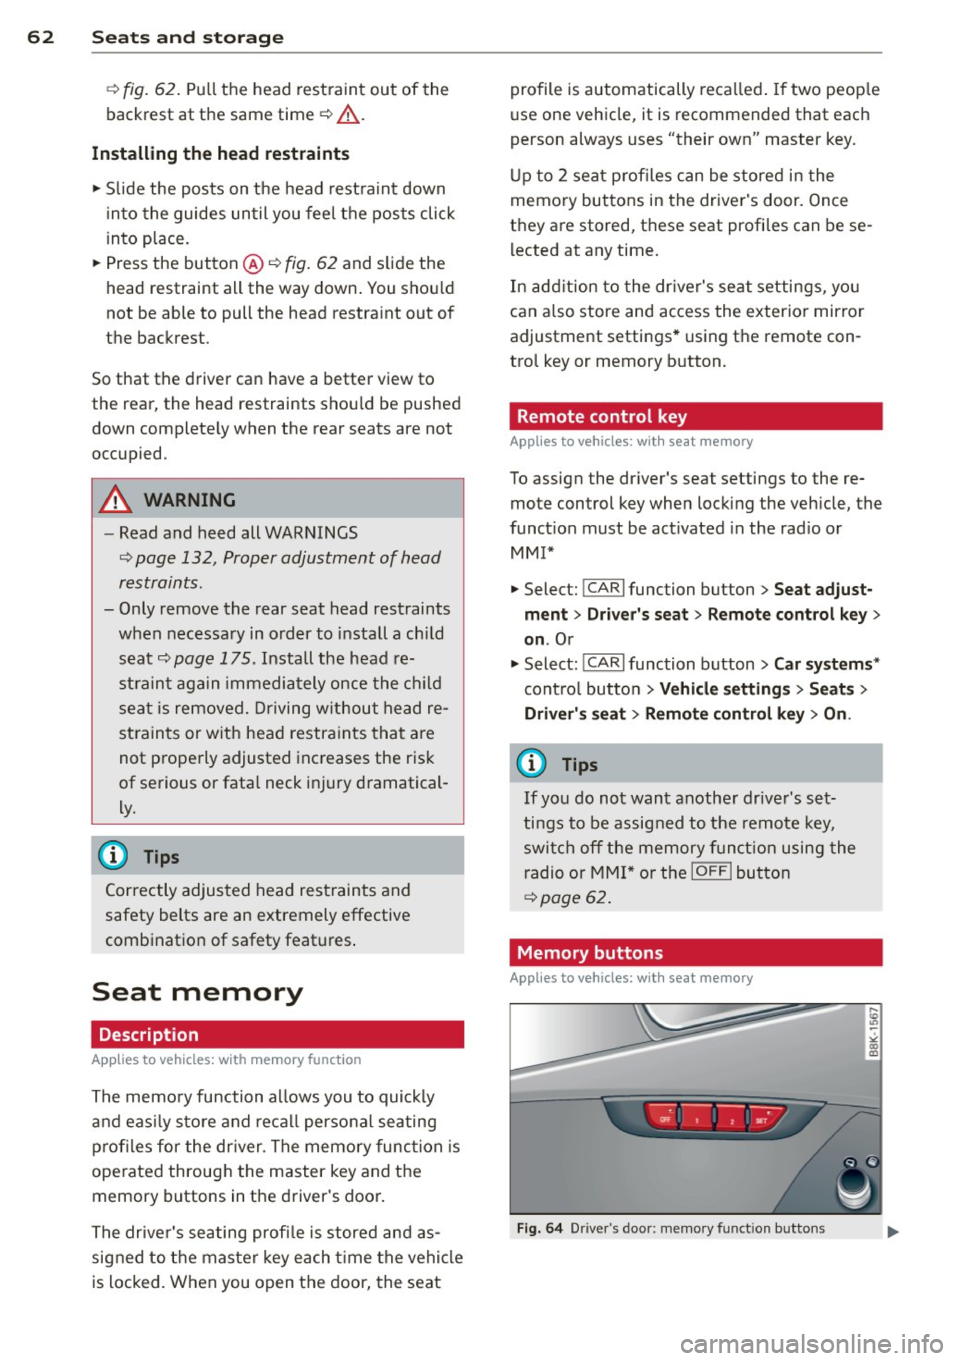
· Memory buttons
Appl ies to vehicles: wit h seat memory
Fig. 64 Driver's door: memory function buttons