oil pressure AUDI S4 2014 Owners Manual
[x] Cancel search | Manufacturer: AUDI, Model Year: 2014, Model line: S4, Model: AUDI S4 2014Pages: 296, PDF Size: 73.56 MB
Page 5 of 296
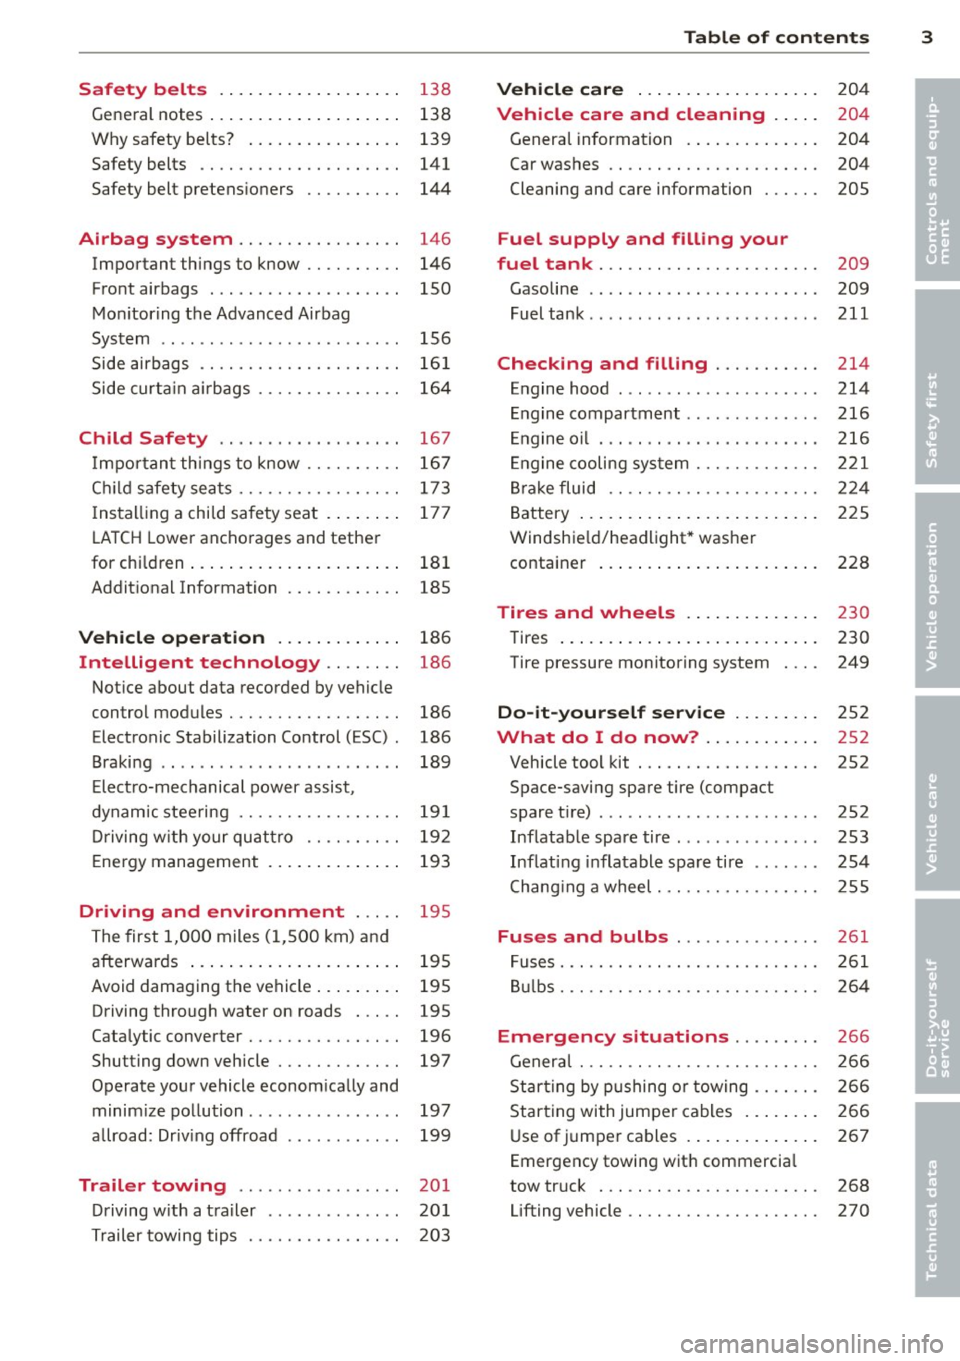
Safety belts . . . . . . . . . . . . . . . . . . . 13 8
General notes . . . . . . . . . . . . . . . . . . . . 138
Why safety be lts? . . . . . . . . . . . . . . . . 139
Safety belts . . . . . . . . . . . . . . . . . . . . . 141
Safety belt pretens ioners . . . . . . . . . . 144
Airbag system ................ .
Important things to know ......... .
Front airbags ................... .
Mon itor ing the Advanced Airbag
System ........................ .
Side airbags ............. .... .. . .
Side curta in a irbags .............. .
Child Safety ........ .... ... .. . .
Impor tant things to know ......... .
C hi ld safety sea ts ................ .
I nstall ing a chi ld safety seat . ... .. . .
L A T CH Lower anchorages and tether
for children ... .... .... ... .. .. .. . .
Addit ional Information
Vehi cle operat ion ..... .. .. .. . .
Intelligent technology .. .. .. . .
Not ice about data recorded by vehicle
control modules .......... .... .. . .
Electronic Stabilization Control (ESC) .
Braking .. ... ................ ... .
E lect ro-mechanical power assist ,
dynamic stee ring ................ .
Driving w ith your qu attro ......... .
E ne rgy management ... ... .. .. .. . .
Driving and environment ... ..
The first 1,000 miles (1,500 km) and
afterwards ... ... ..... ... .. .. .. . .
Avoid damaging the vehicle ... .. .. . .
Driving through water on roads ... . .
Catalytic converter .......... .. .. . .
Shutting down vehicle ............ .
Operate your vehicle econom ically and
minim ize pollution ............... .
a llroad: Driv ing offroad ........ ... .
Trailer towing ... ... ... .. .. .. . .
D riving w ith a t railer ............. .
Trailer towing tips ........ .... .. . . 146
146
150
156
16 1
164
167
167
173
17 7
18 1
185
186
186
186
186
189
19 1
19 2
193
195
195
195
195
196
197
197
199
20 1
20 1
203
Table of contents 3
Vehicle care . . . . . . . . . . . . . . . . . . .
204
Vehicle care and cleaning . . . . . 204
Genera l information . . . . . . . . . . . . . . 204
Car washes . . . . . . . . . . . . . . . . . . . . . . 204
Cleaning and care information . . . . . . 205
Fuel supply and filling your
fuel tank ..... .. .. . ............ .
Gasoline .. .. .. .... ..... ..... ... .
Fuel tank .. .. .. .. .. . .. .... ...... .
Checking and filling .......... .
Engine hood ... ... .............. .
Engine compartment ............. .
E ngine oil . .. .. .. ... .. .. ..... ... .
E ngine cooling system ............ .
B rake fluid .. .. .. .. . ............ .
Battery ... .. .... .. . .. .. ..... ... .
Windshie ld/headlight* washer
container ... .... ... .. .. ..... ... .
Tires and wheels ... ..... ... .. .
Tires ... .. .. .. .... . ... ...... ... .
Tire pressure monitoring system
Do-it-yourself service ...... .. .
What do I do now? ...... ... .. .
Vehicle tool kit . ...... ........... .
Space-saving spare tire (compact
spare tir e) .... ... .. ............. .
Inflatable spare tire .............. .
Inflat ing i nflatable spa re tire ...... .
Changi ng a wheel . .... ........... .
Fuses and bulbs ...... ........ .
Fuses ..... .... .. .. . ............ .
B ulbs ..... .. .. .. .. .. ........... .
Emergency situations ........ .
Genera l ... .. .. .. ............... .
St art ing by p ushing or towing ...... .
Star ting with jumpe r cables .. ... .. .
Use of jumper cables . .. ..... ... .. .
Emergency towing wit h commercia l
tow truck ... .. .. .. .. ........... .
Lifting vehicle .. .. ............... . 209
209
211
214
214
216
216
2
21
224
225
228
2 3 0
230
249
252
252
252
252
253
254
255
261
2 61
264
2 66
2 66
2 66
266
267
268
270
•
•
Page 15 of 296
Instrument s and warnin g/indic ator ligh ts 13
misfiring and fuel could enter into the ex
haust system . The catalytic converter
could then overheat and be damaged .
Warning/indicator
lights
Description
The indicator lights in the instrument cluster
blink or turn on. They indicate functions or
m alfunctions
c::> .&. .
Messages may appear with some indicator
lights. A warning signal will sound at the
same time . The messages disappear again af
ter a short t ime. To display a message again,
press the
I S ET I bu tton c::> page 11 . If several
malfunction s occur, each of the indicator/
warn ing lamps will be d isplayed in succession
for about two seconds at a time.
Some ind icators ligh ts in the display can turn
on in several colors.
A WARNING
- Failure to heed warning lights and other
important vehicle info rmation may result
in serious personal injury o r vehicle dam
age.
- Whenever sta lled or stopped for repa ir,
move the vehicle a safe dis tance off the
road, stop the engine, and turn on the
emergency flasher
c::> page 49.
- T he engine compartment of any motor
vehicle is a poten tially hazardous a rea.
Before you check anything in the engine
compartment, stop the engine and let it
cool down. Always exercise extreme ca u
t ion when working under the hood
c::> page 214.
@ Tips
Ma lf u nctions or faults w ill be identified e i
ther with a red symbo l (pr iority 1 -Dan
ger!) or with a yellow symbol (pr iority 2 -
Warn ing).
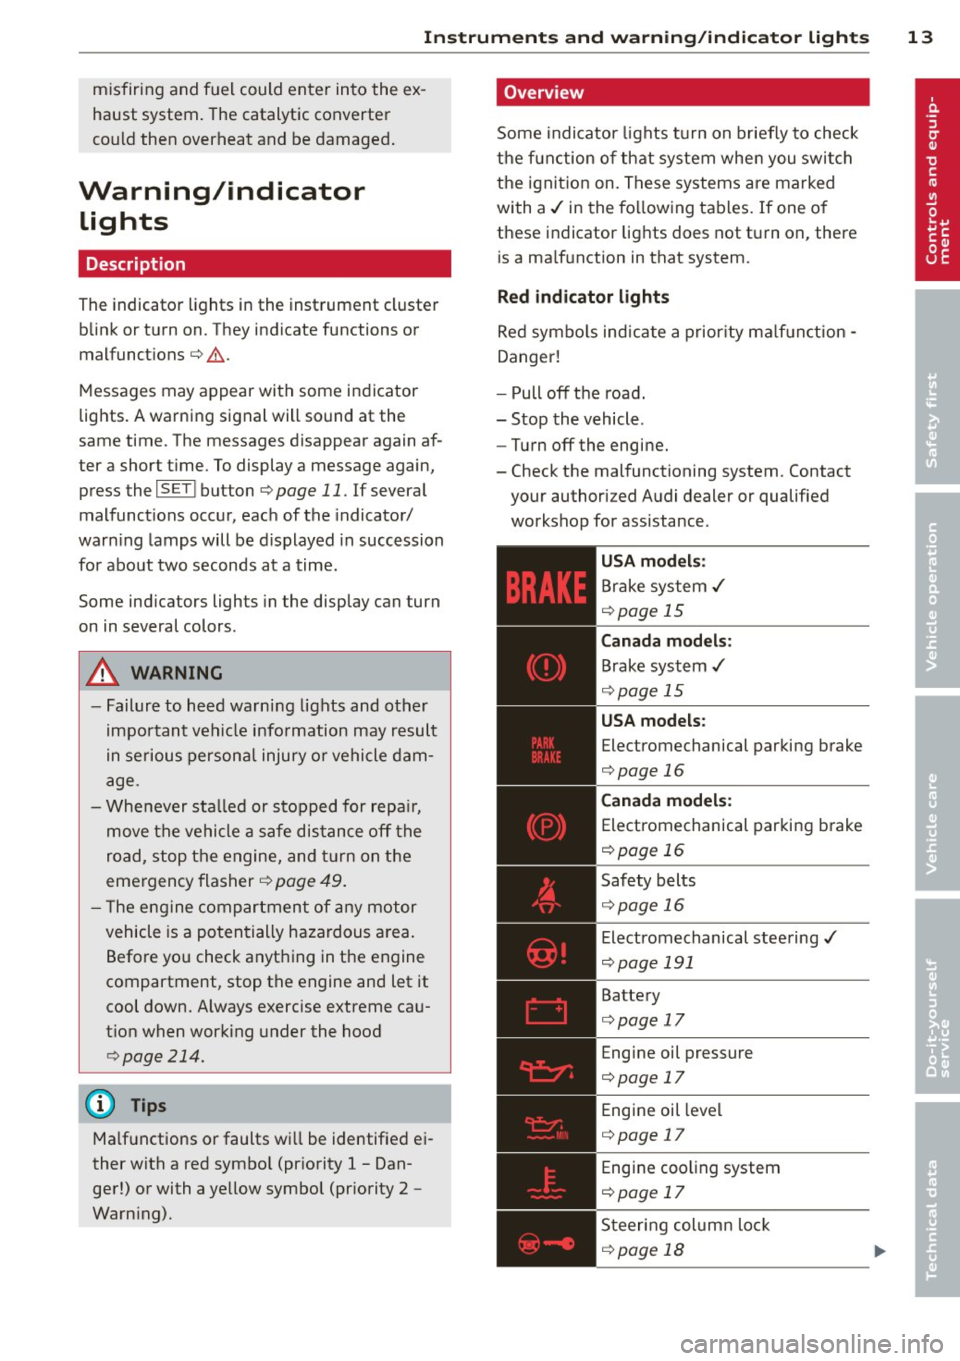
Overview
Some indicator lights turn on b riefly to check
the function of that system whe n you swi tch
the ignition on. These systems are marked
with a../ in the fo llowing tables. If one of
these indicator lights does not turn on, there is a ma lfunction in that system.
Red indicat or lights
Red symbo ls ind ic a te a prior ity ma lf u nct ion -
Danger!
- Pull off the road.
- Stop the vehicle .
- Turn o ff the engine.
- Check the malfunctioning system . Contact
your authori zed Audi dealer or qualified
workshop for assistance.
USA model s:
Brake system ../
c::> page 15
Canada models:
Brake system ../
c::> page 15
USA models:
Electromechanical parking brake
c::> page 16
Canada model s:
Electromechanical parking b rake
c::> page 16
Safety belts
c::> page 16
Electromechanical steering ,/
c::> page 191
Battery
c::> page 17
E ngine oil pressure
c::> page 17
Engine oil leve l
c::> page 17
Engine coo ling system
c::> page 17
Steering column loc k
c::> page 18
Page 16 of 296
14 Instruments and warning/indicator lights
Ignit ion loc k
¢ page 18
USA models:
Speed warning sys tem
¢ page87
Canada models:
Speed warning system
¢page 87
Adaptive cruise cont ro l./
¢ page 102
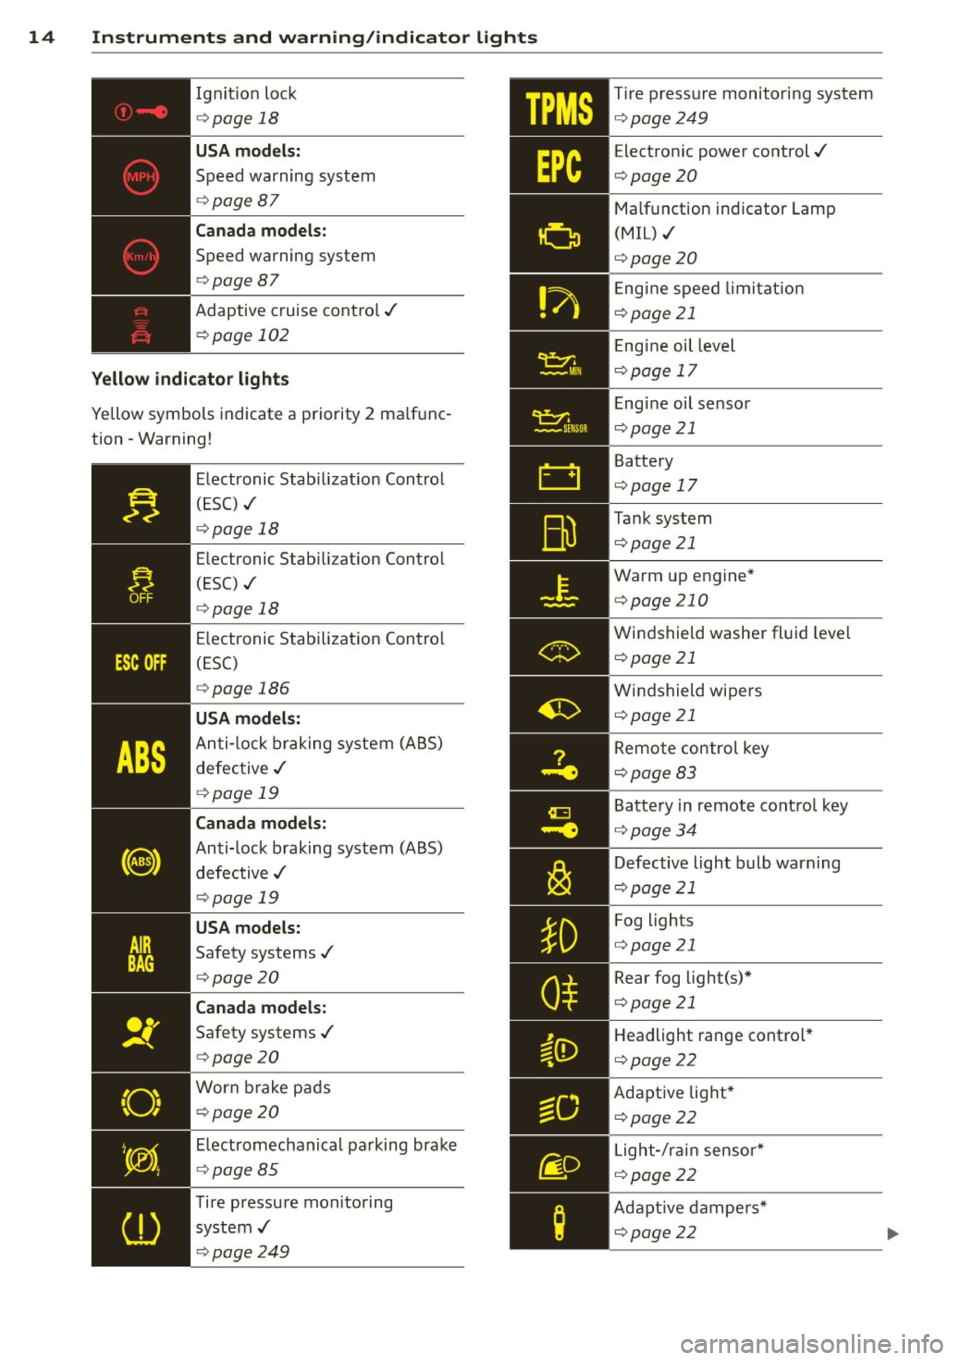
Yellow indicator lights
Yellow symbols indicate a priority 2 ma lf u nc
tion -Warning!
Electronic Stab ilization Con trol
( E SC) ./
¢page 18
E lectronic Stab ili zat ion Contro l
(ESC) ./
¢ page 18
E lectronic Stab ilization Con trol
(ESC)
¢ page 186
USA models:
Anti- lock braking sy stem (A BS)
d efec tive ./
¢ page 19
Canada models:
Anti-lock b raking system (ABS)
defe ctive ./
¢page 19
USA models:
Safety systems ./
¢ pag e20
Canada models:
Safety systems ./
¢ page2 0
W orn brake pa ds
¢page 20
E lectromech anical pa rking bra ke
¢ page 85
T ire pressure mon itoring
system./
¢ page 24 9 T
ir e pressur e monitori ng sys tem
¢ page 249
E lectron ic powe r control ./
¢page20
Ma lf u nction ind icator Lamp
(MIL) ./
¢page20
E ng ine speed limi tat ion
¢page 21
E ng ine oil level
¢ page 17
E ng ine oil senso r
¢ pag e 21
Batte ry
¢ page 17
Ta nk system
¢page21
Warm up eng ine*
¢page 210
Windshield washe r fl uid leve l
¢ page 21
Win dshield wipers
¢ page 21
Remote control key
¢page8 3
B atte ry in remote co ntro l key
¢ page3 4
Defective light b ulb warn ing
¢ pag e 21
Fog lights
¢page21
Rear fog light(s)*
¢page21
Headlight range cont ro l*
¢page22
Adapt ive lig ht*
¢poge22
L ight -/r ain sensor *
¢ page22
A da ptive dampe rs*
¢page22
Page 19 of 296
Instruments and warning/indicator lights 17
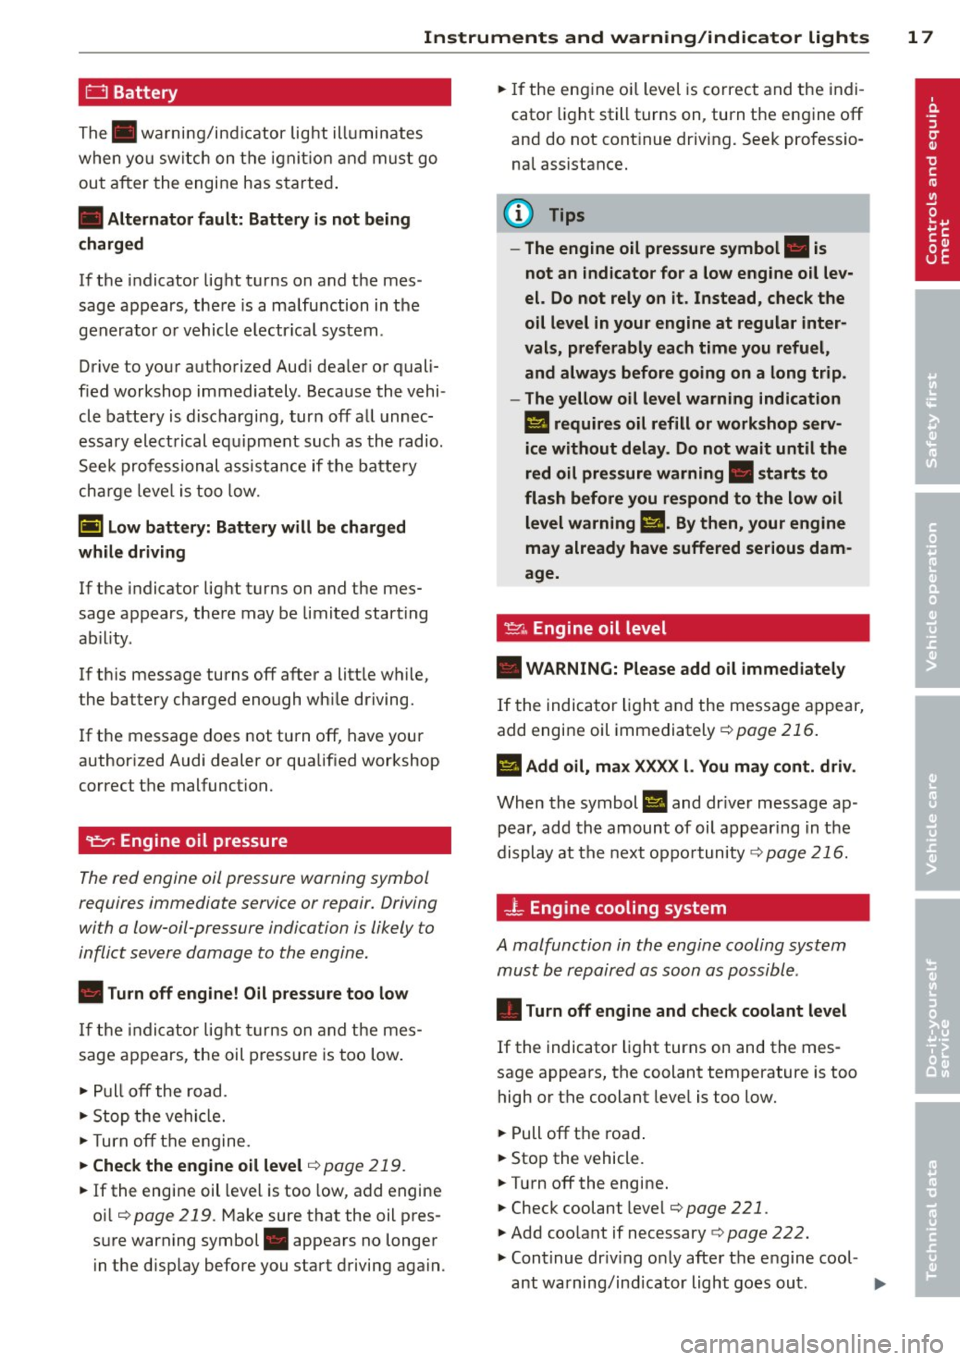
0 Battery
The. warni ng/ind icator lig ht ill umin ates
when yo u switc h on th e igni tion and mu st go
ou t aft er the engine has s tarte d.
• Alternator fault: Battery is not being
charged
I f the i ndicator lig ht t urns on and t he mes
sage appears, the re is a malf unction in t he
gen erato r or vehicle e lectr ica l system .
Drive to yo ur autho rized Aud i dea le r or quali
fied workshop immediately . Because the vehi
cl e ba ttery is disc harging, tur n off a ll unnec
essa ry ele ct rical eq uipment suc h as th e radio.
S eek profession al ass is ta nce if the batte ry
ch arg e leve l is t oo low.
(•) low battery: Battery will be charged
while driving
If t he indicator lig ht t urns on and t he mes
sage appears, the re may be limited starting
ab il ity .
If
t hi s message turns off after a litt le w hile,
the battery charged enough wh ile driving.
If t he message does not turn off, have your
author ized Audi dealer or qua lified wor kshop
c o rrect the malfunctio n.
't:::7: Engine oil pressure
The red en gine oil pressure warning symbol
requires immediate service or repair . Driving
with a low-oil -pressure indication is likely to
inflict severe damag e to the engine.
• Turn off engine! Oil pressure too low
If th e ind ic a tor lig ht tur ns on an d th e me s
sage a ppears, the oil press ure is too low .
~ Pull off the road.
~ Sto p th e ve hicl e.
~T urno ff th e e ngine.
~ Check the engine oil level <=> page 219.
~ If the engi ne oi l leve l is too low , add engine
o il
<:!) page 219. Make sure that the oil pres
s ur e warning symbol. appea rs no longer
i n t he d isp lay before you start d riving aga in.
~ If the en gine o il level is co rrec t and the in di
cato r light still turns on, turn the e ngine
off
and do not cont inue driv ing . See k pr ofessi o
na l assistance .
(D Tips
- The engine oil pressure symbol. is
not an indicator for a low engine oil lev
el. Do not rely on it. Instead, check the
oil level in your engine at regular inter
vals, preferably each time you refuel,
and always before going on a long trip.
- The yellow oil level warning indication
Ill requires oil refill or workshop serv
ice without delay . Do not wait until the
red oil pressure warning. starts to
flash before you respond to the low oil level warning
Ill. By then, your engine
may already have suffered serious dam
age.
·
~ .. Engine oil level
• WARNING: Please add oil immediately
If the indica to r li ght and the message a ppear,
add engine oil immediately
c:!) page 216 .
El Add oil, max XXXX l. You may cont. driv .
When the symbol El and dr ive r message ap
pear, add the amoun t of oil app ear ing in t he
display at t he next oppo rtunity
r:=> page 21 6.
-L Engine cooling system
A malfunction in the engine cooling system
must b e repaired as soon as possibl e .
• Turn off engine and check coolant level
If the indicato r light turns on and the mes
sage appears, the coolant temperature is too
high or the coolant leve l is t oo low.
~ Pull off t h e roa d.
~ Stop the vehicle.
~ Tu rnoff the engine .
~ Check coolant level<=> page 221 .
~ Add coolant if necessary <=> page 222.
~ Continu e dr iv in g o nly afte r the engin e cool-
ant wa rning/ind icator light goes ou t. ..,.
Page 83 of 296
~ Automatic transmission: Step on the brake
peda l and move the se lector lever to the P
or N position .
~ Press the key c::> fig. 94 -the eng ine will
start.
Sw itching the i gnition on /off
If you wou ld like to switch the ignition on
without sta rting the engine, follow t hese
steps :
~ Insert the key into the ignition lock .
~ Press the key briefly without pressing the
clutch peda l (for manual transmissions) or
the brake peda l (for automatic transmis
s ions) .
~ To switch the ignition off, press the key
again .
When starting the engine, major e lectr ica l
loads are switched off temporarily .
You can on ly remove the key with the ignition
switched off.
If the engine sho uld not sta rt immedia tely,
the starting process is automatically stopped
after a short time. Repeat starting proced ure .
A WARNING
-Never allow the engine to run in confined
spaces -danger of asphyxiation.
- Never remove the ign ition key from the
ignition look while the vehicle is moving.
Otherw ise, the steering lock could sud
denly engage and you would not be able
to steer the vehicle.
- Always take the key with you whenever
you leave your vehicle . Otherwise, the
engine could be started or e lectr ical
equipment such as the power w indows
cou ld be operated. This ca n lead to seri
o us inj ury.
- Never leave ch ild ren or persons requiring
assistance unattended in the veh icle. The
doors can be loc ked using the remote
transmitter, preventing people from es caping from the vehicle on their own in
the event of an emergency. Depend ing
on the time of year, people inside the ve-
On th e ro ad 81
hicle can be exposed to very high or very
low temperatures.
(D Note
Avoid high eng ine rpm, fu ll throttle and
heavy engine loads unti l the engine has
reached operating tempe rat ure -other
wise you r isk eng ine damage.
@ For the sake of the environment
Do not let the engine run while parked to
warm up. Begin dr iv ing immediately. This
reduces unnecessary emissions.
@ Tips
- If the key cannot be removed from the
ignition lock, you have to pull the me
chanical key out of the master key in or
der to be able to lock the vehi-
cle <=:>
page 35.
-After starting a cold engine, there may
be a brief period of increased no ise be
cause the oil pressure must first bu ild up
in the hydraulic valve adjusters. This is
normal and not a cause for concern.
- If you leave the veh icle with the ignition
switched on, the ign it ion w ill switch off
afte r a certa in per iod of t ime . Please
note that ele ctrical equ ipment such as
exterior ligh ts w ill sw itch off as well
when that happens .
Page 85 of 296
CD Note
If the engine has been under heavy load
for an extended period, heat builds up in
the engine compartment after the engine
is switched off- there is a risk of damaging
the engine . Allow the engine to run at idle
for about two minutes before switching it
off.
Convenience key
Starting the engine
Applies to vehicles: with convenience key
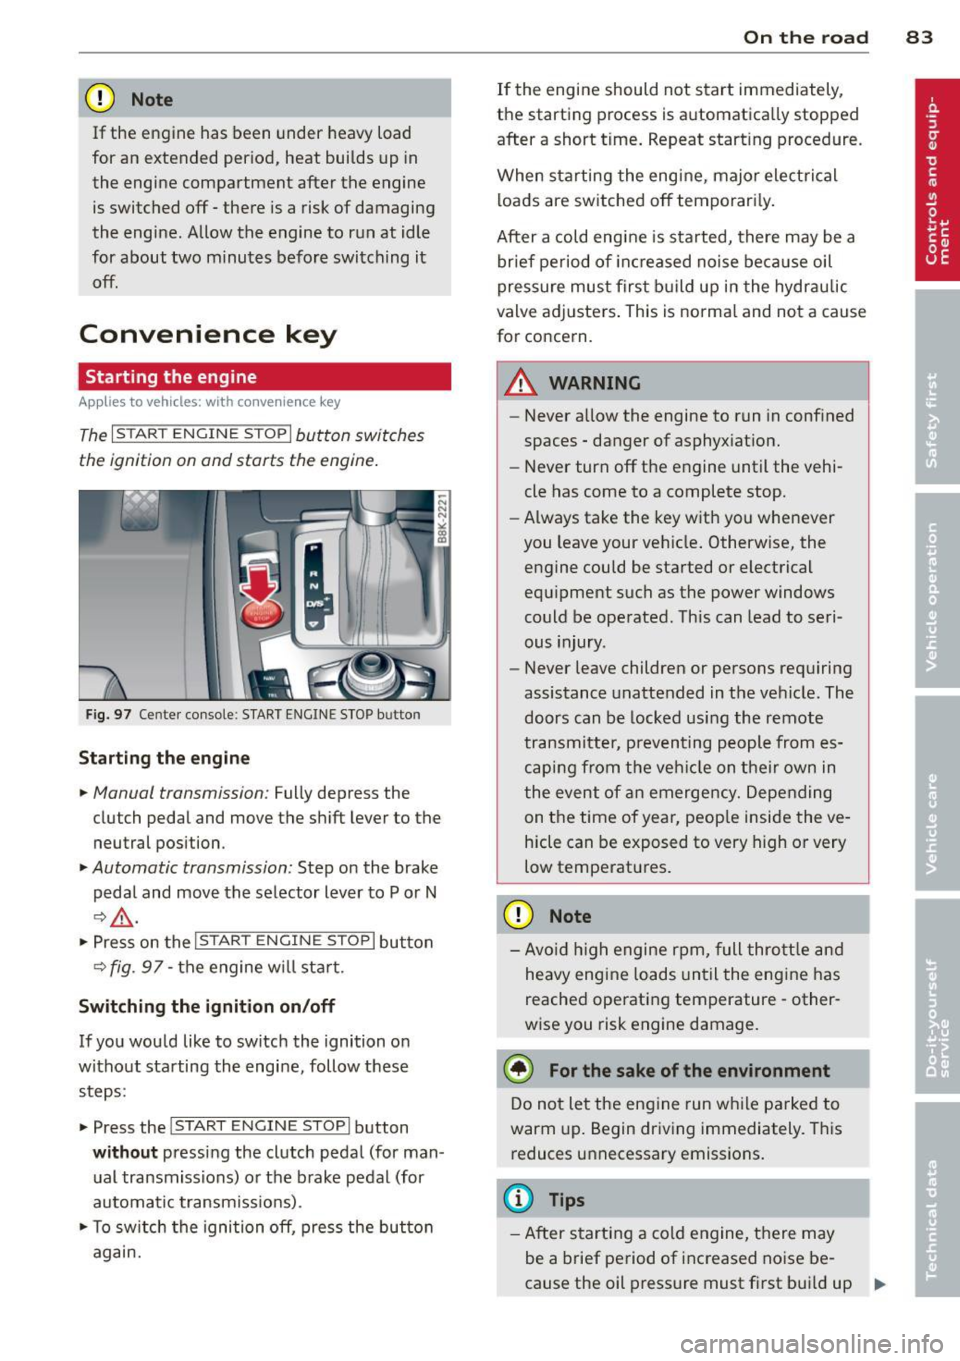
The I STAR T ENGINE ST OPI button switches
the ignition on and starts the engine.
Fig. 97 Center console : S TART ENGINE STOP b utto n
Starting the engine
.. Manual transmission : Fully depress the
clutch pedal and
move the shift lever to the
neutral position .
.. Automatic transmission: Step on the brake
pedal and
move the selector lever to P or N
~ .&, .
.. Press on the I STAR T ENGINE ST OP I button
~fig . 97-the engine will sta rt.
Switching the ignition on/off
If you would like to switch the ignition on
without starting the engine, follow these
steps :
.. Press the
I START ENGINE STOPI button
without pressing the clutch pedal (for man
ual transmissions) or the brake pedal (for
automatic transmissions) .
.. To switch the ignition off, press the button
again.
On the road 83
If the engine should not start immediately,
the starting process is automatically stopped
after a short time. Repeat starting procedure .
When starting the engine , major electrical
loads are switched off temporari ly.
After a cold engine is started, there may be a
brief period of inc reased noise because oil
pressure must first build up in the hydraulic
valve adjusters. This is normal and not a cause
for concern.
A WARNING
- Never allow the engine to run in confined
spaces - danger of asphyxiation.
- Never turn off the engine until the vehi
cle has come to a complete stop.
- Always take the key with you whenever
you leave your vehicle. Otherwise, the
engine could be started or electrical
equipment such as the power windows
could be operated . This can lead to seri
ous injury .
- Never leave children or persons requiring
assistance unattended in the vehicle. The
doors can be locked using the remote
transmitter, preventing people from es
caping from the vehicle on their own in
the event of an emergency. Depending
on the time of year, peop le inside the ve
hicle can be exposed to very high or very
low temperatures .
CD Note
-Avo id high engine rpm, full throttle and
heavy engine loads until the engine has
reached operating temperature - other
wise you risk engine damage.
@ For the sake of the environment
Do not let the engine run while parked to
warm up. Begin driving immediately. This
reduces unnecessary emissions.
(D Tips
-After starting a cold engine, there may
be a brief period of increased noise be-
cause the oil pressure must first bui ld up
II-
Page 220 of 296
218 Checking and filling
temperatures stay below freezing point for long periods.
Detergent additives in the oil w il l make fresh
oil look dark after the eng ine has been run
ning for a short time . This is norma l and is not
a reason to change the oi l more often than
recommended.
Damage or malfun ctions due to lack of
maintenance
It is essential that you change your oil at the
recommended intervals using only engine o il
that complies with Audi oi l standard
VW 502 00. Your Limited New Vehicle War
ranty does not cover damage or malfunctions
due to fail ure to fo llow recommended mainte
nance and use requ irements as set forth in
the Audi Owner's Manual and Warranty
&
Maintenance booklet . Your dealer will have to
deny warranty coverage unless you present to
the dea ler proof in the form of Service or Re
pa ir Orders that all scheduled ma intenance
was performed in a timely manner.
Eng ine oil consumption
The engine in your vehicle depends on an ade
quate amount of oil to lubricate and cool all
of its moving parts.
In order to provide effective lubrication and
cool ing of internal engine components, all in
ternal combustion eng ines consume a certain
amount of oil. O il consumption varies from
engine to engine and may change significantly
over the life of the engine. Typically, engines
with a specif ied break-in period (see
¢
page 195) consume more oil during the
break-in period than they consume after oil
consumption has stabilized.
Under normal conditions, the rate of oil con
sumption depends on the quality and viscosity
of the oil, the RPM (revolutions per minute) at
which the engine is operated, the ambient
temperature and road condit ions . Further fac
tors are the amount of oil d ilution from water
condensat ion or fuel residue and the oxida
tion level of the oil. As any engine is subject to wear as mi
leage builds up, the oil consump
tion may increase over time until replacement
of worn components may become necessary.
With all these variab les coming into play, no
standard rate of oil consumption can be es
tablished or specified. There is no alternative
to regu lar and frequent check ing of the o il lev
el, see
Note .
If the yellow engine oil leve l warning symbo l
Ill in the instrument cluster lights up, you
shou ld check the oil leve l as soon as possib le
¢
page 219. Top off the oil at your earliest
convenience ¢
page 219.
A WARNING '"---
Before you check anythi ng in the engine
compartment, always read and heed all
WARNINGS¢
A in Working in the engine
compartment on page 214.
(D Note
Driving w ith an insufficient o il level is like
ly to cause severe damage to the engine .
(D Tips
-The oil pressure warning display. is
not an indicator of the oil level. Do not
rely on it. Instead, check the oil level in
your engine at regular intervals, pref erably each time you refuel, and always
before going on a long trip.
- If you have the impression your engine
consumes excessive amounts of oil, we
recommend that you consult an author
ized Audi dealer to have the cause of
your concern properly diagnosed. Keep in
m ind that the accurate measurement of
oil consumption requ ires great care and
may take some time. An authorized Aud i
dea ler has instructions about how to
measure oil consumption accurately.
-
Page 224 of 296
222 Check ing and filling
level should be between the "MIN" and
"MAX" markings. When the engine is warm,
the leve l may be slightly above the "MAX"
marking .
The location of the coolant expansion tank
can be seen in the engine compartment illus
tration
c:> page 216.
To obtain an accurate reading, the engine must be switched
off.
The expansion tank in you r vehicle is equipped
with an e lectric coolant level sensor.
When the coolant level is too low, the warning light in the Auto-Check System
c:> page 17will
b link until you add coo lant and the level has
been restored to no rma l. Even though there is
an electric coolant level sensor, we still rec
ommend you check the coolant leve l from
time to time.
Coolant loss
Coolant loss may indicate a leak in the cool ing
system. In the event of coolant loss, the cool
ing system should be inspected immediately
by your authorized A udi dealer.
It is not
enough merely to add coolant.
I n a sealed system, losses can occur only if
the boiling point of the coolant is exceeded as
a result of overheat ing.
A WARNING
The cooling system is unde r pressure and
can get very hot. Reduce the risk of scald
ing from hot coolant by following these
steps .
- Turn
off the engine and allow it to cool
dow n.
- Protect yo ur face, hands and arms from
escaping fluid and steam by covering the
cap with a large, thick rag .
- Turn the cap slowly and very carefully in
a counter-clockwise direction wh ile ap
plying light, downward pressure on the
top of the cap .
- To avoid be ing burned, do not spill ant i
freeze or coolant on the exhaust system
'
or hot engine parts. Under certa in cond i
tions, the ethylene glycol in engine coo l
ant can catch fire.
(D Note
Do not a dd any type of radiator leak sea l
ant to your veh icle's engine coolant. Add
i ng radiator repa ir fl uid may adverse ly af
fect the funct ion and performance of your
cooling system and could result in damage
not covered by your New Veh icle L imited
War ranty .
Adding coolant
Be very careful when adding engine coolant.
Before you check anyth ing in the eng ine com
partment, always read and heed all WARN
INGS
c:> A in Working in the engine compart
ment on page 214 .
Requirement: There m ust be a res idual
amount of coo lant in the expans ion tank
c:> (]) .
.,.. Turn off the eng ine .
.,.. Let the engin e cool down.
.,.. Place a thick rag over the coo lant expansion
tank
c:> page 221 , fig. 185 and carefully turn
the cap counter-clockwise
c:> .&_ .
.,.. Add coo lant m ixed in the correct rat io
c:> page 221, Coolant up to the MAX ma rk
ing.
.,.. Mak e s ure t hat the fl uid leve l remains sta-
b le. Add more coo lant if necessary.
.,.. Twist the cap on again
tightly .
Replacement engine coo lant must confo rm to
ex act spec ific at ions
c:> page 221, Coolant.
We recommend using only coolant add it ive
G12 ++, G13 or i n an emergency G 12+. Do
not
use a different add it ive. In an emergen cy use
plain wa ter until yo u can ge t the correct addi
tive and can restore t he correct ratio. This
sho uld be done as soon as possib le .
If you have los t a cons iderab le amount o f
coolant, the n you sho uld add cold ant ifree ze
and co ld wate r on ly when the engine is cold.
Always use
n ew engine coo la nt w hen refilling . .,.
Page 241 of 296
not exceeded . Vehicle load includes everybody
and everything in and on the vehicle. These
l oad limits are techn ica lly referred to as the
ve hicle's
Gross Veh icle We ight Rat ing
("GVWR").
The "GVWR" includes the weight of the basic
veh icle, all factory insta lled accessories, a full
tank of fu el, oil, coolant and other fluids plus
maximum load. The maximum load includes
the number of passengers that the vehicle is
i n tended to carry ("seating capacity") with a n
assumed weight of 150 lbs . (68 kg) for each
passenger at a des igna ted sea ting pos ition
and the tota l we ight of any l uggage in the ve
h icle. If you tow a trailer, the weight o f the
trailer hitch and the tong ue weight of the
l oaded trailer must be included as part of the
veh icle load.
The
Gro ss A xle Weight Rating ("GAWR") is
the maximum load that can be applied at each
of the vehicle's two ax les.
The G ross Vehicle We ight Rating and the
Gross Axle Weight Rating are listed on the
safety compliance sticker labe l located on the
driver's side B -pi llar . Your Audi has 5 seating
positions, 2 in the front and 3 in the rear for
tota l seating capacity of 5. Each seating posi
tion has a seat belt¢
page 138, Safety belts.
The fact that there is an upper limit to your
veh icle's Gross Vehicle Weight Rating means
that the tota l weight of whatever is being car
ried in the vehicle (including the weight of a
trailer hitch and the tongue weight of the
loaded trailer) is limited. The more passen
ge rs in the veh icle or passengers who are
h eav ier than the standa rd weights assumed
mean that less weight can be ca rr ied as l ug
gage.
The tire pressure labe l on you r Audi also lists
the maximum combined we ight of all of the
oc cu pants and luggage o r othe r ca rgo that
the vehicle can carry . For the location o f the
l abe l
¢page 234, fig. 189.
Tires an d wheel s 239
A WARNING
Overloading a vehicle can cause loss of ve
h icle contro l, a crash or other accident, se
rious pe rsonal injury, and even death.
- Carrying more we ight than your veh icle
was des igned to carry will prevent the
veh icle from handling properly and in
crease the risk of the loss of vehicle con
trol.
- The brakes on a vehicle that has been
overloaded may not be able to stop the
veh icle w ith in a safe distance.
- Tires on a vehicle that has been overload
ed can fail suddenly, incl uding a blowout
and sudden defla tion, causing loss of
contro l and a crash.
- Always ma ke sure that the total load be
ing transpor ted - incl uding the weight of
a trailer hitch and the tongue weight of a loaded trailer -does not ma ke the vehi
cle heavier than the vehicle's Gross Vehi
cle We ight Rating.
Determining correct load limit
U se th e example below to ca l
culate the total weight of the
pa ssengers and lu ggage or oth
e r thing s that you pl an t o tran s
po rt so that you can make sur e
that your vehicle will not be
o verloaded.
Steps for Determining
Correct Load Limit
1 . Lo cate th e statement "THE
COMBINED WEIGHT OF O C
CUPANTS AND CARGO
SHOULD NE VER E XCE ED XXX
KG OR XXX LBS"on your vehi-
c le 's pla card (tire inflation ..,
•
•
Page 283 of 296
Automatic climate control Air vents ... .... .. .... ... .. .. .. .... 78
Operation . . . . . . . . . . . . . . . . . . . . . . . . . 77
Setup ... .. ................. .. .... 79
Automatic S hift Lock (ASL) . . . . . . . . . . . . 93
Automatic transmission ......... ... ... 91
Automatic S hift Lock (ASL) . . . . . . . . . . . 93
D riving .. .. ............. .... .. .. .. 9 3
E mergency mode . . . . . . . . . . . . . . . . . . . 97
E me rgency release . . . . . . . . . . . . . . . . . . 98
Kick -down . . . . . . . . . . . . . . . . . . . . . . . . . 96
M anual shift program .. ... .. .. .. .. .. 96
Remova l lock (ignition key) ... .. .. .. .. 80
Selector lever . . . . . . . . . . . . . . . . . . . . . . 92
Automatic wipe rs . . . . . . . . . . . . . . . . . . . . 53
Auto Safety Hotline ............. .... 136
Average speed . . . . . . . . . . . . . . . . . . . . . . . 25
Avoid damag ing the vehi cle .. .. .. .. .. . 195
B
Bag hooks . . . . . . . . . . . . . . . . . . . . . . . . . . 72
Battery . . . . . . . . . . . . . . . . . . . . . . . 17,225
Battery location inside the luggage com -
partment .. .. ........... .. .. .. ... 225
Charging . ................ ... ... .. 227
Important war nings when wo rking on
the battery . ................ ... ... 225
J ump starti ng ............ .... .. .. . 266
L ow . .. .. .. .. .. ........... .. .. ... 193
Replacing the ba ttery .. ... .. .. .. .. . 228
State of charge . ....... ... .. .. .. ... 193
Winter operation . ..... ... .. .. .. .. . 225
Working on the battery .... .. .. .. .. . 225
B efore dr iving ............. .... .. .. . 128
Bio-ethanol (Fuel) ..... ..... .. .. .. .. . 210
Blended gasoline ... .... ... .. .. .. .. . 209
B lower (automatic climate cont rol) . . . . . . 78
Booster seats ............. .... .. .. . 175
B rake fl uid
C hanging the brake fl uid ... .. .. .. .. . 224
Chec king the brake fluid level ... .. .. . 224
Reservoir .. ............. .... .. ... 224
What is the correct brake flu id leve l? . . 224
What should I do if the brake fluid warn-
i ng light comes o n? .. ..... .. .. .. .. . 224
Inde x 281
Brake system . ..... ... .. .. ..... ... .. 224
Anti- lock b raking system ..... ... .. .. . 19
B rake assist system .. .. ..... ... .. .. 186
Brake fluid .. .. .. ................. 224
Brake fluid specifications for refill and re-
placement ...... .. ............... 224
B rake light defective ... .. .. ... ... .. . 21
B ra ke powe r ass ist unit ............ . 189
Br akes .. .. .. .. .. .. . .............. 189
Ce ram ic bra kes . .. .... ........... .. 189
El ec tromechanica l parking brake ... .. . 85
Warning/indicator lights ..... ... .. .. . 15
Wor n brake pads symbo l . . . . . . . . . . . . . 20
B ra kin g
E mergency b ra ki ng f unction ..... .. .. . 87
braking guard . . . . . . . . . . . . . . . . . . . . . . . 99
Messages . . . . . . . . . . . . . . . . . . . . . . . . 107
Settings ........ .. ............... 106
Break -in per iod .. .. .... ............. 195
Tires ... .. .. .. .. .. ............... 195
Bul bs . ... .. .. .... .. . .. .. ..... ... .. 2 64
C
Califor nia Proposition 65 War ning . .. .. 215
B attery spec ifi c .. ............. .. .. 226
Capacities ........ .. ............... 273
Carbon pa rts
Cleaning . . . . . . . . . . . . . . . . . . . . 206, 207
Care ..... .. .. .. .... ... .......... .. 20 4
Cargo a rea
refer to L uggage compartment . . . 68, 134
Catalytic converter ... .. ...... ... .. .. 196
Cen te r armrest . . . . . . . . . . . . . . . . . . . . . . 60
Central lock ing .. .. ................. . 32
Cen tral lock ing switch ............. .. 36
Co nvenience key . . . . . . . . . . . . . . . . . . . . 36
Remote cont ro l key . ........... .... . 35
Ceram ic brake rotors
New brake pads .. ............. .... 189
Ce rtification . ... .... . ... ...... ... .. 278
Chang ing a flat t ire . .. ... ....... .... . 255
Chang ing a wheel .. ............. .... 255
Chang ing engine oil ............. .... 220
Checking Engine coolant level .... ....... .... . 221
Checking t ire pressure ............... 237
•
•