remove seats AUDI S4 2016 Owners Manual
[x] Cancel search | Manufacturer: AUDI, Model Year: 2016, Model line: S4, Model: AUDI S4 2016Pages: 278, PDF Size: 70.26 MB
Page 63 of 278
...... N
0
""' CX)
...... I.Cl U"I
...... I.Cl ......
Controls
@-Adjusting the lumbar support*: press the
button in the corresponding position¢.&. .
@ -Moving the seat up/down: press the button
up/down¢ .&_.
@ -Moving the seat forward/back: press the but
ton forward/back¢ .&,.
©-Adjusting the backrest angle: press the but
ton forward/back¢ .&..
©-Raising/lowering* the head restraints: press
the button up/down
c:> .&. .
@ -Lengthening /short ening the uppe r thigh
support*: lift the handle. A spring moves the
front seat cushion forward
c:> .&..
A WARNING
-Never adjust the driver's or front passeng
er's seat while the vehicle is moving. If you
do this while the vehicle is moving, you will
be out of position. Always adjust the driver's
or front passenger's seat when the vehicle is
not mov ing.
- Be careful when adjusting the seat height.
Check to see that no one is in the way, or se
rious injury could result!
- Because the seats can be electrically adjust
ed with the ignition off or with the ignition
key removed, never leave children unattend
ed in the vehicle. Unsupervised use of the
electric seat adjustments may cause serious
injury.
- To reduce the risk of injury in the case of
sudden braking or accident, front passen
gers must
never ride in a moving vehicle
with the backrest reclined. Safety belts and
the airbag system only offer maximum pro
tection when the backrest is upright and the
safety belts are properly positioned on the body. The more the backrest is reclined, the
greater the risk of personal injury from an
incorrect seating posit ion and improperly
positioned safety belts .
-
Seats and storage
Center armrest
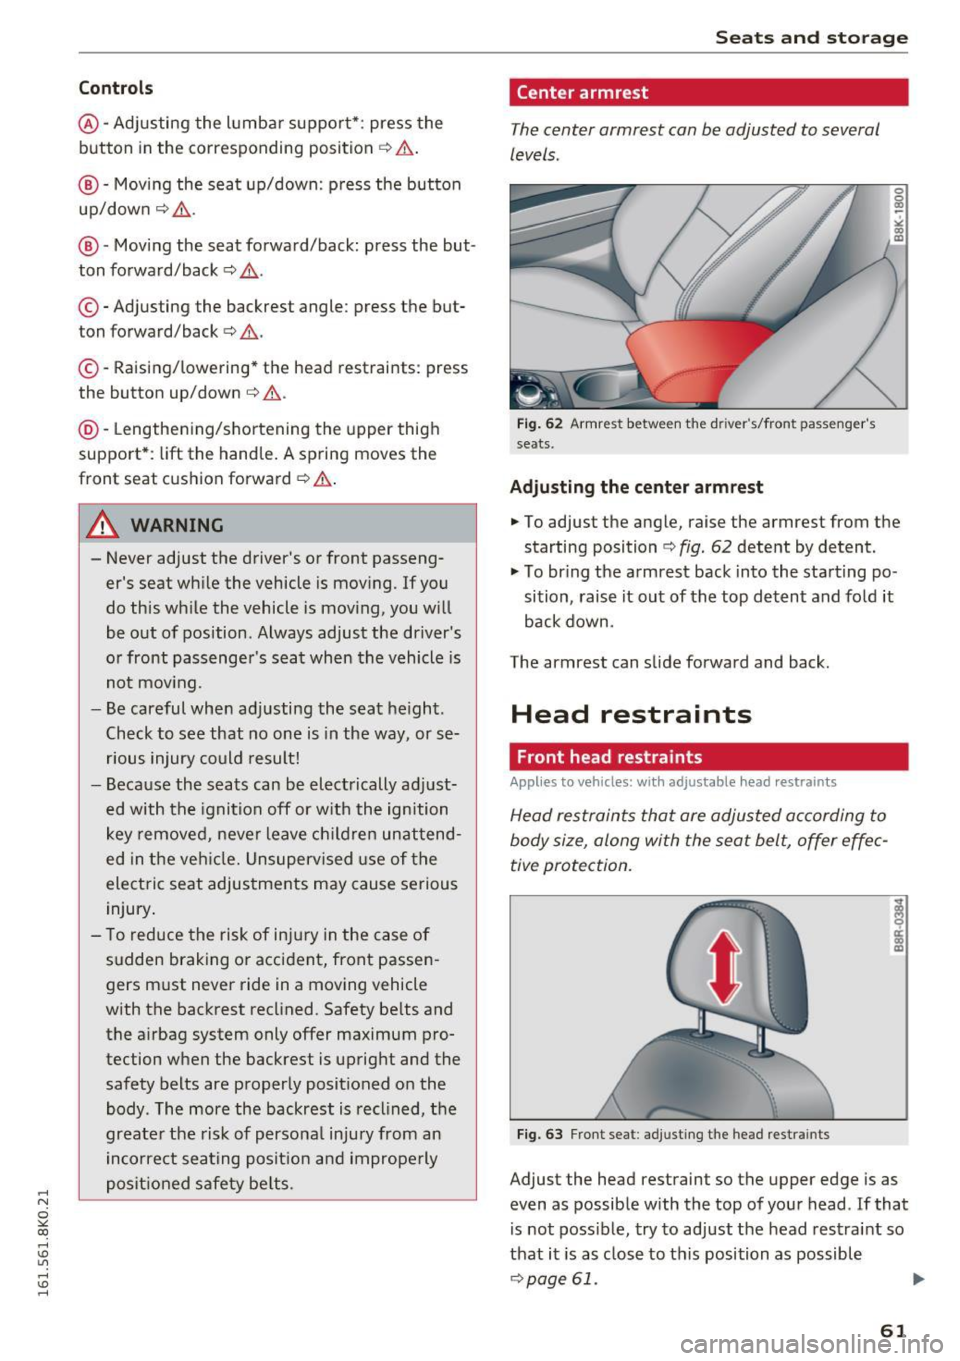
The center armrest can be adjusted to several
levels .
Fig. 62 Armrest between the driver 's/front passenger's
seats.
Adjusting the center armrest
... To adjust the angle, raise the armrest from the
starting position
c:> fig. 62 detent by detent.
... To bring the armrest back into the starting po
sition, raise it out of the top detent and fold it
back down .
The armrest can slide forward and back.
Head restraints
Front head restraints
Appl ies to vehicles: wi th adjus tab le head restrain ts
Head restraints that are adjusted according to
body size, along with the seat belt, offer effec
tive protection.
Fig. 63 Front seat: adj usting the head restrain ts
Adjust the head restraint so the upper edge is as
even as possible with the top of your head . If that
is not possible, try to adjust the head restraint so
that it is as close to this position as possible
¢page 61 .
61
Page 64 of 278
Sea ts and stor age
.,. To adju st the height of the head restraint, grip
the head restraint on the sides with both hands
and s lide it up/down until it locks into place
¢ fig. 63.
Refer to c::> page 124, Proper adjustment of head
restraints
for guidelines on how to adjust the
height of the front head restraints to suit the oc
cupant's body size.
A WARNING
- Driving without head restraints or with head
restra ints that are not properly adjusted in
c reases the risk of ser ious or fatal neck in
jury dramatically.
- Read and heed all WARNINGS
c::>page 124,
Proper adjustment of head restraints.
(D) Tips
Correctly adjusted head restraints and safety
be lts are an extremely effective combination
of safety features .
Rear head restraints
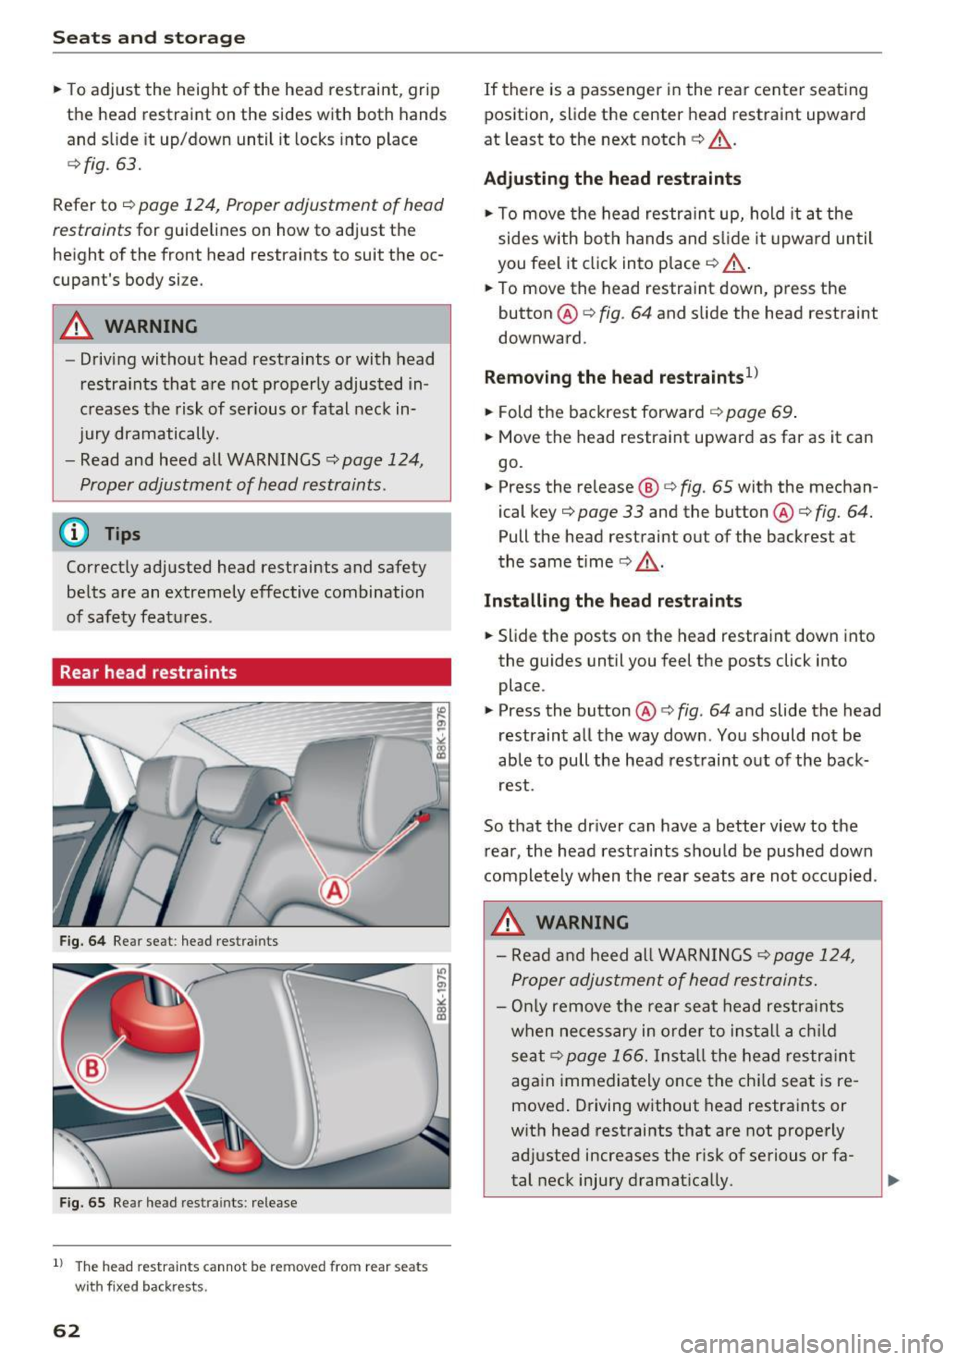
Fig. 64 Rear seat : head restra ints
Fig. 65 Rear head restra ints : release
1l The head restra ints cannot be removed from rear seats
with fixed backrests.
62
If there is a passenger in the rear center seating
position, slide the center head restraint upward
at least to the next notch
c::> &_ .
Adjusting the head re straints
.,. To move the head restraint up, hold it a t the
sides with both hands and s lide it upward until
you feel it click into place
c::> &_ .
.,. To move the head restraint down, press the
button @
c:> fig. 64 and s lide the head restraint
downward .
Removin g the head r estraint s1l
.,. Fold the backrest forward c::> page 69 .
.,. Move the head restraint upward as far as it can
go.
.,. Press the release @
c::> fig. 65 with the mechan
ical key
c::> page 33 and the button @ c::> fig. 64.
Pull the head restraint out of the backrest at
the same t ime
c::> ,& .
Insta lling the he ad r estraint s
.,. Slide the posts on the head restraint down into
the guides until you feel the posts click into
place .
.,. Press the button @
c::> fig. 64 and slide the head
restraint all the way down. You should not be
ab le to pull the head restraint out of the back
rest.
So that the driver can have a better view to the rear, the head restraints should be pushed down
completely when the rear seats a re not occ upied.
A WARNING
- Read and heed all WARN INGS c::>page 124,
Proper adjus tment of head restraints.
- On ly remove the rear seat head restra ints
when necessary in order to install a c hild
seat
c::>page 166. Insta ll the head restra int
again immediately once the chi ld seat is re
moved . Driving without head restraints or
w ith head restraints that are not properly
ad justed increases the risk of serious or fa
tal neck injury dramatica lly.
Page 66 of 278
Seats and storage
Ashtray
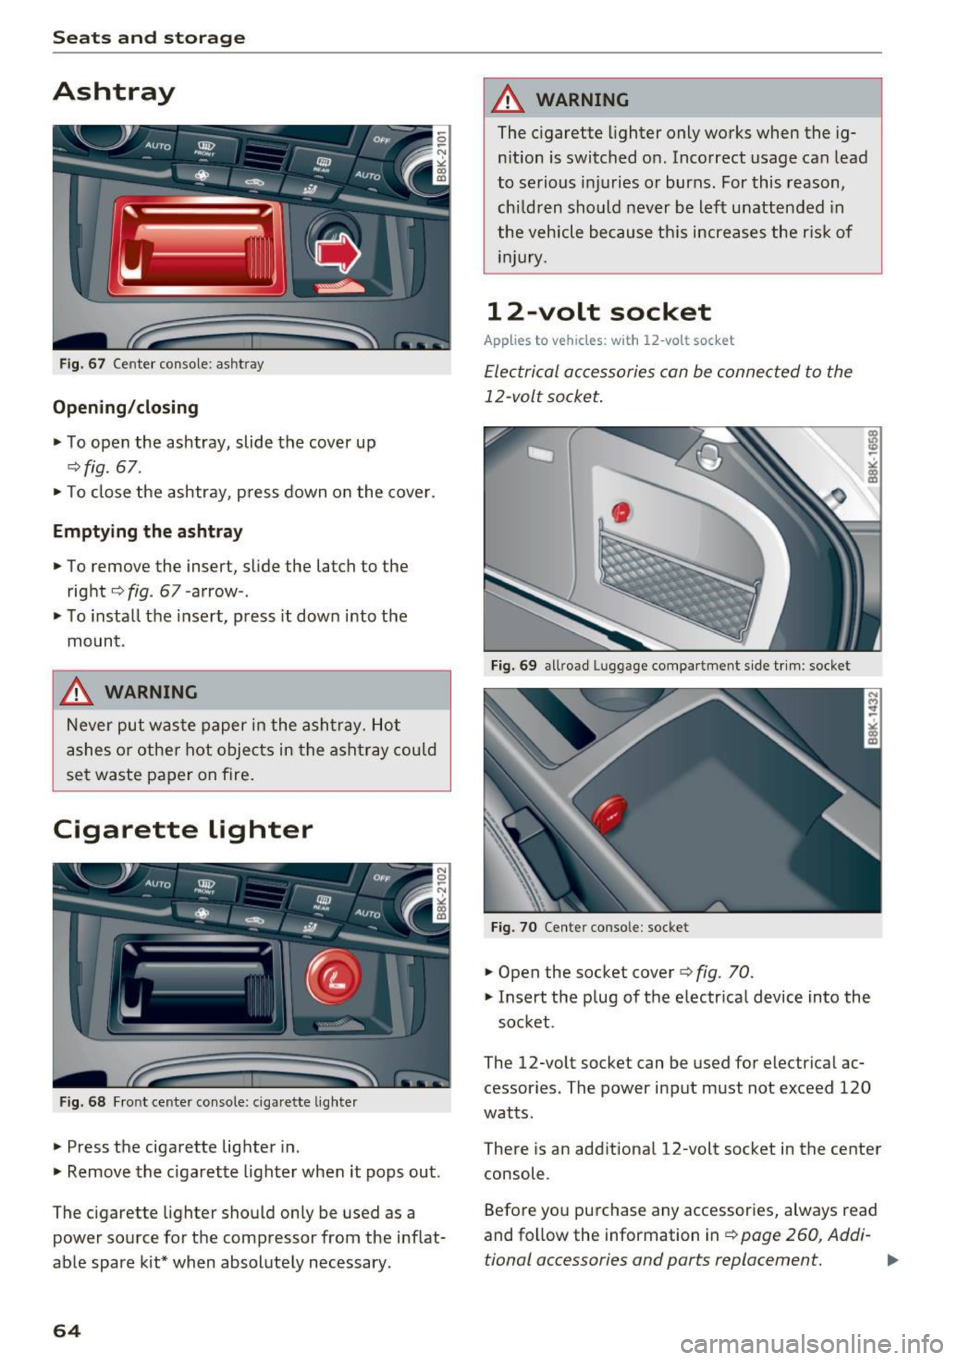
Fig. 67 Center console: as htray
Opening/closing
.,. To open the ashtray, slide the cover up
q fig . 67 .
.,. To close the ashtray, p ress down o n the cover .
Emptying the ashtray
.,. To remove the insert, slide the latch to the
right
<=> fig . 67 -arrow -.
.,. To install the insert, press it dow n into the
mount.
,&. WARNING
-
Never put waste paper in the ashtray. Hot
ashes or other hot objects in the ashtray could
set waste paper on fire.
Cigarette lighter
Fig. 68 Front cente r console: c igarette l ighte r
.,. Press the cigarette lighter in.
.,. Remove the cigarette lighter when it pops out .
The cigarette lighter should only be used as a
power source for the compressor from the inflat
able spare kit* when absolutely necessary .
64
,&. WARNING
The cigarette lighter only works when the ig
nition is switched on. Incorrect usage can lead
to serious injuries or burns. For this reason,
ch ildre n should never be left unattended in
the vehicle because this increases the ris k of
in jur y.
12-volt socket
Appl ies to vehicles: with 12-volt socket
Electrical accessories can be connected to the
12-volt socket.
Fig. 69 allroad Lu ggage compartment side trim: socket
Fig. 70 Cente r conso le : socket
.,. Open the socket cover¢ fig. 70 .
.,. Insert the plug of the electrical device into the
socket .
The 12-volt socket can be used for electrical ac
cessor ies. The power input must not exceed 120
watts .
There is an additiona l 12-volt socket in the center
console.
Before you purchase any accessories, always read
and follow the information in¢
page 260, Addi-
tional accessories and ports replacement. .,,_
Page 67 of 278
,....,
N
0
""' CX) ,....,
I.Cl U"I ,....,
I.Cl ,....,
/! WARNING
The socket and the electrical accessories con
nected to it operate on ly when the ignition is
switched on. Incorrect usage can lead to seri
ous injuries or burns. For this reason, children
should never be left unattended in the veh icle
because this increases the risk of injury.
0 Note
- Never connect equ ipment that gene rates
electrical current, such as a solar pane l or
battery charger, to the 12-volt socket. This
could damage the ve hicle's electrical sys
tem .
- To avoid damag ing the socket, only use
plugs that fit properly .
@ Tips
When the engine is off and accessories are
still plugged in and are on, the vehicle battery
can sti ll be dra ined .
Storing
General overview
A WARNING
-Always remove objects from the instrument
panel. Any items not pu t away cou ld slide
around inside the vehicle wh ile driving or
when accelera ting or when app ly ing the
bra kes or w hen driv ing around a corner.
- When you are dr iv ing make sure that a ny
t hing yo u may have pla ced i n the cen ter con
so le or other sto rage locations cannot fall
o ut into the footwells . In case of s udden
brak ing you would not be ab le to brake, de
press the clutch or accelerate .
-Any pieces of clothing that yo u have hung
up must not interfere with the driver's view .
The coat hooks are designed only for light
weight cloth ing . Never hang any clothing
with hard , pointed or heavy objects in the
pockets on the coat hooks . Dur ing sudden
brak ing or in an accident -especially if t he
airbag is deployed -these objects could in
jure any passengers inside the vehicle.
Seats and storag e
(upholder
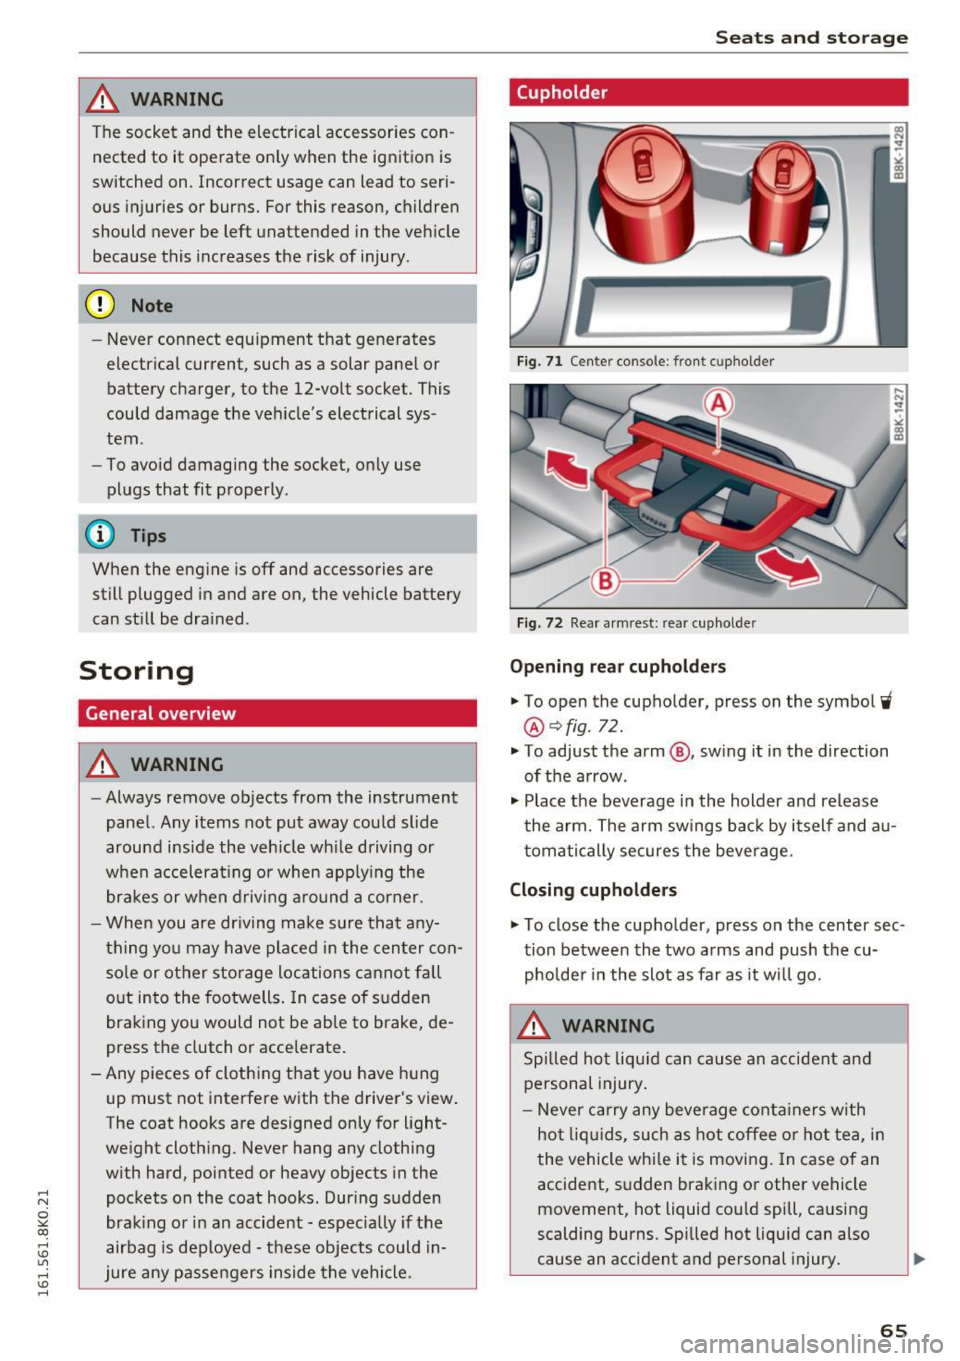
Fig. 71 Cen te r conso le : fr ont cuph older
Fig. 72 Rea r a rmrest: rear cupho lder
Opening rea r cupholders
.. To open the cupho lder, press on the symbol ii
® qfig . 72 .
.. To adjust the arm @, sw ing it in the direction
of t he a rrow .
.. Place t he beverage in the holder and release
the arm. The arm swings bac k by i tself and a u
t oma tically secures the beve rage.
Closing cupholders
.. To close the cupholder, press on the center sec
tion between the two arms and push the cu
pho lder in the slot as far as it wi ll go.
A WARNING
Spi lled ho t liqu id can cause an accident an d
personal injury .
- Never carry any beverage c ontai ners w ith
hot liq uids, such as hot coffee or hot tea, in
t he vehicle whi le i t is movi ng. In case of an
accide nt, sudden brak ing o r other ve hicle
movement, hot liquid co uld spill , ca using
scalding burns. Spilled hot liqu id can also
cause an accident and personal injury.
65
Page 69 of 278
,....,
N
0
""' CX) ,....,
I.Cl U"I ,....,
I.Cl ,....,
-The coat hooks must only be used for light
weight clothing . Do not leave any heavy or
sharp edged objects in the pockets which
may interfere with the side curtain airbag
deployment and can cause personal injury in
a crash .
- Do not use coat hangers for hanging cloth ing on the coat hooks as this can interfere
with proper deployment of the side curtain
airbags in an accident.
- Do not hang heavy objects on the coat
hooks, as they could cause personal injury in
a sudden stop.
-Always keep the compartment above the
rearview mirror closed while driving to re
duce the risk of injury in the event of sudden
braking maneuvers or a collision.
0 Note
Objects located on the rear shelf that rub
against the rear window could damage the
heating wires for the rear window defogger.
(j) Tips
-A vent slot is located between the shelf and
the rear window. Do not block the vent with
any items you may place on the rear window
shelf.
- Do not p lace bulky items on the rear window
shelf as they could restrict or block the driv
er's vision in the rear view mirror.
Roof rack
Description and mounting locations
Additional cargo can be carried with a roof lug
gage rack .
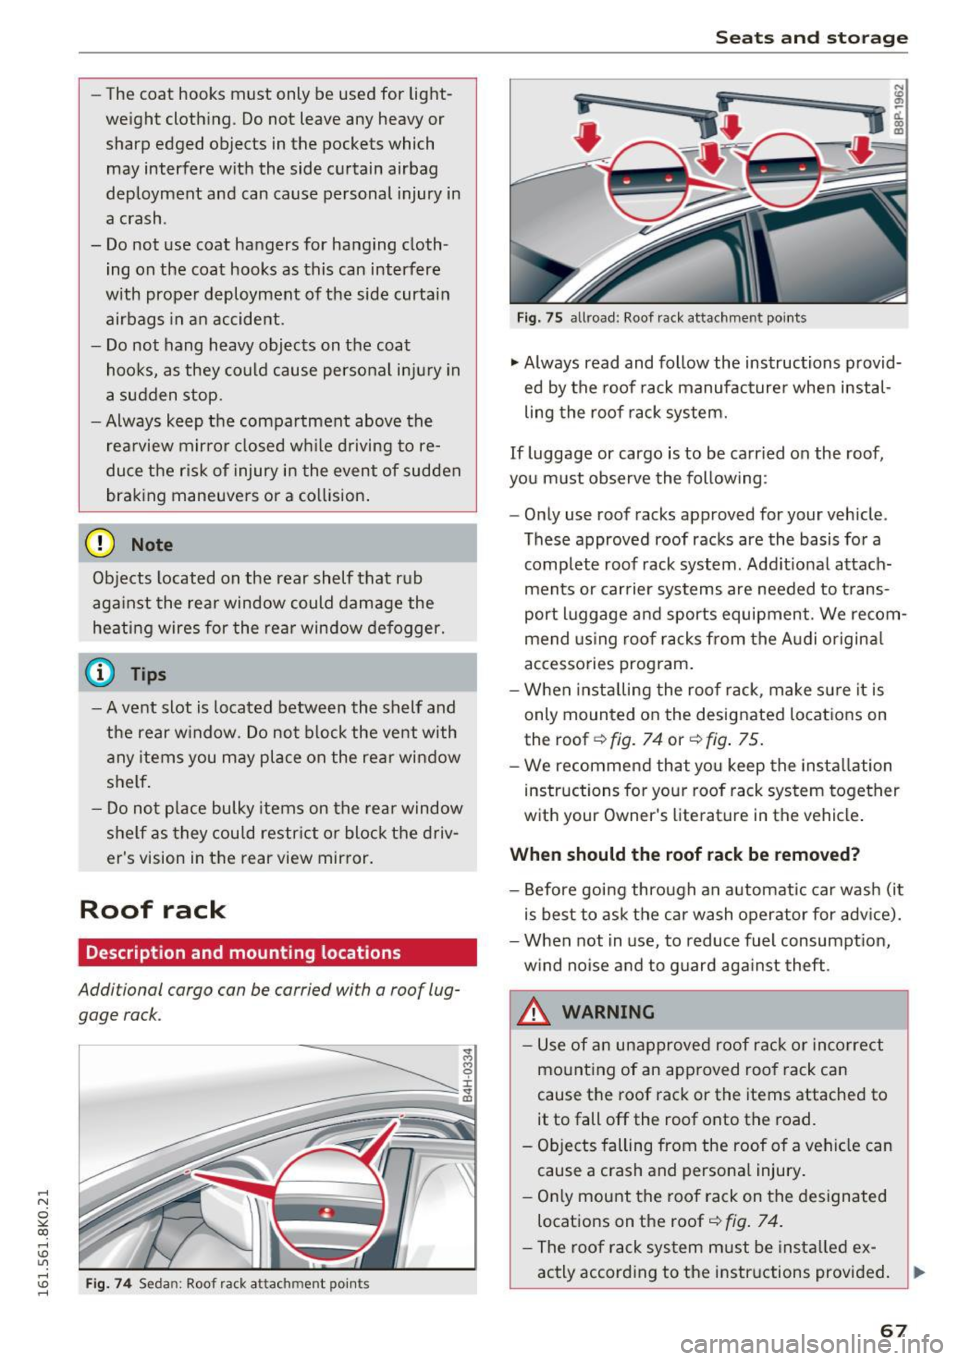
Fig. 74 Sedan: Roof rack a ttac hm en t poin ts
Seats and storage
Fig. 75 allroad : Roof rack attachme nt points
"'Always read and follow the instructions provid
ed by the roof rack manufacturer when instal
ling the roof rack system.
If luggage or cargo is to be carried on the roof,
you must observe the following :
- Only use roof racks approved for your vehicle .
These approved roof racks are the basis for a
complete roof rack system . Add it ional attach
ments or carrier systems are needed to trans
port luggage and sports equipment. We recom
mend using roof racks from the Audi original
accessories program.
- When insta lling the roof rack, make sure it is
only mounted on the designated locations on
the roof
r::!> fig. 74 or r::!> fig. 75.
- We recommend that you keep the installation
instructions for your roof rack system together
with your Owner's literature in the vehicle .
When should the roof rack be removed?
-Before going through an automatic car wash (it
is best to ask the car wash operator for advice).
- When not in use, to reduce fuel consumption,
wind noise and to guard against theft .
_&. WARNING
- Use of an unapproved roof rack or incorrect
mounting of an approved roof rack can
cause the roof rack or the items attached to
it to fall off the roof onto the road.
- Objects falling from the roof of a vehicle can
cause a crash and personal injury.
- Only mount the roof rack on the designated
locations on the roof
r::!> fig. 7 4.
- The roof rack system must be install ed ex-
actly according to the instructions provided. ..,.
67
Page 73 of 278
,....,
N
0
""' CX) ,....,
I.Cl U"I ,....,
I.Cl ,....,
(D Note
Let the partition net roll up slowly to prevent
damage.
Partition net {seatback tilted forward )
Applies to vehicles: with partition net
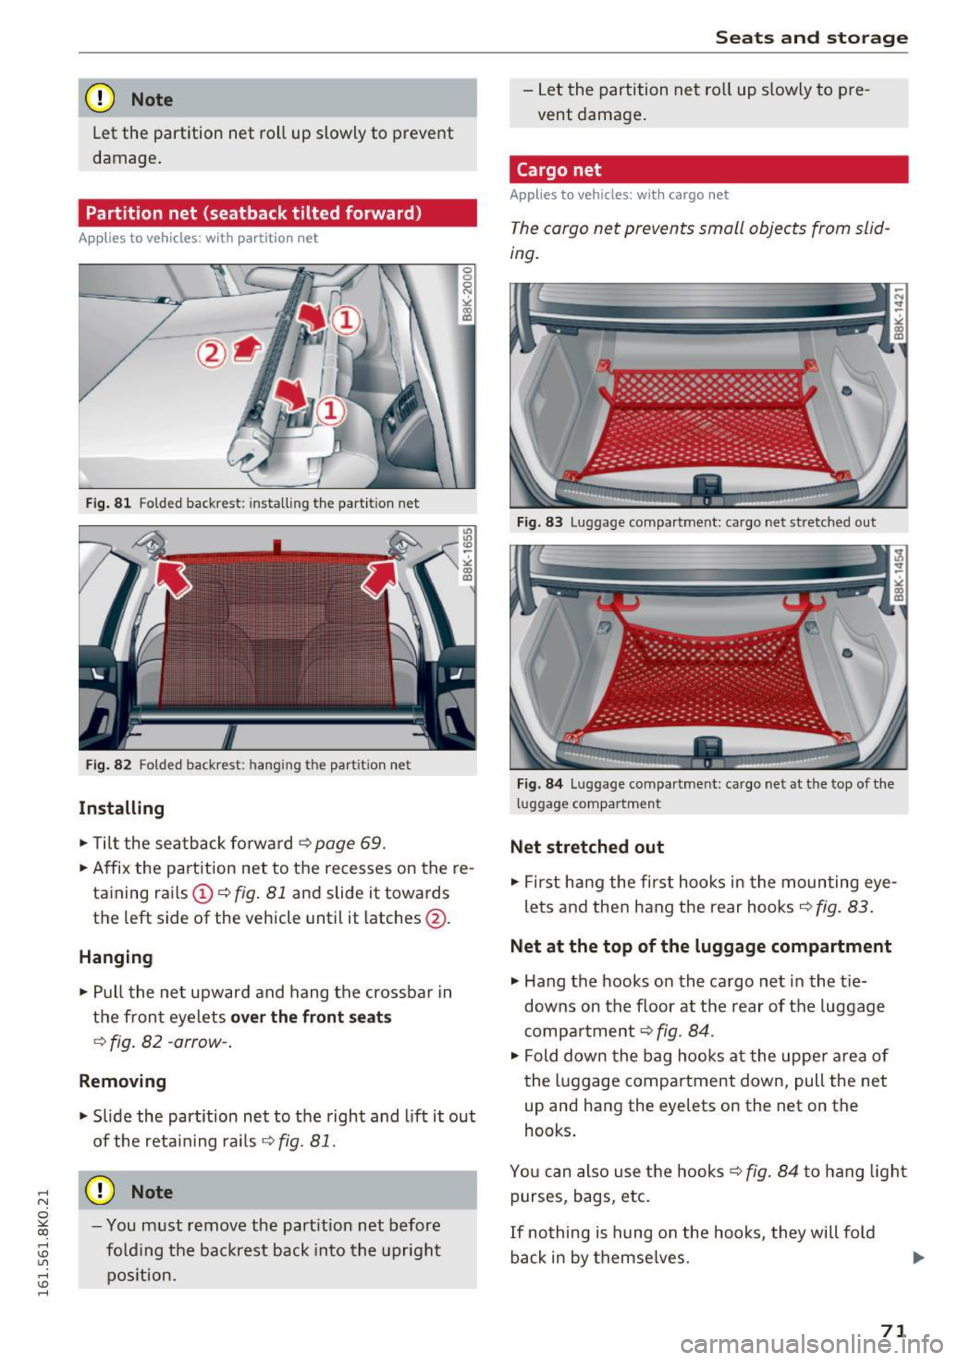
Fig . 81 Folded backrest: installing t he part ition net
Fig . 82 Folded backrest : hanging the partition net
Install ing
.,. Tilt the sea tback fo rwa rd¢ page 69.
.,. Affix the partition net to the recesses on the re
ta ining rails @ ¢
fig. 81 and slide it towards
the left side of the vehicle until it latches @.
Hanging
.,. Pull the ne t upward and hang the crossba r in
the front eyelets
over the front seat s
¢fig . 82 - arrow -.
Removing
.,. Slide the part ition net to the right and l ift it out
of the reta in ing ra ils
¢ fig. 81.
{[) Note
-You must remove the part it ion net before
fo ld ing the backrest back into the upright
pos ition.
Seats and storag e
-Let the partition net ro ll up s lowly to pre
vent damage.
Cargo net
Applies to veh icles: w ith cargo net
The cargo net prevents small objects from slid
ing.
Fig . 83 Luggage compa rtment: ca rgo net stretched out
Fig. 84 Luggage compartment: ca rgo net at the top of the
l uggage compart ment
Net stretched out
.,. Fir st ha ng the fi rst hooks in the moun ting eye
lets and then hang the rear hooks¢
fig. 83.
Net at the top of the luggage compartment
.,. Hang the hooks on the cargo net in the t ie
downs on the floor at the rear of the luggage
compa rtment
¢fig. 84.
.,. Fold down the bag hooks a t the uppe r are a of
the l uggage compar tment down, pull the net
up and hang the eyelets on the net on the
hooks .
You can also use the hooks¢
fig. 84 to hang ligh t
purses, bags, etc.
If nothing is hung on the hooks, they will fo ld
ba ck in by themse lves.
71
Page 135 of 278
,....,
N
0
""' ex:, ,....,
I.Cl U"I ,....,
I.Cl ,....,
_& WARNING
Not wearing safety belts or wearing them im
properly increases the risk of serious personal
injury and death . Safety belts can work only
when used correct ly.
-Always fasten your safety belts correctly be fore driving off and make sure all passen
gers are cor rect ly restrained.
- For maximum protection, safety belts must
always be posit ioned properly on the body .
- Never strap more than one person, includ
ing small ch ildren, into any belt .
- Never place a safety belt over a child sitt ing
on your lap.
- Always keep feet in the footwell in front of
the seat wh ile the vehicle is being driven.
- Never let any person ride w ith their feet on
the instrument panel or st icking out the
window or on the seat .
- Never remove a safety belt while the vehicle
is moving . Do ing so will increase your risk of
being injured or k illed.
- Never wear belts twisted.
- Never wear belts over rigid or breakable ob-
jects in or on your clothing, such as eye
glasses, pens, keys, etc., as these may cause
injury.
- Never allow safety belts to become dam
aged by being caught in door or seat hard
ware.
- Do not wear the shoulder part of the belt
under your arm or otherwise out of position .
- Several layers of heavy clothing may inter
fere with correct positioning of belts and re
duce the overall effectiveness of the system.
- Always keep belt buckles free of anything
that may prevent the buckle from latching
securely .
- Never use comfort clips or devices that cre
ate slack in the shoulder be lt . However, spe
cial clips may be requ ired for the proper use
of some child restraint systems.
- Torn or frayed safety belts can tear, and
damaged belt ha rdware can break in an acc i
dent. Inspect belts regularly.
If webbing,
bind ings, buckles, or re tractors are dam-
Safet y bel ts
aged, have belts rep laced by an authorized
Aud i dea ler .
- Safety belts that have been worn and loaded
in an accident must be replaced with the
correct replacement safety belt by an au
thorized Audi dealer. Replacement may be
necessary even if damage cannot be clearly
seen. Anchorages that were loaded must al
so be inspected.
- Never remove, mod ify, d isassemble, or try
to repair the safety belts yourse lf.
-Always keep the belts clean . Dirty belts may
not work properly and can impair the func
tion of the inert ia reel¢
page 193.
Safety belts
Fastening safety belts
Safety first -everybody buckle up!
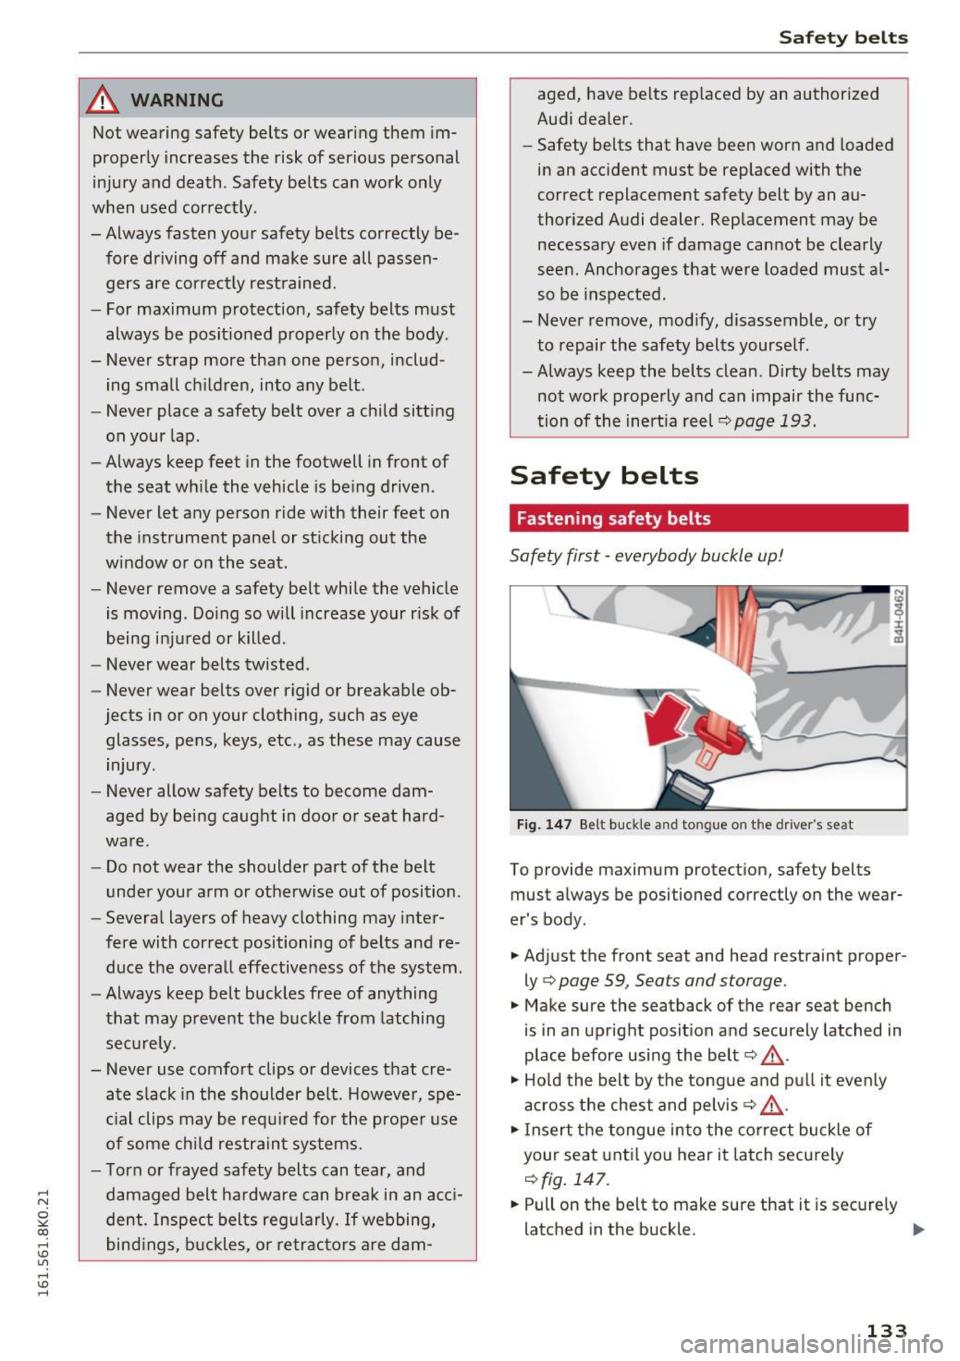
F ig. 14 7 Belt buckle and tongu e on t he d river' s se at
To provide maximum protection, safety belts
must always be positioned correctly on the wear
er 's body .
... Adjust the front seat and head restraint proper
ly
¢ page 59, Seats and storage.
... Make sure the seatback of the rear seat bench
is in an upright posit ion a nd securely latched in
place before using the belt
Q _&. .
"' Ho ld the bel t by the tongue and pu ll it evenly
across the chest and pelvis¢_&. .
... Insert the tongue in to the correct buckle of
your seat unti l you hear it latch securely
Qfig. 147.
... Pull on the belt to make sure that it is securely
latched in the buckle .
IIJ,,
133
Page 136 of 278
Safe ty belts
Autom ati c s afet y belt retr actors
Every safety belt is equ ipped with an automa tic
be lt retractor on the shoulder belt. This feature
locks the belt when the belt is pulled out fast,
during hard braking and in a n accident . The belt
may a lso lock when you drive up or down a steep
hill or through a sharp curve. Dur ing normal driv
ing the belt lets you
move freely .
Safety belt p ret en sion ers
The safety belts are equipped with a belt preten
sioner that helps to t ighten the safety belt and
remove slack when the pretensioner is activated.
The function of the pretensioner is mon itored by
a warning light
r:::') page 19.
Convertib le loc king retracto r
Every safety be lt except the one on the driver
seat is equipped with a convertible locking retrac
tor that
mus t be used when the safety belt is
used to attach a child safety seat. Be sure to read
the impo rtant information about this feature
c:;, page 167.
.&_ WARNING
Imprope rly pos itioned safety be lts can cause
ser ious injury in an accident
c:;, page 134,
Safety belt position.
- Safety belts offer optimum protection only
when the seatback is upright and belts are
properly positioned on the body.
- Always make sure that the rear seat back
rest to which the center rea r safety belt is
attached is secure ly latched whenever the
rear center safety belt is being used. If the
backrest is not securely latched, the passen
ger will move forward with the backrest dur
ing sudden braking, in a sudden maneuver
and especially in a crash.
- Never attach the safety belt to the buckle for another seat. Attaching the belt to the
wrong buckle will reduce safety belt effec
tiveness and can cause serious persona l in
jury.
- A passenger who is not properly restrained can be seriously in jured by the safety be lt it
self when it moves from the stronger parts
134
of the body into critical areas like the abdo men.
- Always lock the convertible locking retractor
when you are securing a child safety seat in
the vehicle
c:;, page 169.
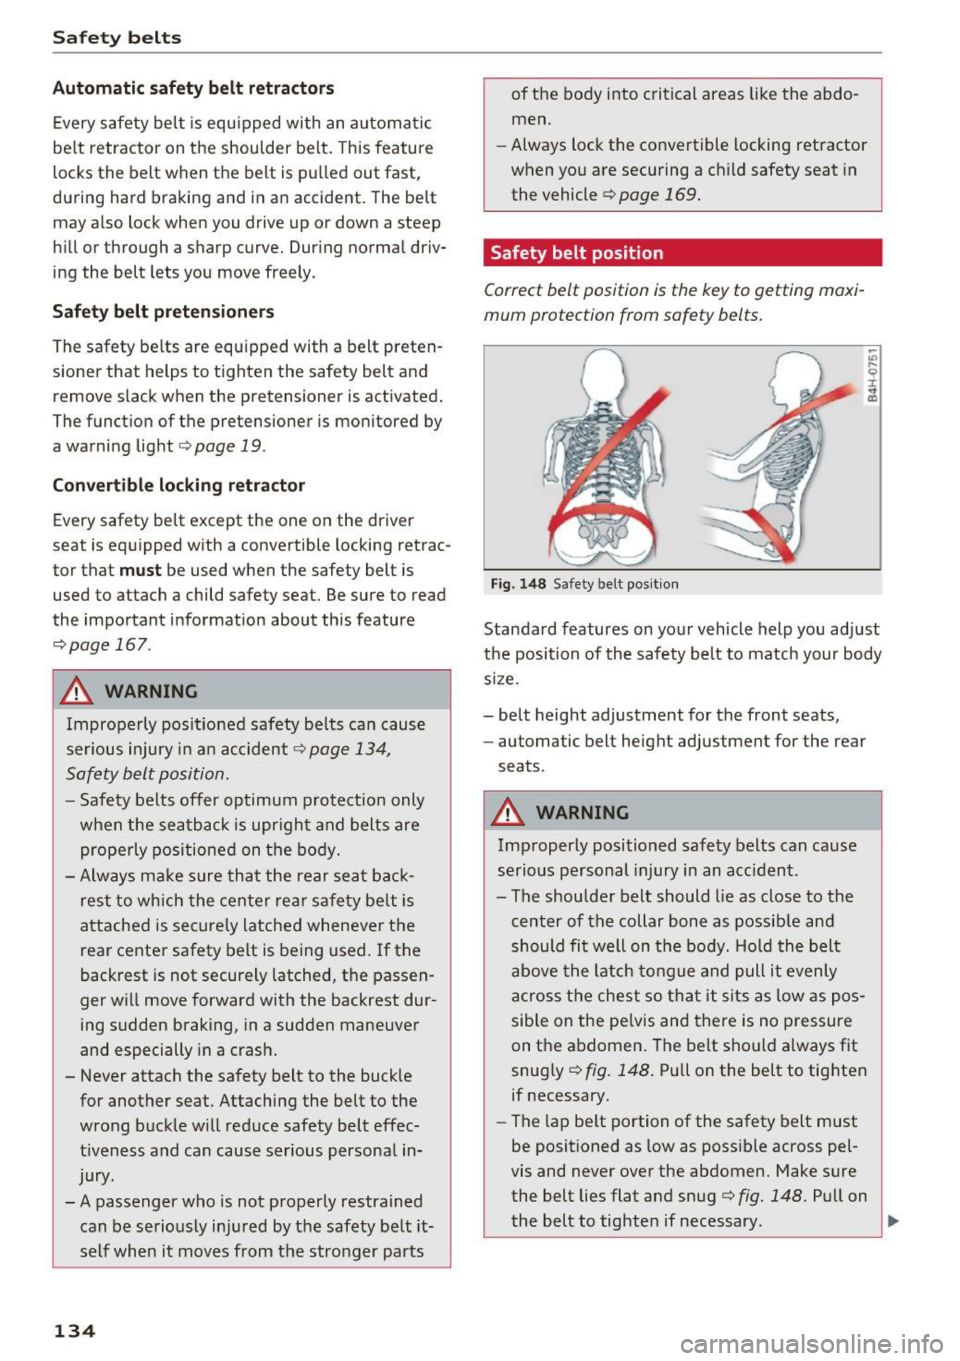
Safety belt position
Correct belt position is the key to getting maxi
mum protection from safety belts .
Fig. 148 Safety belt posit ion
-"' .... 9 I ... a,
Standard features on your vehicle help you adjust
the position of the safety belt to match your body
s ize.
- belt height adjustment for the front seats,
- automatic belt height adjustment for the rear
seats .
.&_ WARNING
Improperly positioned safety belts can cause
serious personal injury in an acc ident.
- The shou lder belt should lie as close to the
center of the collar bone as possible and
should fi t well on t he body. Hold the belt
above the latch to ng ue and pull it evenly
across the chest so tha t it s its as low as pos
sible on the pe lvis and there is no pressure
on the abdomen . The belt sho uld a lways f it
snug ly
c:;, fig. 148 . Pull on the belt to tig hten
if necessary.
- The lap be lt portion of the safety belt must
be positioned as low as poss ible across pel
vis and never over the abdomen. Make sure the belt lies flat and snug
c:;, fig. 148. Pull on
the belt to tighten if necessary. .,.
Page 147 of 278

..... N
0 ::..:: co .....
ger seat contains important parts of the Ad
vanced A irbag System, you must take care to pre
vent it from being damaged. Damage to the seat may prevent the Advanced Airbag for the front
passenger seat from doing its job in a crash .
The front Adv anced Airb ag Sy stem con sist s
of the following :
-Crash sensors in the front of the vehicle that
measure vehicle accelerat ion/decelerat io n to
provide information to the Advanced Airbag
System about the severity of the crash .
- An electronic control un it, with integrated
crash sensors fo r front and side impacts . The
contro l unit "decides" whether to fire the front
airbags based on the information received from
the crash sensors. The control unit also "de
cides" whether the safe ty be lt pretens ioners
sho uld be activated.
- An Advanced Airbag wi th gas generato r and
contro l valve for the driver ins ide the steer ing
whee l hub .
- An Advanced Airbag with gas generator and
contro l valve inside the instrument pane l for
the front passenger.
- A weight -sensing mat under t he upho lstery
padding of the front passenger seat cushion
that meas ures the total weight on the seat . The
information registered is sent continuously to
the electron ic control unit to regulate dep loy
ment of the front Adva need A irbag on the pas
senger side.
- An airbag monitoring system and indicator
light i n the instrument cluster
¢ page 148.
-A sensor in each front seat registers the dis
tance between the respective seat and the
steering wheel or instrument panel. The infor
mation reg istered is sent cont inuous ly to the
electroni c control unit to regulate deployment
of the fro nt Adv a need A irbags.
- T he
PASS EN GE R AIR BAG OFF light comes on
and stays on in the center of the instrument
pane l¢
page 148, fig . 155 a nd tells you when
the fron t Advan ced Airbag on the passenge r
side has been turned off.
- A se nsor below the safe ty bel t lat ch fo r th e
front seat passenger to meas ure the tens ion on
Airb ag sys tem
the sa fe ty belt. The tension on the safety belt
and the weight registered by the weight-sens
ing mat help the contro l unit "decide" whether
the front airbag for the front passenger seat
should be turned off or not¢
page 139, Child
restraints on the front seat -some important
things to know.
- A sensor in the safety belt latch for the driver
and for the front seat passenger that senses
whether that safety belt is latched o r not and
t ransmits this information to t he electronic
cont rol un it.
_& WARNING
Da mage to the front passenge r seat can pre
vent the front airbag from working properly.
- Imp roper repair or disassembly of the fro nt
passenger and driver seat will p revent the
Advanced Airbag System from f unct ioning
p roperly.
- Repairs to the front passenger seat must be
performed by qualified an d properly trained
wo rkshop personne l.
- Never remove the front passenge r or driver
seat from the vehicle.
- Never remove the upholstery from the front
passenger seat.
- Never disassemble o r remove par ts from the
seat o r disconnect w ires from it.
- Never ca rry sharp objects in your pocke ts or
p la ce them on the seat. If the weight-sens
ing mat in the passenger seat is punctu red
it cannot work proper ly.
- Never carry things on your lap or carry ob
jects on the passenge r seat. S uch items can
increase the weight reg istered by the
weight-sensing mat and send the wrong in
formation to the a irbag control unit.
- Never store items unde r the front passenger
seat. Parts of the Advanced Airbag System
under the passenger seat could be dam
aged, p reventing them and the airbag sys
tem from worki ng p roper ly.
- Never p lace seat covers or replacement up
holstery tha t have not been specifically ap
p roved by A udi on the front seats.
- Seat covers can prevent the Advanced A ir
bag Sys tem from recognizing chi ld
145
Page 152 of 278
Airbag syste m
-the adu lt on the front passenger seat is proper
ly seated on the center of the seat cushion with
his or her back up against the backrest and the
backrest is not reclined
c> page 122, Correct
passenger seating positions,
-the adu lt is not taking weight off the seat by
holding on to the passenger assist handle
above the front passenger door or supporting
their we ight on the armrest,
- the safety belt is being properly worn and that
there is not a lot of slack in the safety belt web
bing,
- accessory seat covers or cushions or other
th ings that may cause an incorrect read ing or
impression on the weight-sensing mat under
the upho lstery of the seat have been removed
from the front passenge r seat,
- a safety be lt extender has not been left in the
safety belt latc h for the front passenge r seat.
In addition to the
PASSE NGER AIR BAG OFF
light in the center of the instrument panel, the
message
PASSENGER AIR BAG OFF or PASSEN
GER AIR BAG ON
w ill briefly appear in the inst ru
ment cluster display . T his is to inform the driver
of the current front passenger airbag status.
Important safety instructions on
monitoring the Advanced Airbag System
A WARNING
An airbag system that is not funct ion ing prop
er ly cannot p rovide supplemental p rotection
in a frontal crash.
- If the airbag indicato r light
r=>page 19
comes when the vehicle is be ing used, h ave
the system inspected immediate ly by yo ur
authorized Aud i dealer. It is possible that
the airbag will inflate when it is not s up
posed to, or will not inflate when it should.
A WARNING
If the front airbag inflates, a child without a
child restraint, in a rearward-facing child safe
ty seat or in a forward-facing child restraint
that has not been properly installed will be
ser iously injured and can be killed .
150
-Even though your vehicle is equipped with
an Advanced A irbag System, make certain
that all children, espec ia lly 12 years and
younger, always ride on the back seat prop
erly restrained for their age and s ize.
- Always install forward or rear-facing child
safety seats on the rear seat -even with an
Advanced A irbag System.
- If you must install a rearward-facing child
safety seat on the front passenger seat be
cause of exceptional circumstances and the
PASSENGER AIR BAG OFF l ight does not
appear and s tay on, immedi ately ins tall the
rear-facing child safety seat in a re ar seat ing
position and have the a irbag system in
spected by your a uthorized Audi dea ler.
- A t ight tether or other s trap on a rearward
facing chi ld restraint attached to the front
passenger seat can put too much pressure
on the weight-sensing mat in the seat and
register more weight than is actually on the
seat. The heavier weight registered can
make the system work as thoug h an adu lt
were on the seat and deploy the Advanced
Airbag when it must be suppressed causing
serious or even f atal injury to the child.
- If, in exceptional circumstances, you must
install a forward-fa cing child res traint on
the front p assenge r seat, always move the
seat into i ts rearmost posi tion in the sea t's
fore and aft ad justment range, as far away
from the ai rbag as possible . The back rest
must be adjusted to an upr ight position.
Make sure that the
PASSENGER AIR BAG
OFF
li ght comes on and stays on all the time
wheneve r the ignit ion is switched on.
A WARNING
- If the PASSENGER AIR BAG OFF light does
not go out when an adult is sitting on the
front passenger seat afte r taking the steps
described above, make s ure the adult is
p roper ly sea ted and restra ined at one o f the
rear sea ting posit ions .
- Have the ai rbag system inspec ted by your
author ized Audi dealer befo re t ransporting
anyone on the front passenger seat.