AUDI S4 2020 Owners Manual
Manufacturer: AUDI, Model Year: 2020, Model line: S4, Model: AUDI S4 2020Pages: 296, PDF Size: 80.45 MB
Page 181 of 296
8W1012721BB
Navigation
> Press on a suggested address. The Details
menu will be displayed.
> Press Start.
G) Tips
— Ifa contact is grayed out, there is no ad-
dress stored for that contact.
— Navigation to geographic coordinates for a
contact is not possible.
Loading received destinations and routes
Applies to: vehicles with a navigation system and Audi con-
nect Infotainment
You can search for destinations or routes in the
myAudi app and send to the vehicle.
Requirement: the MMI and the mobile device
must be connected to the Internet > page 169,
Audi connect. You must have the myAudi app in-
stalled on your mobile device.
> Send a destination or route in the myAudi app
to the vehicle.
> Applies to: MMI: Select on the home screen:
NAVIGATION > (&5) > Receiv. destns. & routes.
> Make sure you are logged into the vehicle and
the myAudi app with the same myAudi account.
The received destination and routes will be
loaded automatically.
> Navigating to a destination: press on a desti-
nation.
> Deleting destinations: select: Z > one or more
entries or Select all > Delete > (Done).
Destination details
Applies to: vehicles with navigation system
RAX-0148,
SAR
{0} eset exe ae os 3)
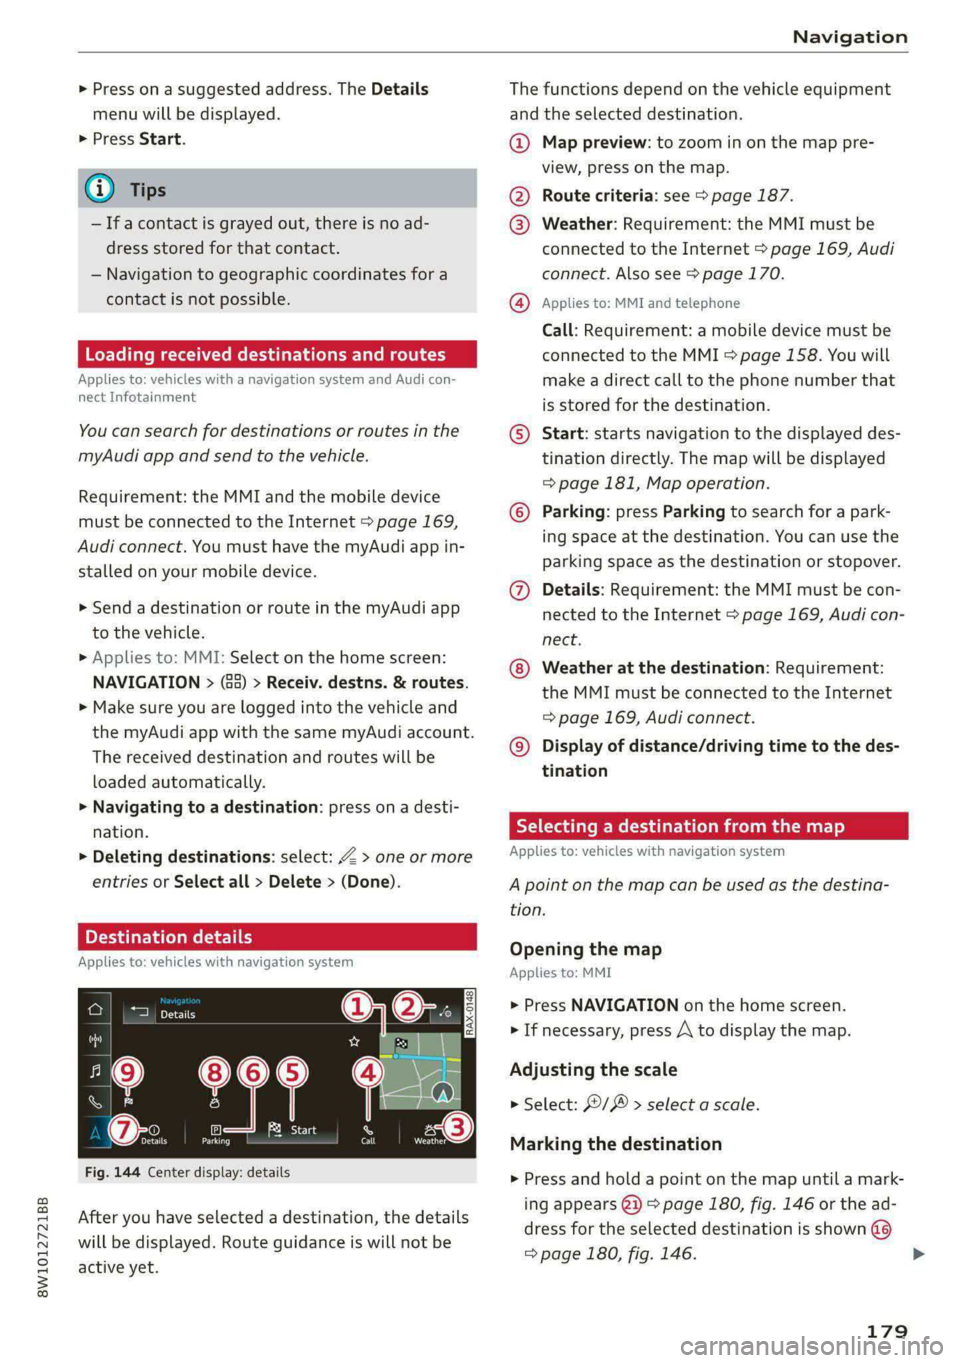
Fig. 144 Center display: details
After you have selected a destination, the details
will be displayed. Route guidance is will not be
active yet.
The functions depend on the vehicle equipment
and the selected destination.
@ Map preview: to zoom in on the map pre-
view, press on the map.
@ Route criteria: see > page 187.
@ Weather: Requirement: the MMI must be
connected to the Internet > page 169, Audi
connect. Also see > page 170.
@ Applies to: MMI and telephone
Call: Requirement: a mobile device must be
connected to the MMI > page 158. You will
make a direct call to the phone number that
is stored for the destination.
© Start: starts navigation to the displayed des-
tination directly. The map will be displayed
= page 181, Map operation.
© Parking: press Parking to search for a park-
ing space at the destination. You can use the
parking space as the destination or stopover.
@ Details: Requirement: the MMI must be con-
nected to the Internet > page 169, Audi con-
nect.
Weather at the destination: Requirement:
the MMI must be connected to the Internet
=> page 169, Audi connect.
© Display of distance/driving time to the des-
tination
Selecting a destination from the map
Applies to: vehicles with navigation system
A point on the map can be used as the destina-
tion.
Opening the map
Applies to: MMI
> Press NAVIGATION on the home screen.
> If necessary, press A to display the map.
Adjusting the scale
> Select: / > select a scale.
Marking the destination
> Press and hold a point on the map until a mark-
ing appears @2) > page 180, fig. 146 or the ad-
dress for the selected destination is shown @
=> page 180, fig. 146.
179
>
Page 182 of 296
Navigation
Selecting map content (such as POIs) as the
destination
Requirement: map content must be displayed
=> page 186.
> Press on map content on the map (for example,
@) > page 180, fig. 146).
Selecting the destination
> Select: @ > page 180, fig. 146, or
> To display destination details, press on
=> page 180, fig. 146 > Start.
Route guidance will be activated and the map will
be displayed > page 180, fig. 145.
SS) ee meee el
Applies to: vehicles with navigation system
You can enter additional destinations during ac-
tive route guidance.
Entering a stopover
Requirement: route guidance must be active.
> Enter a destination > page 177.
Displaying stopovers or the route plan
All destinations are listed in the route plan.
> Press on 2) page 180, fig. 145 on the map.
Editing stopovers
> Press on %) > page 180, fig. 145 on the map.
> Adding a stopover: Select: Add destination > a
destination > Add.
> Moving a stopover: press Z. Touch the $ sym-
bol and move the entry to the desired position.
Press Done.
> Deleting a stopover: Select: Z > one or more
entries or Select all > Delete > (Done).
Stopping route guidance
Applies to: vehicles with navigation system
Requirement: route guidance must be active and
the map must be displayed.
> Applies to: MMI: Press BX @ > page 180,
fig. 145.
180
> Applies to: multifunction steering wheel: Select
in the instrument cluster: Navigation tab >
button > Cancel route guidance.
Map
Applies to: vehicles with navigation system
Cera
Drees eaey cr amy
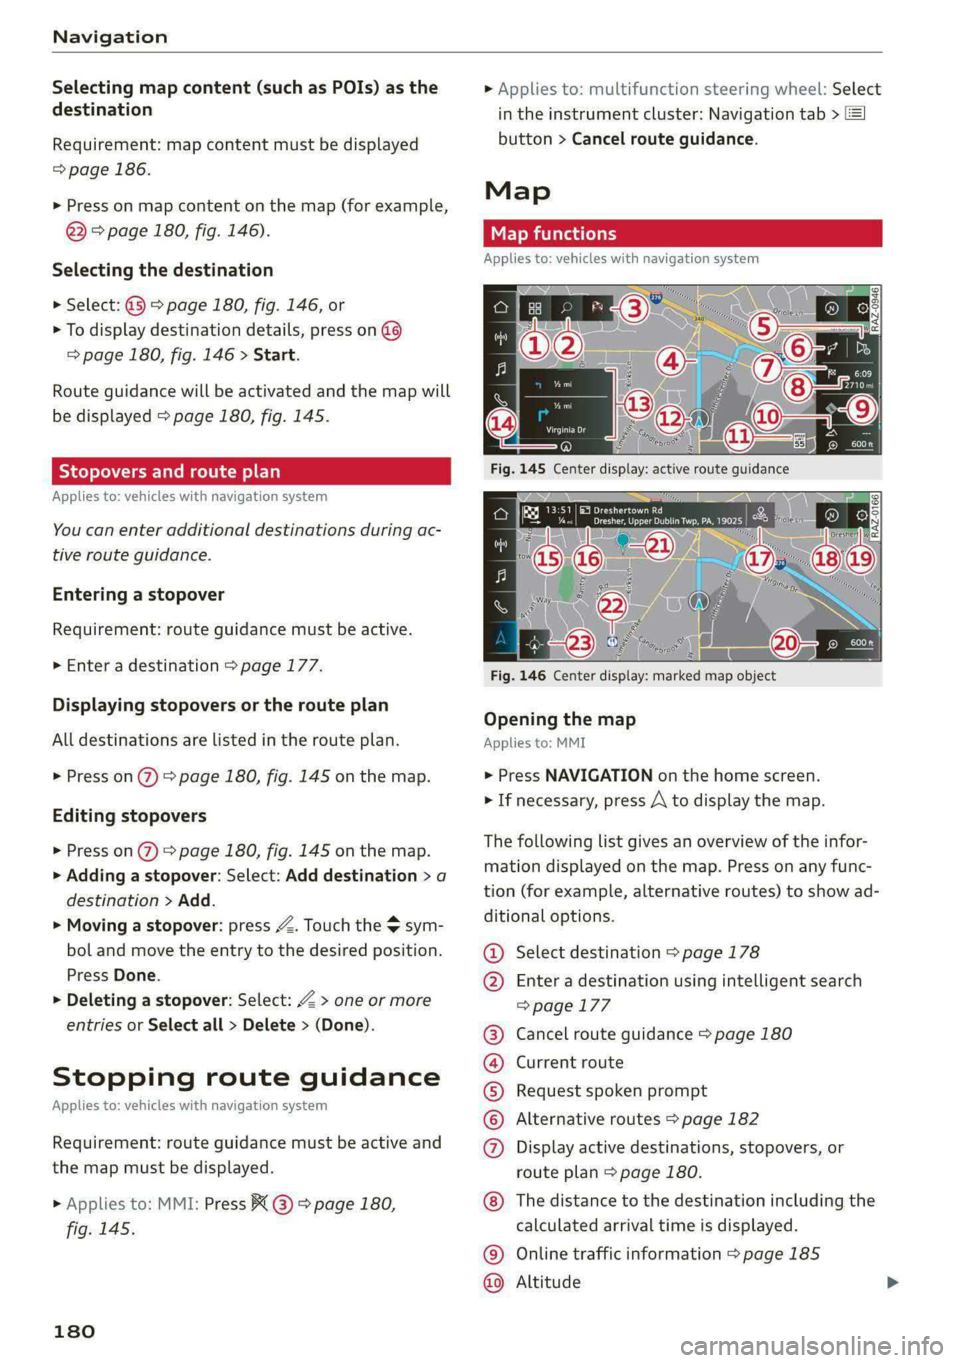
Fig. 146 Center display: marked map object
Opening the map
Applies to: MMI
> Press NAVIGATION on the home screen.
> If necessary, press A to display the map.
The following list gives an overview of the infor-
mation displayed on the map. Press on any func-
tion (for example, alternative routes) to show ad-
ditional options.
Select destination > page 178
Enter a destination using intelligent search
=> page 177
Cancel route guidance > page 180
Current route
Request spoken prompt
Alternative routes > page 182
Display active destinations, stopovers, or
route plan > page 180.
©@
COOH
OO
The distance to the destination including the
calculated arrival time is displayed.
Online traffic information > page 185
Altitude ©©
Page 183 of 296
8W1012721BB
Navigation
@
©®®
O8©
@
®
OO®8
® ®
®
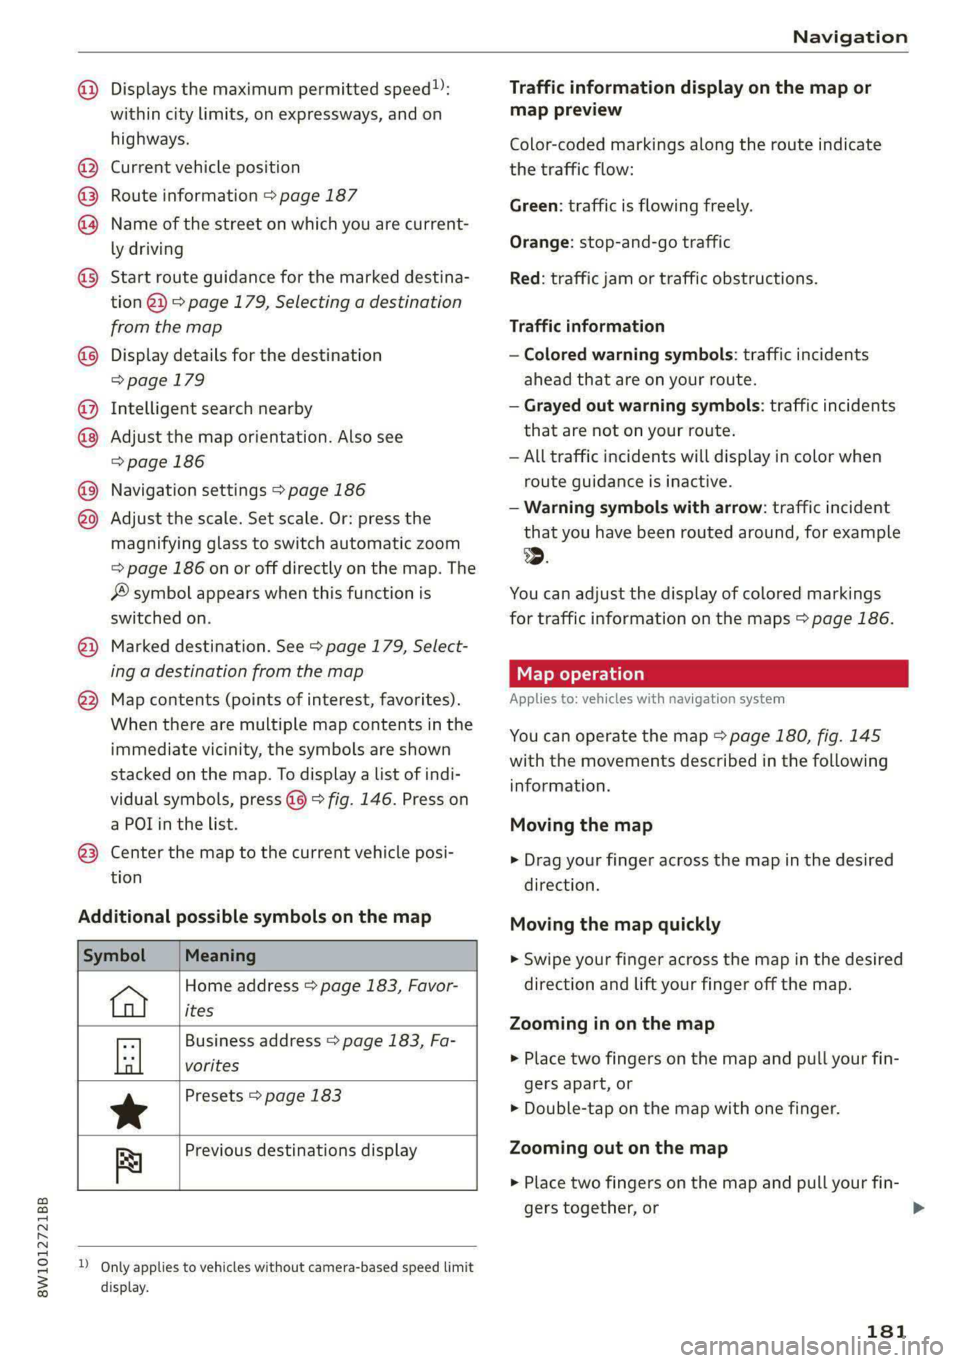
Displays the maximum permitted speed”:
within city limits, on expressways, and on
highways.
Current vehicle position
Route information > page 187
Name of the street on which you are current-
ly driving
Start
route guidance for the marked destina-
tion @3) > page 179, Selecting a destination
from the map
Display details for the destination
=> page 179
Intelligent search nearby
Adjust the map orientation. Also see
=> page 186
Navigation settings > page 186
Adjust the scale. Set scale. Or: press the
magnifying glass to switch automatic zoom
=> page 186 on or off directly on the map. The
® symbol appears when this function is
switched on.
Marked destination. See > page 179, Select-
ing a destination from the map
Map contents (points of interest, favorites).
When there are multiple map contents in the
immediate vicinity, the symbols are shown
stacked on the map. To display a list of indi-
vidual symbols, press @@) > fig. 146. Press on
a POT in the list.
Center the map to the current vehicle posi-
tion
Additional possible symbols on the map
Symbol Meaning
Home address > page 183, Favor-
ites
Business address > page 183, Fa-
tl vorites
Presets > page 183
*
Previous destinations display
Re
dD Only applies to vehicles without camera-based speed limit
display.
Traffic information display on the map or
map preview
Color-coded markings along the route indicate
the traffic flow:
Green: traffic is flowing freely.
Orange: stop-and-go traffic
Red: traffic jam or traffic obstructions.
Traffic information
— Colored warning symbols: traffic incidents
ahead that are on your route.
— Grayed out warning symbols: traffic incidents
that are not on your route.
— All traffic incidents will display in color when
route guidance is inactive.
— Warning symbols with arrow: traffic incident
that you have been routed around, for example
2.
You can adjust the display of colored markings
for traffic information on the maps > page 186.
Map operation
Applies to: vehicles with navigation system
You can operate the map > page 180, fig. 145
with the movements described in the following
information.
Moving the map
> Drag your finger across the map in the desired
direction.
Moving the map quickly
> Swipe your finger across the map in the desired
direction and lift your finger off the map.
Zooming in on the map
> Place two fingers on the map and pull your fin-
gers apart, or
> Double-tap on the map with one finger.
Zooming out on the map
> Place two fingers on the map and pull your fin-
gers together, or
181
>
Page 184 of 296
Navigation
> Double-tap on the map with two fingers.
Rotating the map
> Rotate the map using two fingers.
Tilting the map
> Drag upward or downward with two fingers.
G) Tips
Certain gestures may not be available on all
touch displays or in every menu.
Naviga w with
started
Applies to: vehicles with navigation system and Audi virtual
cockpit
e guidance
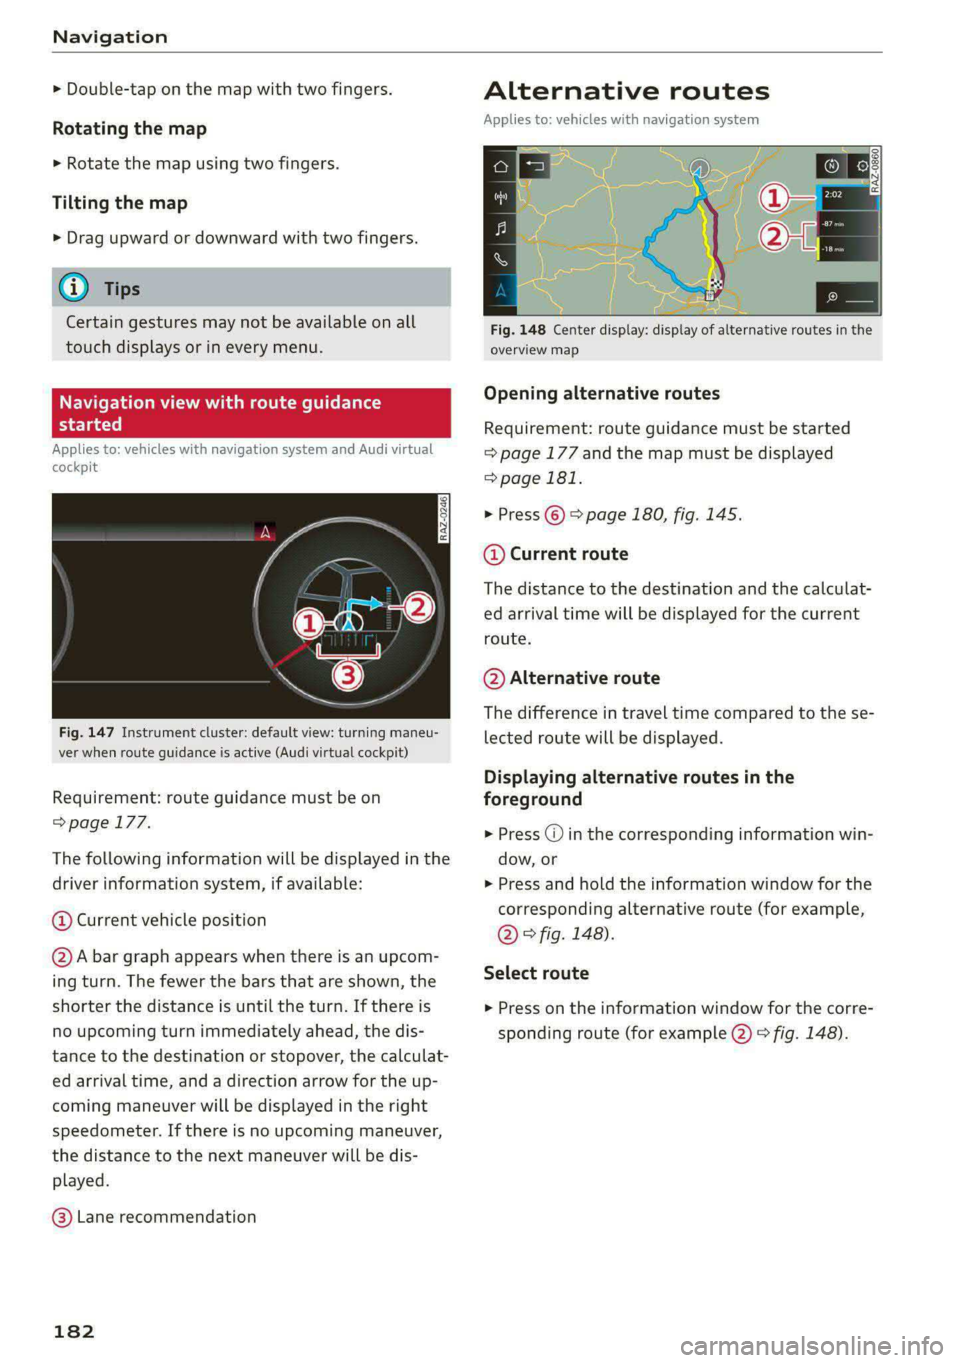
Fig. 147 Instrument cluster: default view: turning maneu-
ver when route guidance is active (Audi virtual cockpit)
Requirement: route guidance must be on
=> page 177.
The following information will be displayed in the
driver information system, if available:
@ Current vehicle position
@A bar graph appears when there is an upcom-
ing turn. The fewer the bars that are shown, the
shorter the distance is until the turn. If there is
no upcoming turn immediately ahead, the dis-
tance to the destination or stopover, the calculat-
ed arrival time, and a direction arrow for the up-
coming maneuver will be displayed in the right
speedometer. If there is no upcoming maneuver,
the distance to the next maneuver will be dis-
played.
@ Lane recommendation
182
Alternative routes
Applies to: vehicles with navigation system
al S| 3|
ne Ny | cc|
Fig. 148 Center display: display of alternative routes in the
overview map
Opening alternative routes
Requirement: route guidance must be started
= page 177 and the map must be displayed
=> page 181.
> Press ©) > page 180, fig. 145.
@ Current route
The distance to the destination and the calculat-
ed arrival time will be displayed for the current
route.
@ Alternative route
The difference in travel time compared to the se-
lected route will be displayed.
Displaying alternative routes in the
foreground
> Press @ in the corresponding information win-
dow, or
> Press and hold the information window for the
corresponding alternative route (for example,
@ © fig. 148).
Select route
> Press on the information window for the corre-
sponding route (for example @) > fig. 148).
Page 185 of 296
8W1012721BB
Navigation
Additional functions
Favorites
Applies to: vehicles with navigation system
You can access frequent destinations in the fa-
vorites. You can quickly and easily start route
guidance using the home address or business ad-
dress function.
Accessing favorites
> Applies to: MMI: Select on the home screen:
NAVIGATION > (&&) > Favorites.
If you use myAudi navigation, your favorites will
be synchronized with your myAudi account
=>page 176.
Storing favorites
> Press v¥ in the Details menu > page 179,
fig. 144.
Storing a home address or business address
> Press Home address or Business address.
When accessed for the first time, you will be
prompted to set the address.
> Select: Create now > enter a destination > OK.
Editing a favorite
Requirement: the favorites list must be dis-
played.
> Setting a favorite as a destination: press ona
favorite.
> Deleting favorites: in the Details menu, press
¥& > page 179, fig. 144, or select: Z > one or
more entries or Select all > Delete > (Done).
> Moving a favorite: press Z. Touch the $ sym-
bol and move the entry to the desired position.
Press Done.
Gi) Tips
— After deleting the home address or business
address, only the address is deleted and the
entry will still be displayed in the favorites.
) Audi provides access to services from third party provid-
ers. Permanent availability cannot be guaranteed, because
that depends on the third party provider.
— Please note when moving favorites that
items 1 and 2 are reserved for the home ad-
dress and business address.
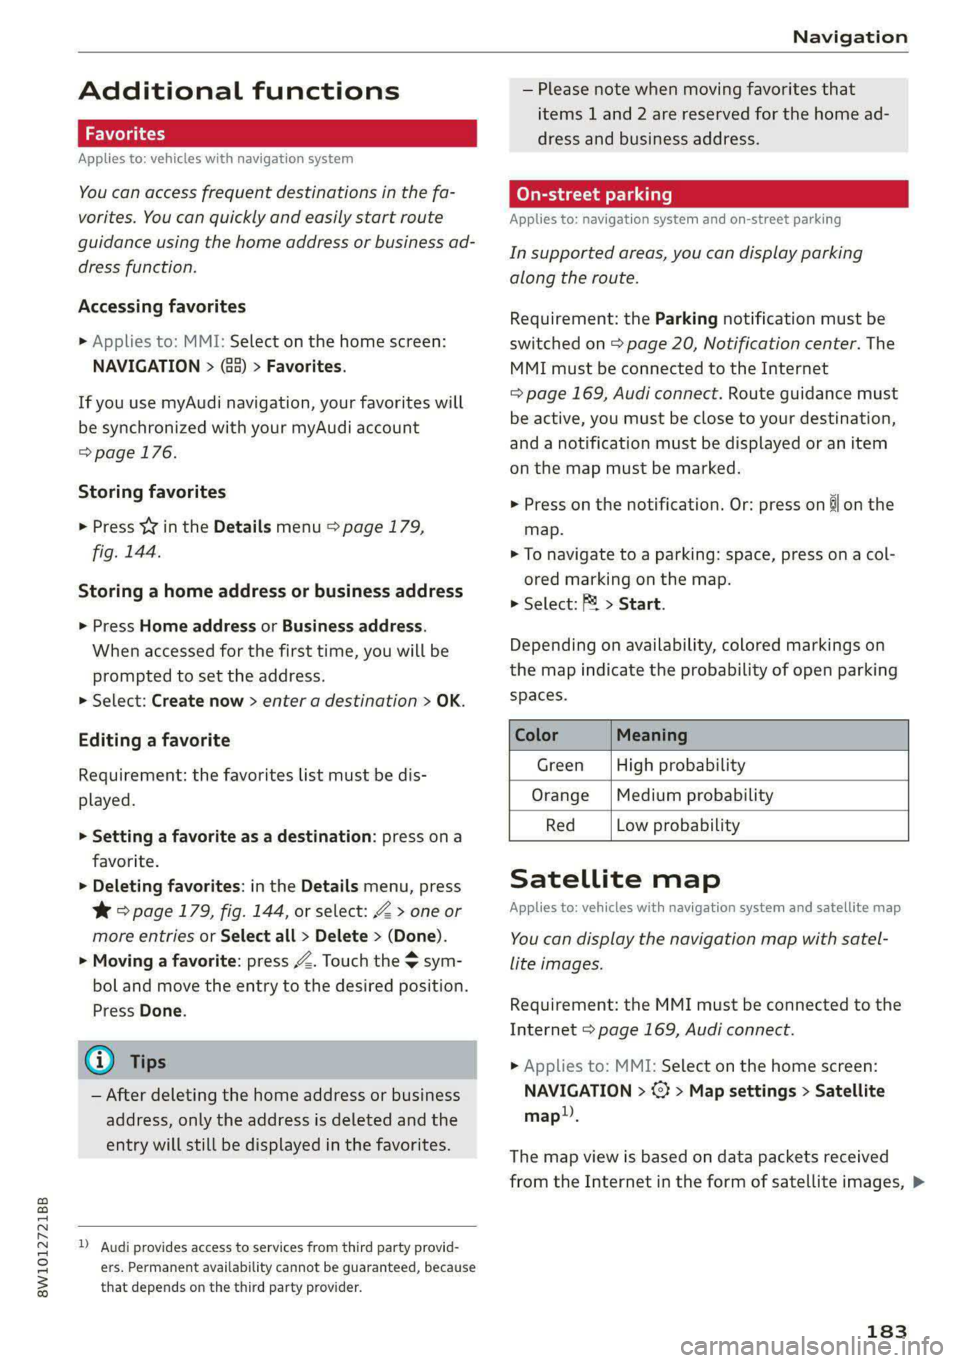
(eye de-\- a rll]
Applies to: navigation system and on-street parking
In supported areas, you can display parking
along the route.
Requirement: the Parking notification must be
switched on > page 20, Notification center. The
MMI must be connected to the Internet
=> page 169, Audi connect. Route guidance must
be active, you must be close to your destination,
and a notification must be displayed or an item
on the map must be marked.
> Press on the notification. Or: press on &l on the
map.
> To navigate to a parking: space, press ona col-
ored marking on the map.
> Select: F4 > Start.
Depending on availability, colored markings on
the map indicate the probability of open parking
spaces.
Color Meaning
Green | High probability
Orange |Medium probability
Red Low probability
Satellite map
Applies to: vehicles with navigation system and satellite map
You can display the navigation map with satel-
lite images.
Requirement: the MMI must be connected to the
Internet > page 169, Audi connect.
> Applies to: MMI: Select on the home screen:
NAVIGATION > <} > Map settings > Satellite
map.
The map view is based on data packets received
from the Internet in the form of satellite images, >
183
Page 186 of 296
Navigation
which are then combined with the roadways from
the > page 180, fig. 145 standard map view.
@) Tips
—The satellite map”) is updated regularly
whenever the function is opened. The proc-
ess may take several seconds.
— When the satellite map display is switched
on ) with the 3D position map type, the dis-
play automatically switches to the 2D map
type when driving through tunnels.
— Depending on the Internet connection, the
standard map may also be displayed when
the satellite map is switched on )).
Map update
Introduction
Applies to: vehicles with navigation system
You can update the map data in the MMI with a
map update. The functions depend on the coun-
try and vehicle equipment.
— Map updates through online map update
=> page 184.
— Import a map update from the USB connection
to your MMI > page 184.
— Map update at an authorized Audi dealer or au-
thorized Audi Service Facility. This can result in
additional costs.
Online map update
Applies to: vehicles with MMI, navigation system, and Audi
connect Infotainment
Using map update online, you can update the
map material in your navigation system directly
from your vehicle.
The MMI determines regions based on the vehicle
position. Based on this, update data for these re-
gions are available for your MMI.
)) Audi provides access to services from third party provid-
ers. Permanent availability cannot be guaranteed, because
that depends on the third party provider.
184
Start map update
Applies to: MMI
Requirement: the MMI must be connected to the
Internet > page 169, Audi connect.
> A notification for a map update will appear in
the center display.
> If the option Automatic online map update
= page 185 is switched on, the MMI will start
the
map update, or
> Press on the notification, or
> Open the notification in the notification center
on > page 20 and press on the notification.
> If the Automatic online map update option
= page 185 is switched off, press on Always al-
low.
The MMI will start the map update. You can
check the status of the download process and the
installation in the notification center > page 20.
When the update has ended, a notification will
be displayed.
@) Tips
Because of the high volume of data, Audi rec-
ommends performing the map update using
the USB connection > page 184.
Map update using the USB connection
Applies to: vehicles with MMI, navigation system, and Audi
connect Infotainment
With the map update, you can update the map
material in your navigation system.
Requirement: you must have created a myAudi
account at my.audi.com. Your vehicle must be
registered in your myAudi account.
Prepare map update
> Download the map update at my.audi.com and
store it on a USB flash drive. For additional in-
formation, visit my.audi.com.
Page 187 of 296
8W1012721BB
Navigation
Start map update
> Connect the USB flash drive to the Audi music
interface > page 196. A notification for a map
update will appear in the center display.
> Press on the notification, or
> Open the notification in the notification center
on > page 20 and press on the notification. The
update package is shown.
> Press Next. The status of the installation is
shown in the center display.
> When the update has ended, a notification will
be displayed.
Map updates settings
Applies
to: vehicles with a navigation system and Audi con-
nect Infotainment
> Applies to: MMI: Select on the home screen:
SETTINGS > System maintenance.
Automatic online map update: when the func-
tion is switched on, map updates will be auto-
matically downloaded and installed.
@) Note
Read the information about Audi connect, and
be sure to note the connectivity costs section
=@ in General information on page 169.
Traffic information
Introduction
Applies to: vehicles with navigation system and online traffic
information
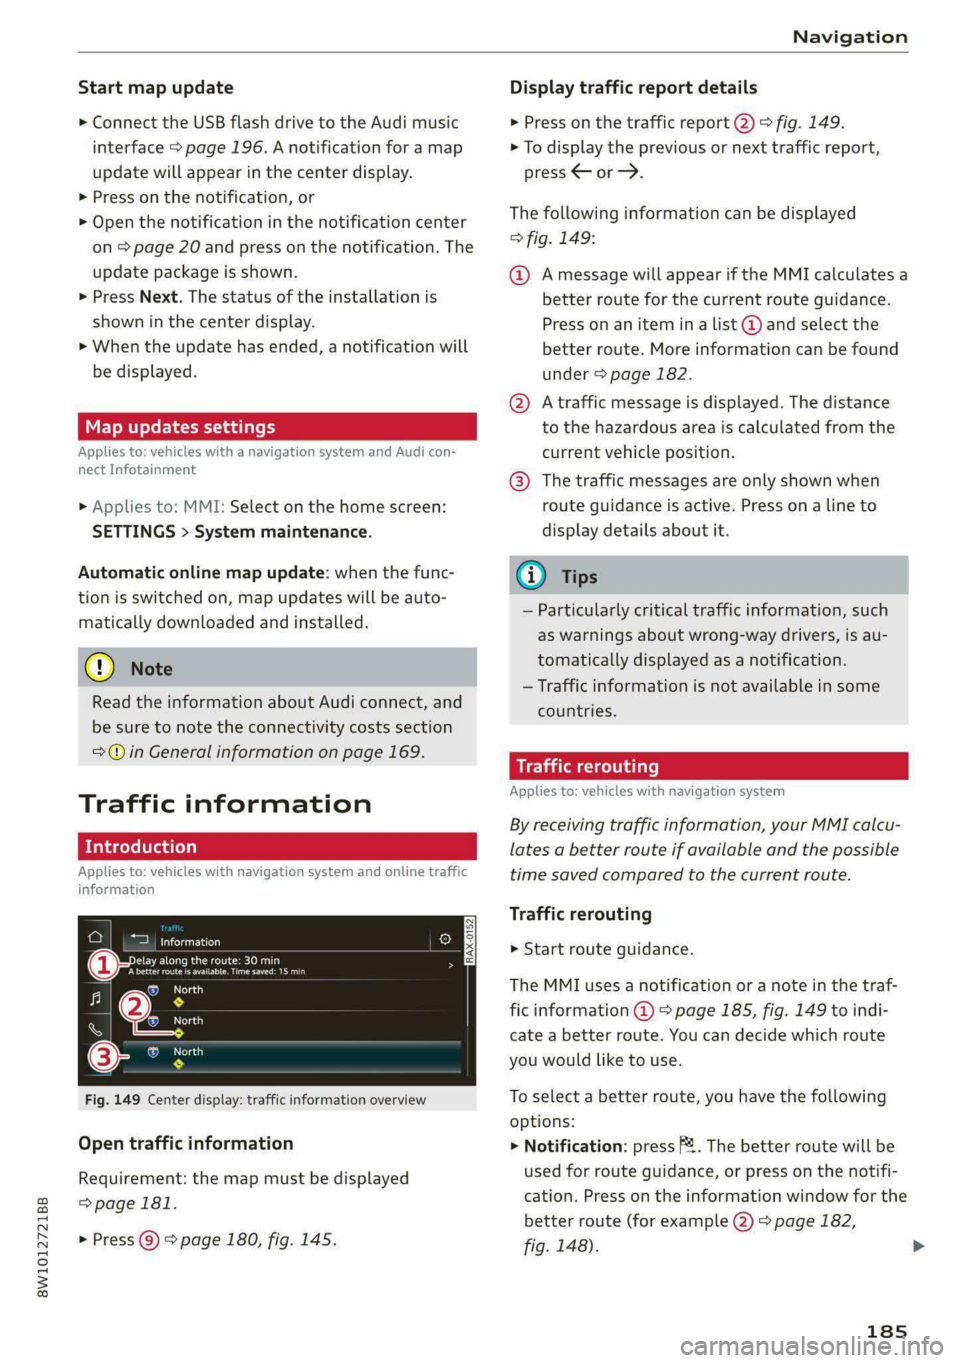
| a eurcu)
Beeirhicincae naa
(Cee ee One aera o
io
RAX-0152
iN TeTaaa)
@,
© North
Fig. 149 Center display: traffic information overview
Open traffic information
Requirement: the map must be displayed
=>page 181.
> Press @) > page 180, fig. 145.
Display traffic report details
> Press on the traffic report @) > fig. 149.
> To display the previous or next traffic report,
press < or.
The following information can be displayed
> fig. 149:
@ Amessage will appear if the MMI calculates a
better route for the current route guidance.
Press on an item ina list @ and select the
better route. More information can be found
under > page 182.
@ Atraffic message is displayed. The distance
to the hazardous area is calculated from the
current vehicle position.
@® The traffic messages are only shown when
route guidance is active. Press ona line to
display details about it.
@) Tips
— Particularly critical traffic information, such
as warnings about wrong-way drivers, is au-
tomatically displayed as a notification.
— Traffic information is not available in some
countries.
Traffic rerouting
Applies to: vehicles with navigation system
By receiving traffic information, your MMI calcu-
lates a better route if available and the possible
time saved compared to the current route.
Traffic rerouting
> Start route guidance.
The MMI uses a notification or a note in the traf-
fic information @ = page 185, fig. 149 to indi-
cate a better route. You can decide which route
you would like to use.
To select a better route, you have the following
options:
> Notification: press F2. The better route will be
used for route guidance, or press on the notifi-
cation. Press on the information window for the
better route (for example (2) > page 182,
fig. 148).
185
Page 188 of 296
Navigation
> Note in the traffic information: press on the
list entry @ & page 185, fig. 149. Press on the
information window for the better route (for
example (2) > page 182, fig. 148).
Online traffic information
Applies to: vehicles with navigation system and online traffic
information
The MMI can receive real-time online traffic in-
formation about congestion, accidents, road
construction, and other incidents.
Requirement: the MMI must be connected to the
Internet > page 169, Audi connect. Traffic infor-
mation must be switched on in the MMI
=> page 186.
Traffic information will be displayed on the
standard map > page 180, fig. 145.
Online traffic information is also displayed on the
standard map > page 183.
G) Tips
— Having the online traffic information func-
tion switched on provides the most accurate
reports of traffic situations and traffic fore-
casting. Your vehicle transmits and process-
es its anonymous, encrypted position infor-
mation at regular intervals to the traffic da-
ta provider. You can switch off data transfer
at any time > page 270.
— The online traffic information network is
not available in all countries, and the cover-
age is not nationwide.
Settings
Applies to: vehicles with navigation system
You can adjust the navigation system settings in
the instrument cluster and in the MMI display
separately. The settings depend on the country
and vehicle equipment.
Accessing settings
» Applies to: MMI: Select on the home screen:
NAVIGATION > ©}.
186
Accessing settings using the multifunction
steering wheel
> Applies to: multifunction steering wheel: Select
in the instrument cluster: Navigation tab >
button.
Please note that a setting applied to the multi-
function steering wheel is only valid for the in-
strument cluster map.
Map settings
Satellite map: see > page 183.
Traffic: you can display current traffic informa-
tion on the map. See > page 181, Traffic infor-
mation display on the map or map preview
— Free flow of traffic
— Traffic obstructions
— Traffic information
Map colors
— Automatic: the map display adapts to the light-
ing conditions (for example, by changing from
day to night when driving through a tunnel).
— Day or Night
Map orientation
— 2D map or 2D north up: the current vehicle po-
sition is displayed. The map is oriented in the
direction of travel or to the north.
— 3D map: the current vehicle position is shown
on a three-dimensional map and is oriented in
the direction of travel.
— Overview: the entire route from the vehicle po-
sition to the destination or the next stopover is
displayed on the map. The map is oriented to
the north.
Automatic zoom
— On: the map scale is adapted automatically de-
pending on the type of road being traveled (ex-
pressway, highway, other roads) so that you al-
ways have an optimal overview of the road
ahead. When route guidance is active, the scale
is adjusted automatically for a better detailed
view when there are upcoming maneuvers.
— Intersection: when route guidance is active, the
scale is adjusted automatically for a better de-
tailed view when there are upcoming maneu-
vers.
Page 189 of 296
8W1012721BB
Navigation
— Off
MMI map contents/Map content: you can switch
the display of additional information (such as
POIs) on the map in the center display on or off.
Voice guidance
Voice guidance: you can adjust the navigation
prompts. With the Traffic setting, the MMI will
only give prompts if there are traffic incidents on
your route.
Voice guidance during phone call
Entertainment fader during navigation: the au-
dio playback volume is temporarily lowered when
navigation prompts are active.
Route criteria
You can adjust which route criteria should be al-
lowed or avoided for the route calculation.
HOV/carpool lanes
Highways
Toll roads
Ferries
Route information
When this function is switched on and route
guidance is active, route information ®
=> page 180, fig. 145 is displayed. The next ma-
neuver will be displayed at the bottom. POIs and
traffic information will also be displayed. Press
route information to display a preview of the next
maneuver on the map. You can switch the follow-
ing information on or off in route information.
— POIs along the route
— Traffic information
Presentation mode
In presentation mode, the system simulates driv-
ing on the center display along the planned route
without the vehicle actually moving. You can use
Specify starting point when you would like to
calculate a route starting from a location other
than the current vehicle position, for example.
Simulating route guidance: start route guidance
and press Presentation mode.
@) Tips
You can adjust the volume of navigation
prompts during voice guidance using the
On/Off knob > page 18.
187
Page 190 of 296
Radio
Radio
General information
Selecting the radio
ee
ya) oes 2) Ww fa
OPE Pa) y 4
3s CRD Paso se NG fa
‘M
fee
RAZ-0922
e®
106.7 ae Ww FM
eta
0 RADIO 5)
Se ue
fee
RAZ-0923
Pao
S$
Fig. 151 Center display: SiriusXM station list
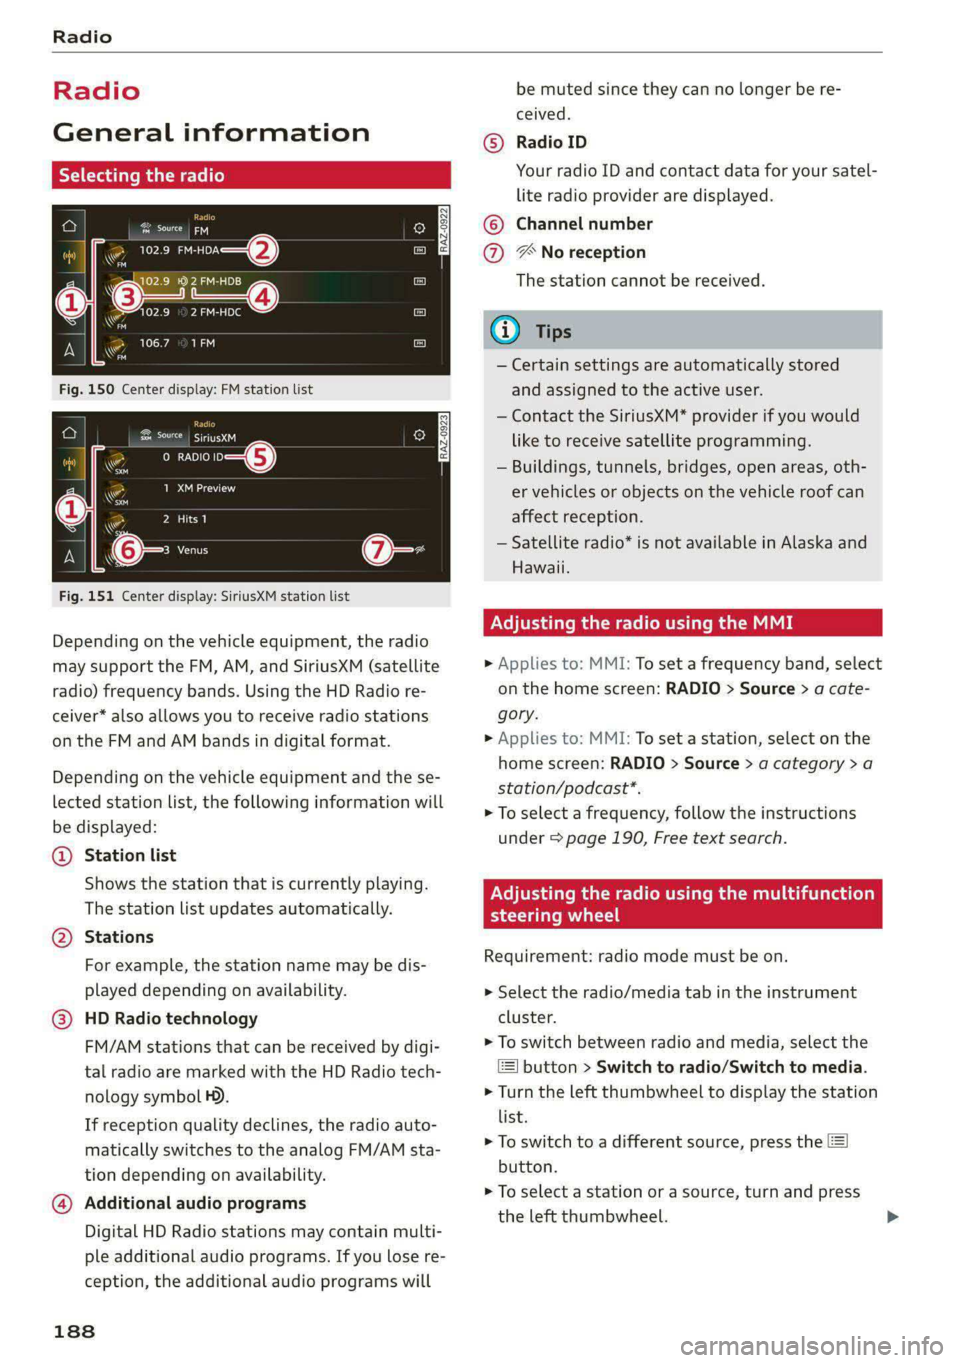
Depending on the vehicle equipment, the radio
may support the FM, AM, and SiriusXM (satellite
radio) frequency bands. Using the HD Radio re-
ceiver* also allows you to receive radio stations
on the FM and AM bands in digital format.
Depending on the vehicle equipment and the se-
lected station list, the following information will
be displayed:
@ Station list
Shows the station that is currently playing.
The station list updates automatically.
@ Stations
For example, the station name may be dis-
played depending on availability.
@ HD Radio technology
FM/AM stations that can be received by digi-
tal radio are marked with the HD Radio tech-
nology symbol H).
If reception quality declines, the radio auto-
matically switches to the analog FM/AM sta-
tion depending on availability.
@ Additional audio programs
Digital HD Radio stations may contain multi-
ple additional audio programs. If you lose re-
ception, the additional audio programs will
188
be muted since they can no longer be re-
ceived.
Radio ID
Your radio ID and contact data for your satel-
lite radio provider are displayed.
©
Channel number
® No reception
The station cannot be received.
G) Tips
— Certain settings are automatically stored
and assigned to the active user.
— Contact the SiriusXM* provider if you would
like to receive satellite programming.
— Buildings, tunnels, bridges, open areas, oth-
er vehicles or objects on the vehicle roof can
affect reception.
— Satellite radio* is not available in Alaska and
Hawaii.
Node mame Mle mam
> Applies to: MMI: To set a frequency band, select
on the home screen: RADIO > Source > a cate-
gory.
> Applies to: MMI: To set a station, select on the
home screen: RADIO > Source > a category > a
station/podcast*.
> To select a frequency, follow the instructions
under > page 190, Free text search.
PN ema mem em eaCmual ie iiad (olay
steering wheel
Requirement: radio mode must be on.
> Select the radio/media tab in the instrument
cluster.
> To switch between radio and media, select the
button > Switch to radio/Switch to media.
> Turn the left thumbwheel to display the station
list.
> To switch to a different source, press the
button.
> To select a station or a source, turn and press
the left thumbwheel.