S mode AUDI S4 2020 User Guide
[x] Cancel search | Manufacturer: AUDI, Model Year: 2020, Model line: S4, Model: AUDI S4 2020Pages: 296, PDF Size: 80.45 MB
Page 78 of 296
Sitting correctly and safely
ZA WARNING
— A safety belt that is not locked by the belt
retractor lock or a locking device cannot se-
cure a child safety seat while driving or in
the event of an accident, which increases the
risk of fatal injury. Always make sure the
belt retractor lock on the safety belt is acti-
vated if the child safety seat manufacturer
instructions require it.
— Due to the risk of fatal injury, never place a
rear-facing child safety seat on the front
passenger's seat when the front passenger's
airbag is switched on.
— For the child safety seat to offer the maxi-
mum protection, it is especially important
to route the vehicle safety belt correctly. Al-
ways follow the instructions from the child
safety seat manufacturer for routing the
safety belt correctly. Incorrectly fastened
safety belts can cause injuries, even during
minor accidents.
RAZ-0093
Additionally securing a child safety seat to
the top tethe
RAZ-0325)
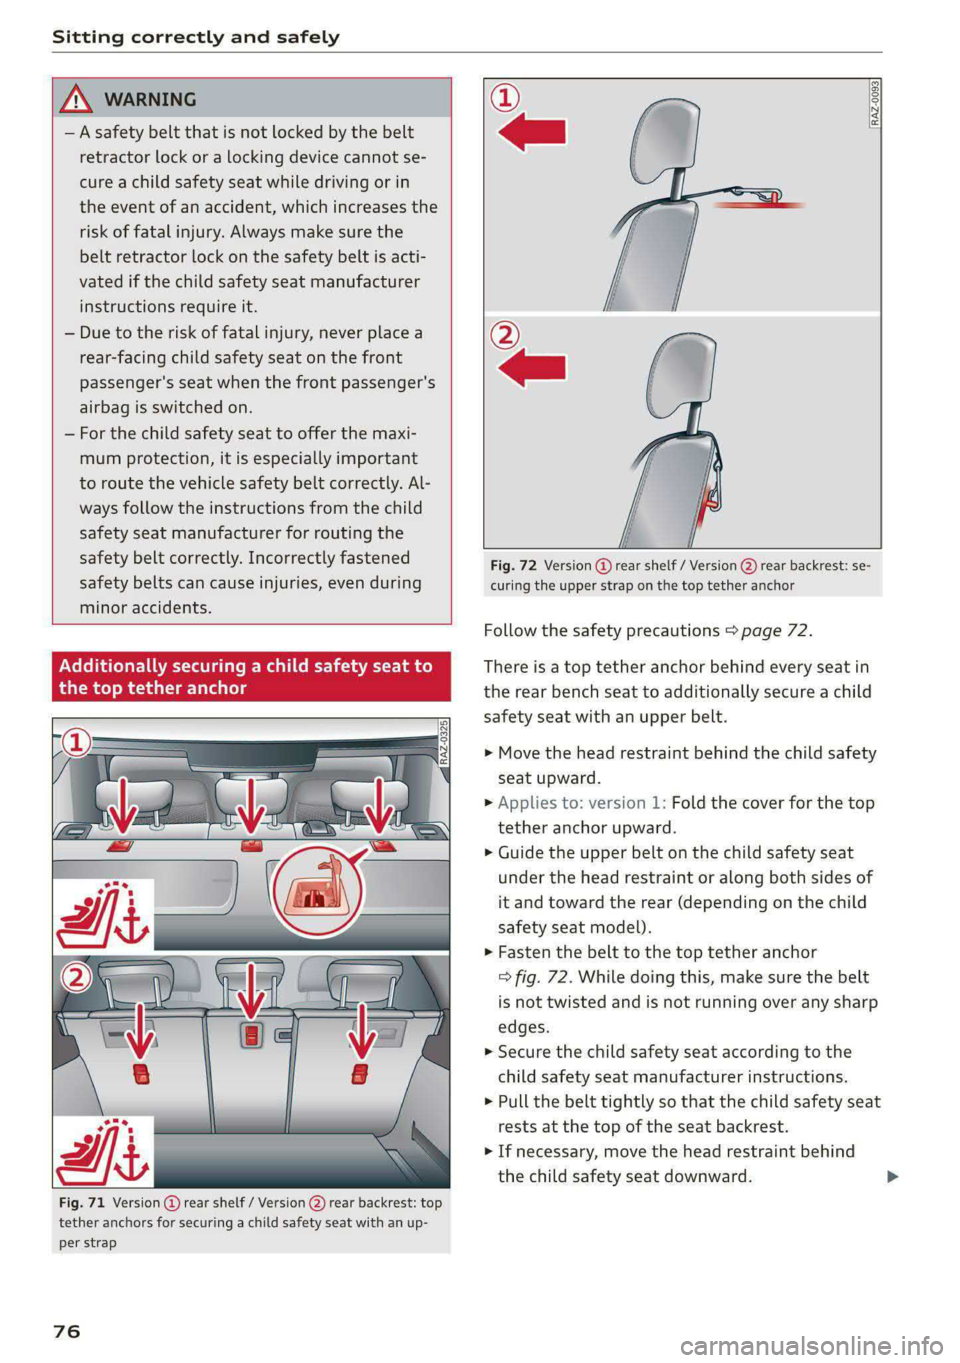
Fig. 71 Version (@) rear shelf / Version @) rear backrest: top
tether anchors for securing a child safety seat with an up-
per strap
76
Fig. 72 Version @ rear shelf / Version @ rear backrest: se-
curing the upper strap on the top tether anchor
Follow the safety precautions > page 72.
There is a top tether anchor behind every seat in
the rear bench seat to additionally secure a child
safety seat with an upper belt.
> Move the head restraint behind the child safety
seat upward.
> Applies to: version 1: Fold the cover for the top
tether anchor upward.
> Guide the upper belt on the child safety seat
under the head restraint or along both sides of
it and toward the rear (depending on the child
safety seat model).
> Fasten the belt to the top tether anchor
=> fig. 72. While doing this, make sure the belt
is not twisted and is not running over any sharp
edges.
> Secure the child safety seat according to the
child safety seat manufacturer instructions.
> Pull the belt tightly so that the child safety seat
rests at the top of the seat backrest.
» If necessary, move the head restraint behind
the child safety seat downward.
Page 89 of 296

8W1012721BB
Warm and cold
Warm and cold
Climate control system
Your vehicle has a deluxe automatic climate con-
trol system with 3 zones where the temperature,
air distribution, and air supply can be set sepa-
rately on the left front side, the right front side,
and in the rear.
The climate control system warms, cools and re-
moves humidity from the air in the vehicle interi-
or. It is the most effective when the windows and
panoramic glass roof* are closed. If there is a
build-up of heat inside the vehicle, ventilation
can help to speed up the cooling process.
In all heating mode functions, except for defrost,
the blower only switches to a higher speed once
the refrigerant has reached a sufficient tempera-
ture.
Pollutant filter
The pollutant filter removes pollutants such as
dust and pollen from the air.
(@) For the sake of the environment
Energy can be saved by switching off the A/C
mode.
@) Tips
—To prevent interference with the heating
and cooling output and to prevent the win-
dows from fogging over, the air intake in
front of the windshield must be free of ice,
snow, and leaves.
— Condensation from the cooling system can
drip and form a puddle of water under the
vehicle. This is normal and does not mean
there is a leak.
— The energy management system may tem-
porarily switch off certain functions, such as
the seat heating* or rear window defogger.
These systems are available again as soon as
the energy supply has been restored.
—The climate control settings are automati-
cally stored and assigned to the vehicle key
that is in use.
87
Page 90 of 296
Warm and cold
3-zone deluxe automatic climate control
Applies to: vehicles with 3-zone deluxe automatic climate control system
B8W-0137
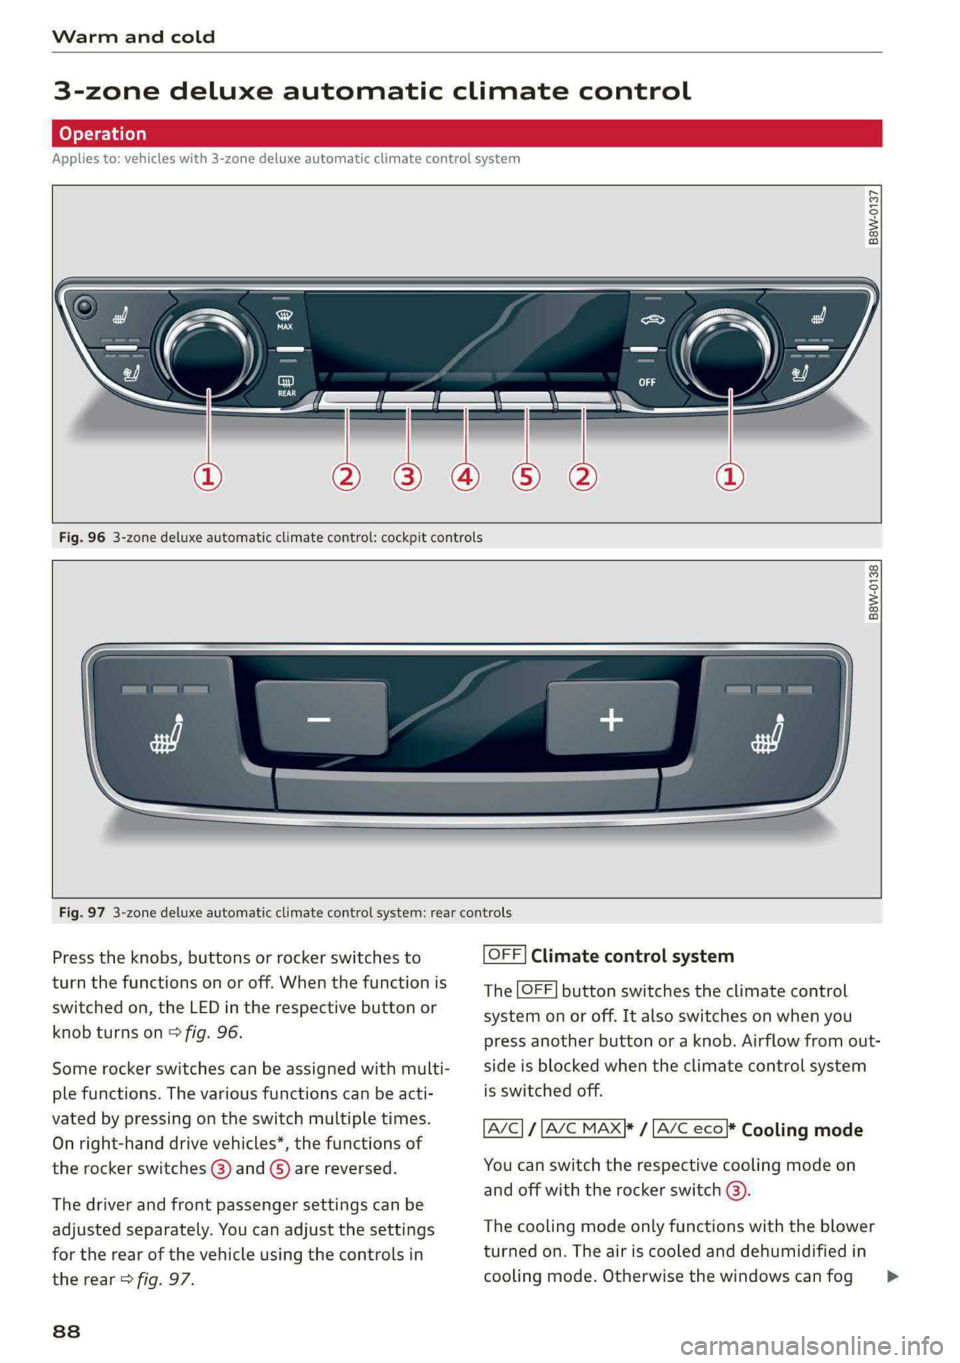
Fig. 96 3-zone deluxe automatic climate control: cockpit controls
B8W-0138
Fig. 97 3-zone deluxe automatic climate control system: rear controls
Press the knobs, buttons or rocker switches to
turn the functions on or off. When the function is
switched on, the LED in the respective button or
knob turns on > fig. 96.
Some rocker switches can be assigned with multi-
ple functions. The various functions can be acti-
vated by pressing on the switch multiple times.
On right-hand drive vehicles*, the functions of
the rocker switches @) and ©) are reversed.
The driver and front passenger settings can be
adjusted separately. You can adjust the settings
for the rear of the vehicle using the controls in
the rear > fig. 97.
838
OFF] Climate control system
The OFF] button switches the climate control
system on or off. It also switches on when you
press another button or a knob. Airflow from out-
side is blocked when the climate control system
is switched off.
A/C} / [A/C MAX|* / [A/C eco}* Cooling mode
You can switch the respective cooling mode on
and off with the rocker switch @).
The cooling mode only functions with the blower
turned on. The air is cooled and dehumidified in
cooling mode. Otherwise the windows can fog >
Page 91 of 296
![AUDI S4 2020 User Guide 8W1012721BB
Warm and cold
up. The cooling mode switches off automatically
at low outside temperatures.
If you activate [A/C ON], the cooling mode will be
automatically regulated. |A/C OFF AUDI S4 2020 User Guide 8W1012721BB
Warm and cold
up. The cooling mode switches off automatically
at low outside temperatures.
If you activate [A/C ON], the cooling mode will be
automatically regulated. |A/C OFF](/img/6/57558/w960_57558-90.png)
8W1012721BB
Warm and cold
up. The cooling mode switches off automatically
at low outside temperatures.
If you activate [A/C ON], the cooling mode will be
automatically regulated. |A/C OFF] switches cool-
ing mode off.
If you activate [A/C MAX}*, the cooling mode will
operate with maximum output. To reduce unnec-
essary energy usage, only use this function brief-
ly.
If you activate [A/C eco}*, the climate control sys-
tem will operate in energy-saving mode.
<= Recirculation mode
In recirculation mode, the air inside the vehicle is
circulated and filtered. This prevents the unfil-
tered air outside the vehicle from entering the
vehicle interior > A\.
Pressing the <> button switches recirculation
mode on or off manually. You can also switch the
recirculation mode off by pressing the knob @ or
the ® button.
AUTO} Automatic mode
Automatic mode maintains a constant tempera-
ture inside the vehicle. Air temperature, airflow
and air distribution are controlled automatically.
You can switch automatic mode on or off by
pressing the knob ().
Temperature
You can adjust the temperature between 60°F
(+16°C) and 84°F (+28°C) by turning the knob
©. If outside of this range, LO or HI will appear
in the climate control system display. In both set-
tings, the climate control runs constantly at the
maximum cooling or heating level. The tempera-
ture is not regulated.
The temperature can be adjusted in the rear us-
ing
the rear controls > fig. 97.
= Blower
You can adjust the volume of air generated by the
blower to your preference using the rocker switch
@. The blower should always run at a low setting
to prevent the windows from fogging and to en-
sure a continuous exchange of air inside the vehi-
cle. To have the blower regulated automatically,
press one of the knobs (4).
Air distribution
You can use the rocker switches (2) to adjust the
vents where the air will flow out of. Press the
rocker switches (2) repeatedly until the desired
air distribution setting is displayed in the climate
control system controls. To have the air distribu-
tion regulated automatically, press one of the
knobs (a).
SYNC] Synchronization
Use the rocker switch ©) to select the function.
When synchronization is switched on, the set-
tings for the driver's side are applied to the front
passenger's side and the rear (except for seat
heating/ventilation*). When the settings on the
front passenger's side or in the rear are changed,
the synchronization is automatically switched off
and 3-ZONE appears in the display.
SET REAR] Function
Use the rocker switch () to select the function.
When the function is switched on, you can adjust
all settings for the rear using the climate control
system controls in the cockpit. The rear climate
control system controls cannot be operated at
the same time. This function switches off auto-
matically after a certain period of time or after
leaving the menu.
#/ Seat heating*
The seat heating temperature can be set at mul-
tiple levels. Press the w button once to switch on
the highest level. Press the a button again to de-
crease the temperature one level at a time. The
seat heating is off when all of the LEDs are off.
#5 Seat ventilation*
The seat ventilation intensity can be set to multi-
ple levels. Press the £J button once to switch on
the highest level. Press the #J button again to
decrease the intensity one level at a time. The
seat ventilation is off when all of the LEDs are off.
& Defrosting
The windshield and side windows are defrosted
or cleared of condensation as quickly as possible. >
89
Page 92 of 296

Warm and cold
The maximum amount of air flows mainly from
the vents below the windshield. Recirculation
mode switches off. The temperature should be
set at +72°F (+22°C) or higher. The temperature
is controlled automatically.
You can switch the defroster on or off using the
& button. You can switch the function off by
pressing a knob (4).
@ Rear window defogger
The rear window defogger only operates when
the engine is running. It switches off automati-
cally after 10 to 20 minutes, depending on the
outside temperature.
To prevent the rear window defogger from
switching off automatically, press and hold @ for
more than three seconds. This is stored until the
ignition is switched off.
Vents
You can open or close the center and rear vents in
the cockpit and the vents in the rear center con-
sole using the ridged thumbwheels. The levers
adjust the direction of the airflow from the vents.
Residual heat
You can activate the residual heat function when
the ignition is switched off by pressing the knob
@ (left side). The residual heat from the coolant
is used to heat the vehicle interior. The residual
heat function switches off automatically after
about 15 minutes.
ZA WARNING
— You should not use the recirculation mode
for an extended period of time, because no
fresh air is drawn in and the windows can
fog when cooling mode is switched off. This
increases the risk of an accident.
— Individuals with reduced sensitivity to pain
or temperature could develop burns when
using the seat heating* function. To reduce
the risk of injury, these individuals should
not use seat heating”.
90
C@) Note
To reduce the risk of damage to the seat heat-
ing* elements, do not kneel on the seats or
place heavy pressure on one area of the seat.
Additional settings
Applies to: vehicles with 3-zone deluxe automatic climate
control system
You can adjust additional settings.
> Applies to: MMI: Select on the home screen:
VEHICLE > Climate control.
Auto recirculation
When switched on, automatic recirculation con-
trols the recirculation mode automatically. You
must press the §& button if fog forms on the win-
dows.
Steering wheel heating
Siem eRe
Applies to: vehicles with steering wheel heating
> Press the @ button on the multifunction steer-
ing wheel to switch the steering wheel heating
on and off.
G) Tips
The steering wheel heating settings are stor-
ed automatically and assigned to the vehicle
key that is in use.
Applies to: vehicles with steering wheel heating
@ Steering wheel heating: on/Steering wheel
heating: off
This message appears if you switched the steer-
ing wheel heating on or off by pressing the but-
ton on the multifunction steering wheel.
Steering wheel heating: malfunction! See own-
er's manual
If this message appears, there is a malfunction.
Drive immediately to an authorized Audi dealer
or authorized Audi Service Facility to have the
malfunction repaired.
Page 96 of 296
Driving
— If you leave the vehicle, switch the ignition
off and take the key with you. This is espe-
cially important when leaving persons or an-
imals in the vehicle. Otherwise, the vehicle
could start unintentionally, the parking
brake could release, or electronic equipment
could activate, which increases the risk of an
accident.
— No persons or animals should be left in a
locked vehicle. Locked doors make it more
difficult for emergency workers to enter the
vehicle, which puts lives at risk.
— If you do not begin driving immediately af-
ter releasing the brake pedal, your vehicle
may begin to roll backward. Press the brake
pedal or set the parking brake immediately.
@) Note
If you have to stop on an incline, always press
the brake pedal to hold the vehicle in place to
reduce the risk of the vehicle rolling back-
ward. Do not try to hold the vehicle in place
by pressing and holding the accelerator pedal.
The transmission can overheat, which increas-
es the risk of damage.
Hill hold assist
If you take your foot off of the brake pedal when
driving on hills, the braking force will be held for
several seconds. At that time, you can start driv-
ing without the vehicle rolling backward.
Requirement: the driver's door must be closed,
the engine must be on, and the vehicle must be
traveling uphill.
> To activate hill hold assist, press and hold the
brake pedal for several seconds while the vehi-
cle is stationary.
ZA\ WARNING
— If you do not begin driving immediately af-
ter releasing the brake pedal, your vehicle
may begin to roll backward. Press the brake
pedal or set the parking brake immediately.
— The hill hold assist cannot hold the vehicle
on inclines in every scenario (for example,
on slippery or icy ground).
94
Gears and driving programs
@Q—
2)—*
RAZ-0410]|
i
R
t
N
tt.
D/S
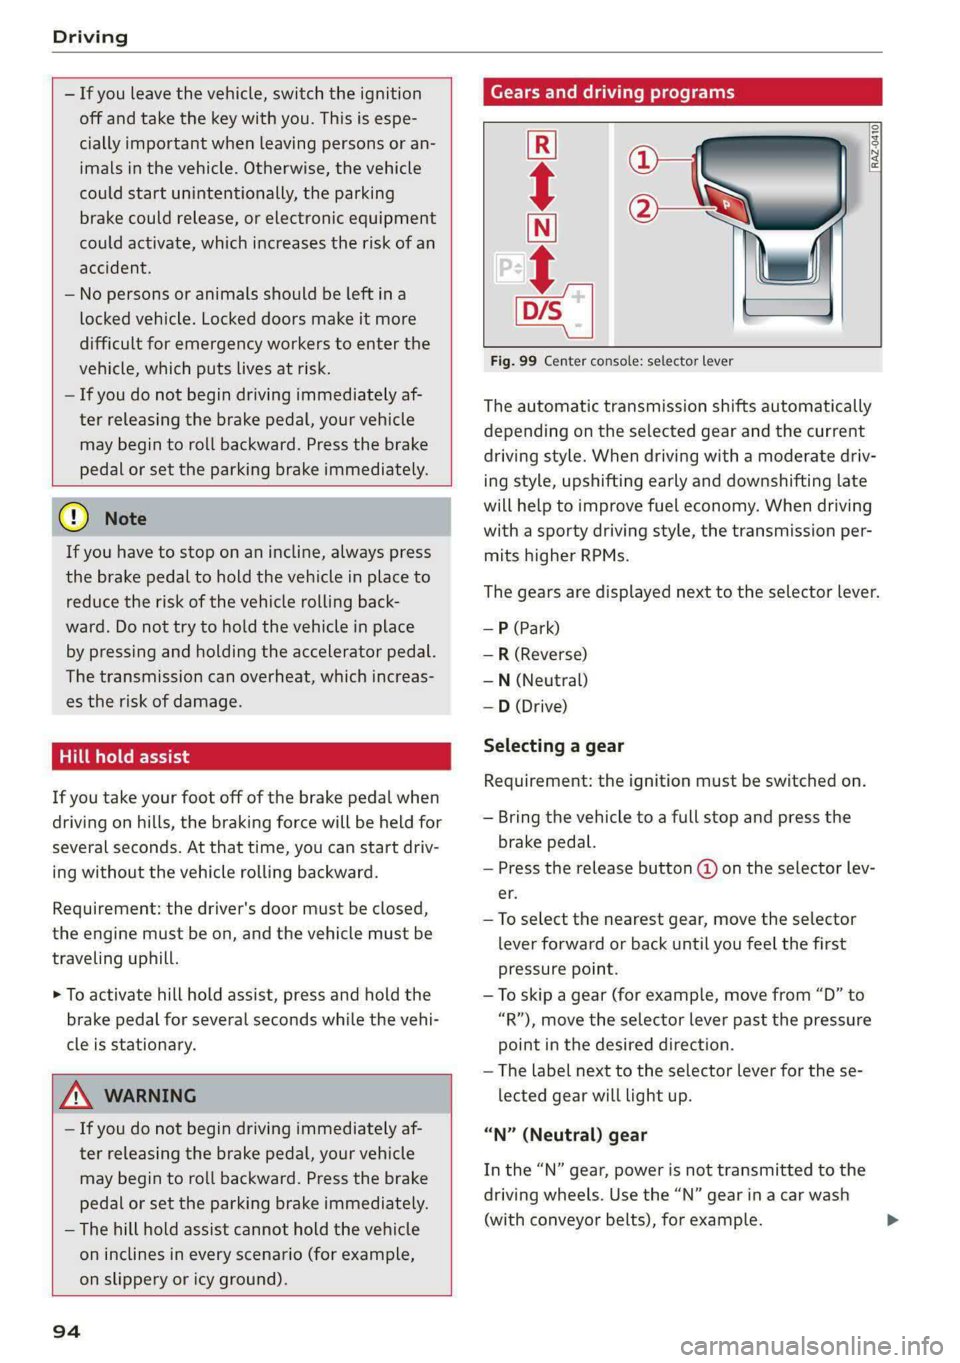
Fig. 99 Center console: selector lever
The automatic transmission shifts automatically
depending on the selected gear and the current
driving style. When driving with a moderate driv-
ing style, upshifting early and downshifting late
will help to improve fuel economy. When driving
with a sporty driving style, the transmission per-
mits higher RPMs.
The gears are displayed next to the selector lever.
— P (Park)
— R (Reverse)
—N (Neutral)
—D (Drive)
Selecting a gear
Requirement: the ignition must be switched on.
— Bring the vehicle to a full stop and press the
brake pedal.
— Press the release button (@) on the selector lev-
er.
—To select the nearest gear, move the selector
lever forward or back until you feel the first
pressure point.
—To skip a gear (for example, move from “D” to
“R”), move the selector lever past the pressure
point in the desired direction.
— The label next to the selector lever for the se-
lected gear will light up.
“N” (Neutral) gear
In the “N” gear, power is not transmitted to the
driving wheels. Use the “N” gear in a car wash
(with conveyor belts), for example.
Page 97 of 296
8W1012721BB
Driving
If you unintentionally select “N” while driving
(faster than 1 mph (2 km/h)), you can also shift
back to “D” without pressing the brake pedal.
For safety reasons, the vehicle cannot be locked
when the transmission is in the "N” gear.
“Pp” (Park) gear
Requirement: the ignition must be switched on.
The vehicle is secured from rolling away by the
parking lock when in the “P” gear.
— Bring the vehicle to a full stop and press the
brake pedal.
— Press the “P” button (2) on the selector lever.
— The “P” next to the selector lever will light up.
“P” engages automatically if you switch the en-
gine off while the “D” or “R” gear is selected. If
you switch the engine off in “N”, “P” will engage
automatically after approximately 30 minutes.
If you want to switch from “P” to “D” or “R”, the
engine must be running.
If you cannot shift out of “P”, for example be-
cause the vehicle has no power, you may need to
use the emergency release for the parking lock
=> page 97.
Selecting a driving program
Various driving programs can be selected when in
the “D” gear. The programs influence when the
transmission shifts and how the accelerator ped-
al responds.
The selected driving program is displayed in the
instrument cluster.
— D (Drive): normal driving mode
—S (Sport): sporty driving mode
If you select the Dynamic mode in Audi drive se-
lect*, the “S” driving program will be activated.
When the ignition is switched off, the driving pro-
gram may be reset to “D”.
To switch between the current driving program
and “S”, push the selector lever toward the rear.
ZX WARNING
— Before starting to drive, check if the desired
gear is displayed next to the selector lever.
— Always secure your vehicle from rolling
away. Press the brake pedal or shift to “P”.
When leaving the vehicle, also set the park-
ing brake.
— Power is still transmitted to the wheels
when the engine is running at idle. To pre-
vent the vehicle from “creeping”, you must
keep your foot on the brake in all selector
lever positions (except "P" and "N") when
the engine is running.
—To reduce the risk of an accident, do not
press the accelerator pedal when changing
gears if the vehicle is stationary and the en-
gine is running.
— Never select the “R" or "P” gears while driv-
ing. Doing so could cause an accident.
—The vehicle can roll even if the ignition is
switched off.
G) Tips
If you shift between “D” and “R” within one
second, you do not need to press the brake
pedal. This makes it possible to “rock” if it is
stuck, for example.
95
Page 98 of 296

Driving
Manual shi
RAZ-0411
=
=»
a
£
Fig. 100 Center console: shifting manually with the selec-
tor lever
RAZ-0003
—
Fig. 101 Steering wheel: shift paddles*
You can shift the gears manually when in “D”
mode. The transmission must be in tiptronic
mode.
Shifting with the selector lever
You can shift into manual shifting mode while the
vehicle is stationary or while driving.
> To switch to manual shifting mode, tilt the se-
lector lever toward the front passenger's side
> fig. 100. “M” will be displayed in the instru-
ment cluster.
> Upshifting: push the selector lever forward ().
> Downshifting: push the selector lever toward
the rear ©).
> To switch back to automatic mode, tilt the se-
lector lever toward the driver's side.
Shifting with the shift paddles
Applies to: vehicles with shift paddles
> Upshifting: press the @) shift paddle > fig. 101.
> Downshifting: press the ©) shift paddle.
> To switch back to automatic mode, press and
hold the @) shift paddle or push the selector
lever toward the rear.
96
If you stop using the shift paddles temporarily,
the transmission will switch back to automatic
mode. To keep shifting manually, tilt the selector
lever toward the front passenger's side.
@) Tips
— The transmission only allows manual shift-
ing when the engine speed is within the per-
mitted range.
— The transmission automatically shifts up or
down before critical engine speed is
reached.
Accelerator pedal
You can accelerate the vehicle using the accelera-
tor pedal. If you press the accelerator pedal all
the way down, the engine’s full power will be
used and you will reach maximum acceleration,
also called “kick-down”.
Z\ WARNING
The driving wheels could spin and the vehicle
could swerve on slick or slippery road surfaces
when using kick-down, which increases the
risk of an accident.
Page 100 of 296

Driving
The transmission temperature has increased sig-
nificantly. Drive very cautiously or take a break
from driving until the temperature returns to the
normal range and the indicator light turns off.
fs} Transmission: malfunction! You can contin-
ue driving. See owner's manual
There is a system malfunction in the transmis-
sion. You may continue driving. Drive to an au-
thorized Audi dealer or authorized Audi Service
Facility soon to have the malfunction corrected.
fs} Transmission: malfunction! You can contin-
ue driving with limited function. Please contact
Service
There is a system malfunction in the transmis-
sion. The transmission is switching to emergency
mode. This mode only shifts into certain gears or
may no longer shift at all. The engine may stall.
Drive to an authorized Audi dealer or authorized
Audi Service Facility immediately to have the
malfunction corrected.
fs} Transmission: malfunction! You can contin-
ue driving with limited function. No reverse
gear
There is a system malfunction in the transmis-
sion. The transmission is switching to emergency
mode. This mode only shifts into certain gears or
may no longer shift at all. The engine may stall.
You cannot engage the reverse gear. Drive to an
authorized Audi dealer or authorized Audi Service
Facility immediately to have the malfunction cor-
rected.
| Transmission: malfunction! You can contin-
ue driving in D until engine is off
There is a system malfunction in the transmis-
sion. The transmission is switching to emergency
mode. If you turn the engine off, you will not be
able to select any other gears after restarting the
engine. Drive to an authorized Audi dealer or au-
thorized Audi Service Facility immediately to have
the malfunction corrected.
fs} Danger of rolling away! P not possible.
Please apply parking brake
— The parking lock was released using the emer-
gency release > page 97. Or
98
— The parking lock can no longer be engaged.
Drive to an authorized Audi dealer or author-
ized Audi Service Facility immediately to have
the malfunction corrected.
isl Selector lever: malfunction! You can contin-
ue driving. Please contact Service
There is a system malfunction in the selector lev-
er. Drive immediately to an authorized Audi deal-
er or authorized Audi Service Facility to have the
malfunction repaired.
i] P button: malfunction! Auto P when engine
off. Please contact Service
There is a malfunction in the "P" button on the
selector lever. The “P” gear is automatically en-
gaged when you turn off the engine. Drive to an
authorized Audi dealer or authorized Audi Service
Facility immediately to have the malfunction cor-
rected.
i] Selector lever: malfunction! Gear change on-
ly possible using both shift paddles
There is a system malfunction in the selector lev-
er. You can continue driving with restricted func-
tion. The selector lever is not working. Gears can
only be selected by tapping both shift paddles at
the same time when the vehicle is stationary. The
“P” gear is automatically engaged when you turn
off the engine. Drive to an authorized Audi dealer
or authorized Audi Service Facility immediately to
have the malfunction corrected.
Move selector lever to automatic position
There is a malfunction in the tiptronic mode. End
tiptronic mode by pushing the selector lever to
the left into the "D/S" position.
Drive system
A new vehicle must be broken in within the first
1,000 miles (1,500 km) so that all moving parts
work smoothly together, which helps to increase
the service life of the engine and other drive com-
ponents.
Do not drive higher than two-thirds of the maxi-
mum permitted engine RPM during the first 600 >
Page 101 of 296
8W1012721BB
Driving
miles (1,000 km) and do not use full accelera-
tion. The engine can be increased RPM gradually
during the next 300 miles (500 km).
ait e eRe al el eit ate li
driving
Your driving style greatly influences the amount
of fuel and energy consumed, the environmental
impact, and the wear on the engine, brakes, and
tires. Note the following information for efficient
and environmentally-conscious driving:
— Turn off electrical equipment that is not need-
ed, for example seat heating”.
— Anticipate upcoming traffic situations while
driving to avoid unnecessary acceleration and
braking.
— Avoid driving at high speeds.
— Avoid adding extra weight to the vehicle if pos-
sible, for example by not leaving roof racks or
bike racks installed when they are not needed.
— Make sure the tire pressure is correct.
— Have maintenance performed regularly on the
vehicle.
— Do not drive with winter tires during the summ-
er.
— Do not let the engine run while the vehicle
parked.
— Use the Start/Stop system.
— Utilize the engine braking effect.
— Avoid driving short distances when possible.
@ Tips
The amount of noise produced by the vehicle
can increase significantly when driving with a
sporty style. Show respect to others around
you and the environment with the way you op-
erate your vehicle, especially at night.
Energy management
Your vehicle is equipped with an intelligent ener-
gy management system for distributing electrici-
ty. This significantly improves the starting ability
and increases the vehicle battery life.
@) Tips
— If you drive short distances frequently, the
vehicle battery may not charge enough
while driving. As a result, convenience func-
tions for electrical equipment may be tem-
porarily unavailable.
— The vehicle battery will gradually drain if
the vehicle is not driven for long periods of
time, or if electrical equipment is used
when the engine is not running. To ensure
that the vehicle can still be started, the
electrical equipment will be limited or
switched off.
Messages
B Drive system: malfunction! Safely stop vehi-
cle
There is a malfunction in the drive system. The
brake
booster and the power steering may stop
working. Stop the vehicle immediately or as soon
as possible and do not continue driving. Have the
problem corrected by an authorized Audi dealer
or authorized Audi Service Facility.
B Drive system: malfunction! Please contact
Service
There is a malfunction in the drive system. Drive
slowly to an authorized Audi dealer or authorized
Audi Service Facility to have the malfunction cor-
rected.
Start/Stop system
Applies to: vehicles with Start/Stop system
The Start/Stop system can help increase fuel
economy and reduce CO2 emissions.
In Start/Stop mode, the engine shuts off auto-
matically when stopped, for example at a traffic
light. The ignition and important assist systems
such as power steering and the brake booster will
remain available during the Stop phase. The en-
gine will restart automatically when needed.
The Start/Stop system is automatically activated
once the ignition is switched on. >
99