buttons AUDI S4 2021 User Guide
[x] Cancel search | Manufacturer: AUDI, Model Year: 2021, Model line: S4, Model: AUDI S4 2021Pages: 304, PDF Size: 82.39 MB
Page 50 of 304
Opening and closing
@) Note
Always close the roof when you leave the vehi-
cle and when there is precipitation to reduce
the risk of damage to the interior equipment,
particularly the electronic equipment.
G) Tips
— After switching off the ignition, the roof and
sunshades can still be operated for several
minutes as long as neither of the front
doors have been opened.
— It is not possible to open the roof when
temperatures are too low.
Valet parking
Applies to: vehicles with valet parking function
The valet parking function can protect the lug-
gage compartment from unauthorized access.
The [VALET] button for valet parking is in the
glove compartment.
You can switch the valet parking function on, for
example when someone else is parking your vehi-
cle ). The vehicle can be driven, locked, and un-
locked using the vehicle key, but access to the
luggage compartment is blocked.
> Remove the mechanical key > page 37.
> Press the [VALET] button in the glove compart-
ment. The LED in the button turns on if the
function is switched on.
> Lock the glove compartment with the mechani-
cal key.
» Applies to: vehicles with lockable pass-through
and lockable rear seat backrests: To secure the
luggage compartment from the vehicle interior,
lock the pass-through and the rear seat backr-
ests using the mechanical key > page 86,
=> page 85.
> Give your vehicle key to the service personnel
who are parking your vehicle and keep the me-
chanical key.
D_ This function is not available in all countries.
2) The possible number of hand-held transmitters depends
on the equipment.
48
The following buttons are deactivated when the
valet parking function is switched on:
— <3 Button in the driver's door
— As Button on the vehicle key
— Handle in the luggage compartment lid
If the valet parking function is switched on, a
message will appear every time the ignition is
switched on.
@) Tips
Please note that the luggage compartment
can still be accessed from the vehicle interior
in vehicles with fixed rear seat backrests or
ones that cannot be locked, even when the
valet parking function is switched on.
Garage door opener
Applies to: vehicles with garage door opener
With the garage door opener, you can activate
systems such as the garage doors, security sys-
tems or house lights from inside your vehicle.
These functions are operated in the MMI. Multi-
ple receivers can be programmed, which can con-
trol the functions of up to eight2) hand-held
transmitters.
ZA\ WARNING
— When operating or programming the garage
door opener, make sure that no people or
objects are in the area immediately sur-
rounding the equipment. People can be in-
jured or property can be damaged if struck
when closing.
— Do not allow yourself to be distracted from
traffic by the viewing and operating the dis-
plays.
(i) Tips
— If you sell your vehicle, reset all settings to
the factory default settings > page 213.
>
Page 56 of 304
Lights and Vision
Messages
If the 8; indicator light turns on, a bulb has
failed. The displayed message indicates the cause
and possible solutions. If one of the messages re-
mains on, drive immediately to an authorized
Audi dealer or authorized Audi Service Facility to
have the malfunction repaired.
By Audi adaptive light: malfunction! See own-
er's manual
Adaptive light* is not working. The headlights
still function. Drive immediately to an authorized
Audi dealer or authorized Audi Service Facility to
have the malfunction repaired.
By Headlight range control: malfunction! See
owner's manual
There is a malfunction in the headlight range
control system, which may cause glare for other
drivers. Drive to an authorized Audi dealer or au-
thorized Audi Service Facility immediately to have
the malfunction corrected.
High beam assistant: malfunction! See own-
er's manual
You can still switch the high beams on or off
manually. Drive immediately to an authorized
Audi dealer or authorized Audi Service Facility to
have the malfunction repaired.
High beam assistant: currently unavailable.
Camera view limited due to environmental con-
ditions
This message appears if the camera's visual field
is blocked. The system will switch itself off. Try
switching the systems on later.
[BY Automatic headlights: malfunction! See
owner's manual
The light/rain sensor is malfunctioning. In the
AUTO light switch position, the low beams re-
main switched on at all times for safety reasons.
Drive immediately to an authorized Audi dealer
or authorized Audi Service Facility to have the
malfunction repaired.
54
Interior lighting
Front interior lighting
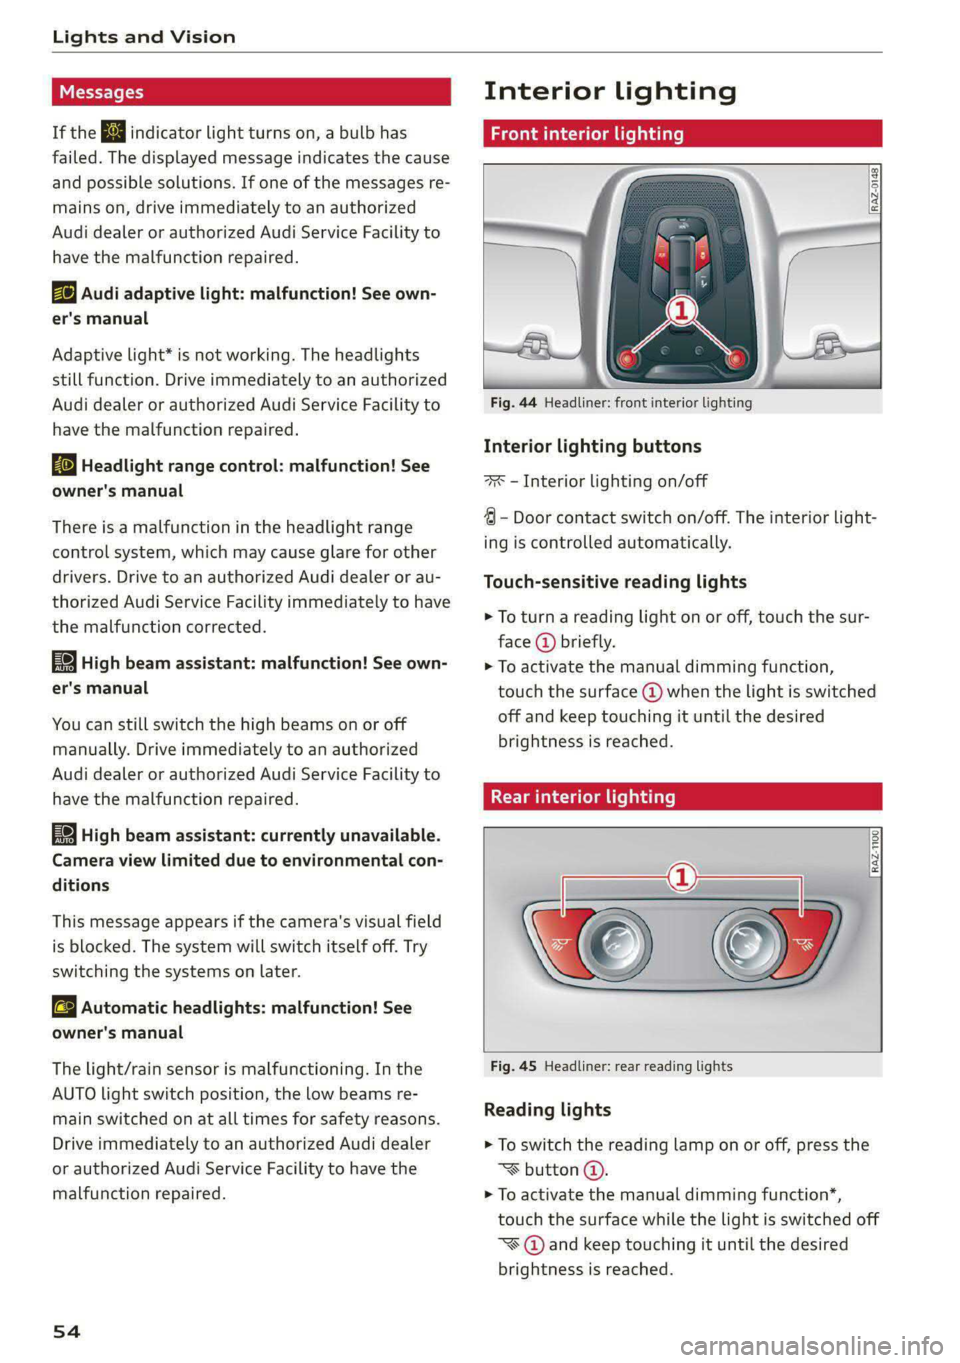
Fig. 44 Headliner: front interior lighting
Interior lighting buttons
ax — Interior lighting on/off
4 - Door contact switch on/off. The interior light-
ing is controlled automatically.
Touch-sensitive reading lights
> To turn a reading light on or off, touch the sur-
face @ briefly.
> To activate the manual dimming function,
touch the surface @ when the light is switched
off and keep touching it until the desired
brightness is reached.
Rear interior lighting
RAZ-T100
Fig. 45 Headliner: rear reading lights
Reading lights
> To switch the reading lamp on or off, press the
~¥ button @.
> To activate the manual dimming function*,
touch the surface while the light is switched off
“~¥@ and keep touching it until the desired
brightness is reached.
Page 68 of 304

Sitting correctly and safely
Depending on the vehicle equipment, the follow-
ing options may be available.
Reset seat position
You can adjust the position of the front passeng-
er’s seat to match the driver's seat.
Driver seat entry assistance
Entry assistance makes it easier to enter or exit
the vehicle.
Front passenger’s seat adjustment
You can adjust the front passenger's side with the
driver's seat buttons.
Front center armrest
Applies to: vehicles with a front center armrest
The front center armrest is located between the
front seats.
Adjusting the center armrest
The settings depend on the vehicle equipment.
> To adjust the armrest forward or backward,
move the armrest in the desired direction.
> To adjust the angle, raise the armrest in stages.
> To move the armrest back into the original posi-
tion, raise it slightly out of the top level and
fold it downward.
Z\ WARNING
In certain positions, the front center armrest
can interfere with the driver’s arm movement,
which increases the risk of injury.
Steering wheel
General information
Make sure that:
— The distance between your upper body and the
steering wheel is at least 10 inches (25 cm)
— Your arms are bent slightly at the elbows
— You have a sufficient view of the area around
the vehicle and you have a clear view of the in-
strument cluster and head-up display*.
66
— You are always holding the steering wheel with
both hands on the outer edge at the sides (9:00
and
3:00 position) when driving
Z\ WARNING
— If you are too close to the steering wheel,
the driver's airbag cannot provide optimal
protection, which increases the risk of injury
or fatality.
— Never hold the steering wheel in the 12:00
position or in any other way, such as holding
the center of the steering wheel. Otherwise,
your arms, hands, and head could be injured
in the event that the driver's airbag deploys.
Adjusting the steering wheel position
manually
Applies to: vehicles with manual steering wheel adjustment
The steering wheel position is adjustable up and
down and forward and back.
Fig. 59 Steering column: lever for adjusting the steering
wheel position
> Press the lever in the direction of the arrow.
> Bring the steering wheel into the desired posi-
tion.
> Push the lever all the way up until it engages.
ZA WARNING
—To reduce the risk of an accident, only adjust
the steering wheel before you start driving.
— Push the lever upward firmly so that the
steering wheel position does not change un-
intentionally while driving, which would in-
crease the risk of an accident.
Page 73 of 304
8W1012721BC
Sitting correctly and safely
Safety belt retractor
The safety belts are equipped with an automatic
belt retractor. This automatic retractor allows the
safety belt to be pulled all the way out when the
belt is pulled slowly. However, the automatic re-
tractor locks during sudden braking maneuvers.
It also locks the belts when accelerating, driving
uphill, and driving around curves.
Belt force limiter
Safety belts with belt force limiters reduce the
force placed on the body by the safety belts dur-
ing a collision.
Safety belt pretensioners
In certain driving situations, safety belts may be
tightened with reversible belt tensioners when
you start driving. If the safety belt is too loose, it
will be tightened so that the belt will rest closer
to the body.
In some collisions, pyrotechnic belt tensioners
may secure the safety belts so that they cannot
loosen. This reduces forward movement by the
vehicle passengers.
Depending on vehicle equipment, some settings
such as the driver’s seat and exterior mirror posi-
tion can be stored.
Storing and recalling a seat profile
Applies to: vehicles with memory function
The memory function buttons are located in the
door trim panel.
Storing a seat profile
> Press the [SET] button. If the LED in the button
turns on, a seat profile can be stored.
> Push one of the numbered memory buttons. A
tone confirms that the settings were stored.
Recalling a seat profile
> When the a door is open and the ignition is
switched off, press the memory button once
briefly. The seat will be fully adjusted to the
settings in the seat profile.
> If the door is closed or the ignition is switched
on, press and hold the memory button until the
seat is fully adjusted to the settings in the seat
profile.
ZA\ WARNING
The pyrotechnic system can only provide pro-
tection during one collision. If the pyrotechnic
belt tensioners deploy, the pretensioning sys-
tem must be replaced by an authorized Audi
dealer or authorized Audi Service Facility.
@) Tips
Smoke may be released when pyrotechnic belt
tensioners deploy. This is not a sign of a vehi-
cle fire.
Memory function
General information
Applies to: vehicles with memory function
With the memory function, you can save and call
up seat profiles using the memory buttons in the
door trim panel.
Z\ WARNING
—To reduce the risk of an accident, the seat
setting can only be recalled when the vehicle
is stationary.
— In an emergency, the recall process can be
canceled by pressing the seat adjustment
button on that seat.
Airbag system
Z\ WARNING
— If you have not fastened your safety belt,
you are in an incorrect seating position, or
you are too close to the airbag system, the
airbag system will not be able to protect
you. This increases the risk of serious or fa-
tal
injuries. Make sure that every vehicle
passenger has their safety belt correctly fas-
tened and is sitting in a correct seating posi-
tion > page 63. This is necessary regardless |>
71
Page 89 of 304
8W1012721BC
Storage and convenience
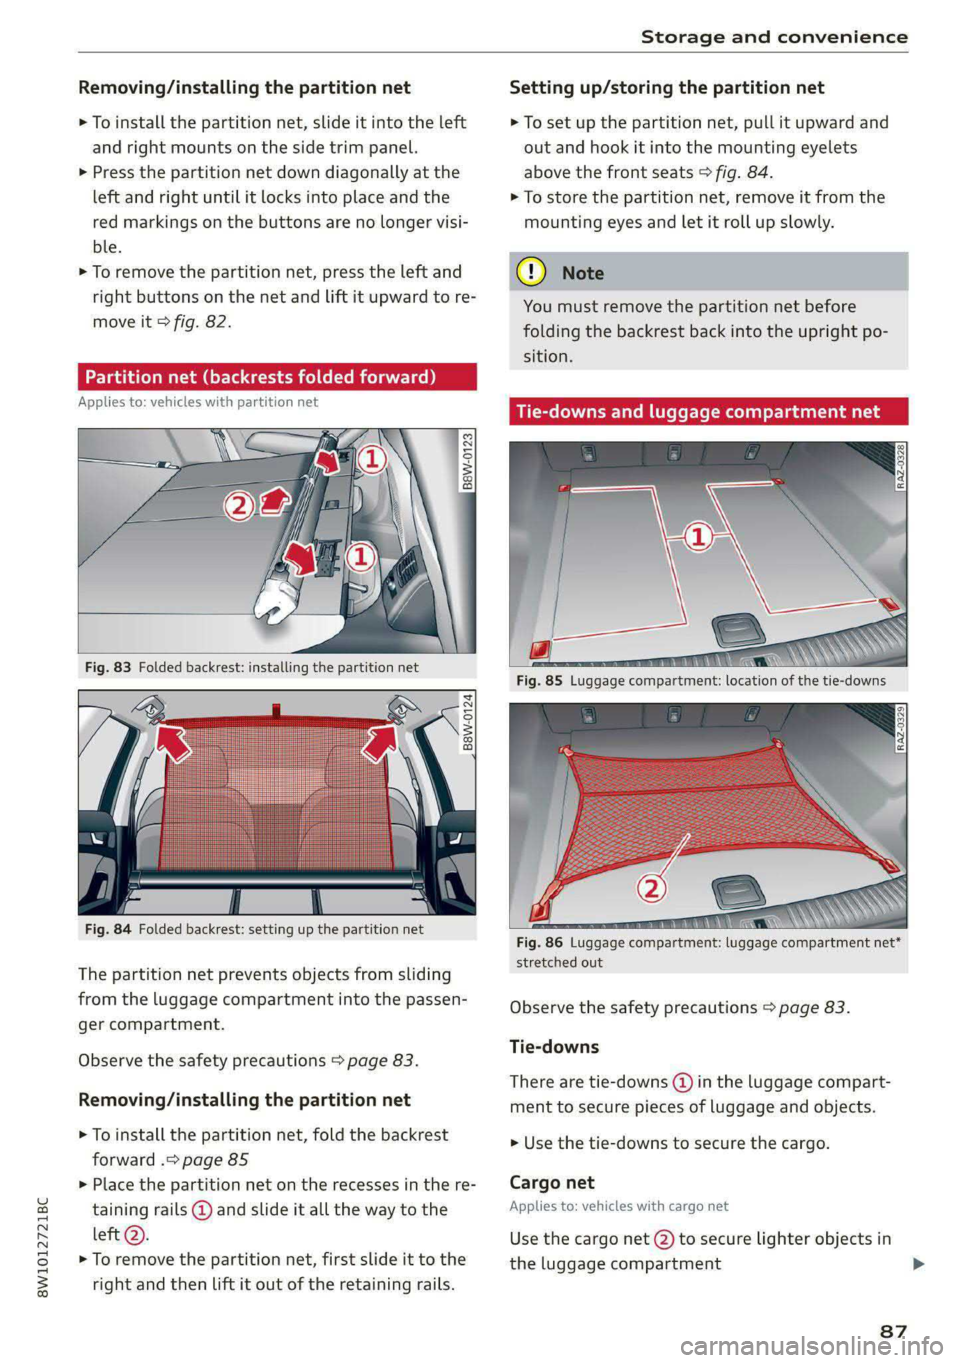
Removing/installing the partition net
> To install the partition net, slide it into the left
and right mounts on the side trim panel.
> Press the partition net down diagonally at the
left and right until it locks into place and the
red markings on the buttons are no longer visi-
ble.
> To remove the partition net, press the left and
right buttons on the net and Lift it upward to re-
move it > fig. 82.
Partition net (backrests folded forward)
Applies to: vehicles with partition net
2 g
=
= a a
Fig. 83 Folded backrest: installing the partition net
B8W-0124
Fig. 84 Folded backrest: setting up the partition net
The partition net prevents objects from sliding
from the luggage compartment into the passen-
ger compartment.
Observe the safety precautions > page 83.
Removing/installing the partition net
> To install the partition net, fold the backrest
forward .> page 85
>» Place the partition net on the recesses in the re-
taining rails @ and slide it all the way to the
left @.
> To remove the partition net, first slide it to the
right and then lift it out of the retaining rails.
Setting up/storing the partition net
> To set up the partition net, pull it upward and
out and hook it into the mounting eyelets
above the front seats > fig. 84.
> To store the partition net, remove it from the
mounting eyes and let it roll up slowly.
You must remove the partition net before
folding the backrest back into the upright po-
sition.
downs and luggage compartme
: 1 dua da ha ees, WS
Fig. 86 Luggage compartment: luggage compartment net*
stretched out
Observe the safety precautions > page 83.
Tie-downs
There are tie-downs (d) in the luggage compart-
ment to secure pieces of luggage and objects.
> Use the tie-downs to secure the cargo.
Cargo net
Applies to: vehicles with cargo net
Use the cargo net (2) to secure lighter objects in
the luggage compartment
87
Page 93 of 304
8W1012721BC
Warm and cold
3-zone deluxe automatic climate control
Applies to: vehicles with 3-zone deluxe automatic climate control system
B8W-0137
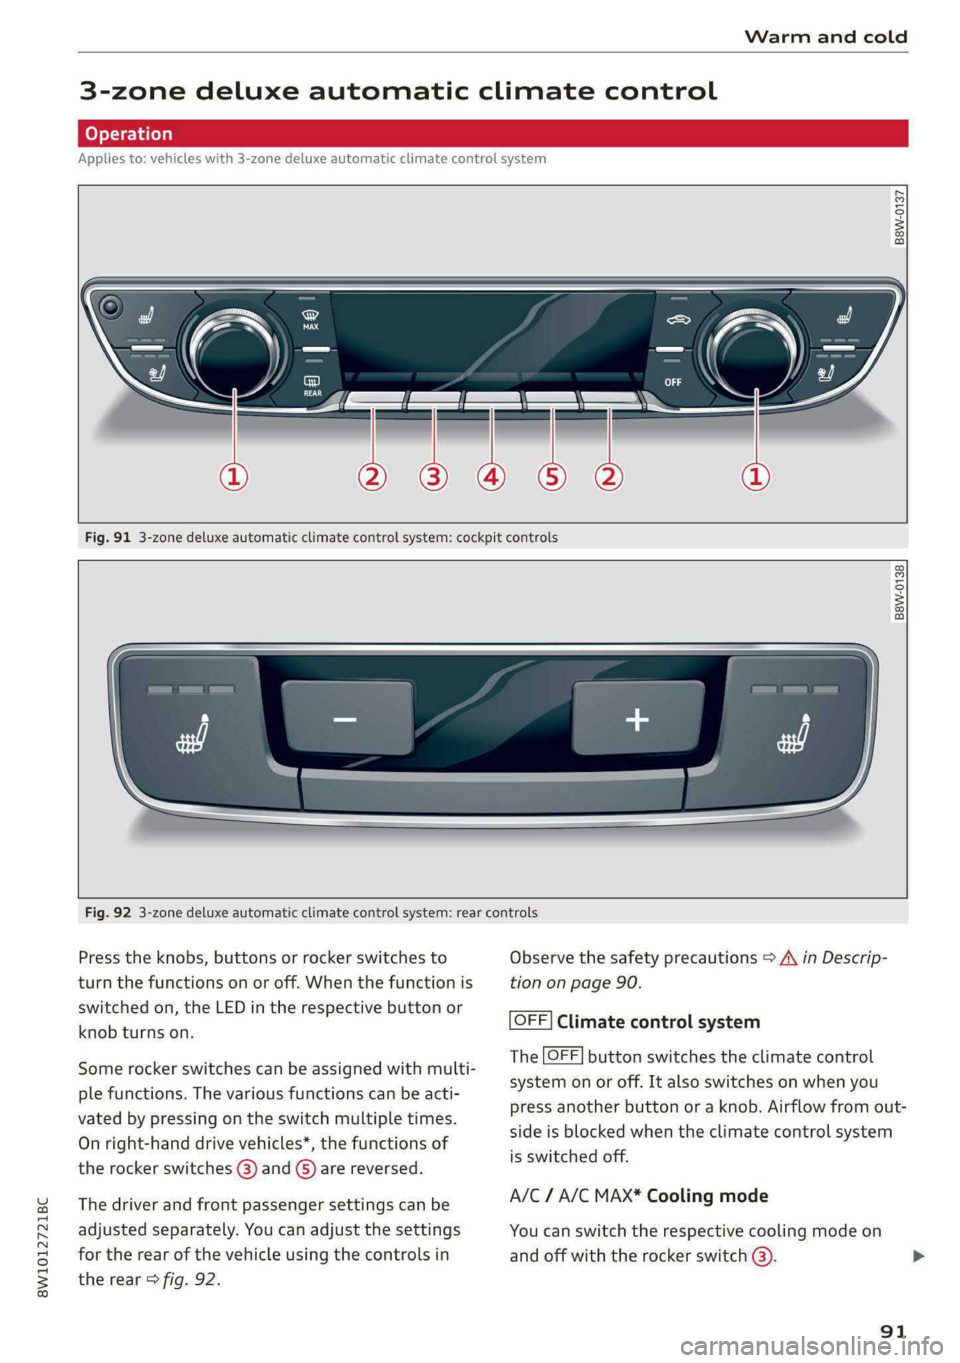
Fig. 91 3-zone deluxe automatic climate control system: cockpit controls
B8W-0138
Fig. 92 3-zone deluxe automatic climate control system: rear controls
Press the knobs, buttons or rocker switches to Observe the safety precautions > A\ in Descrip-
turn the functions on or off. When the function is tion on page 90.
switched on, the LED in the respective button or
knob turns on.
OFF] Climate control system
The [OFF] button switches the climate control
system on or off. It also switches on when you
press another button or a knob. Airflow from out-
side is blocked when the climate control system
is switched off.
Some rocker switches can be assigned with multi-
ple functions. The various functions can be acti-
vated by pressing on the switch multiple times.
On right-hand drive vehicles*, the functions of
the rocker switches @) and ©) are reversed.
The driver and front passenger settings can be A/C / A/C MAX* Cooling mode
adjusted separately. You can adjust the settings You can switch the respective cooling mode on
for the rear of the vehicle using the controls in and off with the rocker switch @).
the rear > fig. 92.
91
Page 296 of 304
Index
Light/rain sensor
Automatic headlights...............00. 51
Intermittent mode (windshield wipers).... 58
CIGHEING': « = sex & = eees & 3 Raw & HeieE 2 F eee 51
EXteriOr’s + cess 2 vem av cen a 2 ee a 2 es 51
TCORIOR ccioe + 0 soniane » : semcace wo wsesure aw ececeat as 54
Listening to music
referto Media................-4- 201, 203
Load... . i.e eee ee 287
E@GAULUSERS ti « sietas oo exansie a « ainsi o x avesiee 8 8 30
Locking and unlocking
By remote control..............-.000-- 38
Using the lock cylinder................. 36
With the convenience key............... 38
Low beam headlights.................00. 51
LTE
refer to Exterior antenna.............. 165
Luggage compartment.................. 83
Cover (power)... ... ce eee eee eee eee 85
Increasing the size................. 85, 86
Passethroughiis « essen s sons a o cos @ sens 6 86
Power SOUrCES .... 1 ee eee eee eee 82
TIG-COWNS sss = ses & z gars se peen st wen ee 87
Valet parking’: « cca es weve ae seme se corre 48
also refer to Luggage compartment...... 83
Luggage compartment lid................ 44
Closing button... ..... 0. cee eee eee eee 4l
General information.................05 40
Mechanically unlocking..............45. 43
Opening and closing................... 41
Opening and closing with foot motion..... 42
Opening from the inside in an emergency... 44
Power opening and closing.............. 41
Luggage compartment net............... 87
Lumbar support...........2.-.000 eee eee 64
M
Maintenance’. » seica i sce ov aveasc vo acanans os 281
Maintenance intervals................-5 233:
Malfunction Indicator Lamp (MIL)........ 220
Manual SHIMING:: « « cows a « cows a x cow a 2 Hew 99
Map
Changing the scale........... 000. seen 184
Display.... 2.0... ee eee eee eee 186
Operating: « asx s x news ¢ o Rew 2 b eRe Fe 185
Setting the destination................ 184
294
MAP
refer to Message Access Profile......... 170
Map preview............0..0 0000000008 184
Map update................02..000 00 189
myAudi app... .. eee c cece eee ee eee 189
ONUNG:: s sexe + 2 wees 2 Ree es Sea Gof Here 189
USBiGONMECEION sxicase s % suncane « © sxenass « © sons 190
Massage function
Front... cece eee eee ees 65
Mechanical key........ 0.0.0 e eee eee eee 37
Media « sisi s ccinene vo anvensa we ot aweseni a aie 201, 203
Supported formats.................-- 207
Media
center.................00000 eee 204
Memory function. ......... 0.0 eee eee eee 71
Menu language
refer to Setting the language........... 212
Menu paths......... 0.0.0... eee eee eee ee 18
Message Access Profile................. 170
MesSagesins « « sows so cavewse 9 a exmnsue wv oss ¥ 6 170
Mitrorcompassy oe sic 3 2 miss oo mar 2 8 aw 61
Mirrors
Adjusting exterior mirrors............... 55
Dimming... 06... cee e eee eee eee 56
Vanity mitror's « wax » ¢ anes 2 y tows © s ewe 57
MMI Navigation plus
refer to Multi Media Interface........... 19
MMI radio
refer
to Multi Media Interface........... 19
MMI Radio plus
refer to Multi Media Interface........... 19
Mobile device
refer to Telephone.............00e000 162
Mobile device reminder signal............ 166
Mountain passes...................00. 107
Mountain roads................0000 eee 107
Multifunction steering wheel
Buttons... 0... 02... cee eee eee 13,29
Operating: « s ws « x eeu sy eee so ewe se 13
Programming buttons...............05- 29
Voice recognition system.............-. 26
Multi Media Interface................... 19
Menus and symbols...............--04- 20
Operating’: « owes 2 wae o 6 wore oo were 17,20
Switching on or off..............02.00. 19
MWC Gpceie 3 5 coveine 6 & cxemens «4 carves ww sagan © & ome 29
MYAUG Es. : aseuore & csesain o cauees oe wrens woo 30,174