sensor AUDI S4 CABRIOLET 2009 User Guide
[x] Cancel search | Manufacturer: AUDI, Model Year: 2009, Model line: S4 CABRIOLET, Model: AUDI S4 CABRIOLET 2009Pages: 340, PDF Size: 77.32 MB
Page 83 of 340
[ i J Tip s
• Do not attach any stickers to the windshield in front of the two
light sensors, as this would interfere with both the automatic oper
ation of the head ligh ts and the automatic dimming of the inside
mirror(s).
• If the veh icle is remotely un locked and locked
three times in
succession,
leaving home will not turn on the lights a fourth time to
safeguard the battery and lights.
• If you wish to use the coming home/leaving home function regu
larly, you can leave it activated at all times wi thout risking perma
nent strain on the electrical system. As the system is contro lled by
light sensors, i t wi ll only b e energi zed in darkness.
• Frequent use of the coming home/leaving home function for
approac hin g and departing a vehicle parked in the dark wi ll strain
the batte ry. This applies particularly if only short distances are
driven between stops . Occasiona lly drive longer distances to make
sure the battery is recharged sufficient ly.
• If the fo g lights have been switched on by the coming
home/leaving home function, they will always be switched off when
you switch on the ig nition. •
Contro ls and eq uip
ment
Cle ar v ision
Instrument panel illumination
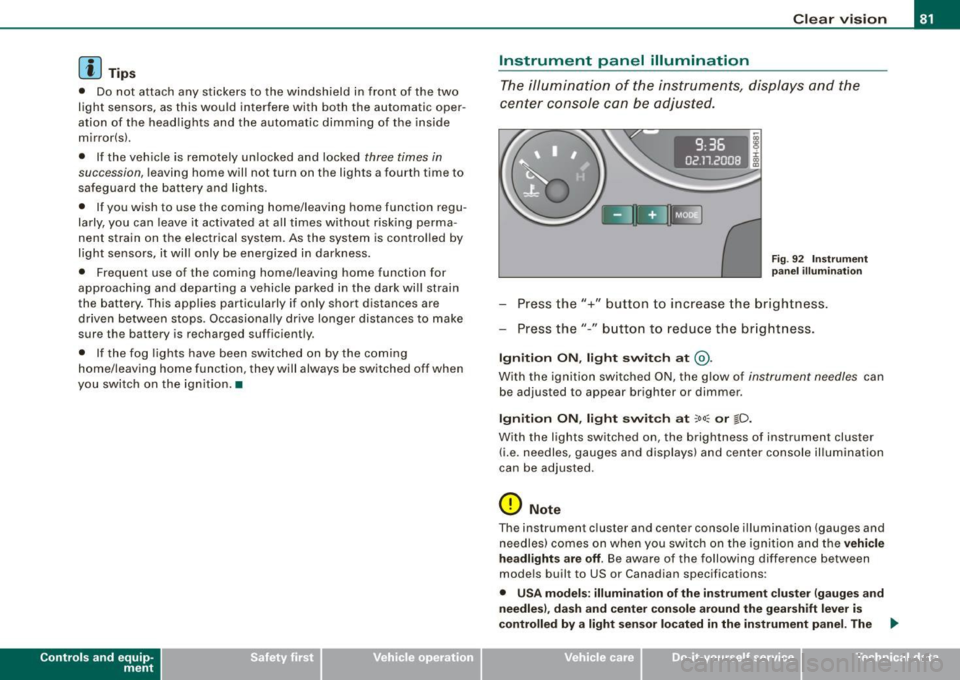
The ill umina tion of the ins trume nts, dis pla ys and the
cente r consol e can be adjusted.
9:3 6
02.11.2008
Fig . 9 2 Instru men t
pane l illum in a ti on
Press the"+" button to increase the brigh tness .
Press the" -" b utton to reduce the br ig htness.
Igniti on ON , light swit ch at @ .
With the ignition switched ON, the glow of instrument needles can
be adjusted to appear brighter or dimmer.
Ignition ON , light switch at :oo: or gD.
With the lights switched on, the brightness of instrument cluster
(i .e. needles, gauges and displays) and center c onsole il luminat io n
can be adjusted .
0 Note
The instrument c luster and center console i llumination ( gauges and
needles) comes on when you swi tch on the ignition and the
vehicle
headlights are off .
Be aware of the following difference between
models built to US or Canadian specifications:
• USA model s: illumination of the in strument cluster (gauge s and
needles ), dash and center conso le around the gearshift lever is
controlled
by a light sen sor located in the instrument panel. The .,
~ehicle care Technical data
Page 87 of 340
Wiper and washer system
r.-·.
Windshield wiper ~
The windshield wiper lever controls both the windshield
w ipers and the washer system.
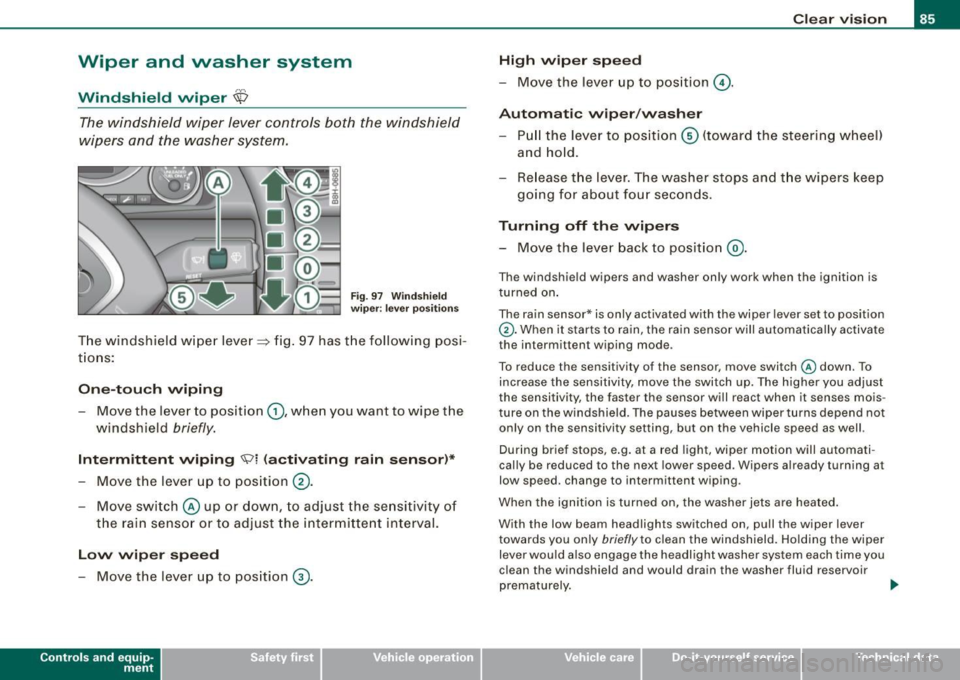
Fig. 9 7 W ind sh ie ld
wip er: leve r posi tion s
The windshield w iper lever=> fig. 97 has t he following posi
t io ns:
On e-tou ch wiping
- Move the lever to position G), whe n you want to wipe the
windshield
briefly .
Intermittent wiping ~l (activating rain sensor )*
- Move the lever up to position 0 -
- Move swit ch @ up or down, to adjust the se nsitivity of
the rain senso r or to adjust the intermitte nt interval.
Low wip er speed
- Move the lever up to pos ition ® ·
Contro ls and eq uip
ment
Cle ar v ision
High wiper sp eed
-Move the lever up to position @.
Automatic wiper /washer
- Pull the lever to pos iti on © (toward the steering w heel)
and ho ld.
Re lease t he lev er. The washer stops and t he wipers keep
going for about fou r seconds.
Turning off the wipers
- Move the lever back to position @ .
The windshie ld wipers and washer on ly work when the ignition is
turned on .
The rain sensor* is only activated with the wiper lever set to position
G). When it starts to rain, the rain sensor will automatically activate
the intermittent wiping mode .
To reduce the sensitivity of the sensor ,
move switch @down . To
increase the sensitivity, move the switch up. The highe r you adjust
the sensitivity, the faster the sensor wi ll react when it senses mois
ture on the windshield. The pauses between wiper turns depend not
only on the sensitivity setting, but on the vehicle speed as well.
During brief stops, e.g. at a red light, wiper motion will automati
cal ly be reduced to the next lower speed. Wipers already turning at
low speed. change to intermittent wiping.
When the ignition is turned on, the washer jets a re heated .
With the low beam headlights switched on, pull the wiper
lever
towards you only briefly to clean the windshield. Ho lding the wiper
lever would also engage the headlight washer system each time you
clean the windshield and would drain the washer fluid reservoir
prematurely. ..
~ehicle care irechnical data
Page 88 of 340
Clear vision
& WARNING
• Wiper blade s are cru cial fo r safe driving ! O nly when they are in
good cond it ion are they able to clear the window s properly to
p ro vi de un comp romi sed vis ibility . Worn or damaged wiper blade s
are a safety hazard
=> page 8 7, "In stalling new w ipe r blades "!
• The rain sen sor is onl y de signed to a ssis t and support the
driver. It remain s ent irely the driver' s re spon sibility to monitor
o ut side weather condit ion s a nd to manually acti vate the wipers a s
soon a s rain or drizzle reduces vi sibility through the wind shield .
• The wind shield mu st not be treat ed w ith water -repellent mate
rials. They can increase glare under poor visibility conditions such
a s w etne ss, darknes s, or when the sun i s lo w on t he horizon . In
addition , they can cause the windshield wipers to chatter .
0 Note
In freezing or near freezing conditions :
• Always check that the wiper blades are not frozen to the g lass
before you turn the wipers on. Loosen a wiper b lade which is frozen
in place before operating the wipers to prevent damage to the wiper
b lade or the wipe r motor.
• Do not use the wipers to clear a frosted window . Using the
wipe rs as a convenient ice scraper wil l destroy the wiper blades .
• Before you take your vehicle to an automatic car wash , make sure
you have the wi ndshield w iper system switched off (lever in position
0), otherwise the windshield wiper system could get damaged in the
car wash if it should suddenly come on .
[ i ] Tips
• The rain sensor is part of the interva l wiping system . Turning off
the ignition will also deactivate the rain sensor. To reactivate the sensor, switch off the interva l wiping function, then switch it back
on aga in. • I
f you switch off the ignition with the windshield wiper lever sti ll
in the interva l wipe position and then come back a while late r and
drive off, the rain sensor will reactivate itself after the vehicle speed
has exceeded 4 mph (6 km/h) .
• Worn or dirty windshield wiper b lades cause smearing which
can affect the operation of the rain sensor . Check the condition of
your windshield wiper b lades regularly .
• Make sure the washer fluid reservoir in the engine co mpartment
is topped off before going on a long trip. Look up=>
page 266 for
checking and f illing the washer container .•
Headlight washer system
The headlight washer system cleans the headlights.
Operate the w indshie ld wiper/washer system, leve r posi
tion
© =>page 85, fig. 97, w ith the head lig hts switched
on
by h old ing the lever for longer than o ne second .
The washer jets extend forward out of the front bumper driven by
water pressure to s pray the front headlights with water .
You should inspec t the head lights regu larly (for examp le when refu
e ling) and c lean off any so lid dirt or insects from the lenses .
To ensure the sys tem works proper ly in winter, keep the washer jets
free of snow and
remove any ice using a de -icing spray .•
Page 91 of 340
& WARNING
The glass of the inside rearview mirror is layered and contains an
electrolyte to achieve its properties. Be aware of liquid electrolyte
leaking from a broken mirror glass. This liquid can cause irritation
to skin, eyes, and respiratory system. If you get electrolyte in your
eyes or on your skin, immediately rinse with plenty of water. If irri
tation persists, seek medical attention.
0 Note
Liquid electrolyte leaked from a broken mirror glass will damage any
plastic surfaces it comes in contact with. Clean up spilled electrolyte
immediately with clear water and a sponge.
[ i] Tips
• If you switch off the automatic dimming function on the inside
mirror, automatic dimming of the outside mirrors will likewise be
disabled.
• Check to make sure there are no objects preventing light from
reaching the inside mirror.
• Do not attach any stickers to the windshield in front of the light
sensor, as this would interfere with the automatic operation of the
headlights and the automatic dimming of the inside mirror.•
Controls and eq uip
ment
Clear vision
Outside mirrors
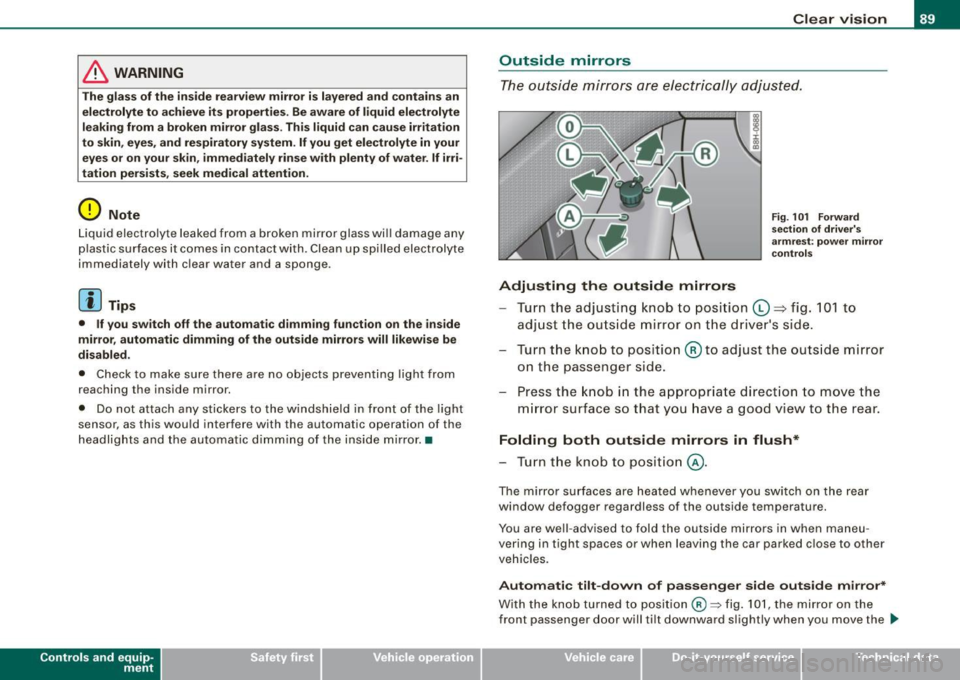
The outside mirrors are electrically adjusted.
Adjusting the outside mirrors
Fig. 101 Forward
section of driver's
armrest: power mirror
controls
Turn the adjusting knob to position (D => fig. 101 to
adjust the outside mirror on the driver's side.
Turn the knob to position
@ to adjust the outside mirror
on the passenger side.
Press the knob in the appropriate direction to move the
mirror surface so that you have a good view to the rear.
Folding both outside mirrors in flush*
- Turn the knob to position @.
The mirror surfaces are heated whenever you switch on the rear
window defogger regardless of the outside temperature.
You are well -advised to fold the outside mirrors in when maneu
vering in tight spaces or when leaving the car parked close to other
vehicles.
Automatic tilt-down of passenger side outside mirror*
With the knob turned to position@:::::, fig. 101, the mirror on the
front passenger door will tilt downward slightly when you move the .,_
~ehicle care Technical data
Page 116 of 340
• .___w __ a _r _m _ a _n_d_ c_ o _ ld __________________________________________________ _
Moreover, the air conditioning switches on again whenever you
press the fan speed or temperature buttons.•
Automatic air recirculation [~I
If outside air is polluted, an air quality sensor in the
vehicle will automatically s witch on the air recirculation .
Switching on air recirculation
-Press [~ J:::::, page 777,fig.130.
Switching off air recir culation
Press~ again, or
- press [AUTO J, or
- press[ ~).
The automat ic air recirculat ion mode should nor mally be left
switched on at a ll times.
The system is ready to operate approximately 30 seconds afte r yo u
turn on the ignition or start the vehicle. Fresh air enters the vehicle only during this initialization period .
I f the
air quality sensor in the air conditioning sys tem detects
exhaust fumes in the outside air, the control unit wil l either pass the
incoming a ir through the pol lution filter, or automatically switch on
the air recirculation .
The air conditioning syste m wi ll aut omatically swi tch o n the ai r
recirculation if it senses that the outside air is very po lluted. At the
same time, it wil l not al low any outside air to ente r the vehic le until
the a ir quality has improved .
T he air recircula tion operates for a maximum of
12 minutes. If the
w indows s tart to fog up whi le the air rec ircula tion is on, press[@!.
Under certain operating conditions (for example, if 1@1 or
[ci;;,, I are
pressed) the air recircu lation automatically switches off . If "ECON" is pressed, or if the temperature is below
-8 °C, the air recirculation
will operate on ly for
12 sec onds. •
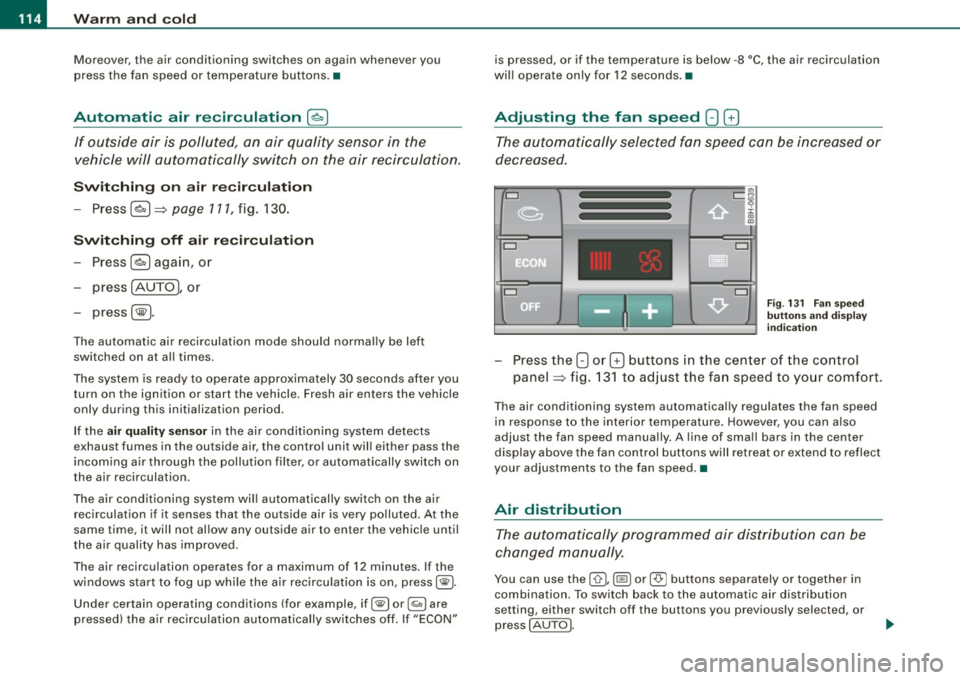
Adjusting the fan speed 8 0
The automaticall y selected fan speed can be increased or
de crease d.
D
D
=
D
:c
"' "'
D
D
F ig . 131 Fa n speed
butt ons a nd di splay
ind ication
Press the 8 or G buttons in the center of the co ntrol
panel :::::, fig. 13 1 to adjust the fan speed to your comfort.
The air conditioning system automatical ly regulates the fan speed
in respo nse to the i nterior temperature . However, you can a ls o
adjust the fan speed manually . A line of sma ll bars in the center
display above the fan control but tons will retreat or ex tend to reflect
your adjustments to the fan speed .•
Air distribution
The aut omatically pr ogr am med air dis tribution ca n be
c ha nged m anu ally.
You can use the [ 0 I, (@ ] or [-0- J buttons separately or together in
combina tion . To swi tch back to the au tomatic air distribution
setting, either switch off the buttons you previously selected, or
press
[ AUTO J.
Page 124 of 340
-L___:O~ n'.... t ~h~ e~r ~o~a ~ d:...._ _______________________________________________ _
-Swit ch off the e ngine an d rem ove the ignitio n key f rom
t h e ig nition loc k.
What else you should do when parking your vehicle on
an i ncline o r de clin e
Turn the s teering wheel so that if the vehic le sh ould start to ro ll, it
wi ll ro ll into the curb .
I f you are parking on a
decline (the fron t of your vehicle facing
downhil l), turn the front wheels to the right so that they point
toward the curb.
If you are par king on an incline (the font of your vehic le fac ing
uphill), turn the front whee ls to the lef t so that they point
away from
the curb .
Move the selector lever into the P position.
LJ}. WARNING
This is how you can redu ce the r isk of injury when leaving your
vehicle .
• Never par k the vehi cle where it c an come i n contact with dry
gra ss, spilled fuel or any other flammable materials .
• Never allow an yone -especi ally s mall ch ildren -to remain in the
vehicle when it i s locked . Locked doors make it more difficult for
res cuer s to acce ss the pas senger compartment in the e vent of a n
emergency _ Danger to life!
• Never leave children unsupervised in the vehicle . Children
c ould release the parking brake or move the gear shift lever out of
gear . The vehi cle could st art to roll awa y and cau se an a ccident .
• No matter wha t the sea son i s, the temperature in a parked
vehi cle can reach d angerous levels . •
Acoustic park assist
A pplies to vehicles : with 4 -ch an nel a co ustic park ass is t
Rear acoustic park assist
The rear acoustic park assist warns you of obstacles or
objects behind your car.
How it works
The acoustic park assist warning system (4-channel acoustic park
assist) uses ultr asonic sensors to warn yo u when you are
backing
your vehicle close to an obstacle . The system 's 4 sensors are located
inside the rear bumper .
Acti va ting
The rear acoustic park assist is ac tivated whenever you shift into
Reverse . You will hear a warn ing tone when the system is on .
Reverse
With the car backing up in reverse gear, the col lision warning sound
sets in at the fol lowing
approximate d istances to obstacles :
straight aft 5ft(1.5m)
angling aft off vehicle corners 2 ft (0
.6 m)
As the dis tance shr inks, the time interva l between the audible tones
grows shorter.
The sound changes to a continuous tone as soon as the remaining distance to an obstacle closes to less than about 1 ft. (0 .3 ml. The
steady tone cautions you that you have backed up hazardously
close and you ris k co llision by backing up any further .
Malfunctions in the system
If a warning tone is audible for about five seconds when you turn on
the ignit ion, there is a malfunction in the system . Have the prob lem
corrected by your authorized Audi dea ler. _,.
Page 125 of 340
On the road ------------------------------.J
Keep the sensors in the rear bumper clean and free from ice so that
the acoustic park assist system can function properly.
& WARNING
• Sensors have dead spaces in which objects cannot be
detected . Be especially alert for small children and animals, since
they are not always detected by the sensors.
• The acoustic park assist system is not a substitute for the
driver's own caution and alertness. Ultimate responsibility always
remains with the driver during parking and similar maneuvers .
Always watch where you are driving.
0 Note
• Remember that low obstacles for which a warning has already
been issued may "dive" below the system's sensing zone if the
vehicle is being backed up closer. In this case, the warning sound
shutting off does
not indicate that you have cleared the obstacle .
Instead, impact is imminent.
• Objects such as trailer hitches, barrier chains, narrow posts or
fences covered by a thin layer of paint may not always be detected
by the system . They can still damage your vehicle without a
warning.
[ i] Tips
Keep the sensors in the rear bumper clean and free of snow and ice
so that the acoustic parking assist system can function properly. •
Controls and equip
ment
Cruise control
General information
The cruise control system allows you to maintain a
constant speed.
The cruise control system allows you to maintain a constant driving
speed when driving faster than 18 mph (30 km/h) -to the extent this
is possible with the given engine power and braking characteristics .
This allows you to take your foot off the "gas" and rest it, especially
on long trips.
The indicator light (U.S. models :
CRUISE , Canadian models:•(') ) in the
instrument cluster illuminates when the system is on.
& WARNING
• To help keep the vehicle under control, do not use the cruise
control system when driving on winding or slippery roads (as
caused by heavy rain or loose gravel on the road surface), or in
heavy or varying traffic.
• Only use the cruise control when traffic, road and weather
conditions allow you to drive at a steady speed.
[ i] Tips
The cruise control cannot maintain a constant speed when driving
downhill. The vehicle will accelerate under its own weight. Down
shift to a lower gear or use the brakes to slow down .•
Page 158 of 340
___ D_ r _i_v _i_n ..;::g =-- S_ a_ f_ e--= ly'----------------------------------------------------
Automatic rollover protection system
Function
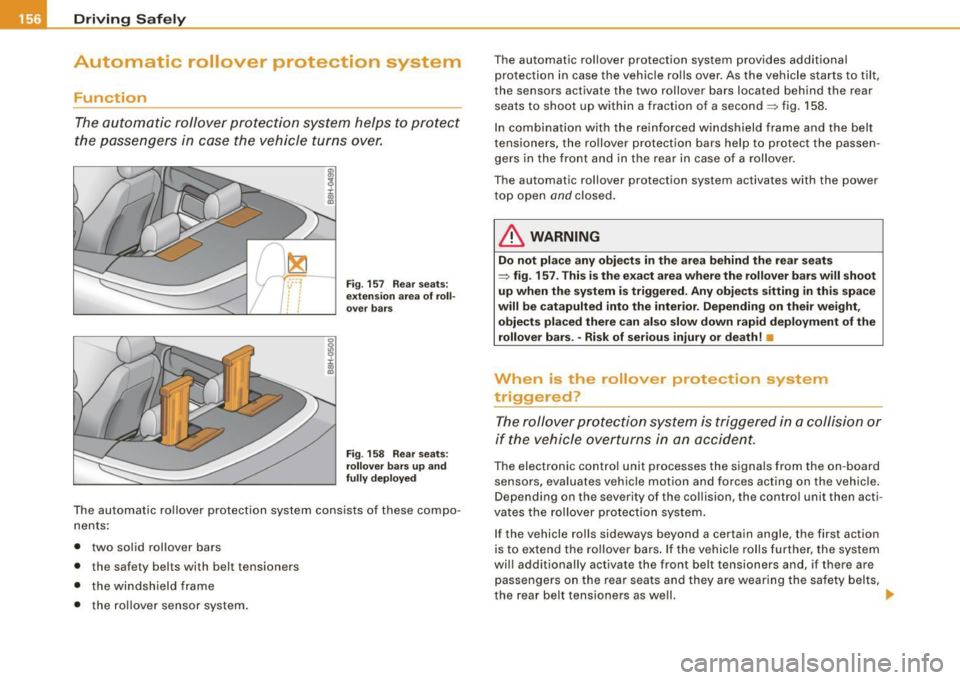
The automatic roll over protection system helps to protect
the passengers in case the vehicle turns over.
1J ~
I ...
,
... . ' : :
: :
'
F ig . 157 Rear sea ts:
ex te n sio n area o f ro ll
over ba rs
F ig . 158 Rea r sea ts :
r ollo ver bars up and
full y dep loyed
The automatic rollover protection system cons ists of these compo
nents:
• two solid rollover bars
• the safety bel ts with belt tensioners
• the windshield frame
• the ro llover sensor system. The automatic rol
lover protection system provides additional
protection in case the vehicle ro lls over. As the vehicle starts to tilt,
the sensors activate the two rollover bars located behind the rear
seats to shoot up wi thin a fraction of a second~ fig. 158 .
In combinat ion with the reinforced windshield frame and the bel t
tensioners, the rollover p rotection bars help to protect the passen
gers in the front and in the rear in case of a rollover.
The automatic rollover protection system activates with the power
top open
and closed.
& WARNING
Do not place any obje cts in the ar ea be hind the r ear seats
~ fig . 157. T his is the e xact area where the rollover b ars will shoot
up wh en th e syst e m i s triggered . An y ob jects si tting in th is s pac e
w ill be cata p ulte d into the inter ior. Depending on the ir wei ght,
object s pl ace d there can also s lo w do wn rap id deploym ent of th e
r o llover bars. -Ri sk of seri ou s inj ur y or deat h! •
When is the rollover protection system
triggered?
T he rollover protection system is triggered in a collisi on or
if the vehicle overturns in an accident.
The electronic control unit processes the signals from the on -board
sensors, evaluates vehicle motion and forces act ing on the vehic le.
Depending on the severity of the co llision, the control unit then acti
vates the rol lover protection system .
If the vehicle rol ls sideways beyond a certain angle , the first action
is to extend the ro llover bars . If the vehicle rolls further, the system
wil l additional ly activate the front belt tensioners and, if there are
passengers on the rear seats and they are wearing the safety belts,
the rear belt tensioners as well. ..,
Page 168 of 340
___ S_a_ f_ e_ t..: y_ b_e_ l_ t _s _______________________________________________ _
Improperly worn safety belts
Incorrectly positioned safety belts can cause severe inju
nes.
Wearing safety belts improperly can cause serious injury or
death. Safety belts can only work when they are correctly positioned on the body. Improper seating positions reduce
the effectiveness of safety belts and will even increase the
risk of injury and death by moving the safety belt to critical
areas of the body. Improper seating positions also increase
the risk of serious injury and death when an airbag deploys
and strikes an occupant who is not in the correct seating
position . A driver is responsible for the safety of all vehicle
occupants and especially for children. Therefore:
- Never permit anyone to assume an incorrect sitting posi
tion in the vehicle while traveling=>&.
& WARNING
Improperly worn safety belts increase the risk of serious personal
injury and death whenever a vehicle is being used.
• Always make sure that all vehicle occupants are correctly
restrained and stay in a correct seating position whenever the
vehicle is being used.
• Always read and heed all WARNINGS and other important infor
mation
=> page 162. •
Safety belt pretensioners
How safety belt pretensioners work
In front, side and rear-end collisions above a particular
severity, safety belts are tensioned automatically.
The safety belts are equipped with safety belt pretensioners . The
system is activated by sensors in front, side and rear -end collisions
of great severity . This tightens the belt and takes up belt slack=>&.
in "Service and disposal of safety belt pretensioner" on
page 167.
Taking up the slack helps to reduce forward occupant movemen t
during a collision.
[ i] Tips
The safety belt pretensioner can only be activated once.
• In minor frontal and side collisions , in rear-end collisions, in a
rollover and in accidents involving very little impact force, the safety
belt pretension er are not activated.
• When the safety belt pretensioners are activated, a fine dust is
released. This is normal and is not caused by a fire in the vehicle.
• The relevant safety requirements must be observed when the
vehicle or components of the system are scrapped . A qualified deal
ership is familiar with these regulations and will be pleased to pass
on the information to you.
• Be sure to observe all safety, environmental and other regula
tions if the vehicle or individual parts of the system, particularly the
safety belt or airbag, are to be disposed. We recommend you have
your authorized Audi dealer perform this service for you. •
Page 177 of 340
Airbag system -----------------=~-
& WARNING (continued)
• If you must install a rearward facing child safety seat on the
front passenger seat because of exceptional circumstances and
the PASSENGER AIR BAG OFF light does not come on and stay on,
immediately install the rear -facing child safety seat in a rear
seating position and have the airbag system inspected by your
Audi dealer.
_& WARNING
If, in exceptional circumstances, you must install a forward-facing
child restraint on the front passenger's seat:
• Always make sure the forward-facing seat has been designed
and certified by its manufacturer for use on a front seat with a
passenger front and side airbag .
• Never put the forward-facing child restraint up against or very
near the instrument panel.
• Always move the passenger seat into its rearmost position in
the seat's fore and aft adjustment range, as far away from the
airbag as possible, before installing the forward-facing child
restraint. The backrest must be adjusted to an upright position.
• Make sure that the PASSENGER AIR BAG OFF light comes on
and stays on all the time whenever the ignition is switched on. •
Advanced Airbag System components
The front passenger seat in your vehicle has a lot of very important
parts of the Advanced Airbag System in it. These parts include the
weight-sensing mat, sensors, wiring, brackets, and more. The func
tion of the system in the front passenger seat is checked by the elec
tronic control unit when the ignition is on. The control unit monitors
the Advanced Airbag System and turns the airbag indicator light on
when a malfunction in the system components is detected. The
function of the airbag indicator light is described in greater detail
Controls and equip ment Safety first Vehicle operation
below.
Because the front passenger seat contains important parts
of the Advanced Airbag System, you must take care to prevent it
from being damaged. Damage to the seat may prevent the
Advanced Airbag for the front passenger seat from doing its job in
a crash.
The front Advanced Airbag System consists of the
following:
• Crash sensors in the front of the vehicle that measure vehicle
acceleration/deceleration to provide information to the Advanced
Airbag System about the severity of the crash.
• An electronic control unit, with integrated crash sensors for front
and side impacts. The control unit "decides" whether to fire the
front airbags based on the information received from the crash sensors. The control unit also "decides" whether the safety belt
pretensioners should be activated.
• An Advanced Airbag with gas generator for the driver inside the
steering wheel hub.
• An Advanced Airbag with gas generator inside the instrument
panel for the front passenger .
• A weight-sensing mat under the upholstery padding of the front
passenger seat cushion that measures the total weight on the seat.
The information registered is sent continuously to the electronic
control unit to regulate deployment of the front Advanced Airbag on
the passenger side.
• An airbag monitoring system and indicator light in the instru
ment cluster ~
page 179.
• The PASSENGER AIR BAG OFF light comes on and stays on in the
center of the instrument panel~
page 180, fig. 174 and tells you
when the front Advanced Airbag on the passenger side has been
turned off .
• A sensor below the safety belt latch for the front seat passenger
to measure the tension on the safety belt. The tension on the safety
belt and the weight registered by the weight -sensing mat help the
control unit "decide" whether the front airbag for the front _,.
Vehicle care Do-it-yourself service Technical data