key battery AUDI S4 CABRIOLET 2009 Owners Manual
[x] Cancel search | Manufacturer: AUDI, Model Year: 2009, Model line: S4 CABRIOLET, Model: AUDI S4 CABRIOLET 2009Pages: 340, PDF Size: 77.32 MB
Page 50 of 340
Opening and clos ing
Master key with remote control
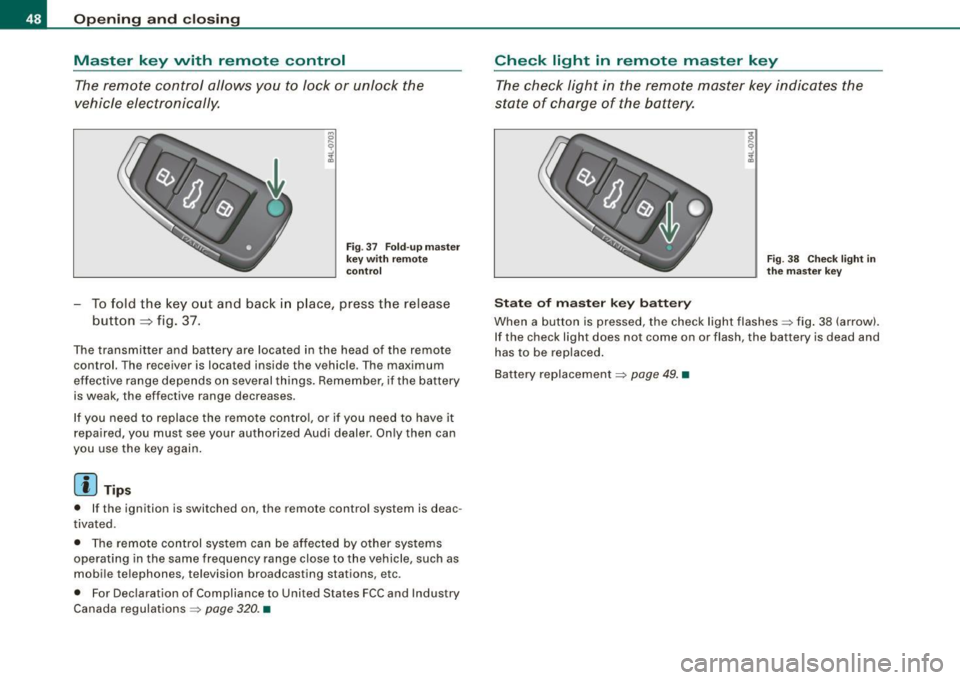
The rem ote control allows you to lock or unlock the
vehicle electronically.
F ig . 37 Fo ld- up ma ster
key with re mote
co ntr ol
- To fold the key out and back i n place, press the release
button ::::, fig. 37.
The transmitter and battery are located in the head of the remote
control. The receiver is located inside the vehicle. The maximum
effective range depends on several things. Remember, if the ba ttery
is weak, the effective range decreases.
I f you need to replace the remote cont ro l, or if you need to have it
repaired, you must see your authorized Audi dealer. Only then can
you use the key again .
[ i ] Tips
• If the ignition is switched on, the remote control system is deac
tivated.
• The remote control system can be affected by other systems
operating in the same frequency range close to the vehicle, such as
mobile telephones, television broadcasting stations, etc.
• For Declaration of Compliance to United States FCC and Industry
Canada regulations =>
page 320. •
Check light in remote master key
The check light in the rem ote master key indic ates the
state of charge of the battery.
S ta te o f m aste r k ey ba tt e ry
F ig . 3 8 Check lig ht in
th e m as ter key
When a button is pressed, the check light flashes=> fig . 38 (arrow).
If the check light does not come on or flash, the battery is dead and
has to be replaced .
Battery replacement =>
page 49. •
Page 51 of 340
Master key battery replacement
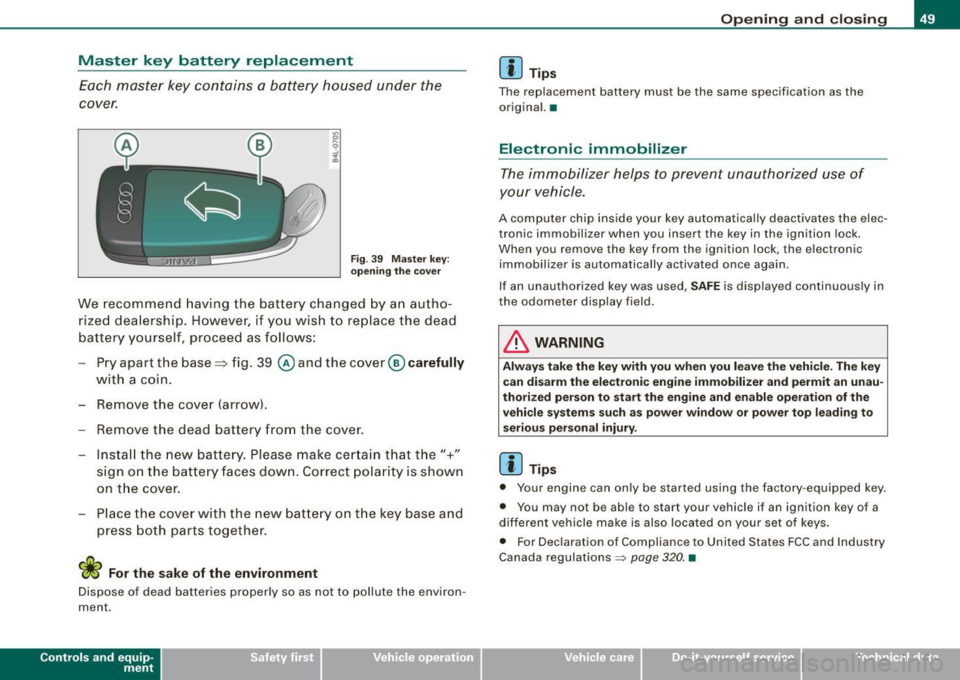
Each master key contains a battery housed under the
cover.
Fig. 39 Master key:
opening the cover
We recommend having the battery changed by an autho
rized dealership. However, if you wish to replace the dead
battery yourself, proceed as follows:
- Pry apart the base=> fig. 39
@ and the cover @carefully
with a coin.
- Remove the cover (arrow).
- Remove the dead battery from the cover.
- Install the new battery. Please make certain that the"+"
sign on the battery faces down. Correct polarity is shown
on the cover.
- Place the cover with the new battery on the key base and
press both parts together.
W For the sake of the environment
Dispose of dead batteries properly so as not to pollute the environ
ment.
Contro ls and eq uip
ment
Opening and closing
[ i] Tips
The replacement battery must be the same specification as the
original. •
Electronic immobilizer
The immobilizer helps to prevent unauthorized use of
your vehicle.
A computer chip inside your key automatically deactivates the elec
tronic immobilizer when you insert the key in the ignition lock.
When you remove the key from the ignition lock, the electronic
immobilizer is automatically activated once again.
If an unauthorized key was used,
SAFE is displayed continuously in
the odometer display field.
in. WARNING
Always take the key with you when you leave the vehicle. The key
can disarm the electronic engine immobilizer and permit an unau
thorized person to start the engine and enable operation of the
vehicle systems such as power window or power top leading to
serious personal injury.
[ i] Tips
• Your engine can only be started using the factory -equipped key.
• You may not be able to start your vehicle if an ignition key of a
different vehicle make is also located on your set of keys.
• For Declaration of Compliance to United States FCC and Industry
Canada regulations
~ page 320. •
~ehicle care irechnical data
Page 53 of 340
& WARNING (co ntin u ed)
• Do n ot l ea ve c hildr en i ns ide th e vehicle un sup erv is ed. In an
e m erg en cy it w ould be impo ssible to op en the door s from the
out side without the key.
[ i ] Tip s
• In the event of a crash with airbag deployment all locked doors
wi ll be automat ically unlocked to give access to the vehicle occu
pants from the outside.
• If the power locking system should fail, you can st ill open the
fue l tank flap in an emergency~
page 248.
• You are we ll advised not to keep va luables inside an unattended
vehic le, visible or not. Even a properly locked vehicle cannot provide
the security of a safe! •
Keyless entry remote control
General description
The remote controls allows you to:
• lock or un lock the vehicle
• selective ly un lock the rear lid.
The turn signals wi ll flash briefly whenever you lock or unlock the
vehic le . Also, the interior light will come on or go off whenever you
open or c lose the driver's door.
The transmitter and battery are located in the head of the remote
control. The receiver is located inside the vehicle. The maximum
effective range depends on severa l things. Remember, if the battery
is weak, the effective range decreases .
The remote -control key contains a fo ld-ou t key that you can use to
manual ly lock or unlock the vehicle and to start the engine .
Controls and eq uip
ment
Op enin g and clo sing
If you need to replace the remote control, or if you need to have it
repaired, you must see your authorized Audi dealer. Only then can
you use the key again. •
Unlocking and locking the vehicle with the
remote control
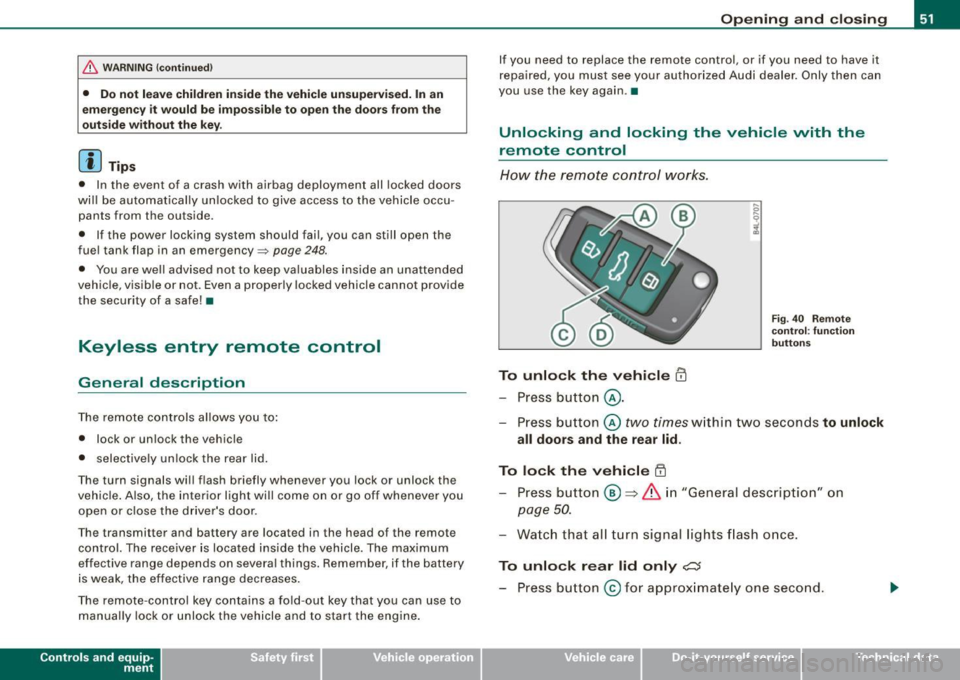
How the remote control works.
To unlock the v ehicle m
- Press button @.
Fig. 40 Remo te
co ntr ol: fu nctio n
b utt ons
- Press button @two times within two seconds to unlock
all doors and the rear lid .
To lock the vehicle [II
-Press bu tton @ => &, in "Gener al descri ption" on
page 50.
- Watch that all turn signal lights flash once.
To unlo ck r ear lid only ,c::;
- Press button @for approx imate ly one second.
~ehicle care Technical data
Page 59 of 340
To unlock r ear lid
- Pu ll the switch c:::::5 ~ page 56, fig. 48 in the driver's door.
To open re ar lid
- Raise the rear lid.
The remote rear lid re lease is deactivated automatically if you lock
the rear lid using the key . This enables the driver to lock the luggage
compartment permanently with the key and prevent unwanted
access to the trunk .•
Anti-theft alarm system
Description
The anti-theft alarm triggers an alarm if anyone attempts
to break into the vehicle.
The anti -theft a larm system triggers an audible alarm and turns on
the emergency flasher if an unauthorized interference with the
veh ic le is sensed by the system.
How i s the anti -theft alarm syste m switched on ?
The anti-theft alarm system is switched on when you lock the
driver's door manually using your key, o r when you use the remote
control. The system is activated approx imately 30 seconds after the
vehic le is locked. The indicator light on top of the door trim start
fl ashing rapid ly for 30 seconds and then b link slowly.
How i s the anti -theft al arm syst em switch ed off ?
The anti-theft alarm system is switched off only when you use the
remote contro l to unlock your vehicle . If you do not open a door
with in 60 seconds after you have unlocked with the remote control,
the vehic le will lock itself again automatica lly.
Controls and equip
ment
Op ening and clo sing
If you lock just the driver's door using your key, the front
passenger's door, the rear and the fuel f iller flap remain locked.
If you use the vehicle key to unlock the driver's door, the other
doors, the rear lid and the fuel tank flap will remain locked . The
a larm system will not be deactivated unless you insert the key in the
ignition switch within 15 seconds and turn on the ignition. If you fai l
to do this, the a lar m wi ll sound.
When will the anti theft alarm system be triggered?
When the vehic le is locked, the a larm system monitors and protects
the following parts of the vehic le:
• engine compar tment
• luggage compartment
• doors
• vehic le incline
• ignition
• factory installed radio.
When the system is activated, the alarm will be triggered if one of
the doors, the engine hood or the rear lid are opened, or if the igni
tion is turned on or the radio removed or if the vehicle incline has
been changed.
The ant i-theft alarm system will also go off when you unlock the rear
lid with your key and open it. The alarm is switched off again when
you close the rear lid.
The anti-theft alarm system will also go off when the battery is d isconnected.
You can also trigge r the alarm by pressing the PANIC button on your
remote control. This will alert other people in case of emergency.
Press the
PANI C button again to turn off the a larm. .,_
Page 109 of 340
________________________________________________ S_e_ a_ ts_ a_ n_d _ s_t _o _r_ a ....; g::. e _ ___,_
The outlet may be used for 12-volt appliances with maximum
consumption of up to 100 watts, such as a flash light, small vacuum
cleaner, etc.
Before you purchase any accessories, a lways read and follow the
information in~
page 318, "Additional accessories and parts
replacement".
& WARNING
The outlet plus any appliances plugged into it remain functional
even if the ignition is switched off or the ignition key is removed.
Never leave children inside the vehicle without supervision.
0 Note
To avoid damaging the socket, only use plugs that fit properly.
[ i] Tips
When the engine is off and accessories are still plugged in and are
on, the vehic le battery can still be drained. •
Storage
General
& WARNING
• Always remove objects from the instrument panel. Any items
not put away could slide around inside the vehicle while driving or
when accelerating or when applying the brakes or when driving
around a corner.
• When you are driving make sure that anything you may have
placed in the center console or other storage locations cannot fall
Contro ls and eq uip
ment
& WARNING (continued)
out into the footwells . In case of sudden braking you would not be
able to brake, depress the clutch or accelerate .
• Any pieces of clothing that you have hung up must not interfere
with the driver's view. The coat hooks are designed only for light
weight clothing . Never hang any clothing with hard , pointed or
heavy objects in the pockets on the coat hooks . During sudden
braking or in an accident -especially if the airbag is deployed -
these objects could injure any passengers inside the vehicle. •
Glove compartment
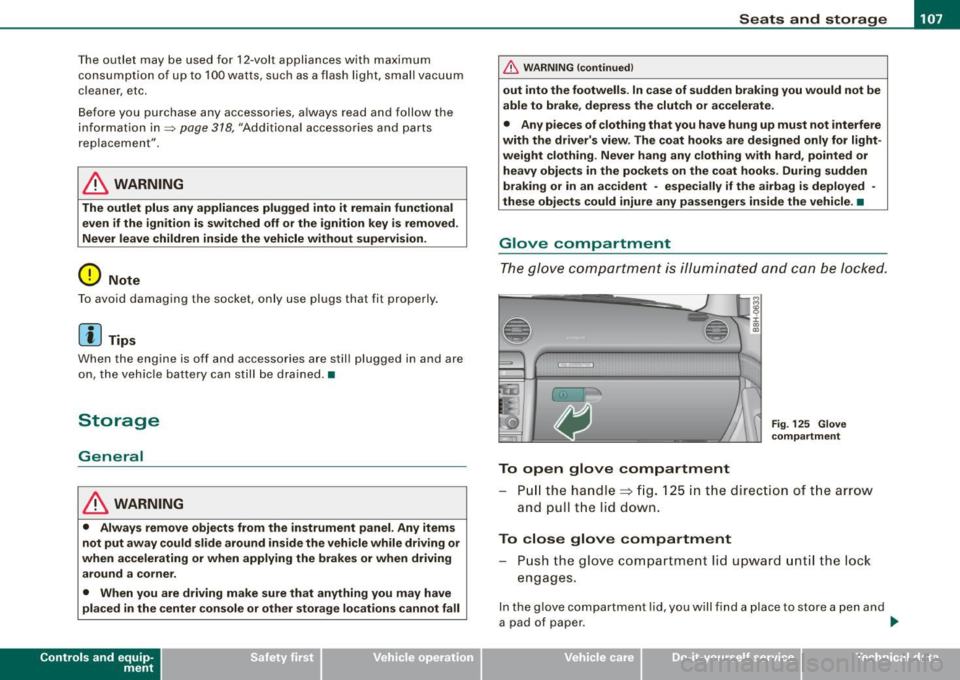
The glove compartment is illuminated and can be locked.
To open glove compartment
Fig. 125 Glove
compartment
P ull the handle~ fig. 125 in the direction of the arrow
and pull the lid down.
To close glove compartment
Push the glove compartment lid upward until the lock
engages.
In the glove compartment lid, you w ill find a place to store a pen and
a pad of paper . ..,_
~ehicle care irechnical data
Page 121 of 340
___________________________________________________ O_ n_ t_h _e_ r_o _a_ d _ ___,11111
Ignition lock and ignition switch
Ignition lock
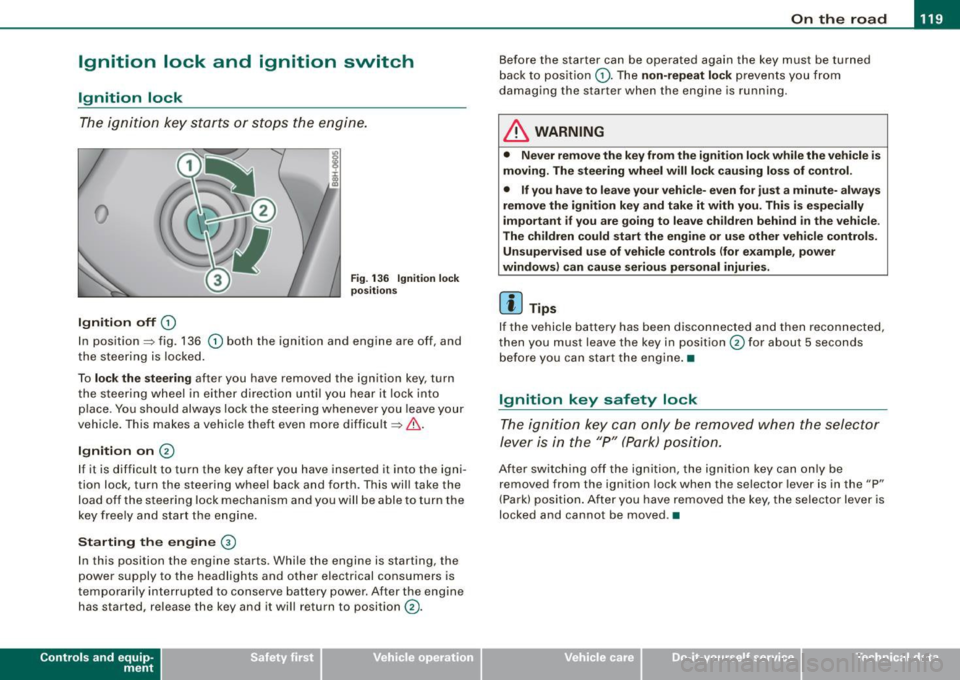
T he i gnition k ey sta rts or st ops t he e ngin e.
0
Ignition off 0
Fig. 13 6 Ignition lock
positi ons
In position~ fig. 136 0 both the ignition and engine are off, and
t he stee rin g is locke d.
To
lo ck the steering after you have removed the ignit ion key, turn
t he stee rin g wheel in either direc tion un til you hear it loc k into
p lace . You should always lock the steering whenever you leave your
vehicle . This ma kes a vehic le theft even more difficult ~ & .
Ignition on 0
If it is difficult to turn the key afte r yo u have inserted it into the igni
tion lock, turn the steering wheel back and forth. This will take the
load off the steering lock mechanism and you will be able to turn the
key free ly an d start the engine.
Starting the engine @
In th is position the engine starts . While the engine is starting, the
power supply to the headlights and other electrical consumers is
temporarily interrupted to conserve battery power. After the engine has started, release the key and it wi ll return to position
(v.
Contro ls and eq uip
ment
Before the starter can be operated again the key must be turned
b ack to position
(D . Th e non -repeat lock p re vents y ou fr om
damag ing the starter when the engine is running .
& WARNING
• Never remove the key from the ignit ion lock while the vehicle is
moving. The steering wheel will lock causing loss of control .
• If you have to leave your vehi cle- even for just a minute- always
remove the ignition key and take it with you. This is especially
important if you are going to leave children behind in the vehicle.
The children could start the engine or use other vehicle controls. Unsupervised use of vehicle controls (for e xample , power
windows) can cause serious personal injuries.
[ i ] Tips
If the vehicle battery has been disco nnec ted and then recon nected,
then you must leave the key in position
0 for about 5 seconds
be fore you can start the eng ine .•
Ignition key safety lock
T he i gnit ion key ca n only be remove d when the se lector
lever is in the "P " (Pa rk) pos itio n.
A fte r swi tc h ing o ff th e ig nition, the ig nition key can only be
removed from the ignition lock when the selector lever is in the "P"
(Park) posi tio n. Af ter y ou h ave remo ved the key, the selec to r lever is
locked and cannot be moved. •
~ehicle care irechnical data
Page 252 of 340
-~_C_ h_e _c _ k_ i_ n ...:::g:;..._ a_n_ d_ f_ i_ll _in ....;g:::;.._ ___________________________________________ _
Closing the engine hood
-Pull t he hood down until the pressure from the strut is
reduced.
- Let t he hood
drop down and latch in place. Do not try to
push it shut;
it may fai l to engage ~& .
& WARNING
A hood that is not completely latched could fly up and block your
view while driving.
• When you close the engine hood, check it to make sure the
safety catch has properly engaged. The hood should be flush with
the surrounding vehicle body parts.
• If you notice while driving that the hood is not secured prop
erly, stop at once and close it. •
Working in the engine compartment
Be especially careful whenever you work in the engine
compartment.
Whenever you must perform any work in the engine compartment,
for example checking and filling different fluids, there is a risk of injury, burns and accidents. To prevent personal injury always
observe the following WARNINGS. The engine compartment of any
vehicle is a hazardous area
~ 6 .
& WARNING
To help avoid injury, before you check anything under the hood :
• Turn off the engine.
• Remove the ignition key.
• Apply the parking brake.
& WARNING (continued)
• Move selector lever of automatic transmission to "P" (Park);
put manual transmission in Neutral.
• Always let the engine cool down. Hot components will burn
skin on contact.
• To reduce the risk of being burned, never open the hood if you
see or hear steam or coolant escaping from the engine compart
ment. Wait until no steam or coolant can be seen or heard before
carefully opening the hood .
• Keep children away from the engine compartment.
• Never spill fluids on hot engine components. They can cause a
fire.
• Never touch the radiator fan. The auxiliary electric fan is
temperature controlled and can switch on suddenly.
• Never open the coolant reservoir cap when the engine is still
warm. The coolant system is pressurized and hot coolant could
spray out.
• Protect your face, hands and arm from steam or hot engine
coolant by placing a thick rag over the cap when you open the
coolant reservoir.
• If work on the fuel system or the electrical system is necessary :
- Always disconnect the battery .
- Never smoke or work near heaters or open flames. Fluids in
the engine compartment could start a fire.
- Keep an approved fire extinguisher immediately available.
• To avoid electrical shock and personal injury while the engine
is running or being started, never touch :
- Ignition cables
- Other components of the high voltage electronic ignition
system.
• If you must perform a check or repair with the engine running:
~
Page 327 of 340
Alph ab eti ca l ind ex -
-------------=----
AUTO
Climate controls .. ...... ..... .... . 112
Switching on .... .... .... .... .... 112
When should I use AUTO? ....... .. 112
Auto Safety Hotl ine .. ..... ... ... .... . 155
Auto-Check Control .. ... ... .... ... .. .. 28
Automat ic air recirculation ........... 114
Automatic belt retractor .... ...... .... 163
Automatic car wash
See Washing .. .... .... ... ...... .. 231
Automatic headlight con trol ....... .... 77
Automatic rollover protection system . . 156
Automatic Shift Lock (ASLl ....... 128, 135
Automatic transm ission
6 -spe ed automatic transmission .... 126
Automatic Shi ft Lock (ASLl .... . 128, 135
Driving ........ ..... ....... ..... 126
Dynamic shif t prog ram ... .... .... . 129
Fail-safe mode ... ...... ........ .. 13 1
Ignition key safety lock ... ... ... .. . 119
Kick-down ... .... .... .... ... .... . 129
Manual sh ift program . ... .... .... . 130
multitronic® ... ... ... .... ... ..... 131
Se lector lever ..... .... ...... . 127, 133
Shift but tons . ... .... .... .... 131, 137
Steering wheel with tiptronic® . 131,137
Average speed ... ... ... ... .. ...... ... 37
Avoid damaging the v ehicle .. ... .... . 22 1
Controls and equip
ment Safety first
B
Battery .
.... .... ...... .... ... .. 261, 264
Charging ...... .. ... ..... .. .. .... 265
Checking battery acid level . .... .... 264
Important warnings when working on the batte ry . .......... .... ... .. ... . 263
Low vol tage symbo l .. ....... .... ... 34
Replacing the battery . ...... .. .... 262
Winter opera tion ... .. ...... ...... 261
Working on the battery .......... .. 263
B efore driving ... ..... .. ...... ...... 146
Blended gasoline ... ... .. .. .. .... .... 244
Body cavity sealing .. .. .. ...... .... .. 237
Boos ter seats .... .... .... .... .... ... 198
How do I properly instal l a booster seat in
my vehicle? . .......... ...... ... 198
Sa fety instructions . .... .... .... ... 198
Brake f luid
Changing the brake fluid .......... 261
Checking the brake fluid leve l .. .... 260
Reservoir . ... .... .... ....... .... . 260
What is the correct brake fluid level? 260
What shou ld I do if the brake fluid warning
light comes on? . ..... ... .... .... 260
Brake system .. ...... .... .... .... ... 260
An ti- lo ck brake system (ABS) ... .... . 20
Brake ass istant . .... .. .... .... ... . 217
Brake booster .... .... .... .... .... 216
Brake flu id .... ... .... .... .... .... 260
Brake f luid specifications for refi ll and
rep lacement . ... ..... ... .... .... 261
Brake pads ...... .... .... .... .... 220
Genera l informa tion ....... .. .... . 215 How does the moisture or road salt affect
the brakes? ....... ... .... .... ... 215
Ma lfunction ... .. .... .... .... .. .. . 30
Warning/indicator lights .. .. .... .... 23
Worn brake pads symbol . ..... .. .. . 33
B reak -in period ...... .... .... .... ... 219
B rake pads ... .... .... .. . .... .... 220
Tires ..... .... .... .... ... .... .. .. 219
Bu lbs ... ... .... ... ... ... .... ...... . 302
C
California Proposition 65 Warning . .... 251
Battery specific ..... ...... .... .... 264
Capacities Eng ine oil .... .... .... ... .... .... 31 4
Fuel tank ..... ...... .. ...... .... . 314
Windshield washer fluid ... .... .... 314
Car care ... .. .... ... .... .... .... .. .. 230
Interior ... .... .... .... ... .... .... 238
Plastic and v inyl .... ... .... .... ... 234
Weatherstr ips . .... .... .... ...... . 236
Care of exterior ..... .... .... .... .. .. 230
Cargo area
See Loading the luggage compartment .
153
Catalytic converter .. ...... ...... .... 220
Centigrade Switching between Centig rade and
Fahrenheit ...... .... .. .. ... .. .. 11 3
Certification . ............ ...... .... . 320
Changing a flat tire ....... ... .... .. .. 293
Chan ging a wheel .... .... ... .... .... 293
Vehicle operation Vehicle care Do-it-yourself service Technical data
Page 328 of 340
ll'JI Alphabetical index _ __,__ ___ ____;_...::.:...::... ___________________________ _
Changing engine oil ...... ... ... .. ... 256
Chassis Undercoating ........ ...... .... .. 237
CHECK button . . . . . . . . . . . . . . . . . . . . . . . 16
Checking Battery acid level . . . . . . . . . . . . . . . . . 264
Engine coolant level .. ............ 258
Checking tire pressure ............... 274
Child restraint Danger of using child restraints in the
front seat . . . . . . . . . . . . . . . . . . . . . . 170
Child restraints What types of chi ld restraint anchors are
available? ..................... 203
Where can I get additional information
about child restraints? ... .... .... 204
Child safety .. ........ ....... ... 190, 195
Booster seats . . . . . . . . . . . . . . . . . . . . 198
Convertible child safety seats . . . . . . 196
Convertible locking retractor . . . . . . . 200
Guidance fixtures for lower anchorages 206
Important safety instructions for using
child safety seats .. ...... ....... 193
Important things to know when driving
with chi ldren ............. ...... 190
Infant seats . . . . . . . . . . . . . . . . . . . . . 195
Installing a child restraint using the
LATCH system .... ... .... ...... . 208
Lower anchorages .... .... ... ... . 205
Mounting and releasing the anchorage
hook ...... ...... .... .......... 209
O lder children and safety belts ... .. 199 Safety belts and oldler children
... .. 199
Which restraint system should my older chi ld wear? ........ .... ... .. ... 199
child safety seat LATCH system . .... .... .... ...... 208
Childsafetyseats .... ........ .... ... 195
Convertible locking retractor .... ... 200
How do I properly install a child safety seat in my vehicle? .. ...... .... .. 193
Installing .... .... ... .. .... .... .. 200
Safety instructions .............. .
Cigarette lighter .......... .... ..... .
Cleaning Alcantara (synthetic suede) ....... .
E . ngine compartment . .... ... .. .. .
Fabrics and fabric coverings ... ... .
Instrument panel ....... .... ..... . 193
105
241
242
238
239
I . ntenor ......................... 238
Leather .... ...... ... .. .... ...... 240
Plastic and vinyl . .... .... ... .. ... 234
P lastic parts ........... .... ... ... 239
Safety be lts ...... ............ ... 242
Trim strips ............. ... .... .. 234
trim strips ... .. ...... .... ..... ... 235
Cleaning and protection .......... ... 230
Climate controls .. .... ......... ..... 11
O
Air distribution . . . . . . . . . . . . . . . . . . 114
Air outlets . . . . . . . . . . . . . . . . . . . . . . . 115
Air recirculation .... .... .... .... .. 113
AUTO (standard setting) .... .... ... 112
Automatic air recirculation ... .. ... 114
Contro ls . . . . . . . . . . . . . . . . . . . . . . . . 111
Defrosting / Defogging . . . . . . . . . . . . 116
Description . . . . . . . . . . . . . . . . . . . . . . 11
O
ECON ... .. .. .. .... .... ..... .. ... 113
Fan .. ............ .... ... .... ... 114
Key coded setting ................ 11
O
Recommended settings ........... 11 O
Setting the temperature ........... 112
Switching between Fahrenheit and Centigrade ... .... .... ...... .... 113
Switching the air conditioning on or off .
113
Using the climate control economically . .
116
Warm and cold .................. 110
Clock .. ........... ........... .... ... 14
Closing Power top . . . . . . . . . . . . . . . . . . . . . . . . 62
Cold tire inflation pressure .. .... ..... 271
Coming -home -function .. ............. 80
Compartments in the door trims ... ... 109
Compass mirror .. .... ...... ... ..... . 90
Comp liance .......... ....... .... ... 320
Consumer Information ........... 155, 316
Contacting NHTSA .................. 155
Continuously Variable Transmission (CVT)
See multitronic® ........ ... ...... 131
Convenience close/open feature Power top . . . . . . . . . . . . . . . . . . . . . . . . 63
Windows ......................... 53
Convertible child seats How do I properly install a convertib le
chi ld seat in my vehic le? ...... ... 196
Safety instructions .. ...... .... ... 196
Page 330 of 340
IIPJI Alphabetical index _ __,__ ___ ____;_...::.:...::... ___________________________ _
Hood ...... ... ...... .. ... .. .. ... 249
Starting .. .... .... ....... ... 119,120
Starting with jumper cables ....... 304
Stopping . . . . . . . . . . . . . . . . . . . . . . .
120
Engine compartment
Safety instructions . . . . . . . . . . . . . . .
250
Working in the engine compartment 250
Engine coolant .................. ... 258
Checking the engine coo lant level .. 258
Malfunction warning symbol ... ..... 31
Engine coolant level
Checking ... .. .... .... ..........
258
E . I
ngine coo ant system ... .... ....... 257
Adding coolant .................. 259
Radiator fan . . . . . . . . . . . . . . . . . . . . . 260
Engine coolant temperature
Temperature gauge ....... .... ....
13
Engine data ...... ............... ... 314
Engine hood Closing ... .... ... .... .... ...... .
250
How to release the hood . . . . . . . . . . 249
Opening .. .... .... ....... .... ... 249
Engine oil ... ... .... .... .... ... .... 252
Adding ... .. ...... ... .... ...... . 255
Additives . . . . . . . . . . . . . . . . . . . . . . . 255
Changing . .............. ........ 256
Checking the engine oil level ...... . 254
Indications and conditions requiring extra
checking .... .... ....... .... ...
254
Indicator light . . . . . . . . . . . . . . . . . . . . 33
Oil capacity . . . . . . . . . . . . . . . . . . . . .
314
Oil consumption ................. 254
Oil grades . . . . . . . . . . . . . . . . . . . . . . . 252
Recommended oil check intervals .. 254
Sensor defective . . . . . . . . . . . . . . . . . . 33
Specification and viscosity ...... ..
252
Engine oil pressure
Malfunction .. ....... ..... ... .... . 32
Environment Break -in period .... .... .... .... ..
219
Catalytic converter .... .... .... ... 220
Disposing of your vehic le battery ...
262
Driving at high speeds ...... .... .. 221
Driving to minimize pollution and noise .
221
Fuel ......... .... ... .. .... .... .. 246
Fuel economy ....... ...... ...... 221
Leaks under your vehicle . ...... ... 250
Letting the vehicle stand and warm up
222
Proper disposa l of drained brake fluid
261
Proper disposal of drained engine
coo lant ..................... ...
259
Proper disposa l of drained engine oil
255,256
Recycling used eng ine oil ......... 255
Unleaded fuel ... .... ..... .... ... 244
What should I do with an old battery?
262
EPC
See Electronic power control .. ... .. . 22
ESP Electronic stabi lization program ....
212
See also Electronic stabilization program
(ESP) . ... .... .... ........ ......
212
Event Data Recorder (EDR) .. ....... .. 212
Expansion tank .. .. .. .. .. .... .... ... 258
F
Fahrenheit
Switching between Fahrenheit and Centigrade ... .... ..............
113
Fan
Climate controls ... ....... .... ...
114
Radiator ...... .... ........... ... 260
Setting the fan speed 114
Flat tire
Changing .. .... .... ............. 293
Floor mats
Fog lights
153
Front ....... ...... .... ........ ... 79
Folding master key with remote control . 47
Foot pedals . ... .. .... .... .... ...... 152
For the sake of the environment
Gaso line fumes and the environment
246
Letting your engine warm up ....... 120
Reducing engine noise by early
upshifting ......................
13
Refueling ......... ...... ........ 246
Saving fuel by early upshifting . ..... 13
Using the rear window defogger ....
116
Front airbags
Description ......................
172
How they work ..... .... ....... ... 177
Front ashtray . . . . . . . . . . . . . . . . . . . . . . . 104
Front seat adjustment
Safety guide lines .................. 92