technical data AUDI S5 2008 8T / 1.G Owners Manual
[x] Cancel search | Manufacturer: AUDI, Model Year: 2008, Model line: S5, Model: AUDI S5 2008 8T / 1.GPages: 294, PDF Size: 12.13 MB
Page 209 of 294
Downloaded from www.Manualslib.com manuals search engine Towing a trailer207
Controls
Safety
Driving tips
General maintenance
Self-help
Technical data
document_0900452a81793dcc.book Seite 207 Mittwoch, 21. März 2007 5:42 17
Page 213 of 294
Downloaded from www.Manualslib.com manuals search engine Care of vehicle and cleaning211
Controls
Safety
Driving tips
General maintenance
Self-help
Technical data
WARNING
•
Do not wash the vehicle with the ignition switched on – risk of
accident.
•
Do not clean the underside of the car or inside the wheel arches
without protecting your hands and arms. You may cut yourself on
sharp metal parts.
•
Take care when washing the car during the winter: moisture
and ice on the brakes may affect braking efficiency – this could
cause an accident.Caution
•
Do not wash the vehicle in direct sunlight – otherwise the paint
can be damaged.
•
Do not use insect sponges, or abrasive household sponges, etc.
– they can damage the surfaces.
•
The headlights should only be washed with water – do not wipe
them with a dry cloth or sponge. It is best to use soapy water.
•
Never wash tyres with a jet that sprays the water out in a direct
stream. This could damage the tyres – even if the spray is kept at a
distance and only used for a very short time.For the sake of the environment
The car should only be washed in special wash bays. This prevents
oily water from getting into the public drains. In some districts,
washing vehicles anywhere else may be prohibited.Waxing and polishingWaxing
Waxing protects the paintwork. It is time to apply a good coat of wax
when water no longer forms droplets and rolls off the clean paint-
work.Even if a wax solution is used regularly in the car wash, it is advis-
able to protect the paint with a coat of wax at least twice a year.
In the summer, you will find it is much easier to remove dead insects
(which accumulate on the bumper and the front of the bonnet) if the
car has been waxed recently.
Polishing
Polishing is only necessary if the paint has lost its shine, and the
gloss cannot be brought back by putting on wax.
The car must be waxed after polishing if the polish used does not
contain wax compounds to seal the paint.
Caution
Matt painted and plastic parts must not be treated with wax or
polish.Ornamental trim and mouldingsThe metal brightwork on the body is made of aluminium rather than
chrome (for environmental reasons).
Dirt or marks on the trim mouldings should be removed with an
acid-free cleaning agent (do not use a chrome cleaner). Body polish
is also unsuitable for use on trim mouldings. The intensive cleaning
fluids often used before the car goes into a car wash may contain
alkaline substances, which can cause dull or milky patches when
they dry out.
Audi dealers carry stocks of cleaning products which have been
tested for use on your vehicle and are not harmful to the
environment.
document_0900452a81793dcc.book Seite 211 Mittwoch, 21. März 2007 5:42 17
Page 215 of 294
Downloaded from www.Manualslib.com manuals search engine Care of vehicle and cleaning213
Controls
Safety
Driving tips
General maintenance
Self-help
Technical data After washing, the wheels should only be cleaned with an "acid-
free" cleaning agent for alloy wheels. This is available from Audi
dealers and specialist retailers. Never leave the cleaning agent on
the rims for any longer than specified in the instructions before
rinsing it off. If the wheel cleaner fluid contains acid it can attack the
surfaces of the wheel bolts.
Car polish or other abrasive agents should not be used. If the
protective paint coating is damaged by stone chips etc., the
damaged area should be touched up immediately.
WARNING
Please note when cleaning the wheels that water, ice and road salt
can impair the effectiveness of the brakes – this can cause an
accident.Care of interiorMMI display screen and control consoleThe MMI display screen can be cleaned with a soft cloth and a
special “LCD cleaner” (available from retailers of electrical goods).
Moisten the cloth with a small amount of the cleaning fluid.
Clean the MMI control console with a fine brush first to prevent any
dirt from getting in between the control buttons and the housing.
We then recommend wiping the MMI control console using a cloth
moistened with washing-up liquid and water.
Caution
To avoid scratching the screen, do not wipe the MMI display with a
dry cloth.•
To avoid any possibility of damage, do not let any liquid get
inside the control console.
Plastic parts and leatherettePlastic parts and leatherette can be cleaned with a damp cloth. If
this is not sufficient, plastic parts and leatherette should only be
treated with a special solvent-free plastic cleaner.Textile covers and trim partsTextile covers and trim parts (e.g. seats, door trim) should be
cleaned regularly with a vacuum cleaner. This will remove surface
dirt which could otherwise be rubbed into the textile material
during use. Do not use steam cleaners, as the steam could carry the
dirt deeper into the textile material.
Normal cleaning
We recommend that you use a soft sponge or lint-free, micro-fibre
cloth for normal cleaning. Only use brushes on floor coverings and
mats, as other textile surfaces could become damaged.
In the case of normal surface dirt you can use a foam cleaner. Use a
sponge to spread the foam on the textile surface and to work it into
the material lightly. However, make sure that the textile material
does not become soaking wet. Then dab off the foam with a dry and
absorbent cloth (e.g. a micro-fibre cloth) and vacuum off any
residue once the surface is completely dry.
Removal of stains
To treat stains caused by spilled drinks (coffee, fruit juice or similar)
make up a solution with a mild detergent for sensitive fabrics and
apply it with a sponge. If the stains are difficult to remove, a
washing paste can be applied directly onto the stain and worked
into the fabric. The surface will then have to be wiped with clear
water to remove any residue left by the paste. To do so, use a damp
cloth or sponge and then dab the stain with an absorbent cloth.
Treat chocolate or make-up stains with a washing paste and then
rinse off with water (using a damp sponge).
document_0900452a81793dcc.book Seite 213 Mittwoch, 21. März 2007 5:42 17
Page 217 of 294
Downloaded from www.Manualslib.com manuals search engine Care of vehicle and cleaning215
Controls
Safety
Driving tips
General maintenance
Self-help
Technical data
•
Remove stains from fresh ball-pen and other inks, lipstick, shoe
cream and similar stains as soon as possible.
•
Preserve the colour of the leather. A special coloured cream will
renew the colour of the leather when required and will eliminate
differences in colour.
Applies to vehicles: with leather upholsteryCleaning and care of leather upholstery
Natural leather requires an extra degree of attention and
care.Normal cleaning
– Moisten a cotton or woollen cloth with water and wipe
over the leather surfaces.
More stubborn dirt
– More stubborn dirt can be removed using a mild soap
solution (pure liquid soap: two tablespoons dissolved in
one litre of water).
– It is very important not to let the water soak through the
leather or penetrate into the seams.
– Then wipe off with a soft, dry cloth.
Removal of stains
– Remove fresh water-based stains such as coffee, tea,
juices, blood etc. with an absorbent cloth or kitchen roll,
dried-on stains with the cleaning agent from the care set.
– Remove fresh fat-based stains on the surface such as
butter, mayonnaise, chocolate, etc. with an absorbent
cloth or kitchen roll or with the cleaning agent from the
care set.–Treat fat-based, dried-in stains with grease-dissolving
spray.
–Treat less common stains such as ball-pen and other
inks, felt-tip pens, nail polish, dispersion paint, shoe
cream etc. with a special leather stain remover.
Leather care products
– The leather should be treated regularly (about twice a
year) with a special leather-care product.
– Apply the cream very sparingly.
– Then wipe off with a soft, dry cloth.
Should you have any questions regarding the care and cleaning of
the leather upholstery in your vehicle, we recommend that you
contact your Audi dealer. The staff there will gladly provide you with
further information on cleaning and care of your upholstery and on
our complete range of leather care products:•
Cleaning and care set
•
Coloured leather-care cream
•
Stain remover for ball-pen inks, shoe cream etc.
•
Grease dissolving spray
•
New products and further developmentsCaution
On no account use solvents (such as petrol, turpentine), wax polish,
shoe cream or similar materials.
document_0900452a81793dcc.book Seite 215 Mittwoch, 21. März 2007 5:42 17
Page 219 of 294
Downloaded from www.Manualslib.com manuals search engine Fuel and filling the tank217
Controls
Safety
Driving tips
General maintenance
Self-help
Technical data
Fuel and filling the tankPetrolPetrol grade
The correct grade of petrol is listed inside the fuel tank
flap.The vehicle is equipped with a catalytic converter and must only be
run on unleaded petrol. Unleaded petrol must comply with the
European EN 228 standard. The petrol grades have different octane
ratings (RON). If, in exceptional circumstances, the correct octane
rating is not available, please note the following:
Your engine normally requires Super Plus unleaded petrol (98 RON)
according to ⇒page 281, “Performance, weights and dimensions”.
Premium unleaded fuel with 95 RON can also be used. This can,
however, result in a slight loss of power under certain driving condi-
tions. If premium unleaded petrol is not available, the engine can be
run on regular unleaded petrol with 91 RON as an emergency
measure. In this case only use moderate engine speeds and a light
throttle. Avoid using full throttle. Fill up with premium or Super Plus
petrol as soon as possible.
Caution
•
Petrol complying with the EN 228 standard can contain small
quantities of ethanol. However, “bioethanol fuels”, which are
retailed under various different names such as E50 and E85, and
which contain a large proportion of ethanol, must not be put into
the vehicle, as this would damage the fuel system.
•
Even one tankful of leaded fuel would permanently impair the
efficiency of the catalytic converter.
•
High engine speed and full throttle can damage the engine when
using petrol with an octane rating lower than the correct grade for
the engine.
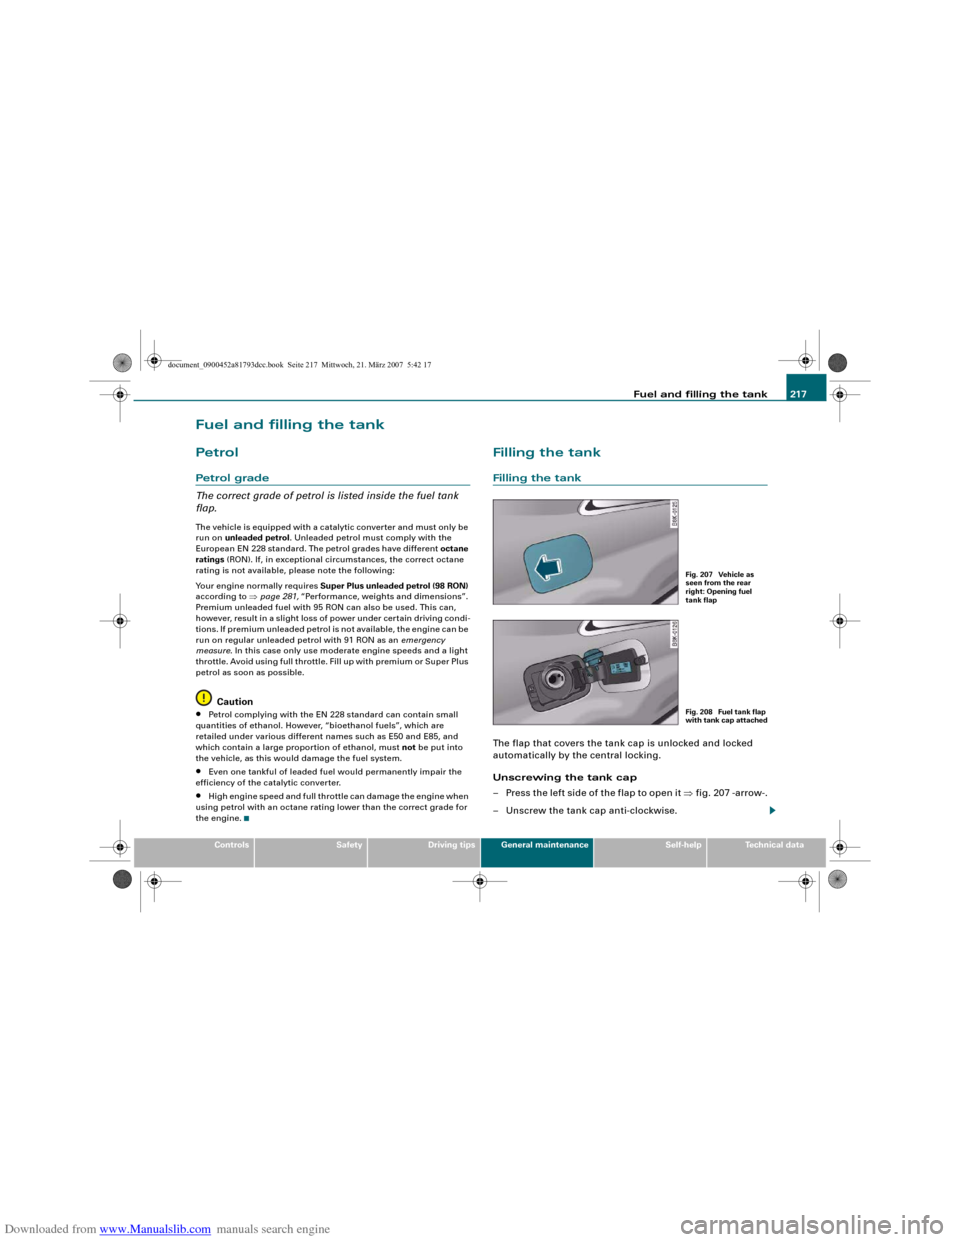
Filling the tankFilling the tankThe flap that covers the tank cap is unlocked and locked
automatically by the central locking.
Unscrewing the tank cap
– Press the left side of the flap to open it ⇒fig. 207 -arrow-.
– Unscrew the tank cap anti-clockwise.
Fig. 207 Vehicle as
seen from the rear
right: Opening fuel
tank flapFig. 208 Fuel tank flap
with tank cap attached
document_0900452a81793dcc.book Seite 217 Mittwoch, 21. März 2007 5:42 17
Page 221 of 294
Downloaded from www.Manualslib.com manuals search engine Fuel and filling the tank219
Controls
Safety
Driving tips
General maintenance
Self-help
Technical data
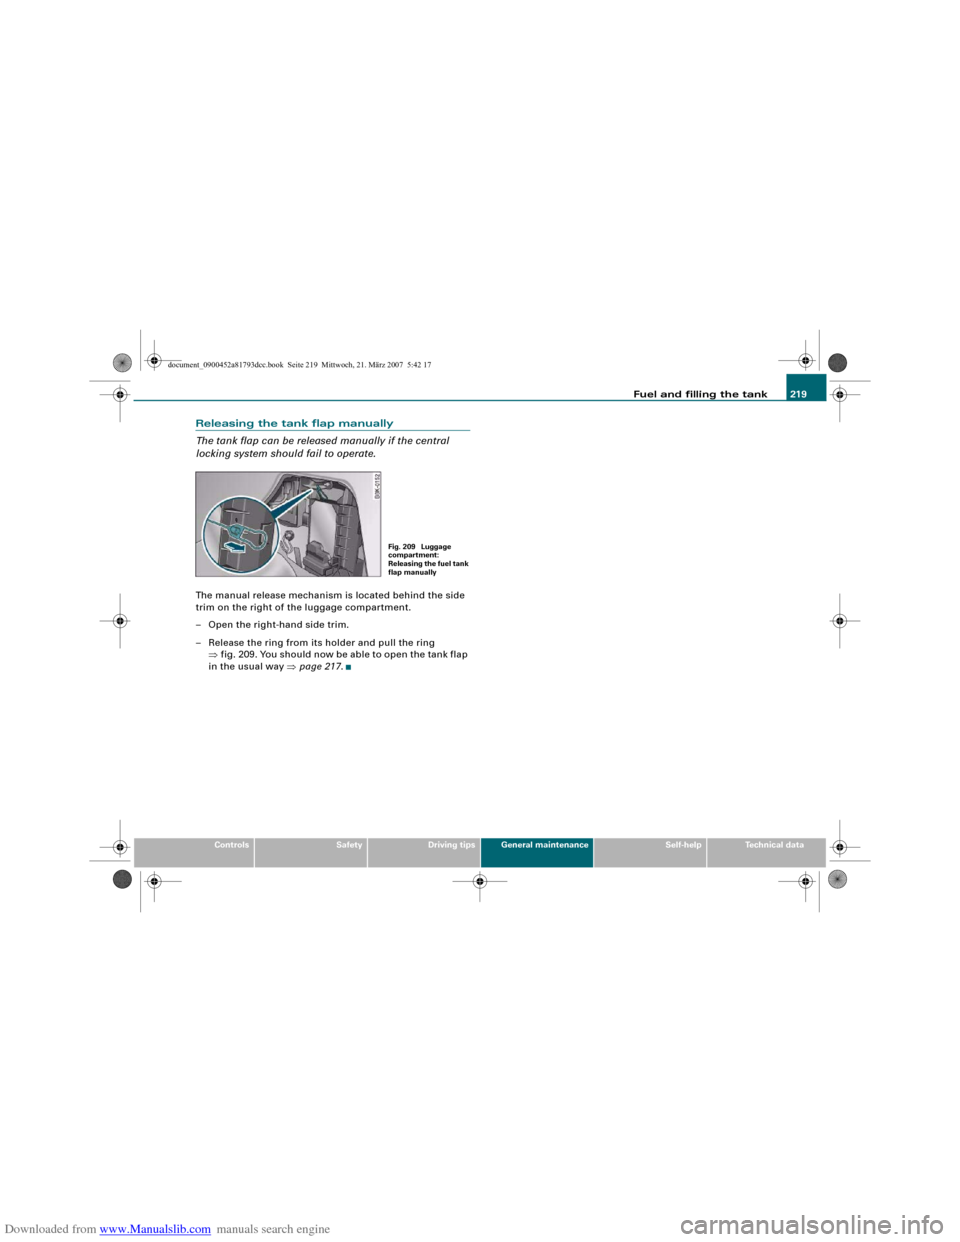
Releasing the tank flap manually
The tank flap can be released manually if the central
locking system should fail to operate.The manual release mechanism is located behind the side
trim on the right of the luggage compartment.
– Open the right-hand side trim.
– Release the ring from its holder and pull the ring
⇒fig. 209. You should now be able to open the tank flap
in the usual way ⇒page 217.
Fig. 209 Luggage
compartment:
Releasing the fuel tank
flap manually
document_0900452a81793dcc.book Seite 219 Mittwoch, 21. März 2007 5:42 17
Page 223 of 294
Downloaded from www.Manualslib.com manuals search engine Checking and topping up fluids221
Controls
Safety
Driving tips
General maintenance
Self-help
Technical data
Working on components in the engine compartment
Extra caution is necessary when working on components
in the engine compartment.Always be aware of the danger of injury and scalding as well as the
risk of accident or fire when working in the engine compartment
(e.g. when checking and refilling fluids). Always observe the warn-
ings listed below and follow all normal safety precautions. The
engine compartment of any motor vehicle is a potentially
hazardous area. ⇒.
WARNING
•
Switch off the engine.
•
Remove the ignition key.
•
Apply the parking brake.
•
Move the gear lever into neutral.
•
Wait for the engine to cool down.
•
Keep children away from engine compartment.
•
Never spill fluids on hot engine components. These fluids can
cause a fire (e.g. radiator anti-freeze).
•
Take care not to cause short circuits in the electrical system,
especially when working on the battery.
•
Do not touch the radiator fan when the engine is hot. The fan
may start running suddenly.
•
Do not unscrew the cap on the expansion tank when the engine
is hot. The cooling system is under pressure.
•
Protect face, hands and arms by covering the cap with a large,
thick rag to protect against escaping coolant and steam.
•
If any tests have to be performed with the engine running,
there is an extra safety risk from the rotating parts, such as the
drive belts, alternator and radiator fan, etc., and from the high-
voltage ignition system.
•
Observe the following additional warnings if work on the fuel
system or the electrical system is necessary:
−Always disconnect the battery.
−Do not smoke.
−Never work near naked flames.
−Always keep an approved fire extinguisher immediately
available.Caution
When topping up fluids make sure the correct fluid is put into the
correct filler opening. This can otherwise cause serious malfunc-
tions or engine damage.
For the sake of the environment
Inspect the ground underneath your vehicle regularly so that any
leaks are detected at an early stage. If you find oil spots or other
fluids, have your vehicle inspected by a qualified workshop.
Note
On right-hand drive vehicles* some of the containers/ reservoirs
mentioned below are located on the other side of the engine
compartment.Closing the bonnet– To close the bonnet, pull it down to overcome the spring
pressure.
– Then let it drop into the catches; do not press down ⇒.
WARNING (continued)
document_0900452a81793dcc.book Seite 221 Mittwoch, 21. März 2007 5:42 17
Page 225 of 294
Downloaded from www.Manualslib.com manuals search engine Checking and topping up fluids223
Controls
Safety
Driving tips
General maintenance
Self-help
Technical data
•
Do not mix the LongLife oil with oil intended for fixed service
intervals, as the requirements for the extended service intervals are
then no longer guaranteed.
•
In exceptional circumstances, if the engine oil level is too low
⇒page 223 and you cannot obtain the specified LongLife oil, you
can put in a small quantity of oil for fixed service intervals -
⇒page 281, “Performance, weights and dimensions”. This should
not be done more than once and no more than 0.5 litres should be
used.
Fixed service intervals (Inspection Service)*
If you do not take advantage of the Audi LongLife service for your
car, you can use the oils for fixed service intervals - ⇒page 281,
“Performance, weights and dimensions”. In this case, your car must
be serviced after a fixed interval of 1 year / 15,000 km (10,000 miles)
– see Service Schedule.
•
In exceptional circumstances, if the engine oil level is too low
⇒page 223 and you cannot obtain the oil specified for your vehicle,
you can put in a small quantity of oil conforming to the specification
ACEA A2 or ACEA A3. This should not be done more than once and
no more than 0.5 litres should be used.
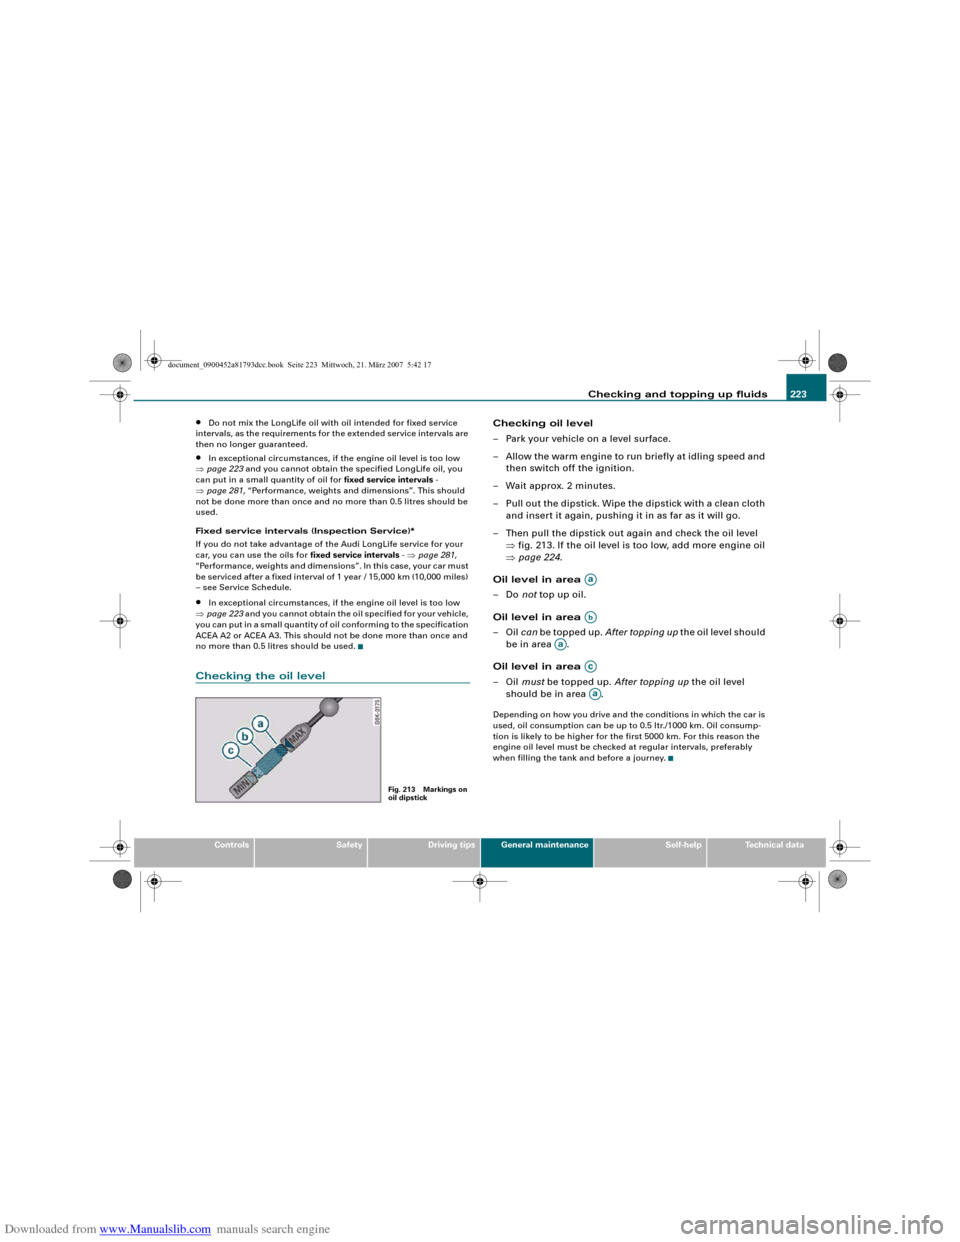
Checking the oil level
Checking oil level
– Park your vehicle on a level surface.
– Allow the warm engine to run briefly at idling speed and
then switch off the ignition.
– Wait approx. 2 minutes.
– Pull out the dipstick. Wipe the dipstick with a clean cloth
and insert it again, pushing it in as far as it will go.
– Then pull the dipstick out again and check the oil level
⇒fig. 213. If the oil level is too low, add more engine oil
⇒page 224.
Oil level in area
–Do not top up oil.
Oil level in area
–Oil can be topped up. After topping up the oil level should
be in area .
Oil level in area
–Oil must be topped up. After topping up the oil level
should be in area .Depending on how you drive and the conditions in which the car is
used, oil consumption can be up to 0.5 ltr./1000 km. Oil consump-
tion is likely to be higher for the first 5000 km. For this reason the
engine oil level must be checked at regular intervals, preferably
when filling the tank and before a journey.
Fig. 213 Markings on
oil dipstick
AaAb
Aa
AcAa
document_0900452a81793dcc.book Seite 223 Mittwoch, 21. März 2007 5:42 17
Page 227 of 294
Downloaded from www.Manualslib.com manuals search engine Checking and topping up fluids225
Controls
Safety
Driving tips
General maintenance
Self-help
Technical data Countries with warm climate
The coolant concentration must not be reduced by adding plain
water, even in the summer or in warm climates. The concentration
of the anti-freeze additive must always be at least 40%.
Countries with cold climate
If greater anti-freeze protection is required in very cold climates, the
proportion of the anti-freeze additive G12+ can be increased. A
concentration of 60% offers protection down to about -40 °C. The
concentration of the antifreeze additive must not be more than 60%,
otherwise this would reduce the antifreeze protection. In addition,
the cooling effect will be adversely affected.
Vehicles for export to countries with a cold climate (such as Sweden,
Norway and Finland) are supplied with antifreeze protection down
to about -35 °C. The concentration of the antifreeze additive for
these countries should always be at least 50%.
Caution
•
It is advisable to have the cooling system checked before the
winter season to make sure that the antifreeze concentration is
adequate for the conditions to be expected. This applies particularly
if you intend to take the car into a colder climate zone. If necessary,
have the anti-freeze concentration increased to 50 - 60% as required.
•
Use only anti-freeze additive G12+, an additive meeting the spec-
ification “TL-VW 774 F ”. Other additives may give considerably infe-
rior corrosion protection. The resulting corrosion in the cooling
system can lead to a loss of coolant, causing serious damage to the
engine.
•
The coolant additive G12+ can be mixed only with additives G11
and G12.
Checking coolant level
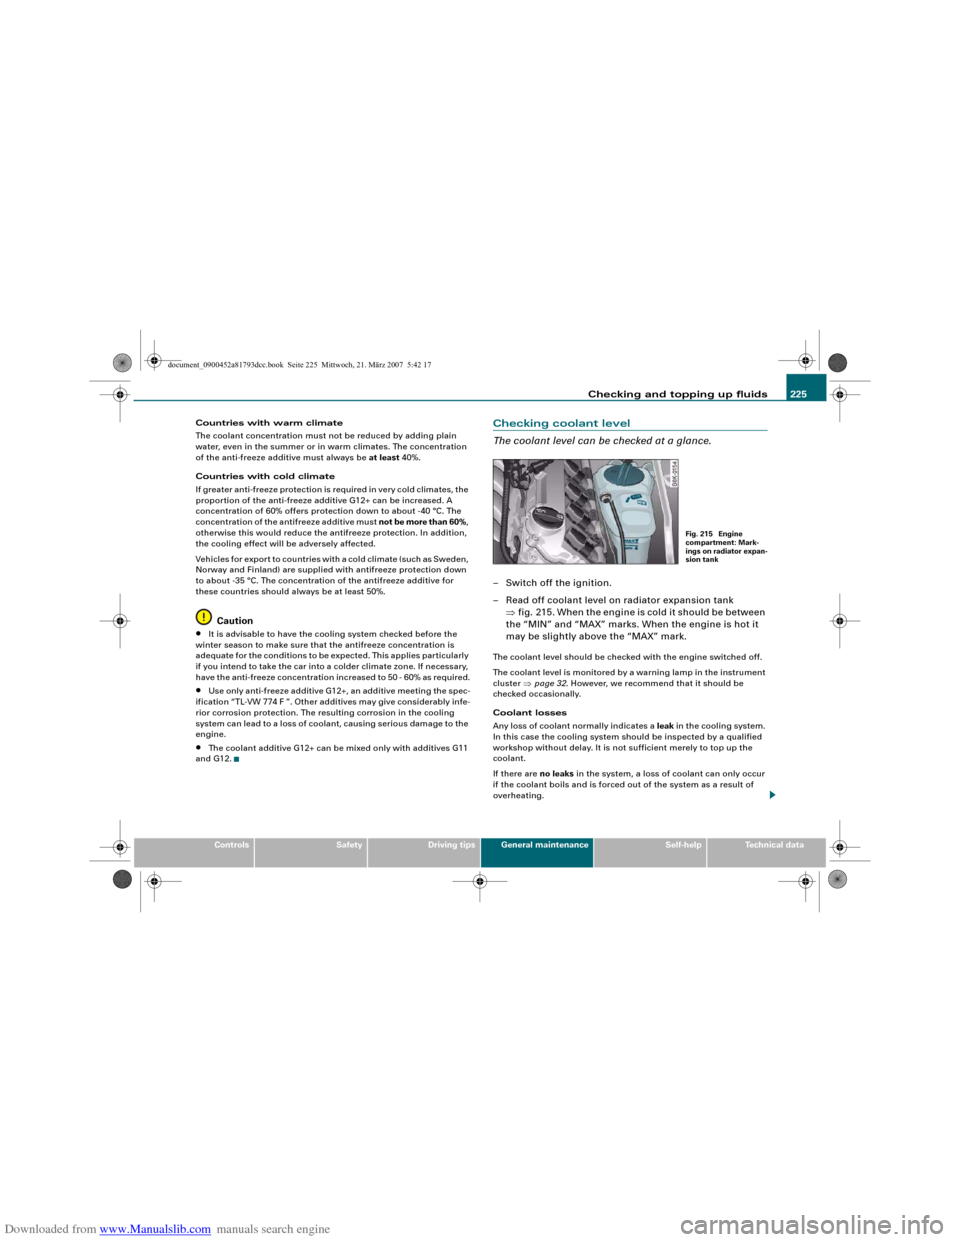
The coolant level can be checked at a glance.– Switch off the ignition.
– Read off coolant level on radiator expansion tank
⇒fig. 215. When the engine is cold it should be between
the “MIN” and “MAX” marks. When the engine is hot it
may be slightly above the “MAX” mark.The coolant level should be checked with the engine switched off.
The coolant level is monitored by a warning lamp in the instrument
cluster ⇒page 32. However, we recommend that it should be
checked occasionally.
Coolant losses
Any loss of coolant normally indicates a leak in the cooling system.
In this case the cooling system should be inspected by a qualified
workshop without delay. It is not sufficient merely to top up the
coolant.
If there are no leaks in the system, a loss of coolant can only occur
if the coolant boils and is forced out of the system as a result of
overheating.
Fig. 215 Engine
compartment: Mark-
ings on radiator expan-
sion tank
document_0900452a81793dcc.book Seite 225 Mittwoch, 21. März 2007 5:42 17
Page 229 of 294
Downloaded from www.Manualslib.com manuals search engine Checking and topping up fluids227
Controls
Safety
Driving tips
General maintenance
Self-help
Technical data
Brake fluidChecking brake fluid level
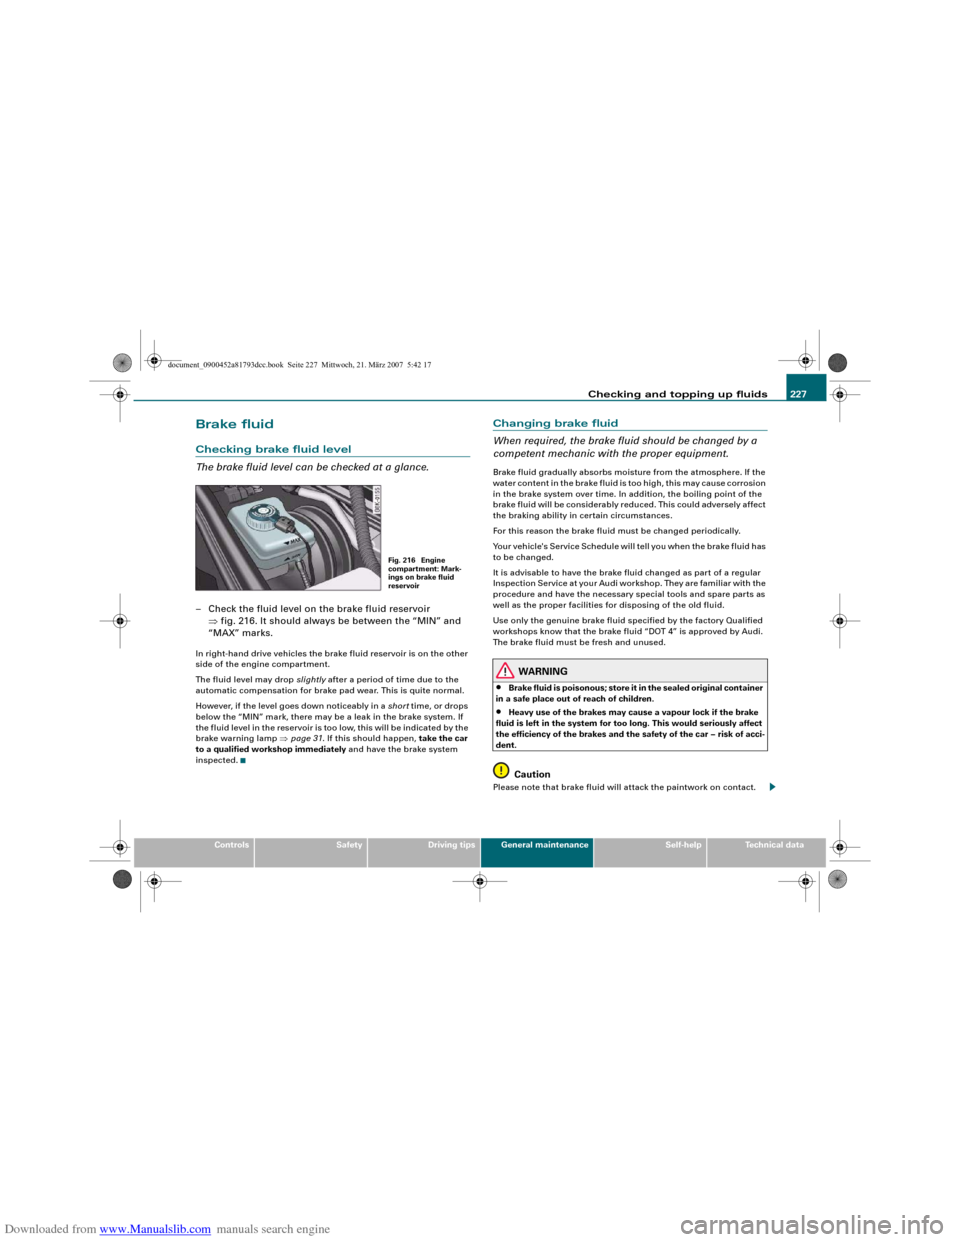
The brake fluid level can be checked at a glance.– Check the fluid level on the brake fluid reservoir
⇒fig. 216. It should always be between the “MIN” and
“MAX” marks.In right-hand drive vehicles the brake fluid reservoir is on the other
side of the engine compartment.
The fluid level may drop slightly after a period of time due to the
automatic compensation for brake pad wear. This is quite normal.
However, if the level goes down noticeably in a short time, or drops
below the “MIN” mark, there may be a leak in the brake system. If
the fluid level in the reservoir is too low, this will be indicated by the
brake warning lamp ⇒page 31. If this should happen, take the car
to a qualified workshop immediately and have the brake system
inspected.
Changing brake fluid
When required, the brake fluid should be changed by a
competent mechanic with the proper equipment.Brake fluid gradually absorbs moisture from the atmosphere. If the
water content in the brake fluid is too high, this may cause corrosion
in the brake system over time. In addition, the boiling point of the
brake fluid will be considerably reduced. This could adversely affect
the braking ability in certain circumstances.
For this reason the brake fluid must be changed periodically.
Your vehicle's Service Schedule will tell you when the brake fluid has
to be changed.
It is advisable to have the brake fluid changed as part of a regular
Inspection Service at your Audi workshop. They are familiar with the
procedure and have the necessary special tools and spare parts as
well as the proper facilities for disposing of the old fluid.
Use only the genuine brake fluid specified by the factory Qualified
workshops know that the brake fluid “DOT 4” is approved by Audi.
The brake fluid must be fresh and unused.
WARNING
•
Brake fluid is poisonous; store it in the sealed original container
in a safe place out of reach of children.
•
Heavy use of the brakes may cause a vapour lock if the brake
fluid is left in the system for too long. This would seriously affect
the efficiency of the brakes and the safety of the car – risk of acci-
dent.Caution
Please note that brake fluid will attack the paintwork on contact.
Fig. 216 Engine
compartment: Mark-
ings on brake fluid
reservoir
document_0900452a81793dcc.book Seite 227 Mittwoch, 21. März 2007 5:42 17