driver seat adjustment AUDI S5 COUPE 2016 Owners Manual
[x] Cancel search | Manufacturer: AUDI, Model Year: 2016, Model line: S5 COUPE, Model: AUDI S5 COUPE 2016Pages: 264, PDF Size: 66.92 MB
Page 56 of 264
Seat s and sto rage
Seats and storage
General information
Why is your seat adjustment so important?
The safety belts and the airbag system can only
provide maximum protection if the front seats are correctly adjusted .
There are various ways of adjusting the front
seats to provide safe and comfortable support
for the dr iver and the front passenger . Adjust
your seat properly so that:
- you can easily and quickly reach all the switches
and controls in the instrument panel
- your body is properly supported thus reducing
physical stress and fatigue
- the safety belts and a irbag system can offer
maximum protection
¢ page 129.
In the following sections, you will see exact ly
how you can best adjust your seats.
There are spec ial regulat ions and instr uctions for
installing a c hild safety seat on the front pas
senger 's seat . Always fo llow the information re
garding child safety provided inc::>
page 151,
Child safety.
A WARNING
Refer to ¢ page 112, Driving safety for im
portant information, tips, suggestions and
wa rnings that you should read and follow for
your own safety and the safety of yo ur pas
senge rs.
A WARNING
In correct seating position of the driver and all
other p assenge rs can result in serious person
al injury .
- Always keep you r fee t on the floor when the
vehicle is in motion -never put your feet on
top o f the instr ument pane l, o ut o f the win
dow or on top of the seat cushion. This ap
plies espec ially to the passenge rs. If your
seat ing pos ition is inco rrect, you increase
the risk of injury in the case of sudden brak
ing o r an accident. If the airbag inflates and
54
the seating position is incorrect, this could
result in personal injury or even death.
- It is important for both the driver and front
passenger to keep a distance of at least
10 inches (25 cm) between themselves and
the steering wheel and/or instrument pan
el. If you're sitt ing any closer than this, the
airbag system cannot protect you properly .
In addition , the front seats and head re
straints must be adjusted to your body
he igh t so that they can g ive you maximum
protection.
- Always try to keep as much distance as pos
sible between yourself and the s teer ing
wheel or instrument pane l.
- Do not adjust the driver's or fron t passeng
er 's sea t while the vehicle is moving. Yo ur
seat may move unexpectedly, causing sud
den loss of vehicle contro l and personal in
jury. If you ad just yo ur seat while the veh icle
is moving, you are out of pos ition.
Driver's seat
The correct seat position is important for safe
and relaxed driving.
We recommend that you adjust the dr iver's seat
in the following manner:
.. Adjust the seat in fo re and aft direction so tha t
you c an ea sily push the ped als to the floor
while keeping your knees slight ly bent
c::> A in
Why is your seat adjustment so important? on
page 54.
.. Adjust the seatback so that when you sit with
your back against the seatback, you can still
grasp the top of the steering wheel.
.. App lies to veh icles w ith adjustable head re
straints : Adjust the head restraint so the upper
edge is as even as possible with the top of your
head.
If t h at i s not poss ible , try to a djust the
he ad rest raint so tha t it is as close to this pos i
tion as possible
c::> page 57.
A WARNING
N eve r place any objects in the dr iver's foot
well. An object could get into the pedal area and interfere with pedal function. In case of
-
Page 58 of 264
Sea ts and stor age
Power easy entry function
Applies to vehicles: with power adjustable seats
The easy entry function makes it easier for the
rear passengers to enter and leave the vehicle.
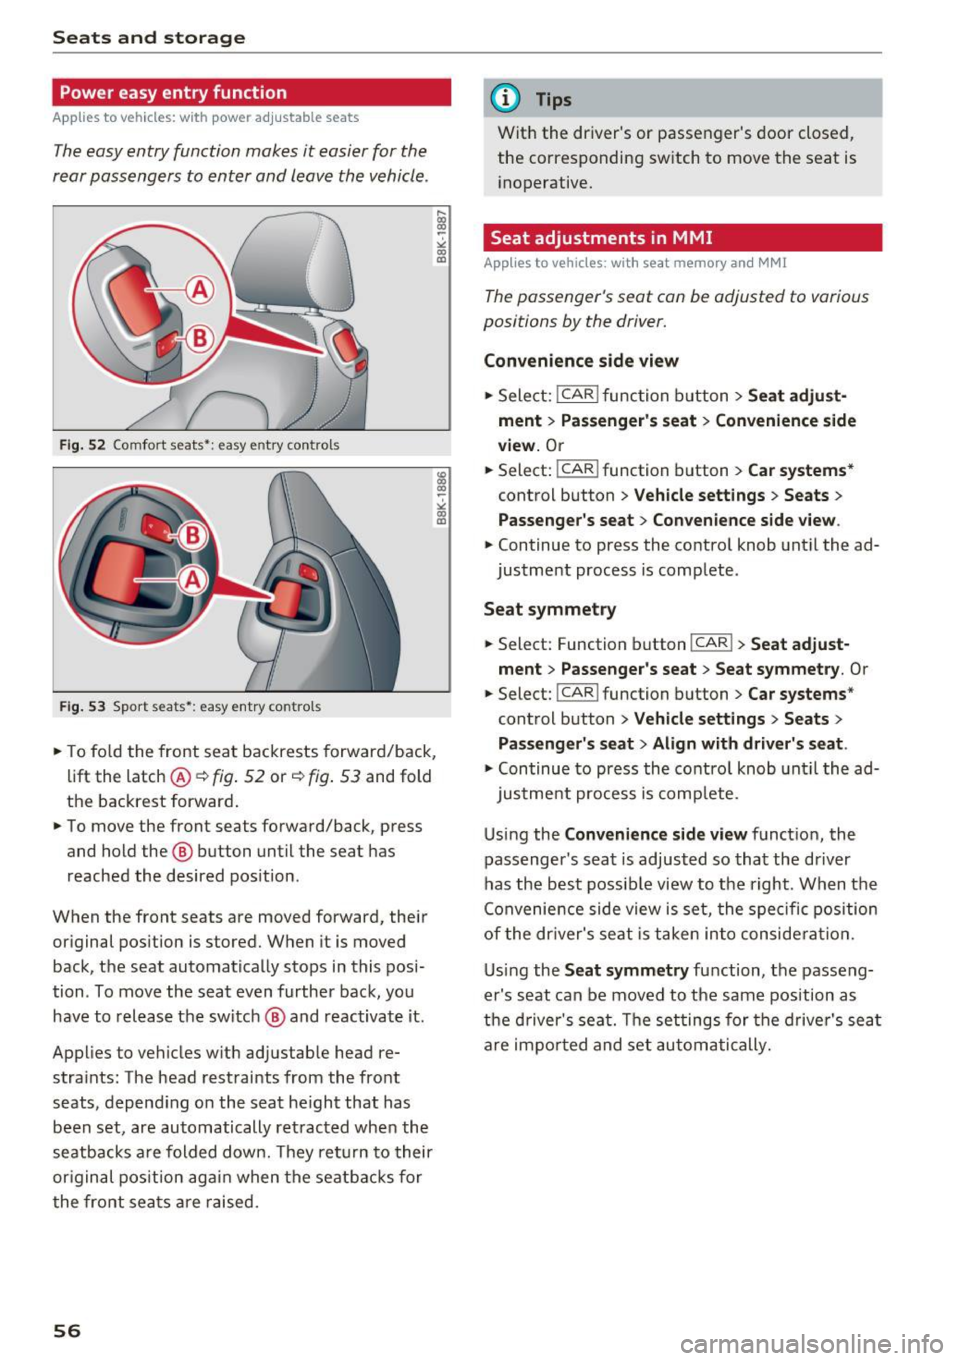
F ig. 52 Comfort seats•: easy entry contro ls
F ig . 53 Sport seats•: easy entry controls
.,. To fo ld the front seat backrests forward/back,
li ft the latch ®¢
fig. 52 or~ fig. 53 and fold
the backrest forward .
.,. To move the front seats forward/back, press
and hold the ® button until the seat has
reached the desired pos ition.
When the front seats are moved forward, their
or iginal pos ition is stored. When it is moved
back, the seat automatically stops in this posi
tion . To move the seat even further back, you
have to release the switch @ and reactivate it.
Applies to vehicles w ith adjustab le head re
stra ints: The head restraints from the fro nt
seats, depend ing on the seat he ight that has
been set, are automatically retracted when the
seatbacks a re folded down. They re turn to their
or iginal pos ition agai n when the seatbacks for
the front seats are raised.
56
@ Tips
Wit h the driver's or passenger's door closed,
the corresponding sw itch to move the seat is
i noperative.
Seat adjustments in MMI
Applies to vehicles: with seat memory and MM!
The passenger 's seat can be adjusted to various
positions by the driver.
Convenience side view
.,. Select: !CAR ! function button> Seat adju st
ment
> Pas senger 's seat > Co nveni ence side
v iew.
O r
.,. Select: !CAR ! function button> C ar s yst ems *
control button > Vehicle settings > Se ats >
Passenger 's seat > Con venienc e side view .
.,. Continue to press the control knob unt il the ad
justment process is complete .
Seat symmetry
.,. Select: Function button I CAR !> Seat adju st
ment
> Pa ssenger's seat > Seat s ymmetr y. Or
.,. Select: !CAR ! function button> Car s ystems *
control button > Vehicle setting s > Seats >
Passe nger' s s eat > Align w ith driver's s eat .
.,. Continue to press the control knob unt il the ad-
justment process is comp lete.
Using the
C on veni en ce side view funct ion, the
passenger 's seat is adjusted so that the driver
has the best possib le view to the right . When the
Convenience side view is set, the specific position
of the dr iver's seat is taken into conside rat ion.
Us ing the
Seat s ymm etr y function, the passeng
er's seat can be moved to the same position as
the d river 's seat. The set tings for the driver 's sea t
are impo rted and set automatically.
Page 60 of 264
Sea ts and stor age
Rear head restraints
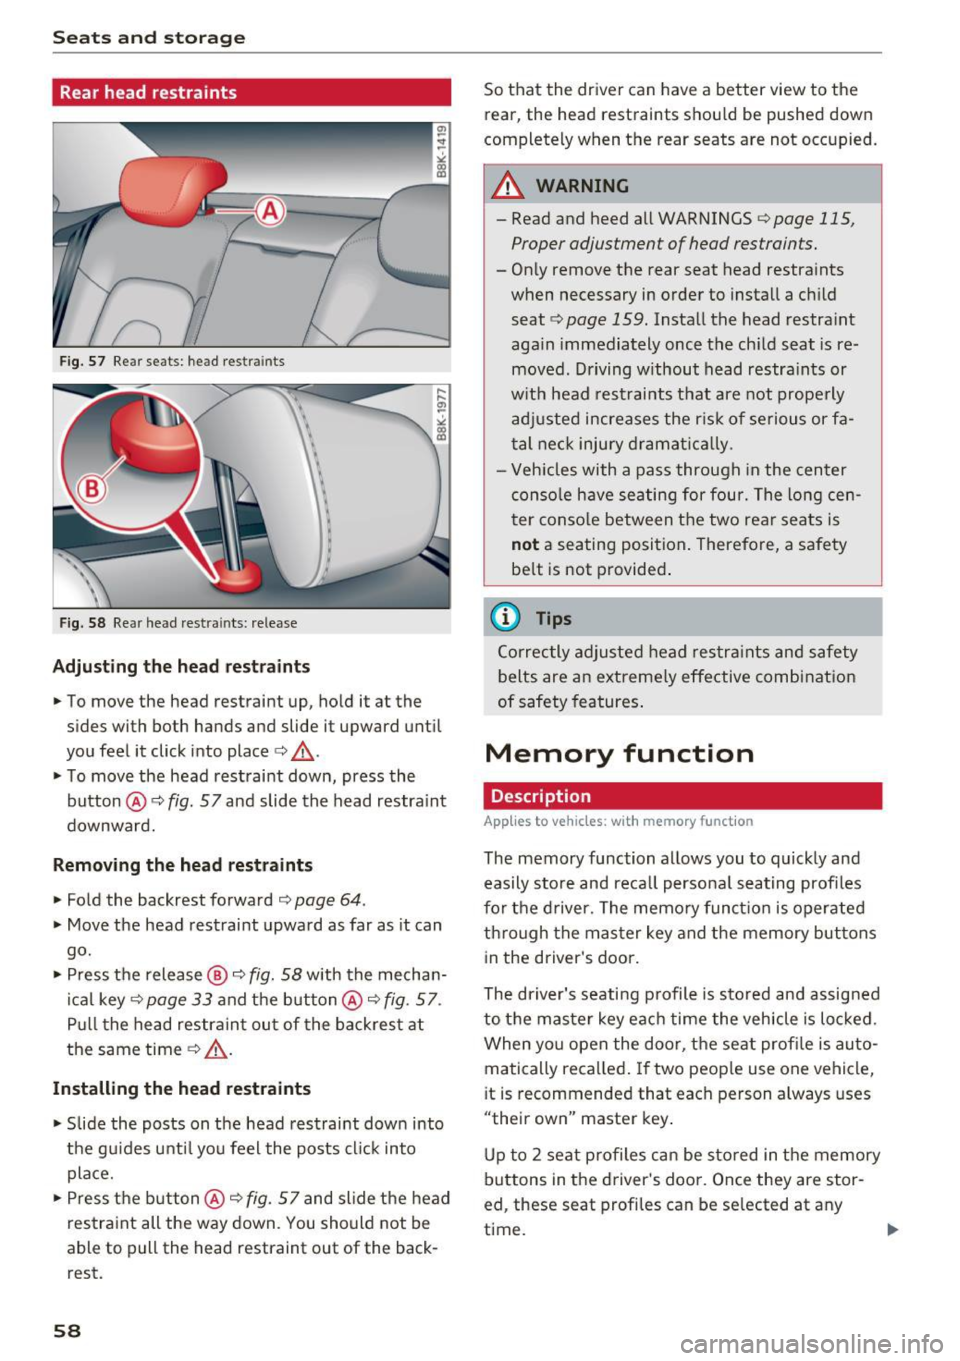
Fig. 57 Re ar seats: he ad res traints
Fig. 58 Rea r head restra ints: re lease
Adjust ing th e head re st rai nts
.. To move the head restraint up, hold it at the
sides with both hands and slide it upward until
you feel it click into place<=>& .
.. To move the head restraint down, press the
button @
c::> fig. 57 and slide the head restra int
downward.
Removing th e he ad re straint s
.. Fold the backrest forward <=> page 64.
.. Move the head restraint upward as far as it can
go.
.. Press the release @
i=:> fig. 58 with the mechan
ical key
c::> page 33 and the button @ c::> fig. 57 .
Pull the head restraint out of the backres t at
the same time¢.&_ .
Install ing the head restra ints
.. Slide the posts on the head rest raint down into
the gu ides unti l you feel the posts cl ick into
place.
.. Press the button @
c::> fig. 57 and slide the head
restraint all the way down. You should not be
able to pull the head restraint out of the back
rest.
58
So that the dr iver can have a better view to the
rear, the head restraints shou ld be pushed down
completely when the rear seats are not occupied.
_& WARNING
- Read and heed all WARNINGS <=:>page 115 ,
Proper adjustment of head restraints.
- Only remove the rear seat head restra ints
when necessary in order to install a ch ild
seat
¢ page 159. Install the head restra int
aga in immediately once the child seat is re
moved. Driving w ithout head restraints or
w it h head restraints that are not prope rly
adj usted increases the r isk of se rious or fa
tal nec k injury d rama tica lly .
- Veh icles with a pass through in the center
conso le have seating for four. The long cen
ter conso le between t he two rear seats is
not a seating position . Therefore, a safety
be lt is not provide d.
(0 Tips
Correctly adjusted head restra ints and safety
belts are an e xtreme ly effe ctive combinat ion
of safety features .
Memory function
Description
Applies to vehicles: with memory funct ion
The memory function allows you to quickly and
easily s tore and reca ll persona l seating profiles
for the d river. The memo ry funct io n is operated
through the master key and the memory but tons
in the driver's door .
The driver's seating p rofile is stored and assigned
to the master key eac h time the vehicle is locked .
When yo u open the door, t he seat profi le is auto
matically reca lled. If two peop le use one vehicle,
i t is recommended that each person always uses
"their own" master key .
Up to 2 seat profiles can be sto red in t he memory
buttons in the dr iver 's doo r. Once they are stor
ed , these seat profi les can be se lected at any
time . ..,_
Page 61 of 264
..... N
0 1-CX)
..... I.Cl U"I
..... I.Cl ......
In addition to the driver 's seat settings, you can
also store and access the exterior mirror adjust
ment settings* using the remote control key or
memory button.
Remote control key
Ap plies to vehi cles: with seat memory
To assign the driver's seat settings to the remote
control key when locking the vehicle, the function
must be act ivated in the radio or MMI*
• Se lect :
ICAR I fu nction button> S eat adjus t
ment > Driver's seat > Remot e control ke y
>
on .Or
• Select :
I CARI fu nct ion button> Car sy stem s*
contro l button > Vehicle setting s > Seats>
Driver' s seat > Remot e control ke y > On.
@ Tips
If you do not want ano th er d river's settings to
be assigned to the remote key, switch off the
memory function us ing t he r adio or MMI* or
the
I O N/O FF I button ~ page 59.
Memory buttons
Applies to vehicles: with seat memo ry
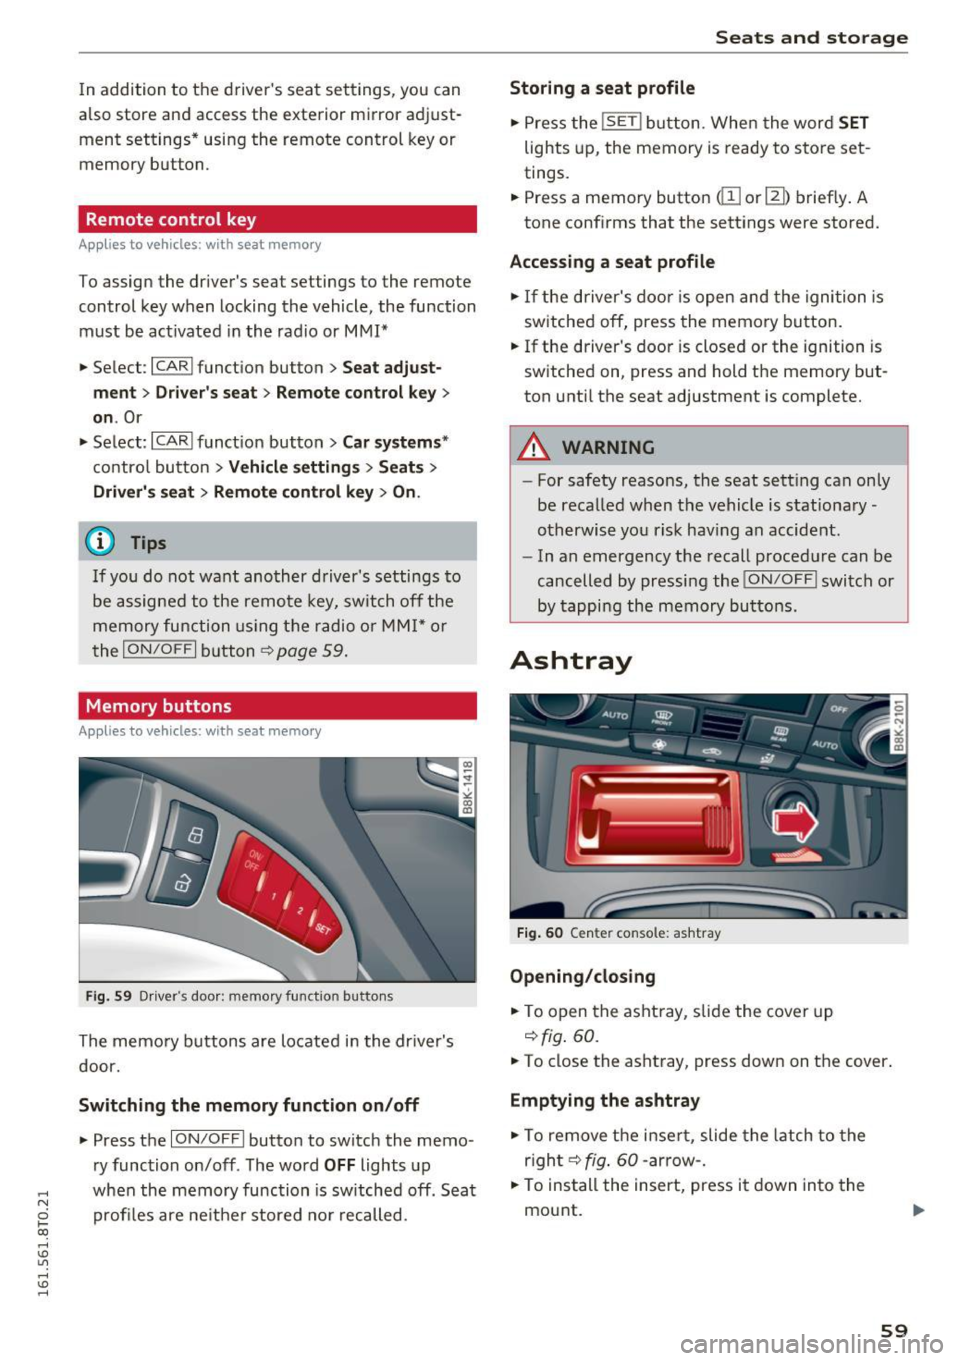
Fi g. 59 Drive r's doo r: m emory funct io n butto ns
The memo ry buttons are located in the dr iver's
door.
Switching the memory function on /off
• Press the ION/OF F I button to switch the memo
ry function on/off . The word
OFF lights up
when the memory function is sw itched off . Seat
profi les are ne ither stored no r recalled .
Seats and storag e
Storing a seat profile
• Press the ISE T! button. Whe n the word SET
lights up, the memory is ready to s tore set
tings.
• Press a memory button
dII or[ II) brief ly . A
tone conf irms that the settings were stored.
Acces sing a seat profile
• If the d river's doo r is open and the ignition is
sw itched off, press the memory button.
• If the driver's door is closed or the ignition is
switched on, press and hold the memory but
ton unti l the seat adjustment is complete.
A WARNING
- For safety reasons, the seat sett ing can on ly
be recalled when the vehicle is stationary
otherwise yo u risk hav ing an accident.
- In an emergency the recall proced ure can be
cancelled by pressing the
! ON/O FF I switch or
by tappi ng the memory buttons.
Ashtray
Fig. 60 Cen te r console : ash tray
Opening /closing
• To open the asht ray, s lide the cover up
~ fig . 60.
• To close the ashtray, press down on the cover .
Emptying the ashtray
• To remove the i nse rt, slide the latch to the
r igh t~
fig . 60 -arrow -.
• To ins tall the insert, press it down into the
mount.
59
Page 74 of 264
Driving
Driving
Steering
Manually adjustable steering wheel
The steering wheel position is fully adjustable up
and down and forward and back .
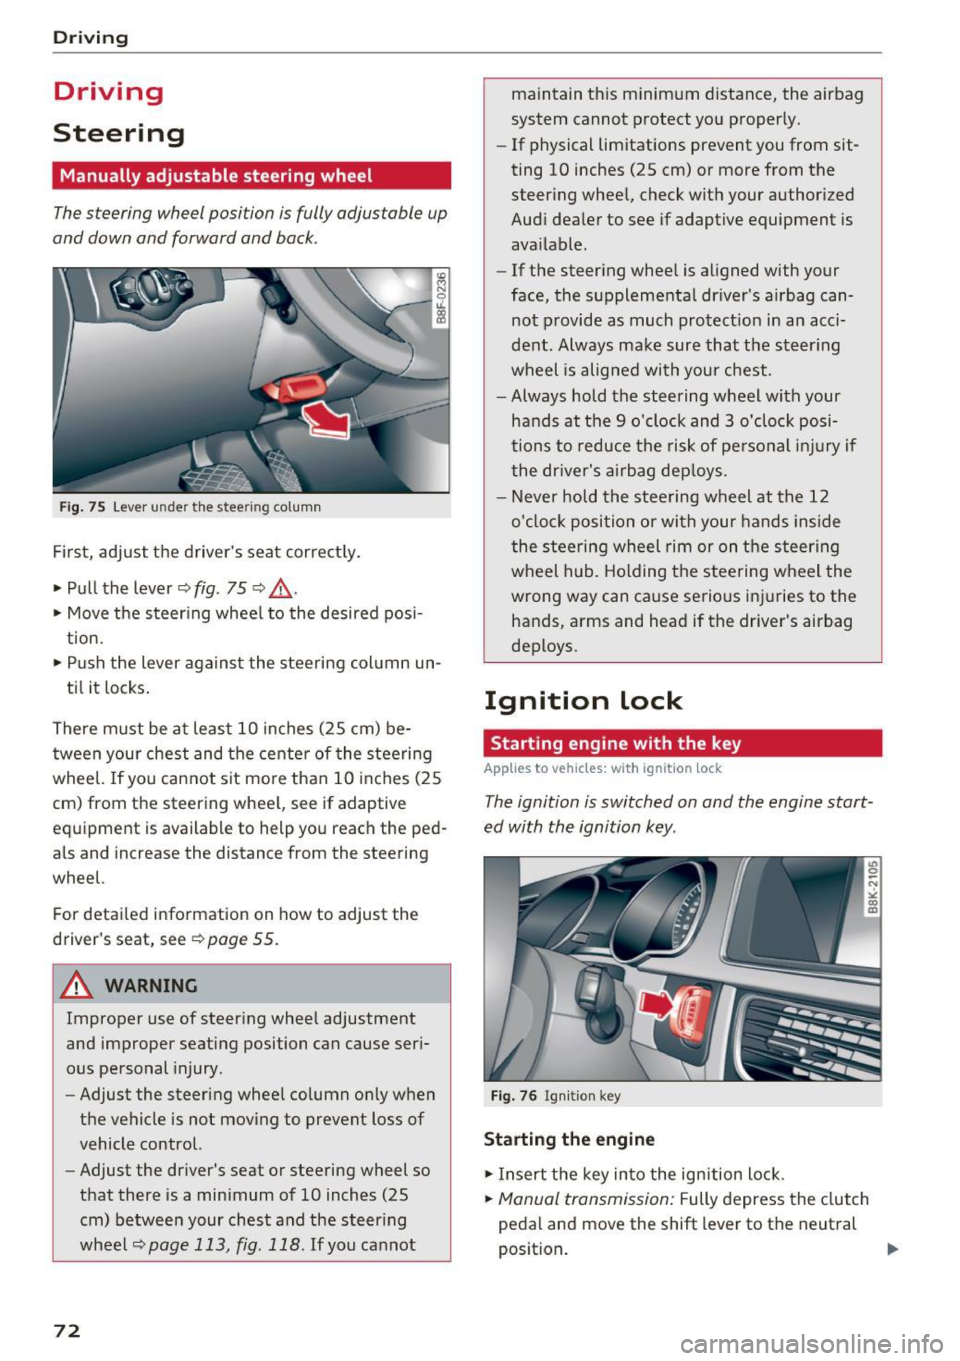
Fig. 75 Lever under the steering column
First, adjust the driver's seat correctly.
• Pull the lever¢
fig. 75 ¢ .&_ .
• Move the steering wheel to the desired posi
tion.
• Push the lever against the steering column un-
til it locks.
There must be at least 10 inches (25 cm) be tween your chest and the center of the steering
wheel. If you cannot sit more than 10 inches (25
cm) from the steering wheel, see if adaptive
equipment is available to help you reach the ped
als and increase the distance from the steering
wheel.
For detailed information on how to adjust the
driver's seat, see
¢page 55.
A WARNING
Improper use of steering wheel adjustment
and improper seating position can cause seri
ous personal injury.
- Adjust the steering wheel column only when
the vehicle is not moving to prevent loss of
vehicle control.
- Adjust the driver's seat or steering wheel so
that there is a minimum of 10 inches (25
cm) between your chest and the steering
wheel
¢page 113, fig. 118 . If you cannot
72
maintain this minimum distance, the airbag
system cannot protect you properly.
- If physical limitations prevent you from sit
ting 10 inches (25 cm) or more from the
steering wheel, check with your authorized
Audi dealer to see if adaptive equipment is
available.
- If the steering wheel is aligned with your
face, the supplemental driver's airbag can
not provide as much protection in an acci
dent. Always make sure that the steering
wheel is aligned with your chest.
- Always hold the steering wheel with your
hands at the 9 o'clock and 3 o'clock posi
tions to reduce the risk of personal injury if
the driver's airbag deploys.
- Never hold the steering wheel at the 12
o'clock position or with your hands inside
the steering wheel rim or on the steering
wheel hub. Holding the steering wheel the
wrong way can cause serious injuries to the
hands, arms and head if the driver's airbag
deploys.
Ignition lock
Starting engine with the key
Applies to vehicles: wit h ignition lock
The ignition is switched on and the engine start
ed with the ignition key .
Fig. 76 Ignition key
Starting the engine
• Insert the key into the ignition lock.
• Manual transmission: Fully depress the clutch
pedal and move the shift lever to the neutral
position. ..,.
Page 131 of 264
.... N
0 I-co ....
Important information
Importance of wearing safety belts and
sitting properly
Airbags are only supplemental restraints. For
airbags to do their job, occupants must always
properly wear their safety belts and be in a prop er seating position.
For your safety and the safety of your passen
gers, before driving off, always :
""Adjust the driver's seat and steering wheel
properly 9page
113,
""Adjust the front passenger's seat properly
9page 55,
.,. Wear safety belts properly 9 page 123,
.,. Always properly use the proper child restraint
to protect children
9 page 151.
In a collision airbags must inflate within the blink
of an eye and with considerable force. The sup
plemental airbags can cause injuries if the driver
or the front seat passenger is not seated proper
ly . Therefore in order to help the airbag to do its
job, it is important, both as a driver and as a pas
senger to sit properly at all times .
By keeping room between your body and the
steering wheel and the front of the passenger
compartment, the airbag can inflate fully and
completely and provide supplemental pro tection
in certain frontal collisions
o page 113, Correct
passenger seating positions .
For details on the
operation of the seat adjustment controls
o page 55.
It 's especially important that children are proper
ly restrained
9page 151.
There is a lot that the driver and the passengers
can and must do to help the individual safety fea
tures installed in your Audi work together as a
system.
Proper seating position is important so that the
front airbag on the driver side can do its job. If
you have a physical impairment or condition that prevents you from sitting properly on the driver
seat with the safety belt properly fastened and
Airbag system
reaching the pedals, special modifications to
your vehicle may be n ecessary.
Contact your authorized Audi dealer, or call Audi
Customer Relations at 1-800-822-2834.
When the airbag system deploys, a gas generator
will fill the airbags , break open the padded cov
ers, and inflate between the steering wheel and
the driver and between the instrument panel and
the front passenger. The airbags will deflate im
mediately after deployment so that the front oc
cupants can see through the windshield again
without interruption.
All of this takes place in the blink of an eye, so
fast that many people don't even realize that the airbags have deployed. The airbags also inflate
with a great deal of force and nothing should be in their way when they deploy. Front airbags in
combination with properly worn safety belts slow
down and limit the occupant's forward move
ment . Together they help to prevent the driver
and front seat passenger from hitting parts of
the inside the vehicle while reducing the forces
acting on the occupant during the crash. In this
way they help to reduce the risk of injury to the head and upper body in the crash. Airbags do not
protect the arms or the lower parts of the body.
Both front airbags will not inflate in all frontal
collisions. The triggering of the airbag system de
pends on the vehicle deceleration rate caused by
the collision and registered by the electronic con
trol unit . If this rate is below the reference value
programmed into the control unit, the airbags
will not be triggered, even though the car may be
badly damaged as a result of the collision . Vehi
cle damage, repair costs or even the lack of vehi
cle damage is not necessarily an indication of
whether an airbag should inflate or not.
It is not possible to define a range of vehicle
speeds that will cover every possible kind and an
gle of impact that will always trigger the airbags ,
since the circumstances will vary considerably be
tween one collision and another. Important fac
tors include, for example, the nature (hard or soft) of the object which the car hits, the angle of
impact, vehicle speed, etc . The front airbags will
IIJJ,
129
Page 143 of 264
.... N
0 Ico ....
ly seated on the center of the seat cushion with
his or her back up against the backrest and the
backrest is not reclined
9page 113, Correc t
passenger seating positions,
- the adult is not taking weight off the seat by
holding on to the passenger assis t handle
above the front passenger door or suppor ting
their weight on the armrest,
- the safety bel t is being properly worn and that
there is not a lot of slack in the safety belt web
bing,
- accessory seat covers or cushions or other
things that may cause an incorrect reading or
impression on the weight-sensing mat under
the upholstery of the seat have been removed
from the front passenger seat,
- a safety belt extender has not been left in the
safety belt latch for the front passenger seat.
In addition to the
PASSENGER AIR BAG OFF
light in the center of the instrument panel, the
message
PASSENGER AIR BAG OFF or PASSEN
GER AIR BAG ON
will briefly appear in the instru
ment cluster display . This is to inform the driver
of the current front passenger airbag status.
Important safety instructions on
monitoring the Advanced Airbag System
A WARNING
An airbag system that is not functioning prop erly cannot provide supplemental protection
in a frontal crash .
- If the airbag indicator light
9 page 19
comes when the vehicle is being used, have
the system inspected immediately by your
authorized Audi dealer. It is possible that
the airbag will inflate when it is not sup
posed to, or will not inflate when it should.
A WARNING
If the front airbag inflates, a child without a
child restraint, in a rearward-facing child safe
ty seat or in a forward-facing child restraint
that has not been properly installed will be
seriously injured and can be killed.
Airbag system
-Even though your vehicle is equipped with
an Advanced Airbag System, make certain
that all children, especially 12 years and
younger, always ride on the back seat prop erly restrained for their age and size .
- Always install forward or rear-facing child
safety seats on the rear seat -even with an
Advanced Airbag System .
- If you must install a rearward-facing child
safety seat on the front passenger seat be
cause of exceptional circumstances and the
PASSENGER AIR BAG OFF light does not
appear and stay on, immediately install the
rear-facing child safety seat in a rear seating
position and have the airbag system in
spected by your authorized Audi dealer.
-A tight tether or other strap on a rearward
facing child restraint attached to the front passenger seat can put too much pressure
on the weight-sensing mat in the seat and
register more weight than is actually on the
seat . The heavier weight registered can
make the system work as though an adult
were on the seat and deploy the Advanced
Airbag when it must be suppressed causing
serious or even fatal injury to the child.
- If, in exceptional circumstances, you must
install a forward-facing child restraint on
the front passenger seat, always move the
seat into its rearmost position in the seat's
fore and aft adjustment range, as far away
from the airbag as possible. The backrest must be adjusted to an upright position .
Make sure that the
PASSENGER AIR BAG
OFF
light comes on and stays on all the time
whenever the ignition is switched on.
A WARNING
-- If the PASSENGER AIR BAG OFF light does
not go out when an adult is sitting on the
front passenger seat after taking the steps
described above, make sure the adult is
properly seated and restrained at one of the rear seating positions.
- Have the airbag system inspected by your
authorized Audi dealer before transporting
anyone on the front passenger seat .
141
Page 154 of 264
Child safety
exceptional circumstances and the PASSEN·
GER AIR BAG OFF
light does not come on
and stay on, immediately install the rear
ward-facing child safety seat in a rear seat
ing position and have the airbag system in
spected immediately by your authorized
Audi dealer.
_& WARNING
If, in exceptional circumstances, you must in
stall a forward-facing child restraint on the
front passenger's seat:
- Always make sure the forward-facing seat
has been designed and certified by its man
ufacturer for use on a front seat with a pas
senger front and side airbag.
- Always follow the manufacturer's instruc
tions provided with the child safety seat or
carrier.
- Always move the passenger seat into its
rearmost position in the seat's fore and aft
adjustment range, as far away from the air
bag as possible before installing the child
restraint. The backrest must be adjusted to
an upright position.
- Always make sure that the
PASSENGER AIR
BAG OFF
light comes on and stays on all the
time whenever the ignition is switched on.
(D Tips
Always replace child restraints that were in
stalled in a vehicle during a crash. Damage to
a child restraint that is not visible could cause
it to fail in another collision situation.
Advanced front airbag system and children
Your vehicle is equipped with a front "Advanced
Airbag System" in compliance with United States
Federal Motor Vehicle Safety Standard (FMVSS)
208, as well as Canada Motor Vehicle Safety
Standard (CMVSS) 208 as applicable at the time
your vehicle was manufactured.
The Advanced Airbag system in your vehicle has
been certified to meet the "low-risk" require
ments for 3- and 6-year old children on the pas
senger side and small adults on the driver side.
152 The low risk deployment criteria are intended
to
reduce the risk of injury through interaction with
the airbag that can occur, for example, by being
too close to the steering wheel and instrument
panel when the airbag inflates. In addition, the
system has been certified to comply with the "suppression" requirements of the Safety Stand
ard, to turn off the front airbag for infants up to
12 months who are restrained on the front pas
senger seat in child restraints that are listed in
the Standard.
Even though your vehicle is equipped with an Ad
vanced Airbag system, all children, especially
those 12 years and younger, should always ride
in the back seat properly restrained for their age
and size. The airbag on the passenger side makes
the front seat a potentially dangerous place for a child to ride. The front seat is not the safest place
for a child in a forward-facing child safety seat. It can be a very dangerous place for an infant or a
larger child in a rearward-facing seat.
· Advanced Airbags and the weight -sensing
mat in the front seat
The Advanced Airbag System in your vehicle de
tects the presence of an infant or child in a child
restraint on the front passenger seat using the
weight-sensing mat in the seat cushion and the
sensor below the safety belt latch on the front
passenger seat that measures the tension on the
safety belt .
The weight-sensing mat measures total weight of the child and the child safety seat and a child
blanket on the front passenger seat. The weight
on the front passenger seat is related to the de
sign of the child restraint and its ' 'footprint", the
size and shape of the bottom of the child re- straint as it sits on the seat. The weight of a child
restraint and its "footprint" vary for different
kinds of child restraints and for the different
models of the same kind of child restraint of-
fered by child restraint manufacturers.
The weight ranges for the individual types,
makes and models of child restraints that the
NHTSA has specified in the Safety Standard to
gether with the weight ranges of typical infants .,.
Page 258 of 264
Index
Rear view camera Parking mode
1 . . . . . . . . . . . . . . . . . . . . . 109
Parking mode 2 . . . . . . . . . . . . . . . . . . . . . 1 10
Rea r view m irro r . . . . . . . . . . . . . . . . . . . . . . . 4 8
Rear window heat ing . . . . . . . . . . . . . . . . . . . 70
R ear window sun shade . . . . . . . . . . . . . . . . .
49
Recircu lat ion mode (automatic climate con-
trol) . . . . . . . . . . . . . . . . . . . . . . . . . . . . . . . . . 70
Refuell ing . . . . . . . . . . . . . . . . . . . . . . . . . . .
188
Release lever for hood ....... ... .. .. ... 19 1
Remote cont rol
Garage doo r opener (Home link) . . . . . . . . .
41
Remote control key . . . . . . . . . . . . . . . . . . . . 32
Personalizing . . . . . . . . . . . . . . . . . . . . . . . . 32
u nl ock ing/locking . . . . . . . . . . . . . . . . . . . . 34
Remote rear lid re lease . . . . . . . . . . . . . . . . . 3 7
Repair man uals . . . . . . . . . . . . . . . . . . . . . . .
24 4
Repairs
Airbag system . . . . . . . . . . . . . . . . . . . . . .
142
Rep lacement key . . . . . . . . . . . . . . . . . . . . . . 32
Rep lac ing b ulbs . . . . . . . . . . . . . . . . . . . . . . 235
Replacing wiper b lades . . . . . . . . . . . . . . . . . 51
Repo rting Sa fety Defects ..... ... .. . 119, 120
Reset button . . . . . . . . . . . . . . . . . . . . . . . . . . 1 2
Retractor . . . . . . . . . . . . . . . . . . . . . . . . . . . . 124
R ight hand drive . . . . . . . . . . . . . . . . . . . . . . . 4 6
Rims . .... .. .. ... ............ .... .. . 219
Roof rack . . . . . . . . . . . . . . . . . . . . . . . . . . . . . 6 2
Roof load . . . . . . . . . . . . . . . . . . . . . . . . . . . 63
Roof weight . . . . . . . . . . . . . . . . . . . . . . . . . 63
s
SAFE . . . . . . . . . . . . . . . . . . . . . . . . . . . . . . . . 1 2
Safe dr iving habits . . . . . . . . . . . . . . . . . . . . 1 12
Safe lock . . . . . . . . . . . . . . . . . . . . . . . . . . . . . . 31
Safety
Airbag system . . . . . . . . . . . . . . . . . . . . . .
129
Belts . . . . . . . . . . . . . . . . . . . . . . . . . . . . . . 121
Ca rgo . . . . . . . . . . . . . . . . . . . . . . . . . . . . . 118
Correct seating position . . . . . . . . . . . . . . 113
Pedal area . . . . . . . . . . . . . . . . . . . . . . . . . . 117
Safety belt position . . . . . . . . . . . . . . . . . . .
12 5
Safety belts worn by p regnant women . . . 126
Safety belt pretensioner
Service and d isposa l. . . . . . . . . . . . . . . . . . 12 7
256
Safety belts ... .. .. .. .. ... . .. .... . 121, 124
Danger to passengers who do not wear a
safety be lt . . . . . . . . . . . . . . . . . . . . . . . . .
122
Fastening . . . . . . . . . . . . . . . . . . . . . . . . . . 124
Improperly worn . . . . . . . . . . . . . . . . . . . . 126
Not wor n . . . . . . . . . . . . . . . . . . . . . . . . . . 122
Safety be lt pos it ion . . . . . . . . . . . . . . . . . . 125
Safety i nstr uctions . . . . . . . . . . . . . . . . . . . 123
Secu ring child safe ty seats . . . . . . . . . . . . 160
Spe cial considera tions for pregn ant wom-
en . . . . . . . . . . . . . . . . . . . . . . . . . . . . . . . .
126
Unfastening . . . . . . . . . . . . . . . . . . . . . . . . 126
Warning/ indicato r light . . . . . . . . . . . . . . 121
Warn ing light . . . . . . . . . . . . . . . . . . . . . . . . 16
Worn properly . . . . . . . . . . . . . . . . . . . . . . 123
Safety be lt warning light . . . . . . . . . . . . . . . 121
Safety compliance sticker . . . . . . . . . . . . . . 241
Safety equipment . . . . . . . . . . . . . . . . . . . . . 112
Safety featu res fo r occupa nt restra int and
pro te ct ion . . . . . . . . . . . . . . . . . . . . . . . . . . .
112
Safety gu idelines
Seats . . . . . . . . . . . . . . . . . . . . . . . . . . . . . . .
54
Safety instr uctions
Engine compartment .. ............. .. 191
for s ide curtain airbags . . . . . . . . . . . . . . .
150
for using child safety seats . . . . . . . . . . . . 154
fo r using safety belts . . . . . . . . . . . . . . . . . 123
Monito ring the Advanced Airbag System 141
Seat adjustment
Head restraints . . . . . . . . . . . . . . . . . . . . . llS
Seat belts
refer to Safety belts ... ... .. ..... ... .. 121
Seat heating . . . . . . . . . . . . . . . . . . . . . . . . . . 70
Seating capac ity . . . . . . . . . . . . . . . . . . . . . .
121
Seating position
Driver . . . . . . . . . . . . . . . . . . . . . . . . . . . . .
113
Front passenger . . . . . . . . . . . . . . . . . . . . . 114
How to ad just the front seats . . . . . . . . . . 114
Incorrect seat pos ition . . . . . . . . . . . . . . . 116
Occupants..... .. .. .. ............. ..
113
Rear passe ngers .. ... ...... ....... .. . llS
Seats Adjusting . . . . . . . . . . . . . . . . . . . . . . . . . . .
55
Adjust ing in the M MI . . . . . . . . . . . . . . . . . . 56
Convenience side view . . . . . . . . . . . . . . . . . 56
Correct seat ing pos ition . . . . . . . . . . . . . . 113
D river 's seat . . . . . . . . . . . . . . . . . . . . . . . . . 54