fog light AUDI S6 2009 Owners Manual
[x] Cancel search | Manufacturer: AUDI, Model Year: 2009, Model line: S6, Model: AUDI S6 2009Pages: 398, PDF Size: 43 MB
Page 27 of 398
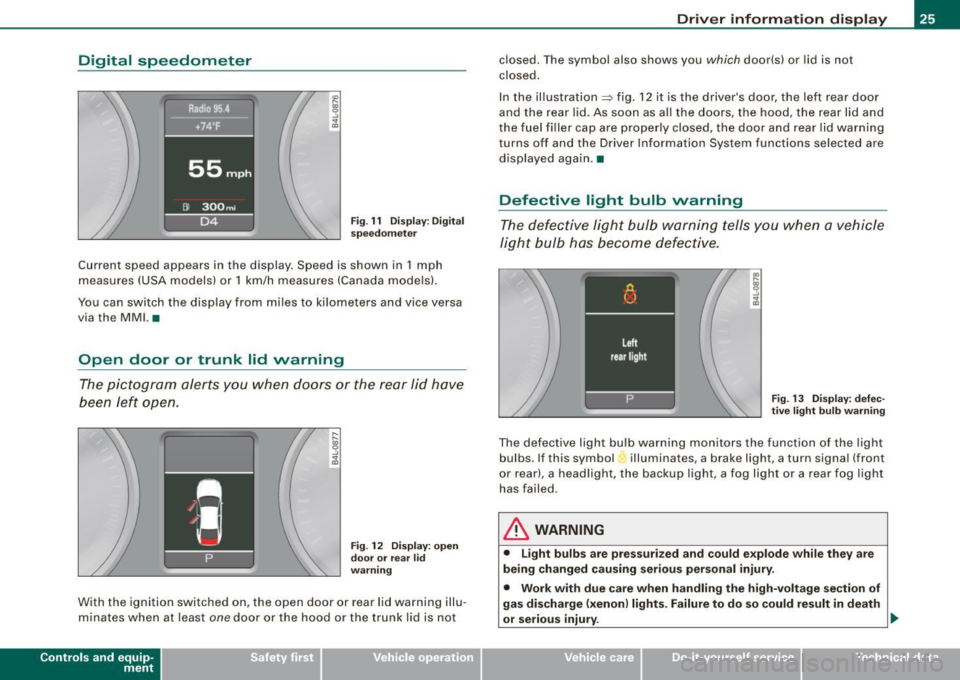
Digital speedometer
Fig. 11 Display: Digital
speedometer
Current speed appears in the display . Speed is shown in 1 mph
measures (USA models) or 1 km/h measures (Canada models).
You can switch the display from miles to kilometers and vice versa
via the MMI. •
Open door or trunk lid warning
The pictogram alerts you when doors or the rear lid have
been left open.
Fig . 12 Display: open
door or rear
lid
warning
With the ignition switched on, the open door or rear lid warning illu
minates when at least
one door or the hood or the trunk lid is not
Con tro ls and eq uip
ment
Driver information display
closed. The symbol also shows you which door(s) or lid is not
closed.
In the illustration=> fig. 12 it is the driver's door, the left rear door
and the rear lid. As soon as all the doors, the hood, the rear lid and
the fuel filler cap are properly closed, the door and rear lid warning
turns off and the Driver Information System functions selected are
displayed again .•
Defective light bulb warning
The defective light bulb warning tells you when a vehicle
light bulb has become defective.
Fig. 13 Display: defec
tive light bulb warning
The defective light bulb warning monitors the function of the light
bulbs . If this symbol illuminates, a brake light, a turn signal (front
or rear), a headlight, the backup light, a fog light or a rear fog light
has failed.
& WARNING
• Light bulbs are pressurized and could explode while they are
being changed causing serious personal injury.
• Work with due care when handling the high-voltage section of
gas discharge (xenon) lights. Failure to do so could result in death
or serious injury . ..,
Vehicle care I I Technical data
Page 66 of 398
Clear vision
brightness increases again, the low beams are turned off again
a uto matically =>& .
In t he
AUTO pos it ion the low b eams ar e switched off automatically
when the ignition is turned off .
Light Sensor Malfunction
In the e vent of a lig ht sensor m alfu n ction, th e drive r is noti fie d in the
instrument cluster display:
e. Automat ic headlights /automatic wipers defective
F or safe ty r eas o ns th e low bea ms are tur ned o n perma nently w ith
th e switch in
AUTO . However, you can continue to tur n the lights on
and off u sing the ligh t switc h. Have the light sen sor checked as s oon
as possib le at a dealership.
& WARNING
• Never use daytime running lights to see where you are going.
They are not bright enough and will not let you see far enough ahead for safety , espe cially at dusk or when it is dark. Always
switch on the low beams at dusk or when it is dark .
• Automatic headlights are only intended to assist the driver .
They do not relieve the driver of his responsibility to check the headlights and to turn them on manually according to the current
light and visibility conditions. For example , fog and rain cannot be
detected by the light sensors . So always switch on the headlights
under these weather conditions and when driving in the dark
tD .
• Crashes can happen when you cannot see the road ahead and
when you cannot be seen by other motorists.
-Always turn on the headlights so that you can see ahead and
so that others can see your car from the back.
[ i ] Tips
• W it h the sw it ch in AUTO front fo g ligh ts and re a r fo g ligh ts
cannot be turned on i n addition . • T
he light sensor for head light control is located in the rear view
mi rror mount . Do no t ap ply a ny s ticker s to th e windshie ld in thi s
area to p revent malfunctions or failures.
• I f you remov e the ignition fr om the ignition l oc k whil e th e he ad
l ights are still on, a buzzer will sound as long as the driver's door is
open to re mind you t o turn off the li g ht s.
• Al ways observe the specific local regulations for your area as to
w he n to u se yo ur ligh ts .•
Adjusting exterior lighting
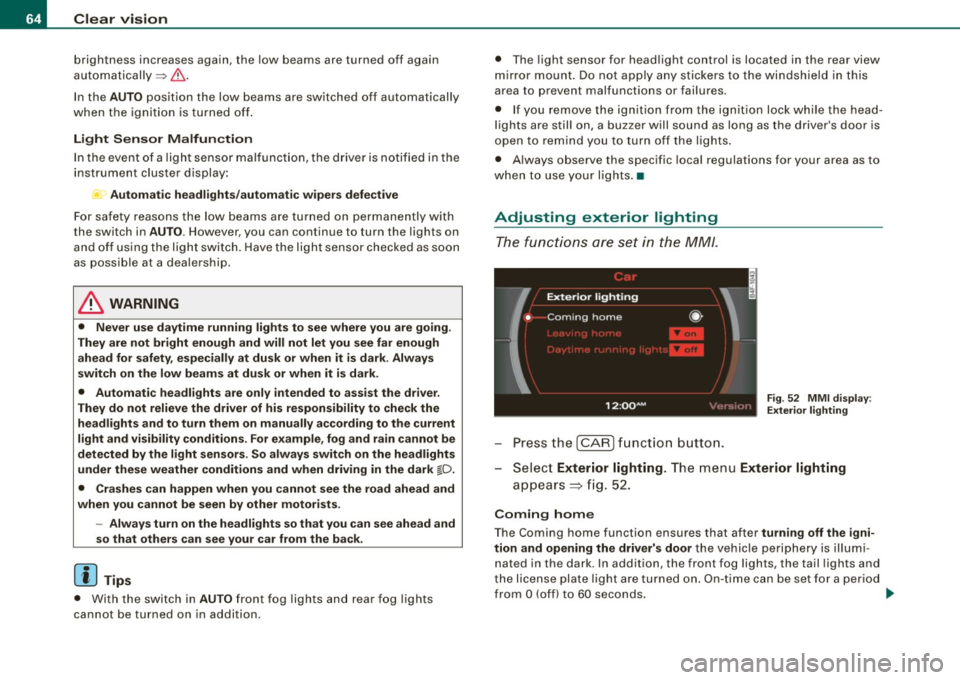
T he functi o ns are se t in th e MM /.
Fig. 52 MM I d is pl ay:
Exterior lighting
- Pre ss th e [ C AR] fun ction bu tto n.
- Selec t
Exterior lighting. The menu Exterior lighting
a pp ears => fig. 52.
Coming home
The Coming home function ensures that after turning off the igni
tion and opening the driver's door
t h e v ehicle per ip he ry is ill um i
nated in the dark. In addition, the front fog lights, the tail lights and
th e lic ense p la te li g ht are tur ned o n. O n-tim e ca n be set for a pe riod
from
O (off) to 60 seconds. .,,_
Page 67 of 398
Le avi ng hom e
The Leaving home functio ns ensures that when unlocking the
vehicle periphery is i lluminated in the dark . In addition, the fron t fog
lights, the tai l lights and the license plate light are turned on. Th is
function can be turned on and off .
Daytime running light s
USA models : On vehicles with xenon lights the daytime running
lights can be turned on or off using this function . On vehicles with
halogen lights there is no dayt ime running lights function.
Canada models ; The function cannot be turned off. It is activated
automatically each ti me the ignition is t urned on. This menu item is
shown "greyed out" .•
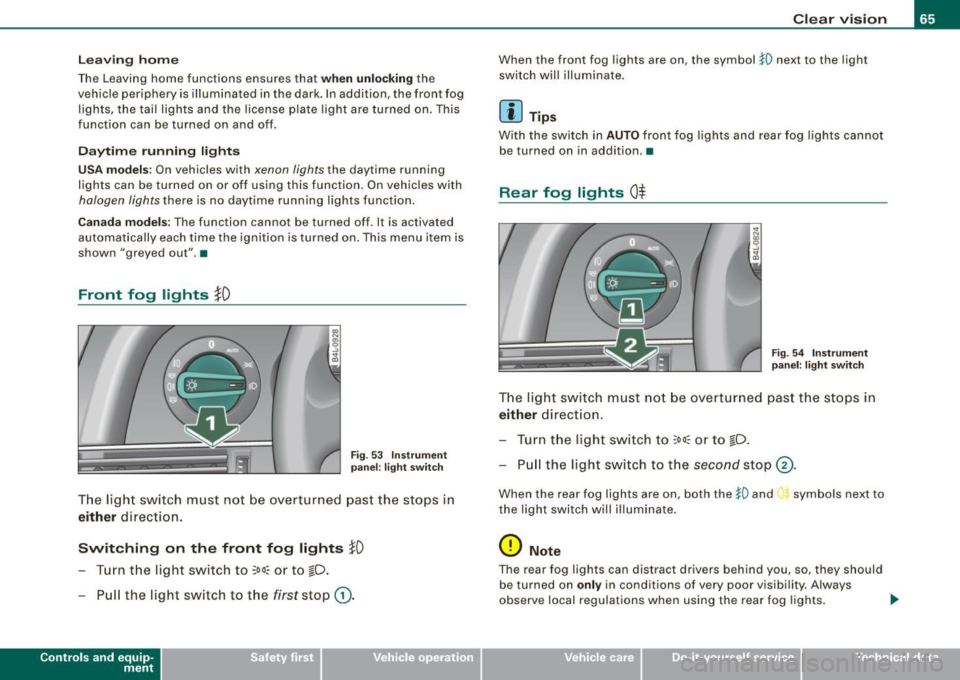
Front fog lights }D
Fig . 53 Ins tru men t
pa nel: lig ht swit ch
The light switch must not be overt urned pas t the stops in
either d ire ction .
Switching on the front fog lights !D
- Turn the light switch to ;oo: or to io.
- Pull the light sw itch to t he first stop G) .
Con tro ls and eq uip
ment
Clear vision
When the front fog lights are on, the symbo l }0 next to the light
switch will illuminate .
[ i ] Tips
With the switch in AUTO front fog lights and rear fog lights cannot
be turned on in addition .•
Rear fog lights 0$
F ig . 54 In stru ment
p ane l: lig ht sw itch
T h e light switch must not be overt urned pas t th e stops in
either direct ion.
Tu rn t he ligh t sw itch to
;oo~ or to io .
Pull the light switch to t he second sto p (v.
When the rear fog lights are on, both the }O and symbols next to
the light switch will i lluminate .
0 Note
The rear fog lights can distract dr ive rs beh ind you, so, they should
be turned on
only in cond itions of very poor visibility. Always
observe local regulations when using the rea r fog lights . ...
Vehicle care I I irechnical data
Page 68 of 398
![AUDI S6 2009 Owners Manual Clear vision
[ i] Tips
With the switch in AUTO front fog lights and rear fog lights cannot
be turned on in addition. •
Applies to vehic les: with Adapt ive Light
Adaptive Light AUDI S6 2009 Owners Manual Clear vision
[ i] Tips
With the switch in AUTO front fog lights and rear fog lights cannot
be turned on in addition. •
Applies to vehic les: with Adapt ive Light
Adaptive Light](/img/6/57595/w960_57595-67.png)
Clear vision
[ i] Tips
With the switch in AUTO front fog lights and rear fog lights cannot
be turned on in addition. •
Applies to vehic les: with Adapt ive Light
Adaptive Light
When making a turn or driving around tight corners, the
relevant area of the road is better illuminated.
Adaptive Light (making turns)
Fig. 55 Adaptive Light
when turning and driving through curves
An additional bulb in the headlight provides a cornering light@ in
addition to the low beam@:::::, fig. 55. Adaptive Light is switched on
and off automatically depending on driving conditions .
When you activate the turn signal lever, the Adaptive Light for the
same side is switched on. Please note that the turn signal lever must
engage.
Adaptive Light is not switched on if you only move the turn signal
lever to the point of resistance to signal a lane change :::::,
page 67,
"Turn signal ¢i ¢ and high beam lsD lever".
When driving around bends, Adaptive Light is controlled according
to steering wheel angle. • It is switched on in tight corners. • It
is not switched on in long, open bends .
Adaptive Light (in curves)
When driving through curves, the low beams © are automatically
controlled depending on driving speed and the steering wheel
angle.
The two main beams pivot at different angles so that there is no
unilluminated area in front of the vehicle.
[ i] Tips
• The system works up to a speed of about 43 mph (70 km/h). If the
speed is higher, it is not activated.
• Adaptive Light (in curves) functions at a speed of about 6 mph
(10 km/h) and is deactivated at speeds below about 4 mph
(6 km/h). •
Applies to vehi cles: with light pac kage
Perimeter lighting in the mirror housing
LEDs in the exterior mirror housing illuminate the ground
during entry.
This function ensures that when unlocking, the vehicle periphery is
illuminated in the dark. LEDs in the exterior mirror housing are
switched on. The function cannot be turned off separately. •
Page 104 of 398
• .___w_ a_ rm __ a_ n_ d_ c_o _l_d ________________________________________________ _
Warm and cold
Climate control
Description
The air conditioner is fully automatic and is designed to
maintain a comfortable and uniform climate inside the
vehicle.
We recommend the follow ing settings:
- Set the temperature to 75 °F (+23 °C).
- Press the !AUTO
I button.
With this setting, you attain maximum comfort in the least amount
of time. Change this setting, as desired, to meet your personal needs.
The climate controls are a combination of heating, ventilation and cooling systems, which automatically reduce humidity and cool the
air inside your vehicle.
The air temperature, air flow and air distribution are automatically
regulated to achieve and maintain the desired passenger compart
ment temperature as quickly as possible.
The system automatically compensates for changes in outside
temperature and for the intensity of the sunlight entering the
vehicle. We recommend you use the
Automatic mode=> page 105
for year-round comfort.
Please note the following:
Turn on the air conditioner to reduce humidity in the vehicle. This also prevents the windows from fogging up.
When the outside temperature is high and the air is very humid,
condensation from the evaporator may drip under the vehicle. This
is normal and does not indicate a leak. If the outside temperature is low,
the fan normally only switches to
a higher speed once the engine coolant has warmed up sufficiently.
The air conditioner temporarily switches off when you drive off from
a standstill using full throttle to save engine power.
The compressor also switches off if the coolant temperature is too
high, so that the engine can be adequately cooled under extreme
loads.
Air pollutants filter
The air pollutants filter (a combined particle filter and activated
charcoal filter) reduces or prevents outside air pollution (dust, or
pollen) from entering the vehicle.
The air pollutants filter must be changed at the intervals specified
in your Warranty
& Maintenance booklet, so that the air conditioner
can properly work.
If you drive your vehicle in an area with high air pollution, the filter
may need to be changed more frequently than specified in your
Audi Warranty
& Maintenance booklet. If in doubt, ask your autho
rized Audi Service Advisor for advice.
Key coded settings
The air conditioner settings selected are automatically stored and
assigned to the key being used. When the vehicle is started, the air
conditioner automatically selects the settings assigned to that key.
This way every driver will maintain his/her own personal settings
and does not have to reset them manually.
If a different driver uses your key and changes the air conditioner
settings, the latest adjustments will erase and replace the settings
you have stored.
Energy management
To prevent the battery from being discharged and to restore the
balance of energy, components which require large amounts of
Page 110 of 398
• ..__w_ a_ r_m _ a_ n_d_ c_ o_ ld __________________________________________________ _
Rear window defogger 4W
Press the QW switch to turn the rear w indow defogger on
and off .
The rear window defogger works only when the engine is running .
The light in the switch will illuminate when the defogger is on .
The rear window defogger wi ll switch off automatically after a short
time. The time the rear window defogger remains on wi ll vary
depending on the outside temperature .
At very low outside temperatures, the rear window defogger can switched on continuously by pushing the
QlP button for more than 2
seconds. This remains stored unti l the ignition is switched off .
A rear window defogger that was switched on also remains stored
fo r 15 minutes after the ignition is switched off . If the engi ne is
restarted within these 15 minutes, the rear window defogger is also
ac tiva ted, depend ing on outside temperature . With a veh ic le that is
parked for a short time, the rear window defogger does not need to
be manually activated again.
<£> For the sake of the environment
Turn the defogger off when the rear window is clear. When you save electricity, you save fuel. •
Air outlets
Air distribution determines the air flow to the individual
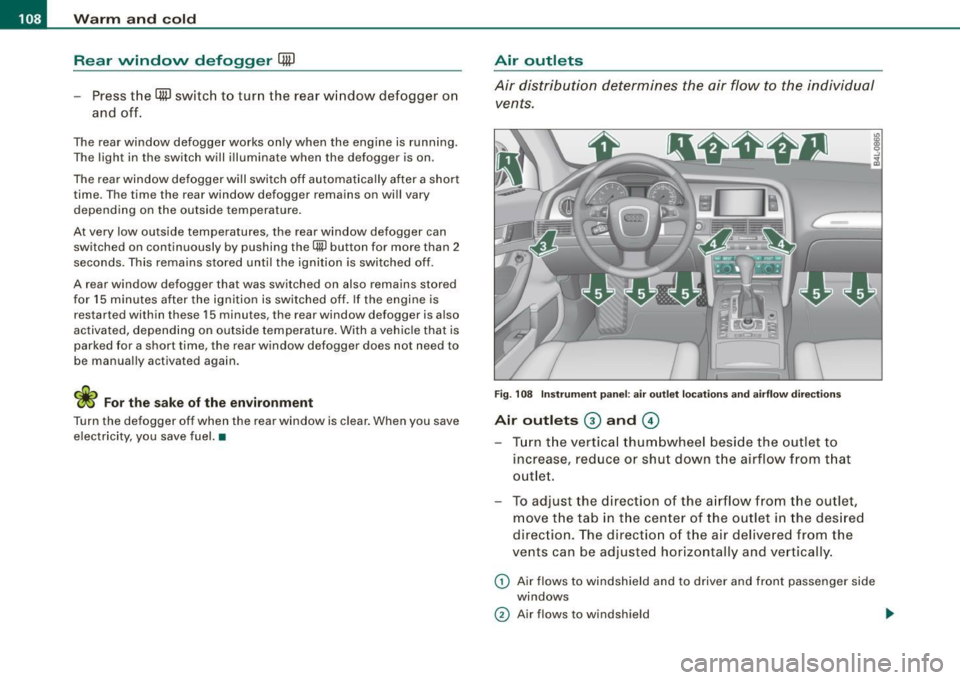
vents.
F ig . 10 8 Instrument p anel: a ir outl et locations and airflow dire ctio ns
Air outlets @ and G)
Tu rn t he vertica l thum bwhee l beside the outlet to
increase, reduce or shu t down the airflow from t hat
out let .
To adjust th e direction of the a irflow fro m the ou tle t,
move the ta b i n t he cen ter of the ou tlet in the des ired
direction. The direct ion o f the air delivered from the
vents can be adjusted horizontally and vertica lly .
G) Air flows to wind shield and to driver and front pas senger side
windows
0 Air flows to windshield .,_
Page 146 of 398
• .___A_ u_ d _ i_l_a _n _ e_ a_ s_s _is _ t _________________________________________________ _
I Not ready: The yellow indicator light shows that the system is
turned on but unable to send a warn ing. This can be due to the
following:
• There are no boundary lines, or there is on ly one boundary line
present .
• The boundary lines are not detected (e.g. due to snow, dirt, wet
conditions or light shining into the camera lens).
• More than two boundary lines (such as at construction sites) are
located in the vehicle's lane.
• The vehicle's speed is below the speed needed to activate it,
which is about 40 mph (65 km/h).
• The lane is narrower than about 8 ft . (2.5 ml, or wider than about
16 ft. (5 ml.
• The curve is too sharp.
Notes on the instrument cluster display
When the lane assist turns off automatically, the instrument cluster
indicator goes out and one of the following messages appears on
the display:
Audi lane assist not available: Currently no sensor vision
This message appears when the camera can no longer function
because it cannot detect the boundary lines. This may be due to the
following :
• The exterior s ide of the camera viewing window=>
page 143,
fig. 144 is covered with dirt or ice. Clean this part of the windshield.
• The camera v iewing window is fogged up on the inside. In this
case, wait until the fog disappears before turning lane assist on
again.
• The system was unable to detect boundary lines over an
extended period of time due to road conditions (such as snow
covered lanes). Do not turn lane assist on again until the lines can
be more easily detected.
Audi lane assist not available
A temporary malfunction is preventing lane assist from operating .
Try turning on lane assist again a t a later time.
Audi lane assist: system fault
The system should be checked by an authorized Audi dealer or other
qualified workshop .
[ i ] Tips
• Make sure that the camera viewing window=> page 143, fig. 144
is not covered by stickers or similar objects .
• Always keep the camera viewing window clean. This can usually
be done by operating the windshield wipers. •
Applies to vehicles: with lane assist
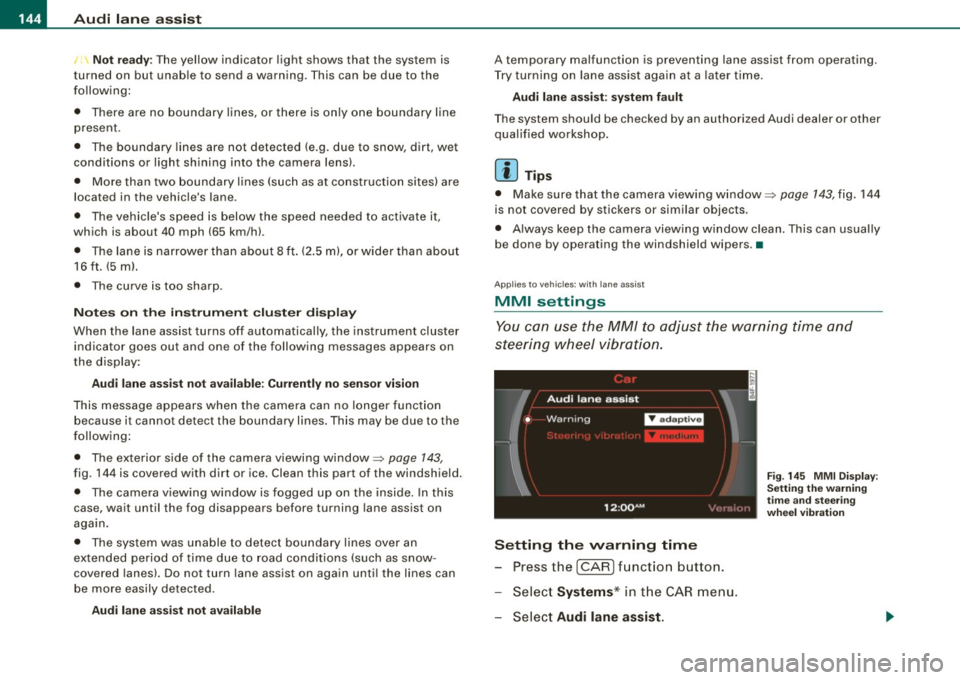
MMI settings
You can use the MM/ to adjust the warning time and
steering wheel vibration.
Setting the warning time
Press the I CAR] function button.
- Select
Systems * in the CAR menu .
- Select
Audi lane assist.
Fig. 145 MMI Display:
Setting the warning
time and stee ring
wheel vibration
Page 289 of 398
_____________________________________________ C_ l_ e _a_ n_ in_ g_a _ n_d_ p_ r_ o_ t _e_ c_t _io _ n __ lll
•
T he best way to remove snow from windows and mirrors is to use a
brush . Use a non -abrasive
pla stic ice scraper -better still, a spray
deicer -to remove
ice from w indows and mirrors .
The windows must not be cleaned with insect remover or wax since
these can inter fere with the function of the w inds hie ld w iper blades
(chatter).
Oil, grease o r sil icone residue can be removed with
glass cleaner or
s ilicone remover . However, wax residue requires the use of a
spec ially for mulated solvent . Please contact your Audi dealer for
advice on safe products for wax removal.
Windows should also be c leaned on the inside at regular interva ls .
Never dry windows with the same chamois that you use to dry
painted surfaces . Wax residue on the chamois can impair vision
t hrough the windows.
& WARNING
• The windshield mu st not be treated with water -repellent mate
rials. They c an incre ase gl are under poor v isibility conditions such
a s wetne ss, darkne ss, or when the sun i s low on the hori zon. In
addition , they can cause the wind shield wipers to chatter .
• Alway s read and heed all WARNINGS and other information
~ page 282.
0 Note
• Never use warm or hot water to remove snow and ice from
windows a nd mirrors . This cou ld cause the glass to crack.
• T o prevent damage to the wires of the rear defogger, do not p lace
any adhesive stickers on the inside of the rear window over the
wires .
• T o he lp prevent dirt from scratching the window, always scrape
in a forward direction -pushing the scraper away from you -never
back and forth. •
Weatherstrips
Complete car car e includes the we atherst rip s as well .
App ly a suitable rubbe r con ditioner to the weatherstr ips
f ro m time to tim e.
To be able sea l properly, the weatherstrips around the hood, doors,
rear lid, etc . must remain pliable. Spray the weatherstrips with sili
co ne or coat them w ith ta lcum powder or glycer ine to retain the
f lexibility of the rubber and to protect them against freezing in the
winte r.
& WARNING
Always read and heed all WARNINGS and other information
~ page 282.
[ i ] Tip s
Keep si licone sprays off the windshield to avoid wiper smear in
ra in .•
Cast (light) alloy wheels
Cast (light) alloy wheels require special care.
- Was h the wheels w ith a sponge or hose b rus h every
other week.
Fo r de ep cle aning af terwar ds, use only a dedicat ed
acid
free cast al lo y whee l c leaner.
R ub a co at of
liquid wax onto t he rims ever y thr ee mo nth .
Be su re t o r ea ch and t reat a ll pa rts of t he r im.
To preserve the decorative appearance of the cas t al loy wheels,
some special care is necessary . In addition to road dirt and salt,
Vehicle care I t •
Page 314 of 398
-Checking
and filling
---=---------------
checked by a service facility . The electrolyte level should also be
checked each time the battery is charged
~ page 314.
Have the battery checked when you take your vehicle in for service.
You are well advised to replace a battery that is older than 5 years.
With certain types of airbag deployment, the battery is discon nected from the vehicle electrical system for safety reasons~
& in
"Repair, care and disposal of the airbags" on
page 229.
Disconnecting the battery terminals
Some vehicle functions (power window regulators, for example) are
lost if the battery terminals are disconnected . These functions have
to be relearned after the battery terminals are connected again . To
prevent this, the battery should only be disconnected from the
vehicle electrical system when absolutely necessary for repairs.
Vehicles not driven for long periods
If you do not drive your vehicle over a period of several days or
weeks, electrical components are gradually cut back or switched off.
This reduces energy consumption and maintains starting capability
over a longer period
~ page 269.
Take into consideration that when you unlock your vehicle, some
convenience functions , such as the master key remote function or
power seat adjustment, may not be available. The convenience
functions will be available again when you turn on the ignition and
start the engine.
Winter operation
During the winter months, battery capacity tends to decrease as
temperatures drop . This is because more power is also consumed
while starting, and the headlights, rear window defogger, etc., are
used more often.
Avoid unnecessary power consumption, particularly in city traffic or
when traveling only short distances. Let your authorized Audi dealer
check the capacity of the vehicle battery before winter sets in
~ page 314. A well charged battery will not only prevent starting
problems when the weather is cold , but will also last longer .
[ i] Tips
If your vehicle is left standing for several weeks at extremely low
temperatures, the vehicle battery should be removed and stored
where it will not freeze. This will prevent it from being damaged and
having to be replaced. •
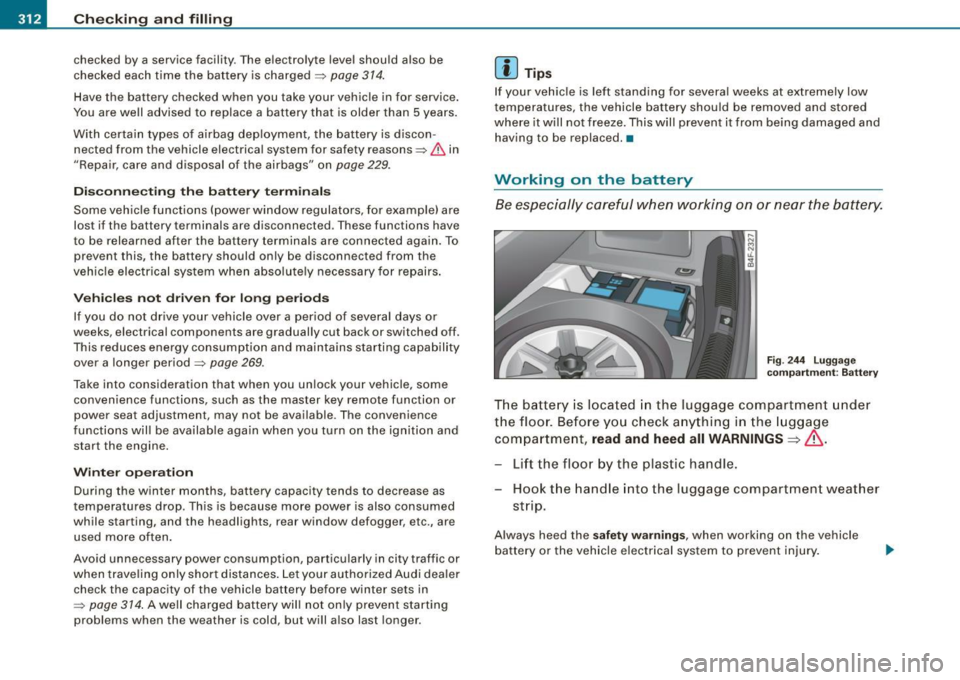
Working on the battery
Be especially careful when working on or near the battery.
Fig. 244 Luggage
compartment : Battery
The battery is located in the luggage compartment under
the floor. Before you check anything in the luggage
compartment,
read and heed all WARNINGS=>& .
Lift the floor by the plastic handle.
Hook the handle into the luggage compartment weather
strip.
Always heed the safety warnings, when working on the vehicle
battery or the vehicle electrical system to prevent injury.
Page 385 of 398
______________________________________________ A_ l_,_ p _h_ a_ b_e _t_i c_ a _ l _in _ d_e _ x __ lllll
Climate controls
Air distribution ... .... .... ........ 107
Air outlets ..... .. .... .... .... .... 108
Air outlets (rear) .... ...... ... ..... 109
Air recirculation .. .... .... ... .... . 107
AU TO (standard setting) ........ .. . 105
Basic se ttings ... .. ... .... .. .. .... 111
Center ai r vent .... .... ... ... ..... 112
Contro ls ..... .... ... .. .... .. .... 104
Defrosting/defogging ..... ... .... . 107
Descr iption ... ... .... .... ...... .. 102
ECON operation .. ..... .. .... .... . 112
Fan . .... ...... .. .... ..... .. ... .. 106
Heated seats , front ..... .. ...... .. 110
Key coded set ting ................ 102
Recircu lation mode (automatic) ..... 112
Recommended settings ... ... .... . 102
Residual heat .... .... .... ...... .. 105
Setting the temperature ..... . .... . 106
SETUP . ......... .... .... ... .... . 112
Solar operat ion ...... .... .. . .... . 113
Switching on and off ...... .. . .... . 105
Synchronization ...... .... ... .... . 112
Using climate contro l economically . 109
Clock ... .... .... .... .... ... .... .... . 13
Closing Pow er sunroof .... ... ... ... .. ..... 59
Coat hooks . . . . . . . . . . . . . . . . . . . . . . . . . 101
Co ld tire inflation pressure .... ...... . 321
Compass m irror . .... .... ... .... .... . 78
Comp liance ... .. ........ ... .. ...... 375
Consumer Information .. ........ . 203, 372
Contacting NHTSA ....... ... .. .. .... 203
Controls and equip
ment Safety first
Continuously Variable
Transmission (CVTJ D
See multitronic® . ........... ..... 16 1
Conven ience key ... .. .... .... ... .... . 52 Damping
Driver messages ...... .... .... ... 1 20
See Adaptive Air Suspension ...... . 184
Locking vehicle ... .... .... .... .... . 53 Data .. ... .... .... .... ... .... .... ... 369
STAR T button . ..... ........ ...... 118
Data reco rder . ... .... .... .. . .... .. .. 262
Star ting engine .. ... .... ... .. .... 118
Date display ....... .... ........ ... ... 13
STO P button ... .. .... ..... .. ..... 1 19
Switching engine off . ....... .... .. 119
Switching on ignition . ...... .. .... 118
Un lock ing vehic le ........ .... .... . 53 Dayti
me runn ing lights ... .... .... .. 63, 64
Dec laration of compliance
Adaptive Cruise Control .... ....... 375
Audi side ass ist ... .... ...... ... .. 375
Convertible chi ld s eats
Cell phone package ... .... .... .. . . 375
How do I prop erly install a convertible
chi ld sea t in my vehicle? .. ...... . 244 Conve
nience key ...... ... .... .. .. 375
E lec tronic immobil izer . ... .... .. .. 375
Safety instruct ions ... .. ....... .... 244
Homelink® universal remote control 375
Conver tible locking re trac tor
Activating .... ...... .... ..... .... 250 Remote control key ..
.... . .... .. .. 375
de f
Deactivati ng . .... ... .... .... .... . 251
Using to secure a chi ld sa fety seat . 248,
250
Co olan t system ..... .. .. .... .... .... 307
Coo ling System
E xpans ion tank .... ..... .. .... .... 308
Cru ise control What does this mean when it appea
rs in
t he trip odomet er disp lay? .. ... .... 14
De fect ive light bu lb warning ...... ... .. 25
D efrosting/defogging the windows ... . 107
Defrosting /defogging windows ....... . 108
Dete rmin ing cor rec t load li mit .. ...... . 3 26
Changing sp eed .. .... ...... ... ... 125
P resetting your speed ....... .... .. 125 Digita
l clock ...... ..... .... .... ...... 13
Digi ta l compass ... .. .... .... .... .. .. . 78
Switching off .................... 125 D
igita l speedometer . ...... .. .... ..... 25
Switching on .... ... .... ... .. .... 124 D
imensions .. .... .... ... .... .... ... 368
Warning/indicato r lights .. .... .... .. 20 Dipstick
See also Adaptive Cruise Control ..
.. 127 Readi
ng th e dipstick p roper ly ..... . 305
Cruising range ... .... .... .... .... ... . 38 Distance control sys
tem
Cupholder ...... ..... .. .... .... .. 95, 96
See Adaptive C ru ise Contro l ..... ... 127
Vehicle operation Vehicle care Do-it-yourself service Technical data