homelink AUDI S6 2010 Owners Manual
[x] Cancel search | Manufacturer: AUDI, Model Year: 2010, Model line: S6, Model: AUDI S6 2010Pages: 368, PDF Size: 86.82 MB
Page 4 of 368
Table of contents
Table of contents
Vehicle literature ..... .
About this Owner's Manual .......... ....... .. .
Controls and
equipment .............. .
Instruments and controls ... .
General illustration ........... .
Instruments and
warning/indicator Lights ..... . Instruments ... ... .......... .
Warning/indicator ligh ts ..... . .
Driver information display ... .
Introduction ...... ......... . .
On-Board Diagno stic sy ste m
(OBD) . ..... ....... .......... .
Auto Ch eck Control ........... .
Speed warning system ........ .
Tr ip computer ............ ... .
Opening and closing ......... . Keys ............ ............ .
Power locking system ........ .
Rear lid .... ..... ............ .
Child safety Lock ............. .
Convenience key ............. .
Anti-theft alarm sys tem ...... .
Power windows .............. .
Sliding/tilting power sunroof .. .
Clear vision .. .... ............ .
L ights ... .. ........ ......... .
Interior ligh ts ... ... .. ....... .
4
5
6
7
7
8
8
12
19
19
23
24
32
34
37
3 7
41
46
47
47
49
so
53
58
58
63 Vi
sion .................... .. .
Wiper and washer system Mirrors ... ............... ... .
Digital compass ............. .
Seats and storage ........ ... .
General recommendations .... .
Power seat . ................. .
S eat m emory ............... . .
Rear sea ts ... ... .. .......... .
Head res train ts ........... ... .
Armrest .. .. ................ .
Luggage compar tm en t ..... .. .
Roof ra ck . .... .... .......... .
Cupholder .................. .
Ashtray .. ................... .
Cigarette Lighter/socket ...... .
S torag e ................ .. .. .
Warm and cold .... .......... .
Cl imate control ....... ... .... .
Ba sic se tt ings ............... .
On the road ... .... .......... .
S tee ring .................... .
Igni tion lock and ignition swi tch
Start ing and stopp ing the engine
Start ing and stopping the engine
with Convenience key ......... .
E lectromechanical parking brake
Cru ise control ............... .
Adaptive Cruise Control ..... . Speed and distance con trol
sys tem .............. ....... .
Dr iver information ........... .
Syst em Limitations ........... .
Audi Lane assist ........... .. .
Lane ass ist .... .. ............ . 64
66
69
73
75
75
76
79
80
81
82
83
87
89
91
92
93
96
96
104
106
106
108
109
110
113
116
119
119
12 7
131
134
134 Audi side assist ...............
137
Lane Change Assistant ......... 137
No tes ....... .... ............. 144
Automatic transmission 146
tiptronic ® (6-sp eed au toma tic
tr ansmission) . . . . . . . . . . . . . . . . . 146
multitronic ® ............ ...... 152
Park assist . . . . . . . . . . . . . . . . . . . . 160
Park ing system (rear, with rear
view camera) . . . . . . . . . . . . . . . . . 160
Adaptive Air Suspension .. ... . 166
Adaptive Air Su spens ion and
Damping . . . . . . . . . . . . . . . . . . . . . 166
Homelink ® ............. ... ... 169
Univ ersal r emot e control 169
Safety first ............ ... 174
Driving Safely .. ............... 174
G eneral n otes ......... ........ 174
Proper occupant seating
po sition s . . . . . . . . . . . . . . . . . . . . . 176
Pedal area . . . . . . . . . . . . . . . . . . . . 180
S towing Luggage .............. 181
Report ing Safety Defects . . . . . . . 183
Safety belts . . . . . . . . . . . . . . . . . . . 185
General no tes . . . . . . . . . . . . . . . . . 185
Why safety belts? ............ . 186
Safe ty b elts . . . . . . . . . . . . . . . . . . . 189
Safety bel t pre ten sioner s . . . . . . . 193
Airbag system ................ 195
Im portan t thing s to kn ow ...... 195
F ront airbags .............. ... 199
Page 171 of 368
___________________________________________________ H_o_ m_ e_L_ i_ n _ k_ ® __ _
Homelink ®
Universal remote control
Applies to veh icles: w ith Hom eli nk ® universal remote control
General information
The Homelink ® feature can learn the up to three radio
frequency codes for most current transmitters used for
operating garage doors, estate gates, home or outdoor
lighting systems, and other devices.
You must first program the Homelink ® transm itter before you can
use the system=>
page 170, "Programming the Home link® trans
mitter".
I n order to program the Homelink ® transmitter for devices utilizing
rolling code, a second person on a ladder who can safe ly reach the
garage door opener motor is recommended. It is also necessary to
locate the "learn" button on your garage door opener motor. Refer to
the operating instructions for the opener, as the location and color of
this button may vary by manufacturer.
You can still use the original remote control for the device at any
time.
& WARNING
• Never use the Homelink'"' transmitter with any garage door
opener that does have not the safety stop and reverse feature as
required by federal safety standards. This includes any garage
door opener model manufactured before Aprill, 1982.
• A garage door opener which cannot detect an object, signaling
the door to stop and reverse does not meet current federal safety
standards. Using a garage door opener without these features
increases risk of serious injury or death.
Controls and equip
ment Safety first
& WARNING
(continued)
• For safety reasons never release the parking brake or start the
engine while anyone is standing in front of the vehicle.
• A garage door or an estate gate may sometimes be set in
motion when the Homelink ® remote control is being
programmed. If the device is repeatedly activated, this can over
strain motor and damage its electrical components -an over
heated motor is a fire hazard!
• To avoid possible injuries or property damage, please always
make absolutely certain that no persons or objects are located in
the range of motion of any equipment being operated.
rn Tips
• If you would like more informat ion on Homelink ®, where to
purchase the Homelink ® compatible products, or would like to
purchase the Homelink ® Home Lighting Package, please call toll
free: 1-800-355-3515.
• For Declaration of Compliance to United States FCC and Industry
Canada regulations=>
page 347 . •
Vehicle care Technical data
Page 172 of 368
ffl..__H_ o_m_ e_ L_ i _n_ k_ ® _______________________________________________ _
Applies to veh icles : w ith Homelin k® un iversa l remote control
Programming the Homel ink ® transmitter
The transmitter is programmed in two phases . For rolling
code transmitters, a third phase is also necessary .
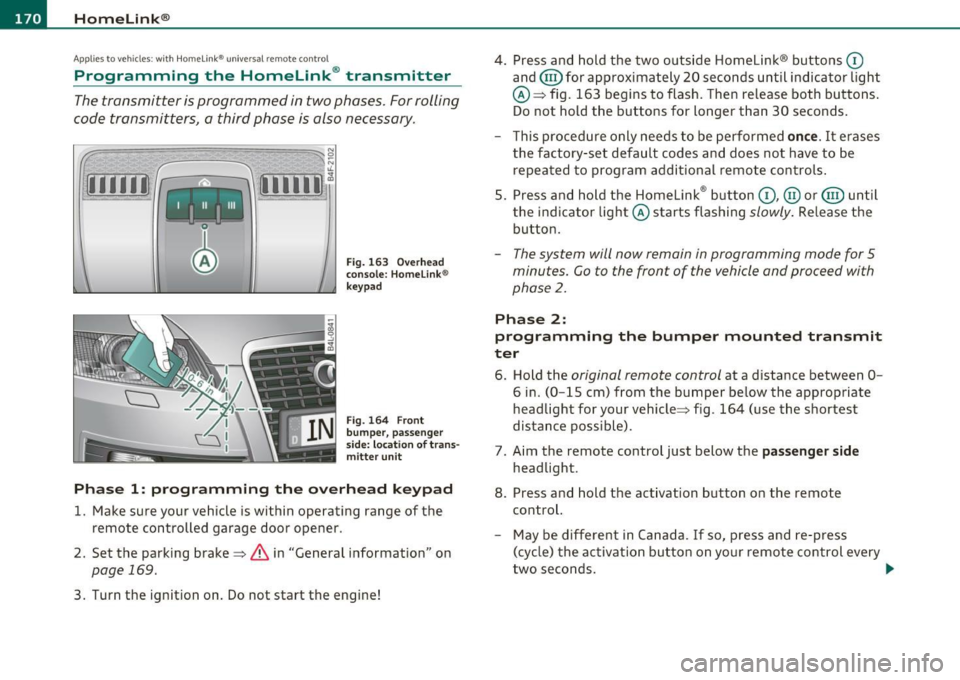
illUl~~ . l
~-1 II I Ill
Fig. 163 Over head
conso le: Homelink ®
keypad
Fig. 164 F ront
bumper, passenger
s ide: loc ation of trans
mitter unit
Phase 1: progr amming th e overhead k eypad
1. Make sure your vehicle is within operating range of the
remote controlled garage door opener .
2. Set the parking brake~
& in "General information " on
page 169.
3. Turn the ignition on . Do not start the engine! 4
. Press and hold the two outside Homelink ® buttons
(D
and (@)for approximately 20 seconds until indicator l ight
@ ~ fig. 163 begins to flash . Then release both buttons .
Do not hold the buttons for longer than 30 seconds .
- This procedure only needs to be performed
on ce . It erases
the factory-set default codes and does not have to be repeated to program additional remote controls .
5. Press and hold the Homelink ® button
(D , @ or@ until
the indicator light © starts flashing
slowly . Release the
button .
-The system will now rema in in programming mode for 5
minutes.
Co to the front of the vehicle and proceed with
phase
2 .
Phase 2:
programming the bumper mounted tr ansmit
ter
6 . Hold the original r emote control at a distance between 0-
6 in. (0 -15 cm) from the bumper below the appropriate
headlight for your vehicle~ fig . 164 (use the shortest
distance possible) .
7 . Aim the remote control just below the
pa ss e nger sid e
headlight .
8. Press and hold the activation button on the remote control.
- May be d ifferent in Canada . If so, press and re-press
(cycle) the activation button on your remote control every
two seconds. .-,,
Page 173 of 368
HomeLink® -_______________ __.
9. The emergency flashers will flash three times (after about
15-60 seconds) when the programming is successful.
Release the button on the remote control.
-To program more devices, repeat steps 4 to 9.
10. Press and hold the trained Homelink ® button and
observe the indicator light©~
page 170, fig. 163.
- If the indicator light is solid/continuous, programming is
complete and your device should activate when you press
and release the trained Homelink ® button.
- If the indicator light blinks rapidly for 2 seconds and is then a solid/continuous light, proceed with phase 3 to program a rolling code device.
Phase 3: rolling code programming
- A second person on a ladder who can safely reach the
garage door opener motor is recommended.
11 . Locate the "learn" button on the garage door opener
motor (refer to the operating instructions for the opener,
as the location of this button may vary by manufacturer) .
12. Press and release the learn button on the garage door
opener motor.
-Note: once the button is pressed, there are 30 seconds in
which to initiate the next step.
13. On the Homelink® keypad inside the vehicle, firmly press
and hold the Homelink® button previously programmed
in phases 1 and 2 for two seconds and release. Repeat this
sequence
twice .
Contro ls a nd e quip
m en t Vehicle
OP-eration
-Some vehicles may require the press/hold/release
sequence up to three times to complete the training
process.
- Homelink ® should now activate your rolling code
equipped device.
If the 5 minute time limit is exceeded, the emergency flashers will
flash one time
to indicate that the process has been terminated. In
this case, repeat steps 4 through 9.
If the emergency flashers do not flash three times (after about 15 -
60 seconds), programming was not successful. In this case, repeat
steps 4 through 9.
Remote control units for garage door openers in Canada are set to
stop transmitt ing radio frequency signals after two seconds. This
time may not be sufficient for the Home link® system to learn the
radio frequency signal. Perform all other steps as described above.•
Applies to veh icles: with Hom elin k® un iversa l rem ote cont rol
Operating the Homelink ® transmitter
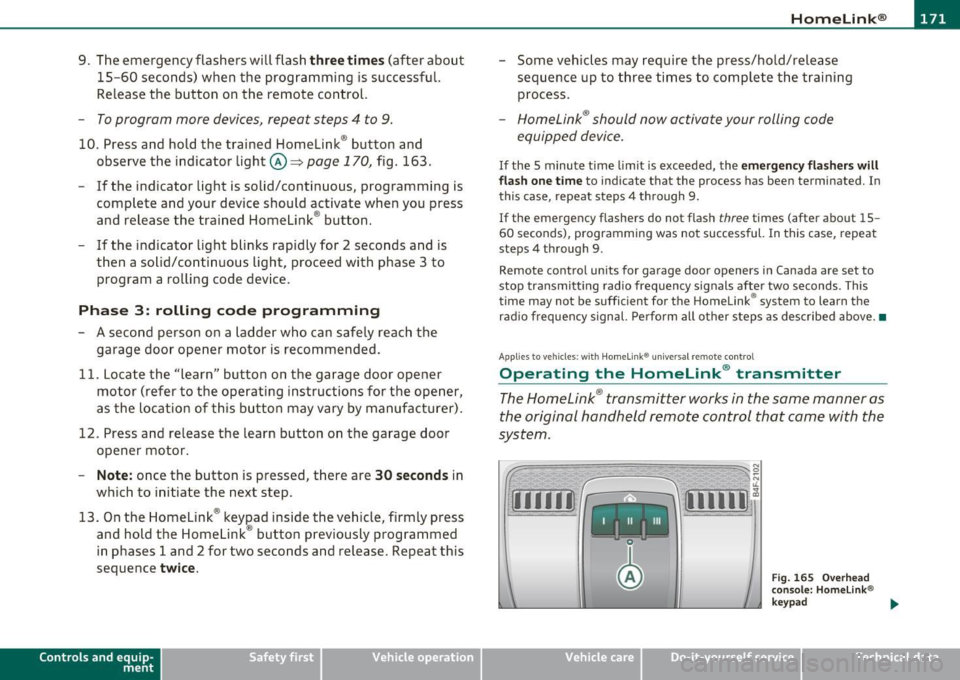
The HomeLink ® transmitter works in the same manner as
the original hand held remote control that came with the
system.
~ ;;;;;~~~~ ~=;==~~~ ;;;;:;;;~,~!:
{I I I I I~ i 111111 1,A
Fig. 1 65 Overhead
conso le: Homelink®
keypad
Vehicle care Do-it-yourselt service iTechnical data
Page 174 of 368
-HomeLin k® •m ___________________ _
-Press th e ap pro priate programmed button G) , @ or@
to activate the desired remote control function ::::>
& in
"Genera l informat io n" on
page 169. •
Applies to ve hicles : w ith Hom eli nk® univer sa l rem ote c ont rol
Reprogramming a single button
A Homelink ® button can be reprogrammed individually
without affecting the other button allocations.
Programming the ov erh ead keypad
- Press the appropriate Homelink ® button until the indi-
cator light begins flashing slowly .
Programming the bumper mounted transmit
ter
1. Hold the original remote control at a distance between 0 -
5 in . (0-13 cm) from the bumper below the appropriate
headlight for your vehicle (use the shortest distance
possible).
2. Aim the remote control just below the
pas senger side
headlight .
3 . Press and hold the ac tivation button on the remote
control.
4 . The emergency flashers will flash
three times (after about
15 -60 seconds) when the programm ing is successful.
N ow release the b utton on the remote control.
- If the device utilizes a rolling code , please follow phase 3
of =>
page 170 , "Programming the Homelink ® trans
mitter" for rolling code programming.
This pr ocedur e will caus e th e ex is ting pr ogramming on th e
Homelink ® button to be era sed !•
Ap plies to veh icles: w ith Ho meli nk® un ive rsa l rem ote c ont rol
Erasing the programming of the
Homelink ® tr ansmitter
When you erase the programming, the programming on
all three of the transmitter channels with be lost!
- Perform steps 1 to 4 as described on::::> page 170, "Phase
1 : programming the overhead keypad".
When completed , the Homel ink ® system will be in the programm ing
mode and is then ready to learn the codes for remote controlled
devices .
[I) Tips
• Programmed buttons cannot be erased individually.
• For security reasons you are advised to erase the programming of
the Homelink ® system before you sell your veh icle .•
Page 175 of 368
HomeLink® -
----------------
Controls and equip
ment Safety first
Vehicle care Technical data
Page 328 of 368

m.___F_ u_ s_e _s _ a _ n_d_ b_ u_ lb_ s _____________________________________________ _
(I) Tips
You are well advised to keep a supply of spare fuses in your vehicle .
Fuses with the proper ampere ratings are available at your Audi
dealer. •
Fuse Location, Instrument Panel left
Fig. 23S Fuse pan el
layout
Some of the equipment items listed a re optiona l or only avai lable on
certain mode l configurat ions.
Note that the following t able i s accu rate at the time of going to
pre ss and is subject to change. In the event of discrepancies, the
label on the in side of the cover alwa ys takes precedence.
T he power seats are p rotected by circuit br eaker s, which a utomat i
cally reset after a few seconds after the overload has been remedied .
No. Equipment
1 Not use d
2 Not used
3 Eng ine management
4 Oil level sensor
Amps
s
5
..
No . Equipment
5
6
7
8
9
10
11
12
1 3
14
1 5
16
17
18
1 9
20
21
22
23
24
25
26
27
28
Climate control, tire pressure mon itoring sys
tem
Electronic Stabilization Program (ESP), clutch
sensor
Di agnost ic co nnector
Homelink control unit
A utom atic dimming in ter ior m irr or
Adaptive Cruise Control
Not used
Diagnostic connector
Sw itch module stee ring col umn
Not used
I ns trumen t cluste r, contro l modu le Gatew ay
Telephone, cell phone Elect ronic Stabilization Program (ESP)
Headlight electronics, left-side
Ra in s ensor
Heated washer nozzles
Se at adjus tment ( drive r)
MMI display
Electromec hanical park ing brake
Not used
N ot used
No t used
No t used
Not used
Amps
5
5
5
5
5
5
10
10
10
5
10
5
5
5
1 0
5
5
-
Page 350 of 368
___ C_ o_n_ s _ u_m_ e_ r_ I_ n_ f_o _r_ m_ a_ t_io _ n _____________________________________________ _
• Cell phone package
• Electronic immobilizer
• Homelink ® universal remote control
• Remote control key
FCC Part 15.19
This device complies with part 15 of the FCC Rules. Operation is
subject to the following two conditions:
(1) This device may not cause harmful interference, and
(2) this device must accept any interference received, including inter
ference that may cause undesired operation.
FCC Part 15.21
CAUTION :
Changes or modifications not expressly approved by the party
respons ible for compliance could void the user's authority to operate
the equipment ,
RSS-Gen Issue 1
Operation is subject to the following two conditions:
(1) this device may not cause interference, and
(2) this device must accept any interference, including interference
that may cause undesired operation of the device. •
Page 355 of 368

Alphabetical index -________________ fWI
Energy management ...... .. .. ..... 96
Fan .................... ... ... .. 100
Heated seats, front .............. . 103
Key coded setting ........ ...... ... 96
Recirculation mode (automatic) .. ... 104
Recommended sett ings ............ 96
Residual heat ..................... 99
Setting the temperature ............ 99
Switching air cooling on/off .... ... .. 99
Synchronization . ... .............. lOS
Turning on and off ....... ...... .. .. 99
Using climate control economically .. 102
Clock ................ .... .. .... .... . 9
Closing Power sunroof ... .. ... ... .. .. . .... S4
Coat hooks ........... ..... .... ... ... 9S
Cold ti re inflation pressure ..... .. ..... 297
Compass mirror ........ ...... .. .... .. 73
Compliance . ... ................ .... 347
Consumer Information . . . . . . . . . . 183, 344
Contacting NH TSA .... .............. 183
Continuously Variable Transmission (CVT)
See multit ronic ® ................. 152
Convenience key .................... . 47
Dr iver messages ....... ... .. .. ... . 112
Locking vehicle ...... ....... .. .... . 49
START button ............. .. ... .. 110
Starting engine .. ............. .. . 110
S TOP button ............ .. .. .... . 111
Switching eng ine off .............. 111
Switching on ignition ......... .. ... 110
Unlocking vehicle ................ .. 48
Convertible child safety seats ..... .... 223
Controls and equip
ment Safety first
Convert
ible lock ing retractor
Activating ............... .. ...... 229
Deactivating ..................... 230
Us ing to secure a chi ld safety seat .. 227,
229
Coolant system ..................... 284
Cooling System Expans ion tank ..... .. .. ... .... .. 284
Cruise control Changing speed ..... ... .......... 117
Presetting your speed ... .......... 117
Switching off . .. ................. 117
Switching on .................. .. 116
Warning/indicator lights ........ .. . 16
See also Adaptive Cruise Control .... 119
Cruising range ... ................ .... 34
(upholder .... ............. .. .. . 89,90
D
Damp ing
See Adaptive A ir Suspens ion ...... .. 166
Data . .... ....................... .. 341
Data record er .. . .... .. ... .......... 240
Date display ......................... . 9
Daytime running lights . . . . . . . . . . . . 58, 59
Declaration of compl ia nee
Adaptive Cruise Contro l ... ......... 347
Audi side assist .. .. . .. ...... .. ... 347
Cell phone package . .............. 347
Convenience key .... .. .. .. .. ..... 347
E lectronic immobilizer ............ 347 Homelink
® universal remote control . 347
Remote control key .. ....... ... ... 34 7
def What does this mean when it appears in
the trip odometer disp lay? .. .. ..... 10
Defective light bulb warn ing ......... .. 21
Defrosting/defogging the windows .. .. . 100
Defrosting/defogging w indows ........ 101
Determining correct load limit ....... .. 302
Digital clock . ........ ................ 9
Digital compass ..................... 73
Digital speedometer .................. 21
Dimensions ............ ... .. .. ..... 339
Dipstick Reading the dipstick properly ....... 281
Distance control system
See Adaptive Cruise Control ... .. .. . 119
Doors Power ch ild safety lock .. ....... .... 47
Driver information system ............. 19
Digital speedometer ............... 21
Driver information messages ........ 24
Open door or rear lid warning . ....... 21
Outs ide temperature display ........ 20
Sound system disp lay .............. 20
Driver seat
See Seating position .............. 176
Driver's seat ... .... .. .... ........... 76
Driver's seat memory ................. 79
Activating remote control key ....... 80
Recalling a seat pos it ion . ... ..... ... 79
Storing a seat position .. ....... .... 79
Vehicle operation Vehicle care Do-it-yourself service Technical data
Page 357 of 368

Alphabetical index -________________ fNi'II
Unleaded fuel .... .... ... .. .. . .. . 271
What should I do with an old battery? ...
292
EPC
See E lectronic power control ........ 14
ESP
See Electronic stabilizat ion program (ESP)
14
Event Data Recorder (EDR) ............ 240
Exhaust tail pipes
Cleaning ................ .... .... 264
Expansion tank ..................... 284
Ex terior lighting in the mirror housing ... 61
Eyeglass es compa rtment .............. 9S
F
Fan
Radiator ............... .. .. .. .. . 286
Fastening Booster seats .................... 225
Convertible child safety seats .. ..... 223
Infant seats .............. .... .. . 222
Fastening eyelets .................... 84
Flat tire Changing . .. ........... ...... .. . 318
Floor mats ......................... 180
Fog lights ................. ........ . 60
Folding master key with remote control .. 3 7
Foot pedals .. .. ... ........ .. .. .. .. . 180
For the sake of the environment
Gasoline fumes and the environment 273
Letting your engine warm up ...... . 109
Controls and equip
ment Safety first
Reducing engine noise
by early upshifting
8
Refueling . .. ..... .. .. .. ......... 273
Saving fuel by early upshifting ........ 8
Using the rear window defogger ..... 101
Front airbags Descript ion . ...... .. .. .. .. ....... 199
How they work ................. .. 204
Front ashtray ........................ 91
Front fog lights .. ................. .. . 60
Front seats ... .. ..... ...... ...... .. . 75
Adjusting .. .. .. ........ ......... 177
Chi ld restraints in the front seat . ... 197
Fro nta l collisions and the laws of physics 186
Fuel Additives .... .. .... .. .. ......... 271
Blended gasoline ................. 271
Consumption ............ .... .. .. . 34
Filler neck ....................... 272
Fuel gauge ...... ............. .... 10
Gasoline ..................... ... 271
Gasoline additives ................ 272
Low fuel leve l . . . . . . . . . . . . . . . . . 10, 30
Octane rating . .. ................. 271
Recommendation . ......... .... .. 271
Refuelling ....... .... .. .. ....... 273
Reserve .................. ... .. .. . 10
T ank capacity .................... 341
Unlocking the fuel filler flap by hand . 275
Fuse arrangement ................. .. 325
G
Garage door opener (Homelink ®) .. .. .. 169 Gas d
ischarge lamps .. ... .... ... .... . 329
Gauges Engine coolant temperature .......... 8
Fuel gauge ... ... .. ............... 10
Speedometer ..................... 10
Tachometer . .... .. ... ............. 9
Trip odometer ............ ...... .. 10
General illustration Instrum ents and contro ls ............ 7
Glossary of tire and loading terminology 294
Glove compartment . .. .... .... .. ..... 94
cd changer .. .... .. .... ........... 94
emergency unlocking .............. 94
Valet key function ................. 40
Gross Vehicle Weight Rating (GVWR) ... 339
H
Head restraints ..................... 179
Adjusting ............... ... ... .. 179
Front seats ........ ............... 81
Rear seats .. .. .. .. ............... 81
Headlight washer reservoir ... ........ 292
Headlights ......................... . 58
Adaptive Light .............. ...... 61
Defective . .. .. .. .. ... ............ 21
Front fog lights ................... 60
Headl ight range control defective .. .. 31
Switching off ............ ... .. .. .. 58
Switching on ............ ...... ... 58
Washer system ... ................ 67
Xenon headlights ... ... ... ......... 58
Heated outside mirrors ............... 71
Vehicle operation Vehicle care Do-it-yourself service Technical data