transmission oil AUDI S6 2012 Owners Manual
[x] Cancel search | Manufacturer: AUDI, Model Year: 2012, Model line: S6, Model: AUDI S6 2012Pages: 298, PDF Size: 74.43 MB
Page 16 of 298
14 Instrum ent s and w arn ing /indic ato r light s
ll
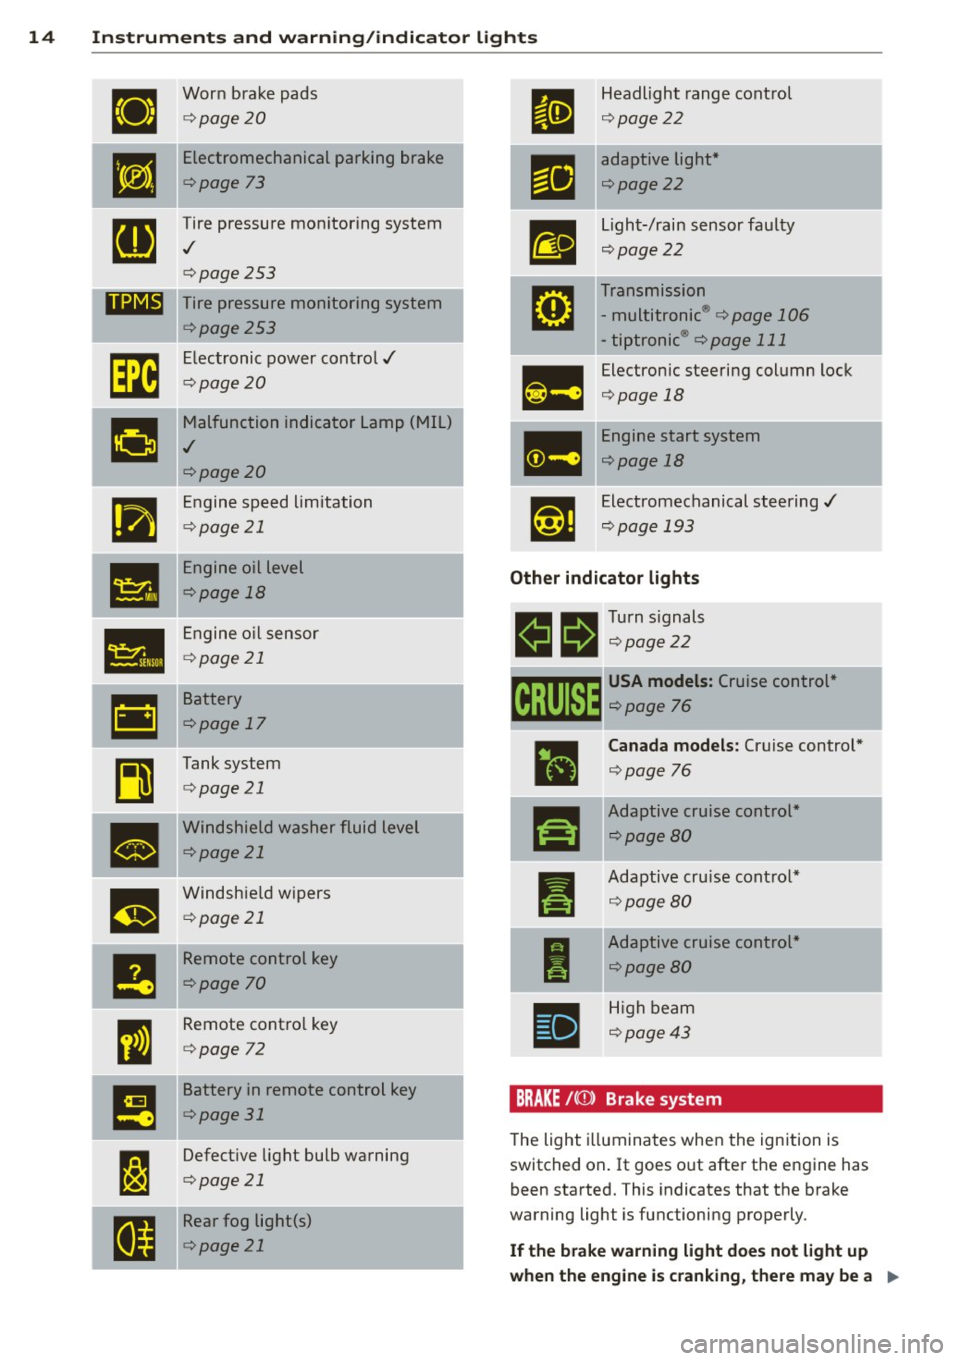
Worn brake pads
¢ page20
•
Electromechanical parking brake
¢page 73
g
Tire pressure monitoring system
./
¢page253
11111 Tire pressure monitoring system
¢page253
rm
Electronic power control./
¢page20
g
Malfunction indicator Lamp (MIL)
./
¢page20
•
Engine speed limitation
¢page 21
•
Engine oil level
¢page 18
•
Engine o il sensor
¢ page 21
•
Battery
¢page 17
~
Tank system
¢page 21
•
Windshield washer fluid level
¢page 21
m
Windshie ld wipers
¢ page 21
--
I!
Remote control key
¢page 70
I
Remote contro l key
¢ page 72
!!
Battery in remote control key
¢page 31
I:~
Defective light bulb warning
¢ page 21
I a
Rear fog light(s)
¢page 21 Headlight range control
¢
page22
adaptive light *
¢page22
-
Light-/rain sensor faulty
¢page22
Transmission
- multitronic ®
¢ page 106
-tiptronic ® ¢page 111
Electronic steering column lock
¢page 18
Engine start system
<=>page 18
Electromechanical steering./
¢page 193
Other indicator lights
11!1 1!11 Turn signals
m 111 <=>page22
~ USA model s: Cruise control "
~ <=> page 76
ra
I
I
•
Canada mod els: Cruise control*
<=> page 76
Adaptive cruise control *
<=>page 80
Adaptive cru ise cont ro l*
¢ page80
Adaptive cruise control *
¢page80
H igh beam
¢page43
BRAKE /( (f) ) Brake system
The light i lluminates when the ignition is
switched on . It goes o ut after the engine has
been started. This indicates that the brake
warning light is functioning properly .
If the brake warn ing light does not light up
when the engine is cranking , there may be a
Ill-
Page 114 of 298

112 Automatic Transmission
authorized Audi dealership as soon as pos
sible to have the condition corrected.
Emergency release of the selector lever
Applies to vehicles: with tiptro nic
If the vehicle's power supply foils, the selec
tor lever can be released in on emergency.
Fig. 118 Emergency release for selecto r lever
> To reach the emergency release mechanism,
remove the ashtray insert*.
> loosen and remove the small cap in the
ashtray mount
~ fig . 118 .
> You now have access to a bolt. Using a
screwdriver or similar, press the bolt down
and hold it down.
> Now press the interlock and move the selec-
tor lever to the
N position.
The selector lever can only be moved from the
P position if the ignition is turned on. If the
vehicle has to be pushed or towed if the power
supply fails (e.g. battery is discharged), the
selector lever must first be moved to the
N
position using the emergency locking device.
Page 194 of 298

192 Intelligent technology
freezing conditions ice) on the brake pads. A
few careful brake applications should dry off
the brake pads or remove any ice coatings.
The effectiveness of the brakes can be reduced
when the vehicle is driven on a salt-covered
road and the brakes are not used . Here too
,
you should clean off accumulated salt coating
from brake discs and pads with a few careful
applications of the brake
Q & .
Corrosion
There may be a tendency for dirt to build up
on the brake pads and corrosion to form on
the discs if the car is not driven regularly or
only for short trips with little use of the brakes.
If the brakes are not used frequently, or if cor
rosion has formed on the discs, it is advisable
to clean off the pads and discs by braking
f irmly a few times from a moderately high
speed
Q & .
Faults in the brake system
If you should notice a sudden increase in
brake pedal travel, then one of the two brake
circuits may have failed
Q & .
Low brake fluid level
Malfunctions can occur in the brake system if
the brake fluid level is too low. The brake fluid
level is monitored electronically.
Brake booster
The brake booster works with vacuum pres
sure which is created only when the engine is
running
Q & .
Brake lining wear status
Brake lining wear may be checked by visual in
spection of the condition of the brake pads
through the openings in the wheel. If neces
sary, the wheel may be removed for this in
spection
Q page 258, Changing a wheel.
WARNING
- You should perform braking maneuvers
for the purpose of cleaning the brake system only if road conditions permit.
Other road users must not be put at risk -
you may cause an accident!
- Before descending a steep grade, reduce
speed and shift transmission into a lower
gear or lower driving range. Do not ride
the brakes or hold the pedal down too
long or too often . This could cause the
brakes to get hot and diminish braking
efficiency.
- Do not "ride the brakes" by resting your
foot on the pedal when you do not intend
to brake. This may cause the brakes to
overheat, premature wear and increased
stopping distance.
- Under certain climatic and operating
conditions such as passing through wa
ter, driving in heavy rain or after washing
the vehicle, the effectiveness of the brakes can be reduced. In winter, ice can
accumulate on the brake pads, linings,
discs and drums. Carefully apply brakes
for a test. Brakes will dry and ice coat
ings will be cleaned off after a few care
ful brake applications.
- Driving for an extended period of time on
salt-covered roads without using your brakes can also affect braking efficiency.
Clean off accumulated salt coating from
brake discs and pads with a few careful
brake applications.
- If you damage the front spoiler, or if you
install a different spoiler, be sure the air
flow to the front brakes is not obstruct
ed. Otherwise the brake system could
overheat reducing the effectiveness of
the entire brake system.
- Failure of one brake circuit will impair
the braking capability resulting in an in
creased stopping distance. Avoid driving
the vehicle and have it towed to the near
est Audi dealer or qualified workshop.
- Never let the vehicle roll to a stop with
the engine shut off.
- If the brake booster is not working, for
example when towing your vehicle, or
because the brake booster has somehow
been damaged, the brake pedal must be
~
Page 238 of 298
236 Tires and wheels
-Never mount used tires on yo ur vehicle if
you are not sure of their "previous histo
ry." Old used tires may have been dam
aged even though the damage cannot be
seen that can lead to sudden tire failure
and loss of vehicle control.
Glossary of tire and loading terminology
Accessory weight
means the comb ined weight (in excess of
those standard items which may be rep laced)
of automatic transmission, power steering, power brakes, power windows, power seats,
radio, and heater, to the extent that these
items are availab le as factory -installed equip
ment (whether installed or not) .
Aspect ratio
means the ratio of the he ight to the w idth of
the tire in percent. Numbers of 55 or lower in
dicate a low sidewall for improved steering re
sponse and better overall handling on dry
pavement.
Bead
means the part of the tire that is made of
steel wires, wrapped o r reinforced by ply cords
and that is shaped to fit the r im.
Bead separation
means a breakdown of the bond between
components in the bead.
Cord
means the strands forming the plies in the
tire.
Cold tire inflation pressure
means the tire pressure recommended by the
vehicle manufacturer for a tire of a designated size that has not been driven for more than a
couple of miles (kilometers) at low speeds in
the three hour period before the tire pressure
is measured or adjusted. -
If you notice unusual vibration or if the
veh icle pulls to one side when driv ing, a l
ways stop as soon as it is safe to do so and check the wheels and tires for dam
age.
Curb weight
means the weight of a motor vehicle w ith
standard equipment including the maximum
capacity of fuel, oil, and coolant, air condi
tioning and additional weight of optiona l
equipment.
Extra load tire
means a t ire design to operate at h igher loads
and at higher inflation pressures than the cor
responding standard tire. Extra load tires may
be identified as "XL", "xl", "EXTRA LOAD", or
"R F" on the sidewall .
Gross Axle Weight Rating ( "GAWR ")
means the load-carrying capacity of a s ingle
axle system, measured at the tire-ground in
terfaces .
Gross Vehicle Weight Rating ("GVWR")
means the maximum total loaded weight of
the vehicle.
Groove
means the space between two adjacent tread
ribs .
Load rating (code)
means the maximum load that a tire is rated
to carry for a given inflation pressure. Yo u
may not find this information on all tires be
cause it is not required by law.
Maximum load rating
means the load rating for a tire at the maxi
mum permissib le inflation pressure for that
tire.
Page 268 of 298
266 Fuses a nd bulb s
Fuse panel @ (black )
No . Equ ipment Amps
=
8
Headlight range adjustment/
5/7,5
adaptive lighting system
10 Left headlight (headlight with
7,5
adaptive light)
Fuse p anel
@ (brown )
No .II Equ ipm ent
II Amp s
1 Climate control 10
2 Climate control system blower 40
3 Diagnostic connector 10
4 Electrical ignition lock 5
5 Power steering column adjust-
ment
5
Steering column switch module 10
7 Power steer
ing column adjust-
ment 25
8 Light switch
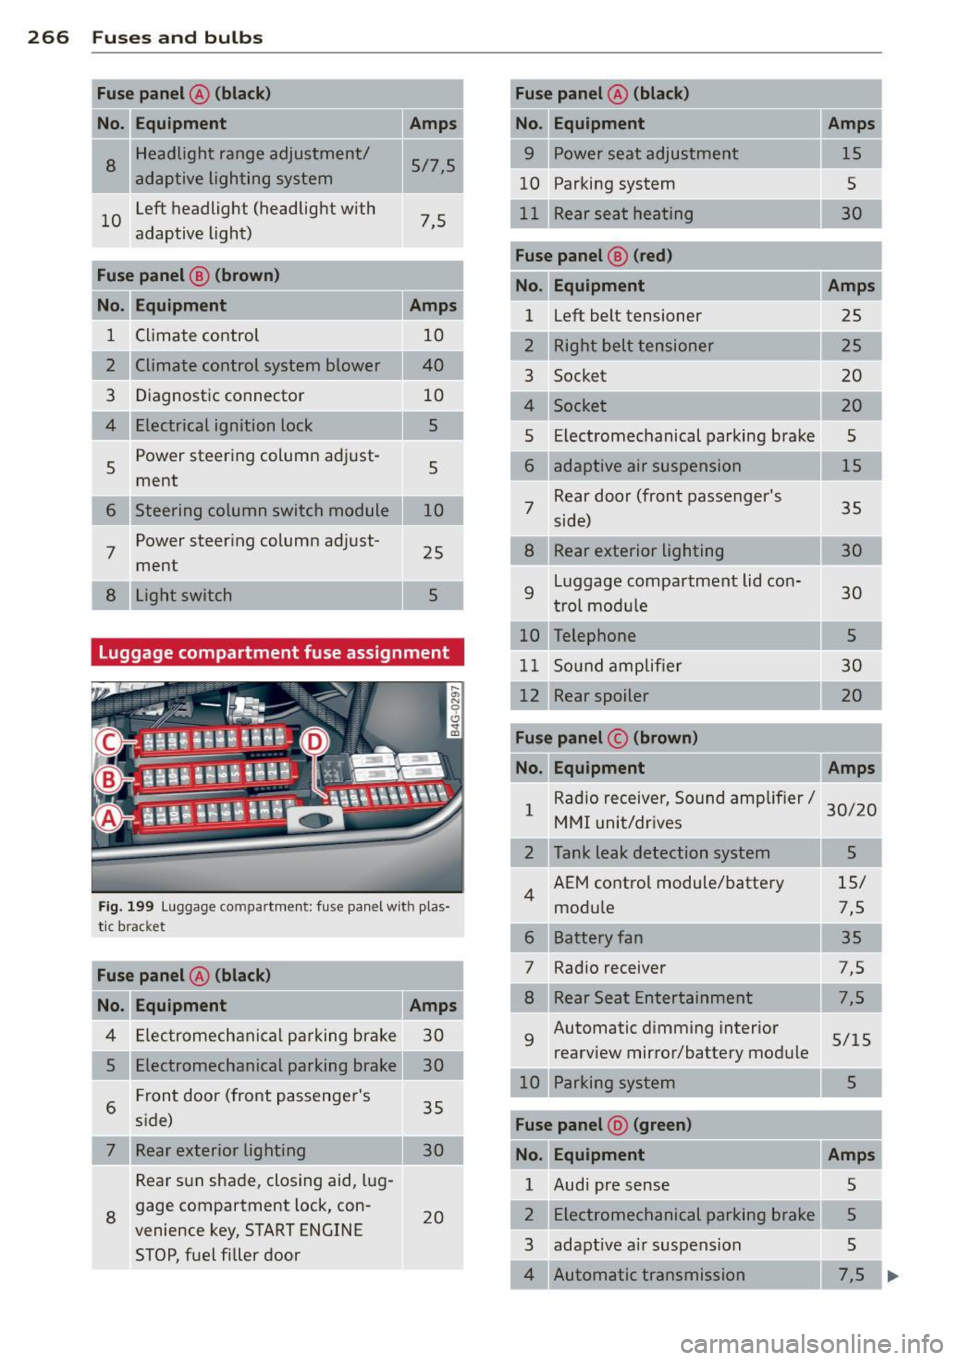
Luggage compartment fuse assignment
Fig. 199 Luggage compartment: fuse panel with plas·
tic bracket
Fuse panel @ (bl ack )
No. II Equipment
I[ Amp s
4 E lectromechanical parking brake 30
5 Electromechanical parking brake 30
6 Front door (front passenger's
35
side)
7 Rear exterior lighting Rear sun shade, closing aid, lug
s gage compartment lock, con
venience key, START ENGINE
STOP, fuel filler door 30
20
-Fuse pane
l@ (blac k) I
No. Equipm ent Amps
=· 9 Power seat adjustment 15
10 Parking system
s
30
Fus e pane l
B (red)
No . Equipment Amps
1 Left belt tensioner
25
Right belt tensioner 25
3 Socket 20
20
Electromechanical parking brake
5
adaptive air suspension 15
7 Rear door (front passenger's
35
side)
Rear exterior lighting 30
9
Luggage compartment lid con-
30
t rol module
10 Telephone 5
11 Sound amp lifier 30
12 Rear spoiler 20
Fuse pane l c (b rown )
No. Equipment Amps
1 Rad
io receiver, Sound amplif ier/
30/20
MMI unit/dr ives
2 Tank leak detection system 5
AEM control module/battery 15/
4
module 7,5
6 Battery fan 35
Rad io receiver
7,5
7,5
9
Automatic dimming interior
5/15
rearview mirror/battery module
Parking system 5
Fu se pan el o (gre en)
No. Equipment Amps
1 Audi pre sense 5
2 Electromechanical parking brake 5
3 adaptive a
ir suspension
5
Automatic transmission 7,5
...
Page 274 of 298

272 Emergency situations
@ Tips
Check carefully to make sure the hook- up
is sec ure before moving the ca r up the flat
bed truck ramp.
Lifting vehicle
Lifting with workshop hoist and with
floor jack
T he vehi cle may only be li~ed at the lifting
points illustra ted .
Fig. 207 Fr ont lift in g po int
Fi g. 208 Rear lift ing point
• Read and heed WARNING q &_ .
• Locate lifting points q fig. 207 and
qfig. 208.
• Adjust lift ing arms of workshop hoist or
floor jack to match vehicle lifting points.
• Inse rt a r ubber pad betw een the floor jack/
wor kshop hoist and the lifti ng points.
If you must lift your vehicle with a floor jack
to work underneath, be sure the vehicle is
safely supported on stands intended for thi s
purpose .
Front lifting point
The lifting point is located on t he floor pan re
i n forcement about at the same level as the j
ac k mounting po int
~ fig. 20 7. Do not lift
the veh icle at the vertical sill reinforcement .
Rear lifting point
The lifti ng po int is located o n the vert ica l rein
f orcemen t of the lowe r sill for the on- boar d
j a ck
q fig . 208.
Lifting with vehicle jack
Refer to ¢ page 261.
A WARNING
-- To reduce the risk of s erio us injury and
ve hicl e damage.
- Always lift the vehicle only at the spe
c ia l workshop hoist and floor jack lift
po ints illustrated
¢ fig. 207 and
q fig. 208.
-Fail ure to lift the ve hicle at these
po ints could cause the vehicle to tilt or
fall from a lift if there is a change i n ve
h icle weight distribution and balanc e.
T his mig ht happen, fo r example, whe n
h eavy com ponen ts such as the eng ine
b lo ck o r trans mission a re remove d.
- W hen removi ng heavy compone nts like
t hese, anch or vehicle to h oist or ad d cor
resp onding we ig hts t o main tain t he cen
t er of gravity. Oth erwise, t he ve hicle
might tilt or slip off the ho ist , ca using
serio us personal injury.
(D Note
- B e aw are o f the followin g poin ts before
li ft ing t he vehicle:
-The vehicle should never be lifted or
jacked up from underneath the engine oil pan, the transmission housing, the
front or rear axle or the body side
members. This could lead to serious
damage .
- To avoid damage to the underbody or
chas sis frame, a rubber pad must be
inserted between the floor jack and
the lift points.
-
- Before driving over a workshop hoist,
check that the vehicle weight doe s not .,..
Page 282 of 298
28 0 Con sum er Inf ormation
-Always make sure the transmission se
lector lever (automatic transmiss ion) is
in "P" (Park position) and the park brake
is f irmly app lied .
@) For the sake of the environment
-Changing the engine settings wi ll ad
versely affect em iss ion levels. This is det
rimental to the environment and increas
es fuel consumption .
- Always observe env ironmental regula
tions when dispos ing of old engine oil,
used brake fluid, dirty engine coolant,
spent batteries or worn o ut tires.
- Undeployed airbag modules and preten
s ioners might be classified as Perchlo
rate Material -spec ial handling may ap
ply, see www.dtsc.ca .gov/hazardous
was te/perch lorate . When the veh icle or
parts of the res traint system including
airbag modules safety belts wit h preten
sioners are scrapped, all applicable laws
and regulations must be observed. Your
authori zed Aud i dea ler is familiar with
these requirements and we recommend
that you have your dealer perform this
serv ice for you .
Additional accessories,
modifications and
parts replacement
Additional accessories and parts
replacement
Always consult an authorized Audi dealer be
fore purchasing accessories.
Your veh icle incorporates the latest safety de
sig n featu res ensu ring a high standard of a c
tive and passive safety .
This safety could be comp romised by non-ap
proved changes to the ve hicle. For this reason ,
if pa rts have to be replaced , please obse rve
the following points when install ing addition
a l accessories: Approved Audi accessories and genuine Aud
i
parts are available from authorized A udi deal
ers.
T hese dea le rs a lso have the necessary facili
ties, tools and tra ined specialists to install the
parts and acc essories proper ly .
A WARNING
-Using the wrong spare parts or using non-
approved accessories can cause damage to
the veh icle and ser ious persona l injury.
- Use on ly accessories express ly approved
by Audi and gen uine Audi spare parts
- These parts and accessories have been
specia lly designed to be used on yo ur ve
h icle .
- Never install accessor ies such as tele
phone crad les or beverage ho lders on a ir
bag covers or within the airbag deploy
ment zones . Do ing so will increase the
risk of injury if a irbags are triggered in an
accident!
- Before you check anything in the engine
compa rtment, always read and heed a ll
WARNI NGS
9 page 214 .
(D Note
-If items other than genu ine Audi spare
parts, add-on equipment and accessory
items are used or if repair work is not
performed accord ing to specified meth
ods, this can resu lt in seve re damage to
your vehicle's eng ine and body (such as
corrosion) and adversely affect yo ur vehi
cle's warranty .
- If emergency repairs must be performed
elsewhere, have the vehicle examined by
an authorized Audi dealer as soon as
possible .
- The manufacturer cannot be held liable
for damage wh ich occ urs due to failure
to comply with these stipu lations.
Page 286 of 298
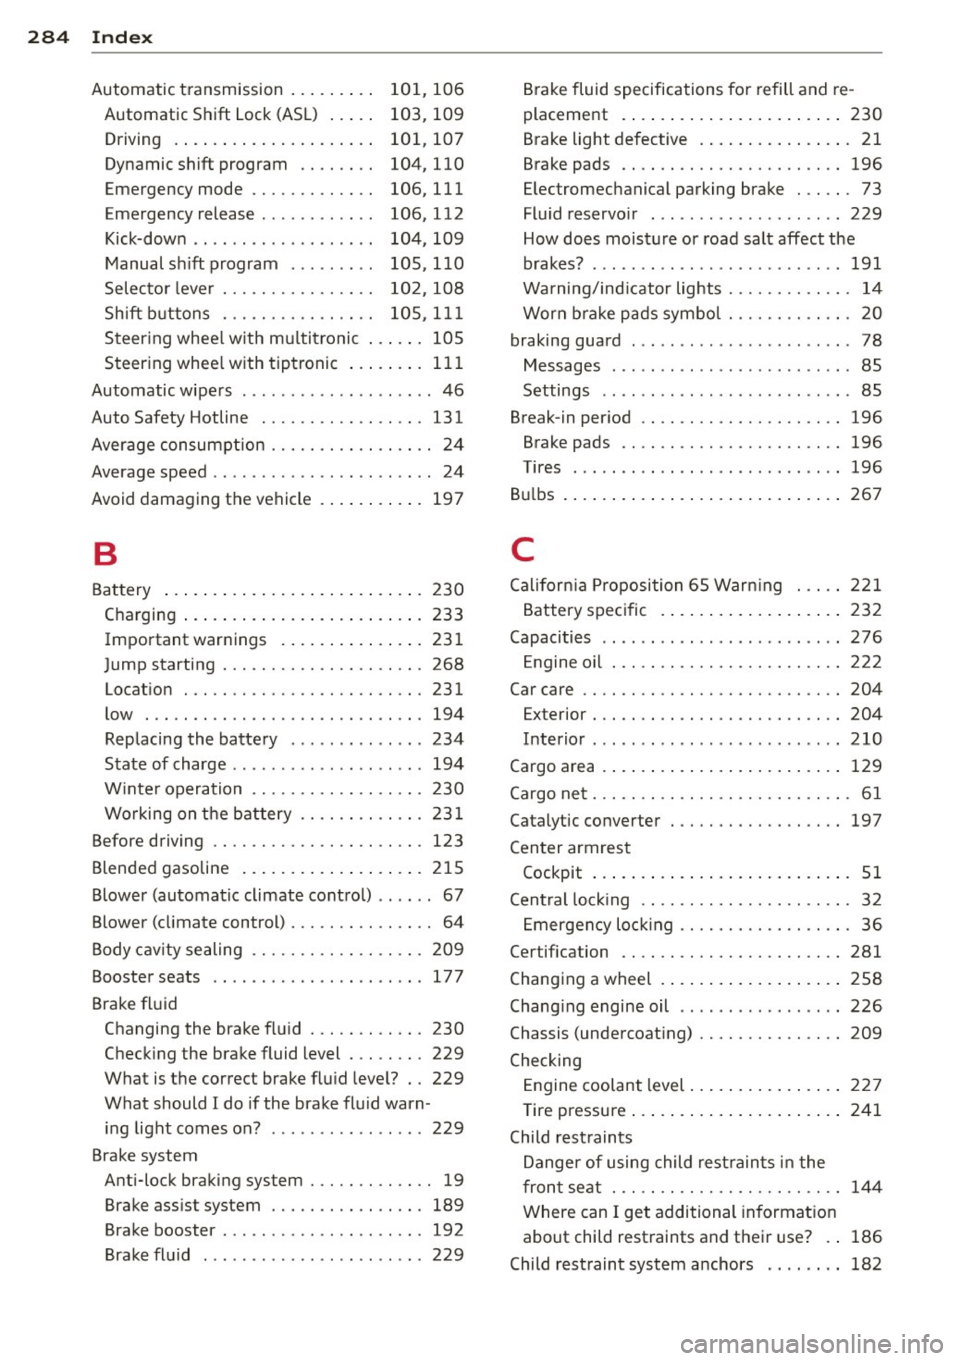
28 4 Index
Automatic transmission . . . . . . . . . 10 1, 106
Automatic Shift Lock (ASL) . . . . . 103, 109
Driving . . . . . . . . . . . . . . . . . . . . . 101, 107
Dynamic shift program . . . . . . . . 104, 110
Emergency mode . . . . . . . . . . . . . 106, 111
Emergency release . . . . . . . . . . . . 106, 112
Kick-dow n . . . . . . . . . . . . . . . . . . . 104, 109
M anual sh ift program . . . . . . . . . 105, 1 10
Selec to r l eve r . . . . . . . . . . . . . . . . 102 , 108
Shift b uttons . . . . . . . . . . . . . . . . 105, 1 11
Steer ing whee l w ith mu lti tronic ... .. . 105
Steering whee l with tiptronic ....... . 11 1
Automatic wipe rs ........... ... .. ... . 46
Auto Safety Hotline . . . . . . . . . . . . . . . . . 131
Average consumption ....... .. .. .... .. 24
Average speed . . . . . . . . . . . . . . . . . . . . . . . 24
Avoid damaging the vehicle . ... ... ... . 197
B
Battery ..... .. . .. ..... ... .. .. .... . 230
Charging .... .. .. ..... ... .. .. .... . 233
Important warnings . ... .. .. ... ... . 23 1
Jump starting .............. .. .... . 268
Locat ion . ............... .. .. .... . 231
low . .. .. .. ... .. ..... ... .... .. .. . 194
Replacing the battery ......... .. ... 234
State of charge ..... ...... .. .. .. .. . 194
W inter operation ......... .. .. .. .. . 230
Wo rking on the battery .... .. .. .. .. . 231
Before driving . . . . . . . . . . . . . . . . . . . . . . 123
Blended gasoline .. ..... ... .. .. .... . 215
Blower (automatic climate cont rol) .. .. .. 67
Blower (climate control) . . . . . . . . . . . . . . . 64
Body cav ity sealing ....... .. .. .. .. .. . 209
Booster seats .............. ... .. .. . 177
Brake fl uid
Changing the brake fl uid ... .. .. .... .
230
Check ing the brake fluid level . .. ..... 229
What is the correct brake flu id leve l? .. 229
What should I do if the brake fluid warn -
ing light comes on? ........ ..... .. .
229
Brake system
Anti-lock braking system ... .... .... ..
19
Brake ass ist system ....... .. .. .. .. . 189
Brake booster .. .... ...... .. .. .. .. . 192
Brake fl uid . ..... ......... ... .. ... 229
B rake fluid specifications fo r r efill and re -
placement . ..... .. ... ..... ... .. ..
230
Brake light defective . . . . . . . . . . . . . . . . 21
Brake pads .... .. ............. .... 196
Electromechanical parking brake . .... . 73
Fluid reservo ir . .. ................ . 229
How does moisture or road salt affect the
brakes? ....... .. .. ........ ...... .
191
Warning/ind icator lights ...... .. .. .. . 14
Worn b rake pads symbo l ........ .. .. . 20
braking guard . .. .. .......... ...... .. 78
Messages ... .. .. .. ... .. ... ..... .. . 85
Settings . . . . . . . . . . . . . . . . . . . . . . . . . . 85
Break -in period .. .. ... .......... .. .. 196
Brake pads .... .. ............. .... 196
Tires ...... ... .. .. ... ........... . 196
Bulbs . ... .. .... .. .. ... ..... ... .. .. 267
C
Cali forn ia Proposition 65 Warn ing . .... 221
Battery specific . ... ... ..... ... .. .. 232
Capac,t,es ...... .. .. ... ........... . 276
Engine oil . .. .. .. ............. .. .. 2 22
Car care .... .... .. ............. .... 204
Exterior . .. .. ... ... ... .. ... ... .. .. 204
Interior ...... ... .. .............. . 210
Cargo area ...... .. ... .. .. ... .... . .. 129
Cargo ne t ... .. .. .. .. ........... .... . 61
Catalytic converter . ............. .. .. 197
Center armrest
Cockpit ... .... .. .. .... . ... ... .. .. .
51
Central lock ing .. .. ............. .. ... 32
E mergency loc king ............... .. . 36
Certification ...... ............... .. 281
Changing a wheel . ... ... ..... ... .. .. 258
Changi ng engine oil ................ . 226
Chassis (undercoat ing) ............. .. 209
Checking
Engine coolant level ..... .... ... .. ..
227
Tire pressure ..... ... .. ..... .... . .. 241
Child rest raints
Danger of using child rest rain ts in t he
fron t seat . . . . . . . . . . . . . . . . . . . . . . . .
144
Where can I get additional in format ion
about child restraints and their use? . .
186
Child rest raint system a nchors .. .. .. .. 182