turn signal AUDI S6 2012 Owners Manual
[x] Cancel search | Manufacturer: AUDI, Model Year: 2012, Model line: S6, Model: AUDI S6 2012Pages: 298, PDF Size: 74.43 MB
Page 13 of 298
Instrument s and warning /indicator lights 11
Instruments and warning/indicator lights
Instruments
Instrument cluster and controls
The instrument cluster is your central source of information.
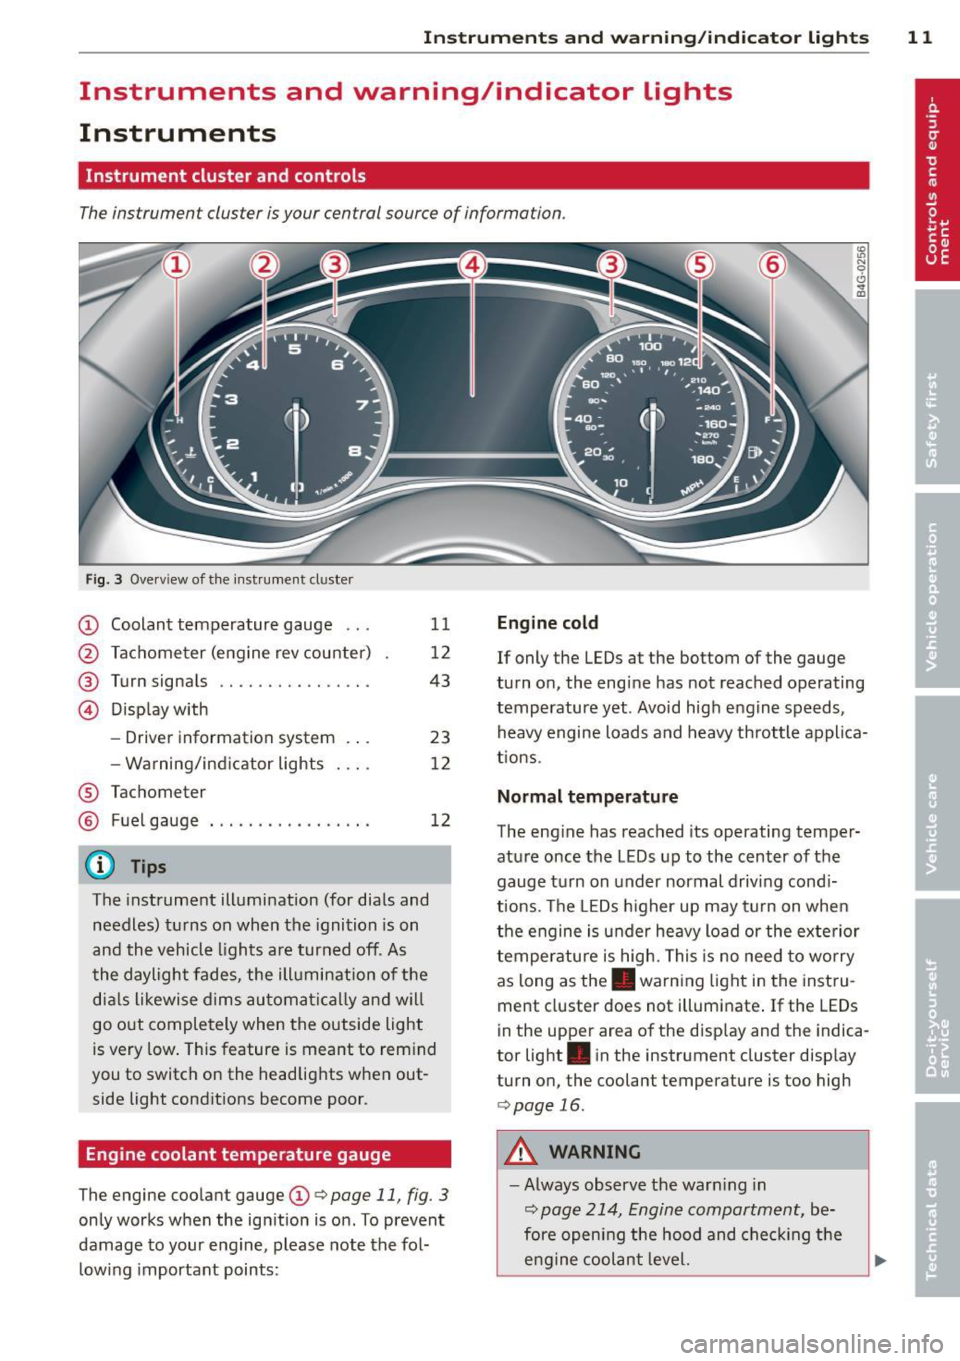
Fig. 3 Overv iew of the instrument cluster
CD Coolant temperature gauge .. .
@ Tachometer (eng ine rev counter)
@ Turn signals ............... .
@ Display with
®
®
-Driver information system .. .
- Wa rning/ind icator lights
Tachometer Fuel gauge
@ Tips
11
12
43
23
12
12
The instrument illumination (for dials and
needles) turns on when the ignition is on
and the vehicle lights are turned off. As
the daylight fades, the illumination of the
dials likewise dims automatically and wil l
go out completely when the outside light
is very low. This feature is meant to rem ind
you to switch on the headlights when out
side light conditions become poor.
Engine coolant temperature gauge
The engine coolant gauge CD¢ page 11, fig. 3
only works when the ignition is on. To prevent
damage to your eng ine, please note the fol
l owing important points:
Engine cold
If only the LEDs at the bottom of the gauge
turn on, the eng ine has not reached operating
temperature yet . Avoid high engine speeds,
heavy engine loads and heavy throttle applica
tions.
Normal temperatu re
The engine has reached its operating temper
ature once the LEDs up to the center of the
gauge turn on under normal driving cond i
t ions. The LEDs higher up may turn on when
the engine is under heavy load or the exterior
temperature is high. This is no need to worry
as long as the. warning light in the instru
ment cluster does not illuminate . If the LEDs
in the upper area of the display and the indica
tor light . in the instrument cluster display
turn on, the coolant temperature is too high
¢page 16.
A WARNING
-Always observe the warn ing in
¢ page 214, Engine compartment, be
fore opening the hood and checking the
engine coolant level.
Page 14 of 298
12 Instrum ent s and w arn ing /indic ato r light s
-Never open the engine hood if you see or
hear steam, or if you see engine coolant
dripping from the engine compartment.
You could burn yourself . Let the engine
cool off first so that you cannot hear or
see any steam or engine coolant .
@ Note
-Mounting additional lights or accessories
i n front of the a ir inlets reduces the cool
i ng effect of the rad iator . At h igh outside
temperatures or high eng ine load, the
engine could overheat.
- The front spo iler has been designed to
proper ly distribute the cooling air when
t h e ve hicle is moving.
If the spoiler is
dam aged, th is co uld red uce the cooling
effect and the engine co uld then over
heat . Ask your authorized Audi dea ler for
assistance .
Tachometer (engine rev counter)
The tachometer indicates the engine RPM
(revolutions per minutes).
If engine RP M drops be low 1,500, yo u should
downshift to the next lower gear. The red a rea
at the end of the sca le indicates maximum
perm iss ib le engine RPM after the break-in pe
riod. Before reaching this area, move these
lector lever to position "D/S (Drive)" or ease
your foot off the accelerator pedal.
(D Note
The tachometer needle should on ly br iefly
be in the red zone: you could damage your
engine! The beginn ing of the red zone var
ies depending on the engine .
@ For the sake of the environment
Upshifting early saves fuel and reduces en
gine noise.
Fuel gauge
The fuel gauge only works when the ignition is
on .
If the fuel level d rops below 2 . 6 ga llons (10 liters), the bottom LED turns red and the
indicator
light~ turns on ¢
page 21. The
bottom LED blinks red when the fuel level is
very low.
T he possible range based on the current fuel
level is shown in tab@¢
page 23, fig . 4 .
(D Note
Never run the tank completely dry. An ir
r egular supply of f uel can cause engine
misfiring and fuel could enter the ex ha ust
system . The catalytic converter could then
overheat and be damaged.
Warning/indicator Lights
Description
The ind icator lights in the instrument cluster
blink or turn on. They indicate funct ions or
malfunctions ¢,& .
Messages may appear with some indicato r
lights. A warning signal will sound at the
same t ime. The indicator lights and messages
in the center of the displays may be rep laced
by other d isplays . To show them again, select
the tab for ind icator lights and messages us
i ng the multifunction steering wheel
¢
page 23. If t here are several malfunc
t ions, you can display them one at a time us
ing the thumbwheel.
Some indicato rs lights in the d isplay can turn
on in severa l co lors.
A WARNING
- F ailure to heed w arning l igh ts and other
important vehicle in forma tion may res ult
in ser io us personal inj ury or vehicle dam
age .
- Whenever stalled or stopped for repair, move the vehicle a safe d istance off the
road, stop the engine, and turn on the
emergency flasher¢
page 42.
-The engine compartment of any motor
veh icle is a potentially hazardous area.
Before you chec k anything in the engine
Page 16 of 298
14 Instrum ent s and w arn ing /indic ato r light s
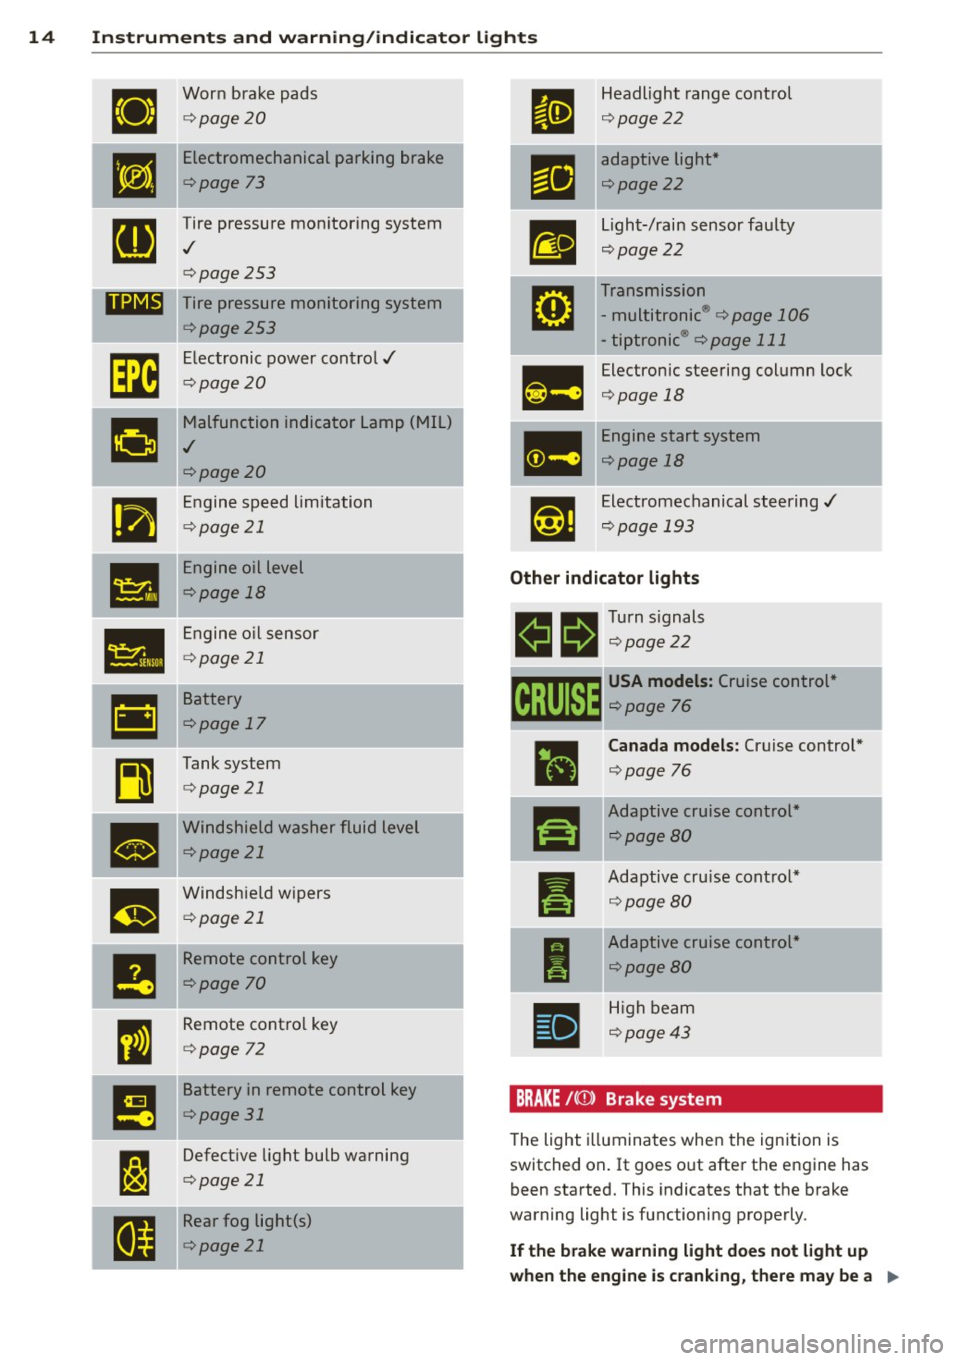
ll
Worn brake pads
¢ page20
•
Electromechanical parking brake
¢page 73
g
Tire pressure monitoring system
./
¢page253
11111 Tire pressure monitoring system
¢page253
rm
Electronic power control./
¢page20
g
Malfunction indicator Lamp (MIL)
./
¢page20
•
Engine speed limitation
¢page 21
•
Engine oil level
¢page 18
•
Engine o il sensor
¢ page 21
•
Battery
¢page 17
~
Tank system
¢page 21
•
Windshield washer fluid level
¢page 21
m
Windshie ld wipers
¢ page 21
--
I!
Remote control key
¢page 70
I
Remote contro l key
¢ page 72
!!
Battery in remote control key
¢page 31
I:~
Defective light bulb warning
¢ page 21
I a
Rear fog light(s)
¢page 21 Headlight range control
¢
page22
adaptive light *
¢page22
-
Light-/rain sensor faulty
¢page22
Transmission
- multitronic ®
¢ page 106
-tiptronic ® ¢page 111
Electronic steering column lock
¢page 18
Engine start system
<=>page 18
Electromechanical steering./
¢page 193
Other indicator lights
11!1 1!11 Turn signals
m 111 <=>page22
~ USA model s: Cruise control "
~ <=> page 76
ra
I
I
•
Canada mod els: Cruise control*
<=> page 76
Adaptive cruise control *
<=>page 80
Adaptive cru ise cont ro l*
¢ page80
Adaptive cruise control *
¢page80
H igh beam
¢page43
BRAKE /( (f) ) Brake system
The light i lluminates when the ignition is
switched on . It goes o ut after the engine has
been started. This indicates that the brake
warning light is functioning properly .
If the brake warn ing light does not light up
when the engine is cranking , there may be a
Ill-
Page 24 of 298

22 Instruments and warning/indicator lights
Have the bulb replaced or the connection
repaired by you r aut horized Aud i Service
department.
i,lD Headlight range control
II Headlight range control: defective !
If the symbo l illuminates, t he headlight range
contro l is no longer working properly . Have
the system checked and repaired at your Aud i
dealer .
l§O Adaptive Light
Applies to vehicles: with Adapt ive Light
II Audi adaptive light: system fault
If the indicator light t urns on and th is mes
sage appears, there is a malfunction in the
adapt ive light system . The headlights still
f u nction .
Go to an aut hori zed dea lership to have the
h eadlights or the contro l unit for t he Adapt ive
Light repai red .
~D Light/rain sensor
f'al Automatic headlights /automatic wipers:
system fault
I f th e i ndicator lig ht turns on and t his mes
sage appears, t he lig ht/ra in sensor is no t
f u nctioni ng cor rec tly .
For safety reasons the low beams are turned
on permanent ly w ith the switch in
AUTO .
However , you can continue to turn the ligh ts
on an d off using the light swi tc h. Y ou can still
con trol a ll fu nct ions tha t are indepe ndent of
t h e rai n sens or throug h the win dshi eld wipe r
l eve r.
Contact your au thor ized Audi deal er as soon
as poss ible to have the prob le m cor recte d.
¢ Q Turn signals
The indicator light blinks when you use either
turn signal .
Whenever yo u use the left B o r th e right rl
turn s ignal , the indicator light blinks. Whe n
you use the emergency flas he rs, both indica
tor lights flash .
If one of the turn signa l light bulbs b urn o ut,
the turn signal w ill blink twice as fast as nor
mal. Carefu lly dr ive to your aut horized Aud i
dealer immed iate ly to have th e malfu nction
cor rected. The indicator lig ht does not indi
cate a m alfu nction if a tur n signal on t he tra il
er o r on the veh icle fails in trail er t ow ing
mode .
(D Tips
For m ore inf orm ation on the t urn sign als ,
r e fer to ¢
page 43 .
CRUISE/" (-) Cruise control
The warning/in dicator lig ht mIDJm (U SA mod
els)ll'II (Canada models) ill umi nates when
the cr uise c ontrol is activated ¢
page 76 .
Page 34 of 298
32 Openin g and clo sing
- The vehicle cann ot be starte d if an unau
thorized key is used. The ve hicle may not
start if another radio device such as a key
for another vehicle or a transponder is
located on the key ring.
- For Declaration of Compliance to United
States FCC and Industry Canada regula
tions ¢
page 281.
Power locking system
General description
The power locking system locks or unlocks all
doors and the rear lid simultaneously.
You can lock and un lock the veh icle centrally.
You have the following choices:
- Remote master key¢
page 34,
-Door handles with convenience key"
¢ page 34,
-Lock cylinder at the dr iver's door
¢page 35, or
- Power locking switch inside
¢ page 35.
Select ive unloc king
When they a re closed, the door and rea r lid
are locked . When unlocking, you can set in the
M MI whether only the driver's door or the en
tire vehicle sho uld be unlocked ¢
page 33 .
Automatic locking
The automat ic locking feat ure locks all the ve
h icle doors and the rear lid when you drive
faster than 9 mph ( 15 km/h) .
The ca r is un locked again, when the opening
f u nction in the power loc king system sw itch
or at one of the doo r levers is ac tuated. The
Auto Lock function can be turned on and
off in
the MMI
¢ page 33.
Anti-theft alarm warning system
I f the a nti-theft alarm warning system de
tec ts a break- in into the vehi cle, acoust ic and
visua l wa rning signals are triggered. The anti
-theft wa rning system is activated au
tomatica lly when you lock the vehicle . It is de
activated when unloc king using the remote
key, with the mechan ica l key, and when you
switch the ign ition on.
The alarm a lso t urns
off when the alarm cycle
has expired .
Turn signals
When you u nlock the veh icle, the turn s ignals
flash twice . When you lock the vehicle the
tu rn signals f lash once. If they do not flash,
one of the doors, the rear lid or t he hood is
not locked.
Unintentionally locking yourself out
In the fo ll ow ing cases there safeg ua rds to
prevent yo u lock ing your remote master key in
the ve hicle:
- The vehicle does not loc k w it h t he cen tral
loc king switc h¢
page 35 if the drive r's
door is open.
- On veh icles with convenience key*, if the
mos t recen tly used master key is in the l ug
gage compartment, the rear lid is a utomat i
cally un locked again after it is closed.
Do no t lock your veh icle w ith the
remot e m as
ter key or co nvenience ke y*
unti l all doors
and the rear lid are closed. In this way you avoid locking yourself o ut accidentally .
Power side door closer*
The vehicle doo rs are equipped with a power
s ide door closer. W hen closing a door, you on
ly have to le t it fall light ly in to the latch . The
door will then automatically close by itself
¢ ,1. .
_8 WARNING
-When you loc k yo ur vehicle from o utside,
nobody- espec ially children -shou ld re
main inside the vehicle. Remember,
when you lock the vehicle from the out
side the wi ndows cannot be opened from
the inside. ..,
Page 36 of 298
34 Openin g and clo sing
locking and unlocking the vehicle with
the remote control
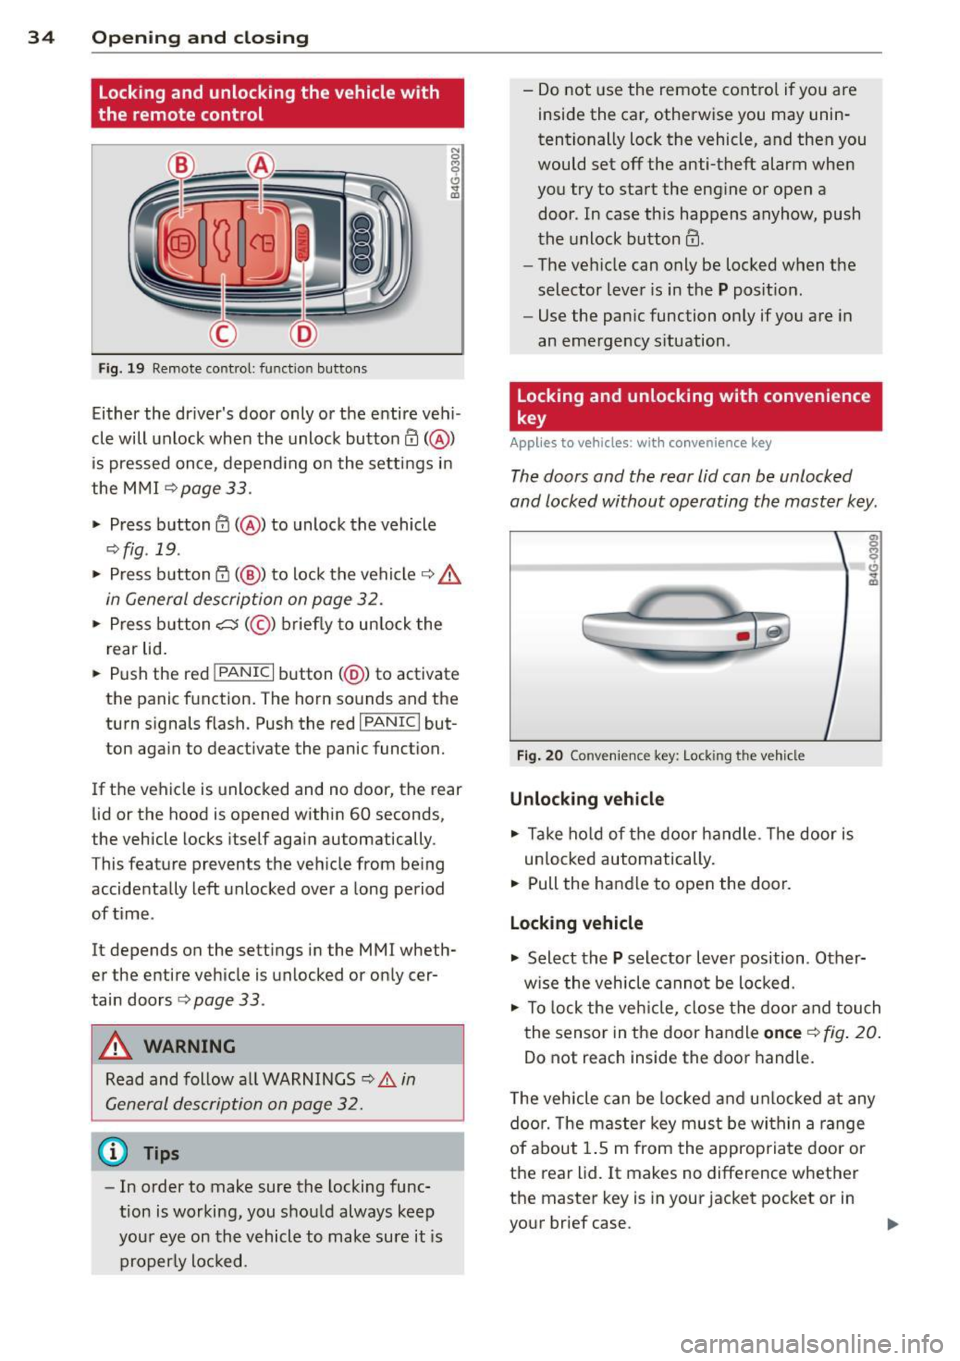
F ig. 19 Remote control: function buttons
N 0
9 (!)
~
Either the driver's door only or the entire veh i
cle will unlock when the unlock button
III( @)
is pressed once, depend ing on the settings in
the MMI
¢page 33.
.. Press button III( @) to unlock the vehicle
¢fig .19 .
.. Press button fij (@ ) to lock the vehicle¢.&,
in General description on page 32 .
.. Press b utton c:s (@ ) briefly to un lock the
rear lid .
.. Push the red
!PANIC I button( @) to activate
the panic f unction. The horn sounds and the
turn signals flash. Push the red
!PANIC I but
ton aga in to deact ivate the panic function.
If the vehicle is unlocked and no door, the rear lid or the hood is opened within 60 seconds,
the vehicle locks itself again automatically.
This feature prevents the vehicle from being
accidentally left unlocked over a long period
of time .
It depends on the settings in the MMI wheth
er the entire vehicle is unlocked or only cer
tain doors
¢ page 33.
A WARNING
Read and follow a ll WARNINGS c:> .&. in
General description on page 32.
@ Tips
- In order to make sure the locking func
tion is working, you should always keep
your eye on the vehicle to make sure it is
properly locked. -
Do not use the remote control if you are
inside the car, otherwise you may unin
tentionally lock the vehicle, and then you
would set off the anti-theft alarm when
you try to start the eng ine or open a
door. In case this happens anyhow, push
the unlock button
III-
- The vehicle can only be locked when the
selector lever is in the
P posit ion.
- Use the panic function only if you are in
an eme rgency s ituation.
locking and unlocking with convenience
key
Applies to vehicles : with convenience key
The doors and the rear lid can be unlocked
and locked without operating the master key .
Fig . 20 Conven ience key: Lock ing the vehicle
Unlocking vehicle
.. Take ho ld of the door handle. The door is
un locked automatically.
.. Pull the handle to open the door.
locking vehicle
.. Select the P selector lever position . Other
w ise the vehicle cannot be lo cked.
.. To lock the veh icle, close the door and touch
the sensor in the door handle
on ce c:> fig . 20 .
Do not reach inside the door handle.
T he veh icle can be locked and unlocked at any
doo r. T he master key must be within a range
of about 1.5 m from the appropriate door or
the rear lid. It makes no difference whether
the master key is in your jacket pocket or in
your brief case.
Page 44 of 298
42 Clear vision
visibility conditions. For example, fog cannot be detected by the light sensors.
So always switch on the headlights
io
under these weather conditions and
when driving in the dark.
- Crashes can happen when you cannot see
the road ahead and when you cannot be
seen by other motorists . Always turn on
the headlights so that you can see ahead and so that others can see your car from
the back.
(D Note
The rear fog lights should only be turned
on in accordance with traffic regulation, as
the lights are bright for following traffic.
@ Tips
-In the event of a light sensor malfunc
tion, the driver is notified in the instru
ment cluster display~
page 22.
- You will hear a warning tone if you open
the driver door when the exterior lights
are switched on.
- Please observe legal regulations when
using the lighting systems described .
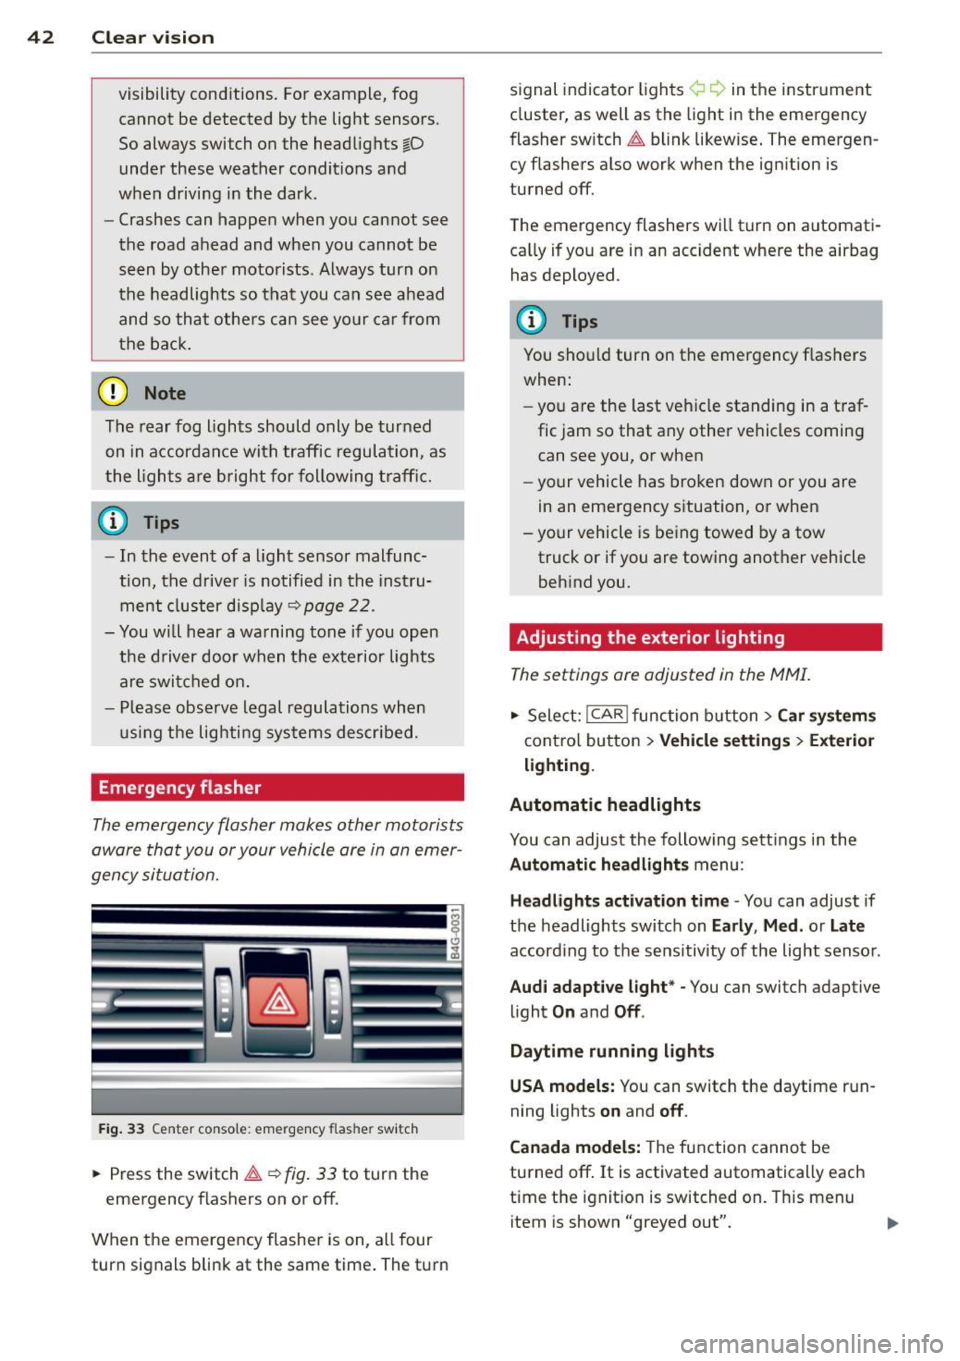
Emergency flasher
The emergency flasher makes other motorists
aware that you or your vehicle are in an emer
gency situation.
Fig. 33 Center console : emerge ncy flasher switch
• Press the switch~~ fig. 33 to turn the
emergency flashers on or off.
When the emergency flasher is on, all four
turn signals blink at the same time. The turn signal
indicato r lights ¢ Q in the instrument
cluster, as well as the light in the emergency
fl asher switch ~ blink likewise. The emergen
cy flashers also work when the ignition is
turned off.
The emergency flashers will turn on automati
cally if you are in an accident where the airbag
has deployed .
(D Tips
You should turn on the emergency flashers
when:
- you are the last vehicle standing in a traf
fic jam so that any other vehicles coming
can see you, or when
- your vehicle has broken down or you are
in an emergency situation, or when
- your vehicle is being towed by a tow
truck or if you are towing another vehicle
behind you.
· Adjusting the exterior lighting
The settings ore adjusted in the MMI.
• Select: I CAR I function button > Car systems
control button > Vehicle settings> Exterior
lighting.
Automatic headlights
You can adjust the following settings in the
Automatic headlights menu :
Headlights activation time -You can adjust if
the headlights switch on
Early , Med. or Late
according to the sensitivity of the light sensor .
Audi adaptive light* -You can switch adaptive
light
On and Off .
Daytime running lights
USA models:
You can switch the daytime run
ning lights
on and off.
Canada models:
The function cannot be
turned off.
It is activated automatically each
time the ignition is switched on. This menu
item is shown "greyed out".
Page 45 of 298
Coming home , Leav ing home
The coming home function il luminates the
area outside the vehicle when you switch the
ignition off and open the driver 's door . To turn
the function on, select
Light s when le aving
c a r > On .
The leav ing home function illuminates the
area outside the vehicle when yo u un lock the
veh icle . To turn the function on, select
Li gh ts
when unloc kin g ca r> On.
The coming home and leaving home functions
only operate when it is dark and the light
switch is in the
AUTO pos ition.
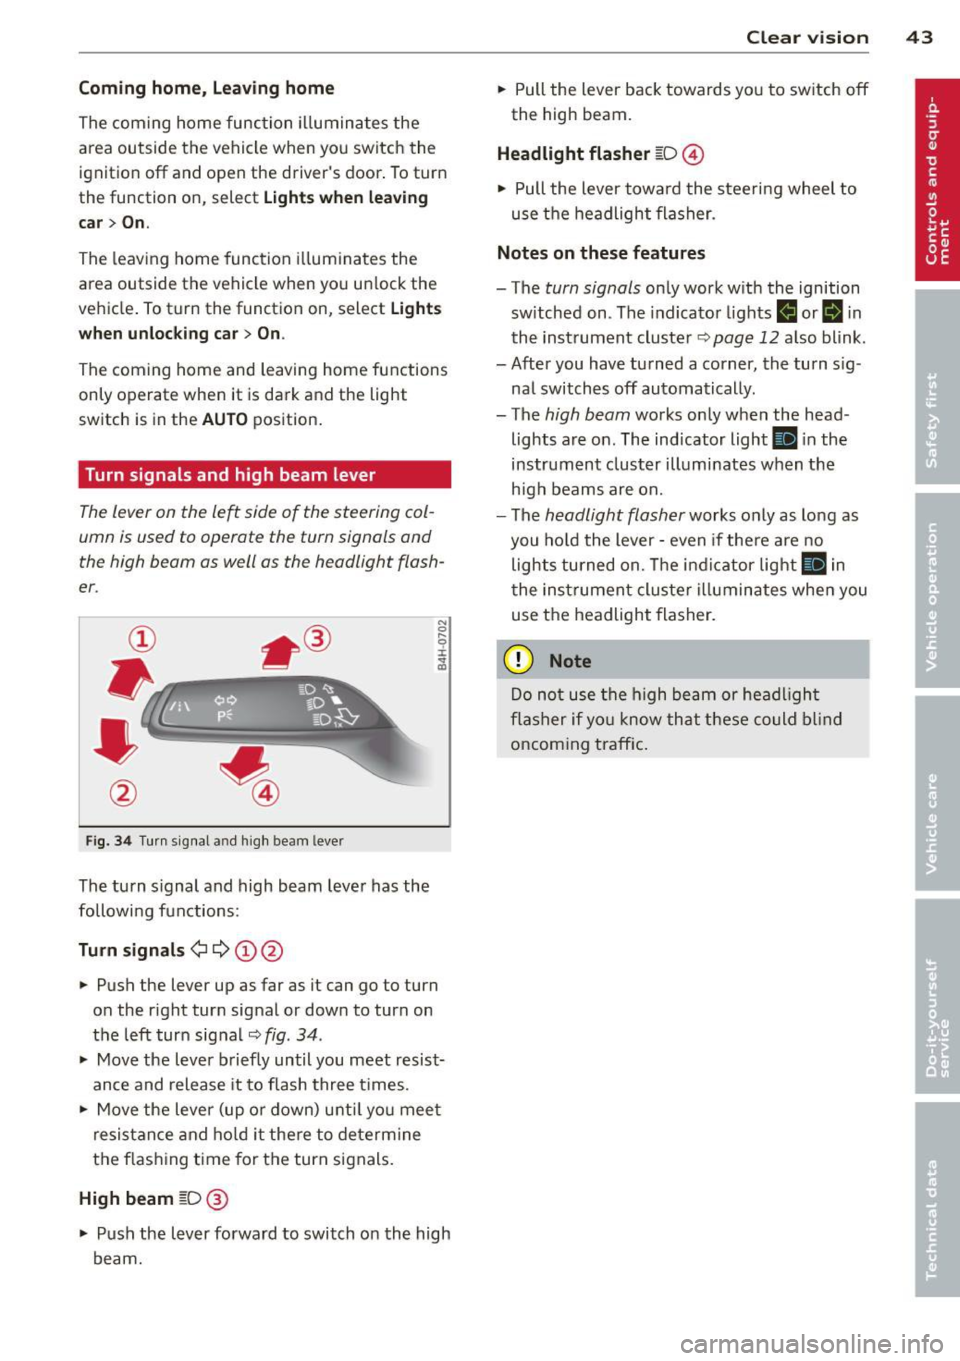
Turn signals and high beam lever
The lever on the le~ side of the steering col
umn is used to operate the turn signals and
the high beam as well as the headlight flash
er .
Fig. 3 4 Tu rn signal a nd h igh beam lever
The turn s ignal and high beam lever has the
followi ng functions:
Tu rn sign als ¢ ¢ @@
.. Push the lever up as far as it can go to turn
on the r ight turn signal or down to turn on
the left turn sig nal
c:::;, fig . 34 .
.. Move the lever b riefly until you meet resist
ance and release it to flash three times .
.. Move the lever (up or down) unti l you mee t
resistance and ho ld it there to dete rmine
the f las hing t ime for the turn signals.
High beam [D @
.. Push the lever forward to switch on the high
beam.
Clear vi sion 43
.. Pull the lever back towards you to switch off
the high beam.
Headlight fla sher [D ©
.. Pull the lever towa rd the stee ring wheel to
use the headlight flasher.
Note s on these features
- The turn signals on ly work with the ignition
sw itched on . The indicator lights
f,j or II in
the inst rument cluster~
page 12 also blink.
- After you have turned a corner, the turn s ig -
nal switches off automatically .
- The
high beam works only when the head
lights are on . The indicator light
Ill in the
instrument cluster illuminates when the
h igh beams are on.
- The
headlight flasher works only as long as
you hold the lever -even if the re a re no
lights turned on. The indicator light
Ill in
the inst rument cluster i lluminates whe n you
use the headlight flasher.
(D Note
Do no t use the high beam or headligh t
flasher if yo u know that these could blind
oncoming traffic.
Page 76 of 298

74 On the road
Parking
Various rules apply to prevent the parked ve
hicle from rolling away accidentally.
P a rking
.. Stop the vehicle with the foot brake .
.. Pu ll the switch <®l to apply the park ing
brake.
.. Se lect the
P se lector lever position
~ page 101.
• Turn the eng ine off ~.&.
In addition on incline s and grade s
.. Turn the steering wheel so that your vehicle
will roll against the curb in case it should
start to move .
A WARNING
-When you leave your veh icle - even if on
ly b rief ly - always take the ignition key
with you. This app lies par ticu la rly when
children remain in the veh icle . Otherw ise
the ch ildren could start the engine, re
lease the parking brake or ope rate e lec
trical equipment (e.g. power windows) .
There is the risk of an accident .
- When the vehicle is locked, no one - par
t icu larly not ch ildren should remain in
the vehicle. Locked doors make it more
difficult for emergency workers to get in
to the vehicle -putt ing lives at risk .
Starting from rest
The starting assis t function ensures tha t the
parking brake is released automatically upon
starting .
Stopping and appl ying park ing br ake
.. Pull the switch(®) to apply the parking
brake.
Starting and automatically releasing the par king brake
.. When you start to drive as usua l, the park
ing brake is automatically re leased and your
vehicle begins to move. When stopping at a traffic signal or stopping
in city t raffic, the parking brake can be ap
plied . T he vehicle does not have to be he ld
with the footbrake . The parking brake elimi
nates the tendency to creep w ith a dr ive range
engaged . As soon as you d rive off as usual,
the pa rking brake is released automat ically
and the vehicle starts to move .
Starting on slopes
When starting on inclines, the starting assist
prevents the vehicle from u nintent ionally roll
ing back . The braking force of the parking
brake is not released until suff ic ient driving
force has been built up at the wheels .
(D Tips
For safety reasons, the parking brake is re
leased automatically o nly when the d riv
er's safety belt is engaged in the buckle.
Starting off with a trailer
To prevent rolling back unintentionally on an
incline, do the following:
.. Keep the sw itch <®l pulled and depress the
accelerator. The parking brake stays applied
and prevents the vehicle from roll ing back
ward .
.. You can release the switch
<®l once you are
sure that you are developing enoug h for
ward momentum at the whee ls as you de
press the acce lerator .
Depend ing on the we ight of the rig (vehi cle
and t railer) and the severity of the incline, yo u
may ro ll backwards as yo u start . You can pre
vent rolling backwards by holding the parking
brake switch <®l pulled out and accelerating -
just as you wou ld when starting on a hill with
a conventiona l hand brake.
Page 89 of 298
Audi side assist Lane Change Assistant
Description
App lies to vehicles: with si de assist
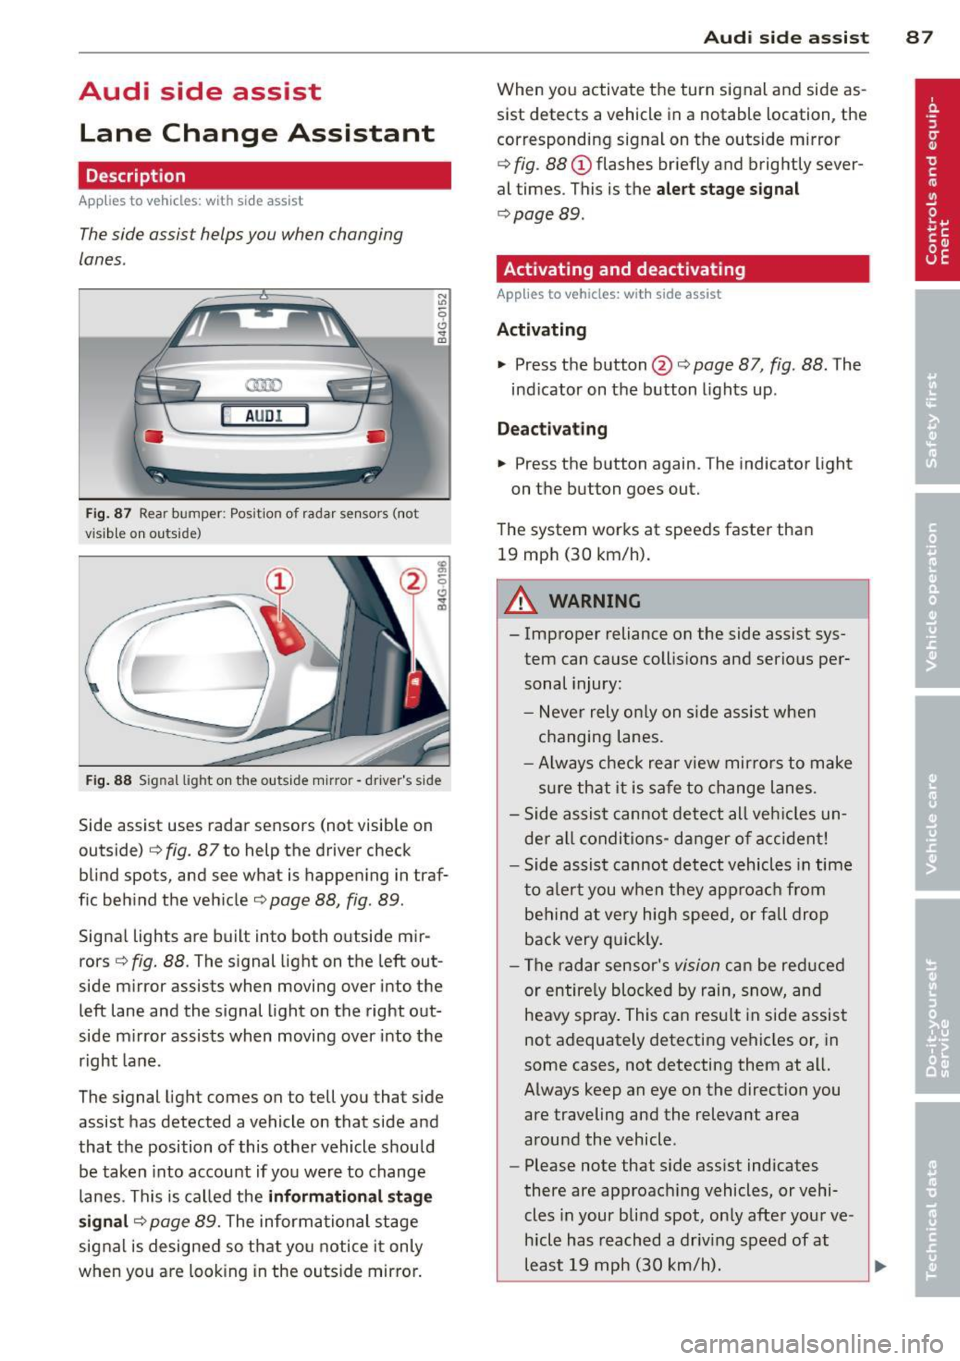
The side assist helps you when changing
lanes .
H AUDI I
Fig. 87 Rear bumper : Pos ition of rada r sen sors (not
v isib le on outs ide)
Fig . 88 S ig n al l ight on the outside m irro r - drive r's side
Side assist uses radar sensors (not visib le on
outside)
c::> fig. 87 to help the driver check
blind spots, and see what is happening in traf
f ic beh ind the veh icle
c::> page 88, fig. 89 .
Signal lights are built into both outside mir
rors <=>
fig. 88. The signal light on the left out
side mirror assists when moving over into the left lane and the signal light on the right out
side m irror assists when moving over into the
right lane .
The signal light comes on to tell you that side
assist has detected a vehicle on that side and
that the position of this other vehicle should be taken into account if yo u were to change
lanes. This is called the
informati onal stag e
s ignal
c::> page 89. The informational stage
signal is designed so that you notice it only
when yo u are look ing in the outside mirro r.
Aud i side assist 8 7
When you activate the turn signal and side as
sist detects a vehicle in a notable location, the
corresponding signal on the outside mirror
c::> fig . 88 (D flashes br iefly and brightly sever
al times . This is the
aler t stage signal
c::> page 89 .
Activating and deactivating
Applies to vehicles: wit h side assist
Activating
.., Press the button @c::> page 87, fig. 88 . The
ind icator on the button lights up .
Dea ctivating
.., Press the button again. The indicator light
on the button goes out.
The system works at speeds faster than 19 mph (30 km/h).
A WARNING
-
- Improper reliance on the side assist sys-
tem can cause collisio ns and serious per
sonal injury:
- Never rely on ly on s ide assist whe n
changing lanes.
- Always check rear view mir rors to make
sure that it is safe to change lanes.
- Side assist cannot detect all veh icles un
de r al l conditions- danger of accident!
- Side assist cannot detect vehicles in time
to a le rt you when they approa ch from
behind a t very high speed, or fall drop
back very q uickly.
- The radar sensor's
vision can be red uced
or entire ly blocked by rain, snow, and
heavy spray . This can resu lt in side assis t
not adequately detecting vehicles or, in
some cases, not detecting them at all.
Always keep an eye on the direction you are traveling and the relevant area
around the vehicle .
- Please note that s ide assist indicates
there are approac hing vehicles, or vehi
cles in your blind spot, on ly afte r you r ve
hicle has reach ed a driv ing speed of at
least 19 mph (30 km/h).
~