transmission oil AUDI S7 2015 Owners Manual
[x] Cancel search | Manufacturer: AUDI, Model Year: 2015, Model line: S7, Model: AUDI S7 2015Pages: 316, PDF Size: 78.09 MB
Page 11 of 316
M N <( (.J
'SI: ,...., \!) 1.1'1 ,...., 1.1'1 ,....,
CD
@
®
©
®
®
(j)
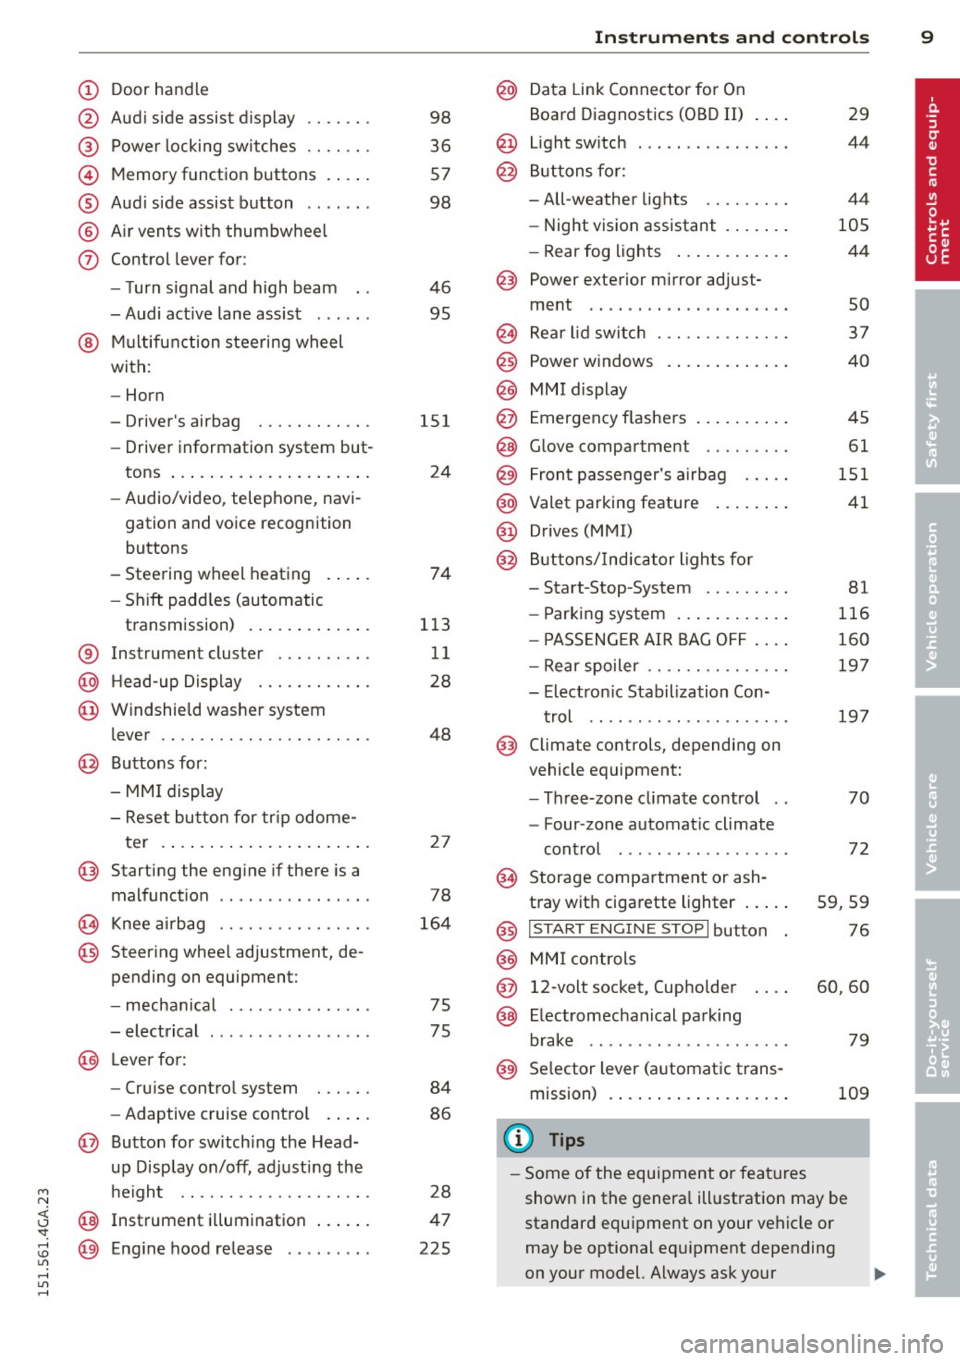
Door handle
Audi side assist display
Power locking sw itches
Memory function buttons .. .. .
Aud i side assist button ...... .
A ir vents with thumbwheel
Control lever for:
- T urn signal and high beam
- Audi act ive lane assist . .. .. .
@ Mu ltifunction steering wheel
with:
- Horn
- Driver's airbag
- Driver information system but-
tons ... ..... ....... ... .. .
- Audio/video , telephone, navi
gation and voice recognition
buttons
- Steering wheel heating . ... .
- Shift padd les (automatic
transmission) ..... ... ... . .
® Instrument cluster ......... .
@ Head-up Display ........... .
@ Windshield washer system
lever .. .. ........ ..... .... .
@ Buttons for :
- MMI display
- Reset bu tton for tr ip odome-
te r .. .. ... .. ..... ... .. .. .
@ Starting the engine if there is a
malfunction ............... .
~ Knee airbag ........... .. .. .
@ Steer ing whee l adjustment, de
pending on equipment:
- mechan ical .......... .. .. .
- electrical .... ....... ... .. .
@ Leve r for:
- Cru ise control system ... .. .
- Adaptive cruise contro l .. .. .
@ Button for sw itch ing the Head
up Disp lay on/off, adjusting the
h eight .. ............. .. .. .
@ Instrument illumination ... .. .
@ Eng ine hood release ........ . 98
36
57
98
46 95
151 24
74
113 11
28
48
2 7
78
164
75
75
84
86
28
47
225
In strument s and control s 9
@ Data Link Connector for On
Board Diagnostics (OBD II)
@ Light switch ... .. . .. ... .... .
@ Buttons for :
- All-weather lights
- Night v ision assistant .... .. .
- Rear fog lights .. .. .. ..... .
@ Power exterior m irror adjust-
ment ...... .. .. ..... ..... . 29
44
44
105 44
so
@ Rea r lid switch . . . . . . . . . . . . . . 37
@ Power w indows . . . . . . . . . . . . . 40
@ MMI display
@ Emergency flashe rs . . . . . . . . . . 45
@ Glove compartment . . . . . . . . . 61
@) Front passenger's airbag . . . . . 151
@ Valet parking feature . . . . . . . . 41
@ Drives (MMI)
@ Buttons/Indicator lights fo r
- Start-Stop-System . . . . . . . . . 81
- Parking system . . . . . . . . . . . . 116
- PASSENG ER AIR BAG OF F . . . . 160
- Rear spoiler . . . . . . . . . . . . . . . 197
- Electron ic Stabilization Con-
t rol . . . . . . . . . . . . . . . . . . . . . 19 7
@ Climate controls, depending on
vehicle equipment:
- Three-zone cl imate control . . 70
- F our-zone automatic climate
cont rol . . . . . . . . . . . . . . . . . . 72
@ Storage compartment or ash-
t ray wit h cigarette lighter . . . . . 59, 59
@ I S T ART ENGINE STOPI button 76
@ MM I controls
@ 12-volt socket, (upho lder 60, 60
@ E lectromechanical parking
brake . . . . . . . . . . . . . . . . . . . . . 79
@ Selector lever (a utomatic trans-
mission) 109
(D Tips
-Some of the equipment or fea tures
show n in the genera l ill ustration may be
standard equipment on your vehicle or
may be opt ional equ ipment depending
on your model. Always ask your
Page 16 of 316
14 Instrum ent s and w arn ing /indic ato r light s
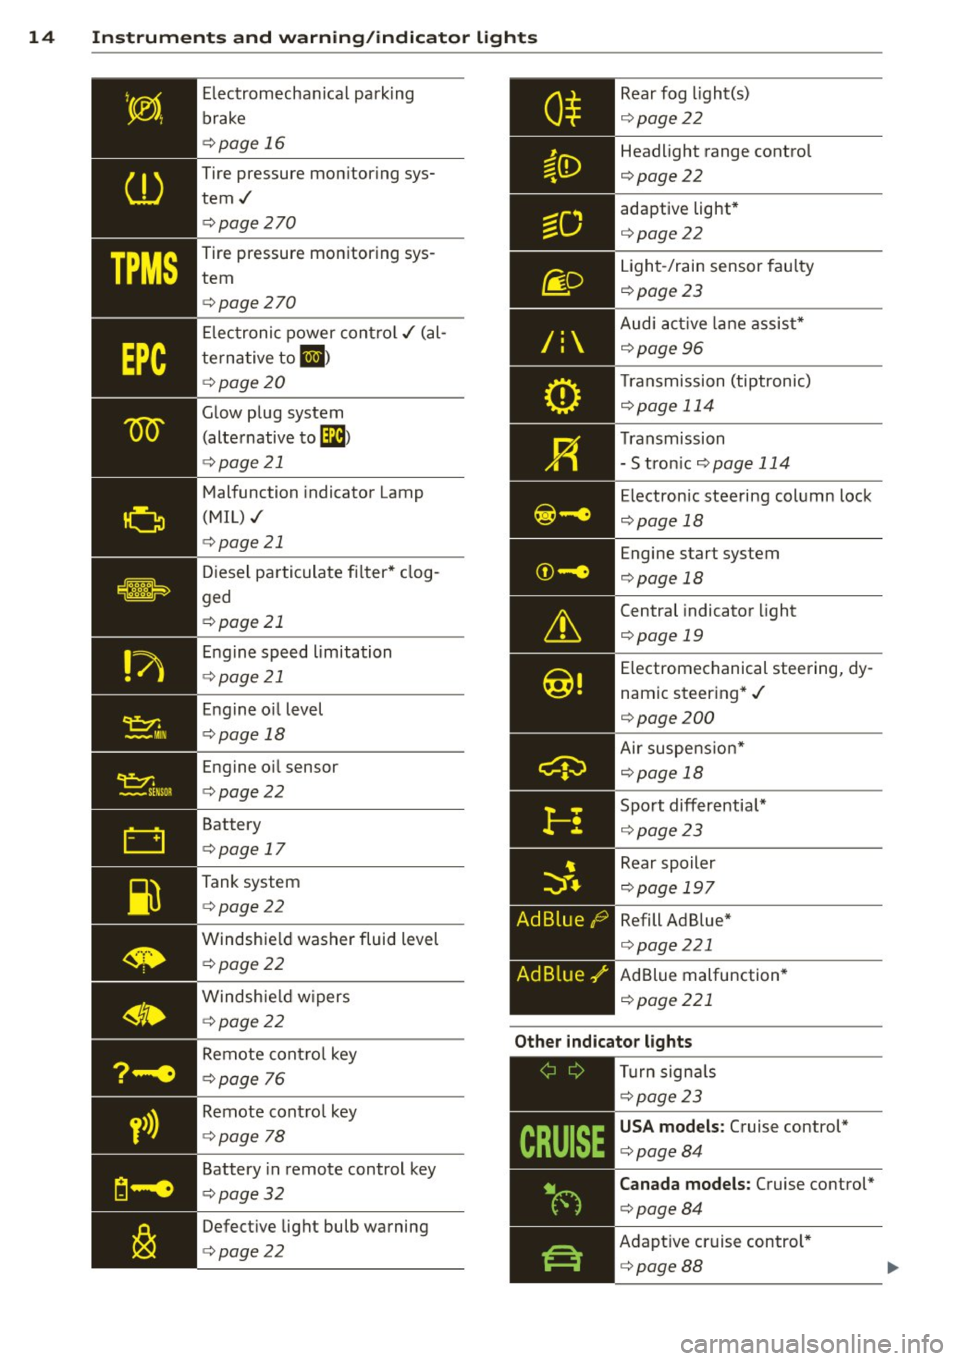
Electromechanical parking
brake
c::>page 16
Tire pressure monitor ing sys
tem../
c::> page270
Tire pressure monitoring sys
tem
c::> page270
Electronic power control../ (al
te rna tive to
II)
c::> page20
Glow plug system
(alternative to
Gi)
c::> page 21
Malfunction indicator Lamp
(MIL)../
Diesel particulate fi lter* clog
ged
c::> page 21
Engine speed limitation
c::>page 21
Engine oil level
c::> page 18
Engine o il sensor
c::> page 22
Battery
c::>page 17
Tank system
c::>page22
Windshie ld washer fluid level
c::>page22
Windshie ld w ipers
c::> page22
AdBlue ./'
Rear fog light(s)
c::> page 22
Headlight range control
c::>page22
adaptive light*
c::>page 22
Light-/rain sensor fau lty
c::>page 23
Audi act ive lane assist*
c::>page 96
T ransmission (tiptronic)
c::>page 114
Transmission
- S tron ic
c::>page 114
Electronic steering column lock
c::>page 18
Engine start system
c::>page 18
Central indicator light
c::>page 19
Electromechanical steering, dy
namic steering*../
c::>page 200
Air suspens ion*
c::>page 18
Sport differentia l*
c::> page 23
Rear spoiler
c::>page 197
Refill Ad Blue*
c::>page 221
AdBlue malfunction*
c::>page 221
Remote cont ro l key
c::>page 76
Other indicato r lights
,---=--~-----
Remote cont ro l key
c::> page 78
Battery in remote control key
c::> page32
Defect ive light bulb warning
c::>page 22
Tu rn signa ls
c::> page23
USA mod els : Cruise control*
c::>page 84
Can ada models : Cruise control*
c::> page 84
Adaptive cruise control*
c::> page 88
Page 25 of 316
M N <( (.J
'SI: ,...., \!) 1.1'1 ,...., 1.1'1 ,....,
Instruments and warning/indicator lights 23
Go to an authorized dea lership to have the
headlights or the contro l unit for the Adaptive
Light repaired.
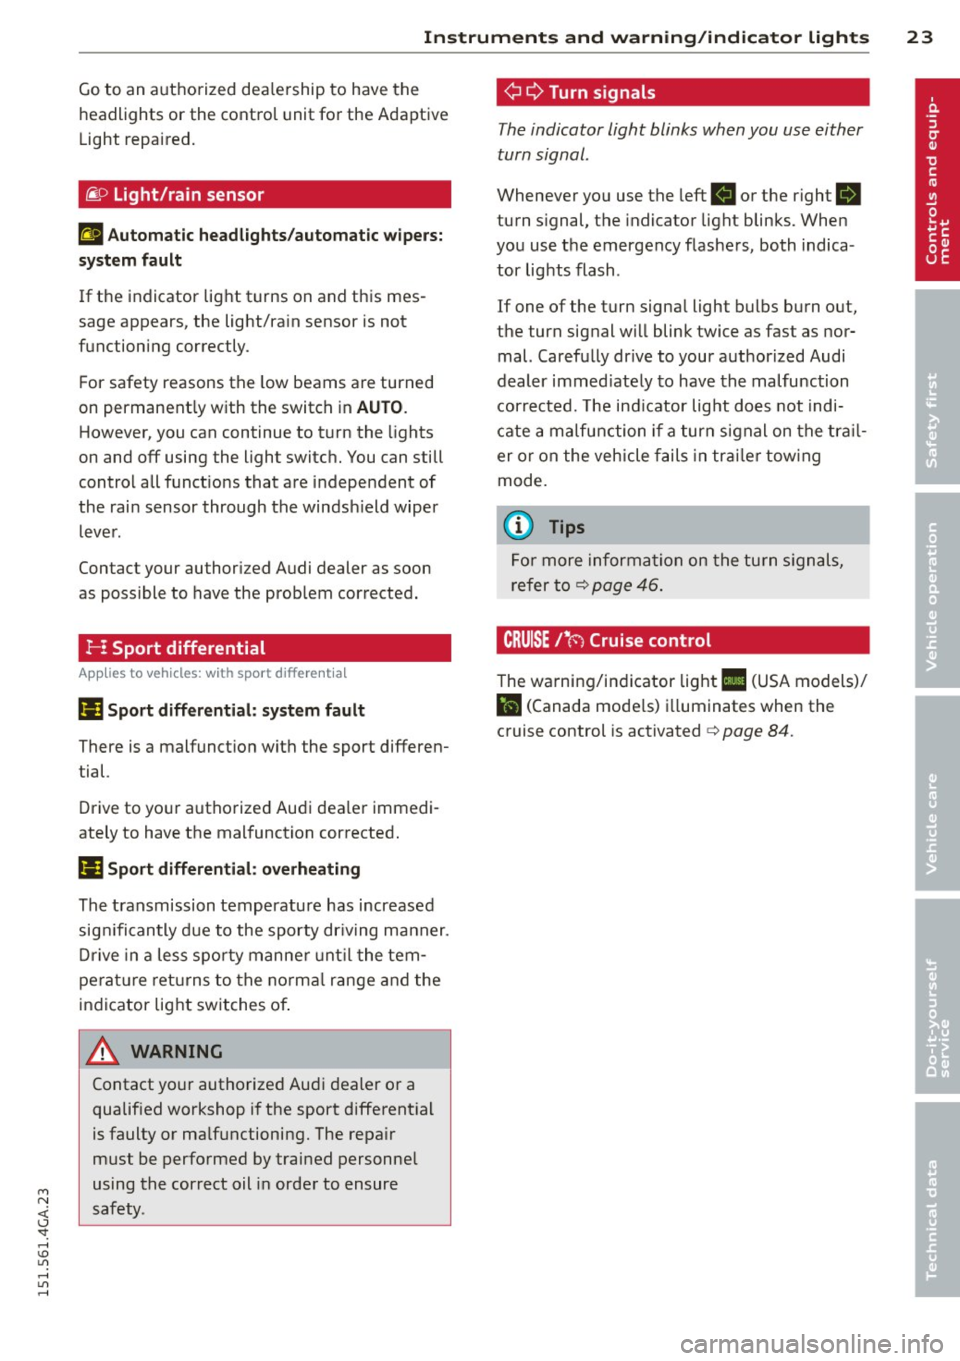
fi.D Light/rain sensor
El Automatic headl ights/automatic wipers:
system fault
If the indicator light t urns on and this mes
sage appears, the light/rain sensor is not
functioning correctly .
F or safety reasons the low beams are turned
on permanent ly with the switch in
AUTO.
However, you can continue to turn the lights
on and off using the light switch. You can still
control all funct ions that are independent of
the rain sensor through the windsh ield wiper
lever .
Contact your author iz ed Audi dealer as soon
as possible to have the problem corrected.
I-: Sport differential
App lies to vehicles: with sport different ia l
IIJ Sport differential: system fault
There is a malfunct ion with the sport differen
tial.
Drive to your authorized Audi dea ler immedi
ately to have the malfunction corrected.
IIJ Sport differential : overheating
The transmission temperature has increased
sig nificantly due to the sporty dr iv ing manner .
Dri ve i n a less sporty manner until the tem
perature returns to the normal range and the
indicator light switches of .
A WARNING
Contact your authorized Audi dealer or a
qualif ied workshop if the sport differential
is faulty or ma lfunctioning. The repa ir
must be performed by trained personnel
using the correct oil in order to ensure
safety .
-
¢ Q Turn signals
The indicator light blinks when you use either
turn signal .
Whenever you use the left . or the right 1B
turn s ignal, the indicator light blinks. When
you use the emergency flashers, both indica
tor lights flash .
If one of the turn signa l light bulbs burn out,
the turn signal will blink twice as fast as nor
mal. Carefully dr ive to your authorized Audi
dealer immed iately to have the malfunction
corrected. The ind icator light does not indi
cate a malfunction if a turn signal on the trail
er or on the vehicle fails in trailer towing
mode.
(D Tips
For more information on the turn signals,
refer to
q page 46.
CRUISE/' (-) Cruise control
The warning/indicator light Ill (USA models)/
l'I (Canada mode ls) illuminates when the
cruise control is activated
q page 84.
Page 201 of 316
M N <( (.J
'SI: ,...., \!) 1.1'1 ,...., 1.1'1 ,....,
effect can be reduced due to moisture (or in
freezing conditions ice) on the brake pads . A
few careful brake app lications should dry off
the brake pads or remove any ice coatings.
When you are driving at higher speeds wit h
the windshield wipers on, the brake pads will briefly touch the brake d iscs in regular inter
vals so as to improve reaction t ime when brak
ing on wet surfaces. You the driver w ill not no
tice anything .
The effectiveness of the brakes can be reduced
when the vehicle is dr iven on a salt-covered
road and the brakes are not used . Here too,
you shou ld clean off accumulated salt coat ing
from brake discs and pads with a few careful
applications of the brake ¢
A.
Cor ro sion
There may be a tendency for dirt to build up
on the brake pads and corrosion to form on
the discs if the car is not dr iven regularly or
only for sho rt trips with l ittle use of the
b rakes .
If the brakes are not used frequently, or if cor rosion has formed on the discs, it is advisable
to clean off the pads and discs by b rak ing
fi rm ly a few times from a mode rately h igh
speed ¢,& .
Faults in the brake system
If you should notice a sudden increase in
brake peda l travel, t hen one of the two brake
circu its may have failed¢
A.
Low brake flu id le vel
Malfunct ions can occur in the brake system if
the brake fluid level is too low . T he brake fluid
level is monitored electronically .
Brake booste r
The brake booster works with vacuum pres
sure which is created only when the engine is
running ¢
A.
Brake lining w ear statu s
Brake lining wea r may be c hecked by vis ual in
spection of the condition of the brake pads
Int ellig ent technolog y 199
thro ugh the open ings in the wheel. If neces
sa ry, the whee l may be removed for t his in
spection ¢
page 2 75, Changing a wheel.
_& WARNING
- You should perform braking maneuvers
for the purpose of cleaning the brake
system only if road conditions permit.
Othe r road use rs must not be put at risk -
you may ca use an accident!
- Before descend ing a steep grade, reduce
speed and sh ift transmission into a lower
gea r o r l ower dr iving range. Do not ride
the brakes or hold the pedal down too long or too o ften . T hi s could c ause the
brakes to get hot and diminish braking
efficiency .
- Do not "ride the brakes" by rest ing you r
foot on the pedal when you do not intend
to b rake . This may cause the brakes to
overheat, premature wear and increased
stopping distance.
- Unde r ce rtain climatic and operating
conditions such as passing thro ugh wa
ter, dr iv ing in heavy rain or after washing
the vehicle, the effectiveness of the brakes can be reduced . In winte r, ice can
accumu late on the brake pads, lin ings,
discs and drums. Carefully app ly bra kes
for a test. Brakes will dry and ice co at
ings w ill be cleaned off after a few care
fu l brake applicat ions.
- Driving for an ex tended period of time on
salt-covered roads without using your
brakes can a lso affect bra king efficiency .
Clean off accum ulated salt coating from
brake discs and pads with a few careful
brake applications.
- If you damage the front spoiler, or if you
install a different spoiler, be sure the air
f low to the front brakes is not obstruct
ed. Otherw ise the brake system could
overheat reducing the effectiveness of
the entire brake system.
- Failure of one brake circuit will impair
the braking capab il ity result ing in an in
creased stopping distance . Avoid driving
the vehicle and have it towed to the
•
•
Page 206 of 316

204 Driving and en vir onm ent
Avoid damaging the
vehicle
When you are driving on poor roads, or over
curbs, steep ramps, etc ., make certain that
low-lying parts such as spoilers and exhaust
system parts do not bottom out and get dam
aged.
This is especially true for vehicles with low
slung chassis (sports chassis) * and fully load
ed veh icles .
Driving through water
on roads
Note the following to avoid vehicle damage
when driving through water, for example on
flooded roads:
- T he water must not be any higher tha n the
bottom o f the vehicle body.
- Do not d rive faster than wa lking speed.
_& WARNING
After d riving through water, m ud, slush,
etc., the brakes may be slow to take effect
because o f wet brake rotors and pads . Dry
the brakes first by braking carefully to re
store the full braking effect.
(]) Note
-Vehicle components such as the eng ine,
transmission, suspension or e lectr ica l
system can be severe ly damaged by driv
ing through water.
- Always switch
off the Start-Stop-System
when driving through water¢
page 81.
(D Tips
-Check the depth o f the water before driv
ing through it.
- Do no t stop the veh icle, dr ive in reverse
or switch the engine
off when driving
through water.
- Keep in mind that oncoming vehicles
may create waves that raise the water
level and make it too deep fo r your vehi
cle to drive through safely.
-
- Avoid driving through salt water because
it can cause corrosion .
Catalytic converter
Applies to vehicles : w ith gasoli ne e ngi ne
It is very important that your emission con
trol system (catalytic converter) is function
ing properly to ensure that your vehicle is run
ning in on environmentally sound manner.
.. Always use lead-free gasoline ¢ page 217,
Fuel supply .
.. Never run the tank down all the way to emp
ty.
.. Never put too much motor o il in your eng ine
¢ page 229, Adding engine oil~-
.. Never try to push- or tow-sta rt your vehicle.
The catalytic converter is an efficient "clean
u p" dev ice built into the exhaust system of
the ve hicle. The cata lytic conve rter bu rns
many of the pollutants in the exha ust gas be
f ore they are re leased into the atmosphere.
The exclusive use of unleaded fuel is c rit ically
important fo r the life of the catalyt ic convert
er and prope r fu nct ion ing of the engine.
A WARNING
-
The temperature of the exhaust system is
h igh, both when driving and after stopping
the engine.
- Never touch the exhaust tail pipes once
they have become hot . This could result
in burns .
- Do not park or operate the vehicle in
areas where the hot exha ust system may
come in contact with dry grass, brush,
fue l spill or other material which can
cause a fire .
- Do not app ly additional undercoating or
rustproofing on or near the exhaust
manifold, exhaust pipes, catalytic con
verter or heat shields. Dur ing driv ing, the
substance used fo r undercoating could
overheat and cause a fire.
~
Page 285 of 316
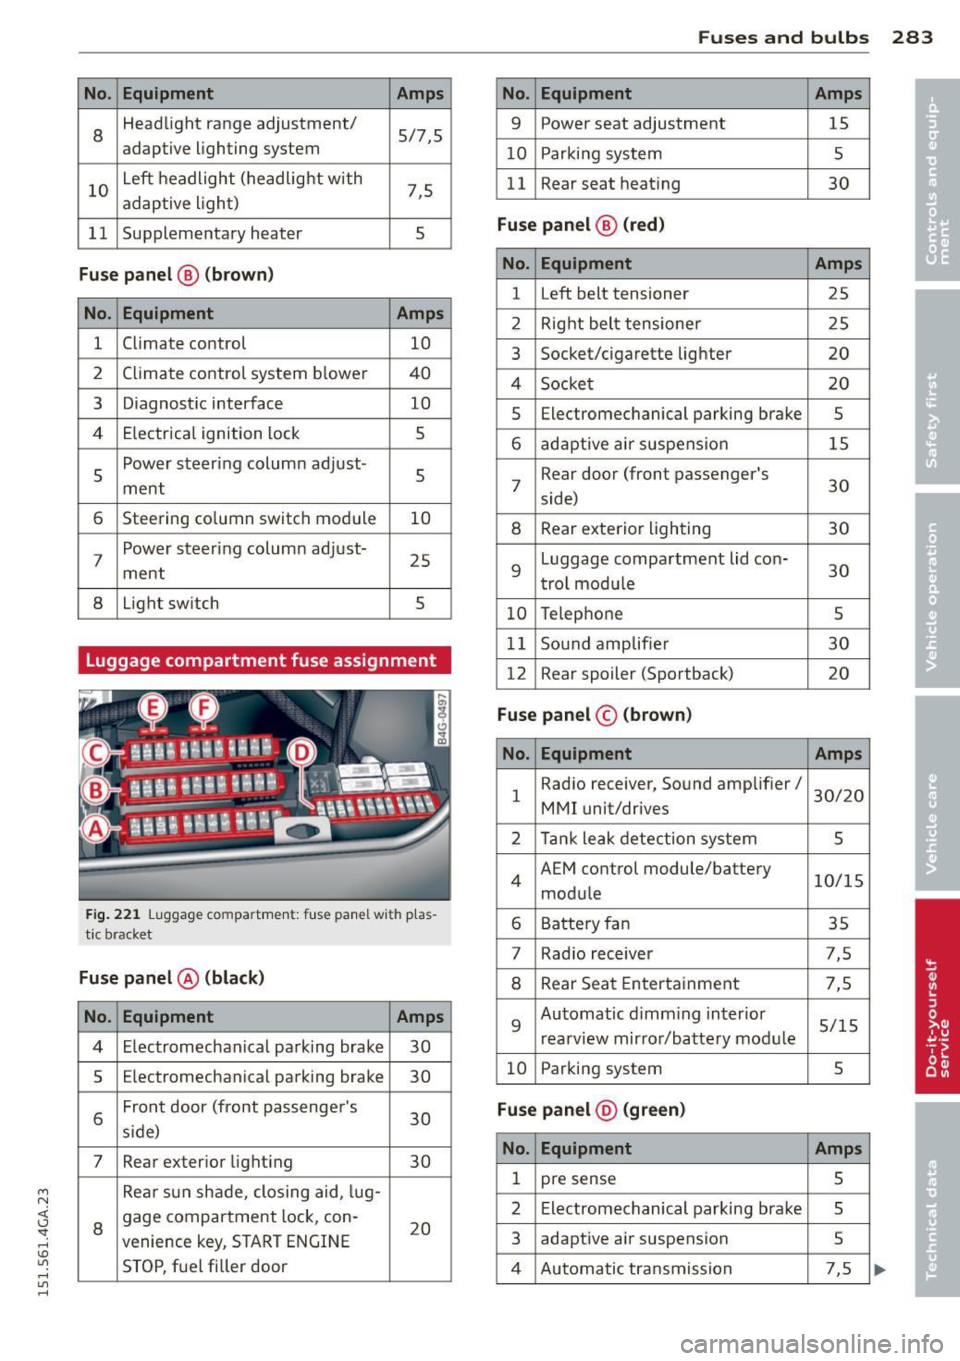
M N <( I.J "". rl I.O
"' rl
"' rl
No. Equ ipment Amps
8
Headlight range adjustment/ 5/7,5
adaptive lighting system
10
Left headlight (headlight with 7,5 adaptive light)
11 Supplementary heater s
Fuse p anel @ (b ro w n)
No . Equipment Amps
1 Climate control 10
2
Climate control system blower 40
3
Diagnostic interface 10
4
E lectrical ignition lock s
5
Power steering column adjust-
ment
s
6 Steering column switch module 10
7
Power steering column adjust-
ment
25
8 Light switch 5
Luggage compartment fuse assignment
Fig . 221 Luggage compa rtmen t: fuse panel wit h p las
tic bracket
Fuse p anel @ (black )
No. Equipment Amps
4 Electromechan ical parking brake 30
5
Electromechanical parking brake 30
6
Front door (front passenge r's
30 s ide)
7 Rear exterior light ing 30
Rea r sun shade, closing aid, lug-
8
gage compartment lock, con-
20 venience key, START ENGINE
STOP, fuel filler door
Fu se s and bulb s 283
No. Equipment Amps
9 Power seat adjustment 15
10
Parking system 5
11
Rear seat heating 30
Fu se p an el@ (r e d )
No . Equipment Amps
1 Left belt tensioner 25
2
Right belt tensioner 25
3
Socket/cigarette lighter 20
4
Socket 20
5
Electromechanical parking brake 5
6 adaptive air suspension 15
7
Rear door (front passenger's
30 side)
8 Rear exterior lighting 30
9
Luggage compartment lid con-
30 trol modu le
10 Telephone 5
11
Sound amplifier 30
12
Rear spoiler (Sportback) 20
Fuse panel© (brown)
No . Equ ipment Amps
1
Radio receiver, Sound amplifier/
30/20
MMI unit/drives
2 Tank leak detection system 5
4
AEM control module/battery 10/15
module
6 Battery fan 35
7
Rad io receiver 7,5
8 Rear Seat Entertainment 7,5
9
Automatic d imm ing interior 5/15
rearview mirror/battery module
10 Parking system 5
Fu se pan el@ (gr ee n)
No . Equipment Amps
1 pre sense 5
2
Electromechanical parking brake 5
3
adaptive air suspension 5
4 Automatic transmission 7,5
Page 292 of 316

2 90 Emergency situations
heavy components such as the engine
b lock or transmiss io n are removed.
- W he n removing heavy components like
these, ancho r vehicle to ho ist o r add cor
responding weig hts to ma inta in the cen
ter of g ravity . Othe rwise, the vehicle
might tilt or s lip off t he hoist, causing
ser ious p erson al injury.
(D Note
-Be awa re of the follow ing points befo re
li fting the vehicle:
- The vehicle should never be lifted or
jacked up from underneath the engine oil pan, the transmission housing, the
front or rear axle or the body side
membe rs. This could lead to ser ious
damage.
- To avoid damage to the underbody or
chassis frame , a rubber pad must be
i nserted between the floor jack and
the l ift points.
- Before driving over a workshop hoist,
check that the veh icle weight does not
exceed the permissible lifting capacity
of the hoist .
- Before driving over a workshop hoist,
ensure that there is sufficient clear
ance between the hoist and low parts
of the vehicle.
Page 293 of 316

M N <( I.J ""'. rl I.O
"' rl
"' rl
Technical data
Vehicle identification
F ig. 231 Veh ide Identificat ion Number (VlN) plate: lo ·
c ation on d river 's s ide das h pane l
XXXXX XX · X -XXXX XXX
~ fAllftlli. -llllll · NR. ~ W!ru -llllll -NO.
xx
XXXX XXXX XX X XXXXXXXX
XXX XXX
IYP /TYPE
XX XXXXXXX XX X X XX
XXX KW XXX
®i ~W.::·f :l~~ XXXX XXX XXX
©+ ::rw= xxxx I xxxx XXX I xx
M. · AUSSt I IJ'IIDIIS
~--
EOA 7D 5 4UB 6XM SSG SRW
2E H JOZ 1LB lA S 1BA
3FC SMU 7X l
FD A 9G3 OG7 OYH OJF
TL6 3 KA 8EH UlA X98 027
lXW 803 908 824 D2D
7T6 CV7 7KO 4X3 2K2
3L4 4KC 3YO 413 502
1S A 7GB 01A 4GO
XX. X XX X XX X XXXX
Fig. 232
The vehicle identification label - inside the
luggage co mpartment
Vehicle Identification Number (VlN)
The Veh icle Identification Number is located
in different p laces :
- under the w indshield on the driver's side
¢fig. 231.
- in the MMI: Select: Function button ICAR ! >
(Car)* systems> Servicing & checks > VIN
number.
-on the vehicle identification label.
Techni cal data 291
Vehicle identification label
The vehicle identification label is located in
the luggage compartment in the spare wheel
well.
T he label¢
fig. 232 shows the following vehi
cle data :
(D Vehicle Identificat ion Number (VIN)
@ Vehicle type, engine output, transmission
® Engine and transmission code
© Paint number and interior
® Optional equipment numbers
The information of the veh icle identification
label can also be found in your Warranty
&
Maintenance booklet .
Safety compliance sticker
The safety compliance sticker is your assur
ance that your new veh icle complies with all
applicable Federal Motor Vehicle Safety
Standards which were in effect at the time the
vehicle was manufactured . You can find this
sticker on the door jamb on the driver's side. It shows the month and year of production
and the vehicle ident ification number of your
vehicle (perforation) as well as the Gross Vehi
cle Weight Rating (GVWR) and the Gross Axle
Weight Rating (GAWR) .
High voltage warning label
The high voltage warning label is located in
the engine compartment next to the engine hood release. The spark ignition system com
plies with the Canadian standard ICES-002 .
Weights
Gross Vehicle Weight Rating
The Gross Vehicle Weight Rating (GVWR), and
the Gross Axle Weight Rating (GAWR) for
front and rear are listed on a sticker on the
door jamb on the driver's s ide.
The Gross Vehicle Weight Rating includes the
weight of the basic vehicle plus full fuel tank,
oil and coolant, plus maximum load, which in
cludes passenger we ight (150 lbs/68 kg per
II>--
Page 298 of 316
29 6 Con sum er Inf ormation
-Always make sure the transmission se
lector lever (automatic transmiss ion) is
in P (Park position) and the park brake is
applied .
@) For the sake of the environment
-Changing the engine settings wi ll ad
versely affect em iss ion levels. This is det
rimental to the environment and increas
es fuel consumption .
- Always observe env ironmental regula
tions when dispos ing of old engine oil,
used brake fluid, dirty engine coolant,
spent batteries or worn out tires.
- Undeployed airbag modules and preten
s ioners might be classified as Perchlo
rate Material -spec ial handling may ap
ply, see www.dtsc.ca .gov/hazardous
waste/perch lorate . When the veh icle or
parts of the restraint system including
airbag modules safety belts wit h preten
sioners are scrapped, all applicable laws
and regulations must be observed. Your
authori zed Aud i dea ler is familiar with
these requirements and we recommend
that you have your dealer perform this
serv ice for you .
Additional accessories,
modifications and
parts replacement
Additional accessories and parts
replacement
Always consult an authorized Audi dealer be
fore purchasing accessories.
Your veh icle incorporates the latest safety de
sig n featu res ensu ring a high standard of ac
tive and passive safety .
This safety could be compromised by non-ap proved changes to the veh icle. For this reason ,
if pa rts have to be replaced , please observe
the following points when install ing addition
a l accessories: Approved Audi accessories and genuine Aud
i
parts are available from authorized A udi deal
ers.
T hese dea le rs a lso have the necessary facili
ties, tools and trained specialists to install the parts and acc essories proper ly .
A WARNING
-Using the wrong spare parts or using non-
approved accessories can cause damage to
the veh icle and ser ious persona l injury.
- Use on ly accessories express ly approved
by Audi and gen uine Audi spare parts
- These parts and accessories have been
specia lly designed to be used on yo ur ve
h icle .
- Never install accessor ies such as tele
phone crad les or beverage ho lders on a ir
bag covers or within the airbag deploy
ment zones . Do ing so will increase the
risk of injury if a irbags are triggered in an
accident!
- Before you check anything in the engine
compa rtment, always read and heed a ll
WARNI NGS
9 page 225 .
(D Note
-If items other than genu ine Audi spare
parts, add-on equipment and accessory
items are used or if repair work is not
performed accord ing to specified meth
ods, this c an resu lt in seve re damage to
your vehicle's eng ine and body (such as
corrosion) and adversely affect yo ur vehi
cle's warranty .
- If emergency repairs must be performed
elsewhere, have the vehicle examined by
an authorized A udi dealer as soon as
possible .
- The manufacturer cannot be held liable
for damage wh ich occ urs due to failure
to comply with these stipu lations.
Page 302 of 316
300 Index
AUTO automatic climat e control .. .. ... ... ..
73
Automatic headlights ....... .. .... .. 44
climate control . . . . . . . . . . . . . . . . . . . . . 70
Auto Lock . . . . . . . . . . . . . . . . . . . . . . . . . . 3 3
Automatic belt retractor .. ... ..... .. .
141
Automatic climate control
Air vents . .... ........... .... .... ..
7 3
Automatic recirculation .... .. .. .. .. . . 74
Opera tion . . . . . . . . . . . . . . . . . . . . . . . . . 72
Setup . .. .. ................ ... .. .. 74
synchron izing .... ......... ... .. .. .. 73
Automatic Shift Lock (ASL) .... .. .. .. . 110
Automatic transmission ..... .. .. .. .. . 109
Automatic Shift Lock (ASL) .......... 110
Driving . . . . . . . . . . . . . . . . . . . . . . . . . . 111
Emergency mode . . . . . . . . . . . . . . . . . . 114
Emergency release .......... .. .... . 115
Kick-down ............... .. .. .... . 113
Manual shift program ..... .... .... . 113
Selector lever . . . . . . . . . . . . . . . . . . . . . 109
Automatic wipers .................. .. 48
Auto Safety Hotline ........ .. .. .. .. . 136
Ave rage consumption ....... .. .. .. .. . . 25
Average speed . . . . . . . . . . . . . . . . . . . . . . .
25
Avoid damaging the vehicle .. .. .. .. .. . 204
B
Brake fluid
Changing the brake fluid ............
234
Checking the brake fluid level ........ 234
What is the correct brake fluid level? .. 234
What should I do if the brake fluid warn-
ing light comes on? ................
234
Brake system
Anti- lock braking system . . . . . . . . . . . . .
19
Brake assist system . ....... .... .. .. 195
Brake booster .. ... .............. .. 199
Brake fluid .. .. .. .......... ...... . 234
Brake fluid specifications for refill and re-
placement ...... ................ .
234
Brake pads .... .. ............. .... 203
Electromechanical parking brake ... .. . 79
Fluid reservoir ... ................ . 234
How does moisture or road salt affect the
brakes? . . . . . . . . . . . . . . . . . . . . . . . . . .
198
Warning/indicator lights ........ .. .. . 15
Worn brake pads symbol . . . . . . . . . . . . . 20
braking guard
Settings .. .... .. .. .............. ..
93
Brak ing guard . .. .. .......... ...... .. 86
Messages ... .. .. .. ....... .... .... . 93
Break-in period .. .. ............. .... 203
Brake pads .. ... . ... ... .... ... .. .. 203
Tires ........ ... .. .............. . 203
Bulbs .......... .. .. .............. . 284
Bag hooks . . . . . . . . . . . . . . . . . . . . . . . . . . 67 C
Battery ..... ................ ..... .
Charging ................... ..... .
Important warnings ...... .. .. .. .. .
Jump starting . .... ....... .. .. .. .. .
Location
. .. .... ........... .. .... .
low ..... .. ................ ... ' . .
Replacing the battery ..... .. .. .. .. .
State of charge ........... .. .. .. .. .
w· t · 1n er operation ......... .... .... .
Working on the battery .... .. .. .... .
Before driving .............. ... .. .. .
235
237
235
285
235
201
238
201
235
235
128
Blended gasoline . . . . . . . . . . . . . . . . . . . 217
Blower (automatic climate control) . . . . . . 73
Blower (climate con trol) . . . . . . . . . . . . . . . 70
Booster seats .............. ... .... . 182
California Proposition 65 Warning ..... 226
Battery specific .. ............. .... 236
Capacities .. .. .. .. ............. .. .. 292
Engine oil ..... .. ............. .... 227
Carbon par ts
Cleaning . . . . . . . . . . . . . . . . . . . .
214,215
Car carrier
Transporting your vehicle ....... ....
289
Care ..... .. .. .. .. .... ......... .... 212
Cargo area ...... .. .. ... ........... . 134
Cargo net . . . . . . . . . . . . . . . . . . . . . . . . . . . 66
Catalytic converter . ... .. ... ..... .. .. 204
Center armrest
Cockpit . .. .. .. .. ............. .. .. .
56
Central locking .... ............. ..... 33
Emergency locking ................ ..
37