battery AUDI S7 2016 Owners Manual
[x] Cancel search | Manufacturer: AUDI, Model Year: 2016, Model line: S7, Model: AUDI S7 2016Pages: 294, PDF Size: 73.82 MB
Page 5 of 294
M N <( (.J
'SI: ,...., \!) 1.1'1
N \!) ,....,
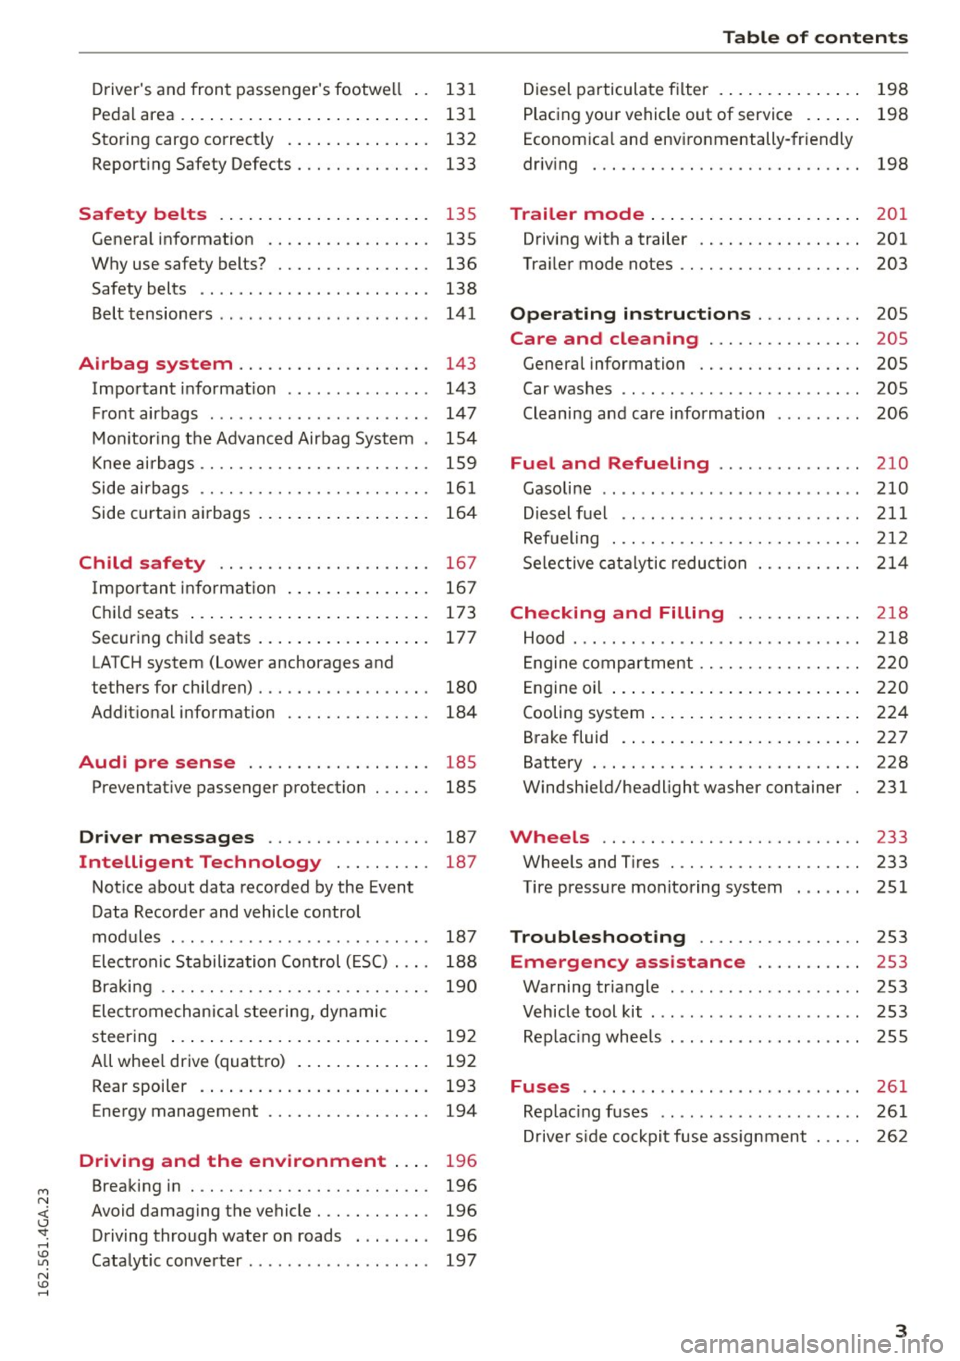
Driver's and front passenger's footwell . . 131
Pedal area . . . . . . . . . . . . . . . . . . . . . . . . . . 131
Storing cargo correct ly . . . . . . . . . . . . . . . 132
Reporting Safety Defects . . . . . . . . . . . . . . 133
Safety belts . . . . . . . . . . . . . . . . . . . . . . 13 5
General information . . . . . . . . . . . . . . . . . 135
Why use safety belts? . . . . . . . . . . . . . . . . 136
Safety belts . . . . . . . . . . . . . . . . . . . . . . . . 138
Belt tensioners . . . . . . . . . . . . . . . . . . . . . . 141
Airbag system . . . . . . . . . . . . . . . . . . . . 143
Important informat ion . . . . . . . . . . . . . . . 143
Front airbags ............... .. .... . .
Monitoring the Advanced Airbag System . 147
154
Knee airbags . . . . . . . . . . . . . . . . . . . . . . . . 159
Side airbags . . . . . . . . . . . . . . . . . . . . . . . . 161
Side curtain airbags . . . . . . . . . . . . . . . . . . 164
Child safety . . . . . . . . . . . . . . . . . . . . . . 167
I mportant informat ion . . . . . . . . . . . . . . . 167
Child seats . . . . . . . . . . . . . . . . . . . . . . . . . 173
Securing chi ld seats . . . . . . . . . . . . . . . . . . 177
LATCH system (Lower anchorages and
tethers for children) . . . . . . . . . . . . . . . . . . 180
Addit ional information 184
Audi pre sense . . . . . . . . . . . . . . . . . . . 185
Preventat ive passenger protection
185
Driver messages . . . . . . . . . . . . . . . . . 187
Intelligent Technology . . . . . . . . . . 187
Notice about data recorded by the Event
Data Recorder and vehicle control
modules . . . . . . . . . . . . . . . . . . . . . . . . . . . 187
E lect ron ic Stabilization Control (ES C) . . . . 188
Braking . . . . . . . . . . . . . . . . . . . . . . . . . . . . 190
Electromechanical steering, dynamic
steering . . . . . . . . . . . . . . . . . . . . . . . . . . . 192
All whee l drive (quattro) . . . . . . . . . . . . . . 192
Rear spoiler . . . . . . . . . . . . . . . . . . . . . . . . 193
Energy management . . . . . . . . . . . . . . . . . 194
Driving and the environment . . . . 196
Breaking in . . . . . . . . . . . . . . . . . . . . . . . . . 196
Avoid damag ing the vehicle . . . . . . . . . . . . 196
Driving through water on roads . . . . . . . . 196
Cata lytic converter . . . . . . . . . . . . . . . . . . . 197
Table of contents
Diesel particulate filter . . . . . . . . . . . . . . . 198
Placing your vehicle out of service . . . . . . 198
Econom ica l and env ironmentally-friendly
driving . . . . . . . . . . . . . . . . . . . . . . . . . . . . 198
Trailer mode . . . . . . . . . . . . . . . . . . . . . . 201
Driving with a trailer . . . . . . . . . . . . . . . . . 201
Tra iler mode notes . . . . . . . . . . . . . . . . . . . 203
Operating instructions . . . . . . . . . . . 205
Care and clean ing . . . . . . . . . . . . . . . . 205
General information . . . . . . . . . . . . . . . . . 20S
Car washes . . . . . . . . . . . . . . . . . . . . . . . . . 205
Cleaning and care information 206
Fuel and Refueling .......... ... .. 210
Gasoline . . . . . . . . . . . . . . . . . . . . . . . . . . . 210
Diesel fuel . . . . . . . . . . . . . . . . . . . . . . . . . 211
Refueling . . . . . . . . . . . . . . . . . . . . . . . . . . 212
Selective catalytic reduction 214
Checking and Filling . . . . . . . . . . . . . 2 18
Hood ... .. .. .. .. .. ........... .. .. .. 218
Engine compartment . . . . . . . . . . . . . . . . . 220
En gine oil . . . . . . . . . . . . . . . . . . . . . . . . . . 220
Cooling system . . . . . . . . . . . . . . . . . . . . . . 224
Brake fluid . . . . . . . . . . . . . . . . . . . . . . . . . 227
Battery . . . . . . . . . . . . . . . . . . . . . . . . . . . . 228
Windshield/headlight washer container
231
Wheels ...... .. ............. .... .. 233
Wheels and Tires . . . . . . . . . . . . . . . . . . . . 233
Tire pressure monitoring system 251
Troubleshooting . . . . . . . . . . . . . . . . . 253
Emergency assistance . . . . . . . . . . . 253
Warning triangle . . . . . . . . . . . . . . . . . . . . 253
Vehicle tool kit . . . . . . . . . . . . . . . . . . . . . . 253
Replacing wheels . . . . . . . . . . . . . . . . . . . . 255
Fuses ....... ... .. .............. ... 261
Replacing fu ses . . . . . . . . . . . . . . . . . . . . . 261
Driver sid e cockpit fuse assignment . . . . . 262
3
Page 14 of 294
Instruments and indicator lights
-The engine compartment of any motor vehi
cle is a potentially hazardous area. Before
you check anything in the engine compart ment, stop the engine and let it cool down.
Always exercise extreme ca ution when work
ing under the hood
c:> page 218.
Overview
Some ind icator lights turn on briefly to chec k the
function of that system whe n you swi tch the ign i
t ion o n. These systems are m ark ed w it h a ../ in
t he fo llowing tables . If one of these indi cator
lights does not tu rn on, there is a malfunction in
that system .
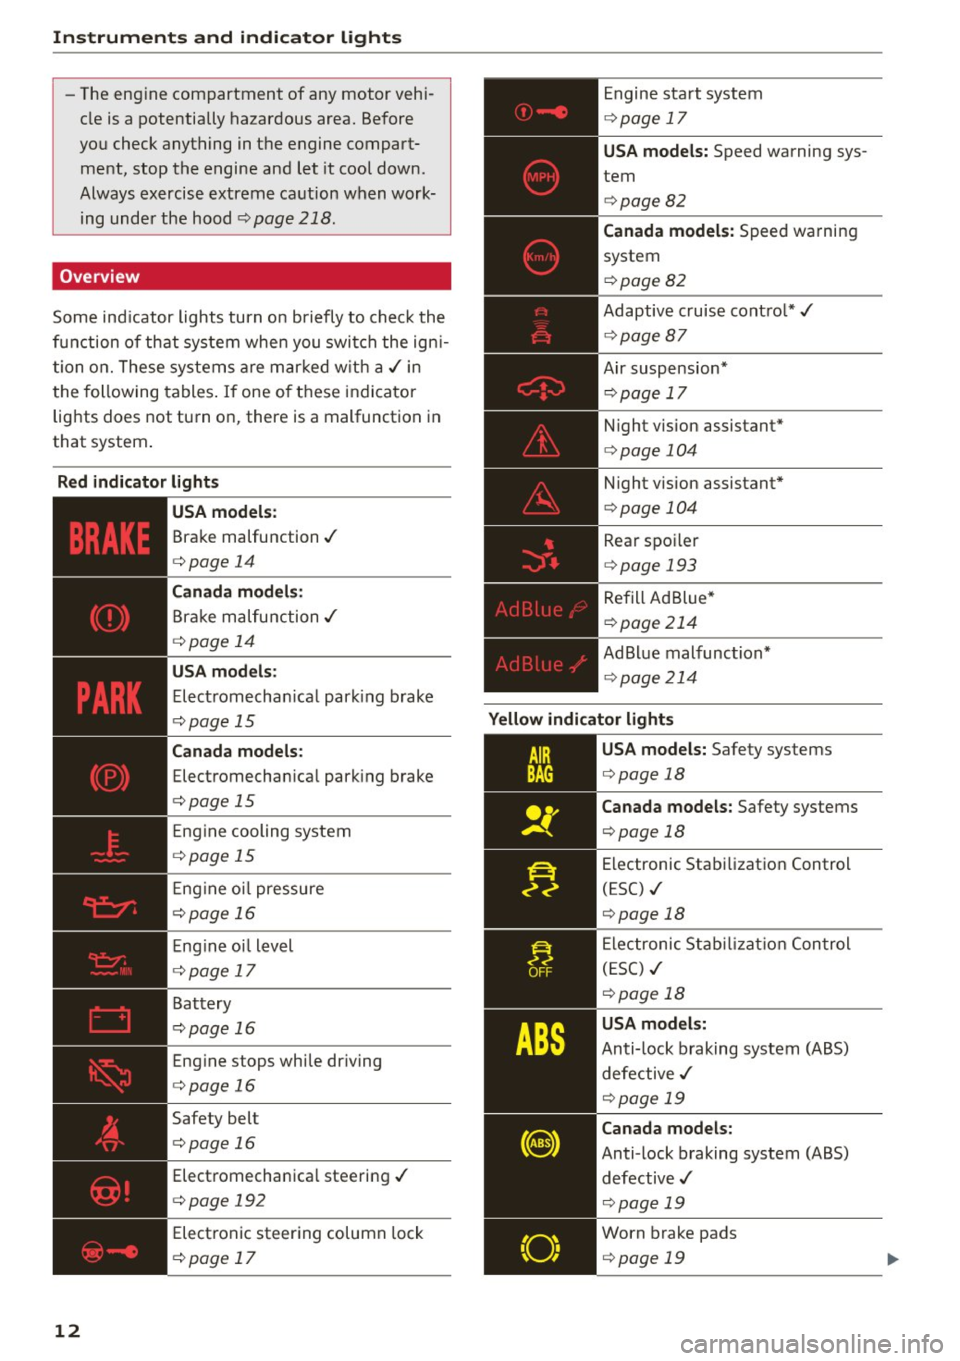
Red indicator lights
12
-------------
US A models :
Brake malfunction ../
c:> page
14
Canada mod els :
Bra ke m alfunction ../
r::!> page
14
USA mod els :
Elect romechan ica l par king brake
r::!>page
15
Canada models:
Electromechan ica l park ing brake
c:>page
15
E ng ine cooling system
r::!> page
15
Eng ine oi l pressure
r::!> page
16
E ng ine o il level
r::!> page
17
Battery
c:> page
16
Eng ine stops while dr iving
r::!> page
16
Safety belt
c:>page
16
Elect romechan ica l steering ../
c:> page
192
Electronic steering column lock
r::!> page
17
Engine sta rt system
r::!> page
17
USA models: Speed warning sys
tem r::!> page
82
Canada model s: Speed warni ng
system
r::!> page
82
Adaptive cruise contro l*../
r::!> page
87
Air suspension *
r::!> page
17
Night vision assistant*
i=> page
104
Night vision assistant *
i=> page
104
Rear spo iler
i=> page
193
Refill Ad Blue*
i=>page
214
AdBl ue malfunction*
c:> page
214
Yellow indicator light s
-------------
US A models: Safety systems
i=> page
18
Canada models: Safety systems
i=> page
18
Electronic Stabi lizatio n Control
(ESC) ../
c:> page
18
Elec tronic Stab ilizati on Con trol
( E SC) ../
i=> page
18
USA models:
Anti-lock braking system (ABS)
defective ../
c:>page
19
Canada models:
Anti -lock braking system (ABS)
defective ../
c:> page
19
Worn brake pads
i=> page
19
Page 15 of 294
M N <( (.J
'SI: ,...., \!) 1.1'1
N \!) ,....,
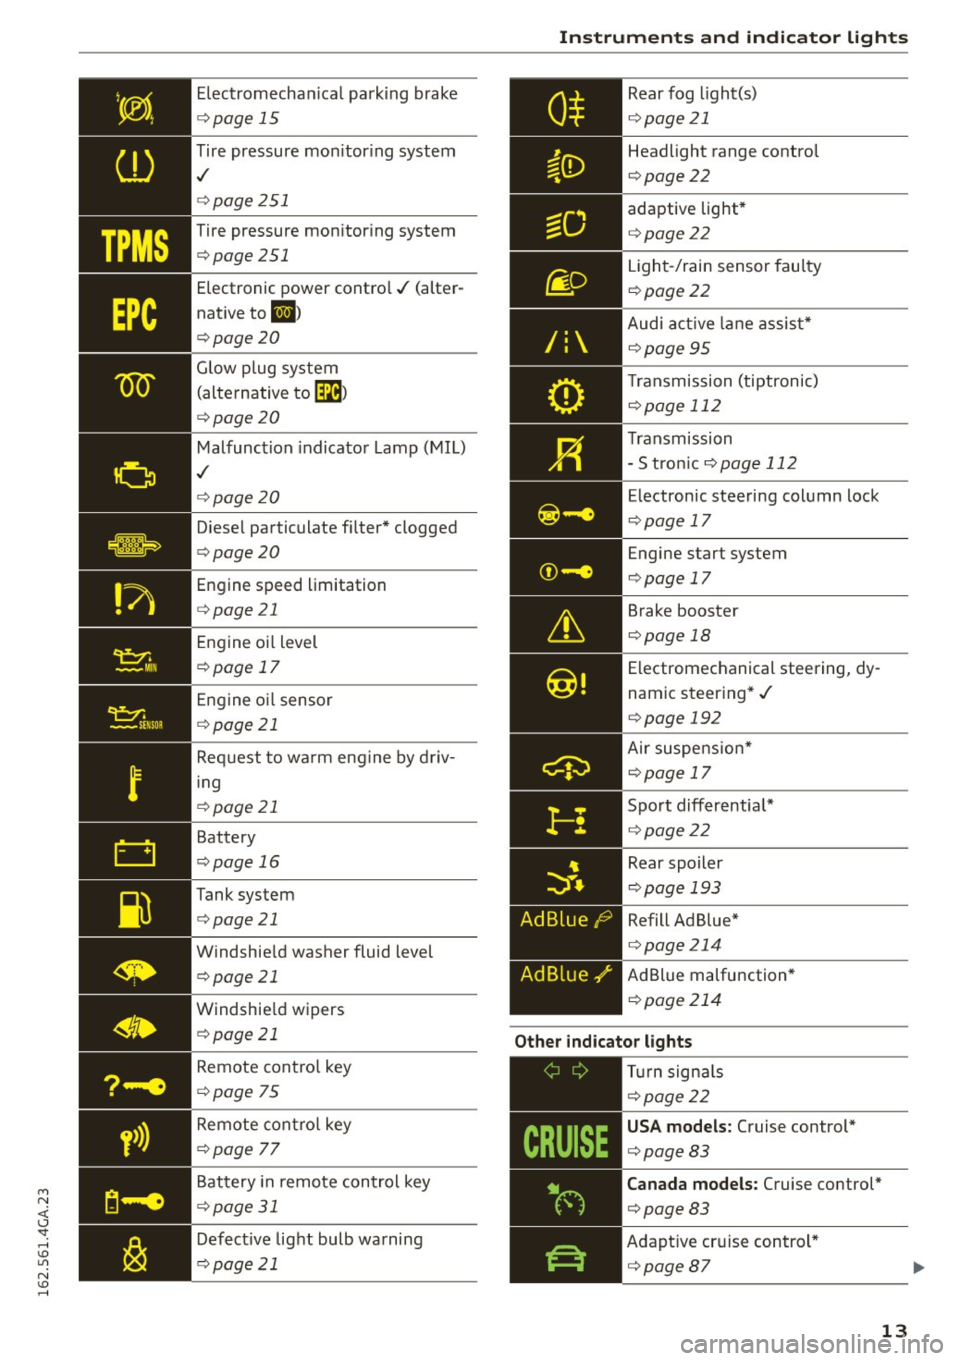
Electromechanical parking brake
opage 15
Tire pressure mon itoring system
,/
o page 251
Tire pressure monitoring system
opage 251
Electronic power control ./ (alter
native to
El>
o page20
Glow plug system
(alternative to
[m )
opage20
Malfunction indicator Lamp (MIL)
,/
opage20
Diese l particulate fi lter* clogged
o page20
Engine speed limitation
opage 21
Engine oil level
o page 17
Engine oil sensor
o page 21
Request to warm eng ine by driv
in g
o page 21
Battery
opage 16
Tank system
opage 21
Windshie ld washer fluid level
o page 21
Windshie ld wipers
o page 21
Remote contro l key
o page 75
Remote contro l key
o page 77
Battery in remote control key
opage 31
Defective light bulb warning
opage 21
Instruments and indicator lights
/:
Rear fog light(s)
opage 21
Headlight range control
opage 22
adaptive light*
opage 22
Light-/rain sensor faulty
opoge 22
Audi active lane assist*
o page 95
Transmission (tiptronic)
opage 112
Transmission
- S tron ic
opage 112
Electronic steering column lock
opage 17
Engine start system
opage 17
Brake booster
opage 18
Electromechanical steering, dy
namic steering*./
o page 192
Air suspension*
opoge 17
Sport differential*
opage 22
Rear spoiler
opage 193
Refill Ad Blue*
opage 214
AdBlue malfunction*
opoge 214
Other indicator lights
CRUISE
,---------------
Turn signals
o page22
USA models: Cruise control*
opage 83
Canada models: Cruise control*
opage 83
Adaptive cruise control *
opage87
13
Page 18 of 294
Instruments and indicator lights
th e e ngine and allow it to coo l. Follow the
warning stickers¢
page 218 .
(D Note
Do not conti nue d riving if the . symbo l ill u
minates. There is a malfunction in the engine
cooling system -you could damage your en
gine.
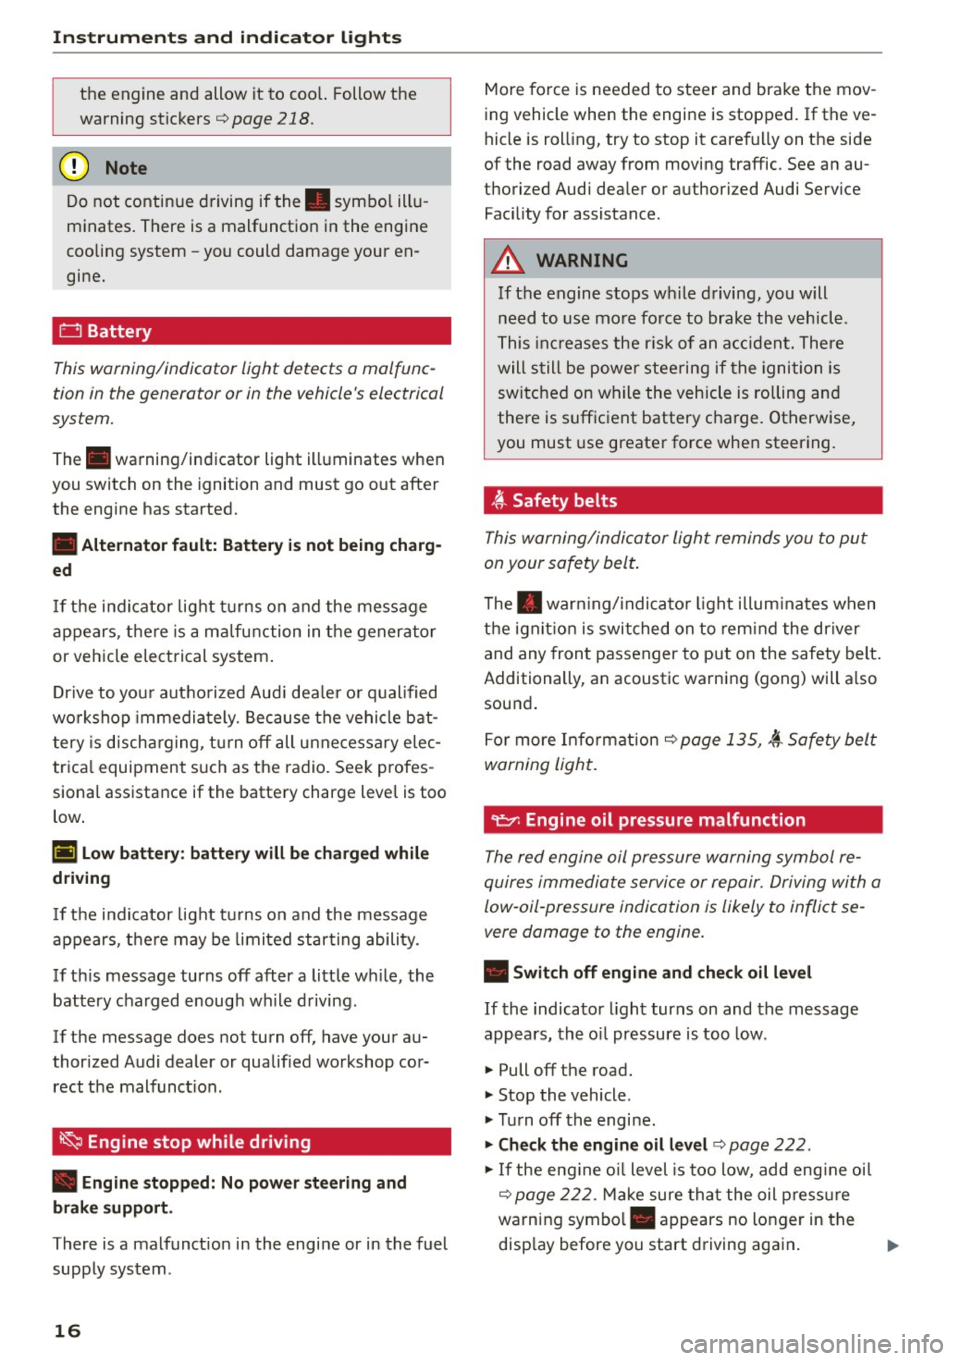
D Battery
This warning/indicator light detects a malfunc
t ion in the generator or in the vehicle's electrical
sys tem.
The . warning/indicator lig ht ill uminates when
you switch on the ignition and must go out after
the engine has started.
• Alternator fault: Battery i s not being charg
ed
If th e i nd ic ator lig ht tur ns on and the message
a ppears, the re is a m alfunction in the genera tor
or ve hicle elec trical system .
D rive to you r autho rized Aud i dea le r o r q ualified
wo rkshop imme dia tely. Because the ve hicl e b at
t ery is d isch arging, t urn off all unne cessa ry e lec
tr ica l equipmen t su ch as the radio. Seek p rofes
sional assistance if the batte ry charge level is too
low .
(•) Low battery : battery will be charged while
driving
I f t he i ndi cator lig ht t urns on and the message
ap pears, t he re m ay be limi ted star ting abili ty.
If t his message turns off after a litt le w hile, the
battery cha rged enoug h wh ile d riving .
If the message does not turn off, have your au
thor ized Audi dealer or qualified workshop cor
rect the malfunct ion .
~ Engine stop while driving
• Engine stopped: No power ste ering and
brake support .
There is a malfunct ion in the engine or in the fuel
supp ly system .
16
More force is needed to s teer and brake the mov
ing vehicle when the engi ne is stopped.
If the ve
hicle is roll ing, try to stop it caref ully on the side
of the road away from moving traffic . See an au
thori zed Audi dea ler or authorized Audi Serv ice
Fac ility for assistance .
A WARNING
If the engine s tops w hile driving, you will
need to use mo re fo rce t o brake the vehicl e.
T his in cr eases the r is k of an a cc iden t. The re
will s till be powe r stee ring if the igni tion is
switched on while the vehicle is rolling and
there is suff ic ient battery charge. Ot herwise,
you must use greate r force whe n steer ing.
,~ - Safety belts
-
This warning/indicator light reminds you to pu t
on your safety bel t.
The . war ning/ indica to r li gh t illum ina tes w hen
the ignit io n is swit ched on to rem ind the driver
and any fron t passenger to p ut on the safety belt .
Additionally, an acoustic warni ng (gong) will a lso
sound .
Fo r more Info rm ation ¢
page 135, i Safety belt
warning light.
"t:::r. Engine oil pressure malfunction
The red engine oil p ressure warning symbol re
quires immediate service or repair . Driving with a
low-oil -pressure indication is likely to inflict se
vere damage to the engine.
• Swit ch off engine and check oil level
If th e indicato r ligh t turns on and the message
appea rs, the o il pressure is too low .
.. Pull off the road.
.. Stop the vehicle .
.. Tur n off the engi ne .
.. Check the engine oil level ¢ page 2 2 2 .
"'If the eng ine o il level is too low, add eng ine oi l
¢
page 22 2. Make sure th at the oil press ure
warning symbol. appears no longer in the
disp lay before you start driving again .
111>
Page 27 of 294
M N <( I.J ""'. rl I.O
"' N I.O rl
- Short-term memory overview
- Long-term memo ry overview
The short-term memo ry collects d riving informa
tion from the time the ignit ion is switched on un
til it is switched off .
If you continue driv ing within
two hours after switching the ignit ion off, the
new values are included when calcu lating the cur
rent trip information.
Unlike the short-te rm memory, the long -term
memory is not erased automat ical ly. You can se
lect the time period for evaluat ing trip informa
tion yourself.
F or some veh icle functions, you can access the
tr ip informat ion from the tempor ary memory in
the line @.
Fuel consumption
The current fuel consumpt ion can be displayed
using a bar~
fig. 8. The average consumption
(mpg) s tored in the short-term memory is also
d isp layed. When the bar turns green, your veh icle
saves fuel by one of the following functions:
- Recuper ation : When the vehicle is coasting or
driv ing downh ill, electrical energy can be stored
in the battery. The bar will move toward 0.
-Cy linder on de mand Sy stem *: when the de
ma nd for power is low and other conditions are
met, the eng ine a utomatically deactivates fo ur
cylinders. The driver and passengers will not
even notice this . The cylinders sw itch on again
when more power is needed.
(D Tips
Fue l consumptions (average and current),
range and speed are displayed in metric units
on Canadian models.
Ins trument s and indi cator ligh ts
Efficiency program
Applies to vehicles: wit h effic ie ncy program
Fig. 9 In st rum en t cluster: Other consumers
Fig. 10 Instrument clus te r: economy tip
The efficiency program can help you to use less
fuel. It shows other consumers that are using
fuel and economy tips give advice on how to drive
effic iently. The efficiency program rece ives d is
tance a nd consumpt ion data from the on -board
compu ter.
T o d isplay the eff ic iency program, open the
V ehi
cle func tion s
menu and select the Efficienc y pro
gram
menu i tem.
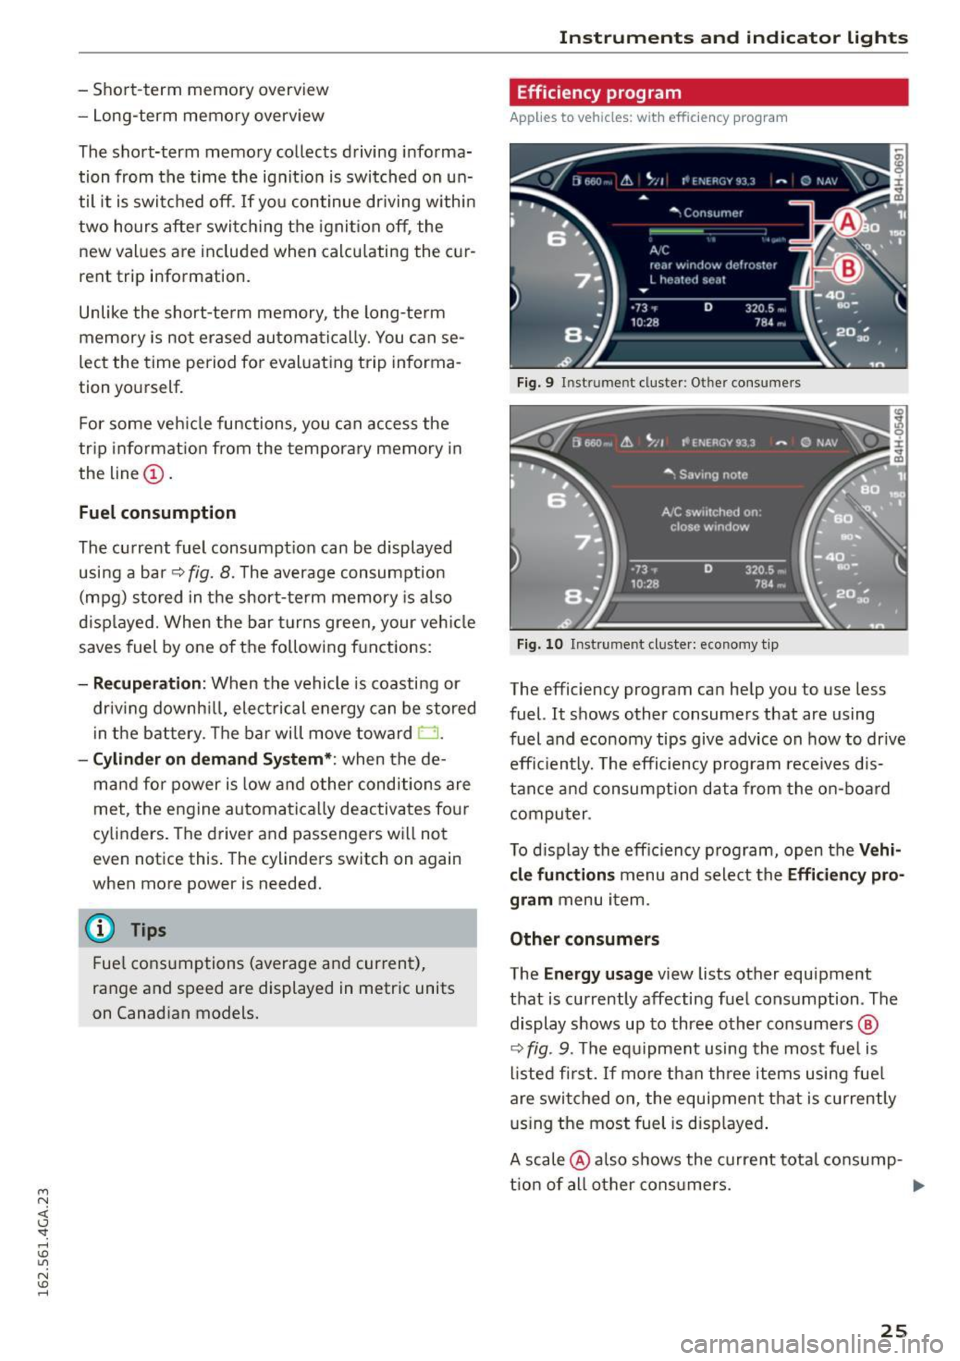
Other consumers
The En ergy u sag e view lists other equipment
that is currently affecting fuel consumption . The
display shows up to three other cons umers @
~ fig. 9. The equipment using the most fue l is
listed fi rst. If more than three items using fue l
are swi tched on, the equipment that is currently
using the most fuel is disp layed .
A scale @also shows the current tota l consump-
t ion of all other consumers. .,.
25
Page 29 of 294
M N <( I.J "". rl I.O
"' N I.O rl
-Inspection or oil change reminder: After a cer
tain distance driven, a message appears in the
instrument cluster display each time the igni
tion is switched on or off
c> fig. 13. The remain
ing distance or time is displayed briefly .
-Inspection or oil change due : If your vehicle is
due for an inspection or oil change or both, a
message appears br iefly in the instrument clus
ter display when switching the ignition on or
off:
Inspection due! or Oil change due! or Oil
change and inspection due! .
Checking service intervals
You can check the remaining distance or time un
til the next oil change or next inspection n the
Car menu. To do th is, select: the ICAR !function
button
> (Car) * Systems control button > Service
& control
> Servi ce intervals .
Resetting the indicator
Your authorized Audi dealer or authorized Audi
Service Facility will reset the service interval dis
play after performing service .
If you have changed the oil yourself, you must re
set the oil change interval.
To reset the indicator, select: the ICARI fu nct ion
button
> (Car)* System control button > Service
& control > Service intervals. Turn the control
knob downward to
Reset oil change interval and
press the control knob.
(D Note
- Only reset the oil change indicator if the o il
was changed.
- Fo llowing the service intervals is critical to
maintain ing the service life and value of
your vehicle, especially the engine. Even if
the mileage on the vehicle is low, do not ex
ceed the time for the next service.
- Calculating the time to the next oil change
i s interrupted when the vehicle battery is
disconnected. If the vehicle is not driven for
a long period of time, check the mainte
nance schedule so that you can follow the
maintenance interva ls.
Instruments and indicator lights
Head-up display
Applies to vehicles: wit h Head-up disp lay
Fig. 14 Examp le : Indicato rs i n th e Head -up dis play
Fig . 15 Instrument panel: head-up display knob
The Head-up display projects certain warnings or
selected information from the assistance sys
tems* or navigation* on the windsh ield . T he dis
play appears w ith in the dr iver's field of vision.
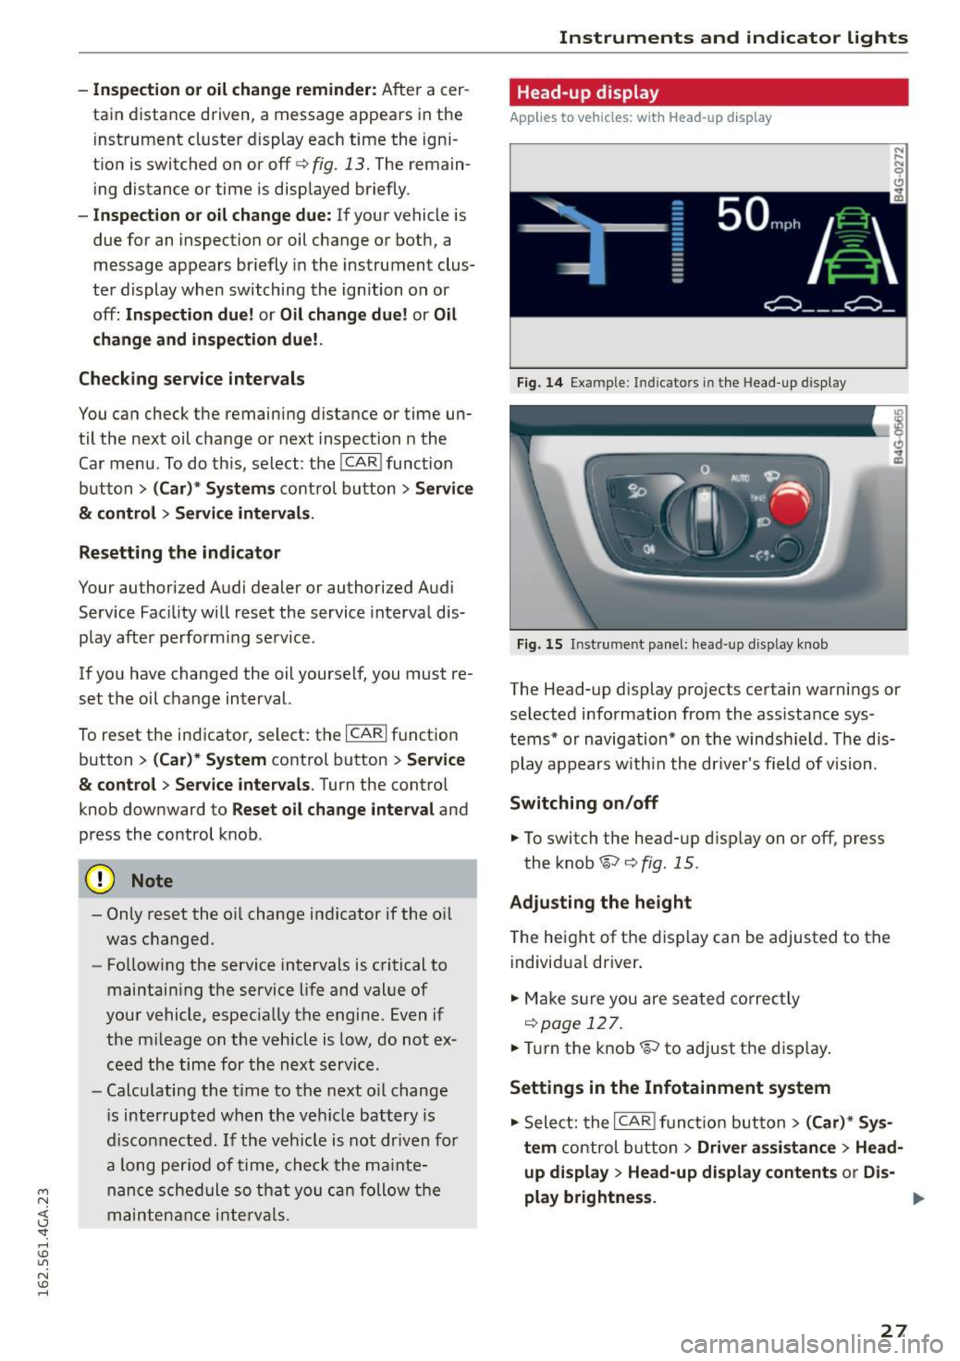
Switching on/off
... To switch the head-up d isplay on or off, press
the knob~
c> fig. 15.
Adjusting the height
The height of the display can be adjusted to the
individual driver.
... Make sur e you are seated correctly
r=!)page 127 .
... Tur n the knob~ to adjust the disp lay .
Settings in the Infotainment system
... Sele ct: the I CARI function button > (Car)* Sys
tem
control button > Driver assistance > Head
up display > Head-up display contents or Dis-
play brightness. ..,
27
Page 33 of 294

M N <( I.J "". rl I.O
"' N I.O rl
.. Press the release button @¢fig . 18.
.. Pull the mechanica l key @ out of the master
key .
Using the mechanica l key, you can:
- lock and unlock the storage compartment on
the passenger's s ide ¢
page 60.
- lock and unlock the vehicle manually
¢ page 35.
-lock the front and rear passenger doors me
chanically ¢
page 36.
LED and batteries in the remote control key
Fig. 1 9 Remote control key: Remov ing the batte ry h olde r
LED in the remote cont rol key
The LED @informs you about the funct ion of th e
remote control key .
.. If you press a button qu ickly, the LED blinks
once.
.. If you press a button longer (convenience open
ing), the LED blinks several times .
.. If the LED does not blink, the remote control
key battery is dead. The
Ill indicator ligh t and
t h e m essage
Plea se change key batt ery appear.
Replace the ba tte ry.
Replacing the remote control key battery
.. Remove the emergency key¢ page 30 .
.,. Press the release butto n ® on the battery
holder and pull the battery ho lder out of the
master key in the direction of the ar row at the
same time.
.. Insert the new battery with the"+" facing
down.
.. Push the battery holde r carefully into the mas
ter key.
.. Install the mechanical key.
Open ing and clo sing
@) For the sake of the environment
Dead batteries must be d ispose d of using
methods that wi ll not harm the environment .
Do not d ispose of t hem in ho useho ld trash.
@ Tips
The replacement battery must meet the same
spec ificat ions as t he origina l battery .
Electronic immobilizer
The immobilizer helps to prevent unauthorized
use of your vehicle .
A compute r ch ip ins ide you r key au toma tically
deact ivates the electronic immobilizer when the
key is inside the vehicle . When yo u remove the
key from the vehicle, the electronic immob ilizer
is aut omatically activated once again.
A WARNING
-Always take the key with you when you leave
the veh icle. The key can disarm the electronic
engine immobilizer and permit an unauthor
i zed person to start the engine and enab le op
e ra ti on o f the ve hicle sys tems s uch as powe r
window or power s unroo f lead ing t o serious
personal injury .
@ Tips
- T he ve hicle cannot be started if an una u
tho riz ed key is used. The vehicle may not
s ta rt if another radio device s uch as a key
for ano ther ve hicle or a transpo nder is locat
ed on the key ring .
- F or Declara tion of Comp liance to United
States FC C and In du stry Canada reg ulations
¢page 277 .
Central locking
General description
The power locking system locks or unlocks all
doors and the rear lid simultaneously.
You can lock and unlock the vehicle centrally . Yo u
have the following choices:
111>
31
Page 36 of 294

Opening and closing
It
depends on the settings in the MMI whether
the entire vehicle is un locked or only certain
doors
¢ page 33.
.&_ WARNING
Read and follow all WARNINGS¢.&. in Gener
al description on page 32.
(D Tips
- In order to make sure the locking function is
working, you should always keep your eye
on the vehicle to make sure it is properly
locked.
- Do not use the remote control if you are in
side the car, otherwise you may unintention
ally lock the vehicle, and then you would set
off the ant i-theft alarm when you try to
start the engine or open a door. In case this
happens anyhow, push the unlock button
ffi.
-The vehicle can only be locked when these
l ector lever is in the P posit ion.
- Use the panic funct ion only if you are in an
emergency situation .
Locking and unlocking with convenience
key
Applies to veh icles: w ith conven ie n ce key
The doors and the rear lid con be unlocked and
locked without operating the master key.
Fig. 21 Conve nien ce key: Locking the vehicle
Unlocking vehicle
• Take hold of the door hand le . The door is un
l ocked automatically.
• Pu ll the handle to open the door.
34
Locking vehicle
• Select the P selector lever position. Otherwise
the vehicle cannot be locked.
• To lock the vehicle, close the door and touch
the sensor in the door handle
once ¢ fig. 21. Do
not reach inside the door handle.
The vehicle can be locked and un locked at any
door. The master key must be within a range of
about 1.5 m from the appropriate door or the
rear lid. It makes no difference whether the mas
ter key is in your jacket pocket or in your brief
case .
It is not possib le to re-open the door for a brief
period directly after closing it. This allows you to
ensure that the doors are properly locked .
It depends on the settings in the MMI whether
the entire vehicle is unlocked or one of the doors
¢page 33.
.&_ WARNING
Read and follow all WARNINGS ¢.&. in Gener
al description on page 32 .
{!) Tips
If your vehicle has been standing for an ex
tended period, please note the following:
- The proximity sensors are deactivated after
a few days to save power. You then have to
pull on the door handle once to unlock the
vehicle and a second time to open the vehi
cle.
- To prevent the battery from being dis
charged and to preserve your vehicle's abili
ty to start for as long as possible, the ener
gy management system gradua lly switches
off unnecessary convenience functions.
It is
possible that you will not be able to unlock
your vehicle using these convenience func
tions.
- For Declaration of Compliance to United
States FCC and Industry Canada regulations
¢page 277.
Page 40 of 294

Opening and closing
- There are audio signals when closing the
luggage compartment lid with the remote
control key (vehicles with convenience key*)
or with the~ button in the driver's door.
- When the vehicle is locked, the luggage
compartment lid can be unlocked separately
by pressing the button
l a ! on the remote
control key. When the luggage compart ment lid is closed aga in, it locks automati
cally.
- You can close the luggage compartment lid
using the master key (vehicles with conven
i ence key*) up to a distance of approximate
l y 9 ft (3 m).
- The luggage compartment lid can be oper
ated by hand if the vehicle battery is low.
It
is necessary to use more force when doing
th is . Move the lid slowly to reduce the
amount of force needed.
Luggage compartment with movement
activated opening
Applies to veh icles: w ith conve nien ce key and senso r-contro l
led lugg age compart ment lid
Fig. 28 Rear of the veh icle : foot movement
Requirements You must be carrying your veh icle
key with you. You must be standing at the center
behind the luggage compartment lid. T he re
should be a distance of approximately 20 cm
from the rear of the vehicle. The ignition must be
switched off. Make sure you have firm footing.
.,. Swing yo ur foot back and forth below the
bumper ¢
fig. 28. Do not touch the bumper.
Once the system recognizes the movement, the
luggage compartment lid will open .
The luggage compartment lid will only open if
you make the movement as described. This pre-
38
vents the luggage compartment lid from opening
due to similar movements such as when you wa lk
between the rear of the vehicle and your garage
door.
General information
In some situat ions, the function is limited or
temporarily unavailable. This may happen if:
- the luggage compartment lid was closed be
forehand .
-you park close to a hedge and the branches
move back and forth under the veh icle for a
long period of time.
-you clean your vehicle, for example with a pres
sure washer or in a car wash.
- there is heavy rain.
- the bumper is very dirty, for example after driv- ing on salt-covered roads.
- there is interference to the radio signal from
the vehicle key, suc h as from cell phones or re
mote controls.
Luggage compartment lid emergency
release
The luggage compartment lid can be released in
an emergency from inside the luggage compart
ment.
Fig. 29 Inside of the lu ggage compartme nt: access to the
e m ergency release
.,. Remove the emergency key ¢ page 30 .
.,. Pry the cover out using the eme rgency key
~fig. 29 .
.,. Press the lever in the direction of the arrow to
release the luggage compartment lid.
Page 42 of 294
Opening and closing
- Pay carefu l attent ion when closing the win
dows. It could cause injury by pinching.
- When locking the vehicle from outside, the
vehicle must be unoccupied since the win
dows can no longer be opened in an emer
gency.
(D Tips
- When you open the doors, the w indows au
tomatically lower about
0.4 inches
(10 mm).
- When the window in the driver's or passeng
er's door is completely open, it will raise ap
proximately 1 inch (25 mm) when the door
is opened . The window wi ll lower again
when you close the door.
- After the ignition has been switched off, the
windows can st ill be opened or closed for
about
10 m inutes. The power windows are
not switched off until the driver's door or
passenger's door has been opened.
Convenience opening
All of the windows and the sunroof* can be
opened at once.
The settings in the Infotainment system specify
which windows will open.
Convenience opening
.,. Press and hold the li button on the remote
control key until the windows reach their de
sired position and the sunroof* is tilted open.
Setting convenience opening in the
Infotainment system
.,. Select: the ICARI function button > (Car)* Sys
tems control button > Vehicle settings > Cen
tral locking > Long-press to open windows .
To enable convenience opening of the windows
and the roof*, the
Front windows , Rear windows
and Roof funct ions must be switched On.
A WARNING
For security reasons, the windows and the
sunroof* can only be opened with the remote
40
control key at a maximum d istance of approxi
mately 6 feet (2 meters) from the vehicle.
Correcting power window malfunctions
After disconnecting the vehicle battery, the one
touch up and down feature must be activated
again.
.,. Pull the power window switch until the window
is completely raised.
.,. Release the switch and pull it again for at least
one second.
Sunroof
Description
Fig. 32 Sect ion from headli ner: sunroof b utton
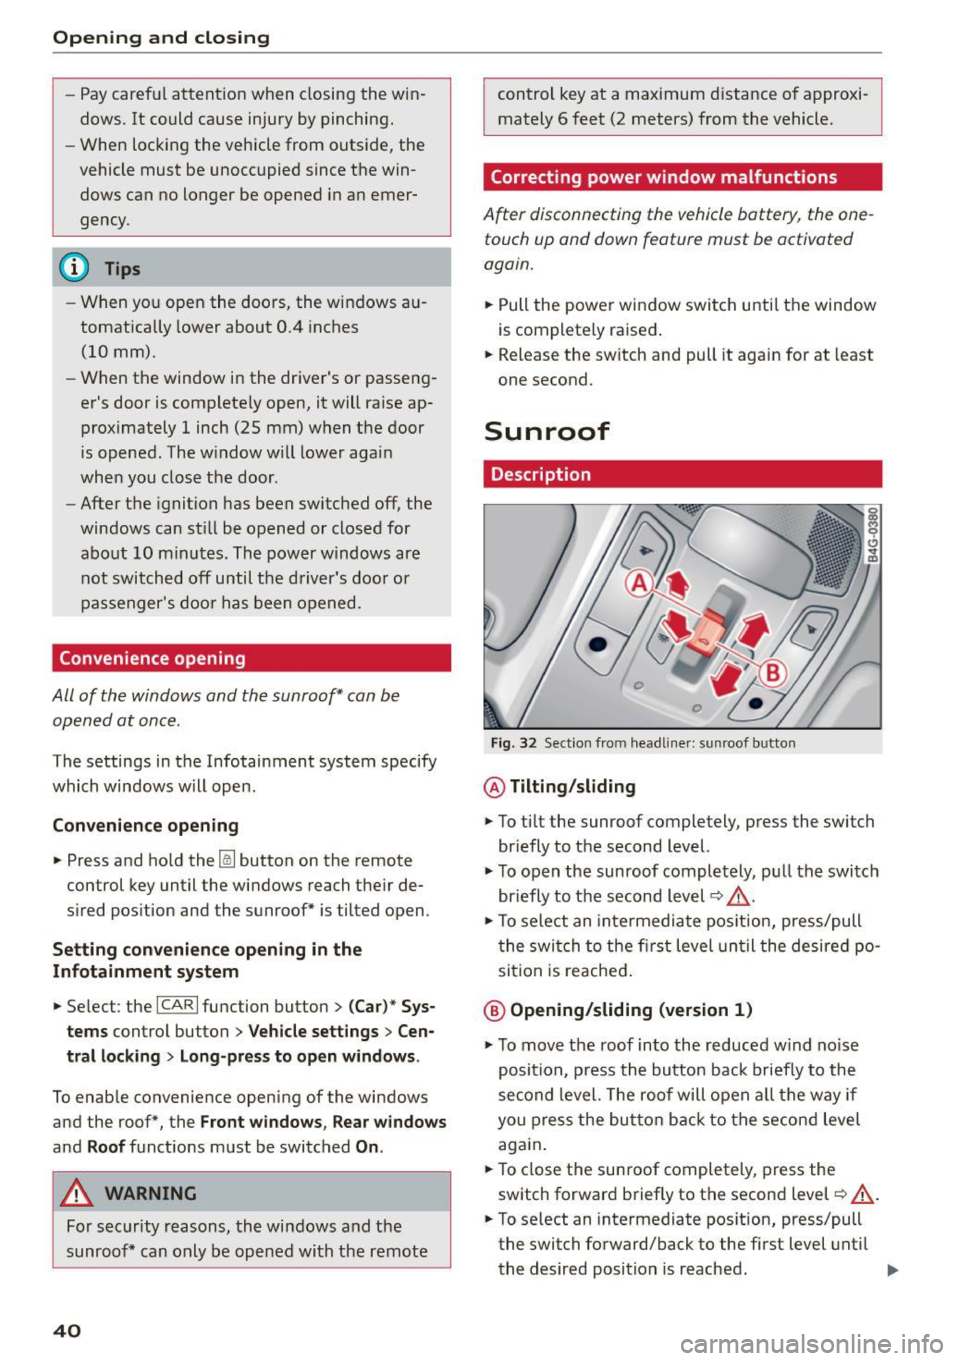
@ Tilting/sliding
.,. To tilt the sunroof completely, press the switch
briefly to the second level.
.,. To open the sunroof completely, pull the switch
briefly to the second level~.&_ .
.,. To select an intermediate position, press/pull
the switch to the first level until the desired po
sition is reached .
@ Opening/sliding (version 1)
.,. To move the roof into the reduced w ind no ise
position, press the button back briefly to the
second level. The roof will open all the way if
you press the button back to the second level
aga in.
.,. To close the sunroof completely, press the
sw itch forward briefly to the second level~.&_ .
.,. To select an intermedi ate position, press/pull
the switch forward/back to the first level until
the desired position is reached. ..,.