turn signal AUDI S7 2016 Owners Manual
[x] Cancel search | Manufacturer: AUDI, Model Year: 2016, Model line: S7, Model: AUDI S7 2016Pages: 294, PDF Size: 73.82 MB
Page 15 of 294
M N <( (.J
'SI: ,...., \!) 1.1'1
N \!) ,....,
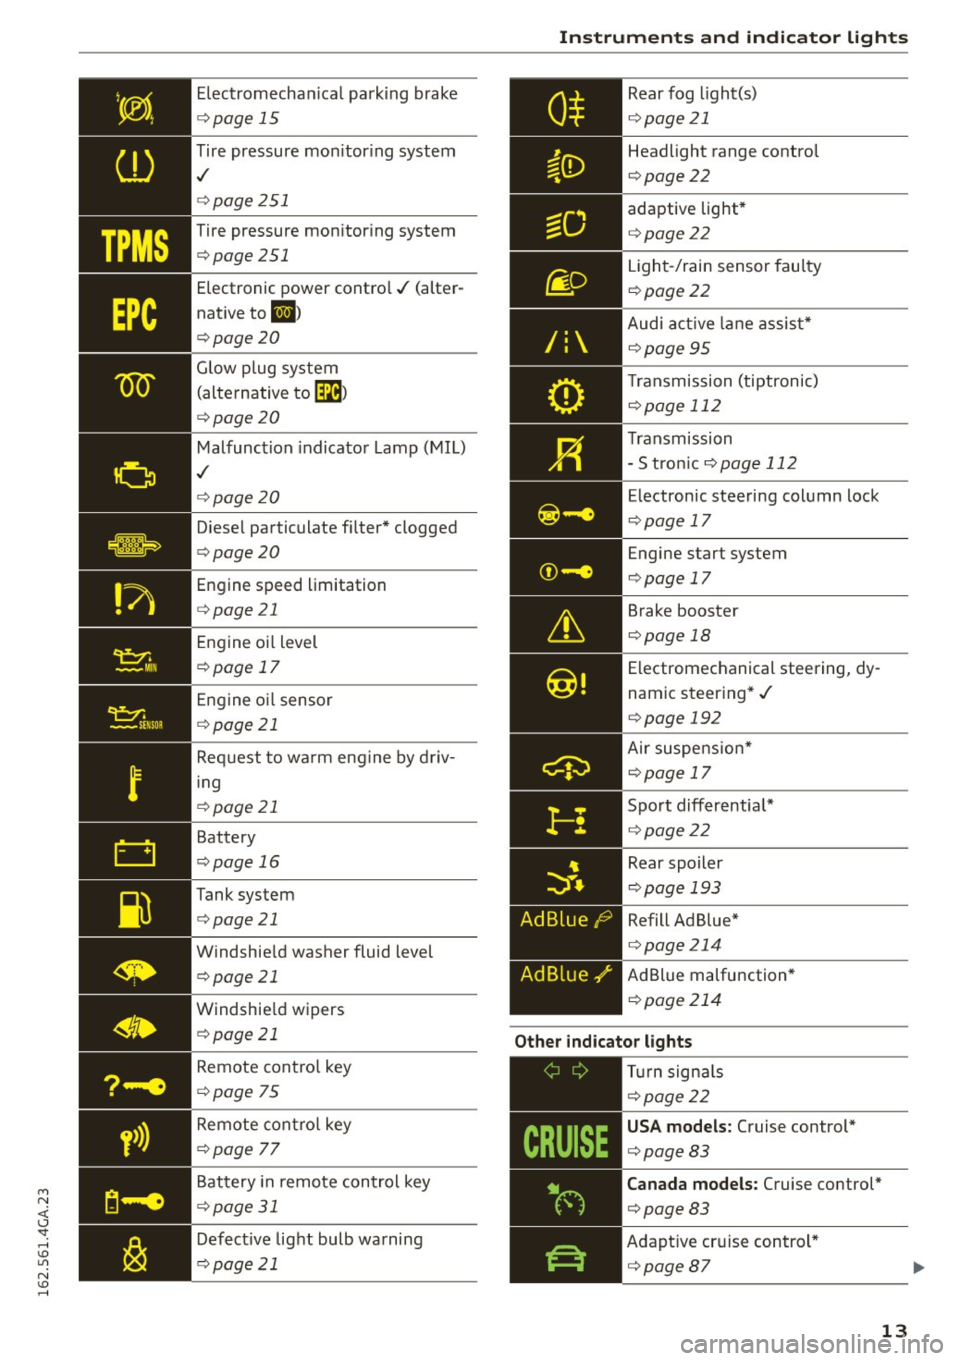
Electromechanical parking brake
opage 15
Tire pressure mon itoring system
,/
o page 251
Tire pressure monitoring system
opage 251
Electronic power control ./ (alter
native to
El>
o page20
Glow plug system
(alternative to
[m )
opage20
Malfunction indicator Lamp (MIL)
,/
opage20
Diese l particulate fi lter* clogged
o page20
Engine speed limitation
opage 21
Engine oil level
o page 17
Engine oil sensor
o page 21
Request to warm eng ine by driv
in g
o page 21
Battery
opage 16
Tank system
opage 21
Windshie ld washer fluid level
o page 21
Windshie ld wipers
o page 21
Remote contro l key
o page 75
Remote contro l key
o page 77
Battery in remote control key
opage 31
Defective light bulb warning
opage 21
Instruments and indicator lights
/:
Rear fog light(s)
opage 21
Headlight range control
opage 22
adaptive light*
opage 22
Light-/rain sensor faulty
opoge 22
Audi active lane assist*
o page 95
Transmission (tiptronic)
opage 112
Transmission
- S tron ic
opage 112
Electronic steering column lock
opage 17
Engine start system
opage 17
Brake booster
opage 18
Electromechanical steering, dy
namic steering*./
o page 192
Air suspension*
opoge 17
Sport differential*
opage 22
Rear spoiler
opage 193
Refill Ad Blue*
opage 214
AdBlue malfunction*
opoge 214
Other indicator lights
CRUISE
,---------------
Turn signals
o page22
USA models: Cruise control*
opage 83
Canada models: Cruise control*
opage 83
Adaptive cruise control *
opage87
13
Page 24 of 294
Instruments and indicator lights
Drive to an authorized Aud i dea ler or authorized
Audi Service Faci lity immediately to have the
malfunct ion corrected .
~(D Headlight range control
El Headlight range co ntrol: defe cti ve !
If the symbo l illuminates, the headlight range
control is no longer working properly. Have the
system checked and repaired at your A udi dealer .
1aO Adaptive Light
Applies to veh icles: with Adapt ive Light
mi Aud i adapti ve light: system fault
If the indicator lig ht t urns on and this message
appears, there is a malfunction in the adaptive
light system . The headlights still f unction.
Go to an a uthorized dea le rship to have the head
lights or the control unit for the Adaptive Light
repaired.
~ o Light/rain sensor
El Automatic headlights / automat ic wipe rs:
System fault
The light/rain sensor is malfunctioning.
F or safety reasons , the low beams are turned on
permanen tly with the switch in
AUTO. However,
you can continue to turn the lights on and off us
ing the light switch . You can still control a ll func
tions that are independent of the rain sensor
t hrough the windshield wiper lever.
D rive to an a uthorized Audi dea ler or a uthorized
Aud i Service Faci lity immediately to have the
malfunct ion corrected.
!-- : Sport differential
Applies to veh icles: w ith sport different ia l
II) Sport di fferential : system fault
There is a malfunction with the sport differentia l.
Drive to your aut ho rized Aud i dea le r i mmedia tely
to have the ma lfunction co rrec ted .
II) Sport differential: overheating
22
The transm ission temperat ure has increased s ig
nificantly d ue to the sporty driving manner. Drive
i n a less sporty manner unt il the temperature re
turns to the normal range and the indicator light
switches of.
A WARNING
-
Contact your author ized Audi dealer or a
qualified workshop if the spo rt differential is
fa ulty o r malfunctioning . The repa ir must be
performed by trained pe rsonnel using the cor
rect o il in order to ens ure s afety.
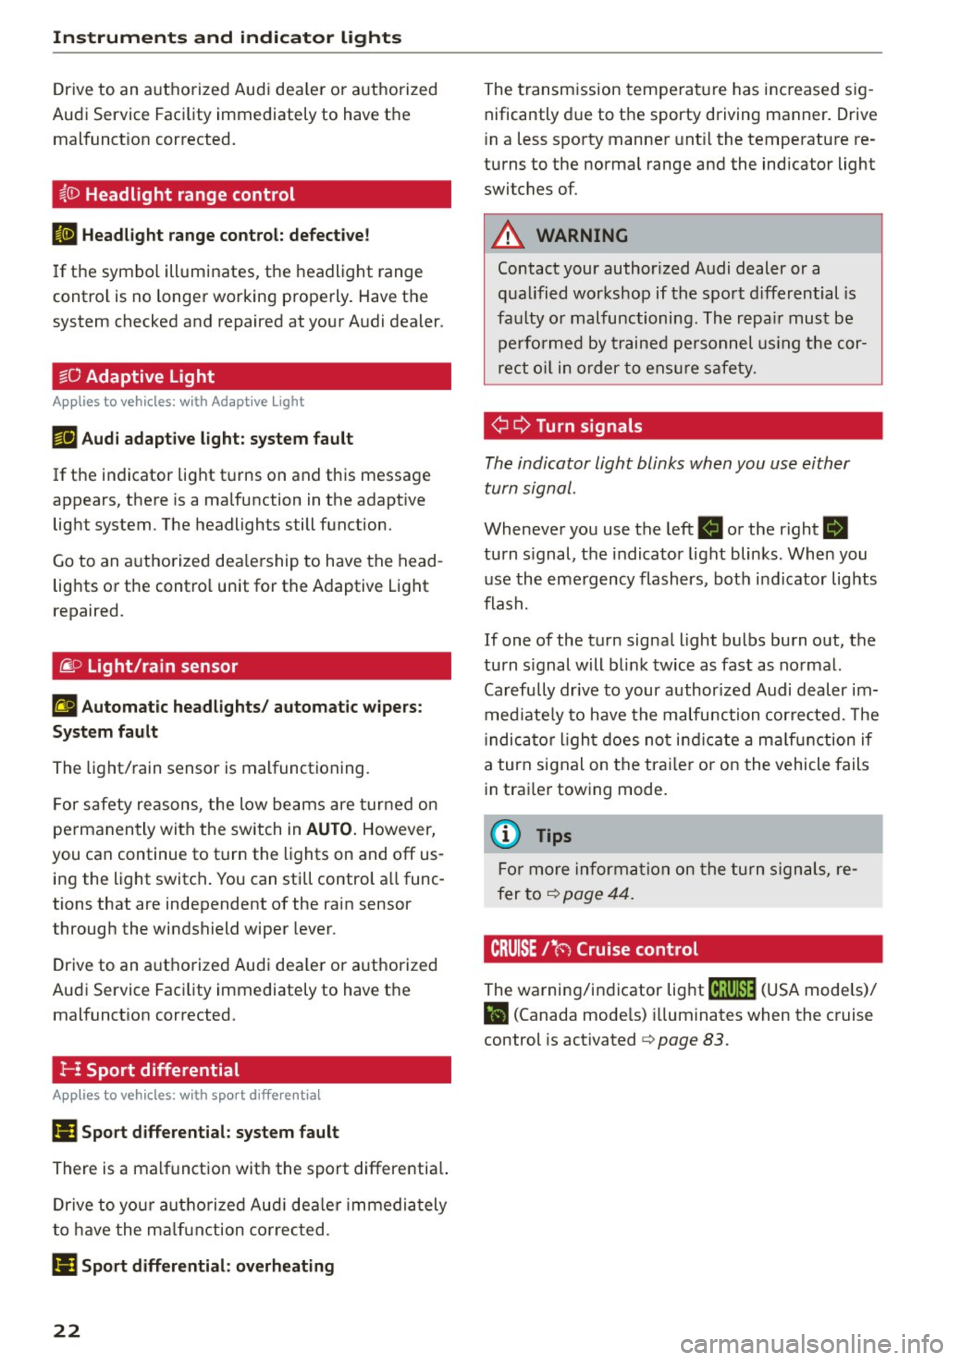
¢ ¢Turn signals
The indicator light blinks when you use either
turn signal.
Wheneve r you use the left B or the right B
turn s ignal, the indicator light blinks . When you
use the eme rgency flashers, bot h indicator lights
flash.
If one of the turn signa l light bulbs burn out, the
turn s ignal will bli nk twice as fast as normal.
Carefully dr ive to your author ized Audi dealer im
med iate ly to have the malfunction cor rected. The
i ndica tor l igh t does not ind icate a ma lf u nction if
a turn signal on the tra iler or on the vehicle fails
i n tra iler towing mode.
(D Tips
Fo r more informa tion on the turn s ign als , re
fer to<=>
page 44.
CRUISE 1• 0 Cruise control
The warning/indicator lig ht (ij;(l)~14 (USA mode ls)/
l'I (Canada mode ls) illuminates when the cruise
control is activated <=>
page 83.
Page 34 of 294

Opening and closing
-Remote master key ¢ page 33,
-Door handles with convenience key*
¢page 34,
-Lock cylinder at the driver's door c::> page 35,
or
- Power locking switch inside
c::> page 35.
Selective unlocking
When you lock the vehicle, the power locking sys
tem will lock the doors and the rear lid. When un
locking, you can set in the MMI whether only the
driver's door or the entire vehicle should be un locked
c::> page 33.
Automatic locking
The automatic locking feature locks all the vehi
cle doors and the rear lid when you drive faster
than 9 mph (15 km/h) .
The car is unlocked again, when the opening
function in the power locking system switch or at
one of the door levers is actuated. The Auto Lock
function can be turned on and off in the MMI
c::> page 3 3.
Anti-theft alarm warning system
If the anti-theft alarm warning system detects a
break-in into the vehicle, acoustic and visual
warning signals are triggered.
The anti-theft warning system is activated auto
matically when you lock the vehicle. It is deacti
vated when unlocking using the remote key, with
the mechanical key, and when you switch the ig nition on .
The alarm also turns off when the alarm cycle has
expired.
Turn signals
When you unlock the vehicle , the turn signals
flash twice. When you lock the vehicle the turn signals flash once. If they do not flash, one of the
doors , the rear lid or the hood is not locked.
Unintentionally locking yourself out
In the following cases there safeguards to pre
vent you locking your remote master key in the
vehicle:
32 -
The vehicle does not lock with the central lock
ing switch
c::> page 35 if the driver's door is
open.
- On vehicles with convenience key*, if the most
recently used master key is in the luggage com
partment, the rear lid is automatically unlocked
again after it is closed.
Do not lock your vehicle with the
remote master
key or convenience key*
until all doors and the
rear lid are closed. In this way you avoid locking
yourself out accidentally.
Power side door closer*
The vehicle doors are equipped with a power side door closer. When closing a door, you only have
to let it fall lightly into the latch. The door will
then automatically close by itself
c::> ,&..
A WARNING
-When you lock your vehicle from outside,
nobody - especially children -should remain
inside the vehicle . Remember, when you
lock the vehicle from the outside the win
dows cannot be opened from the inside.
- When you leave the vehicle, always take the
ignition key with you. This will prevent pas
sengers (children, for example) from acci
dentally being locked in the vehicle should
they accidentally press the power locking
switch in the doors.
-
-Do not leave children inside the vehicle un
supervised. In an emergency it would be im
possible to open the doors from the outside
without the key.
- Applies to vehicles with power side door
closer*:
- When closing a door, make sure nothing
can interfere with the door . This could
cause serious personal injury.
- You can stop the door from closing at any
time by pulling on the inside or outside
door handle.
(D Tips
-In the event of a crash with airbag deploy
ment all locked doors will be automatically
Page 46 of 294
Lights and Vi sion
- In cool or damp weather, the ins ide of the
headlights, turn signals and tail lights can
fog over due to the temperat ure difference
between the inside and outs ide. They w ill
clear shortly after switching them on. This
does not affect the service li fe of the light
i ng.
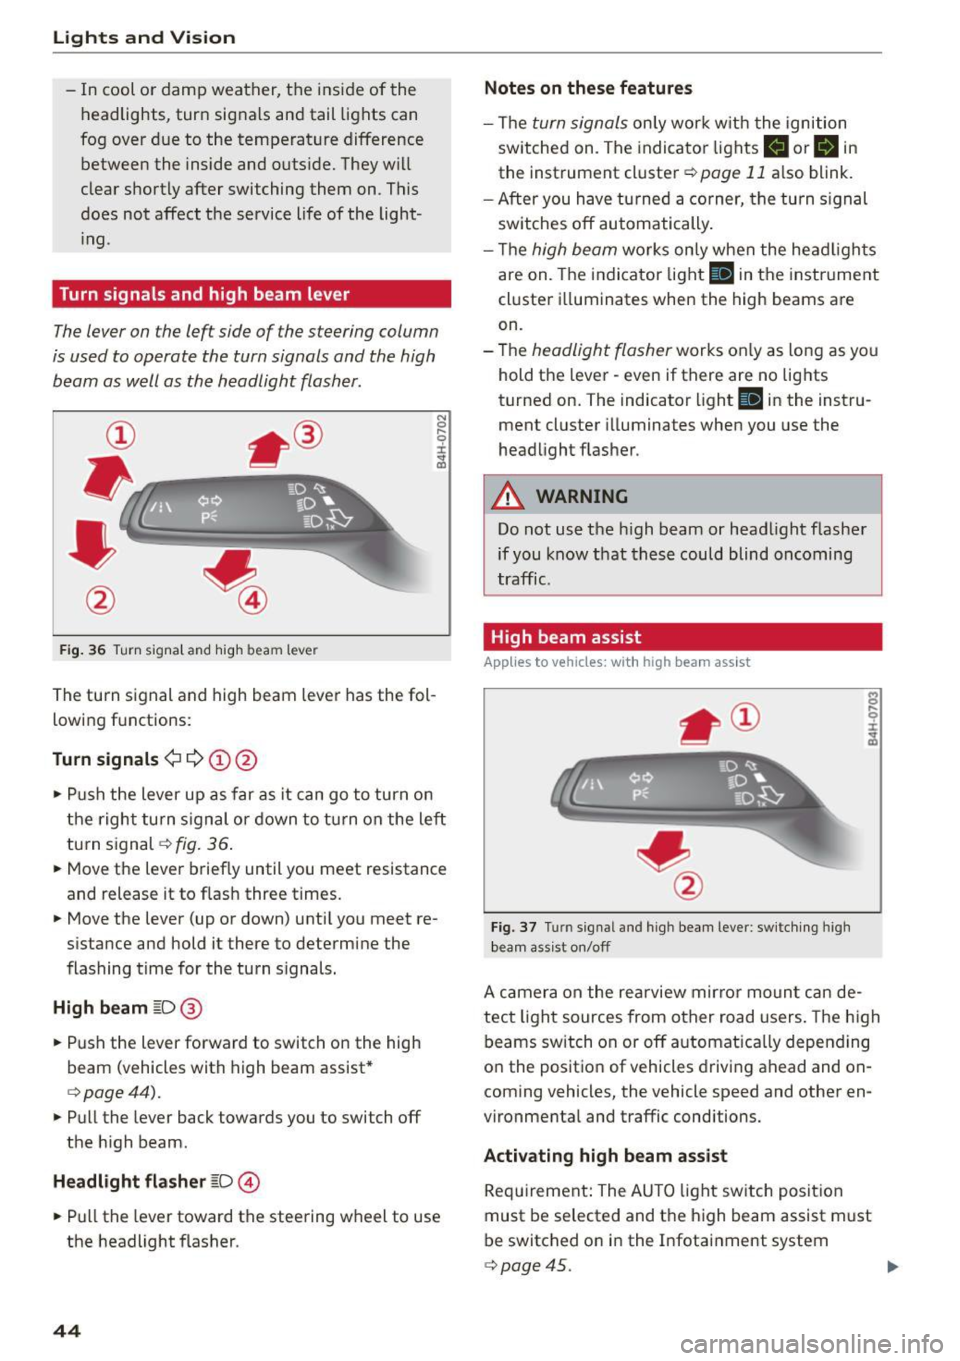
Turn signals and high beam lev er
The lever on the left side of the steering column
is used to operate the turn signals and the high
beam as well as the headlight flasher.
F ig . 36 Tu rn signa l and hig h beam lever
The turn s ignal and high beam leve r has the fol
lowing f unctions:
Turn signals ¢¢@@
N
0 ,.._ 0 ±
~
• Pu sh the lever up as far as it can go t o turn on
t he righ t turn s ignal or down to tu rn on the left
tu rn s ignal
c:> fig. 36 .
• Move the lever brief ly until you meet resistance
and release it to flas h three times.
• Move the lever (up or down) unti l you meet re
s istance and hold it there to determine the
flashing time for the tu rn s ignals.
High beam ~D @
• Push the lever forward to switch on the high
beam (vehicles with h igh beam assist *
c:>page44).
• Pull the lever back towards you to switch off
the h igh beam.
Headlight flasher ~D ©
• Pull the lever toward the steering wheel to use
the headlight f lasher.
44
Notes on these features
- The turn signals on ly work w it h the ignition
sw itche d on. The indicato r lights
II or Bin
the instrument cl uster c:> page 11 also blink.
- After you have tu rned a corner, the turn s ignal
sw itches off automatically .
- Th e
high beam works on ly when the he ad ligh ts
are on. The indi cator light
II in the instr ume nt
cl uste r ill uminates when the high beams a re
on.
- The
headligh t flasher works o nly as long as yo u
hold t he leve r - even if there are no lig hts
turned on. The indicator light
II in the instru
ment cluster i lluminates when you use the
headlight f lasher .
A WARNING
Do not use the high beam or head light flasher
if you know that th ese could blind oncoming
traffic .
High beam assist
Applies to veh icles: with high beam assist
Fig . 3 7 Turn signal and high beam lever: sw itc hing high
bea m ass ist o n/off
A camer a on the rea rview mirror moun t ca n de
tec t light sources from other road users . The high
beams switch on or off a utomat ica lly depen ding
o n the position of vehicles driving ahead and on
coming vehicles, the vehicle speed and othe r en
vironme nta l and traffic conditions.
Activating high beam assist
Req uirement: The AU TO light sw itch posit ion
must be selected and t he h igh beam assist m ust
be switched o n in the I nfotai nment system
c:> page45.
Page 48 of 294
Lights and Vision
The leaving home function illuminates the area
outside the vehicle when you un lock the vehicle.
To turn the function on, select
Lights when un
locking car> On .
The coming home and leaving home functions
only operate when it is dark and the light switch
is in the
AUTO posit ion .
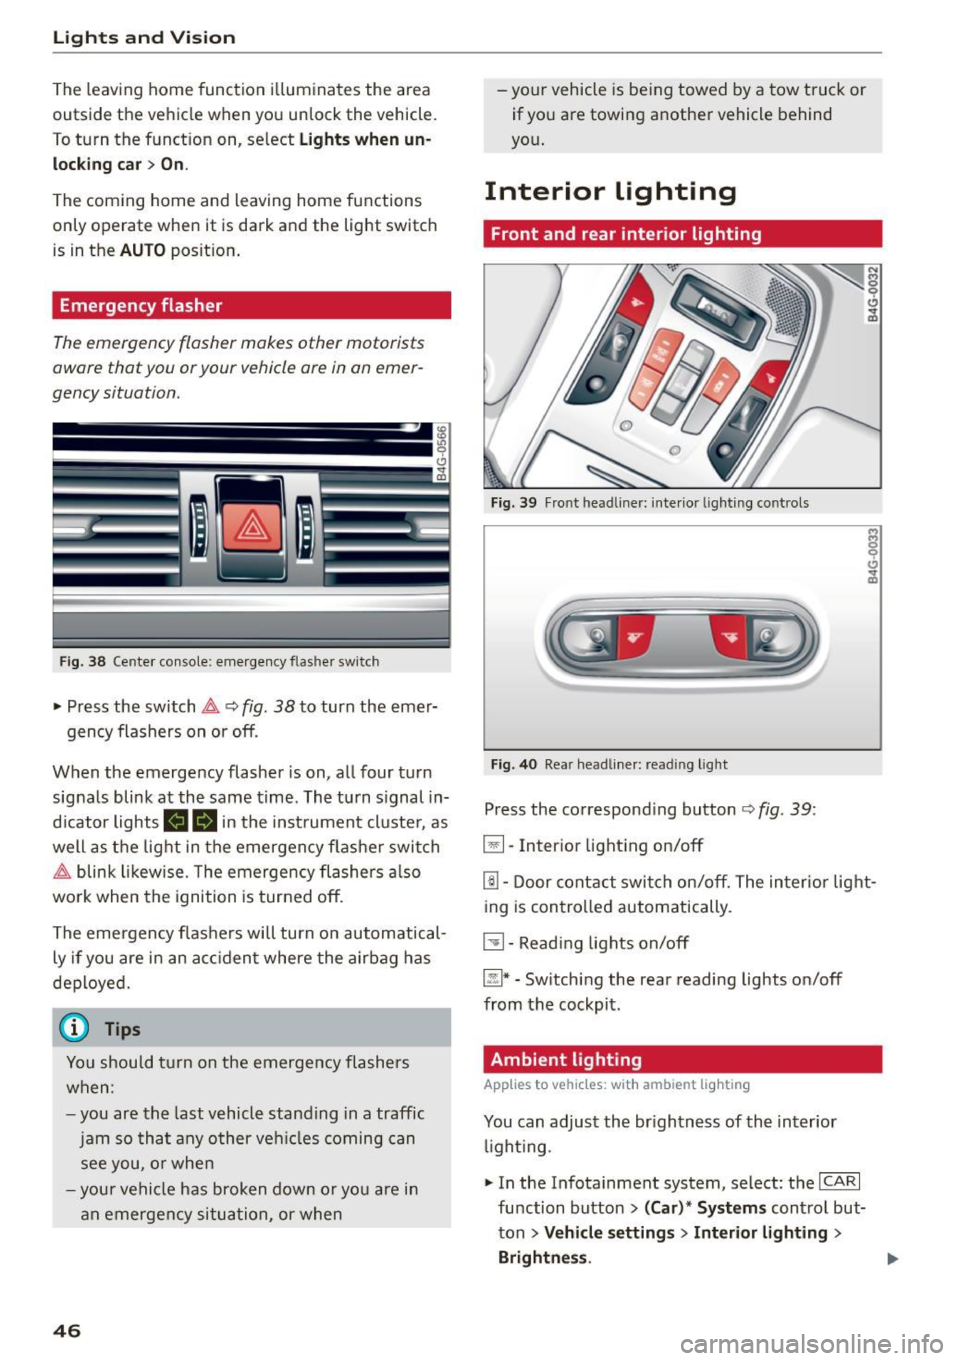
Emergency flasher
The emergency flasher makes other motorists
aware that you or your vehicle are in an emer
gency situation.
F ig. 38 Cente r co nsole: e mergen cy flasher sw itc h
~ Press the switch &, Q fig. 38 to turn the emer-
gency flashers on or off.
When the emergency flasher is on, all four turn
signals blink at the same time . The turn s ignal in
d icator lights
111!1 in the instrument cluster, as
well as the light in the emergen cy flashe r swit ch
&, blink likewise . T he emergency flashers also
wo rk when the ignition is turned off.
The emergency flashers will turn on automatical
ly if you are in an acc ident where the airbag has
deployed.
(j) Tips
You should turn on the emergency flashers
when:
- you are the last vehicle standing in a traffic
jam so that any other vehicl es coming can
see you, or when
- your vehicle has broken down or you are in
an emergency situation, or when
46
-your vehicle is being towed by a tow truck or
if you are towing another vehicle behind
yo u.
Interior Lighting
Front and rear interior lighting
Fig. 39 Front head liner: interio r light ing controls
Fig . 40 Rea r head lin er: read ing light
Press the corresponding button ¢ fig. 39:
5:1-Interior lighting on/off
rn-Door contact switch on/off. The interior light
ing is controlled automatically.
~- Reading lights on/off
~* -Switching the rear reading lights on/off
from the cockpit.
Ambient lighting
Applies to vehicles: wit h ambient lig hting
You can adjust the br ightness of the interior
li ght ing .
~ In the Infotainment system, select : the ICA RI
function button > (Car)* Systems control but
ton
> Vehicle settings > Interior lighting >
Brightne ss.
Page 96 of 294
Audi active lane assist
Audi active lane assist Lane assist
Description
A pp lies to veh icles: w ith Audi active lane assist
Active lane assist detects lane marker lines with
in the limits of the system using a camera in the
windshield. If you are approaching a detected lane marker line and it appears likely that you
will leave the lane, the system will warn you with
corrective steering. You can override this steering
at any time. If you pass over a line, the steering
wheel will vibrate lightly. In order for this warn
ing vibration to occur, it must first be switched
on in the Infotainment system. Active lane assist is operable when the lane marker line is detected
on at least one side of the vehicle.
The system is designed for driving on freeways
and expanded highways and thus works only at
speeds of 40 mph (65 km/h) or more .
Applies to vehicles with side assist*: If you acti
vate a turn s ignal when active lane assist is ready
and it classifies a lane change as critical because
of vehicles traveling alongside you or approach ing you, there will be noticeable corrective steer
ing shortly before you leave the lane. This will at
tempt to keep your vehicle in the lane.
Applies to vehicles without side assist*: the sys
tem does not warn when it is ready if you activate
the turn signal before crossing the lane marker line. In this case, it assumes that you are chang
ing lanes intentionally.
Applies to vehicles with adaptive cruise control*
or parking aid*: The corrective steering is target
ed based on the driving situation. In addition to
the lane marker lines, the system can also take
into account other objects such as guard rails. If
they are detected in close proximity to the vehi
cle, active lane assist helps prevent the vehicle
from driving too close to them. There is also
passing assistance . The system does not provide
any corrective steering if it detects that you are
passing another vehicle.
94
A WARNING
-
- The system warns the driver that the vehicle
is leaving the lane using corrective steering.
The driver is always responsible for keeping
the vehicle within the lane.
- The system can help you keep the vehicle in the lane, but it does not drive by itself. Al
ways keep your hands on the steering
wheel.
- Corrective steering may not occur in certain
situations, such as during heavy braking.
- There may be cases where the camera does
not recognize all lane marker lines. Correc
tive steering can only take place on the side
of the vehicle where lane marker lines are
detected.
- Other road structures or objects could possi
bly be identified unintentionally as lane marker lines. As a result, corrective steering
may be unexpected or may not occur.
- The camera view can be restricted, for ex
ample by vehicles driving ahead or by rain,
snow, heavy spray or light shining into the
camera. This can result in active lane assist
not detecting the lane marker lines or de
tecting them incorrectly.
- Under certain conditions such as ruts in the
road, a banked roadway or crosswinds, the
corrective steering alone may not be enough
to keep the vehicle in the middle of the lane.
- For safety reasons, active lane assist must
not be used when there are poor road and/
or weather conditions such as slippery roads, fog, gravel, heavy rain, snow and the
potential for hydroplaning. Using active lane
assist under these conditions may increase
the risk of a crash.
Page 97 of 294

M N <( I.J "". rl I.O
"' N I.O rl
Switching on and off
Applies to vehicles: with Audi active lane assist
Fig. 100 Turn signal lever: active lane assist button
Fig. 101 Windshield: camera w indow for active lane assis t
... Press the¢ fig. 100 button to switch the sys
tem on and off. The. or. indicator light in
the instrument cluster turns on or off .
Indicator lights
• Ready:
The indicator light turns on when the
system is ready for use. The system can now be
operated .
• Not ready: The indicator light turns on if the
system is switched on but is inoperable . This may
be due to the following reasons :
- There is no lane marker line.
- The relevant lane marker lines are not detected
(for example, markings in a construction zone
or because they are obstructed by snow, dirt,
water or backlighting).
- The vehicle's speed is below the speed needed
to activate it, which is about 40 mph (65 km/
h).
- The lane is narrower than about 8 ft. (2.5 m) or
wider than 15
ft (4.5 m).
- The curve is too sharp.
Audi active lane assist
- The driver's hands are not on the steering
wheel.
(D Tips
Make sure the camera's field of view
¢
fig. 101 is not obstructed by stickers or any
thing else. For information on cleaning, refer
to ¢ page
205.
Lane assist display in the instrument
cluster
Applies to vehicles: wit h Audi active lane ass ist
Fig. 102 Instrument cluster: active lane assist is switched
on and providing warnings
Fig. 103 Instrumen t cluster: act ive lane assist is sw itched
on but not ready to provide warn ings
You can call up the active lane assist display using
the buttons in the multifunction steering wheel
¢ page
23.
An additional indicato r appears in the Head-up
display* .
95
Page 99 of 294

M N <( I.J ""'. rl I.O
"' N I.O rl
Audi side assist Side assist
Description
Applies to vehicles: with Audi side assist
Fig. 104 Sensor detection range
F ig. 105 Display on the exterio r mirro r
Side ass ist helps you monitor your blind spot and
traffic behind your veh icle . With in the limits of
the system, it wa rns you about vehicles that are
coming closer or that are traveling w ith your
within sensor range
(D c> fig. 104: If a lane
change is class ified as critical, the display@in
the exterior mirror turns on
c> fig. 105 .
The display i n the left exterior mirror provides as
sistance when making a lane cha nge to the left,
while the d isp lay in the right exterio r mirror pro
vides assistance when making a lane change to
the right .
Information stage
As long as you do not activate the turn signal,
side assis t
informs you about ve hicles that a re
detected and classified as crit ica l. The display in
the mirror turns on, but is dim.
Aud i side assist
The display remains d im in the information stage
so that your view toward the front is not d istur
bed.
Warning stage
If the display in a m irror blinks bright ly when you
act ivate a tu rn s ignal, s ide ass ist is
warning you
about detected vehicles that it has classified as
critica l. If this happens, check traffic by glancing
in the rearview mirror and over your shoulder
c> .&. in General informa tion on page 98.
Applies to vehicles w ith active lane assist* : The
display in the mirror can also blink if you have not
activated a turn signal : If you are app roaching a
detected lane marker line and it appears you will
be leaving the lane, side assist w ill warn you
about detected vehicles that it has class ified as
critical.
@ Tips
You can adjust the brightness on of the dis
play on the rearview mirror
c>page 99.
97
Page 117 of 294

M N <( I.J "". rl I.O
"' N I.O rl
Parking system plus
Description
Applies to vehicles: with parking system plus
Audi parking system plus provides audio and vis
ual signals when parking.
Fig . 121 Di sp lay fie ld
Sensors are located in the front and rear bump
ers. If these detect an obstacle, visual and in
some situations audible signals warn you.
Make sure the sensors are not covered by stick
ers, deposits or any other obstructions as it may
impair the sensor function. For information on
cleaning, refer to¢
page 205.
The display field begins approximate ly at :
® 4 ft (1.20 m)
® 3 ft (0.90 m)
© 5.2 ft (1.60 m)
@ 3 ft (0.90 m)
The closer you get to the obstacle, the shorter
the interval between the audible signals. A con
tinuous tone sounds when the obstacle is less
than approximately 1 ft (0.30 m) away. Do not
continue driv ing farther ¢&.
in General informa
tion on page 114,
~ 0 in General information on
page 114!
If the distance to an obstacle remains constant,
the volume of the distance warning gradually
drops after about four seconds (this does not ap
p~ in the continuous tone rang~.
Parking systems
Switching on/off
Applies to vehicles: with parking system plus
Fig. 122 Cente r co n sole : pa rking a id b utton
Switching on
.. Shift into reverse, or
.. Press the
Pw.a button in the center console
¢
fig . 122 . A short confirmation tone sounds
and the LED in the button turns on .
Switching off
.. Drive faster than 6 mph (10 km/h), or
.. press the
Pw.a button, or
.. Switch the ignition off.
Visual display
The segments in front of and behind the vehicle
help you to determine the distance between you
and an obstacle . The red lines* mark the expect
ed direction of travel according to the steering
angle . A white segment indicates an identified
obstacle that is outside of the vehicle's path . Red
segments show identified obstacles that are in
you r vehicle 's path . As your vehicle comes closer
to the obstacle, the segments move closer to the
vehicle . Th e coll is ion area has been reached when
the next to last segment is displayed. Obstacles
in the collision area, including those outside of
the vehicle's path, are shown in red. Do not con
tinue driving forward or in reverse ¢&.
in Gener
al information on page 114,
¢ (i) in General in
formation on page 114!
115
Page 124 of 294
Parking systems
.,. Se lect the @symbol with the control knob .
You can choose between three different views in
this mode .
.. To cross park, parallel park or position the vehi
cle in front of a trailer* , press the control but
ton ® on the cont rol panel repeatedly until the
symbol for the des ired mode is selected.
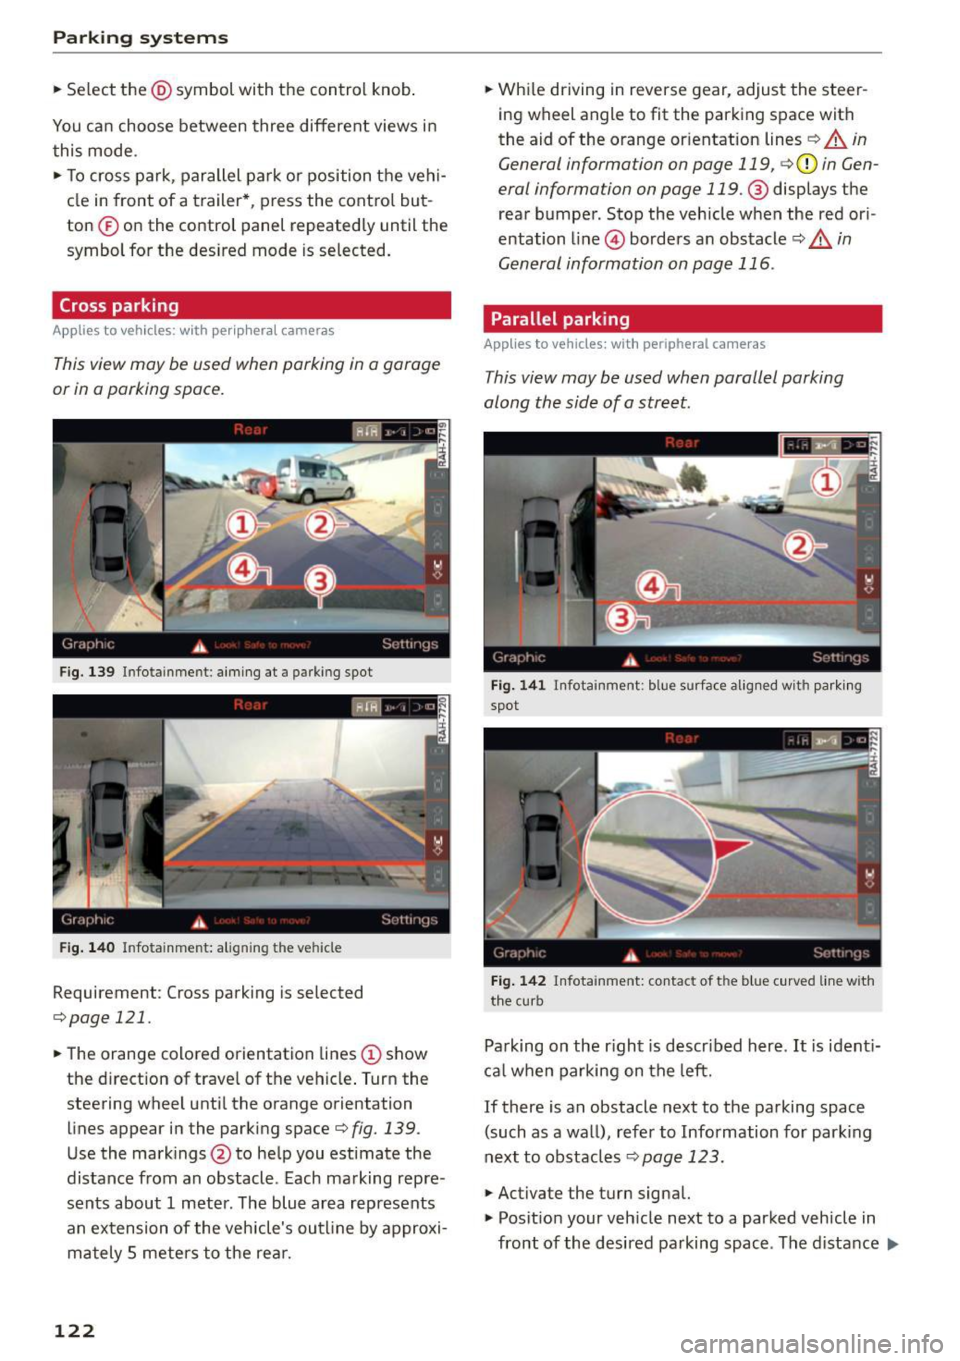
Cross parking
Applies to vehicles: w ith per ip hera l cameras
This view may be used when parking in a garage
or in a parking space.
F ig . 139 In fo tain me nt: aiming at a parking spot
Fig. 140 In fota inme nt: ali gning th e vehicle
Requirement : Cross parking is selected
c::;,page 121.
.. The orange colored orientation lines (D show
the direction of trave l of the vehicle . Turn the
steering wheel unti l the orange orientation
lines appear in the parking space
¢fig. 139.
Use the markings @to he lp you estimate the
distance from an obstacle . Each marking repre
sents about 1 meter . The blue area represents
an extension of the vehicle's outline by approxi
mately S meters to the rea r.
122
.. While driving in reverse gear, adjust the steer
ing wheel angle to fit the parking space with
the aid of the orange or ientation lines
c::;, A in
General informa tion on page 119 ,
c::;,(D in Gen
eral informa tion on page
119 .@ displays the
rear bumper . Stop the vehicle when the red ori
entation line@) borders an obstacle
c::;, &. in
General information on page 116 .
Parallel parking
Applies to vehicles: with peripheral cameras
This view may be used when parallel parking
along the side of a street.
Fig. 141 Infota in m ent : blue s urface aligned wit h park ing
spot
Fig. 142 Infota in m ent: contac t of the blu e curve d line wit h
the curb
Parking on the r ight is descr ibed here . It is ident i
cal when parking on the left.
If there is an obstacle next to the parking space
(such as a wall), refer to Information for park ing
next to obstacles
c::;, page 123.
.,. Activate the turn signal.
.,. Posit ion your vehicle next to a parked vehicle in
front of the desired parking space . The distance .,.