tire pressure AUDI S8 2009 Owners Manual
[x] Cancel search | Manufacturer: AUDI, Model Year: 2009, Model line: S8, Model: AUDI S8 2009Pages: 408, PDF Size: 91.63 MB
Page 4 of 408
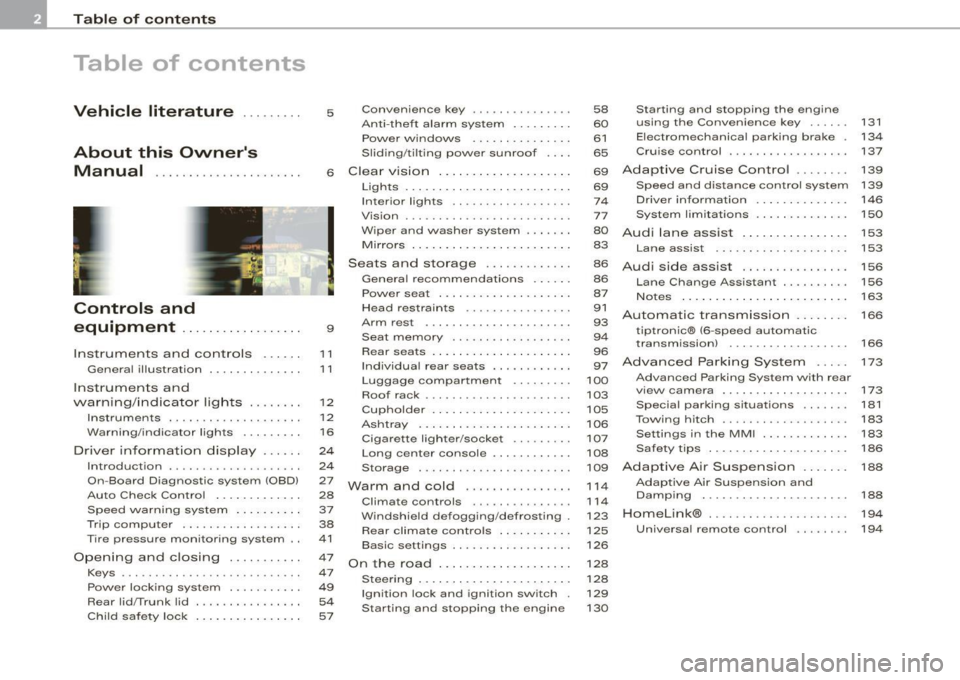
Table of contents
Table of contents
Vehicle literature ........ .
About this Owner's Manual .............. ...... . .
Controls and
equipment .. .. .... ..... ... . .
Inst rumen ts and con trols ..... .
Genera l ill ustration ............. .
Instruments and
warning/indica tor lig hts ....... .
Instruments .............. ..... .
Warning/indicator lights ........ .
Driver in forma tio n d isplay ..... .
Introduct ion ............... .... .
On-Board Diagnostic system (OBD)
Auto Check Control ............ .
Speed warning system ... .... .. .
Trip computer ..... ... .. ..... .. .
Tire pressure monitoring system ..
Opening and closing .......... .
Keys ...... ...... ... .. . ··· ·· ··· ·
Powe r locking system .......... .
Rear lid/Trunk lid ............. .. .
Ch ild safe ty lock . ... ..... ... ... . 5 Convenience key
.............. .
Anti-theft a larm system ..... ... .
Power w indows ... ... ... .... . .
S lid ing/ti lt ing power sunroof ... .
6 Clear vision ... .... .. ... .. .... . .
9
11
1 1
12
12
1 6
24
2 4
27
28
37
38
41
47
47
49
54
57 Lights
... ............. .. .. .. .. .
Interior lights ...... ... .. ... ... .
V is ion ................. .... ... .
W iper and washer system ...... .
Mirrors .... ... ......... ..... . . .
Seats and sto rage ..... .... ... .
Genera l recommendat ions ..... .
Powe r seat . ... ... ......... ... .
Head restraints ....... ....... . .
Arm rest .................... . .
Seat memory ... .. ... ... ... ... .
Rear sea ts . ... ... . .. ... ... .. .. .
Ind ividua l rear seats ........ ... .
Luggage compartment ..... •.. .
Roof rack ........... .... ... ... .
Cupho lder .................... .
As htray . ... ... ... ......... ... .
Cigarette lighter/socket ........ .
Long center console ........... .
Storage . ... ..... ... ... .. ... .. .
Warm and cold ............... .
Climate controls .............. .
W indshield defogging/defrosting .
Rear climate controls .. .. ... ... .
Basic settings .............. ... .
On the road ... ... . .. ... .. ... .. .
Stee ring . ...... .... ........ ... .
Ignition lock and ignition switch .
Starting and stopping the engine 58
Starting and stopping the engine
60 using the Conven ience key ... .. .
61 Electromechanical parking brake .
65 Cru ise control ....... ... ....... .
69
Adapt ive Cruise Control ....... .
131
134
137
139
69 Speed and distance control system 139
74 Drive r informat ion . . . . . . . . . . . . . . 146
77 System limita tions . . . . . . . . . . . . . . 150
80
Audi lane assist . . . . . . . . . . . . . . . . 153
83 Lane assist . . . . . . . . . . . . . . . . . . . . 153
86
A udi side assist . . . . . . . . . . . . . . . . 156
86
87
91
93
9 4
96
97
100
103
105
106
107
108
109
1 14
11 4
123
125
126
128
128
129
130 Lane Change
Assistant ......... .
No tes ........ ...... ........ .. .
Automatic transmission ....... .
tiptron ic® (6-speed automatic
transm ission) ................. .
Advanced Parking System .... .
Advanced Parking System with rear
v iew camera .................. .
Specia l parking situations .... .. .
Towing hitch ......... ... ...... .
Settings in the MM I .. ... .. .... . .
Safety t ips .............. ...... .
Adaptive Air Suspension ...... .
Adaptive Air Suspension and
Damping ..... ................ .
Homelink® .................. .. .
Universa l remote control ....... . 156
163
166
166
173
173
181
183
183
186
188
188
19
4
19 4
Page 19 of 408
tl~ Airbag system
--
/: Lane assist (system is ready)
Lane assist (system is not ready)
¢
D
-
Left turn signal
High beam
Fog lights
Rear fog lights
Tire pressure monitoring system*
Malfunction Indicator Lamp (MIU
Safety belt
Adaptive Air Suspension
~ Adaptive Air Suspension
--
CRUISE
Right turn signal
USA models :
Cruise control activated
Canada models:
Cruise control activated
USA models:
Anti-lock brake system (ABS) defec
tive
Controls and equip
ment
=> page 19
=> page 19
=> page 19
=> page 19
=> page 19
=> page 19
=> page 19
=> page 20
=> page20
=> page20
=> page20
=> page 21
=> page 19
=> page 21
=> page 21
=> page 21
-
-
-
-
Instruments and warning/indicator lights
PARX
BRAKE
(® )
-
Canada models:
Anti-lock brake system (ABS) defec
tive
USA models :
Electromechanical parking brake
Canada models: Electromechanical parking brake
BRAKE USA models:
Brake malfunction
--((D) Canada models:
Brake malfunction
=> page 21
=> page22
=> page 22
-
=> page 22
=> page22
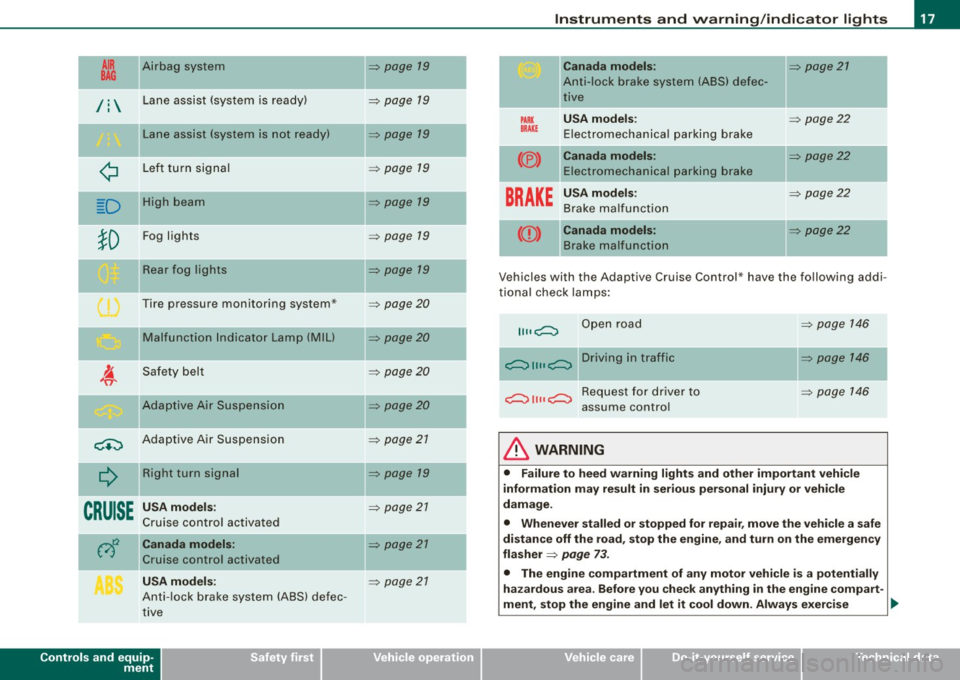
Vehicles with the Adaptive Cruise Control* have the follow ing addi
tional check lamps:
II II c;:;:::::::, Open road
c;:;:::::::, 11 11 c;:;:::::::, D r i vi n g i n t raff i c
c;:;:::::::, 11 11 c;:;:::::::, R e q u e st f o r d r i v e r to
assume control
& WARNING
=> page 146
=> page 146
=> page 146
• Failure to heed warning lights and other important vehicle
information may result in serious personal injury or vehicle
damage.
• Whenever stalled or stopped for repair, move the vehicle a safe
distance off the road, stop the engine, and turn on the emergency
flasher
=> page 73 .
• The engine compartment of any motor vehicle is a potentially
hazardous area. Before you check anything in the engine compart-
ment, stop the engine and let it cool down. Always exercise _..
I • •
Page 22 of 408

Instruments and warning/indicator lights
Ap plies to vehi cles : wi th n re pressu re monitor in g system
Significant loss of air pressure l
The warning/indicator light appears in the event of a
significant loss of air pressure.
The 'warning/ indicator light illum inates when you switch on the
ign ition and must go out after the engine has started .
If the
I symbo l appears, pressure is too low in at least one tire.
For more information
~ page 43. •
Malfunction Indicator Lamp (MIL) ....;
The Malfunction Indicator Lamp (MIU is part of the On-Board Diag
nostic (OBD II) system. The symbol lights up when the ignition is
turned on and will turn off after the engine has started and has sett led at a constant id le speed. This indicates that the MIL is
work ing proper ly .
The warning light illuminates when there is a malfunction in the
engine electronic system. Contact your authorized Audi dealer and
have the malfunction corrected .
An improperly closed fuel filler cap may also cause the MIL light to
illuminate
~ page 305.
For more information ~ page 27. •
Safety belts 4i-
This warning/indicator light reminds you to put on your
safety belt.
The 4,_ warning/indicator light illuminates when the ignition is
switched on to remind the driver and any front passenger to put on
the safety belt. Additionally, an acoustic warning (gong) will also
sound. For more
Information~
page 211, "Safety belt warning light t". •
Adaptive Air Suspension
The warning/indicator light illuminates, when the jacking mode
has been activated ~ page 191. This warning/indicator light has the
following functions:
• It illuminates for a few seconds after the ignition is turned on as
function check and then goes out .
• If the warning/indicator light illuminates steadily, there is a
system fault in the Adaptive Air Suspension . A system fault can
r esult in lim ited ride comfort and
low ground clearance . The fault
should be corrected as soon as possib le by an authorized Audi
dea ler .
• If the warning/indicator light flashes, you should not drive the
vehic le . The flashing warning/indicator light points to an extreme
High level. A very pronounced lifting of the vehicle (extreme High
level) can resu lt, for examp le, when a heavy load is removed from
the vehic le . As soon as the level has returned to normal, the
warning/indicator light stops flashing , and you can drive away .
• If the warning/indicator light flashes in conjunction with the~
warning/indicator light, you should not drive off immediately in
order to prevent damage to the underbody . The two warning/indi
cator lights flashing together points to an extreme Low level. A very
pronounced lowering of the vehicle (extreme Low level) can result,
for example , from a heavy load. As soon as the level has returned to
normal, the warning/indicator lights stop flashing, and you can
drive away .
0 Note
If the warning/indicator light flashes in conjunction with the~
warning/indicator light, you should not drive the vehicle because
l ow -lying vehicle parts can bottom out as you drive over uneven
ground and be damaged as a result.•
Page 26 of 408

Driver informati on displ ay
Driver information display
Introduction
General notes
The driver information display inside the instrument
cluster provides you, the driver, with much useful infor
mation.
Fig . 8 Inst rum ent
c lu ster : cente r dis pl ay
Information from the Driver Information System is shown in the
display in the cen ter of the instrument clust er.
When you turn on the ignition and while you are driving, some func
tions and vehicle components are scanned for their operating status. Malfunctions or required service procedures are signalled
audibly and shown by red and yellow ligh ted symbols and
reminders to the driver in the display.
The driver is also shown information about radio and CD operation and directions fo r the navigation system . You can find additional
information on these subjects in the MMI manual.
The Driver Information System provides the fol lowing functions : Sound system display
~ page25
Outside air temperature ~ page25
Digital speedometer ~ page25
Door open indicator ~ page26
Defective light bulb ~ page26
Service interval display ~ page27
Au
to Check syst em ~ page28
Driver information ~ page29
Speed limiter ~ page28
Trip computer ~ page38
Tire pressure monito ring* ~ page 41
Selector lever pos ition ~ page 167
[ i ] Tips
In the event of a malfunction either a red or yellow icon appears in
the display. Red symbols indicat e
Danger ~ page 30. Yellow
symbols ind icate a
Warning ~ page 34. •
Page 36 of 408
Driver information display
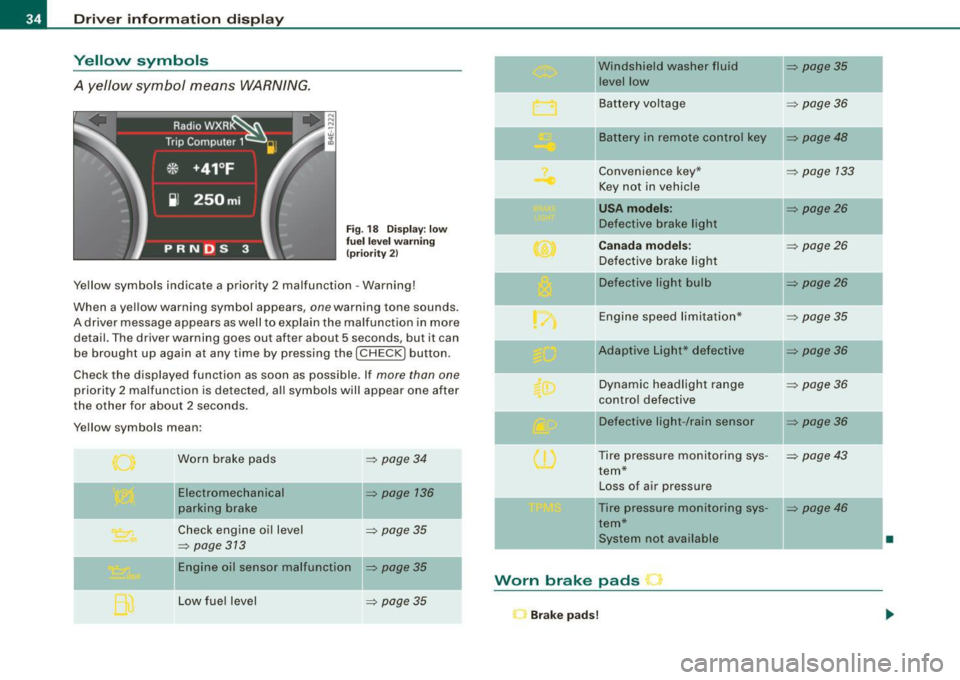
Yellow symbols
A yellow symbol means WARNING.
Fig. 18 Display: low
fuel level warning
(priority 2)
Yellow symbols indicate a priority 2 malfunction -Warning!
When a y ellow warning symbol appears,
one warn ing ton e sounds.
A driver message appears as well to explain the malfunction in more
detail. The dr iver warning goes out after about
5 s e conds, bu t it can
be brought up again at any time by pressing the [
CHECK I button .
Check the displayed function as soon as possible . If
more than one
priority 2 malfunction is detected, all symbols will appear one after
the other for about
2 seconds .
Yellow symbols mean :
Worn brake pads
Electromechanical
parking brake
=> page 34
=> page 136
Check engine oil level => page 35
=> page 313
Engine oil sensor malfunction => page 35
Low fuel level => page 35
Windshield washer fluid => page 35
level low
Battery voltage
=> page 36
-
II Battery in remote control key => page 48
Convenience key * => page 133
Key not in vehicle
USA models: => page26
Defect ive brake light
Canada models: => page26
Defective brake light
Defective light bulb
=> page26
Engine speed limitation* => page 35
-
IIAdaptive Light* defective => page 36
Dynamic headlight range => page 36
control defective
Defect ive light -/rain sensor
=> page 36
Tire pressure monitoring sys-=> page 43
tern*
Loss of air pressure
-Tire pressure monitoring sys -=> page 46
tern*
ll system not ava ilable
•
Worn brake pads r
Brake pads!
Page 43 of 408
-Select System s in the CAR menu .
- Selec t
Instrument cluster .
-Select Trip computer 1 or Trip computer 2 .
-Select, for examp le, Fuel range On to turn on the display
or
Off to turn the disp lay off.
All values in the single -trip or the total -trip memory can be reset to
zero simultaneously in MMI. In addition you can determine what
driving information from the trip computer should be shown in the
instrument cluster display. If one of the pieces of driver information
is turned off, that driver information will not be shown in the display .
The information will continue to be calcu lated by the trip computer
and can be turned back
on at any time. •
Tire pressure monitoring system
Applies t o vehi cle s: with n re pre ss ure moni toring sys te m
General notes I)
Each tire, including the spare (if provided}, should be checked
month ly when cold and inflated to the inflation pressure recom
mended by the vehicle manufacturer on the vehicle placard or tire
inflation pressure label. (If your vehicle has tires of a different size
than the size indicated on the vehicle placard or tire inflation pres
sure label, you should determine the proper tire inflation pressure
for those tires.}
As an added safety feature, your vehicle has been equipped with a
tire pressure monitoring system (TPMSl that illuminates a low tire pressure tellta le when one or more of your tires is significantly
under-inflated . Accordingly, when the low tire pressure te lltale i llu
minates, you should stop and check your tires as soon as possible,
and inflate them to the proper pressure. Driving on a significantly
under -inflated tire causes the tire to overheat and can lead to tire
Controls and equip
ment
Dr ive r informat ion di spl ay
failure . Under -inflation also reduces fuel efficiency and tire tread
life, and may affect the vehicle's handling and s topping ability.
Please note that the TPMS is not a substitute for proper tire mainte
nance, and it is the driver 's responsibility to maintain correct tire
pressure, even if under-inflation has not reached the leve l to trigger
illumination of the TPMS low tire pressure te lltale.
Your vehic le has a lso been equipped with a TPMS malfunction indi
cator to indicate when the system is not operating proper ly. The
TPMS ma lfunction indicator is combined w ith the low ti re p ressure
tel ltale . When the system detects a malfunction , the telltale wil l
flash for approximately one minute and then remain continuously
il luminated . This sequence will cont inue upon subsequent vehicle
start -ups as long as the malfunction exists.
When the ma lfunction indicator is illuminated, the system may not
be able to detect or signal low tire pressure as intended . TPMS
mal functions may occur for a variety of reasons, including the
insta llation of replacement or alternate tires or wheels on the
vehic le that prevent the TPMS from funct ioning properly. A lways
check the TPMS malfunction tellta le after replacing one or more
tires or whee ls on your vehicle to ensure that the replacement or
alternate tires and wheels allow the TPMS to continue to function
properly. •
Applies t o vehic les : w ith Tire press ure mon itoring sy stem
Introduction
The tire pressure monitoring system moni tors air pressure
in all four roa d wheels and the spare tire* while the
vehicle is moving.
As soon as the tire pressure monitoring system senses a significant loss of air pressure in one o r severa l tires, text messages and yellow
symbo ls appear in the instrument cluster display to alert the driver.
The L warni ng light in the instrument cluster comes on when the
tire is significantly underinflated
=> page 20. _,,
I • •
Page 44 of 408
Driver inf ormati on displ ay
The warning light n also illuminates in the case of a system
mal fu n ction.
The system continuously receives radio signals from sensors located inside each tire .
Be aware that tire pressure is also dependent on the temperature of
the tire. For every 18 °F (10 °C) increase in tire temperature, tire pres
sure increases by about
1 .5 psi (0.1 bar). The tire warms up while the
vehic le is moving and tire pressure rises. So you should adjust tire
pressure only when the tires are
cold, when the temperature of the
tires is roughly the same as the ambient air temperature .
In order to keep the tire pressure monitoring system properly cali
brated, tire pressure on al l four tires and on the spare tire * should
be checked at regular intervals, adjusted if necessary and sav ed in
the proper setting (recommended pressure) =>
page 44.
The tire pressure is shown on the tire pressure label. On USA vehi
cles, the tire pressure label is located on the driver's side B -pi llar. On
Canada vehicles, the tire pressure labe l is located either on the
driver's side B -pil lar or inside the fuel filler flap . The tire pressu re
label lists the recommended cold t ire inflat ion pressures for the
vehic le at its maximum capacity weight and the tires that were on
your vehicle at the time it was manufactured . For recommended tire
pressures for normal load conditions, please see chapter
=>
page 330 .
The current temperatures and pressure of your tires can be viewed
i n the MMI =>
page 44.
& WARNING
• When the t ire pre ssure moni toring sy st em warning light i s lit ,
one or more of your tir es is s ignifi cantly under -infl ate d . Y ou s hould
s to p and che ck your tir es as soon as poss ible, and infl ate th em to
th e p rop er p ress ure as i ndicated on the vehicle's tire press ure
lab el
=> page 3 30 . Driving on a s ig n ific antly und er-inflated tir e
ca uses the t ire to overheat an d ca n le a d t o tir e fai lur e. U nde r- infl a-
& W ARN IN G (c ontinued )
tion a lso is likel y to imp air t he veh icle 's handling and sto pping
ability .
• Do not adju st t ire press ure when t ire temper atu re i s excessiv e.
T hi s c ould le ad to seriou s tire dam age and even cause the ti re to
bur st, w ith the additional d ange r of an accident .
tread life.
[ i ] Tips
• Each tire, includin g the sp are*, should be checked monthly when
cold and set to the recommended inflation pressure as specified on
the tire pressure label=>
page 330.
• T he tire pressure monitoring system he lps the d river to keep an
eye on tire pressures . But the dr iver st ill has the responsibility for
maintaining the correct tire pressure .
• Tire pressure must only be adjusted when the temperature of the
tires is about the same as ambient air temperature.
• When tires are replaced, the sensors and valves shou ld not be
detached or exchanged . Only the valve core needs to be replaced
and, if necessary, the va lve and the wheel electronics replaced .
• If you should put different whee ls and tires on your vehicle (e.g .
winter wheels and tires), you must be certain that the wheels and
tires are compatible with the tire pressure monitoring system. Otherwise the system will register a ma lfunction and a fault
message will be displayed. For more information , contact your
authorized Audi dea ler.
• Adjust the tire pressure and store the pressure in the tire pres
sure mon itor ing system to the load you are carrying=>
page 330.
• For Declaration of Compliance to United States FCC and Industry
Canada regulations =>
page 385. •
Page 45 of 408
Applies to vehi cle s: w ith nr e pressu re monitoring syst em
Significant loss of air pressure '
The yellow symbol appears in the event of a significant
loss of air pressure.
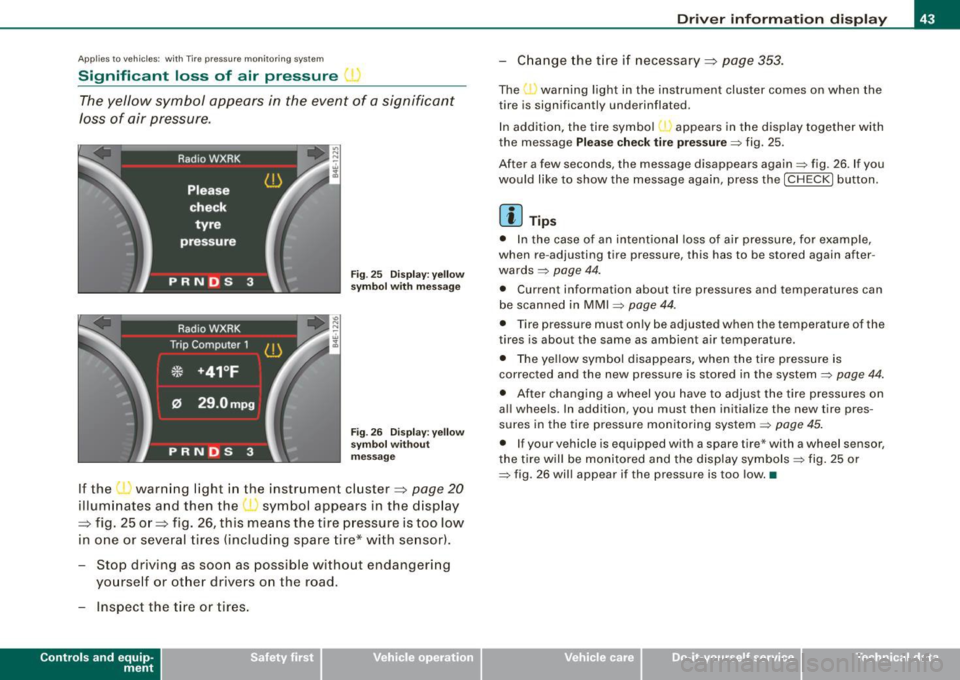
Fig. 25 Display: yellow
sy mbol with message
Fig . 26 Display: yellow
sy mbol without
mess age
If the ' ' warning light in the instrument cluster=:> page 20
illuminates and then the symbol appears in the display
=:> fig. 25 or=:> fig. 26, this means the tire pressure is too low
in one or several tires (including spare tire* with se nsor).
- Stop driving as soon as possible without endangering
yourself or other drivers on the road.
- Inspect the t ire or tires .
Contro ls and eq uip
ment
Driver information display
-Chang e the tire i f necessary =:> page 353.
The warning light in the instrument cluster comes on when the
tire is significantly underinflated.
In addition, the tire symbol appears in the display together with
the message
Please check tire pressure=> fig. 25.
After a few seconds, the message disappears again=> fig. 26 . If you
would like to show the message again, press the [ CH ECK] button.
[ i ] Tips
• In the case of an intentional loss of air pressure, for example,
when re -adjusting tire pressure, this has to be stored again after
wards =>
page 44.
• Current information about tire pressures and temperatures can
be scanned in MMI
~ page 44.
• Tire pressure must only be adjusted when the temperature of the
tires is about the same as ambient air temperature.
• The yellow symbol disappears, when the tire pressure is
corrected and the new pressure is stored in the system~
page 44.
• After changing a wheel you have to adjust the t ire pressures on
al l whee ls. In addition, you must then initialize the new tire pres
sures in the tire pressure monitoring system~
page 45.
• If your vehicle is equipped with a spare tire* with a wheel sensor,
the tire will be monitored and the display symbols~ fig. 25 or
~ fig. 26 will appear if the pressure is too low. •
Vehicle care I I irechnical data
Page 46 of 408
Driver informati on displ ay
Ap plies to vehicles: w ith n,e pre ssu re monitoring system
Displaying tire pressures and temperatures
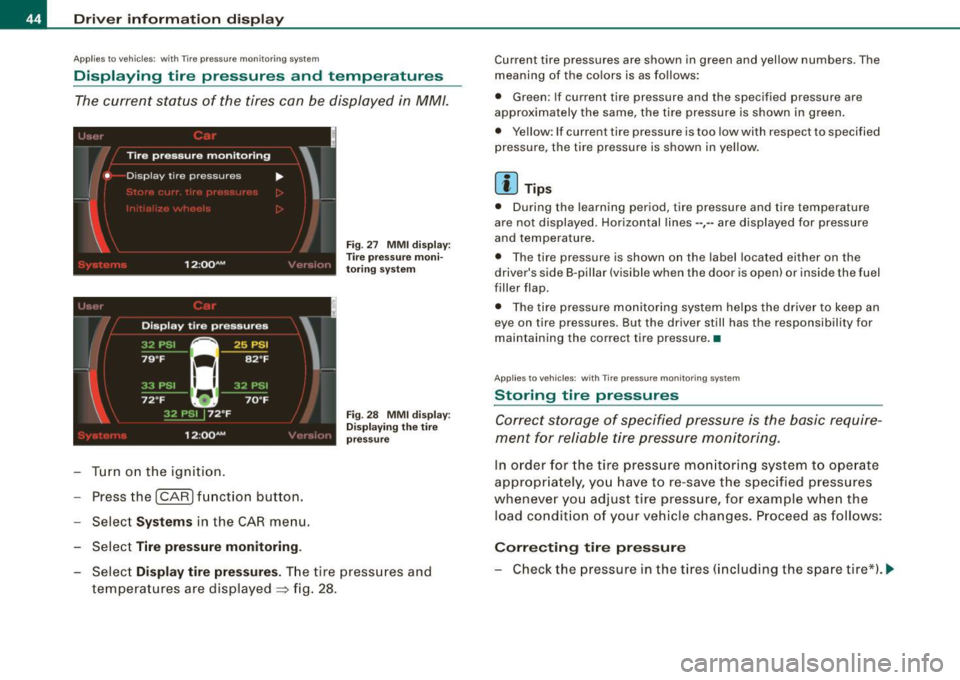
The current status of the tires can be displayed in MM/.
~ J '-, ' l
I
'
Tire pressure monitoring
• D isp lay tire pressures ....
I
12 :QQ AM , ·' ',!(,I:
Turn on the ignition.
Press the
!CAR) function button.
Select
Syst ems in the CAR menu.
Select
Tire pre ssure monitoring .
Fig . 27 MMI d isp lay:
T ire pressure moni
to ring system
Fig . 28 MMI dis play:
D is play in g th e tire
p ressu re
Select Di splay tir e pr ess ures. The tire pressures and
temperatures are dis played
=> fig . 28.
Current tire pressures are shown in green and yellow numbers. The
meaning of the co lors is as fo llows:
• Green: If current tire pressure and the specified pressure are
approximately the same, the tire pressure is shown in green .
• Yellow : If current tire pressure is too low with respect to specified
pressure, the tire pressure is shown in yellow.
[ i ] Tips
• During the learning period, tire pressure and tire temperature
are not displayed . Horizontal lines --,-- are displayed for pressure
and temperature.
• The tire pressure is shown on the label located either on the
driver's side B-pil lar (visible when the door is open) or inside the fuel
filler flap.
• The tire pressure monitoring system helps the driver to keep an
eye on tire pressures. But the driver still has the responsibility for
maintaining the correct tire pressure. •
Applies to vehicles: with Tire pressure mon itor ing system
Storing tire pressures
Correct storage of specified pressure is the basic require
men t for reliable tire pressure monitoring.
In order for the tire pressure mo nito ring system to ope rate
appropr iately, yo u have to re -save the specified pressures
whenever yo u adjust tire pressure, for example when the
load condition of your vehicle changes. Proceed as follows:
Corr ecting t ir e pres sure
- Check the pressure in the tires (including the spare tir e*). ~
Page 47 of 408
-Adjust air pressure as needed in acco rdance with the
informat io n on the label located either on the driver's
side B -pillar (visible w hen the door is open), inside the
fuel filler flap and addi tionally in t he manua l.
Saving tir e pres sur es
- Tur n on the ignition.
- Press the
I CAR I funct ion button.
- Select
Systems in the CAR menu .
Selec t
Tire p ressure monitoring.
-Select Store curr. tire pres sures :::} page 44, fig. 27 .
All pressure warning indicators in the display will be canceled .
Following each intentional change in specified pressures, tire pres
sures must be resaved .
After the pressures are saved, the tire pressure monitoring system measures the current tire pressures and saves them as the new
specified pressures.
[ i ] Tip s
• T he t ire pressure is shown on the tire pressure label. On USA
vehic les, the tire pressure label is located on the driver's side 8 -
pillar. On Canada vehicles , the tire pressure labe l is located e ither on
the driver's side 8 -pillar or inside the fuel filler flap. The tire pressure
label lists the recommended cold tire inflation pressures for the
vehicle at its maximum capacity weight and the tires that were on
your vehicle at the time it was manufactured . For recommended tire
pressures for normal load conditions, please see chapter
=> page 330 .
• The tire pressure mon itoring system he lps the driver to keep an
eye on tire pressures. But the driver still has the responsibility for
maintaining the correct tire pressure.
Controls and equip
ment
Dr ive r informat ion di spl ay
• I f your vehic le is equipped with a standard spare tire *, it must be
inflated to the maximum pressure specified for the veh icle. •
Applie s to veh ic le s : with T ire pressur e mo nitoring sys tem
Changing a wheel
When you change a wheel, the new tire must be initial
ized.
- Turn on the ignition .
Press the
I CAR] function button.
Select
Systems in the CAR menu.
- Selec t
Tire pre ssure monitoring .
Select Initialize wh eel s:::} page 44, fig. 27.
Programming is necessary:
• After the tires have been rotated on the vehicle (inc luding use of
the spare tire*),
• I f tires with new wheel sensors are used.
A ll pressure warning and system ma lfunction indicators in the
display will be canceled.
I f a wheel change has been made, it is necessary to complete the
Initi aliz e w heel s function.
The tire pressure monitoring system is not available during the programming process and no pressure and temperature values are
displayed on the MMI display.
After you have selected the function, the new whee ls are
programmed and the actual pressures are stored. This learning
phase can take up to 20 minutes driving time. •
I • •